lug BMW 323I 2011 E90 Owner's Manual
[x] Cancel search | Manufacturer: BMW, Model Year: 2011, Model line: 323I, Model: BMW 323I 2011 E90Pages: 286, PDF Size: 8.25 MB
Page 40 of 286
Opening and closing
38
Opening, closing
>Press the switch backwards to the resis-
tance point.
The glass roof and the sliding visor open
together as long as you hold the switch in
this position.
>Press the switch backwards past the resis-
tance point.
The glass roof and the sliding visor open
automatically. Briefly press the switch again
to stop the opening movement.
You can close the glass roof in a similar manner
by pressing the switch forwards. The sliding
visor remains open and can be closed by hand.
For information on Convenient operation via the
remote control or door lock, refer to page27
or29.
After switching off the ignition
When the remote control is removed or the igni-
tion is switched off, you can still operate the roof
for approx. 1 minute as long as no door has
been opened.
Pinch protection system
If the glass roof encounters an obstruction dur-
ing closing from approximately the middle of
the opening in the roof, or during closing from
the raised position, the closing movement is
interrupted and the glass roof is opened again
slightly.
Despite the pinch protection system
check and clear the roof's travel path prior
to closing it; otherwise, the safety system might
fail to detect certain kinds of obstructions, such
as very thin objects, and the roof would con-
tinue closing.<
Closing without pinch protection
If there is an external danger, press the switch
forward past the resistance point. The roof
closes without pinch protection.
Following interruptions in electrical
power supply
After a power failure, there is a possibility that
the glass roof can only be raised. The system
must be initialized. BMW recommends having
this work done by your BMW center.
Closing manually*
In the event of an electrical malfunction, you can
move the glass roof manually:
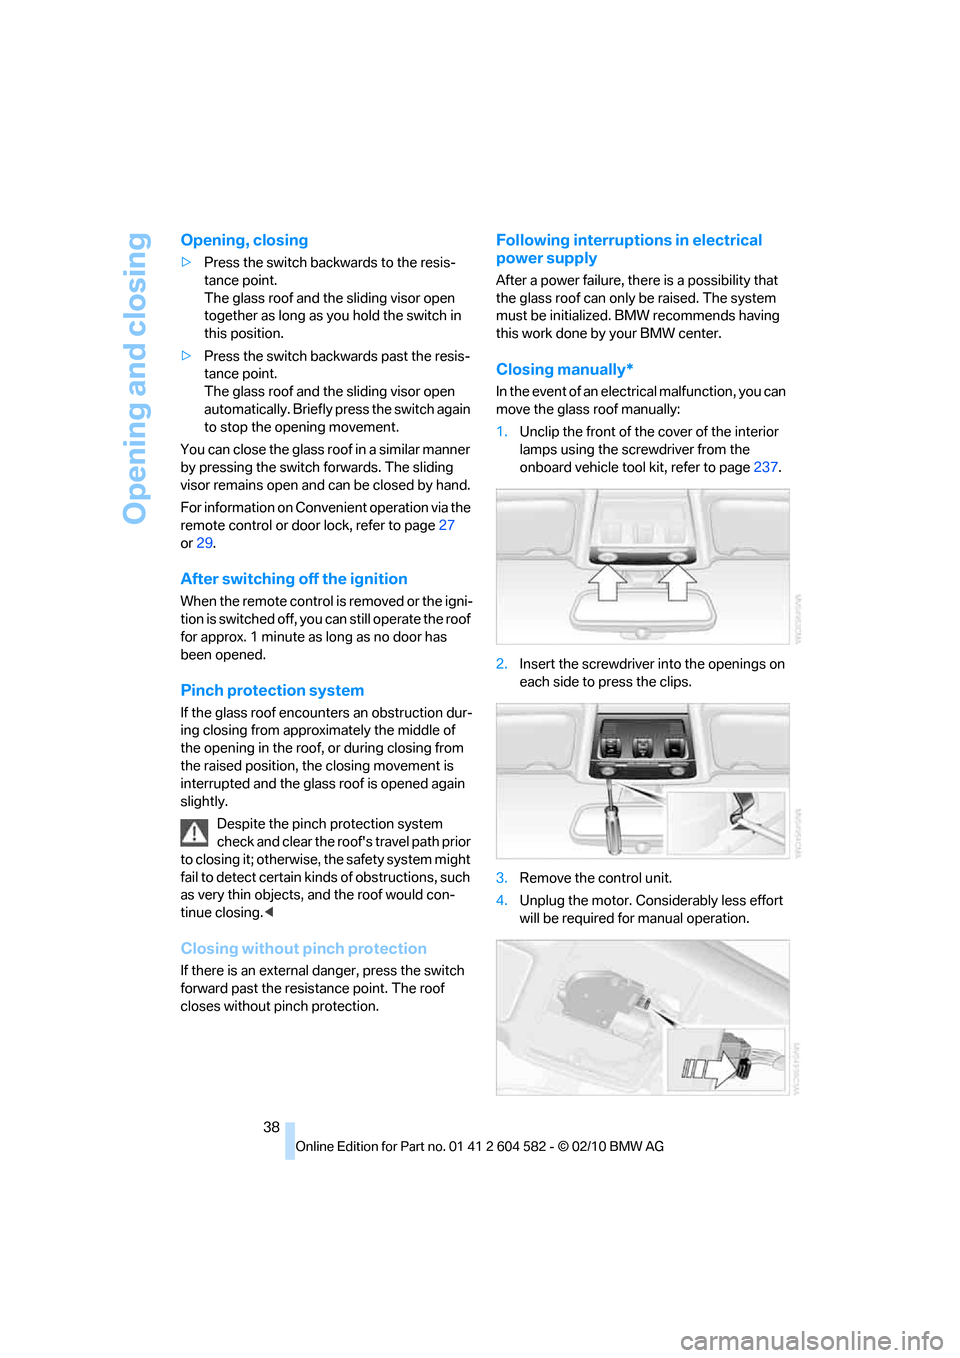
1.Unclip the front of the cover of the interior
lamps using the screwdriver from the
onboard vehicle tool kit, refer to page237.
2.Insert the screwdriver into the openings on
each side to press the clips.
3.Remove the control unit.
4.Unplug the motor. Considerably less effort
will be required for manual operation.
Page 42 of 286
Opening and closing
40
Comfort position
In the comfort position, the roof is not com-
pletely open, thus reducing wind noise in the
passenger compartment.
Each time the panorama glass roof is opened or
closed completely, it stops in the comfort posi-
tion. If desired, continue the movement by
pressing the switch.
After switching off the ignition
When the remote control is removed or the igni-
tion is switched off, you can still operate the roof
for approx. 1 minute as long as no door has
been opened.
Pinch protection system
If the panorama glass roof or the sliding visor
encounters an obstruction while closing from a
position about two-thirds closed, or during
closing from the raised position, the closing
movement is interrupted and the panorama
glass roof and the sliding visor are opened again
slightly.
Despite the pinch protection system
check and clear the roof's travel path prior
to closing it; otherwise, the safety system might
fail to detect certain kinds of obstructions, such
as very thin objects, and the roof would con-
tinue closing.<
Closing without pinch protection
If there is an external danger, press the switch
forward past the resistance point and hold it
there. The roof closes without pinch protection.
Following interruptions in electrical
power supply
After a power failure, there is a possibility that
the panorama glass roof can only be raised. The
system must be initialized. BMW recommends
having this work done by your BMW center.
Closing manually*
In the event of an electrical malfunction, you can
move the panorama glass roof manually:
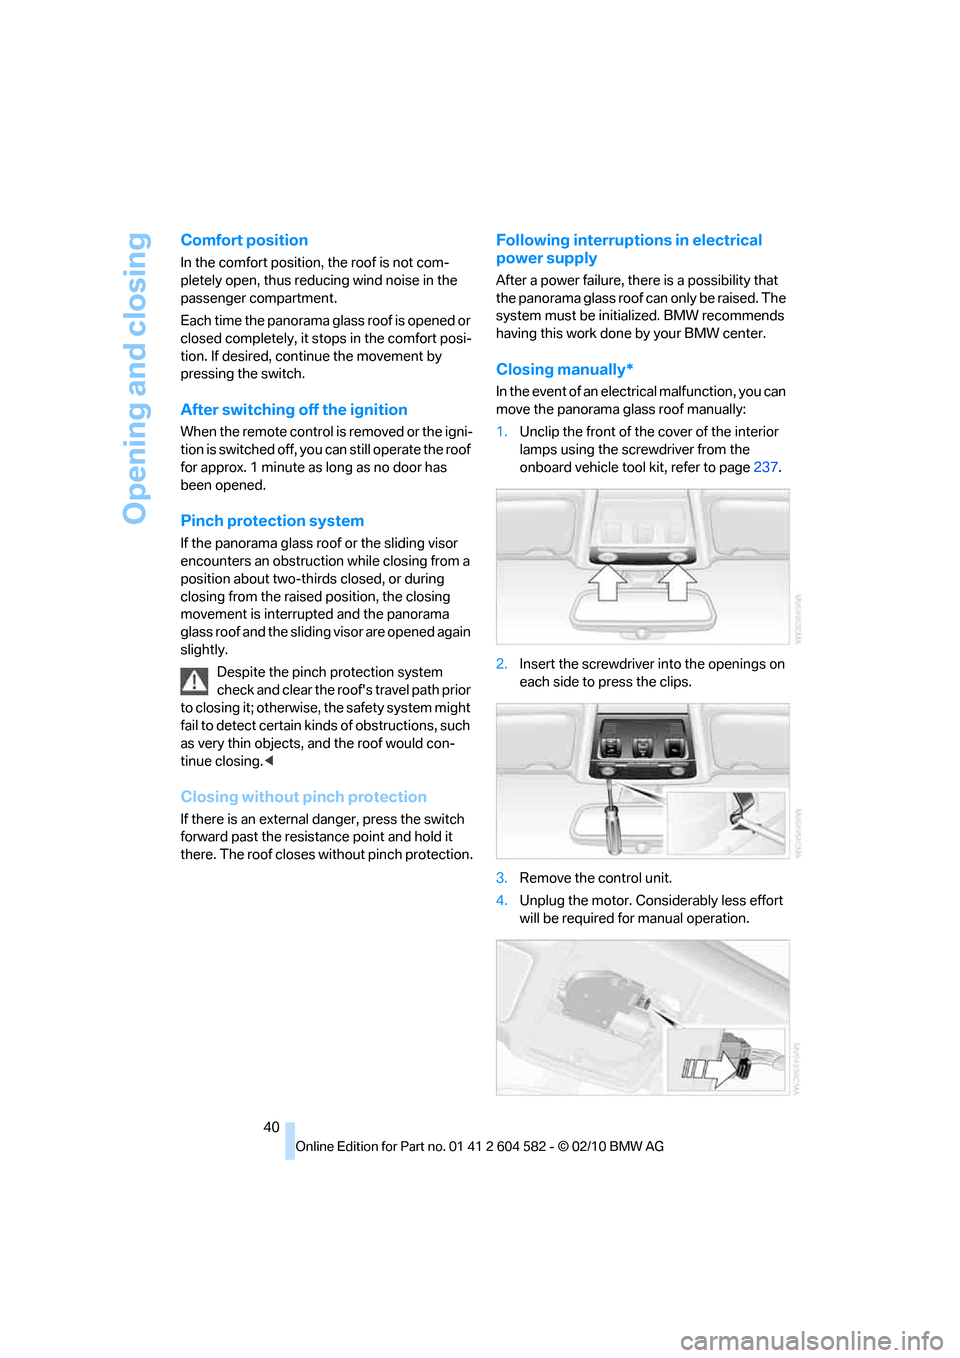
1.Unclip the front of the cover of the interior
lamps using the screwdriver from the
onboard vehicle tool kit, refer to page237.
2.Insert the screwdriver into the openings on
each side to press the clips.
3.Remove the control unit.
4.Unplug the motor. Considerably less effort
will be required for manual operation.
Page 91 of 286
Controls
89Reference
At a glance
Driving tips
Communications
Navigation
Entertainment
Mobility
Indication of a flat tire
The warning lamps come on in yellow
and red. A message appears on the
Control Display. In addition, an
acoustic signal sounds. There is a flat
tire or substantial loss of tire pressure.
What to do in case of a flat tire
Run-flat tires
With a damaged tire, is possible to continue
driving at speeds of up to 50 mph/80 km/h.
Do not continue driving if the vehicle is
not equipped with run-flat tires, refer to
page223; continued driving could result in a
severe accident.<
When continuing to drive with a damaged tire:
1.Avoid sudden braking and steering maneu-
vers.
2.Do not exceed a speed of 50 mph/80 km/h.
3.At the next opportunity, check the air pres-
sure in all four tires.
If all four tires are inflated to the cor-
rect pressures, the Flat Tire Monitor
might not have been initialized. The system
must then be initialized.<
Possible travel distance with complete tire
pressure loss:
>With a light load:
1 to 2 persons without luggage:
Approx. 155 miles/250 km
>With a medium load:
2 persons, cargo area full, or 4 persons
without luggage:
Approx. 94 miles/150 km
>With a full load:
4 or more persons, cargo area full:
Approx. 30 miles/50 km
Drive cautiously and do not exceed a
speed of 50 mph/80 km/h.
When there is a tire pressure loss, the handling
characteristics change, e.g. there will be
reduced directional stability during braking,
braking distances will be longer, and self-steer-
ing response will change.
Reduce your speed and bring the vehicle to a
stop; otherwise, tire components may become
detached, which could result in an accident.
Do not continue driving; instead, contact your
BMW center.<
Tire Pressure Monitor TPM*
The concept
Check the inflation pressure in the four installed
tires. The system notifies you if there is a signif-
icant loss of pressure in one or more tires.
Functional requirement
The system has to have been reset at the cor-
rect inflation pressure; otherwise, a reliable
reporting of a flat tire is not assured.
Always use wheels with TPM electronics to
assure a trouble-free function of the system.
Each time a tire inflation pressure has
been corrected or a wheel or tire has been
changed, reset the system.<
System limitations
It is impossible to provide advance warn-
ing of sudden, severe tire damage caused
by outside influences.<
The system does not function correctly if it has
not been reset. For example, a flat tire may be
indicated even though the tire inflation pres-
sures are correct.
The system is inactive and cannot indicate a flat
tire:
>when a wheel without TPM electronics is
installed.
>when other systems or devices that use the
same radio frequency interfere with TPM.
Page 93 of 286
Controls
91Reference
At a glance
Driving tips
Communications
Navigation
Entertainment
Mobility
Message for low tire inflation pressure
The warning lamps come on in yellow
and red. A message appears on the
Control Display. In addition, a signal
sounds.
>There is a flat tire or substantial loss of tire
pressure.
>The system was not reset after a wheel
change and will thus issue warnings at the
last initialized inflation pressures.
Cautiously reduce speed to below 50 mph/
80 km/h. Avoid sudden braking and steering
maneuvers. Do not exceed a speed of 50 mph/
80 km/h.
Do not continue driving if the vehicle is
not equipped with run-flat tires, refer to
page223; continued driving could result in a
severe accident.<
Continuing to drive with a flat tire
Possible travel distance with complete tire
pressure loss:
>With a light load:
1 to 2 persons without luggage:
Approx. 155 miles/250 km
>With a medium load:
2 persons, cargo area full, or 4 persons
without luggage:
Approx. 95 miles/150 km
>With a full load:
4 or more persons, cargo area full:
Approx. 30 miles/50 km
Drive cautiously and do not exceed a
speed of 50 mph/80 km/h.
When there is a tire pressure loss, the handling
characteristics change, e.g. there will be
reduced directional stability during braking,
braking distances will be longer, and self-steer-
ing response will change.<
Vibrations or loud noises during driving
may indicate the final failure of the tire.
Reduce your speed and bring the vehicle to a
stop; otherwise, tire components may become
detached, which could result in an accident. Do
not continue driving; instead, contact your
BMW center.<
Message for unsuccessful
system reset
Yellow warning lamp comes on.
A message appears on the
Control Display.
The system is not reset, e.g. after a wheel
change.
Check the tire inflation pressure and reset the
system, refer to page90.
Malfunction
The small warning lamp flashes in
yellow and then lights up continu-
ously; the large warning lamp comes
on in yellow. The tires appear in gray
in the Control Display. No punctures can be
detected.
Display in the following situations:
>Malfunction
Have the system checked.
>A wheel without TPM electronics has been
installed:
Have it checked by your BMW center.
>Interference from systems or devices that
use the same radio frequency:
The system automatically becomes active
again when the vehicle moves out of the
interference zone.
Declaration according to NHTSA/
FMVSS 138
Tire Pressure Monitoring Systems
Each tire should be checked monthly when cold
and inflated to the inflation pressure recom-
mended by the vehicle manufacturer on the
vehicle placard or tire inflation pressure label. If
your vehicle has tires of a different size than the
size indicated on the vehicle placard or tire infla-
tion pressure label, you should determine the
proper tire inflation pressure for those tires. As
an added safety feature, your vehicle has been
equipped with a tire pressure monitoring sys-
tem, TPMS, that illuminates a low tire pressure
telltale when one or more of your tires are signif-
icantly underinflated. Accordingly, when the
low tire pressure telltale illuminates, you should
Page 113 of 286
Controls
111Reference
At a glance
Driving tips
Communications
Navigation
Entertainment
Mobility
Locking
To lock the glove compartment, use the inte-
grated key of the remote control, refer to
page26.
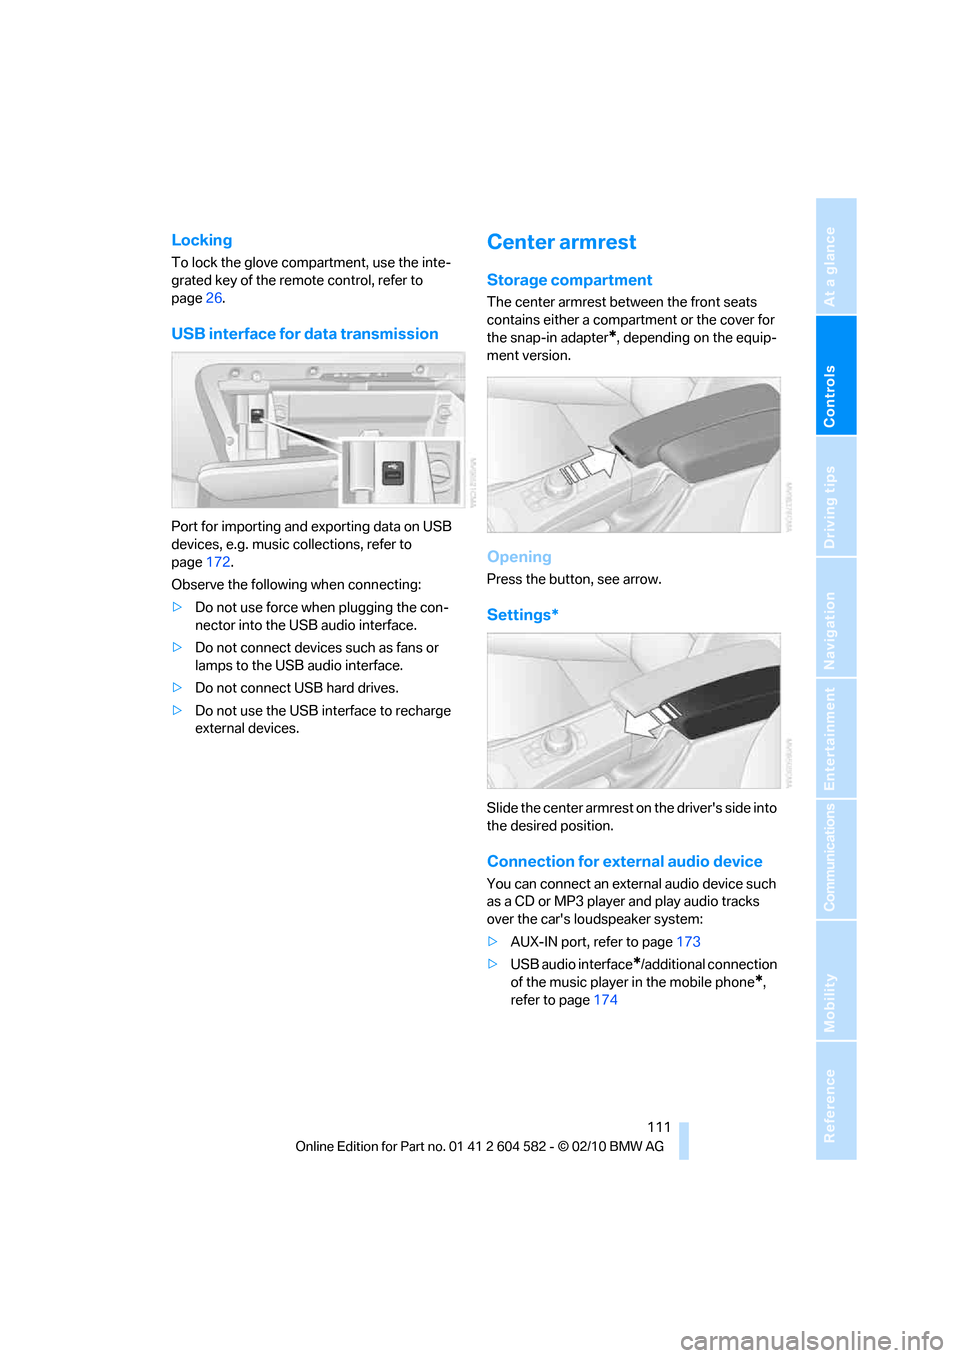
USB interface for data transmission
Port for importing and exporting data on USB
devices, e.g. music collections, refer to
page172.
Observe the following when connecting:
>Do not use force when plugging the con-
nector into the USB audio interface.
>Do not connect devices such as fans or
lamps to the USB audio interface.
>Do not connect USB hard drives.
>Do not use the USB interface to recharge
external devices.
Center armrest
Storage compartment
The center armrest between the front seats
contains either a compartment or the cover for
the snap-in adapter
*, depending on the equip-
ment version.
Opening
Press the button, see arrow.
Settings*
Slide the center armrest on the driver's side into
the desired position.
Connection for external audio device
You can connect an external audio device such
as a CD or MP3 player and play audio tracks
over the car's loudspeaker system:
>AUX-IN port, refer to page173
>USB audio interface
*/additional connection
of the music player in the mobile phone
*,
refer to page174
Page 115 of 286
Controls
113Reference
At a glance
Driving tips
Communications
Navigation
Entertainment
Mobility
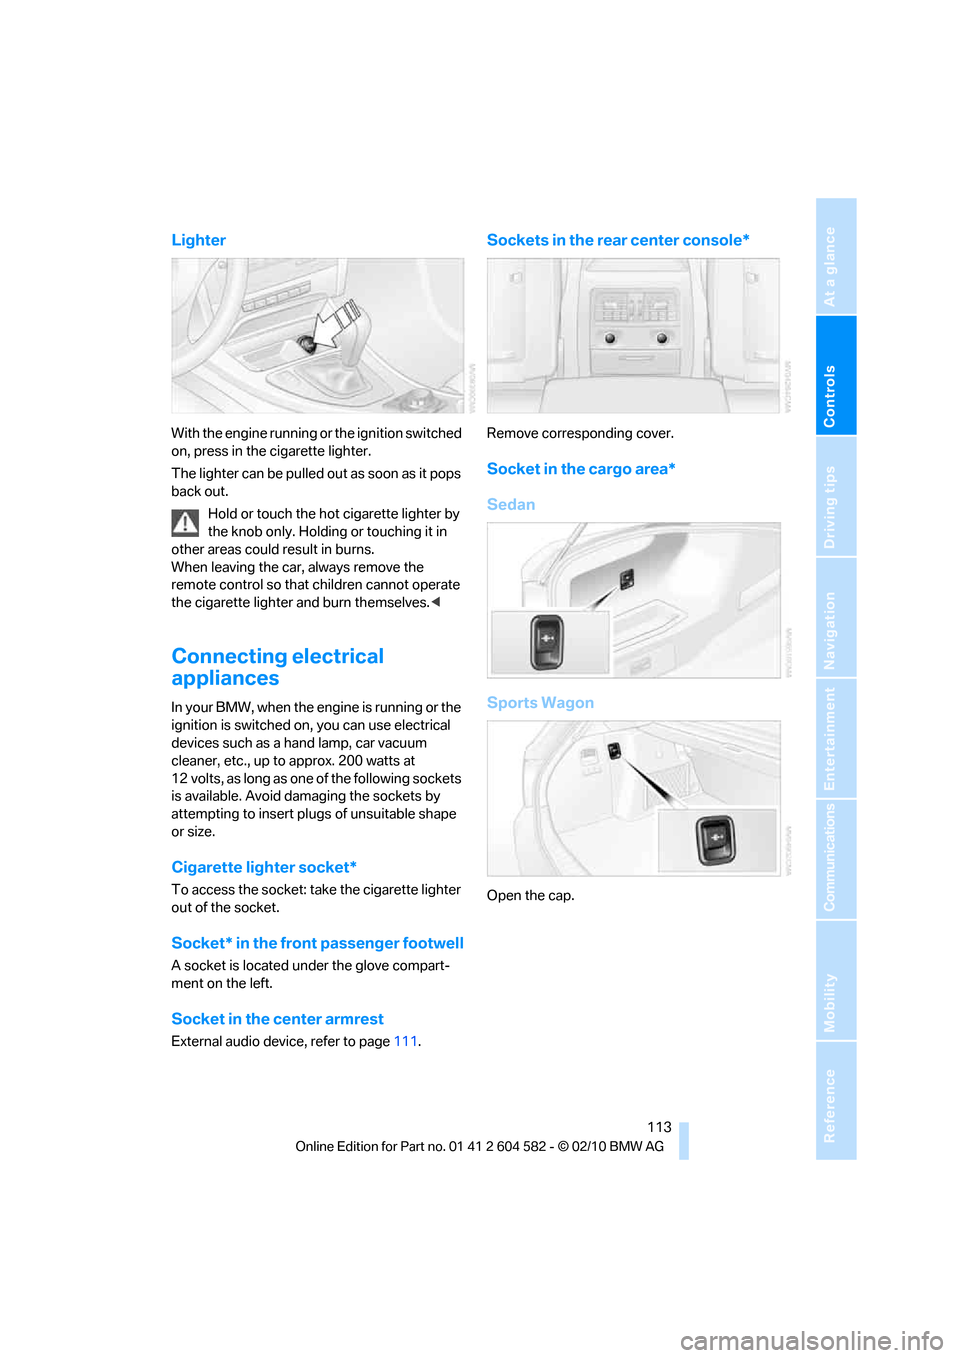
Lighter
With the engine running or the ignition switched
on, press in the cigarette lighter.
The lighter can be pulled out as soon as it pops
back out.
Hold or touch the hot cigarette lighter by
the knob only. Holding or touching it in
other areas could result in burns.
When leaving the car, always remove the
remote control so that children cannot operate
the cigarette lighter and burn themselves.<
Connecting electrical
appliances
In your BMW, when the engine is running or the
ignition is switched on, you can use electrical
devices such as a hand lamp, car vacuum
cleaner, etc., up to approx. 200 watts at
12 volts, as long as one of the following sockets
is available. Avoid damaging the sockets by
attempting to insert plugs of unsuitable shape
or size.
Cigarette lighter socket*
To access the socket: take the cigarette lighter
out of the socket.
Socket* in the front passenger footwell
A socket is located under the glove compart-
ment on the left.
Socket in the center armrest
External audio device, refer to page111.
Sockets in the rear center console*
Remove corresponding cover.
Socket in the cargo area*
Sedan
Sports Wagon
Open the cap.
Page 117 of 286
Controls
115Reference
At a glance
Driving tips
Communications
Navigation
Entertainment
Mobility
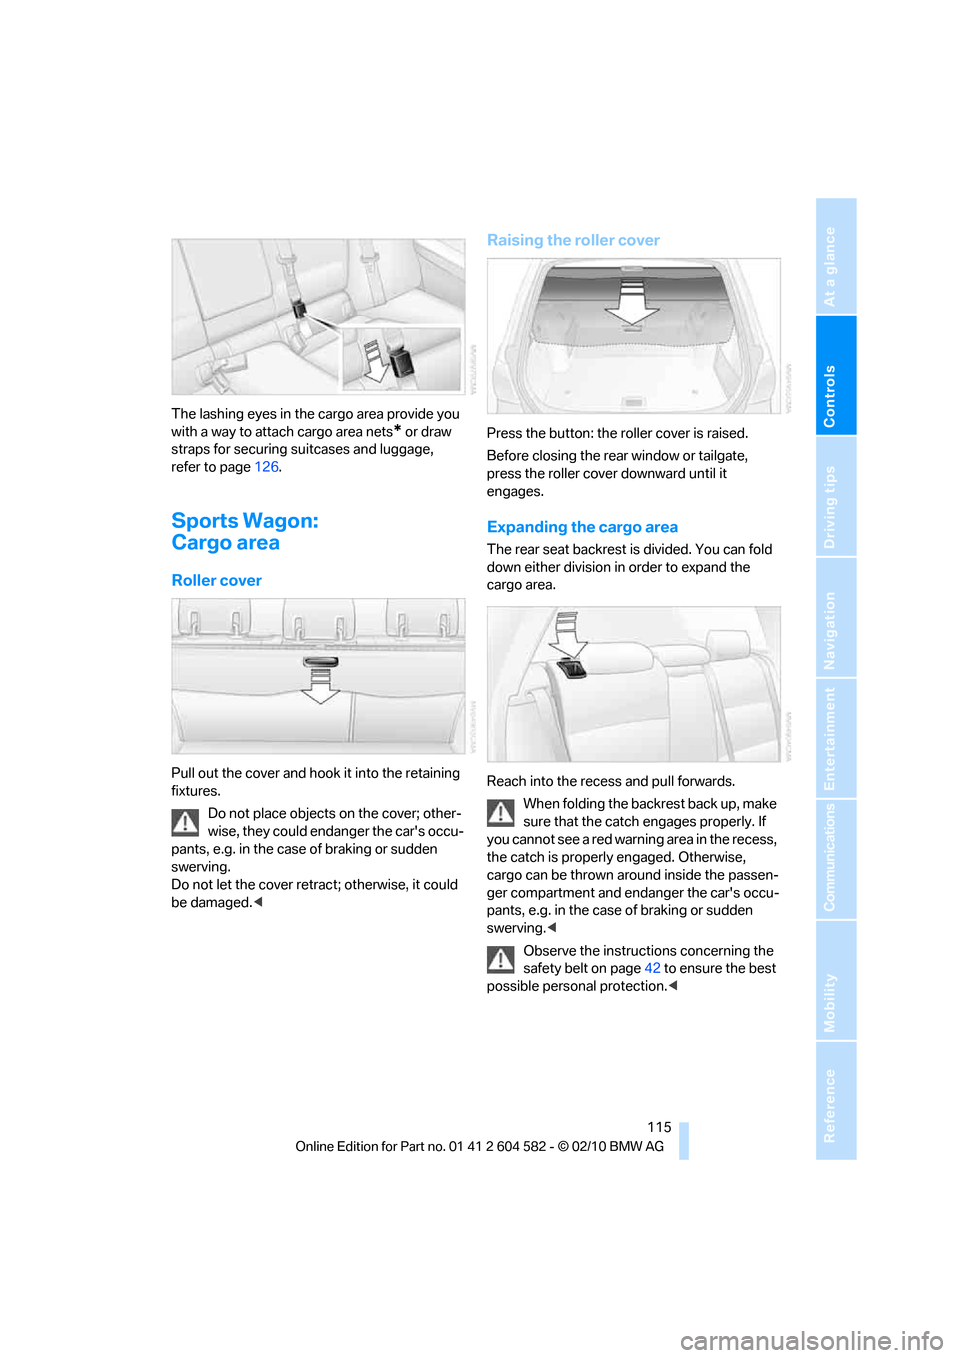
The lashing eyes in the cargo area provide you
with a way to attach cargo area nets
* or draw
straps for securing suitcases and luggage,
refer to page126.
Sports Wagon:
Cargo area
Roller cover
Pull out the cover and hook it into the retaining
fixtures.
Do not place objects on the cover; other-
wise, they could endanger the car's occu-
pants, e.g. in the case of braking or sudden
swerving.
Do not let the cover retract; otherwise, it could
be damaged.<
Raising the roller cover
Press the button: the roller cover is raised.
Before closing the rear window or tailgate,
press the roller cover downward until it
engages.
Expanding the cargo area
The rear seat backrest is divided. You can fold
down either division in order to expand the
cargo area.
Reach into the recess and pull forwards.
When folding the backrest back up, make
sure that the catch engages properly. If
you cannot see a red warning area in the recess,
the catch is properly engaged. Otherwise,
cargo can be thrown around inside the passen-
ger compartment and endanger the car's occu-
pants, e.g. in the case of braking or sudden
swerving.<
Observe the instructions concerning the
safety belt on page42 to ensure the best
possible personal protection.<
Page 119 of 286
Controls
117Reference
At a glance
Driving tips
Communications
Navigation
Entertainment
Mobility
>Folding, removable box* under the floor
panel, e.g. for wet or dirty items
>Stowage compartment under the floor
panel
>Insertable dividers
* and removable storage
tray for the storage compartment under the
floor panel
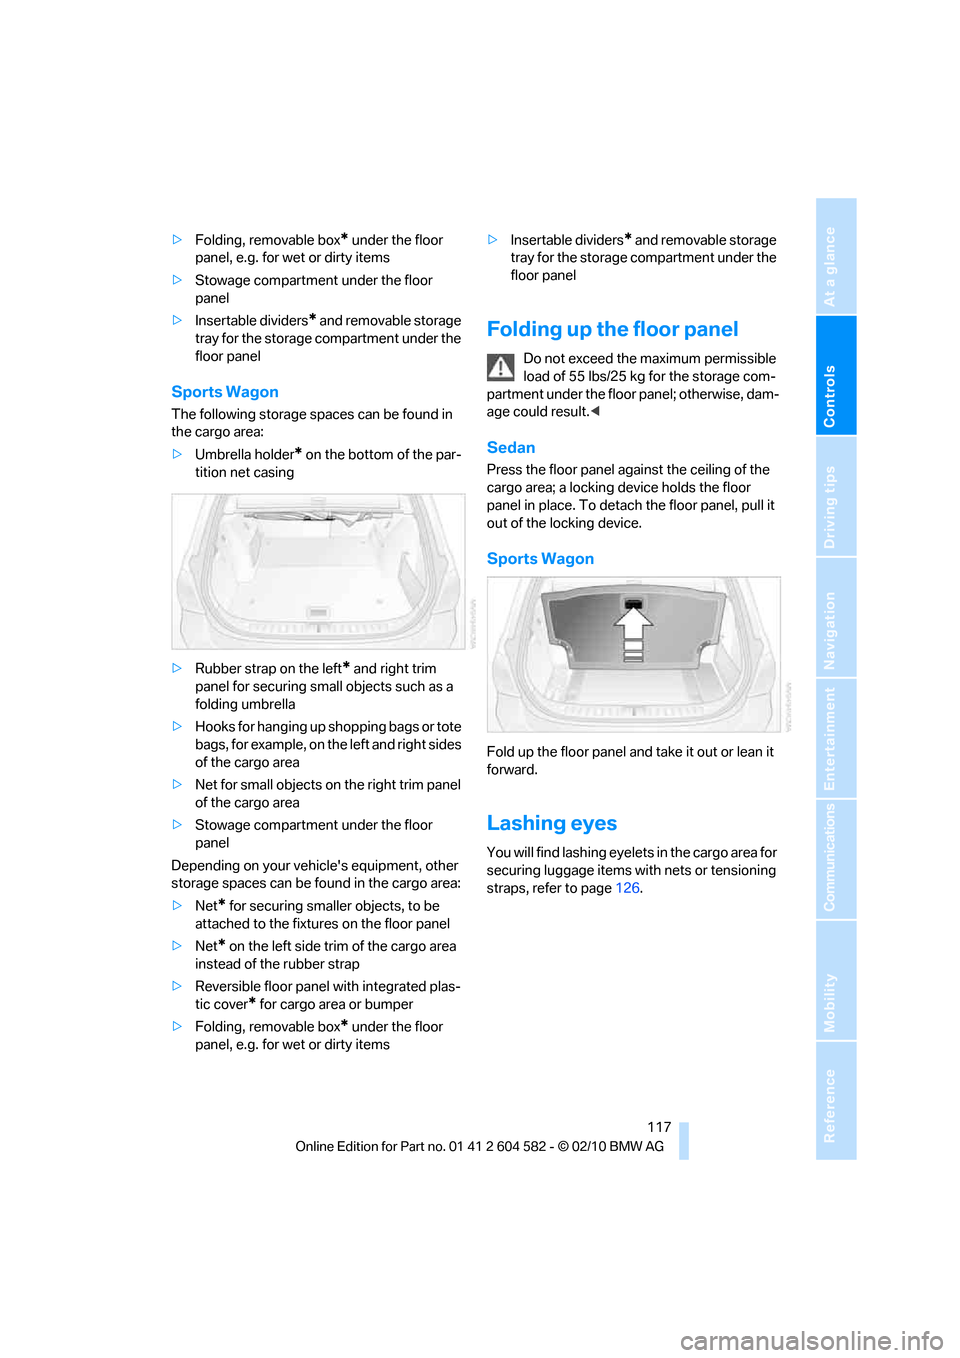
Sports Wagon
The following storage spaces can be found in
the cargo area:
>Umbrella holder
* on the bottom of the par-
tition net casing
>Rubber strap on the left
* and right trim
panel for securing small objects such as a
folding umbrella
>Hooks for hanging up shopping bags or tote
bags, for example, on the left and right sides
of the cargo area
>Net for small objects on the right trim panel
of the cargo area
>Stowage compartment under the floor
panel
Depending on your vehicle's equipment, other
storage spaces can be found in the cargo area:
>Net
* for securing smaller objects, to be
attached to the fixtures on the floor panel
>Net
* on the left side trim of the cargo area
instead of the rubber strap
>Reversible floor panel with integrated plas-
tic cover
* for cargo area or bumper
>Folding, removable box
* under the floor
panel, e.g. for wet or dirty items>Insertable dividers
* and removable storage
tray for the storage compartment under the
floor panel
Folding up the floor panel
Do not exceed the maximum permissible
load of 55 lbs/25 kg for the storage com-
partment under the floor panel; otherwise, dam-
age could result.<
Sedan
Press the floor panel against the ceiling of the
cargo area; a locking device holds the floor
panel in place. To detach the floor panel, pull it
out of the locking device.
Sports Wagon
Fold up the floor panel and take it out or lean it
forward.
Lashing eyes
You will find lashing eyelets in the cargo area for
securing luggage items with nets or tensioning
straps, refer to page126.
Page 124 of 286
Things to remember when driving
122
Things to remember when driving
Break-in period
Moving parts need breaking-in time to adjust to
each other. Please follow the instructions below
in order to achieve the optimal service life and
economy of operation for your vehicle.
Engine and differential
Always obey all official speed limits.
Up to 1,200 miles/2,000 km
Drive at varying engine and road speeds but do
not exceed:
>Gasoline engine
4,500 rpm or 100 mph/160 km/h
>Diesel engine
3,500 rpm or 93 mph/150 km/h
Avoid full-throttle operation and use of the
transmission's kickdown mode.
After driving 1,200 miles/2,000 km
Engine and vehicle speeds can be gradually
increased.
Tires
Due to technical factors associated with their
manufacture, tires do not achieve their full trac-
tion potential until after an initial break-in
period. Therefore, drive cautiously during the
first 200 miles/300 km.
Brake system
Brakes require an initial break-in period of
approx. 300 miles/500 km to achieve optimized
contact and wear patterns between brake pads
and rotors. Drive cautiously during this break-in
period.
Clutch
The function of the clutch reaches its optimal
level only after a distance driven of approx.
300 miles/500 km. During this break-in period,
engage the clutch gently.
Following part replacement
The same break-in procedures should be
observed if any of the components mentioned
above have to be renewed in the course of the
vehicle's operating life.
Saving fuel
The fuel consumption of your vehicle depends
on several factors. You can lower fuel consump-
tion and the environmental impact by taking
certain measures, adjusting your driving style
and having the vehicle serviced regularly.
Remove any unneeded cargo
Additional weight increases fuel consumption.
Remove any mounted parts after you
have finished using them
Remove unneeded additional mirrors, the roof
rack and the rear luggage rack after use.
Mounted parts affect the vehicle's aerodynam-
ics and increase fuel consumption.
Close the windows and glass roof
An open glass roof or window causes higher air
resistance and thus increases fuel consump-
tion.
Check tire inflation pressure regularly
Check the tire inflation pressure at least twice a
month and before embarking on a long journey,
and correct it if necessary.
Low tire inflation pressure causes higher rolling
resistance and thus increases fuel consumption
and tire wear.
Set off immediately
Do not let the engine warm up while the car is
still standing, but set off immediately at moder-
ate engine speed. This is the fastest way for the
cold engine to reach its operating temperature.
Page 127 of 286
Driving tips
125Reference
At a glance
Controls
Communications
Navigation
Entertainment
Mobility
Corrosion on brake rotors
When the vehicle is driven only occasionally,
during extended periods when the vehicle is not
used at all, and in operating conditions where
brake applications are less frequent, there is an
increased tendency for corrosion to form on
rotors, while contaminants accumulate on the
brake pads. This occurs because the minimum
pressure which must be exerted by the pads
during brake applications to clean the rotors is
not reached.
Should corrosion form on the brake rotors, the
brakes will tend to respond with a pulsating
effect that even extended application will fail to
cure.
When the vehicle is parked
Condensation forms while the automatic cli-
mate control is in operation, and then exits
under the vehicle. Traces of condensed water
under the vehicle are therefore normal.
Cargo loading
To avoid loading the tires beyond their
approved carrying capacity, never over-
load the vehicle. Overloading can lead to over-
heating and increases the rate at which damage
develops inside the tires. In some situations,
this can result in sudden loss of tire pressure.<
Make sure that no liquids are spilled or
leak from their containers in the cargo
area, as this could result in damage to the vehi-
cle.<
Determining loading limit
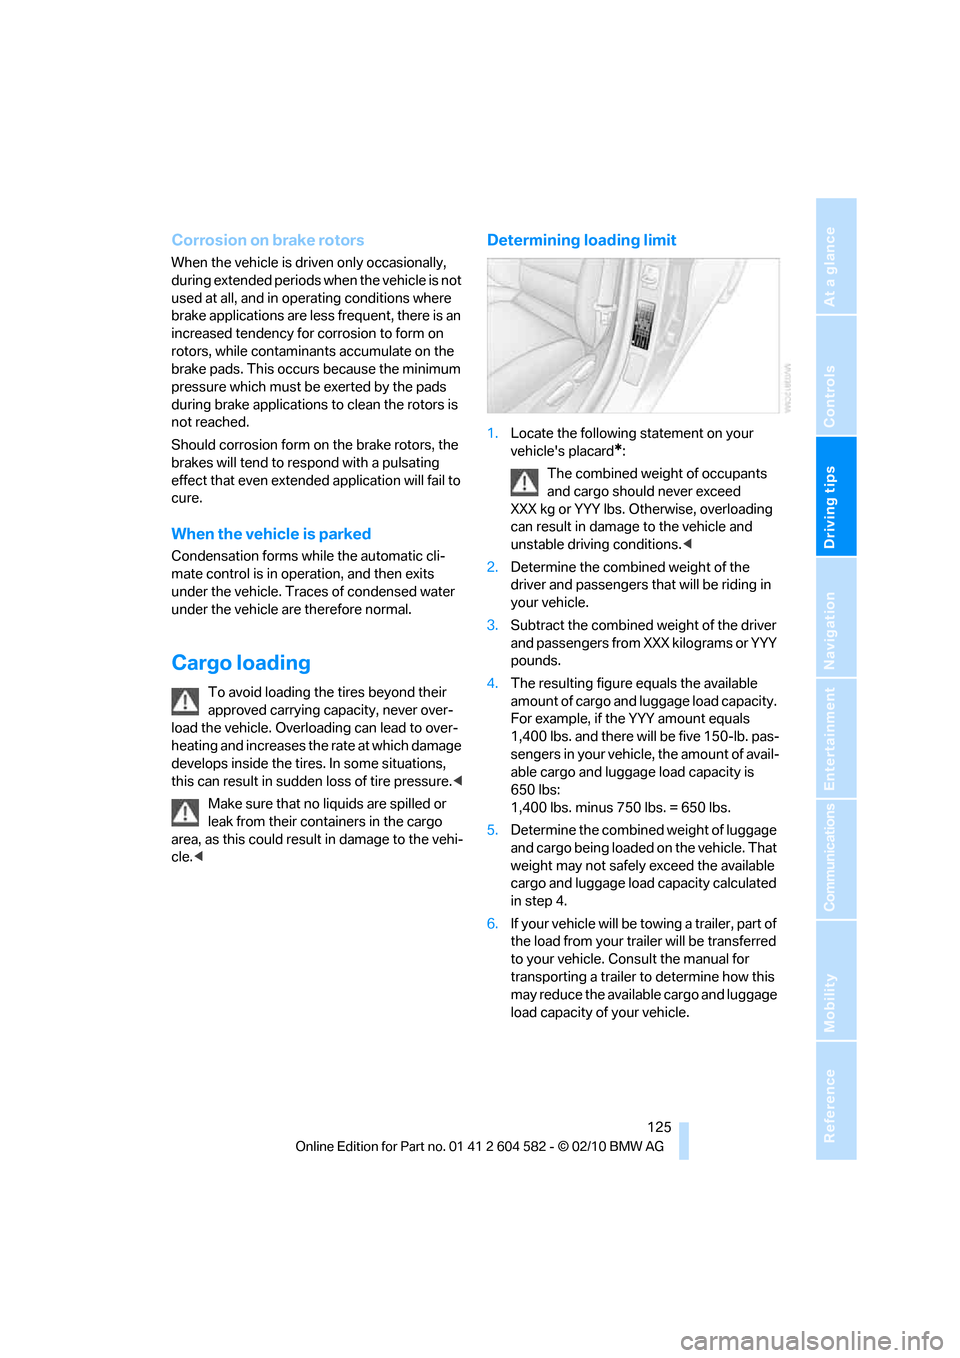
1.Locate the following statement on your
vehicle's placard
*:
The combined weight of occupants
and cargo should never exceed
XXX kg or YYY lbs. Otherwise, overloading
can result in damage to the vehicle and
unstable driving conditions.<
2.Determine the combined weight of the
driver and passengers that will be riding in
your vehicle.
3.Subtract the combined weight of the driver
and passengers from XXX kilograms or YYY
pounds.
4.The resulting figure equals the available
amount of cargo and luggage load capacity.
For example, if the YYY amount equals
1,400 lbs. and there will be five 150-lb. pas-
sengers in your vehicle, the amount of avail-
able cargo and luggage load capacity is
650 lbs:
1,400 lbs. minus 750 lbs. = 650 lbs.
5.Determine the combined weight of luggage
and cargo being loaded on the vehicle. That
weight may not safely exceed the available
cargo and luggage load capacity calculated
in step 4.
6.If your vehicle will be towing a trailer, part of
the load from your trailer will be transferred
to your vehicle. Consult the manual for
transporting a trailer to determine how this
may reduce the available cargo and luggage
load capacity of your vehicle.