service BMW 328D XDRIVE SPORTS WAGON 2014 Owner's Manual
[x] Cancel search | Manufacturer: BMW, Model Year: 2014, Model line: 328D XDRIVE SPORTS WAGON, Model: BMW 328D XDRIVE SPORTS WAGON 2014Pages: 244, PDF Size: 7.28 MB
Page 188 of 244

Refill in good time
The reducing agent must be replenished
as soon as the Reserve display appears, other‐
wise the engine cannot be restarted.◀
Diesel exhaust fluid on minimum The engine will continue to runeven when the display shows --,
as long as it is not switched off
and all other operating condi‐
tions are satisfied, sufficient fuel
for example.
Engine does not start
Do not continue driving to the limit of the
remaining travel distance. Otherwise, you will
not be able to restart the engine after switch‐
ing it off.◀
Misfueling A Check Control message is displayed when
an incorrect fluid is added.
After adding the wrong fluid, contact your
service center.
System defect
A Check Control message is displayed when
there is a system defect.
Have the diesel exhaust fluid
replenished
The reducing agent is added by the service
center within the context of regular mainte‐
nance.
It may be necessary to have the fluid replen‐
ished several times under particular circum‐
stances, for example, if the vehicle is driven in
a particularly sporty style or if it is driven at
high altitudes.
The reducing agent must be replenished as
soon as the reserve display appears in the in‐
strument cluster to avoid not being able to re‐
start the engine.Diesel exhaust fluid at low
temperatures
Due to its physical properties, it is possible
that the reducing agent may also need to be
replenished between regular maintenance ap‐
pointments if it is exposed to temperatures un‐
der + 23 ℉/- 5 ℃. In this case, add reducing
agent only immediately before starting to drive.
The need to replenish it is indicated by the Re‐
serve display in the instrument cluster.
At temperatures below + 12 ℉/- 11 ℃ the fill
level in some cases cannot be measured.
After adding reducing agent, the reserve dis‐
play is displayed only until the fill level can be
measured again.
Replenishing Diesel exhaust fluid
yourself in exceptional cases
You can replenish reducing agent yourself in
exceptional cases, e.g., to get to the service
center.
Avoid contact with Diesel exhaust fluid
Do not come into contact with the reduc‐
ing agent. Otherwise, skin or eye irritations
may result.◀
Handling Diesel exhaust fluid
When working with reducing agent in
closed spaces, ensure good ventilation. When
the bottle or container is opened, acrid smell‐
ing fumes may escape.◀
Keeping Diesel exhaust fluid out of reach
of children
Keep reducing agent out of reach of children◀
Avoid contact with surfaces
Avoid contact of reducing agent with sur‐
faces of the vehicle. Damage could result.◀
Suitable Diesel exhaust fluid▷Preferred: BMW Diesel Exhaust Fluid. With
this bottle and its special adapter, DieselSeite 188MobilityFuel188
Online Edition for Part no. 01 40 2 925 793 - II/14
Page 189 of 244
exhaust fluid can be replenished simply
and safely.▷Alternative: NOx reduction agent AUS 32
Diesel exhaust fluid can be purchased at your
Service Center.
Refill quantity
When the Reserve display starts, add at least 2
bottles of reducing agent.
This corresponds to approx. 1 gallon.
Tank for reducing agent
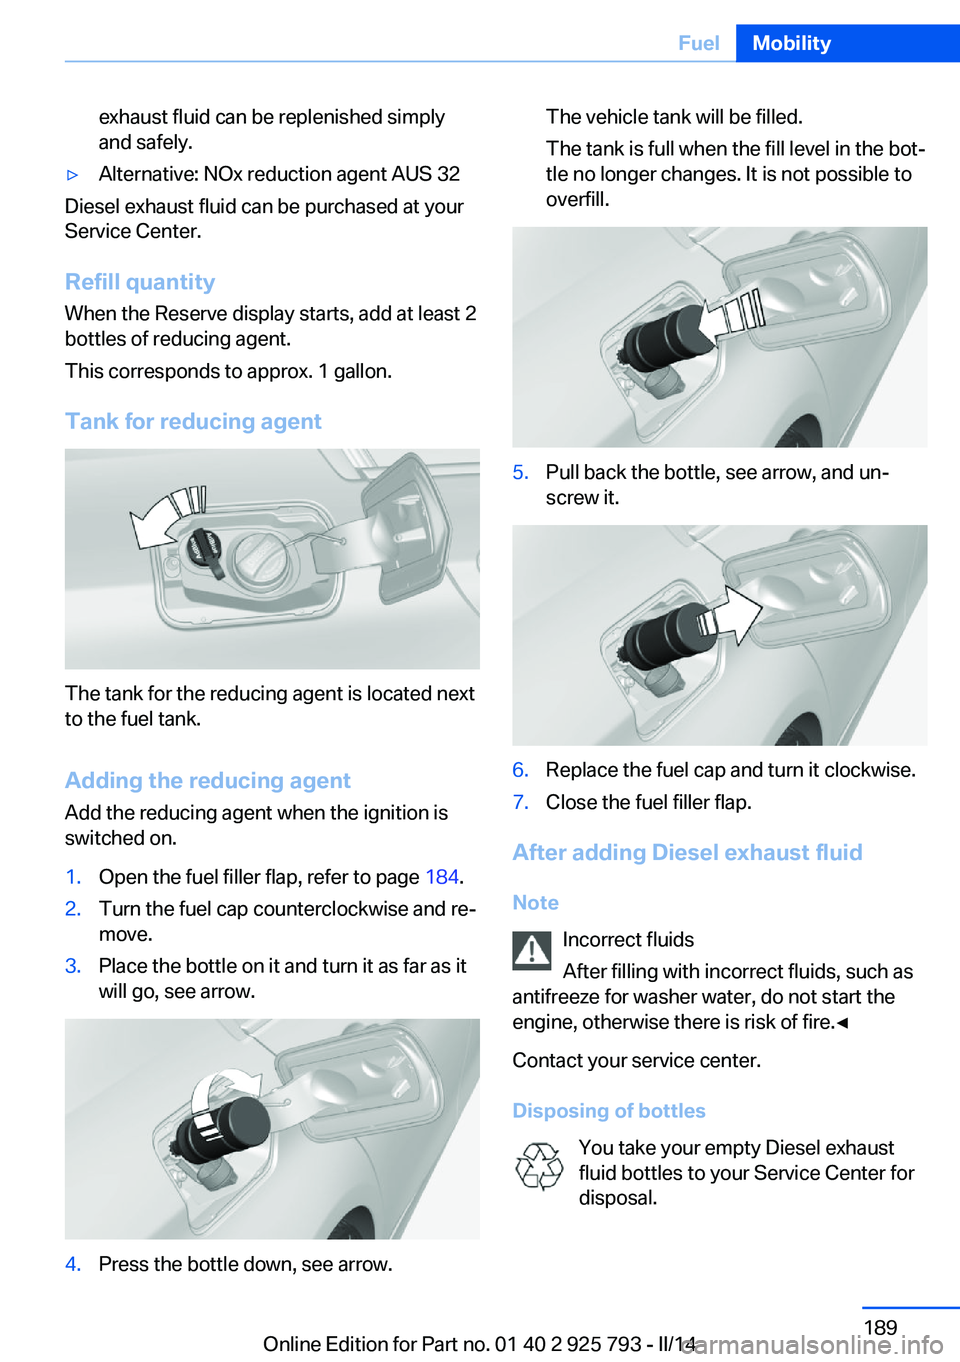
The tank for the reducing agent is located next
to the fuel tank.
Adding the reducing agent Add the reducing agent when the ignition is
switched on.
1.Open the fuel filler flap, refer to page 184.2.Turn the fuel cap counterclockwise and re‐
move.3.Place the bottle on it and turn it as far as it
will go, see arrow.4.Press the bottle down, see arrow.The vehicle tank will be filled.
The tank is full when the fill level in the bot‐
tle no longer changes. It is not possible to
overfill.5.Pull back the bottle, see arrow, and un‐
screw it.6.Replace the fuel cap and turn it clockwise.7.Close the fuel filler flap.
After adding Diesel exhaust fluid
Note Incorrect fluids
After filling with incorrect fluids, such as
antifreeze for washer water, do not start the
engine, otherwise there is risk of fire.◀
Contact your service center.
Disposing of bottles You take your empty Diesel exhaust
fluid bottles to your Service Center for
disposal.
Seite 189FuelMobility189
Online Edition for Part no. 01 40 2 925 793 - II/14
Page 191 of 244

Wheels and tiresVehicle equipment
All standard, country-specific and optional
equipment that is offered in the model series is
described in this chapter. Therefore, equip‐
ment is also described that is not available in a
vehicle, e. g., because of the selected optional
equipment or country variant. This also applies
for safety-related functions and systems.
Tire inflation pressure Safety information
The tire characteristics and tire inflation pres‐
sure influence the following:▷The service life of the tires.▷Road safety.▷Driving comfort.
Checking the pressure
Tires have a natural, consistent loss of pres‐
sure.
Check the tire inflation pressure regularly
Regularly check the tire inflation pres‐
sure, and correct it as needed: at least twice a
month and before a long trip. If you fail to ob‐
serve this precaution, you may be driving on
tires with incorrect tire pressures, a condition
that may not only compromise your vehicle's
driving stability, but also lead to tire damage
and the risk of an accident.◀
Tires heat up during driving, and the tire infla‐
tion pressure increases along with the temper‐
ature of the tire. The tire inflation pressure
specifications relate to cold tires or tires with
the ambient temperature.
Only check the tire inflation pressure when the
tires are cold. This means after driving no more
than 1.25 miles/2 km or when the vehicle has
been parked for at least 2 hours.
The displays of inflation devices may under-
read by up to 0.1bar, 2 psi.
For Flat Tire Monitor: after correcting the tire
inflation pressure, reinitialize the Flat Tire
Monitor.
For Tire Pressure Monitor: after correcting the
tire inflation pressure, reset the Tire Pressure
Monitor.
Pressure specifications The tire inflation pressure table, refer to
page 192, contains all pressure specifications
for the specified tire sizes at the ambient tem‐
perature. Pressure specifications apply to ap‐
proved tire sizes and recommended tire
brands. This information can be obtained from
your service center.
To identify the correct tire inflation pressure,
please note the following:▷Tire sizes of your vehicle.▷Maximum permitted driving speed.
Tire inflation pressures up to
100 mph/160 km/h
For speeds of up to 100 mph/160 km/h and for
optimum driving comfort, note the pressure
values in the tire inflation pressure table, refer
to page 192, and adjust as necessary.
Seite 191Wheels and tiresMobility191
Online Edition for Part no. 01 40 2 925 793 - II/14
Page 194 of 244

45: aspect ratio in %
R: radial tire code
18: rim diameter in inches
96: load rating, not for ZR tires
Y: speed rating, before the R on ZR tires
Speed letter
Q = up to 100 mph, 160 km/h
R = up to 106 mph, 170 km/h
S = up to 112 mph, 180 km/h
T = up to 118 mph, 190 km/h
H = up to 131 mph, 210 km/h
V = up to 150 mph, 240 km/h
W = up to 167 mph, 270 km/h
Y = up to 186 mph, 300 km/h
Tire Identification NumberDOT code: DOT xxxx xxx 0814
xxxx: manufacturer code for the tire brand
xxx: tire size and tire design
0814: tire age
Tires with DOT codes meet the guidelines of
the U.S. Department of Transportation.
Tire age DOT … 0814: the tire was manufactured in the
8th week of 2014.
Recommendation
Regardless of wear, replace tires at least every
6 years.
Uniform Tire Quality Grading Quality grades can be found where applicable
on the tire sidewall between tread shoulder
and maximum section width.
For example: Treadwear 200; Traction AA;
Temperature ADOT Quality Grades
Treadwear
Traction AA A B C
Temperature A B C
All passenger car tires must conform to Fed‐
eral Safety Requirements in addition to these
grades.
Treadwear The treadwear grade is a comparative rating
based on the wear rate of the tire when tested
under controlled conditions on a specified gov‐
ernment test course. For example, a tire
graded 150 would wear one and one-half, 1 g,
times as well on the government course as a
tire graded 100. The relative performance of
tires depends upon the actual conditions of
their use, however, and may depart signifi‐
cantly from the norm due to variations in driv‐
ing habits, service practices and differences in
road characteristics and climate.
Traction
The traction grades, from highest to lowest,
are AA, A, B, and C.
Those grades represent the tire's ability to
stop on wet pavement as measured under
controlled conditions on specified government
test surfaces of asphalt and concrete. A tire
marked C may have poor traction performance.
The traction grade assigned to this tire is
based on straight-ahead braking traction tests,
and does not include acceleration, cornering,
hydroplaning, or peak traction characteristics.
Temperature The temperature grades are A, the highest, B,
and C, representing the tire's resistance to the
generation of heat and its ability to dissipate
heat when tested under controlled conditions
on a specified indoor laboratory test wheel.
Sustained high temperature can cause the ma‐
terial of the tire to degenerate and reduce tire
life, and excessive temperature can lead toSeite 194MobilityWheels and tires194
Online Edition for Part no. 01 40 2 925 793 - II/14
Page 196 of 244

In case of tire damage
If there are indications of tire damage, re‐
duce your speed immediately and have the
wheels and tires checked right away; other‐
wise, there is the increased risk of an accident.
Drive carefully to the nearest service center.
Have the vehicle towed or transported there.
Otherwise, tire damage can become life threat‐
ening for vehicle occupants and also other
road users.◀
Repair of tire damage
For safety reasons, the manufacturer of
your vehicle recommends that you do not have
damaged tires repaired; they should be re‐
placed. Otherwise, damage can occur as a re‐
sult.◀
Changing wheels and tires
Mounting Information on mounting tires
Have mounting and balancing performed
only by a service center.
If this work is not carried out properly, there is
the danger of subsequent damage and related
safety hazards.◀
Wheel and tire combination
You can ask the service center about the right
wheel/tire combination and wheel rim versions
for the vehicle.
Incorrect wheel and tire combinations impair
the function of a variety of systems such as
ABS or DSC.
To maintain good handling and vehicle re‐
sponse, use only tires with a single tread con‐
figuration from a single manufacturer.
Following tire damage, have the original wheel
and tire combination remounted on the vehicle
as soon as possible.Approved wheels and tires
You should only use wheels and tires
that have been approved by the vehicle manu‐
facturer for your vehicle type; otherwise, for
example, despite having the same official size
ratings, variations can lead to body contact and
with it, the risk of severe accidents
The manufacturer of your vehicle cannot eval‐
uate non-approved wheels and tires to deter‐
mine if they are suited for use, and therefore
cannot ensure the operating safety of the vehi‐
cle if they are mounted.◀
Recommended tire brands
For each tire size, the manufacturer of your ve‐
hicle recommends certain tire brands. These
can be identified by a star on the tire sidewall.
With proper use, these tires meet the highest
standards for safety and handling.
New tires Due to technical factors associated with their
manufacture, tires do not achieve their full
traction potential until after an initial breaking-
in period.
Drive conservatively for the first
200 miles/300 km.
Retreaded tires
The manufacturer of your vehicle does not rec‐
ommend the use of retreaded tires.
Seite 196MobilityWheels and tires196
Online Edition for Part no. 01 40 2 925 793 - II/14
Page 197 of 244

Retreaded tires
Possibly substantial variations in the de‐
sign and age of the tire casing structures can
limit service life and have a negative impact on
road safety.◀
Winter tires
Winter tires are recommended for operating on
winter roads.
Although so-called all-season M+S tires do
provide better winter traction than summer tires, they do not provide the same level of per‐
formance as winter tires.
Maximum speed of winter tires If the maximum speed of the vehicle is higher
than the permissible speed for the winter tires,
then display a corresponding sign in the field
of vision. You can obtain this sign from the tire
specialist or from your service center.
Maximum speed for winter tires
Do not exceed the maximum speed for
the respective winter tires; otherwise, tire dam‐
age and accidents can occur.◀
Run-flat tires If you are already using run-flat tires, for your
own safety you should replace them only with
the same kind. No spare tire is available in the
case of a flat tire. Your service center will be
glad to advise you.
Rotating wheels between axles Different wear patterns can occur on the front
and rear axles depending on individual driving
conditions. The tires can be rotated between
the axles to achieve even wear. Your service
center will be glad to advise you. After rotating,
check the tire pressure and correct if neces‐
sary.
Rotating the tires is not permissible on vehi‐
cles with different tire sizes on the front andrear axles, i.e. when using different types of
tires.
Storage
Store wheels and tires in a cool, dry place with
as little exposure to light as possible.
Always protect tires against all contact with oil,
grease and fuels.
Do not exceed the maximum tire inflation pres‐
sure indicated on the side wall of the tire.
Run-flat tires
Label
RSC label on the tire sidewall.
The wheels are composed of special rims and
tires that are self-supporting, to a limited de‐
gree.
The support of the sidewall allows the tire to
remain drivable to a restricted degree in the
event of a pressure loss.
FTM: continued driving with a damaged tire,
refer to page 103.
TPM: continued driving with a damaged tire,
refer to page 100.
Changing run-flat tires
For your own safety, only use run-flat tires. No
spare tire is available in the case of a flat tire.
Your service center will be glad to advise you.
Seite 197Wheels and tiresMobility197
Online Edition for Part no. 01 40 2 925 793 - II/14
Page 198 of 244

Snow chains
Fine-link snow chains Only certain types of fine-link snow chains
have been tested by the manufacturer of the
vehicle, classified as road-safe and approved.
Information about the approved snow chains
are available from the service center.
Use Use only in pairs on the rear wheels, equipped
with the tires of the following size:▷205/60 R 16.▷225/55 R 16.▷225/50 R 17.▷225/45 R 18.
Follow the chain manufacturer's instructions.
Make sure that the snow chains are always
sufficiently tight. Retighten as needed accord‐
ing to the chain manufacturer's instructions.
Do not initialize the Flat Tire Monitor after
mounting snow chains, as doing so may result
in incorrect readings.
Do not initialize the Tire Pressure Monitor after
mounting snow chains, as doing so may result
in incorrect readings.
When driving with snow chains, briefly activate
Dynamic Traction Control if necessary.
Maximum speed with snow chains Do not exceed a speed of 30 mph/50 km/h
when using snow chains.
Seite 198MobilityWheels and tires198
Online Edition for Part no. 01 40 2 925 793 - II/14
Page 200 of 244

Hood
Hints Working in the engine compartment
Never attempt to perform any service or
repair operations on your vehicle without the
necessary professional technical training.
If you are unfamiliar with the statutory guide‐
lines, have any work on the vehicle performed
only by a service center.
If this work is not carried out properly, there is
the danger of subsequent damage and related
safety hazards.◀
Never reach into the engine compart‐
ment
Never reach into the intermediate spaces or
gaps in the engine compartment. Otherwise,
there is risk of injury, e.g., from rotating or hot
parts.◀
Fold down wiper arm
Before opening the hood, ensure that the
wiper arms are against the windshield, or this
may result in damage.◀
Opening the hood1.Pull lever in the interior:
Engine is released, arrow 1.2.After the lever is released, pull the lever
again:
Hood can be opened, arrow 2.Indicator/warning lamps
When the hood is opened, a Check Control
message is displayed.
Closing the hood
Let the hood drop from a height of approx. 16
in/40 cm and push down on it to lock it fully.
The hood must audibly engage on both sides.
Hood open when driving
If you see any signs that the hood is not
completely closed while driving, pull over im‐
mediately and close it securely.◀
Danger of pinching
Make sure that the closing path of the
hood is clear; otherwise, injuries may result.◀
Seite 200MobilityEngine compartment200
Online Edition for Part no. 01 40 2 925 793 - II/14
Page 203 of 244

Approved oil typesYou can add oils with the following specifica‐
tions:Gasoline engineBMW Longlife-01.BMW Longlife-01 FE.Diesel engineBMW Longlife-04.
Additional information about the approved
types of oils can be requested from the service
center.
Alternative oil types If the approved engine oils are not available, up
to 1 US quart/liter of an oil with the following
specification can be added:
Gasoline engineAPI SM or superior grade specification.Diesel engineAPI ILSAC GF-5.
Engine oil change:
The vehicle manufacturer recommends that
you let the service center change the motor oil.
Seite 203Engine oilMobility203
Online Edition for Part no. 01 40 2 925 793 - II/14
Page 204 of 244

CoolantVehicle equipmentAll standard, country-specific and optional
equipment that is offered in the model series is
described in this chapter. Therefore, equip‐
ment is also described that is not available in a
vehicle, e. g., because of the selected optional
equipment or country variant. This also applies
for safety-related functions and systems.
Hints Danger of burns from hot engine
Do not open the cooling system while
the engine is hot; otherwise, escaping coolant
may cause burns.◀
Suitable additives
Only use suitable additives; otherwise,
engine damage may occur. The additives are
harmful to your health.◀
Coolant consists of water and additives.
Not all commercially available additives are
suitable for the vehicle. Information about the
suitable additives are available from the service
center.
Coolant level
General information Depending on the engine installation, the cool‐
ant reservoir may be located on the opposite
side of the engine compartment.
Checking1.Let the engine cool.2.The coolant level is correct if it lies be‐
tween the minimum and maximum marks.The marks are on the side of the coolant
reservoir.SymbolMeaningMaximumMinimum
Adding
1.Let the engine cool.2.Turn the cap of the coolant reservoir
slightly counterclockwise to allow any ex‐
cess pressure to dissipate, and then open
it.3.If the coolant is low, slowly add coolant up
to the specified level; do not overfill.4.Turn the cap until there is an audible click.
The arrows on the coolant reservoir and
the cap must point towards one another.5.Have the cause of the coolant loss elimi‐
nated as soon as possible.
Disposal
Comply with the relevant environmen‐
tal protection regulations when dispos‐
ing of coolant and coolant additives.
Seite 204MobilityCoolant204
Online Edition for Part no. 01 40 2 925 793 - II/14