Engine BMW 328i 1998 E36 Workshop Manual
[x] Cancel search | Manufacturer: BMW, Model Year: 1998, Model line: 328i, Model: BMW 328i 1998 E36Pages: 759
Page 265 of 759
STABILIZER
BAR
Stabilizer
bar,
removing
and
installing
Stabilizer
bar
link
arrangements
differ
slightly
among
mod-
els
.
In
most
models
the
links
attach
lo
the
control
arms
near
the
outboard
end
.
OnM3
models
the
links
attach
lo
the
strut
assemblies
.
1
.
Raise
car
and
remove
both
front
wheels
.
WARNING
-
Make
sure
that
the
car
is
firmly
supported
on
jack
stands
desígned
for
the
purpose
.
Place
the
jack
stands
beneath
a
structural
chassís
point
.
Do
not
place
jack
stands
under
suspension
parts
.
uul
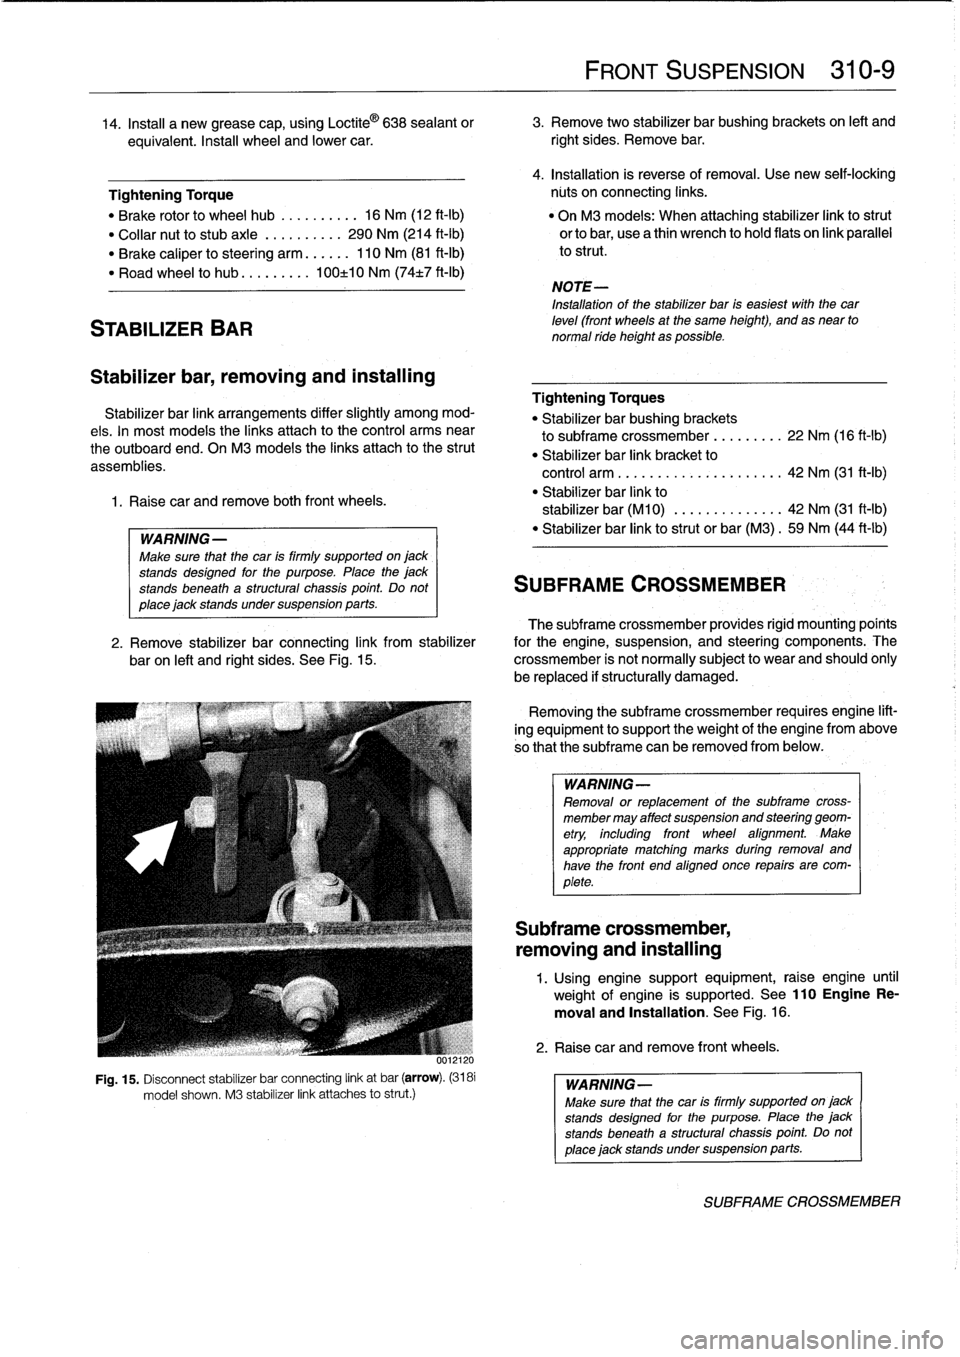
Fig
.
15
.
Disconnect
stabilizer
bar
connecting
link
at
bar
(arrow)
.
(3181
model
shown
.
M3
stabilizer
link
attaches
lo
strut
.)
FRONT
SUSPENSION
310-
9
14
.
Insta¡¡
a
new
grease
cap,
using
Loctite
©
638
sealant
or
3
.
Remove
two
stabilizer
bar
bushing
brackets
on
left
and
equivalent
.
Insta¡¡
wheel
and
lower
car
.
right
sides
.
Remove
bar
.
4
.
Installation
is
reverse
of
removal
.
Use
new
seif-lockíng
Tightening
Torque
núts
on
connecting
links
.
"
Brake
rotor
lo
wheel
hub
..........
16
Nm
(12
ft-Ib)
"
On
M3
models
:
When
attaching
stabilizer
link
lostrut
"
Collar
nut
lo
stubaxle
.
.........
290
Nm
(214
ft-Ib)
orlobar,
usea
thin
wrench
lo
hold
flats
on
link
parallel
"
Brake
caliper
losteering
arm
......
110
Nm
(81
ft-Ib)
lo
strut
.
"
Road
wheel
lo
hub
...
...
.
.
.
100±10
Nm
(74t7
ft-Ib)
NOTE-
Installation
of
the
stabilizer
bar
is
easiest
with
thecar
leve¡
(front
wheels
at
the
same
height),
and
as
near
to
normal
ride
height
as
possible
.
Tightening
Torques
"
Stabilizer
bar
bushing
brackets
lo
subframe
crossmember
...
..
.
..
.
22
Nm
(16
ft-Ib)
"
Stabilizer
bar
link
bracket
lo
control
arm
................
.
.
.
.
.
42
Nm
(31
ft-1b)
"
Stabilizer
bar
link
lo
stabilizer
bar
(M10)
.............
.
42
Nm
(31
ft-Ib)
"
Stabilizer
bar
link
lostrut
or
bar
(M3)
.
59
Nm
(44
ft-Ib)
SUBFRAME
CROSSMEMBER
The
subframe
crossmember
provides
rigid
mounting'poínts
2
.
Remove
stabilizer
bar
connecting
link
from
stabilizer
for
the
engine,
suspension,
and
steering
components
.
The
baron
left
and
right
sides
.
See
Fig
.
15
.
crossmember
is
not
normally
subject
lo
wear
and
should
ohly
be
replaced
if
structurally
damaged
.
Removing
the
subframe
crossmember
requires
engine
lift-
ing
equipment
lo
support
theweight
of
tfhe
engine
from
above
so
that
the
subframe
can
be
removed
from
below
.
WARNING-
Removal
or
replacement
of
the
subframe
cross-
member
may
affect
suspension
and
steering
geom-
etry,
including
front
wheel
afignment
.
Make
appropriate
matching
marks
during
removal
and
have
the
front
end
aligned
once
repairs
are
com-
plete
.
Subframe
crossmember,
removing
and
installing
1
.
Using
enginesupport
equipment,
raise
engine
until
weight
of
engine
is
supported
.
See
110EngineRe-
moval
and
Installation
.
See
Fig
.
16
.
2
.
Raise
car
andremove
front
wheels
.
WARNING-
Make
sure
that
the
car
is
firmly
supportedon
jack
stands
desígned
for
the
purpose
.
Place
the
jack
stands
beneatha
structural
chassís
point
Do
not
place
jack
standsundersuspension
parts
.
SUBFRAME
CROSSMEMBER
Page 266 of 759
310-
1
0
FRONT
SUSPENSION
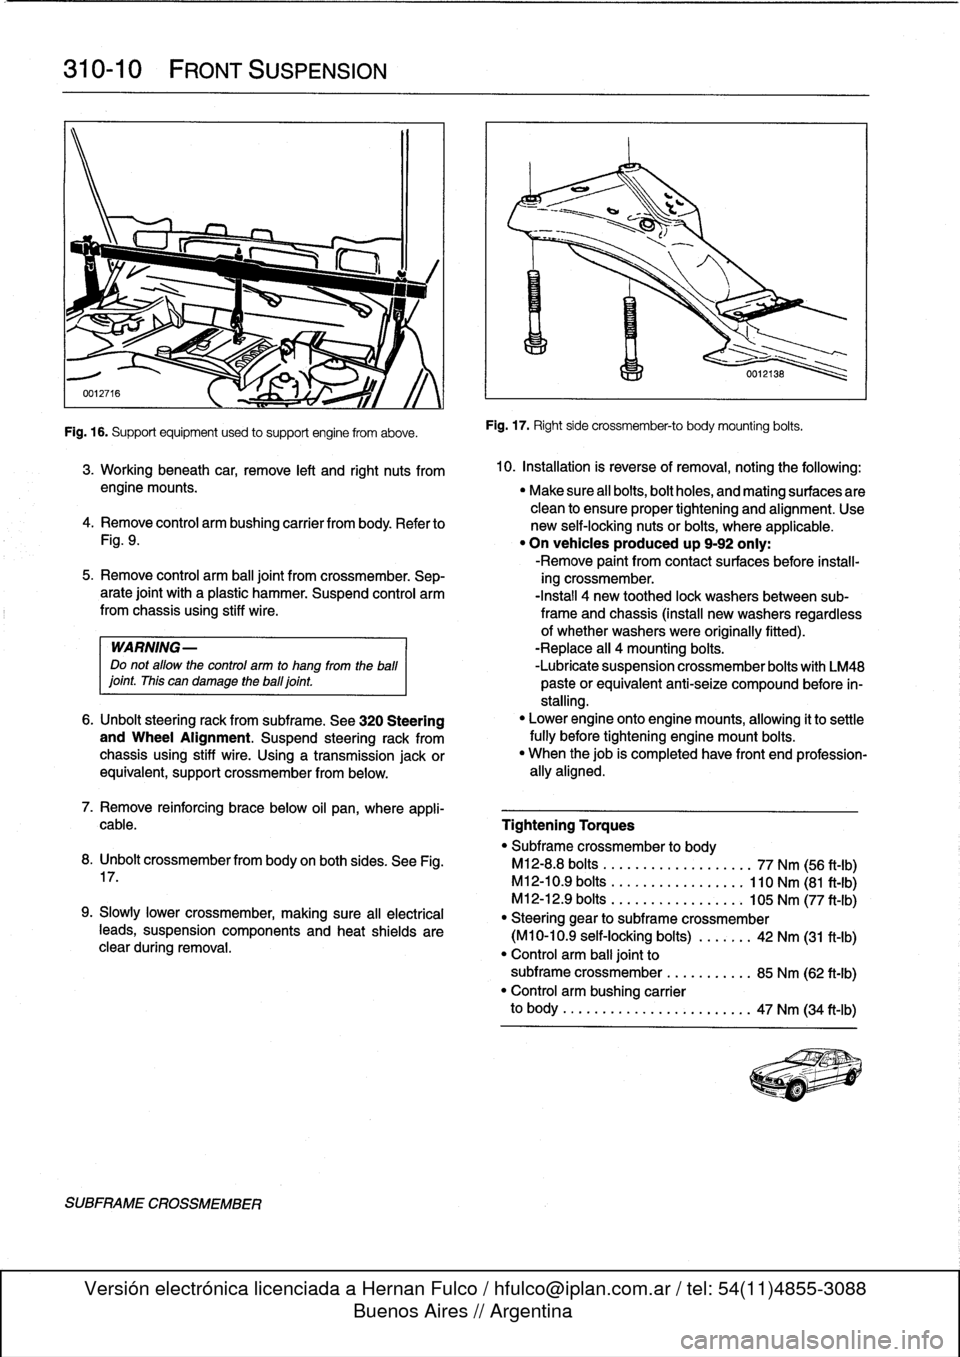
Fig
.
16
.
Supportequipment
used
to
support
engine
from
aboye
.
SUBFRAME
CROSSMEMBER
Fig
.
17
.
Right
side
crossmember-to
body
mounting
bolts
.
3
.
Working
beneath
car,
remove
left
and
right
nuts
from
10
.
Installation
is
reverse
ofremoval,
noting
the
followíng
:
engine
mounts
.
"
Make
sure
all
bolts,bolt
holes,
and
mating
surfaces
are
clean
to
ensure
proper
tightening
and
alignment
.
Use
4
.
Remove
control
arm
bushing
carrier
from
body
.
Refer
to
new
self-locking
nuts
or
bolts,
where
applicable
.
Fig
.
9
.
"
On
vehicles
produced
up
9-92
only
:
-Remove
paint
from
contact
surfaces
before
ínstall-
5
.
Remove
control
arm
ball
joint
from
crossmember
.
Sep-
ing
crossmember
.
arate
joint
with
a
plastic
hammer
.
Suspend
control
arm
-Install
4
new
toothed
lock
washersbetween
sub-from
chassis
using
stiff
wire
.
frame
and
chassis
(install
new
washers
regardless
of
whether
washers
were
originally
fitted)
.
WARNING-
-Replace
all
4
mounting
bolts
.
Do
not
allow
the
control
arm
to
hang
from
the
ball
-Lubrícate
suspension
crossmember
bolts
with
LM48
¡oint
.
This
can
damage
theball¡oint
.
paste
orequivalent
anti-seize
compound
before
ín-
stalling
.
6
.
Unbolt
steering
rack
from
subframe
.
See
320
Steering
"
Lower
engine
onto
enginemounts,
allowing
it
to
settle
and
Wheel
Alignment
.
Suspend
steering
rack
from
fully
before
tightening
engine
mount
bolts
.
chassis
using
stiff
wire
.
Using
a
transmission
jackor
"
When
thejob
is
completed
have
front
end
profession-
equivalent,
support
crossmember
from
below
.
ally
aligned
.
7
.
Remove
reinforcing
brace
below
oil
pan,
where
appli-
cable
.
Tightening
Torques
"
Subframe
crossmember
to
body
8
.
Unbolt
crossmemberfrom
body
on
both
sides
.
See
Fig
.
M12-8
.8
bolts
..................
.
77
Nm
(56
ft-Ib)
17
.
M12-10
.9
bolts
.................
110
Nm
(81
ft-Ib)
M12-12
.9
bolts
............
.
...
.
105
Nm
(77
ft-Ib)
9
.
Slowly
Lower
crossmember,
making
sure
all
electrical
"
Steering
gear
to
subframe
crossmember
teads,
suspension
components
and
heat
shields
are
(M10-10
.9
self-locking
bolts)
..
.
.
.
.
.
42
Nm
(31
ft-Ib)
clear
during
removal
.
"
Control
arm
balljoint
to
subframe
crossmember
...
.......
.
85
Nm
(62
ft-Ib)
"
Control
arm
bushing
carrier
to
body
..........
...
.
.....
.
..
..
47
Nm
(34
ft-Ib)
Page 267 of 759
320
Steering
and
Wheel
Alignment
GENERAL
...
.
.
.
...
.
....
.
.
.
.
.
.
.
.
.
...
.
.
320-1
Outer
tie
rod
end,
replacing
.
...
.
.
.
.
.
.
.
...
.
320-4
Tie
rod,
replacing
.
.
.
.
.
.
.
.......
.
.
.
.
.
...
.
320-5
STEERING
WHEEL
320-1
Steering
wheel,
removing
and
installing
.....
320-1
WHEEL
ALIGNMENT
.
.
.
.........
.
.....
.320-5
POWER
STEERING
SYSTEM
.
.
.
.
.
.
.....
320-2
Front
Toe-in
and
Toe
Difference
Angle
.
.
...
.
320-6
Power
steering
pump,
Rear
Toe-in
.
.
.
.
.
.
.
...
.
................
320-6
removing
and
installing
..
.
.
.
.
.
.
.
.
.
.....
320-2
Wheel
Alignment
Specifications
.....
.
......
320-6
Power
steering
system,
bleeding
and
filling
.
.
320-3
STEERING
GEAR
.
.
.
.
...
.
.
.
.
.
.
.
.
.
.....
320-3
Steering
gear
rack,
removing
and
installing
.
...
.
..
.
..
..
..
.
..
.
320-3
GENERAL
STEERING
WHEEL
This
repair
group
covers
servicing
of
the
mechanical
and
The
BMW
E36
is
equipped
with
an
SRS
airbag
mounted
in
hydraulic
components
of
the
steering
system,
including
wheel
the
steering
wheel
.
Improper
handling
of
the
airbag
could
alignment
information
.
cause
serious
injury
.
The
airbag
is
an
explosivedevice
and
should
be
treated
with
extreme
caution
.
Always
follow
the
air-
The
variable-assist
power
steering
system
consistsof
an
bag
removal
procedure
as
outlined
in
721
Airbag
System
engine-driven
hydraulic
pump,
a
rack-and-pinion
steering
(SRS)
.
gear
assembly
with
an
integral
hydraulic
control
valve,
and
connecting
linkage
to
the
road
wheels
.
WARNING-
"
The
BMW
Supplemental
Restraint
System
(SRS)
At
lowspeeds,
maximum
power
assist
is
provided
to
ease
is
complex
and
special
precautions
must
be
ob-
parking
and
city
driving
.
At
high
speeds,
assist
is
reduced
to
served
when
servicing
.
Serious
injury
may
result
ensure
stability
.
The
power
steering
system
varies
assist
if
system
service
is
attempted
by
persons
unfa-
based
on
engine
speed
.
miliar
with
the
BMW
SRS
and
its
approved
ser-
vice
procedures
.
BMW
specifies
that
all
ING-
inspection
and
service
shouldbe
performed
by
WARN
an
authorized
BMW
dealer
.
"
Do
not
reuse
self-locking
nuts
.
They
are
de-signed
to
beused
only
once
and
may
failif
re-
"
BMW
Supplemental
Restraint
Systems
(SRS)
used
.
Always
replace
them
with
new
locking
nuts
.
are
equipped
with
a
back-up
power
supply
inside
the
SRS
control
module
.
A
10minute
waiting
"
Do
not
ínstall
bolts
and
nuts
coated
with
under-
shouldbe
observed
after
the
battery
cable
has
coating
wax,
as
correct
tightening
torque
cannot
been
disconnected
.
This
will
allow
the
reserve
be
assured
.
Always
clean
the
threads
with
sol-
power
supply
to
discharge
.
vent
before
installation,
or
install
new
parts
.
"
Do
not
attempt
to
weldor
straighten
any
steering
components
.
Always
replace
damaged
parts
.
NOTE-
For
information
on
steering
column-mounted
switches
and
the
ignition
lock,
see
612
Switches
and
Electrical
Accessories
.
STEERING
AND
WHEEL
ALIGNMENT
320-1
Caster
and
Camber
.
.
.
.
.
...........
.
....
320-5
TABLES
a
.
Front
Wheel
Alignment
Specifications
.
...
.......
320-6
b
.
Rear
Wheel
Alignment
Specifications
.
...
.......
320-6
Steering
wheel,
removing
and
installing
1
.
Center
steering
wheel
.
Make
sure
front
wheelsare
pointed
straight
ahead
.
2
.
Disconnect
negative
(-)
cable
from
battery
and
cover
terminal
with
insulating
material
.
CAUTION-
Prior
to
disconnectiog
the
battery,
read
the
battery
disconnection
cautions
given
at
the
front
of
this
manual
on
page
viii
.
STEERING
WHEEL
Page 268 of 759
320-2
STEERING
AND
WHEEL
ALIGNMENT
3
.
Carefully
remove
airbag
from
front
of
steering
wheel
.
See
721
Airbag
System
(SRS)
.
Store
airbag
unit
in
a
safe
place
.
WARNING-
Improper
handling
of
theaírbag
could
cause
seri-
ous
ínjury
.
Store
theaírbag
with
the
horn
pad
facing
up
.
If
stored
facing
down,
accidental
deployment
could
propel
it
vlolently
into
the
air,
causíng
ínjury
.
4
.
Remove
steering
wheel
center
bolt
.
Lightly
punch
mark
or
scribe
position
of
steering
wheel
to
steering
column
shaft
.
See
Fig
.
1
.
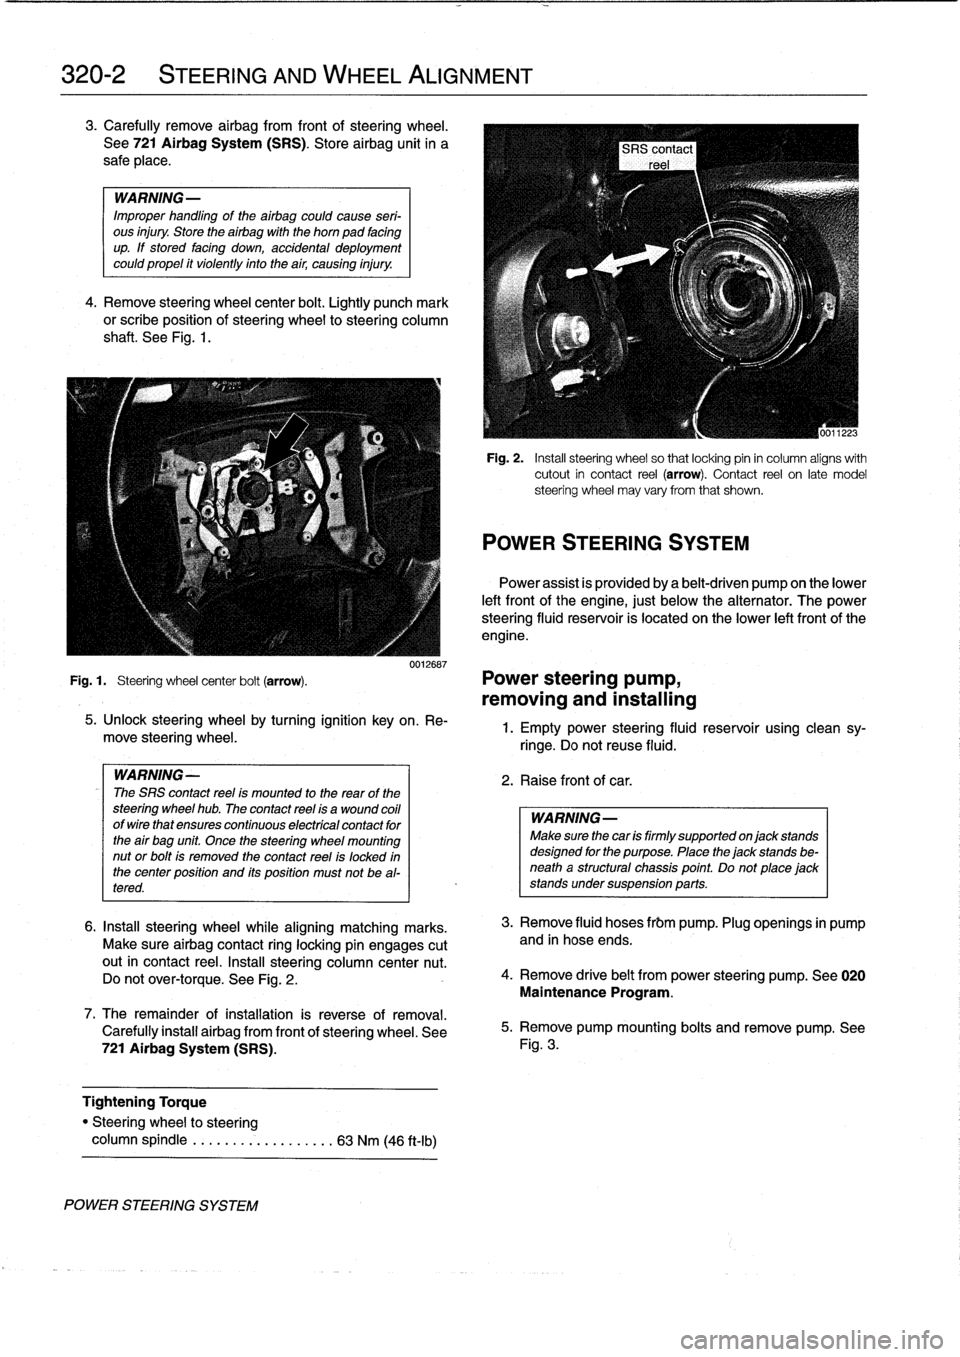
0012687
Fig
.
1
.
Steering
wheel
center
bolt
(arrow)
.
Power
steering
pump,
removing
and
installing
POWER
STEERING
SYSTEM
5
.
Unlock
steering
wheel
by
turning
ignition
key
on
.
Re-
move
steering
wheel
.
WARNING-
The
SRS
contact
reel
ís
mounted
to
the
rear
of
the
steering
wheel
hub
.
The
contact
reel
ís
a
wound
coil
ofwirethat
ensures
continuous
electrícal
contact
for
the
air
bag
unit
Once
the
steering
wheel
mounting
nut
or
bolt
is
removed
the
contact
reel
is
locked
in
the
center
position
and
its
position
must
not
be
al-
tered
.
6
.
Insta¡¡
steering
wheel
while
aligning
matching
marks
.
Make
sure
airbag
contact
ring
locking
pin
engages
cutout
in
contact
reel
.
Insta¡¡
steering
column
center
nut
.
Do
not
over-torque
.
See
Fig
.
2
.
7
.
The
remainder
ofinstallation
is
reverse
of
removal
.
Carefully
install
airbag
from
front
of
steering
wheel
.
See
721
Airbag
System
(SRS)
.
Tightening
Torque
"
Steering
wheel
to
steering
column
spindle
...
..
..
.
..........
63
Nm
(46
ft-Ib)
Fig
.
2
.
Insta¡¡
steering
wheel
so
that
locking
pin
in
column
aligns
with
cutout
in
contact
reel
(arrow)
.
Contact
reel
on
late
model
steering
wheel
may
vary
from
that
shown
.
POWER
STEERING
SYSTEM
Power
assist
is
províded
by
a
belt-driven
pump
on
the
lower
left
front
of
the
engine,
just
below
the
alternator
.
The
power
steering
fluid
resenroir
is
located
on
the
lower
left
front
of
the
engine
.
1
.
Empty
power
steering
fluid
reservoir
usingclean
sy-
ringe
.
Do
not
reuse
fluid
.
2
.
Raise
front
of
car
.
WARNING
Make
sure
thecar
is
firmly
supportedon
jack
stands
designed
for
the
purpose
.
Place
the
jack
stands
be-
neatha
structural
chassis
point
.
Do
not
place
jack
stands
undersuspension
parts
.
3
.
Remove
fluid
hoses
frbm
pump
.
Plug
openings
in
pump
and
in
hose
ends
.
4
.
Remove
drive
belt
from
power
steering
pump
.
See
020
Maintenance
Program
.
5
.
Remove
pump
mounting
bolts
and
remove
pump
.
See
Fig
.
3
.
Page 269 of 759
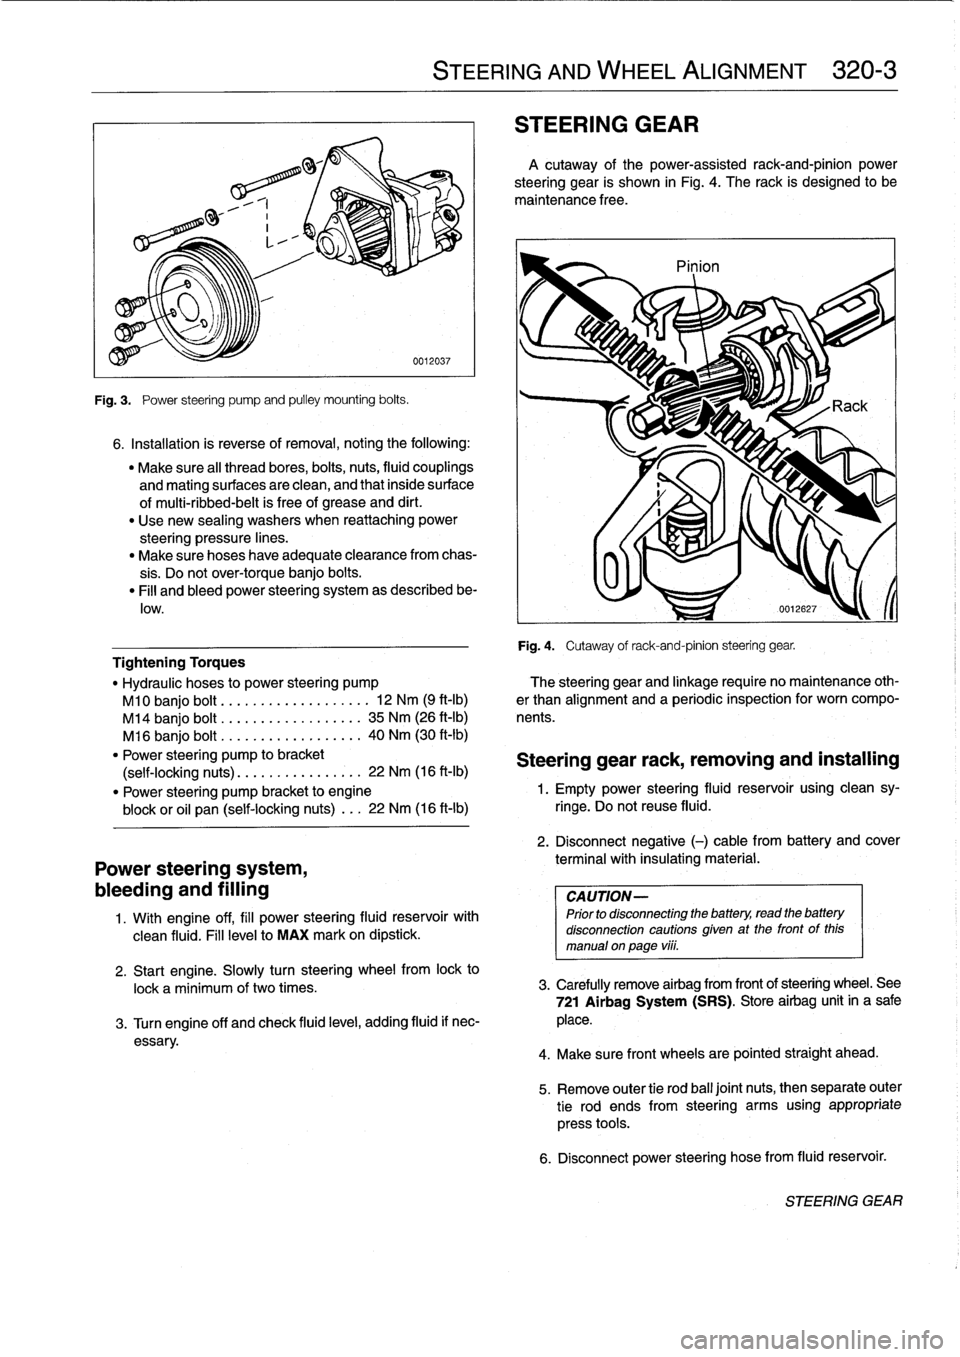
Fig
.
3
.
Power
steering
pump
and
pulley
mounting
bolts
.
6
.
Installation
is
reverse
of
removal,
noting
the
following
:
"
Make
sure
al¡
thread
bores,
bolts,
nuts,
fluid
couplings
and
mating
surfaces
are
clean,
and
that
inside
surface
of
multi-ribbed-belt
is
free
of
grease
and
dirt
.
"
Use
new
sealing
washers
when
reattaching
power
steering
pressure
lines
.
"
Make
sure
hoses
have
adequate
clearance
from
chas-
sis
.
Do
not
over-torque
banjo
bolts
.
"
Fill
and
bleed
power
steering
system
as
described
be-
low
.
Power
steering
system,
bleeding
and
filling
1
.
Wíth
engine
off,
fill
power
steering
fluid
reservoir
with
clean
fluid
.
Fill
levelto
MAX
mark
on
dipstick
.
STEERING
AND
WHEEL
ALIGNMENT
320-
3
STEERING
GEAR
A
cutaway
of
the
power-assisted
rack-and-pinion
power
steering
gear
is
shown
in
Fig
.
4
.
The
rack
is
designed
to
be
maintenance
free
.
Pinion
Fig
.
4
.
Cutaway
of
rack-and-pinion
steering
gear
.
Tightening
Torques
"
Hydraulic
hoses
to
power
steering
pump
?he
steering
gear
and
linkage
require
no
maintenance
oth-
M10
banjo
bolt
.........
..
.
...
...
.
12
Nm
(9
ft-Ib)
er
than
alignment
and
a
periodic
inspection
for
worn
compo
M14
banjo
bolt
..............
..
..
35
Nm
(26
ft-Ib)
nents
.
M16
banjo
bolt
..............
...
.
40
Nm
(30
ft-Ib)
"
Power
steering
pump
to
bracket
Steering
gear
rack,
removing
and
installing
(self-locking
nuts)
.............
..
.
22
Nm
(16
ft-Ib)
"
Power
steering
pump
bracket
to
engine
1
.
Empty
power
steering
fluid
reservoir
using
clean
sy-
block
or
oil
pan
(self-locking
nuts)
...
22
Nm
(16
ft-lb)
ringe
.
Do
not
reuse
fluid
.
2
.
Disconnect
negative
(-)
cable
from
battery
and
cover
terminal
with
insulating
material
.
CAUTION-
Prior
to
disconnectiog
the
battery,
read
the
battery
disconnection
cautions
given
at
the
front
of
this
manual
on
page
viii
.
2
.
Start
engine
.
Slowly
turn
steering
wheelfrom
lock
to
lock
a
minimum
of
two
times
.
3
.
Carefully
remove
airbag
from
frontof
steering
wheel
.
See
721
Airbag
System
(SRS)
.
Store
airbag
unit
in
a
sale
3
.
Turn
engine
off
and
check
fluid
leve¡,
adding
fluid
if
nec-
place
.
essary
.
4
.
Make
sure
front
wheelsare
pointed
straight
ahead
.
5
.
Remove
outer
tie
rod
ball
joínt
nuts,
thenseparate
outer
tie
rod
ends
from
steering
arms
using
appropriate
press
tools
.
6
.
Disconnect
power
steering
hose
from
fluid
reservoir
.
STEERING
GEAR
Page 291 of 759
Brake
rotor,
removing
and
installing
.
.
.
.
.
.
.
.
340-7
MASTER
CYLINDER
............
.
.
.
.
.
.
.340-7
Master
cylinder,
removing
and
installing
.
...
.
340-7
GENERAL
TROUBLESHOOTING
WARNING
-
"
Although
semi-metallic
and
metallic
Brake
friction
materials
in
Brake
pads
or
shoes
no
longer
con-
tain
asbestos,
they
produce
dangerous
dust
.
"
Brake
fluid
is
poisonous,
highly
corrosive
and
dangerous
to
the
environment
Wear
safety
glasses
and
rubber
gloves
when
working
with
Brake
fluid
.
Do
not
siphonBrake
fluid
with
your
mouth
.
Immediately
clean
away
any
fluid
spilled
on
painted
surfaces
and
wash
with
water,
asBrake
fluid
will
remove
paint
.
"
Always
use
new
Brake
fluid
froma
fresh,
un-
opened
container
.
Brake
fluid
will
absorb
mois-
ture
from
the
air
.
This
canlead
to
corrosion
problems
in
the
brakingsystem,
and
will
also
low-
er
the
Brake
fluid's
boiling
point
.
Dispose
of
Brake
fluid
properly
.
"
Do
notreuse
self-locking
nuts,bolts
or
fasteners
.
They
are
designed
to
be
used
only
once
and
may
failif
reused
.
Always
replace
them
with
new
self-
locking
fasteners
.
BMW
E36
models
areequipped
with
vacuum
power-assist-
ed
four-wheel
disc
brakes
with
an
integral
Antilock
Brake
Sys-
tem
(ABS)
.
Single-pistoncalipers
act
on
solid
or
vented
front
rotors
and
solid
rear
rotors
.
A
brake
pad
wear
sensor
for
each
axle
indicates
when
brake
padsneed
replacement
.
The
dual
drum-type
parking
brakesystem
is
integrated
with
the
rear
brake
rotors
.
NOTE-
M3
models
havevented
directional
Brake
rotors
on
the
rearaxle
as
well
ason
the
front
.
340
Brakes
BRAKES
340-1
GENERAL
.
.
.
.
.
.
.........
.
.
.
..........
340-1
BRAKE
BOOSTER
.........
.
.
.
.
.
...
.
.
.
.
340-8
TROUBLESHOOTING
.......
.
......
.
...
340-1
Brake
booster,
removing
and
installing
....
.
.
340-8
PARKING
BRAKE
.
.....
.
...
.
.
.
.....
.
.
.
340-10
BLEEDING
BRAKES
.
.
.
.
.
.
.
.
..........
340-3
Parking
brake,adjusting
.
.
.
.
.
.
.
.
.
.
.....
.
340-10
Pressure
bleeding
brakes
Parking
brake
shoes,
removing
and
installing
.
340-11(except
cars
with
AST)
.
.
.
.
.
.
.
.
.
...
.
.
.
.
.340-3
Parking
Brake
cable,
replacing
.
.
.
.
.
.
.
.
.
.
.
.
340-11
BRAKE
PADS,
CALIPERS,
ANTILOCK
BRAKE
SYSTEM
(ABS)
.
.
.
.340-11
AND
ROTORS
..........
.
.......
.
.
.
.
.
.
.
340-3
ABS
System
Inspection
.
...
.
.......
.
.
.
..
340-12
Brake
pads,
replacing
............
.
.
.
.
.
.
.
340-4
ABS
wheel
speed
sensors,
replacing
.
.
.
.
..
340-12
Brake
caliper,
removing
and
installing
.
..
..
.
340-6
TABLES
a
.
Brake
System
Troubleshooting
.....
...
.
.
.....
.340-2
b
.
Brake
Rotor
Reconditioning
Specifications
.
.....
.340-7
Brakeperformance
is
mainly
affected
by
three
things
:
the
leve¡
and
condition
of
the
brake
fluid,
the
system's
abilíty
to
create
and
maintain
hydraulic
pressure,
and
the
condition
of
the
friction
components
.
Air
in
the
Brake
fluid
will
make
the
Brake
pedal
feel
spongy
during
braking
or
will
increase
the
Brake
pedalforce
required
to
stop
.
Fluid
contaminated
by
moisture
or
dirt
can
corrode
the
system
.
Inspect
the
Brake
fluid
inside
the
reservoir
.
Ifit
is
dirty
or
murky,
or
is
over
a
year
old,
the
fluid
should
be
replaced
.
Visually
check
the
hydraulic
system
startingat
the
master
cylinder
.
To
check
the
function
of
the
master
cylinder
hold
the
brake
pedal
down
hard
with
the
engine
running
.
The
pedal
should
feelsolid
and
stay
solid
.
If
the
pedal
slowly
falls
to
the
floor,
either
the
master
cylinder
is
leaking
internally,
or
fluid
is
leaking
externally
.
If
no
leaks
canbe
found,
the
master
cylin-
der
is
faulty
and
should
be
replaced
.
Check
all
Brake
fluid
lines
and
couplings
for
leaks,
kinks,
chafing
and
corrosion
.
Check
the
Brake
booster
by
pumping
the
Brake
pedal
ap-
proximately
10
times
with
the
engine
off
.
Hold
the
pedal
down
and
start
the
engine
.
The
pedal
should
fa¡¡
slightly
.
If
not,
check
for
any
visiblefaults
before
suspecting
a
faulty
brake
booster
.
Check
for
strong
vacuum
at
the
vacuum
hose
fitting
at
the
booster,
and
check
the
non-retum
valve
for
one-way
flow
.
Worn
or
contaminated
brake
pads
will
cause
poor
braking
performance
.
Oil-contaminated
or
glazed
pads
will
cause
stopping
distances
to
increase
.
Inspect
the
rotors
for
glazing,
discoloration
and
scoring
.
Steering
wheel
vibration
while
braking
at
speed
is
often
caused
by
warped
rotors,
but
can
also
be
caused
byworn
suspension
components
.
TROUBLESHOOTING
Page 298 of 759
340-
8
BRAKES
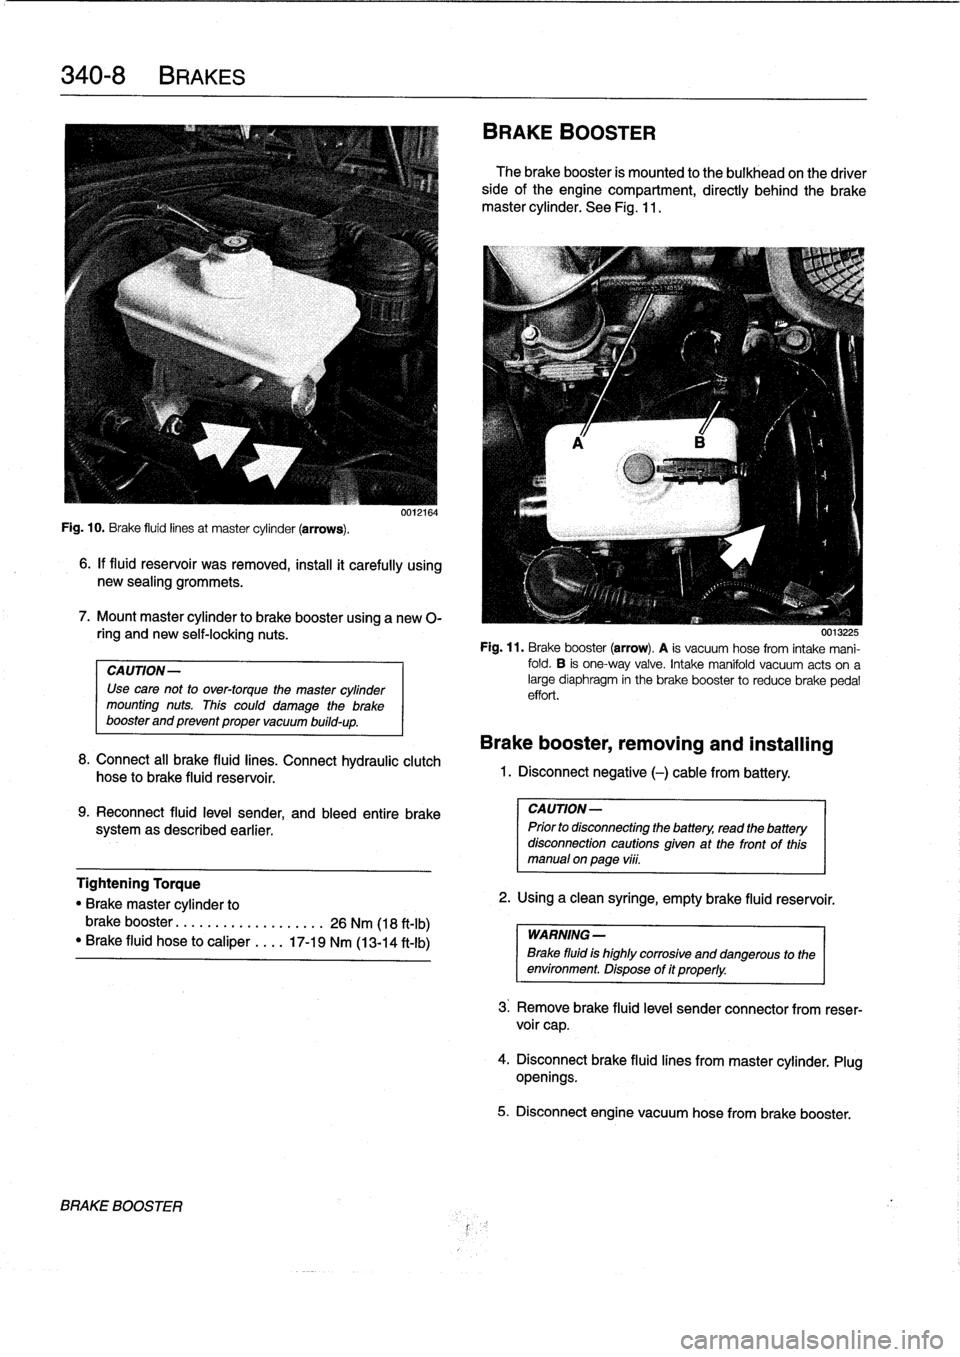
Fig
.
10
.
Brake
fluid
linesat
master
cylinder
(arrows)
.
6
.
If
fluid
reservoir
was
removed,
install
it
carefully
using
new
sealing
grommets
.
7
.
Mount
master
cylinder
to
brake
booster
using
a
new
0-
ring
and
new
self-locking
nuts
.
CAUTION-
Use
cave
not
to
over-torque
the
master
cylinder
mounting
nuts
.
This
could
damage
the
brake
booster
and
prevent
proper
vacuum
build-up
.
0012164
8
.
Connect
all
brake
fluid
lines
.
Connect
hydraulic
clutch
hose
to
brake
fluid
reservoir
.
9
.
Reconnect
fluid
leve¡
sender,
and
bleed
entire
brake
systemas
described
earlier
.
BRAKE
BOOSTER
BRAKE
BOOSTER
The
brake
booster
is
mounted
to
the
bulkhead
on
the
driver
sideofthe
engine
compartment,
directly
behind
the
brake
master
cylinder
.
See
Fig
.
11
.
0015225
Fig
.
11
.
Brake
booster
(arrow)
.
A
is
vacuum
hose
from
intake
mani-
fold
.
B
is
one-way
valve
.
Intake
manifold
vacuum
acts
ona
large
diaphragm
in
the
brake
booster
to
reducebrake
pedal
effort
.
Brake
booster,
removing
and
installing
1
.
Disconnect
negative
(-)
cable
from
battery
.
CAUTION-
Prior
to
disconnecting
the
battery,
read
the
battery
disconnection
cautions
given
at
the
front
of
this
manual
onpage
vi¡¡
.
Tightening
Torque
"
Brake
master
cylinder
to
2
.
Using
a
clean
syringe,
empty
brake
(luid
reservoir
.
brake
booster
.....
..
.
..
.........
26
Nm
(18
ft-Ib)
WARNING-
"
Brake
fluid
hose
to
caliper
....
17-19
Nm
(13-14
ft-Ib)
Brake
fluid
is
highly
corroslve
and
dangerous
to
the
environment
.
Dispose
of
it
properly
.
3
.
Remove
brake
fluid
level
sender
connector
from
reser-
voir
cap
.
4
.
Disconnectbrake
fluid
lines
from
master
cylinder
.
Plug
openings
.
5
.
Disconnect
engine
vacuum
hose
from
brake
booster
.
Page 299 of 759
6
.
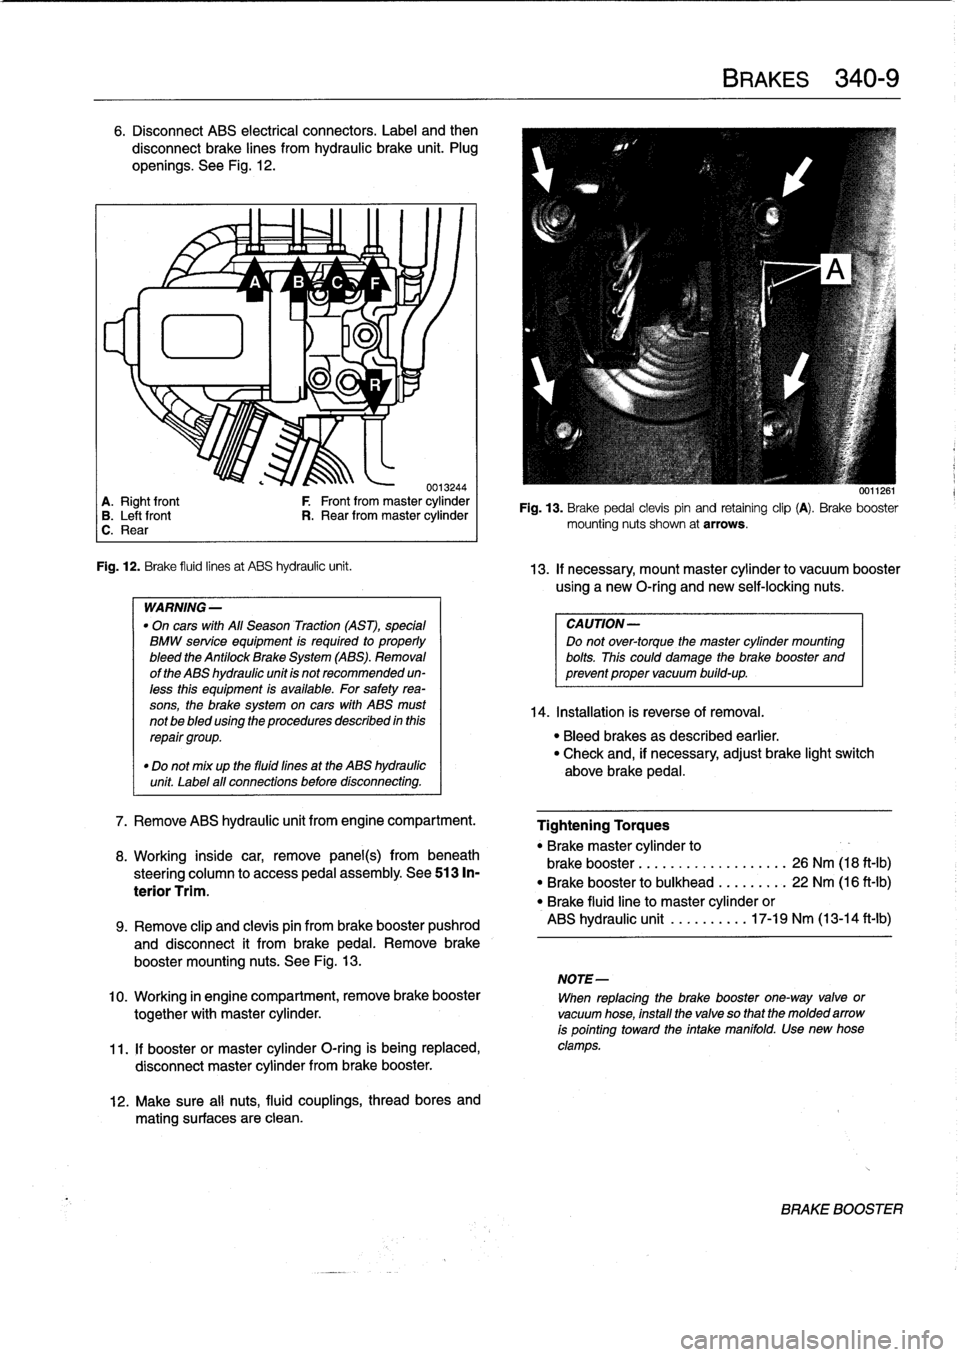
Disconnect
ABS
electrical
connectors
.
Label
and
then
disconnect
brake
lines
from
hydraulic
brake
unit
.
Plug
openíngs
.
See
Fig
.
12
.
~
~
A
1/
B
'1v
C
~
F
lu
11
-ri
J
.
0013244
A
.
Right
front
F
Front
from
master
cylinder
B
.
Leftfront
R
.
Rear
from
master
cylinder
C
.
Rear
Fig
.
12
.
Brake
fluid
linesat
ABS
hydraulic
unit
.
WARNING
-
"
On
cars
with
All
Season
Traction
(AST),
special
BMW
service
equipment
is
required
to
properly
bleed
the
Antilock
Brake
System
(ABS)
.
Removal
of
the
ABS
hydraulic
unit
is
not
recommended
un-
less
this
equipment
is
available
.
For
safetyrea-
sons,
the
brake
system
on
cars
with
ABS
must
not
be
bled
using
the
procedures
described
inthis
repair
group
.
"
Do
not
mix
up
the
fluid
fines
at
the
ABS
hydraulic
unit
Label
all
connections
before
disconnecting
.
7
.
Remove
ABS
hydraulic
unit
from
engine
compartment
.
8
.
Working
inside
car,
remove
panel(s)
frombeneath
steering
column
to
access
pedal
assembly
.
See513
In-
terior
Trim
.
12
.
Make
sure
al¡
nuts,
fluid
couplings,
thread
bores
and
mating
surfaces
are
clean
.
BRAKES
340-
9
0011261
Fig
.
13
.
Brake
pedal
clevispin
and
retaining
clip
(A)
.
Brake
booster
mounting
nuts
shown
at
arrows
.
13
.
If
necessary,
mount
master
cylinder
to
vacuum
booster
using
a
new
O-ríng
and
newself-locking
nuts
.
CAUTION-
Do
not
over-torque
the
master
cylinder
mounting
bolts
.
This
could
damage
the
brake
booster
and
prevent
proper
vacuum
build-up
.
14
.
Installation
is
reverse
of
Rmoval
.
"
Bleed
brakes
as
described
earlier
.
"
Check
and,
if
necessary,
adjust
brake
light
switch
above
brake
pedal
.
Tightening
Torques
"
Brakemaster
cylinder
to
brake
booster
...........
.
..
..
...
26
Nm
(18
ft-Ib)
"
Brake
booster
to
bulkhead
.
.
..
..
...
22
Nm
(16
ft-Ib)
"
Brake
fluidline
to
master
cylinder
or
ABS
hydraulic
unit
.......
.
..
17-19
Nm
(13-14
ft-lb)
9
.
Remove
clip
and
clevis
pin
from
brake
booster
pushrod
and
disconnect
it
from
brakepedal
.
Remove
brake
booster
mounting
nuts
.
See
Fig
.
13
.
NOTE-
10
.
Working
in
engine
compartment,
remove
brake
booster
When
replacing
the
brake
booster
one-way
valve
or
together
with
master
cylinder
.
vacuum
hose,
install
the
valve
so
that
the
molded
arrow
is
pointing
toward
the
intake
manifold
.
Use
new
hose
11
.
If
booster
or
master
cylinder
O-ring
is
being
replaced,
clamps
.
disconnect
master
cylinder
from
brake
booster
.
BRAKE
BOOSTER
Page 304 of 759
400-2
BODY-GENERAL
4-door
Sedan
Coupe
-
saas3
.7""
351
/
37
.3
O
I
x
`-193
267
o
oa
'3281
model
"M3
model
Convertible
BODYASSEMBLY
55
ass
.e
iss
""
-
66
.9
-
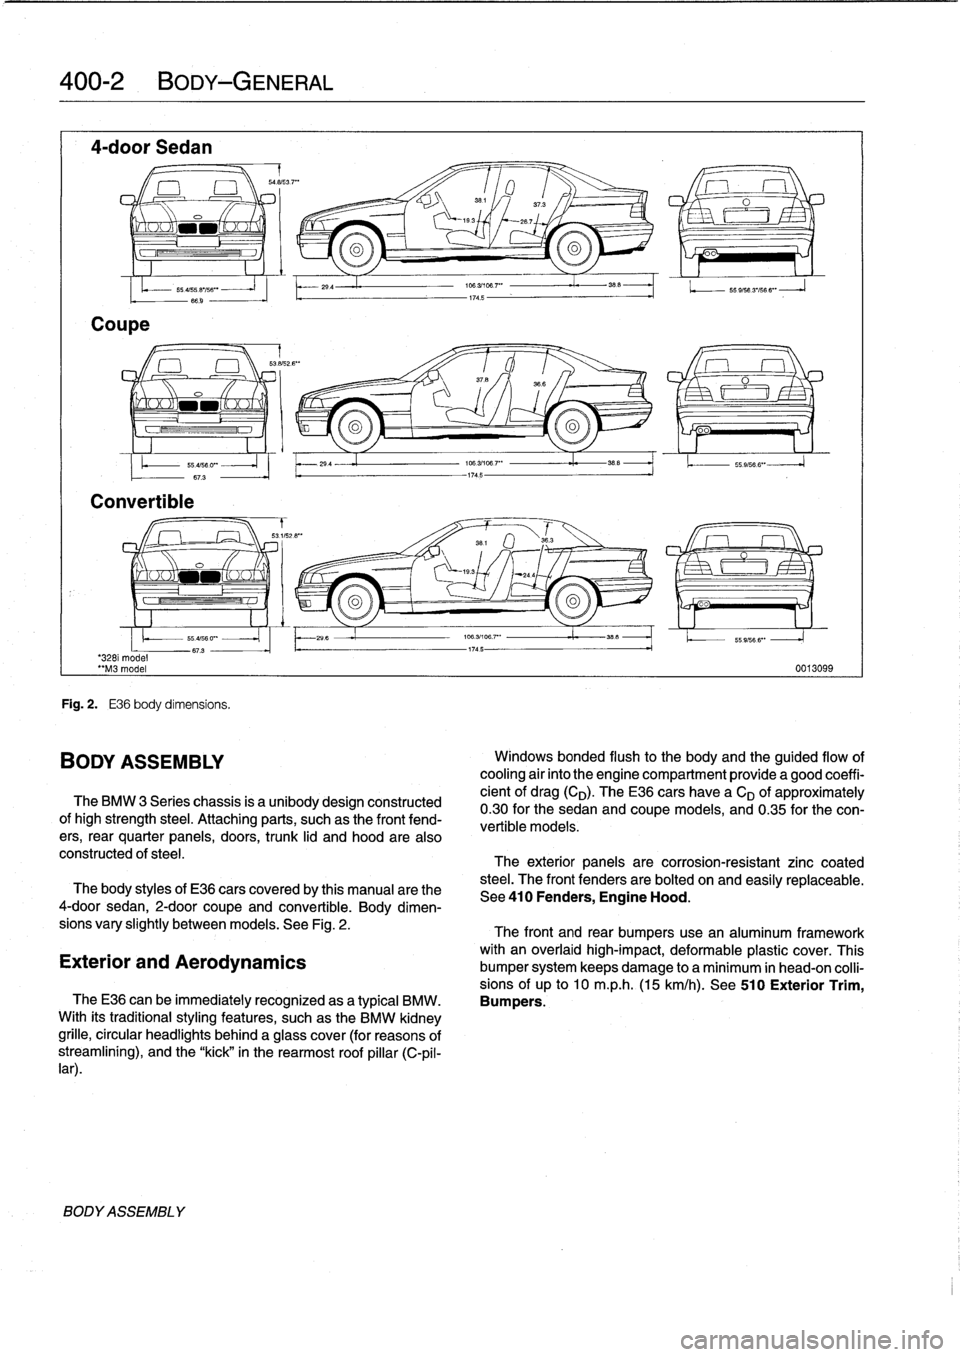
Fig
.
2
.
E36
body
dimensíons
.
BODY
ASSEMBLY
29
.4
29
4
The
BMW
3
Series
chassis
is
a
unibodydesign
constructed
ofhigh
strength
steel
.
Attaching
parts,
suchas
the
front
fend-
ers,
rear
quarter
panels,
doors,
trunk
lid
and
hood
are
also
constructed
of
steel
.
706
.31108
.7"
I
38
.5
174
.5
174
.5
O
oo
196
.3/106
.7'
"
35_5
1.
.
55
.9,566
".
106
.3/196
.7""
i.
358
-1745-
55
9/56
3'/56
6"
-
J
0013099
Windows
bonded
flush
to
the
body
and
the
guided
flow
of
cooling
air
into
the
engine
compartment
provide
a
good
coeffi-
cient
of
drag(CD)
.
TheE36
cars
have
a
CD
of
approximately
0
.30for
the
sedan
and
coupe
models,
and
0
.35
for
the
con-
vertible
models
:
The
exterior
panels
are
corrosion-resistant
zinc
coated
steel
.
The
front
fenders
are
bolted
on
and
easily
replaceabie
.
The
body
styles
of
E36
cars
coveredby
this
manual
arethe
See410
Fenders,
Engine
Hood
.
4-door
sedan,
2-door
coupe
and
convertible
.
Body
dimen-
sions
vary
slightly
betweenmodels
.
See
Fig
.
2
.
The
front
and
rear
bumpers
use
an
aluminum
framework
with
an
overlaid
high-impact,
deformable
plastic
cover
.
This
Exterior
and
Aerodynamics
bumper
system
keeps
damage
to
a
minimum
in
head-on
colli-
sions
of
up
to
10
m
.p
.h
.
(15
km/h)
.
See
510
Exterior
Trim,
TheE36
can
be
immediatelyrecognized
asa
typical
BMW
.
Bumpers
.
With
its
traditionalstyling
features,
suchas
the
BMW
kidney
grille,
circular
headlights
behind
a
glass
cover
(for
reasons
of
streamliníng),
and
the
"kick"
in
the
rearmost
roof
pillar
(C-pil-
lar)
.
Page 307 of 759
Ambient
temperaturelclock
MÍM
Aa
.Mi}rm
-Mil"
IMua~naa~u~itacar
"
za
.~
Central
Body
Electronics
0013028
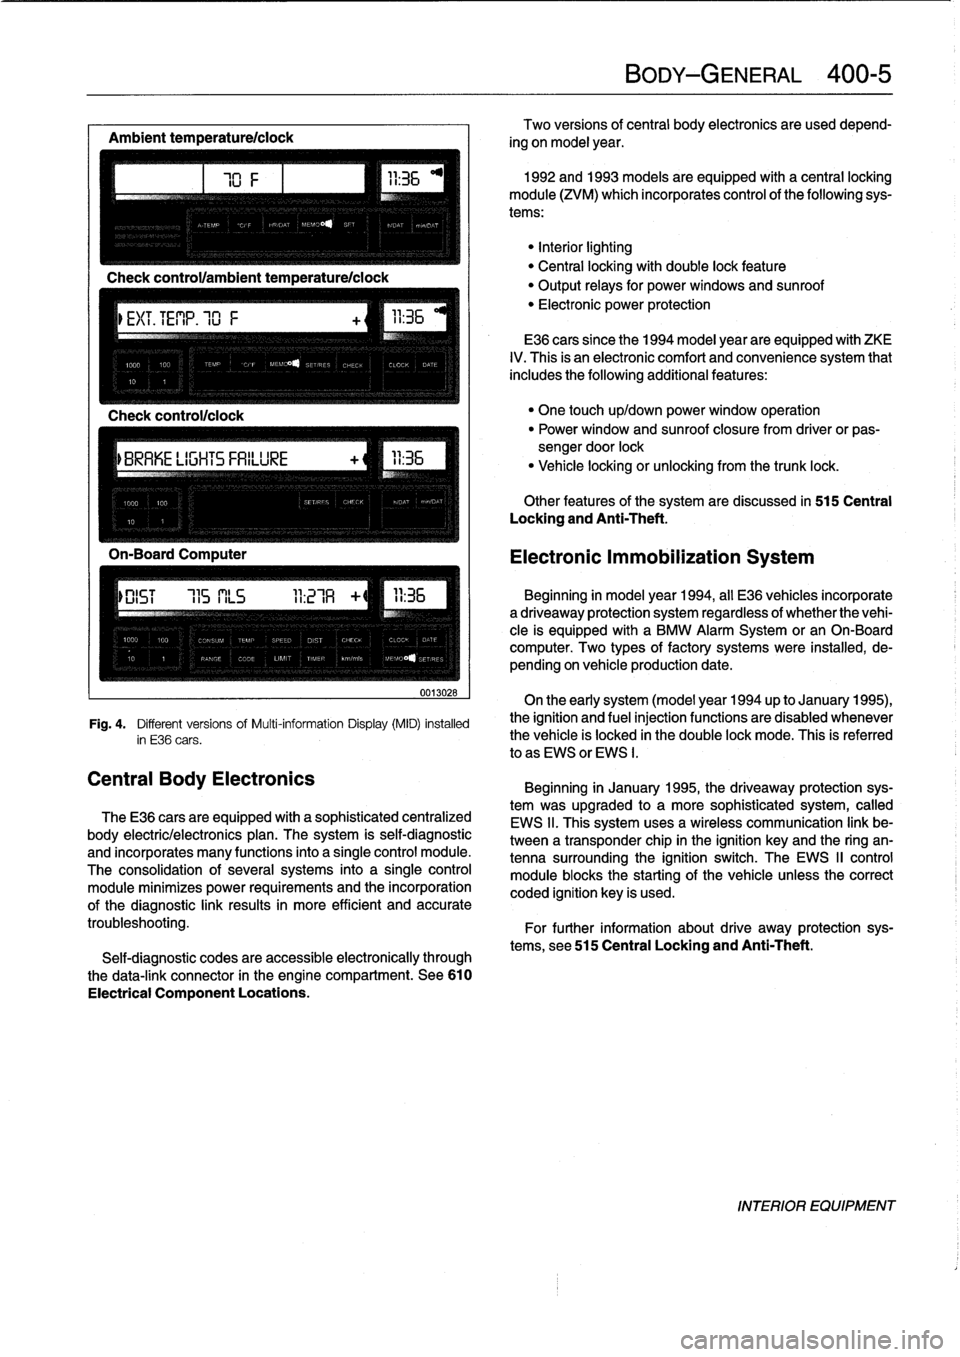
Fig
.
4
.
Different
versionsof
Multi-information
Display(MID)
installed
in
E36
cars
.
The
E36
cars
are
equipped
with
a
sophisticated
centralized
body
electric/electronics
plan
.
The
system
is
self-diagnostic
and
incorporates
many
functions
into
a
single
control
module
.
The
consolidation
of
several
systems
into
a
single
control
module
minimizes
power
requirements
and
the
incorporation
of
the
diagnostic
link
results
in
more
efficient
and
accurate
troubleshooting
.
Self-diagnostic
codes
are
accessible
electronically
through
the
data-link
connector
in
the
engine
compartment
.
See610
Electrical
Component
Locations
.
BODY-GENERAL
400-
5
Two
versions
of
central
body
electronics
are
used
depend-
ing
on
model
year
.
1992
and
1993
models
are
equipped
with
a
central
locking
module
(ZVM)
which
incorporates
control
of
the
following
sys-
tems
:
"Interiorlighting
"
Central
locking
with
double
lock
feature
"
Output
relays
for
powerwindows
and
sunroof
"
Electronic
power
protection
E36
cars
since
the
1994
model
year
are
equipped
with
ZKE
IV
.
This
is
an
electronic
comfort
and
convenience
system
that
includes
the
following
additional
features
:
"
One
touch
up/down
power
window
operation
"
Power
window
and
sunroof
closure
from
driver
or
pas-
sengerdoor
lock
"
Vehicle
locking
or
unlocking
from
the
trunk
lock
.
Other
features
of
the
system
are
discussed
in
515
Central
Locking
and
Anti-Theft
.
Electronic
Immobilization
System
Beginning
in
model
year
1994,
all
E36
vehicles
incorporate
adriveaway
protection
system
regardless
of
whether
the
vehi-
cle
is
equipped
with
a
BMW
Alarm
System
or
an
On-Board
computer
.
Two
types
of
factory
systems
were
installed,
de-
pending
on
vehicle
production
date
.
On
the
early
system
(model
year
1994
up
to
January
1995),
the
ignition
and
fuel
injection
functions
are
disabled
whenever
the
vehicle
is
locked
in
the
double
lock
mode
.
This
is
referred
lo
as
EWS
or
EWS
I
.
Beginning
in
January
1995,
the
driveaway
protection
sys-
tem
was
upgraded
to
a
more
sophisticated
system,
called
EWS
II
.
This
system
uses
a
wireless
communication
link
be-
tween
a
transponder
chip
in
the
ignition
keyand
the
ring
an-
tenna
surrounding
the
ignition
switch
.
The
EWS
II
control
module
blocksthe
starting
of
the
vehicle
unlessthe
correct
coded
ignition
key
is
used
.
For
further
information
about
drive
away
protection
sys-
tems,
see
515
Central
Locking
and
Anti-Theft
.
INTERIOR
EQUIPMENT