brake light BMW 328I 2000 Owners Manual
[x] Cancel search | Manufacturer: BMW, Model Year: 2000, Model line: 328I, Model: BMW 328I 2000Pages: 189, PDF Size: 1.81 MB
Page 11 of 189
11n
Controls and features
Operation, care and maintenance
Lamps:
Parking lamps/Headlamps82
Dash lighting82
High beams/Parking lamps83
Fog lamps83
Interior lamps83
Reading lamps84
Controlling the climate
for pleasant driving:
Automatic climate control86
Seat heating91
Roller sun blind91
Interior conveniences:
HiFi system92
Glove compartment92
Storage compartments93
Cellular phones95
Ashtray, front95
Cigarette lighter96
Ashtray, rear96
Loading and transporting:
Through-loading system97
Ski bag98
Cargo loading99
Roof-mounted luggage rack100
Special operating instructions:
Break-in procedures104
Driving notes104
Catalytic converter105
Antilock Brake System
(ABS)106
Disc brakes108
Brake system109
Winter operation110
Power steering111
Cellular phones112
Radio reception112
Wheels and tires:
Tire inflation pressures113
Tire condition113
Tire replacement114
Tire rotation115
Wheel and tire
combinations116
Winter tires117
Snow chains117
Approved wheel and tire
specifications118
Under the hood:
Hood120
Engine compartment122
Washer fluids124
Washer nozzles124
Engine oil125
Coolant128
Brake fluid129
Vehicle Identification
Number130
Care and maintenance:
The BMW Maintenance
System131
Caring for your car132
Airbags137
Vehicle storage137
Laws and regulations:
Technical modifications to the
vehicle138
OBD interface socket139
Page 20 of 189
20n
Indicator and warning lamps
Technology that monitors itself
Many of the systems of your BMW
monitor themselves automatically, both
during engine starts and while you are
driving. Indicator and warning lamps
that are identified by "
l
" are tested for
proper functioning whenever the igni-
tion key is turned. They each light up
once for different periods of time.
If a fault should occur in one of these
systems, the corresponding lamp does
not go out after the engine is started, or
it lights up while the vehicle is moving.
You will see how to react to this below.
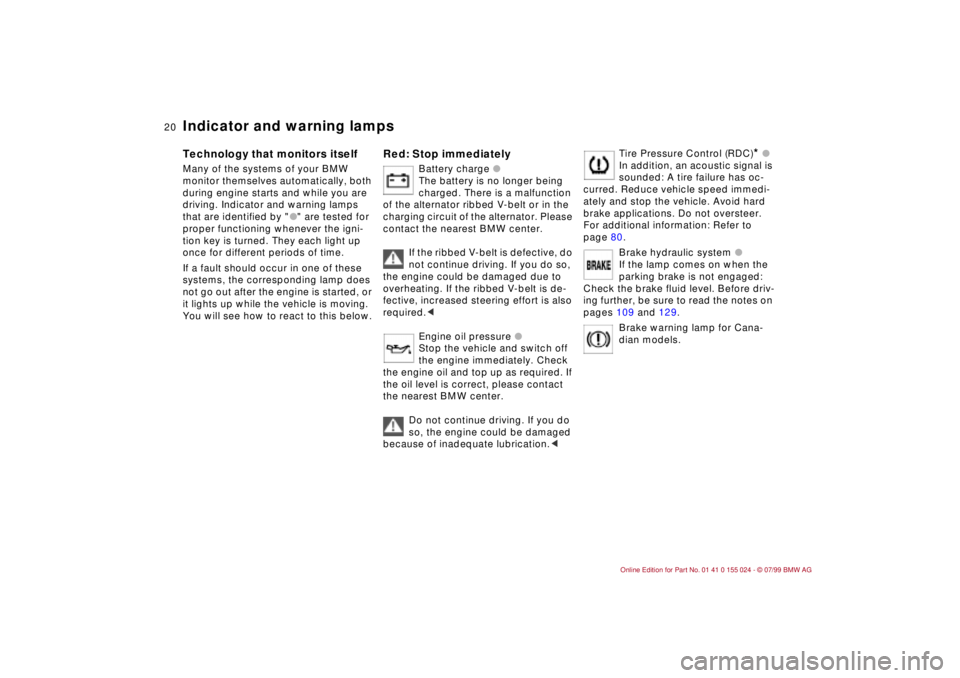
Red: Stop immediately
Battery charge
l
The battery is no longer being
charged. There is a malfunction
of the alternator ribbed V-belt or in the
charging circuit of the alternator. Please
contact the nearest BMW center.
If the ribbed V-belt is defective, do
not continue driving. If you do so,
the engine could be damaged due to
overheating. If the ribbed V-belt is de-
fective, increased steering effort is also
required.<
Engine oil pressure l
Stop the vehicle and switch off
the engine immediately. Check
the engine oil and top up as required. If
the oil level is correct, please contact
the nearest BMW center.
Do not continue driving. If you do
so, the engine could be damaged
because of inadequate lubrication.<
Tire Pressure Control (RDC)
* l
In addition, an acoustic signal is
sounded: A tire failure has oc-
curred. Reduce vehicle speed immedi-
ately and stop the vehicle. Avoid hard
brake applications. Do not oversteer.
For additional information: Refer to
page 80.
Brake hydraulic system l
If the lamp comes on when the
parking brake is not engaged:
Check the brake fluid level. Before driv-
ing further, be sure to read the notes on
pages 109 and 129.
Brake warning lamp for Cana-
dian models.
Page 21 of 189
21n
IndexDataTechnologyRepairsCar careControlsOverview
Indicator and warning lampsYellow: Stop immediately
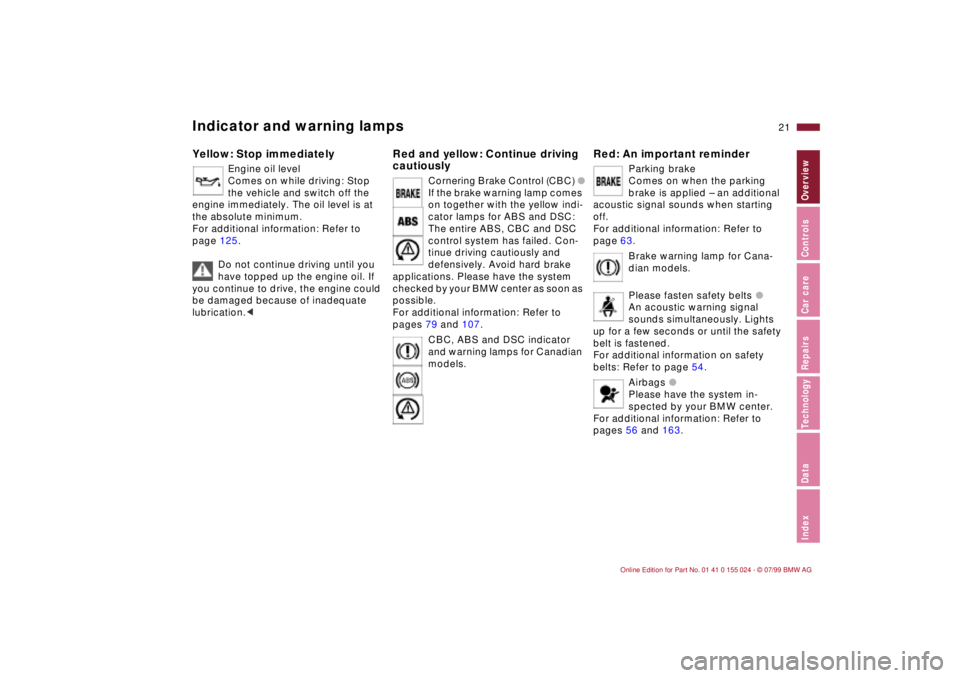
Engine oil level
Comes on while driving: Stop
the vehicle and switch off the
engine immediately. The oil level is at
the absolute minimum.
For additional information: Refer to
page 125.
Do not continue driving until you
have topped up the engine oil. If
you continue to drive, the engine could
be damaged because of inadequate
lubrication.<
Red and yellow: Continue driving
cautiously
Cornering Brake Control (CBC) l
If the brake warning lamp comes
on together with the yellow indi-
cator lamps for ABS and DSC:
The entire ABS, CBC and DSC
control system has failed. Con-
tinue driving cautiously and
defensively. Avoid hard brake
applications. Please have the system
checked by your BMW center as soon as
possible.
For additional information: Refer to
pages 79 and 107.
CBC, ABS and DSC indicator
and warning lamps for Canadian
models.
Red: An important reminder
Parking brake
Comes on when the parking
brake is applied Ð an additional
acoustic signal sounds when starting
off.
For additional information: Refer to
page 63.
Brake warning lamp for Cana-
dian models.
Please fasten safety belts l
An acoustic warning signal
sounds simultaneously. Lights
up for a few seconds or until the safety
belt is fastened.
For additional information on safety
belts: Refer to page 54.
Airbags l
Please have the system in-
spected by your BMW center.
For additional information: Refer to
pages 56 and 163.
Page 23 of 189
23n
IndexDataTechnologyRepairsCar careControlsOverview
Indicator and warning lamps
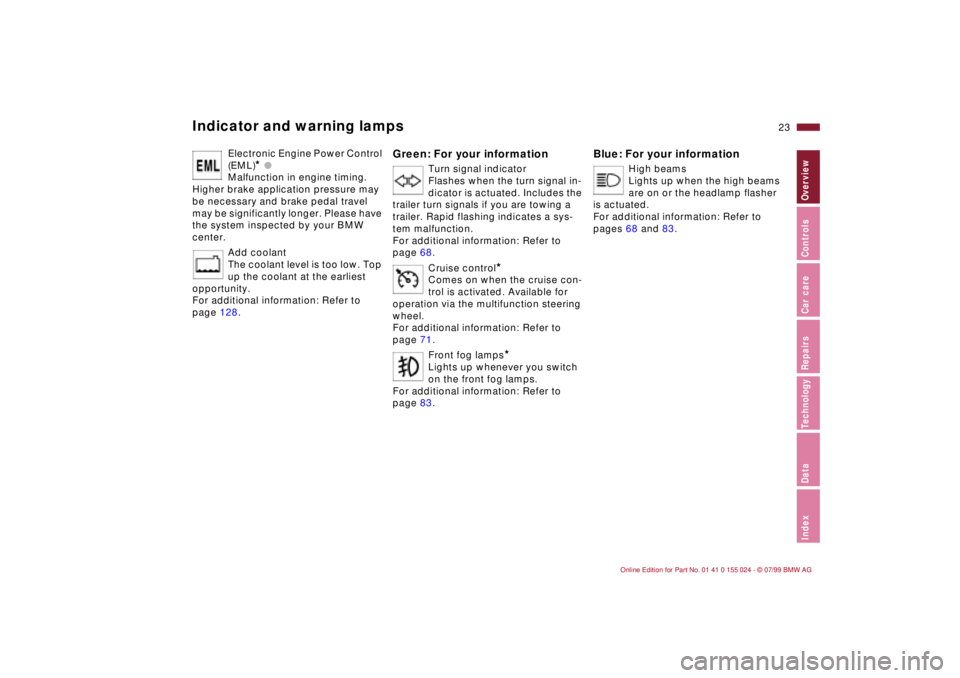
Electronic Engine Power Control
(EML)
* l
Malfunction in engine timing.
Higher brake application pressure may
be necessary and brake pedal travel
may be significantly longer. Please have
the system inspected by your BMW
center.
Add coolant
The coolant level is too low. Top
up the coolant at the earliest
opportunity.
For additional information: Refer to
page 128.
Green: For your information
Turn signal indicator
Flashes when the turn signal in-
dicator is actuated. Includes the
trailer turn signals if you are towing a
trailer. Rapid flashing indicates a sys-
tem malfunction.
For additional information: Refer to
page 68.
Cruise control
*
Comes on when the cruise con-
trol is activated. Available for
operation via the multifunction steering
wheel.
For additional information: Refer to
page 71.
Front fog lamps
*
Lights up whenever you switch
on the front fog lamps.
For additional information: Refer to
page 83.
Blue: For your information
High beams
Lights up when the high beams
are on or the headlamp flasher
is actuated.
For additional information: Refer to
pages 68 and 83.
Page 31 of 189
Overview
Controls and features
Operation, care
and maintenance
Owner service procedures
Technical data
Index Advanced technology
31n
IndexDataTechnologyRepairsCar careControlsOverview
Driving:
Steering/Ignition lock61
Starting the engine61
Switching off the engine62
Parking brake63
Manual transmission64
Automatic transmission with
Steptronic65
Turn signal indicator/Headlamp
flasher68
Wiper/Washer system/Rain
sensor68
Rear window defroster70
Cruise control71
Everything under control:
Odometer73
Tachometer73
Energy Control73
Fuel gauge74
Temperature gauge74
Service Interval Display74
Check Control75
Clock75
Onboard computer76
Technology for safety and
convenience:
Park Distance Control (PDC)78
Dynamic Stability Control
(DSC)79
Tire Pressure Control (RDC)80Lamps:
Parking lamps/Headlamps82
Dash lighting82
High beams/Parking lamps83
Fog lamps83
Interior lamps83
Reading lamps84
Controlling the climate for
pleasant driving:
Automatic climate control86
Seat heating91
Roller sun blind91
Interior conveniences:
HiFi system92
Glove compartment92
Storage compartments93
Cellular phones95
Ashtray, front95
Cigarette lighter96
Ashtray, rear96
Loading and transporting:
Through-loading system97
Ski bag98
Cargo loading99
Roof-mounted luggage rack100
Page 61 of 189
61n
IndexDataTechnologyRepairsCar careControlsOverview
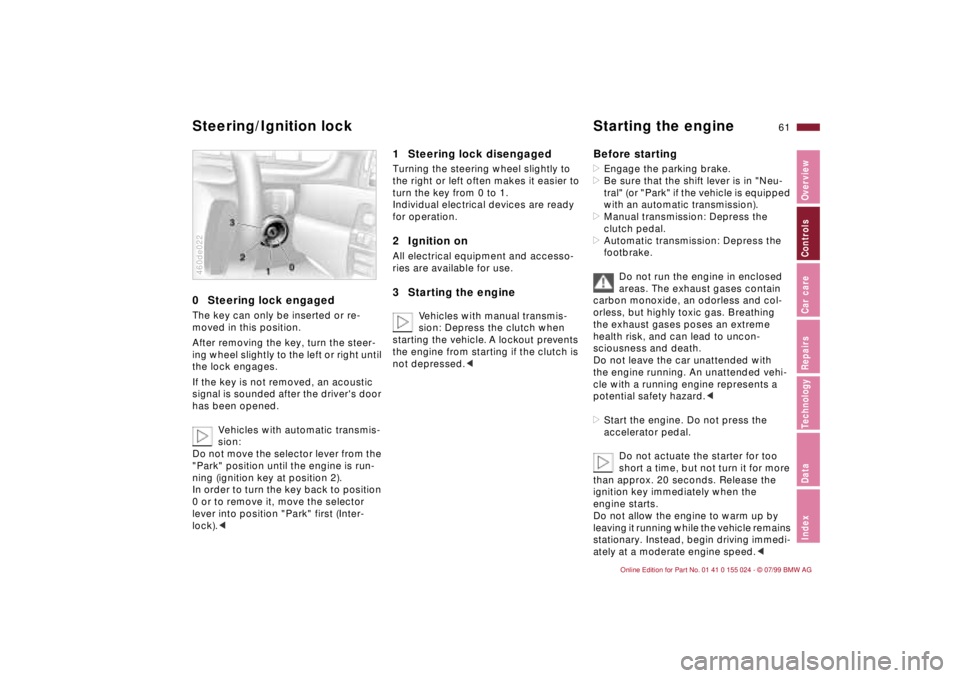
0 Steering lock engaged The key can only be inserted or re-
moved in this position.
After removing the key, turn the steer-
ing wheel slightly to the left or right until
the lock engages.
If the key is not removed, an acoustic
signal is sounded after the driver's door
has been opened.
Vehicles with automatic transmis-
sion:
Do not move the selector lever from the
"Park" position until the engine is run-
ning (ignition key at position 2).
In order to turn the key back to position
0 or to remove it, move the selector
lever into position "Park" first (Inter-
lock).<460de022
1 Steering lock disengaged Turning the steering wheel slightly to
the right or left often makes it easier to
turn the key from 0 to 1.
Individual electrical devices are ready
for operation.2 Ignition onAll electrical equipment and accesso-
ries are available for use.3 Starting the engine
Vehicles with manual transmis-
sion: Depress the clutch when
starting the vehicle. A lockout prevents
the engine from starting if the clutch is
not depressed.c
Before starting>Engage the parking brake.
>Be sure that the shift lever is in "Neu-
tral" (or "Park" if the vehicle is equipped
with an automatic transmission).
>Manual transmission: Depress the
clutch pedal.
>Automatic transmission: Depress the
footbrake.
Do not run the engine in enclosed
areas. The exhaust gases contain
carbon monoxide, an odorless and col-
orless, but highly toxic gas. Breathing
the exhaust gases poses an extreme
health risk, and can lead to uncon-
sciousness and death.
Do not leave the car unattended with
the engine running. An unattended vehi-
cle with a running engine represents a
potential safety hazard.<
>Start the engine. Do not press the
accelerator pedal.
Do not actuate the starter for too
short a time, but not turn it for more
than approx. 20 seconds. Release the
ignition key immediately when the
engine starts.
Do not allow the engine to warm up by
leaving it running while the vehicle remains
stationary. Instead, begin driving immedi-
ately at a moderate engine speed.<
Steering/Ignition lock Starting the engine
Page 63 of 189
63n
IndexDataTechnologyRepairsCar careControlsOverview
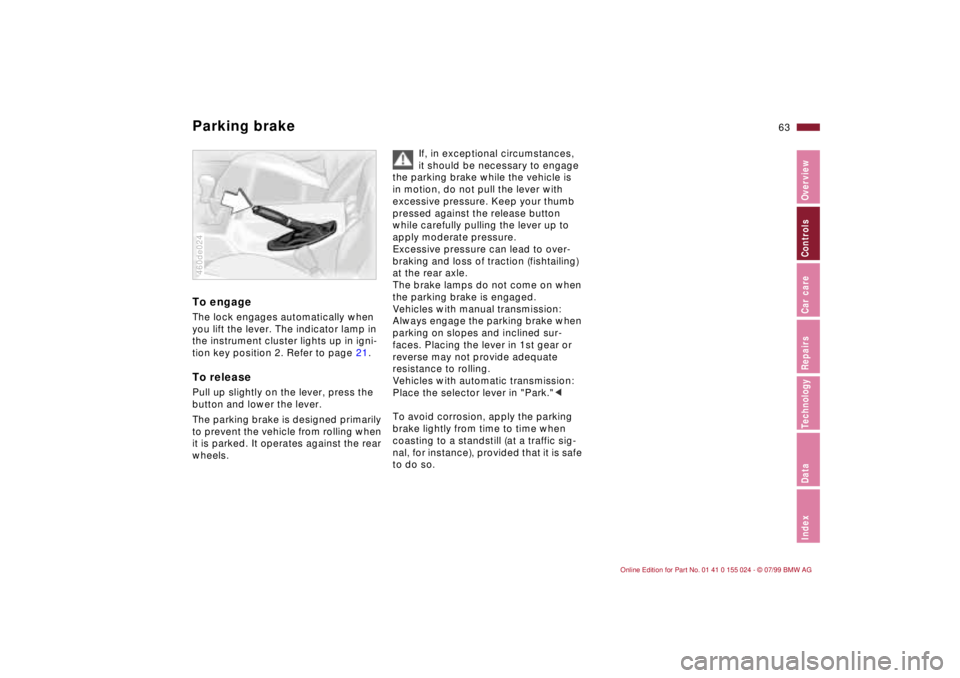
Parking brake To engageThe lock engages automatically when
you lift the lever. The indicator lamp in
the instrument cluster lights up in igni-
tion key position 2. Refer to page 21.To releasePull up slightly on the lever, press the
button and lower the lever.
The parking brake is designed primarily
to prevent the vehicle from rolling when
it is parked. It operates against the rear
wheels.460de024
If, in exceptional circumstances,
it should be necessary to engage
the parking brake while the vehicle is
in motion, do not pull the lever with
excessive pressure. Keep your thumb
pressed against the release button
while carefully pulling the lever up to
apply moderate pressure.
Excessive pressure can lead to over-
braking and loss of traction (fishtailing)
at the rear axle.
The brake lamps do not come on when
the parking brake is engaged.
Vehicles with manual transmission:
Always engage the parking brake when
parking on slopes and inclined sur-
faces. Placing the lever in 1st gear or
reverse may not provide adequate
resistance to rolling.
Vehicles with automatic transmission:
Place the selector lever in "Park."<
To avoid corrosion, apply the parking
brake lightly from time to time when
coasting to a standstill (at a traffic sig-
nal, for instance), provided that it is safe
to do so.
Page 64 of 189
64n
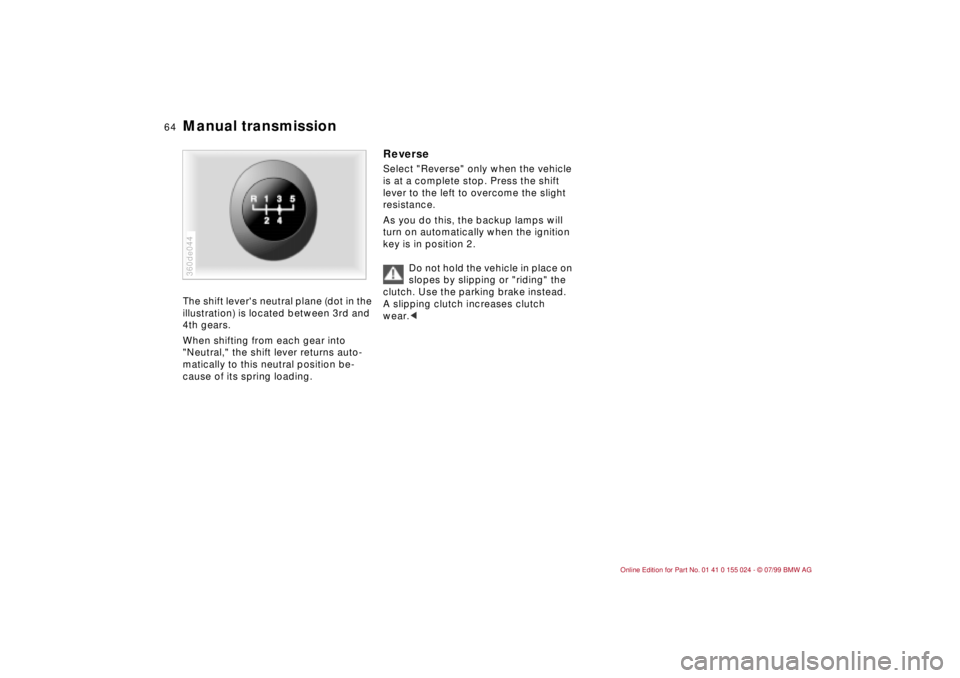
Manual transmission The shift lever's neutral plane (dot in the
illustration) is located between 3rd and
4th gears.
When shifting from each gear into
"Neutral," the shift lever returns auto-
matically to this neutral position be-
cause of its spring loading.360de044
Reverse Select "Reverse" only when the vehicle
is at a complete stop. Press the shift
lever to the left to overcome the slight
resistance.
As you do this, the backup lamps will
turn on automatically when the ignition
key is in position 2.
Do not hold the vehicle in place on
slopes by slipping or "riding" the
clutch. Use the parking brake instead.
A slipping clutch increases clutch
wear.<
Page 97 of 189
97n
IndexDataTechnologyRepairsCar careControlsOverview
Through-loading system
*
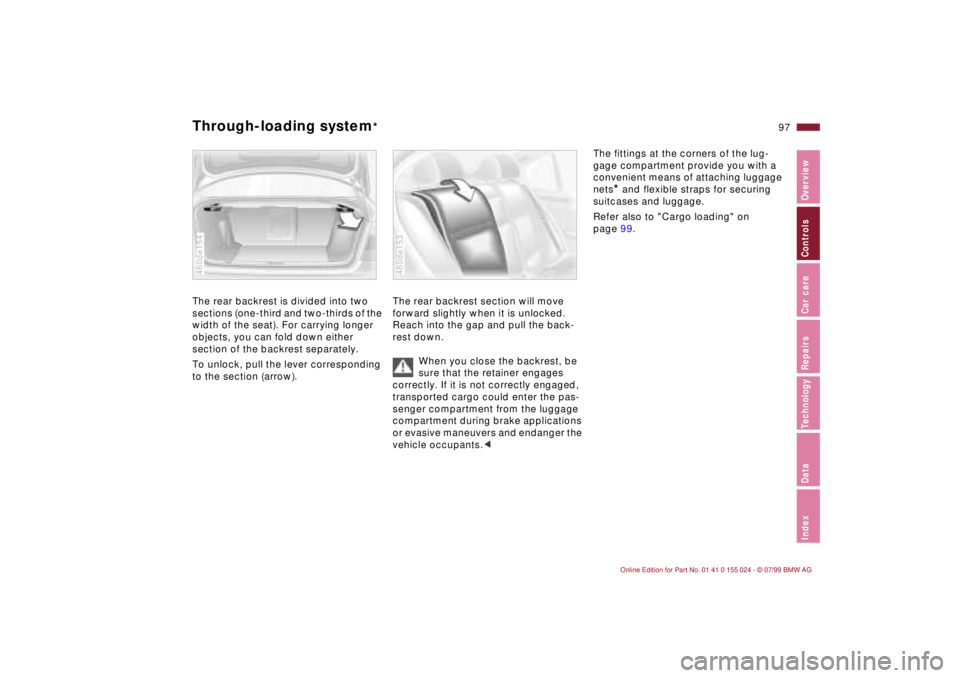
The rear backrest is divided into two
sections (one-third and two-thirds of the
width of the seat). For carrying longer
objects, you can fold down either
section of the backrest separately.
To unlock, pull the lever corresponding
to the section (arrow).460de154
The rear backrest section will move
forward slightly when it is unlocked.
Reach into the gap and pull the back-
rest down.
When you close the backrest, be
sure that the retainer engages
correctly. If it is not correctly engaged,
transported cargo could enter the pas-
senger compartment from the luggage
compartment during brake applications
or evasive maneuvers and endanger the
vehicle occupants.<460de153
The fittings at the corners of the lug-
gage compartment provide you with a
convenient means of attaching luggage
nets
* and flexible straps for securing
suitcases and luggage.
Refer also to "Cargo loading" on
page 99.
Page 104 of 189
104n
To ensure that your vehicle provides
maximum economy throughout a long
service life, we request that you comply
with the following recommendations:
Engine and differentialUp to 1,200 miles (2,000 km):
Drive at varying engine speeds and
road speeds, but do not exceed
4,500 RPM or a road speed of 100 mph
(160 km/h) during this initial period.
Do not apply full throttle and avoid
pressing the accelerator beyond the
kickdown point.
After 1,200 miles (2,000 km), you can
gradually increase the engine speed or
road speed.
Follow the same break-in procedure if
either the engine or the differential is
replaced in the future.
TiresDue to technical factors associated
with their manufacture, tires do not
achieve their full traction potential until
an initial break-in period has elapsed.
For this reason, drive cautiously during
the first 200 miles (300 km).Brake systemBrake pads and disks do not attain their
optimal wear patterns until after approx.
300 miles (500 km).
To break-in the separate parking brake
drums, apply the parking brake lightly
when coasting to a standstill (at a traffic
signal, for instance), provided that traf-
fic conditions allow you to do so.
To avoid corrosion, repeat this proce-
dure from time to time.
The brake lamps do not come on
when the parking brake is set.
Vacuum for the brake system servo unit
on your BMW is available only when the
engine is running. When you move the
car with the engine off Ð when towing,
for example Ð substantially higher levels
of pedal force will be required to brake
the vehicle.<
Brakes:
Do not drive with your foot resting
on the brake pedal. Even light but con-
sistent pedal pressure can lead to high
temperatures, brake wear, and possibly
to brake failure.
Aquaplaning:
Reduce your speed when you drive on
wet or slushy roads. If you do not, a
wedge of water can form between the
tires and the road surface. This phe-
nomenon is referred to as aquaplaning
or hydroplaning. It is characterized by a
partial or complete loss of contact be-
tween the tires and the road surface.
The ultimate results are loss of steering
and braking control.
Driving through water:
Do not drive through water that is
deeper than 1 foot (30 cm). If you must
drive through water accumulations up
to that depth, drive only at walking
speed. Driving at a faster speed could
cause damage to the engine, the elec-
trical systems and the transmission.
Package tray:
Never use the rear window shelf to
store heavy or bulky objects. If you do
so, such objects could pose the risk of
injury to vehicle occupants during brak-
ing or evasive maneuvers or in a crash.
Break-in procedures Driving notes