radio controls BMW 328I XDRIVE CONVERTIBLE 2009 E93 Owner's Manual
[x] Cancel search | Manufacturer: BMW, Model Year: 2009, Model line: 328I XDRIVE CONVERTIBLE, Model: BMW 328I XDRIVE CONVERTIBLE 2009 E93Pages: 260, PDF Size: 7.95 MB
Page 5 of 260
Reference
At a glance
Controls
Driving tips
Communications
Navigation
Entertainment
Mobility
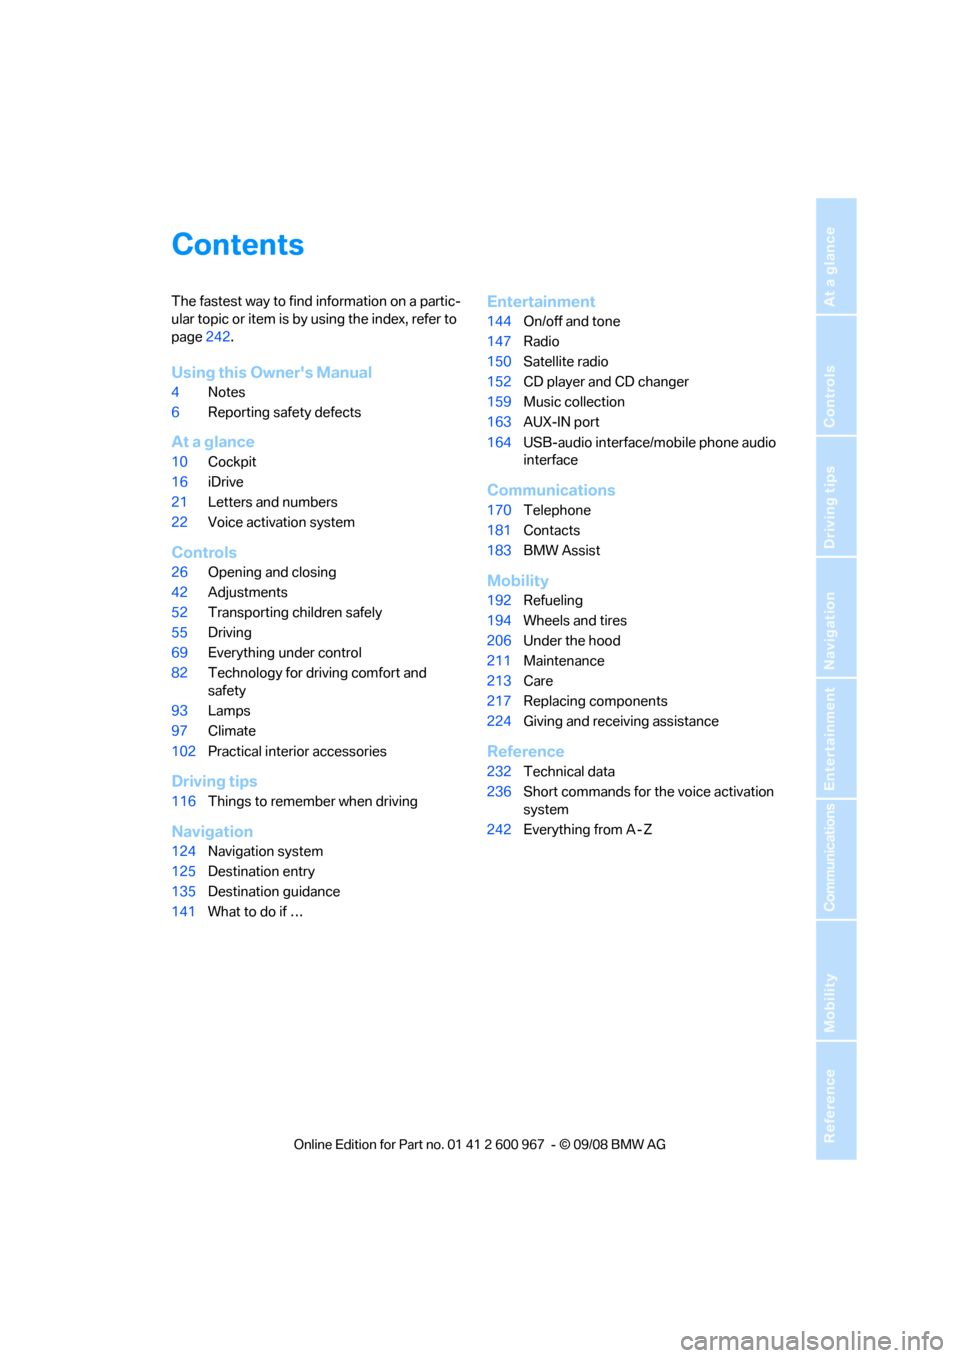
Contents
The fastest way to find information on a partic-
ular topic or item is by using the index, refer to
page242.
Using this Owner's Manual
4Notes
6Reporting safety defects
At a glance
10Cockpit
16iDrive
21Letters and numbers
22Voice activation system
Controls
26Opening and closing
42Adjustments
52Transporting children safely
55Driving
69Everything under control
82Technology for driving comfort and
safety
93Lamps
97Climate
102Practical interior accessories
Driving tips
116Things to remember when driving
Navigation
124Navigation system
125Destination entry
135Destination guidance
141What to do if …
Entertainment
144On/off and tone
147Radio
150Satellite radio
152CD player and CD changer
159Music collection
163AUX-IN port
164USB-audio interface/mobile phone audio
interface
Communications
170Telephone
181Contacts
183BMW Assist
Mobility
192Refueling
194Wheels and tires
206Under the hood
211Maintenance
213Care
217Replacing components
224Giving and receiving assistance
Reference
232Technical data
236Short commands for the voice activation
system
242Everything from A - Z
Page 7 of 260
5Reference
At a glance
Controls
Driving tips
Communications
Navigation
Entertainment
Mobility
The individual vehicle
When you ordered your BMW, you chose vari-
ous items of equipment. This Owner's Manual
describes the entire array of options and equip-
ment available with a specific BMW model.
Please bear in mind that the manual may con-
tain information on accessories and equipment
that you have not specified for your own vehicle.
Sections describing options and special equip-
ment are marked by asterisks
* to assist you in
identifying possible differences between the
descriptions in this manual and your own vehi-
cle's equipment.
If equipment in your BMW is not described in
this Owner's Manual, please refer to the accom-
panying Supplementary Owner's Manuals.
Editorial notice
BMW pursues a policy of continuous, ongoing
development that is conceived to ensure that
our vehicles continue to embody the highest
quality and safety standards combined with
advanced, state-of-the-art technology. For this
reason, it is possible in exceptional cases that
features described in this Owner's Manual
could differ from those on your vehicle.
For your own safety
Maintenance and repair
Advanced technology, e.g. the use of
modern materials and powerful electron-
ics, requires specially adapted maintenance
and repair methods. You should therefore have
the corresponding work on your vehicle per-
formed only by your BMW center or at a work-
shop that works according to BMW repair pro-
cedures with correspondingly trained
personnel. If this work is not carried out prop-
erly, there is a danger of subsequent damage
and related safety hazards.<
Parts and accessories
For your own safety, use genuine parts
and accessories approved by BMW.
When you purchase accessories tested and
approved by BMW and Original BMW Parts, you
simultaneously acquire the assurance that they
have been thoroughly tested by BMW to ensure
optimum performance when installed on your
vehicle.
BMW warrants these parts to be free from
defects in material and workmanship.
BMW will not accept any liability for damage
resulting from installation of parts and accesso-
ries not approved by BMW.
BMW cannot test every product made by other
manufacturers to verify if it can be used on a
BMW safely and without risk to either the vehi-
cle, its operation, or its occupants.
Original BMW Parts, BMW Accessories and
other products approved by BMW, together
with professional advice on using these items,
are available from all BMW centers.
Installation and operation of non-BMW
approved accessories such as alarms, radios,
amplifiers, radar detectors, wheels, suspension
components, brake dust shields, telephones,
including operation of any mobile phone from
within the vehicle without using an externally
mounted antenna, or transceiver equipment, for
instance, CBs, walkie-talkies, ham radio or sim-
ilar accessories, may cause extensive damage
Page 13 of 260
At a glance
11Reference
Controls
Driving tips
Communications
Navigation
Entertainment
Mobility
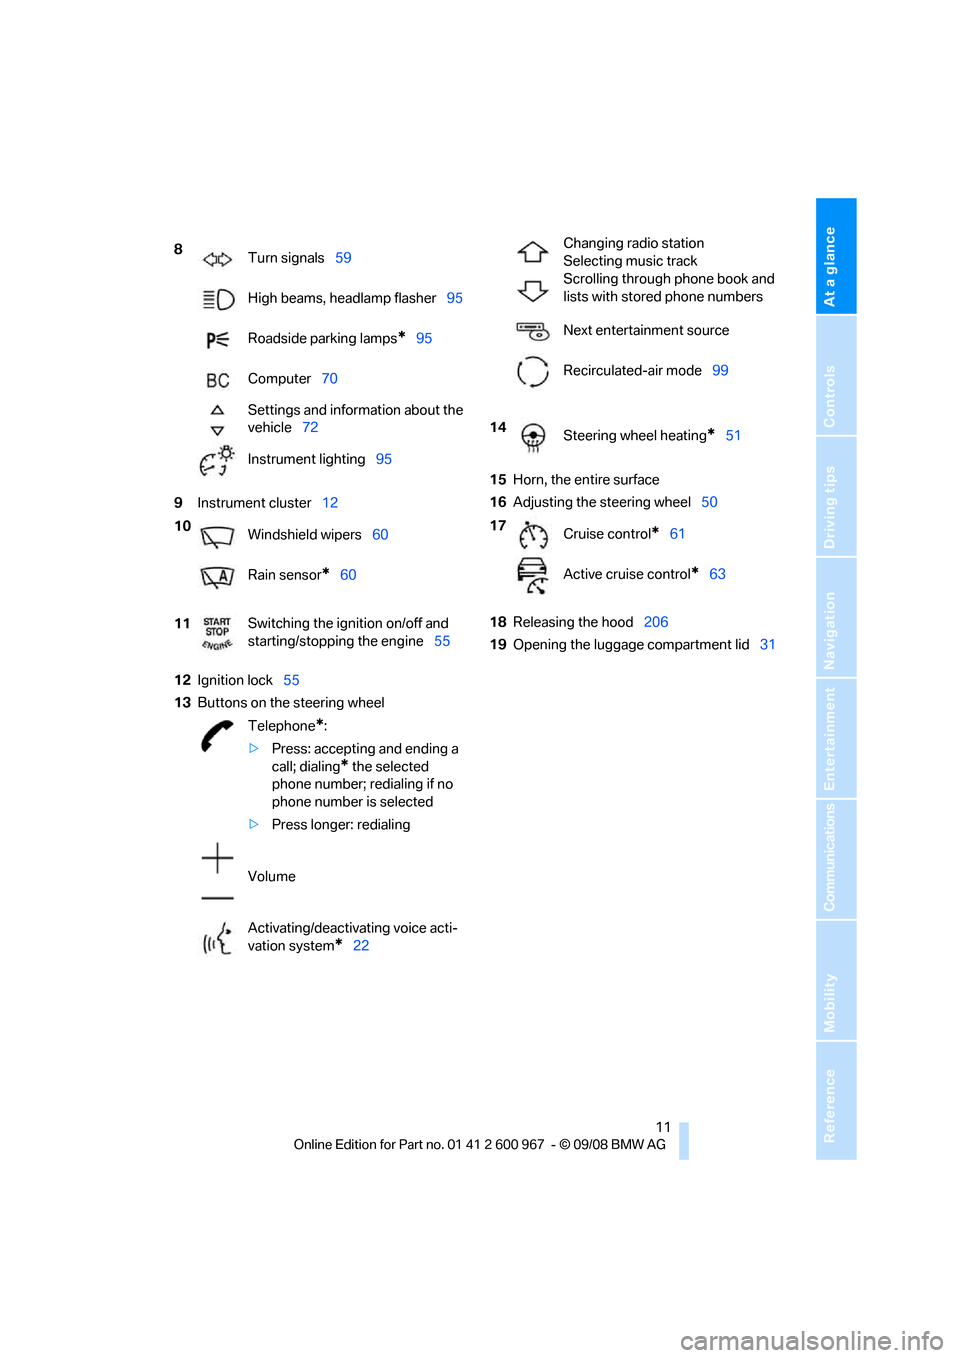
9Instrument cluster12
12Ignition lock55
13Buttons on the steering wheel15Horn, the entire surface
16Adjusting the steering wheel50
18Releasing the hood206
19Opening the luggage compartment lid31 8
Turn signals59
High beams, headlamp flasher95
Roadside parking lamps
*95
Computer70
Settings and information about the
vehicle72
Instrument lighting95
10
Windshield wipers60
Rain sensor
*60
11Switching the ignition on/off and
starting/stopping the engine55
Telephone
*:
>Press: accepting and ending a
call; dialing
* the selected
phone number; redialing if no
phone number is selected
>Press longer: redialing
Volume
Activating/deactivating voice acti-
vation system
*22
Changing radio station
Selecting music track
Scrolling through phone book and
lists with stored phone numbers
Next entertainment source
Recirculated-air mode99
14
Steering wheel heating
*51
17
Cruise control
*61
Active cruise control
*63
Page 17 of 260
At a glance
15Reference
Controls
Driving tips
Communications
Navigation
Entertainment
Mobility
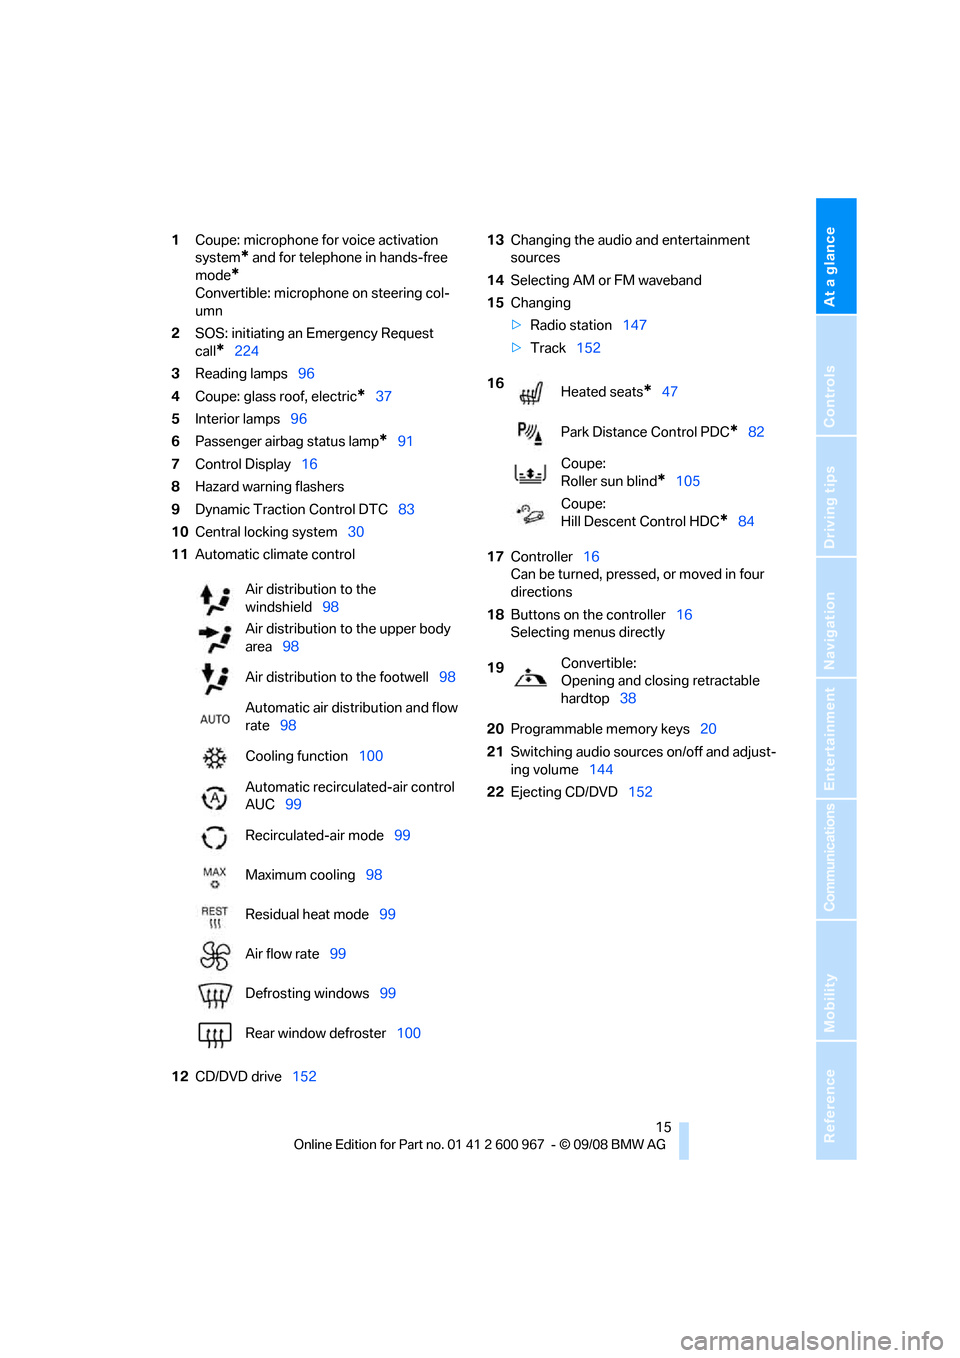
1Coupe: microphone for voice activation
system
* and for telephone in hands-free
mode
*
Convertible: microphone on steering col-
umn
2SOS: initiating an Emergency Request
call
*224
3Reading lamps96
4Coupe: glass roof, electric
*37
5Interior lamps96
6Passenger airbag status lamp
*91
7Control Display16
8Hazard warning flashers
9Dynamic Traction Control DTC83
10Central locking system30
11Automatic climate control
12CD/DVD drive15213Changing the audio and entertainment
sources
14Selecting AM or FM waveband
15Changing
>Radio station147
>Track152
17Controller16
Can be turned, pressed, or moved in four
directions
18Buttons on the controller16
Selecting menus directly
20Programmable memory keys20
21Switching audio sources on/off and adjust-
ing volume144
22Ejecting CD/DVD152 Air distribution to the
windshield98
Air distribution to the upper body
area98
Air distribution to the footwell98
Automatic air distribution and flow
rate98
Cooling function100
Automatic recirculated-air control
AUC99
Recirculated-air mode99
Maximum cooling98
Residual heat mode99
Air flow rate99
Defrosting windows99
Rear window defroster100
16
Heated seats*47
Park Distance Control PDC
*82
Coupe:
Roller sun blind
*105
Coupe:
Hill Descent Control HDC
*84
19Convertible:
Opening and closing retractable
hardtop38
Page 19 of 260
At a glance
17Reference
Controls
Driving tips
Communications
Navigation
Entertainment
Mobility
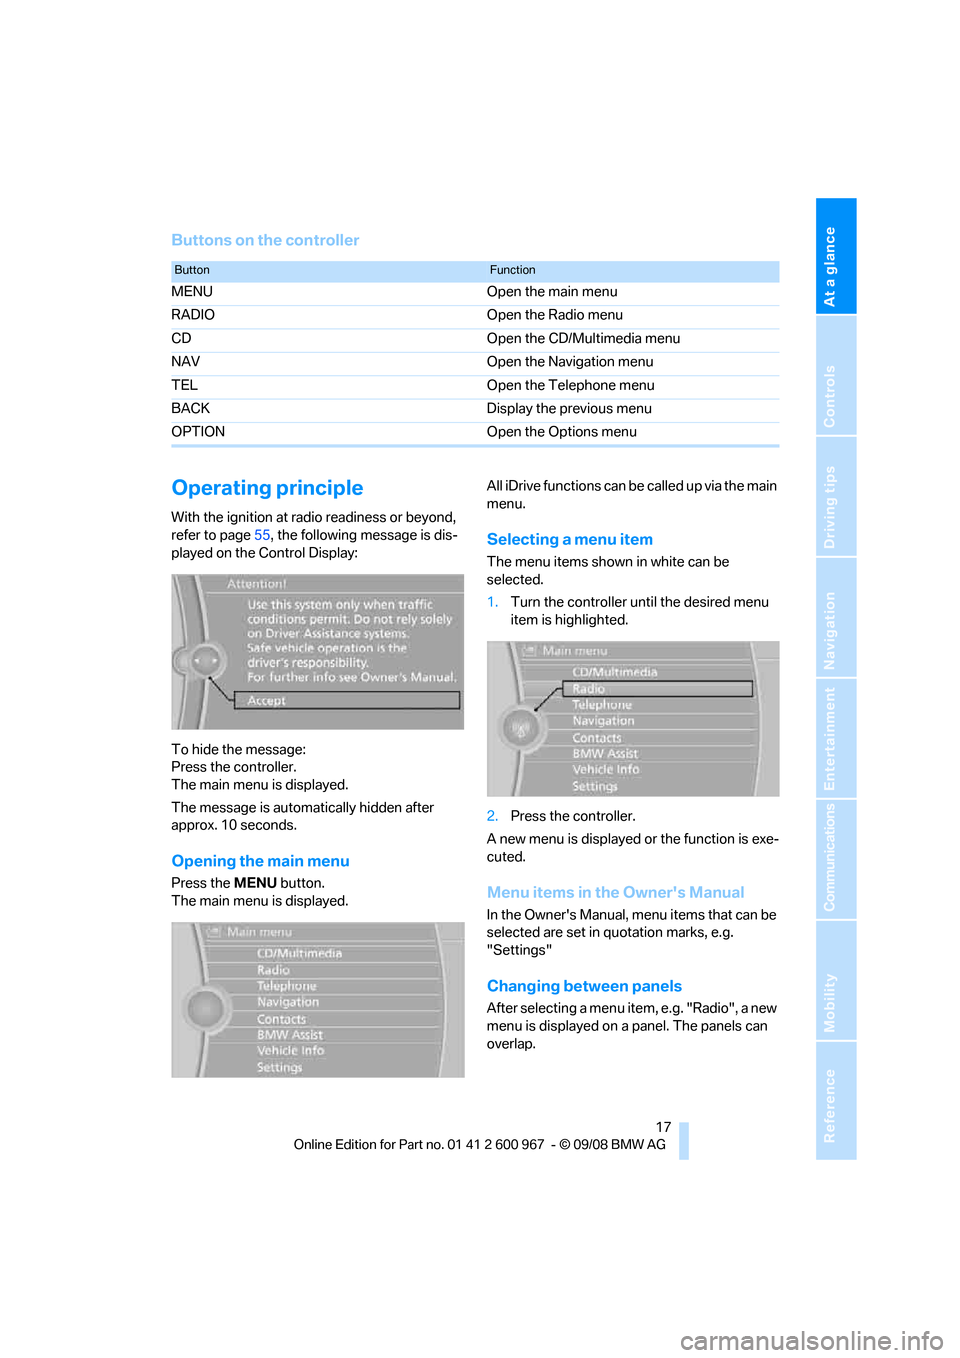
Buttons on the controller
Operating principle
With the ignition at radio readiness or beyond,
refer to page55, the following message is dis-
played on the Control Display:
To hide the message:
Press the controller.
The main menu is displayed.
The message is automatically hidden after
approx. 10 seconds.
Opening the main menu
Press the MENU button.
The main menu is displayed.All iDrive functions can be called up via the main
menu.
Selecting a menu item
The menu items shown in white can be
selected.
1.Turn the controller until the desired menu
item is highlighted.
2.Press the controller.
A new menu is displayed or the function is exe-
cuted.
Menu items in the Owner's Manual
In the Owner's Manual, menu items that can be
selected are set in quotation marks, e.g.
"Settings"
Changing between panels
After selecting a menu item, e.g. "Radio", a new
menu is displayed on a panel. The panels can
overlap.
ButtonFunction
MENU Open the main menu
RADIO Open the Radio menu
CD Open the CD/Multimedia menu
NAV Open the Navigation menu
TEL Open the Telephone menu
BACK Display the previous menu
OPTION Open the Options menu
Page 21 of 260
At a glance
19Reference
Controls
Driving tips
Communications
Navigation
Entertainment
Mobility
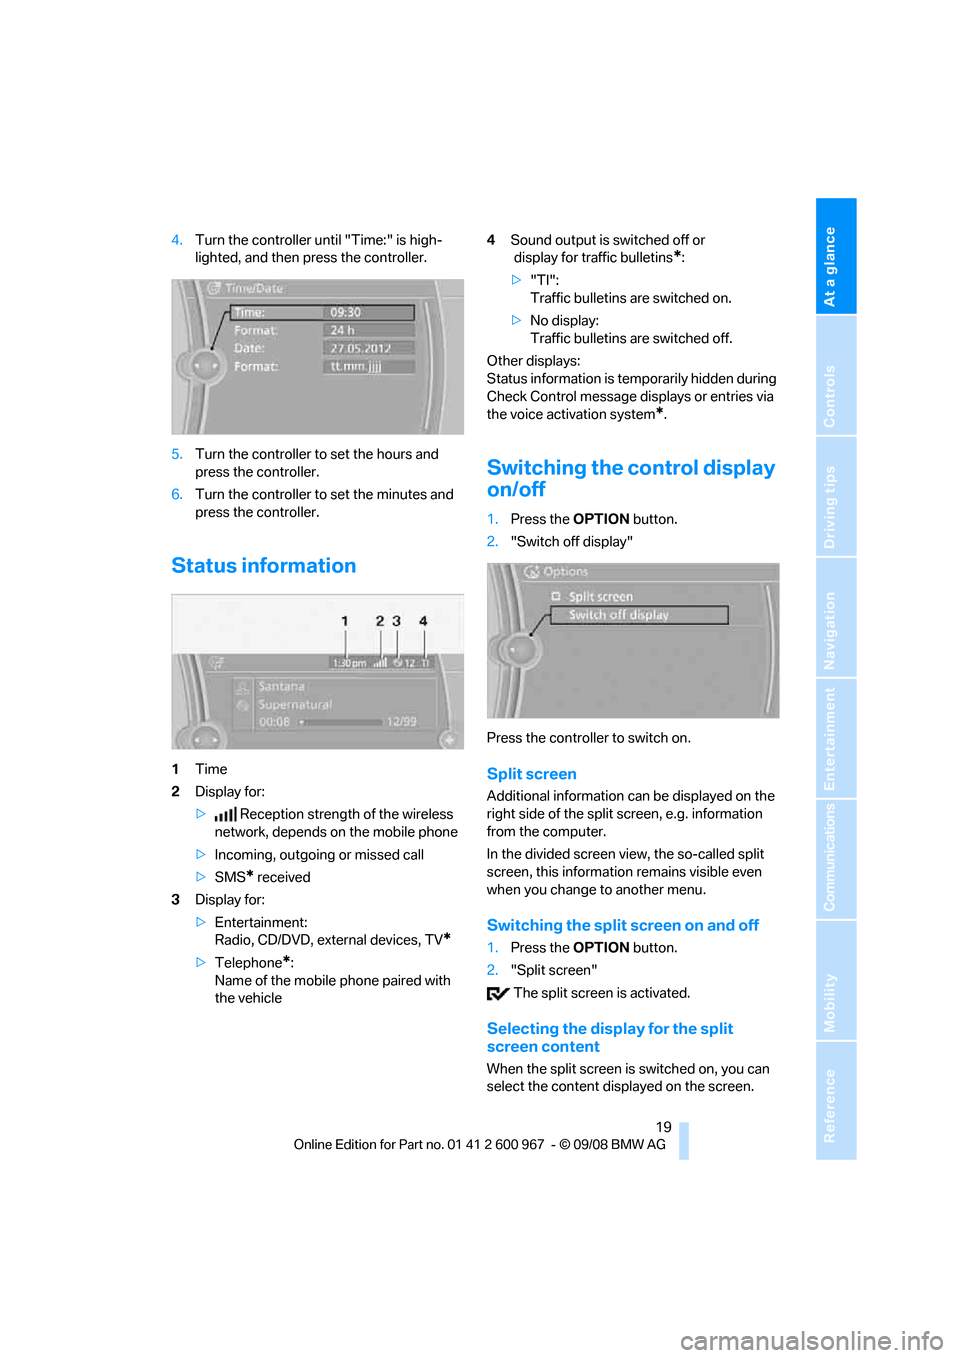
4.Turn the controller until "Time:" is high-
lighted, and then press the controller.
5.Turn the controller to set the hours and
press the controller.
6.Turn the controller to set the minutes and
press the controller.
Status information
1Time
2Display for:
>Reception strength of the wireless
network, depends on the mobile phone
>Incoming, outgoing or missed call
>SMS
* received
3Display for:
>Entertainment:
Radio, CD/DVD, external devices, TV
*
>Telephone*:
Name of the mobile phone paired with
the vehicle4Sound output is switched off or
display for traffic bulletins
*:
>"TI":
Traffic bulletins are switched on.
>No display:
Traffic bulletins are switched off.
Other displays:
Status information is temporarily hidden during
Check Control message displays or entries via
the voice activation system
*.
Switching the control display
on/off
1.Press the OPTION button.
2."Switch off display"
Press the controller to switch on.
Split screen
Additional information can be displayed on the
right side of the split screen, e.g. information
from the computer.
In the divided screen view, the so-called split
screen, this information remains visible even
when you change to another menu.
Switching the split screen on and off
1.Press the OPTION button.
2."Split screen"
The split screen is activated.
Selecting the display for the split
screen content
When the split screen is switched on, you can
select the content displayed on the screen.
Page 25 of 260
At a glance
23Reference
Controls
Driving tips
Communications
Navigation
Entertainment
Mobility
In dialogs that call for a text of your choice, the
procedure can only be canceled using the but-
ton on the steering wheel.
Possible commands
The commands available in each case depend
on the menu item selected on the Control Dis-
play.
To have the available commands read aloud:
For example, if "CD/DVD" is selected, the com-
mands for operating CD/Multimedia are read
aloud
.
Using alternative commands
There are often a number of commands to run a
function, e.g.:
Calling up functions immediately via
short commands
Short commands enable you to perform certain
functions immediately, irrespective of which
menu item is selected, refer to page236.
Example: selecting the track of a CD
1.If necessary, switch on entertainment audio
output.
2.Press the button on the steering wheel.
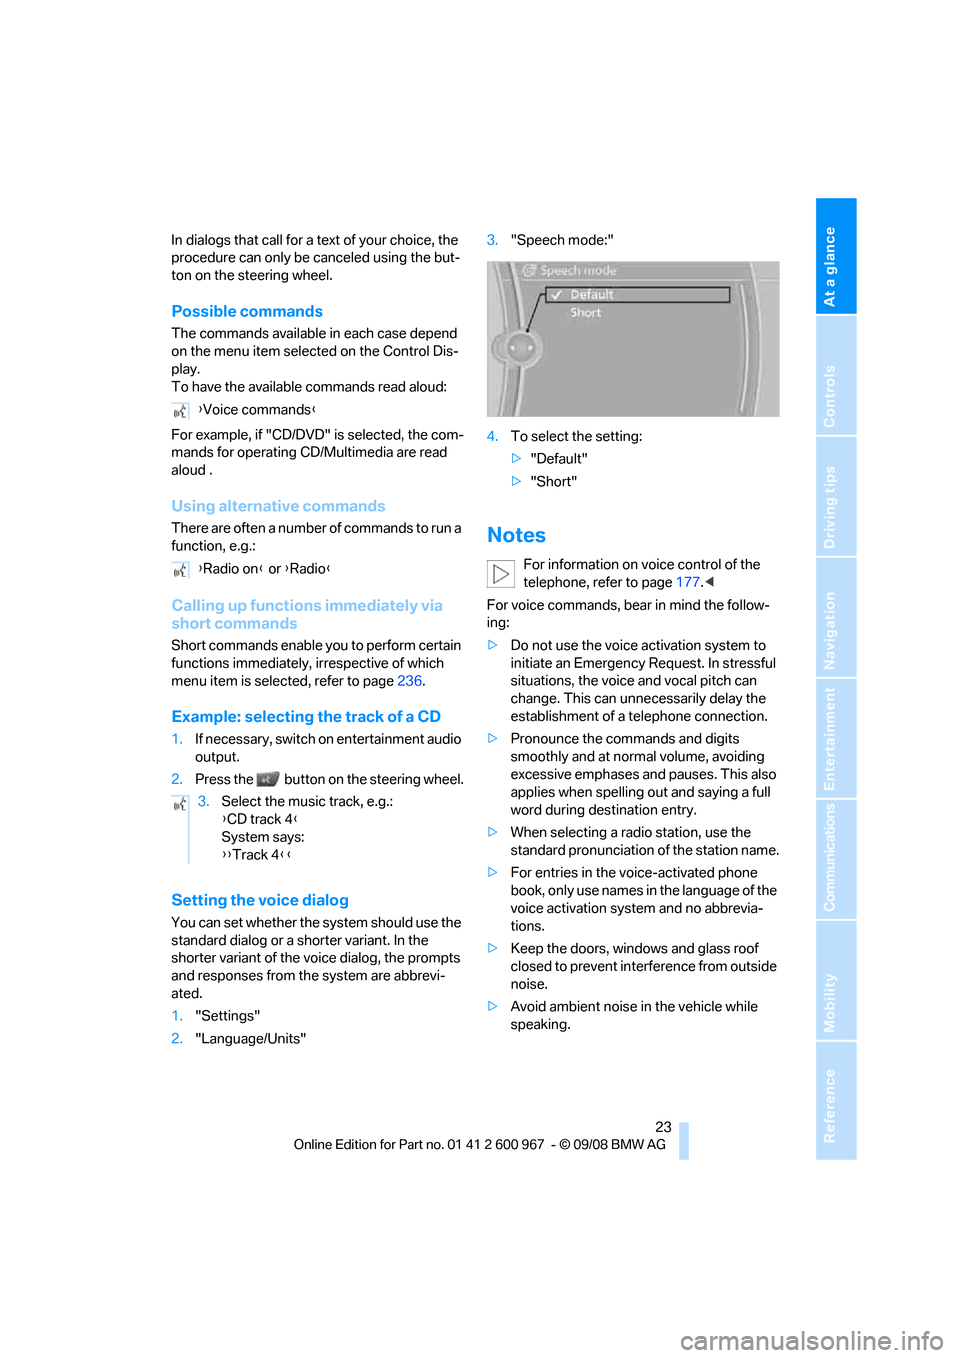
Setting the voice dialog
You can set whether the system should use the
standard dialog or a shorter variant. In the
shorter variant of the voice dialog, the prompts
and responses from the system are abbrevi-
ated.
1."Settings"
2."Language/Units"3."Speech mode:"
4.To select the setting:
>"Default"
>"Short"
Notes
For information on voice control of the
telephone, refer to page177.<
For voice commands, bear in mind the follow-
ing:
>Do not use the voice activation system to
initiate an Emergency Request. In stressful
situations, the voice and vocal pitch can
change. This can unnecessarily delay the
establishment of a telephone connection.
>Pronounce the commands and digits
smoothly and at normal volume, avoiding
excessive emphases and pauses. This also
applies when spelling out and saying a full
word during destination entry.
>When selecting a radio station, use the
standard pronunciation of the station name.
>For entries in the voice-activated phone
book, only use names in the language of the
voice activation system and no abbrevia-
tions.
>Keep the doors, windows and glass roof
closed to prevent interference from outside
noise.
>Avoid ambient noise in the vehicle while
speaking. {Voice commands}
{Radio on} or {Radio}
3.Select the music track, e.g.:
{CD track 4}
System says:
{{Track 4}}
Page 31 of 260
Controls
29Reference
At a glance
Driving tips
Communications
Navigation
Entertainment
Mobility
position. The luggage compartment lid
opens slightly.
2.Open the luggage compartment lid, press
the cargo bay partition upward and stow the
cargo in the cargo bay.
3.Press down the cargo bay partition until it
engages on both sides and close the lug-
gage compartment lid.
4.Press the button for a longer period to
fold the retractable hardtop back in.
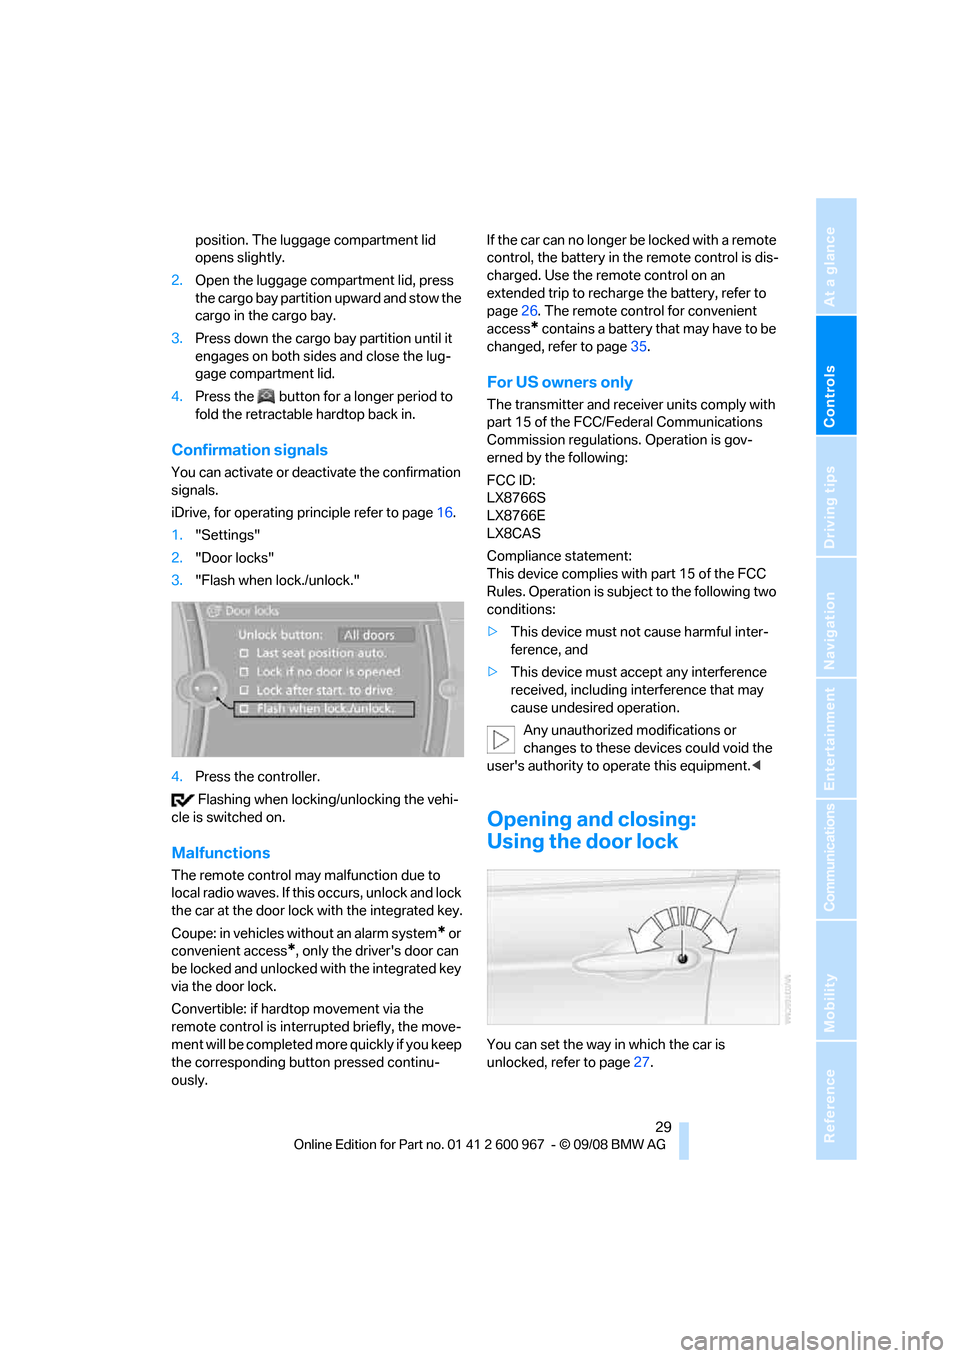
Confirmation signals
You can activate or deactivate the confirmation
signals.
iDrive, for operating principle refer to page16.
1."Settings"
2."Door locks"
3."Flash when lock./unlock."
4.Press the controller.
Flashing when locking/unlocking the vehi-
cle is switched on.
Malfunctions
The remote control may malfunction due to
local radio waves. If this occurs, unlock and lock
the car at the door lock with the integrated key.
Coupe: in vehicles without an alarm system
* or
convenient access
*, only the driver's door can
be locked and unlocked with the integrated key
via the door lock.
Convertible: if hardtop movement via the
remote control is interrupted briefly, the move-
ment will be completed more quickly if you keep
the corresponding button pressed continu-
ously.If the car can no longer be locked with a remote
control, the battery in the remote control is dis-
charged. Use the remote control on an
extended trip to recharge the battery, refer to
page26. The remote control for convenient
access
* contains a battery that may have to be
changed, refer to page35.
For US owners only
The transmitter and receiver units comply with
part 15 of the FCC/Federal Communications
Commission regulations. Operation is gov-
erned by the following:
FCC ID:
LX8766S
LX8766E
LX8CAS
Compliance statement:
This device complies with part 15 of the FCC
Rules. Operation is subject to the following two
conditions:
>This device must not cause harmful inter-
ference, and
>This device must accept any interference
received, including interference that may
cause undesired operation.
Any unauthorized modifications or
changes to these devices could void the
user's authority to operate this equipment.<
Opening and closing:
Using the door lock
You can set the way in which the car is
unlocked, refer to page27.
Page 37 of 260
Controls
35Reference
At a glance
Driving tips
Communications
Navigation
Entertainment
Mobility
compartment lid is closed, the lid will reopen.
The hazard warning flashers flash and an
acoustic signal
* sounds.<
Switching on radio readiness
Radio readiness is switched on by pressing the
start/stop button, refer to page55.
Do not depress the brake or the clutch,
otherwise the engine will start.<
Starting the engine
You can start the engine or switch on the igni-
tion when a remote control is inside the vehicle.
It is not necessary to insert a remote control into
the ignition switch, refer to page55.
Switching off the engine in cars with
automatic transmission
The engine can only be switched off when the
selector lever is in position P, refer to page56.
To switch the engine off when the selector lever
is in position N, the remote control must be in
the ignition switch.
Malfunction
Convenient access may malfunction due to
local radio waves. If this happens, open or close
the vehicle via the buttons on the remote con-
trol or using the integrated key. To start the
engine afterward, insert the remote control into
the ignition switch.
Warning lamps
The warning lamp in the instrument
cluster lights up when you attempt to
start the engine: the engine cannot
be started. The remote control is not inside the
vehicle or is malfunctioning. Take the remote
control with you inside the vehicle or have it
checked. If necessary, insert another remote
control into the ignition switch.
The warning lamp in the instrument
cluster lights up while the engine is
running: the remote control is no
longer inside the vehicle. After the engine is
switched off, the engine can only be restarted
within approx. 10 seconds.The indicator lamp in the instrument
cluster comes on and a message
appears on the Control Display:
replace the battery in the remote control.
Replacing the battery
The remote control for convenient access con-
tains a battery that will need to be replaced from
time to time.
1.Take the integrated key out of the remote
control, refer to page26.
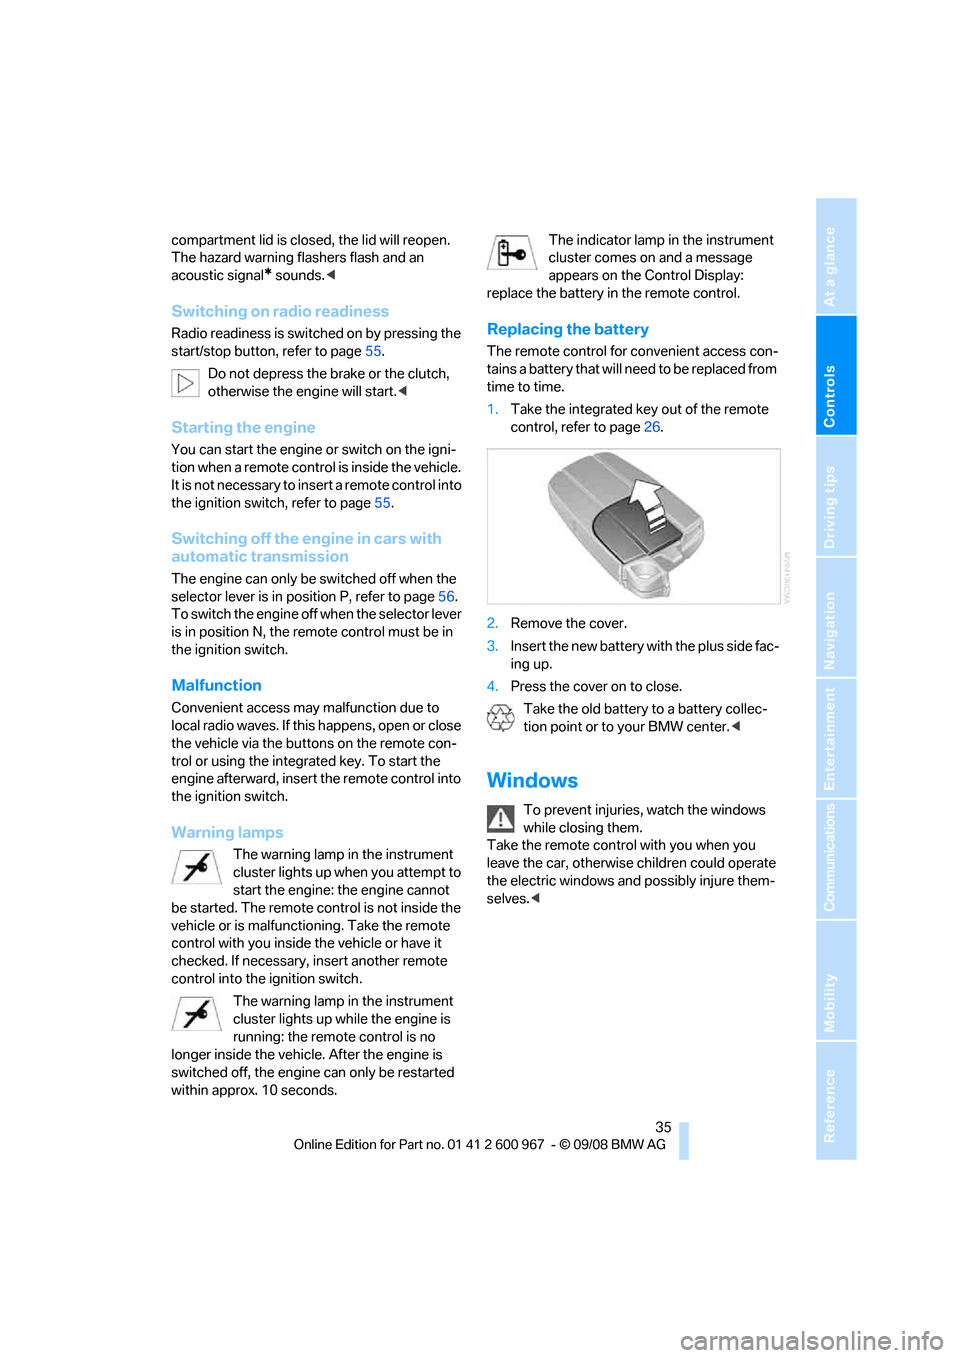
2.Remove the cover.
3.Insert the new battery with the plus side fac-
ing up.
4.Press the cover on to close.
Take the old battery to a battery collec-
tion point or to your BMW center.<
Windows
To prevent injuries, watch the windows
while closing them.
Take the remote control with you when you
leave the car, otherwise children could operate
the electric windows and possibly injure them-
selves.<
Page 41 of 260
Controls
39Reference
At a glance
Driving tips
Communications
Navigation
Entertainment
Mobility
from the cargo bay beforehand to avoid
water stains or soiling.
Do not place any objects on the retract-
able hardtop or on the luggage compart-
ment lid, otherwise they could fall during move-
ments of the retractable hardtop and cause
damage or injury.
Never move the retractable hardtop when the
rollover protection system is in the activated
position.
Driving when the hardtop is not fully opened or
closed may result in damage or injury.
Do not reach into the mechanism while the
hardtop is opening or closing. Keep children
away from the swiveling area of the retractable
hardtop.<
The retractable hardtop cannot be moved
at temperatures below + 147/–106. A
message appears on the Control Display.<
The retractable hardtop can only be
opened and closed when the vehicle is
stationary. To avoid causing damage, do not
drive off until the hardtop has stopped mov-
ing.<
Before opening and closing
>Comply with the safety precautions
described above.
>Ensure that the cargo bay partition is folded
down and engaged on both sides, refer to
page109, otherwise it will not be possible
to open the retractable hardtop.
>Do not place any objects next to or on the
cargo bay partition and close the storage
compartment on the left side of the cargo
bay.
>Do not exceed the maximum loading height
under the cargo bay partition; refer to the
label in the cargo bay showing a line indicat-
ing the maximum height.
>Ensure that the luggage compartment lid is
closed.
>The vehicle should be parked on fairly level
ground. Excessive angle is indicated by a
lamp.
Opening and closing
When the vehicle is stationary and at radio
readiness or beyond, refer to page55:
If possible, conserve the battery by only
operating the retractable hardtop when
the engine is running.
Before closing the retractable hardtop, remove
all foreign objects from the windshield frame as
these could prevent the hardtop from closing
properly.<
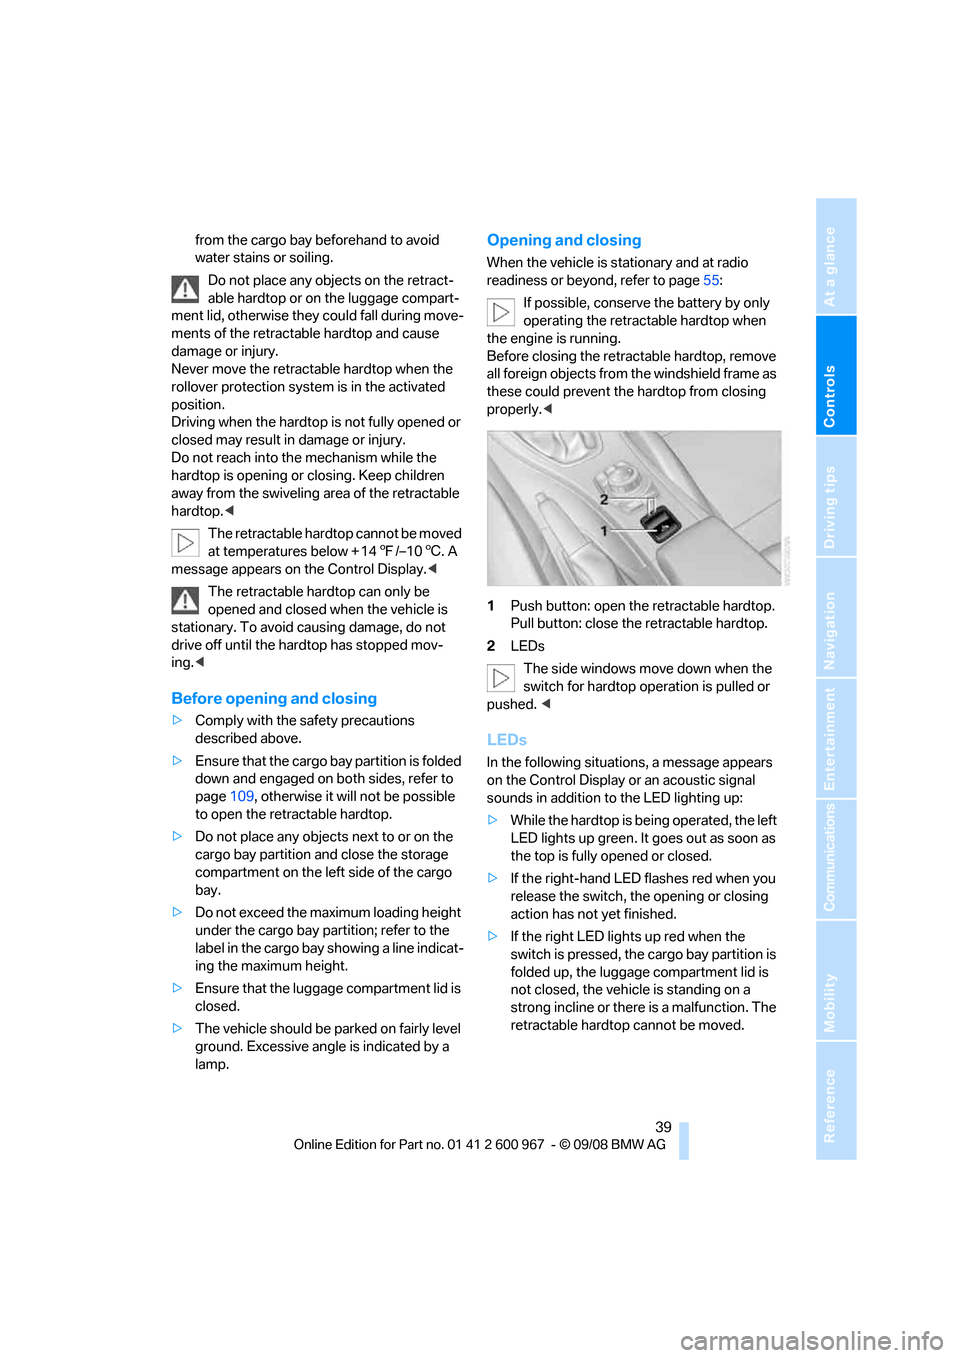
1Push button: open the retractable hardtop.
Pull button: close the retractable hardtop.
2LEDs
The side windows move down when the
switch for hardtop operation is pulled or
pushed. <
LEDs
In the following situations, a message appears
on the Control Display or an acoustic signal
sounds in addition to the LED lighting up:
>While the hardtop is being operated, the left
LED lights up green. It goes out as soon as
the top is fully opened or closed.
>If the right-hand LED flashes red when you
release the switch, the opening or closing
action has not yet finished.
>If the right LED lights up red when the
switch is pressed, the cargo bay partition is
folded up, the luggage compartment lid is
not closed, the vehicle is standing on a
strong incline or there is a malfunction. The
retractable hardtop cannot be moved.