steering BMW 330Ci CONVERTIBLE 2002 E46 Owner's Manual
[x] Cancel search | Manufacturer: BMW, Model Year: 2002, Model line: 330Ci CONVERTIBLE, Model: BMW 330Ci CONVERTIBLE 2002 E46Pages: 159, PDF Size: 2.28 MB
Page 4 of 159

Contents
© 2001 Bayerische Motoren Werke
Aktiengesellschaft
Munich, Germany
Reprinting, including excerpts, only with the
written consent of BMW AG, Munich.
Order No. 01 41 0 156 190
US English VIII/01
Printed in Germany
Printed on environmentally friendly paper
(bleached without chlorine, suitable for recycling).
Overview
Controls and features
Cockpit14
Instrument cluster15
Indicator and warning lamps17
Multifunction steering wheel
(MFL)21
Hazard warning triangle22
Refueling22
Fuel specifications23
Tire inflation pressures24
Opening and closing:
Keys28
Central locking system28
Opening and closing
Ð via the remote control29
Ð via the door lock31
Ð from the inside32
Luggage compartment lid33
Luggage compartment35
Alarm system36
Electric power windows38
Manual convertible top39
Fully-automatic convertible
top42
Wind deflector46
Adjustments:
Correct sitting posture48
Seats48
Adjusting electric power
seats49
Lumbar support50
Head restraints50
Entering the rear51
Safety belts52
Seat and mirror memory53
Seat heating54
Steering wheel54
Mirrors55
Passenger safety systems:
Airbags56
Transporting children safely59Rollover protection system61
Vehicle Memory, Key
Memory63
Driving:
Ignition lock64
Starting the engine64
Switching off the engine65
Parking brake66
Manual transmission66
Automatic transmission with
Steptronic67
Indicator/Headlamp flasher69
Washer/Wiper system/
Rain sensor70
Cruise control72
Everything under control:
Odometer74
Tachometer74
Energy control74
Fuel gauge75
Temperature gauge75
Service Interval Display75
Check Control76
Computer76
Technology for safety and
driving convenience:
Park Distance Control (PDC)79
Automatic Stability Control plus
Traction (ASC+T)80
Contents
Page 14 of 159
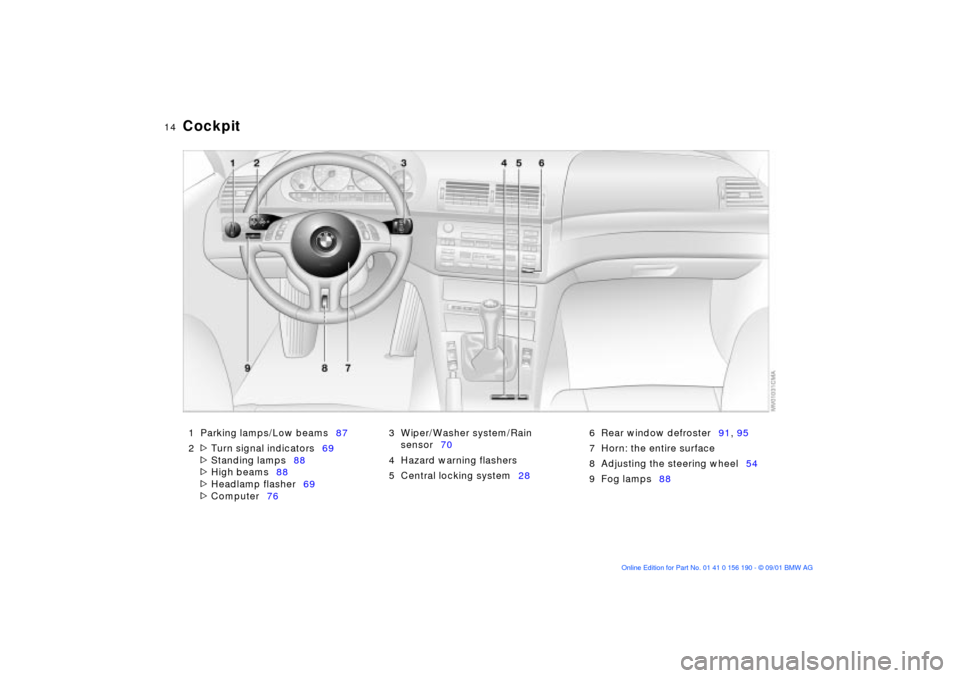
14n
1 Parking lamps/Low beams87
2
>
Turn signal indicators69
>
Standing lamps88
>
High beams88
>
Headlamp flasher69
>
Computer763 Wiper/Washer system/Rain
sensor70
4 Hazard warning flashers
5 Central locking system286 Rear window defroster91, 95
7 Horn: the entire surface
8 Adjusting the steering wheel54
9 Fog lamps88
Cockpit
Page 17 of 159
17n
OverviewControlsMaintenanceRepairsDataIndex
Indicator and warning lamps
Technology that monitors itself
The system runs an operational check
on the indicator and warning lamps
identified with the
l
symbol each time
you switch on the ignition. They each
light up once for different periods of
time.
If a fault should occur in one of these
systems, the corresponding lamp does
not go out after the engine is started, or
it lights up while the vehicle is moving.
You will see how to react in the
following section.
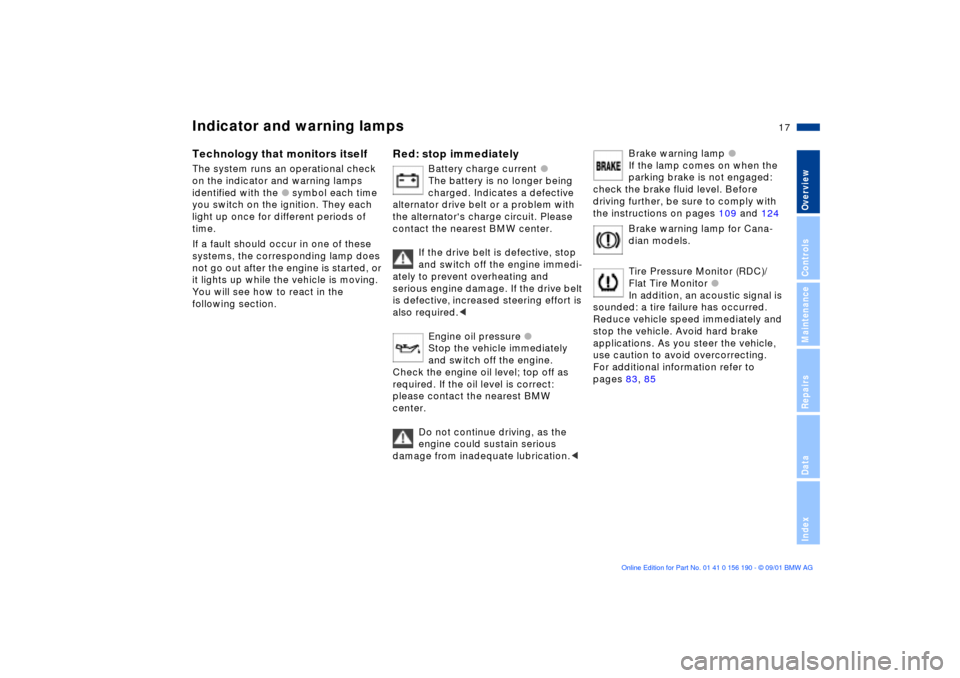
Red: stop immediately
Battery charge current
l
The battery is no longer being
charged. Indicates a defective
alternator drive belt or a problem with
the alternator's charge circuit. Please
contact the nearest BMW center.
If the drive belt is defective, stop
and switch off the engine immedi-
ately to prevent overheating and
serious engine damage. If the drive belt
is defective, increased steering effort is
also required.
<
Engine oil pressure
l
Stop the vehicle immediately
and switch off the engine.
Check the engine oil level; top off as
required. If the oil level is correct:
please contact the nearest BMW
center.
Do not continue driving, as the
engine could sustain serious
damage from inadequate lubrication.
<
Brake warning lamp
l
If the lamp comes on when the
parking brake is not engaged:
check the brake fluid level. Before
driving further, be sure to comply with
the instructions on pages 109 and 124
Brake warning lamp for Cana-
dian models.
Tire Pressure Monitor (RDC)/
Flat Tire Monitor
l
In addition, an acoustic signal is
sounded: a tire failure has occurred.
Reduce vehicle speed immediately and
stop the vehicle. Avoid hard brake
applications. As you steer the vehicle,
use caution to avoid overcorrecting.
For additional information refer to
pages 83, 85
Page 20 of 159
20n
Indicator and warning lamps
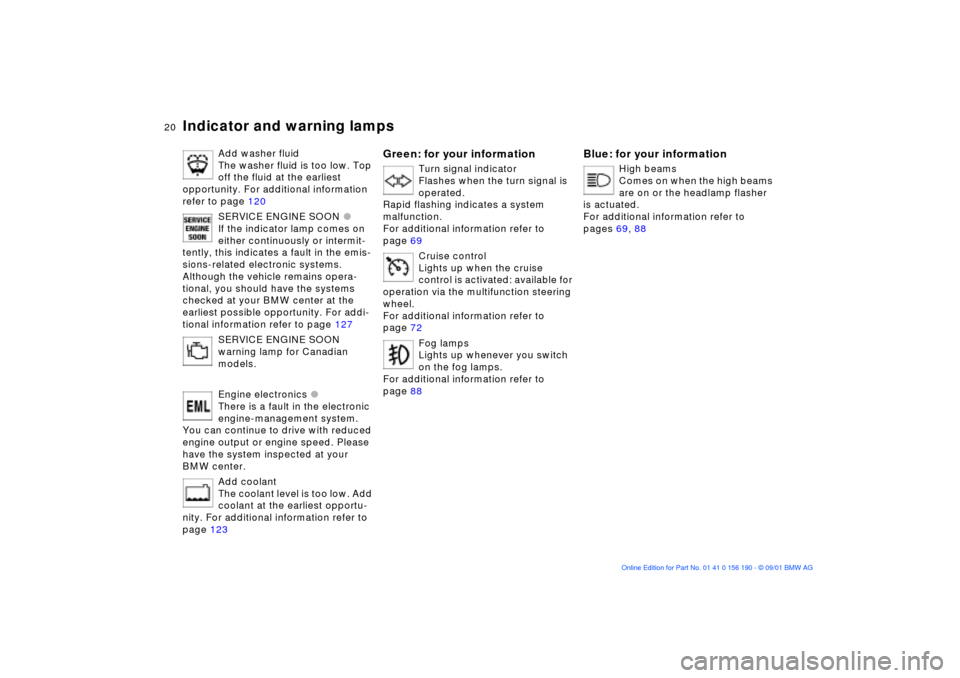
Add washer fluid
The washer fluid is too low. Top
off the fluid at the earliest
opportunity. For additional information
refer to page 120
SERVICE ENGINE SOON
l
If the indicator lamp comes on
either continuously or intermit-
tently, this indicates a fault in the emis-
sions-related electronic systems.
Although the vehicle remains opera-
tional, you should have the systems
checked at your BMW center at the
earliest possible opportunity. For addi-
tional information refer to page 127
SERVICE ENGINE SOON
warning lamp for Canadian
models.
Engine electronics
l
There is a fault in the electronic
engine-management system.
You can continue to drive with reduced
engine output or engine speed. Please
have the system inspected at your
BMW center.
Add coolant
The coolant level is too low. Add
coolant at the earliest opportu-
nity. For additional information refer to
page 123
Green: for your information
Turn signal indicator
Flashes when the turn signal is
operated.
Rapid flashing indicates a system
malfunction.
For additional information refer to
page 69
Cruise control
Lights up when the cruise
control is activated: available for
operation via the multifunction steering
wheel.
For additional information refer to
page 72
Fog lamps
Lights up whenever you switch
on the fog lamps.
For additional information refer to
page 88
Blue: for your information
High beams
Comes on when the high beams
are on or the headlamp flasher
is actuated.
For additional information refer to
pages 69, 88
Page 21 of 159
21n
OverviewControlsMaintenanceRepairsDataIndex
Multifunction steering wheel (MFL)
*
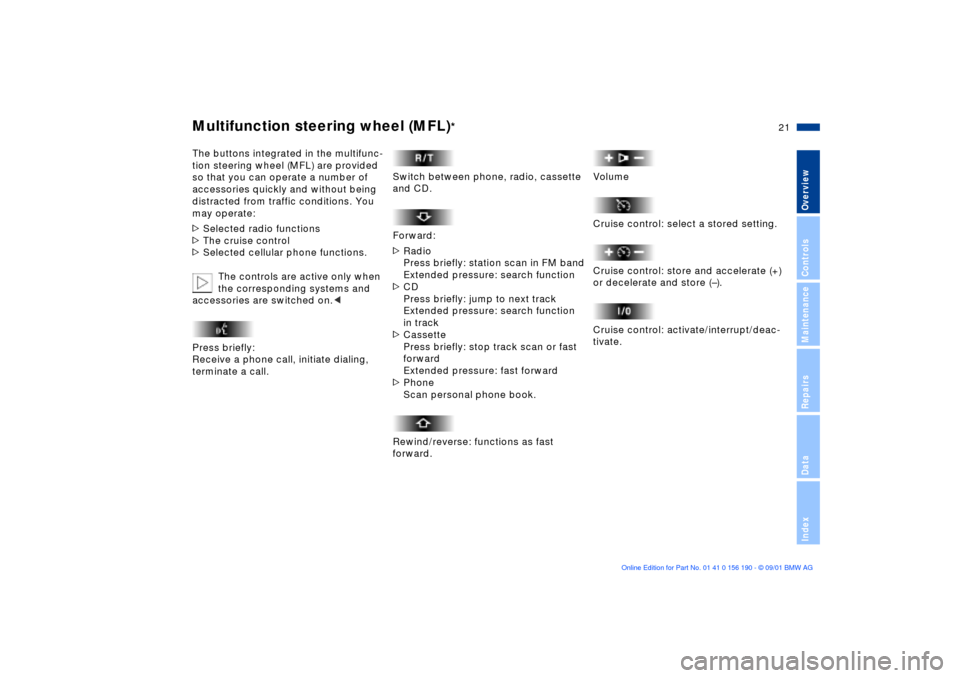
The buttons integrated in the multifunc-
tion steering wheel (MFL) are provided
so that you can operate a number of
accessories quickly and without being
distracted from traffic conditions. You
may operate:
>
Selected radio functions
>
The cruise control
>
Selected cellular phone functions.
The controls are active only when
the corresponding systems and
accessories are switched on.
<
Press briefly:
Receive a phone call, initiate dialing,
terminate a call.
Switch between phone, radio, cassette
and CD.
Forward:
>
Radio
Press briefly: station scan in FM band
Extended pressure: search function
>
CD
Press briefly: jump to next track
Extended pressure: search function
in track
>
Cassette
Press briefly: stop track scan or fast
forward
Extended pressure: fast forward
>
Phone
Scan personal phone book.
Rewind/reverse: functions as fast
forward.
Volume
Cruise control: select a stored setting.
Cruise control: store and accelerate (+)
or decelerate and store (Ð).
Cruise control: activate/interrupt/deac-
tivate.
Page 48 of 159

48n
Correct sitting posture SeatsFor relaxed and fatigue-free driving you
should select a sitting position that
reflects your personal requirements.
Correct posture combines with safety
belts and airbags to enhance occupant
safety in the event of an accident. To
ensure that the vehicle's safety systems
provide you with optimal protection, we
request that you direct your careful
attention to the following section.
For supplementary information on
transporting children refer to page 59. Sitting correctly with airbags
Always maintain an adequate
distance between yourself and the
airbags. Always hold the steering wheel
by the rim to keep any chance of injury
to hands or arms to an absolute
minimum should the airbag be
deployed. Never allow any objects,
individuals or animals to obstruct the
areas between passengers and airbags.
Never use the front airbag's cover as a
storage tray or support for objects of
any kind. Never allow front passengers
to rest their feet or legs on the airbag
cover.<
For airbag locations and additional
information on airbags refer to page 56.
Safe with safety belts
Never allow more than one person
to wear a single safety belt. Never
allow infants or small children to ride in
a passenger's lap. Avoid twisting the
belt while routing it firmly across the
hips and shoulder, wear it as snugly
against your body as possible. Do not
allow the belt to rest against hard or
fragile objects. Do not route the belt
across your neck, or run it across sharp
edges. Be sure that the belt does not
become caught or jammed. Avoid
wearing bulky clothing and pull on the
lap belt periodically to retension it over
your shoulders. In the event of a frontal
impact, a loose lap belt could slide over
your hips, leading to abdominal injury.
In addition, the safety belt's restraint
effectiveness is reduced if it is worn
loosely. Expectant mothers should
always wear their safety belts, taking
care to position the lap belt against the
lower hips, where it will not exert pres-
sure against the abdominal area.<
For information on using the safety
belts refer to page 52.
When adjusting your seat, always
observe the following precautions
Never try to adjust your seat while
operating the vehicle. The seat
could respond with unexpected move-
ment, and the ensuing loss of vehicle
control could lead to an accident. Never
ride with the backrest reclined to an
extreme horizontal angle (important for
front passengers to remember). Keep
the backrest relatively upright to mini-
mize the risk of sliding under the safety
belt and sustaining injury in an acci-
dent.<
Seat adjustment>Power seat, refer to page 49
>Head restraint, refer to page 50
>Entering the rear, refer to page 51
Page 54 of 159
54n
Seat and mirror memory
*
Seat heating
**Steering wheel
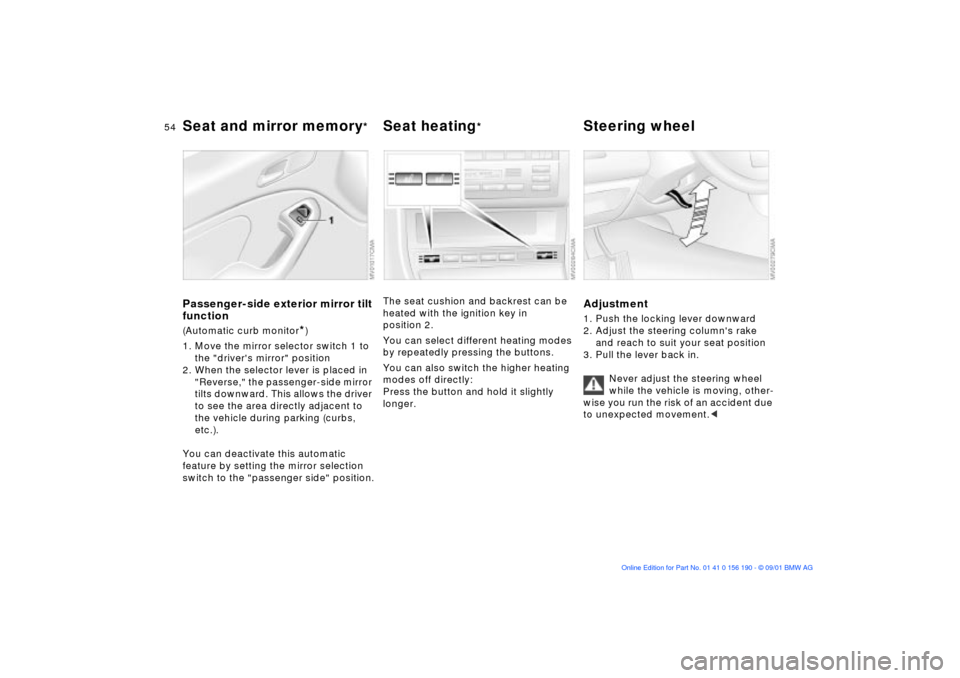
Passenger-side exterior mirror tilt
function(Automatic curb monitor
*)
1. Move the mirror selector switch 1 to
the "driver's mirror" position
2. When the selector lever is placed in
"Reverse," the passenger-side mirror
tilts downward. This allows the driver
to see the area directly adjacent to
the vehicle during parking (curbs,
etc.).
You can deactivate this automatic
feature by setting the mirror selection
switch to the "passenger side" position.
The seat cushion and backrest can be
heated with the ignition key in
position 2.
You can select different heating modes
by repeatedly pressing the buttons.
You can also switch the higher heating
modes off directly:
Press the button and hold it slightly
longer.
Adjustment1. Push the locking lever downward
2. Adjust the steering column's rake
and reach to suit your seat position
3. Pull the lever back in.
Never adjust the steering wheel
while the vehicle is moving, other-
wise you run the risk of an accident due
to unexpected movement.<
Page 57 of 159

57n
OverviewControlsMaintenanceRepairsDataIndex
Airbags
The airbags do not deploy in
response to minor collisions, rear
impacts and certain kinds of vehicle
rollover.<
For your safety, comply with the
following instructions for the
airbags. If you do not, the airbags may
not be able to provide their maximum
protection. All passengers in the vehicle
should be aware of and comply with
these directions:
The airbags are supplemental restraint
devices designed to provide extra
protection; they are not a substitute for
safety belts. Wear your safety belt at all
times. The airbags will not be triggered
in the event of a minor accident, a
vehicle rollover, or collisions from the
rear. In these instances, the safety belt
provides optimal protection.
Airbags are located under cover panels
in the steering wheel, in the instrument
panel, in the side trim panels in the
front and rear
*, in the roof panels, and
in the sides of the inside roof lining.
Adjust your seat to a position that
provides maximum distance between
you and the steering wheel, the instru-
ment panel and the door while still
allowing comfortable and safe access
to all vehicle controls.
To avoid sustaining hand and arm inju-
ries, always grasp the steering wheel
on the rim with the hands at the 9 and
3 o'clock positions. Do not place your
hands on the center pad.
Never allow any objects to obstruct the
area between the airbag and an occu-
pant.
Do not use the cover panel above the
passenger-side airbag as a storage
area.
Do not apply adhesive materials to the
cover panels of the airbags, cover them
or modify them in any other way.
Do not install a rear-facing child-
restraint system in the front passenger
seat of this vehicle.
Children under 13 years of age and less
than 5 ft (150 cm) tall should ride only in
the rear seat.
Infants or small children should never
be held on the lap of a passenger.
If your vehicle is equipped with side
airbags in the rear passenger area
*, be
sure that child restraints are mounted
correctly with the greatest-possible
distance between them and the airbags
in the side trim panels. Do not allow
children to lean out of the child's seat in
the direction of the side trim panels. If
they do so, serious injuries can occur if
the airbag is triggered.
(infants and small children in appro-
priate child-restraint systems; larger
children and adults using the safety
belts). Never let an occupant's head
rest near or on a side airbag, as the
inflating airbag could cause a serious or
fatal injury. Please note that the word
Airbag imprinted on the door trim panel
indicates the airbag's location.
Accident research shows that the
safest place for children in an auto-
mobile is in the rear seat. However, a
child sitting in the rear seat and not
properly restrained may place his or her
head on or near the airbag, if so
equipped. For example, a child Ñ even
though belted Ñ may fall asleep with his
or her head against the side airbag. It
may be difficult for a driver to ensure
that children in the rear seat will remain
properly positioned at all times and not
place their heads on or near the side
airbag.
Therefore, we recommend that the
rear-seat side airbags, if installed in the
vehicle, be deactivated if children will
travel in the rear seat.
The rear-seat side airbags may already
have been deactivated, either at the
time of manufacture or by a BMW
Page 64 of 159
64n
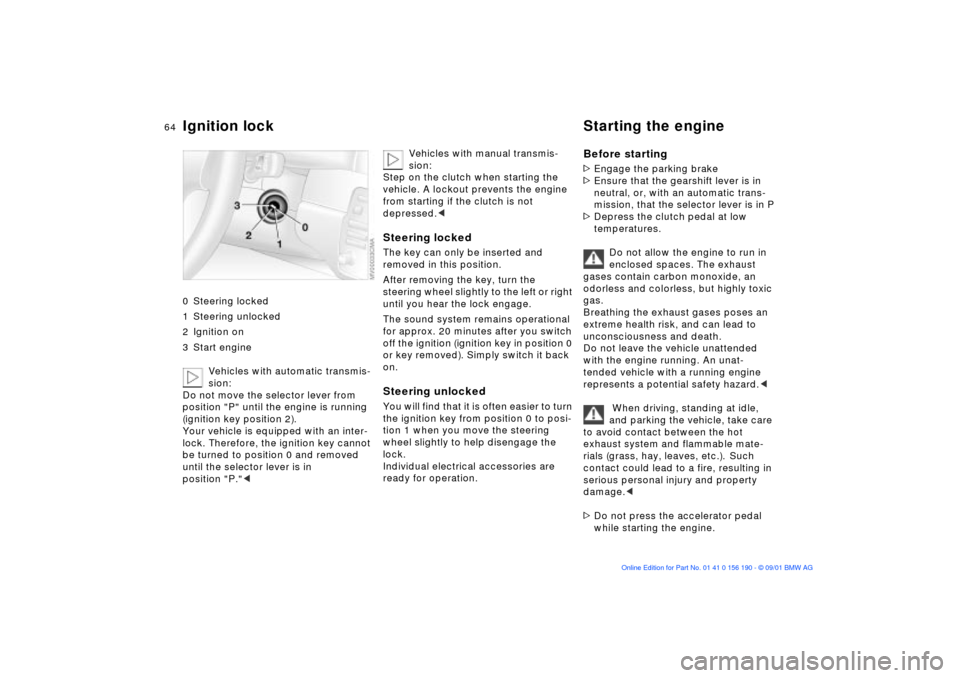
Ignition lock Starting the engine 0 Steering locked
1 Steering unlocked
2 Ignition on
3 Start engine
Vehicles with automatic transmis-
sion:
Do not move the selector lever from
position "P" until the engine is running
(ignition key position 2).
Your vehicle is equipped with an inter-
lock. Therefore, the ignition key cannot
be turned to position 0 and removed
until the selector lever is in
position "P."<
Vehicles with manual transmis-
sion:
Step on the clutch when starting the
vehicle. A lockout prevents the engine
from starting if the clutch is not
depressed.<
Steering lockedThe key can only be inserted and
removed in this position.
After removing the key, turn the
steering wheel slightly to the left or right
until you hear the lock engage.
The sound system remains operational
for approx. 20 minutes after you switch
off the ignition (ignition key in position 0
or key removed). Simply switch it back
on.Steering unlocked You will find that it is often easier to turn
the ignition key from position 0 to posi-
tion 1 when you move the steering
wheel slightly to help disengage the
lock.
Individual electrical accessories are
ready for operation.
Before starting>Engage the parking brake
>Ensure that the gearshift lever is in
neutral, or, with an automatic trans-
mission, that the selector lever is in P
>Depress the clutch pedal at low
temperatures.
Do not allow the engine to run in
enclosed spaces. The exhaust
gases contain carbon monoxide, an
odorless and colorless, but highly toxic
gas.
Breathing the exhaust gases poses an
extreme health risk, and can lead to
unconsciousness and death.
Do not leave the vehicle unattended
with the engine running. An unat-
tended vehicle with a running engine
represents a potential safety hazard.<
When driving, standing at idle,
and parking the vehicle, take care
to avoid contact between the hot
exhaust system and flammable mate-
rials (grass, hay, leaves, etc.). Such
contact could lead to a fire, resulting in
serious personal injury and property
damage.<
>Do not press the accelerator pedal
while starting the engine.
Page 65 of 159
65n
OverviewControlsMaintenanceRepairsDataIndex
Starting the engine Switching off the engine
Do not actuate the starter for too
short a time, but do not actuate it
for more than approx. 20 seconds.
Release the ignition key immediately
when the engine starts.
Do not allow the engine to warm up by
leaving it running while the vehicle
remains stationary. Instead, drive off
immediately at a moderate engine
speed.<
If the engine does not start on the first
attempt (if it is very hot or cold, for
instance):
>Press the accelerator pedal halfway
down while engaging the starter.
Cold starts at extremely low tempera-
tures of roughly +5 7 (Ð15 6) or below
and at altitudes of over 3,300 ft
(1,000 m):
>On the first start attempt, engage the
starter for a longer period (approx.
10 seconds)
>Press the accelerator pedal halfway
down while engaging the starter.
Engine idle speed is controlled by the
engine computer system. Increased
speeds at start-up are normal and
should decrease as the engine warms
up. If engine speed does not decrease,
service is required.
To prevent the battery from discharging,
always deactivate electrical devices
that are not in use. Switch the ignition
off when the vehicle is not being driven.
Extended starting attempts, char-
acterized by excessively frequent
or long periods with the starter
engaged, can lead to catalyst
damage.<
Turn the ignition key to position 1 or 0.
You should never remove the igni-
tion key when the vehicle is in
motion, as the steering lock could
engage.
When you leave the vehicle, always
remove the ignition key and engage the
steering lock.
Vehicles with manual transmission:
Always engage the parking brake when
parking on hills and slopes, as first gear
or reverse may not provide adequate
resistance to rolling.
Vehicles with automatic transmission:
Place the selector lever in "P."<