navigation system BMW 335D 2011 E90 User Guide
[x] Cancel search | Manufacturer: BMW, Model Year: 2011, Model line: 335D, Model: BMW 335D 2011 E90Pages: 286, PDF Size: 8.25 MB
Page 39 of 286
Controls
37Reference
At a glance
Driving tips
Communications
Navigation
Entertainment
Mobility
Convenient operation
For information on Convenient operation via the
remote control or the door lock, refer to page27
or29. For information on Convenient closing
with Comfort Access, refer to Locking on
page28.
Pinch protection system
If the closing force exceeds a specific value as a
window closes, the closing action is interrupted
and the window reopens slightly.
Despite the pinch protection system
check and clear the window's travel path
prior to closing it; otherwise, the safety system
might fail to detect certain kinds of obstruc-
tions, such as thin objects, and the window
would continue closing.
Do not install any accessories that might inter-
fere with window movement. Otherwise, the
pinch protection system could be impaired.<
Closing without pinch protection
If there is an external danger, or if ice on the win-
dows, etc., prevents you from closing the win-
dows normally, proceed as follows:
1.Pull the switch past the resistance point and
hold it there. Pinch protection is limited and
the window reopens slightly if the closing
force exceeds a certain value.
2.Pull the switch again past the resistance
point within approx. 4 seconds and hold it
there. The window closes without pinch
protection.
Safety switch
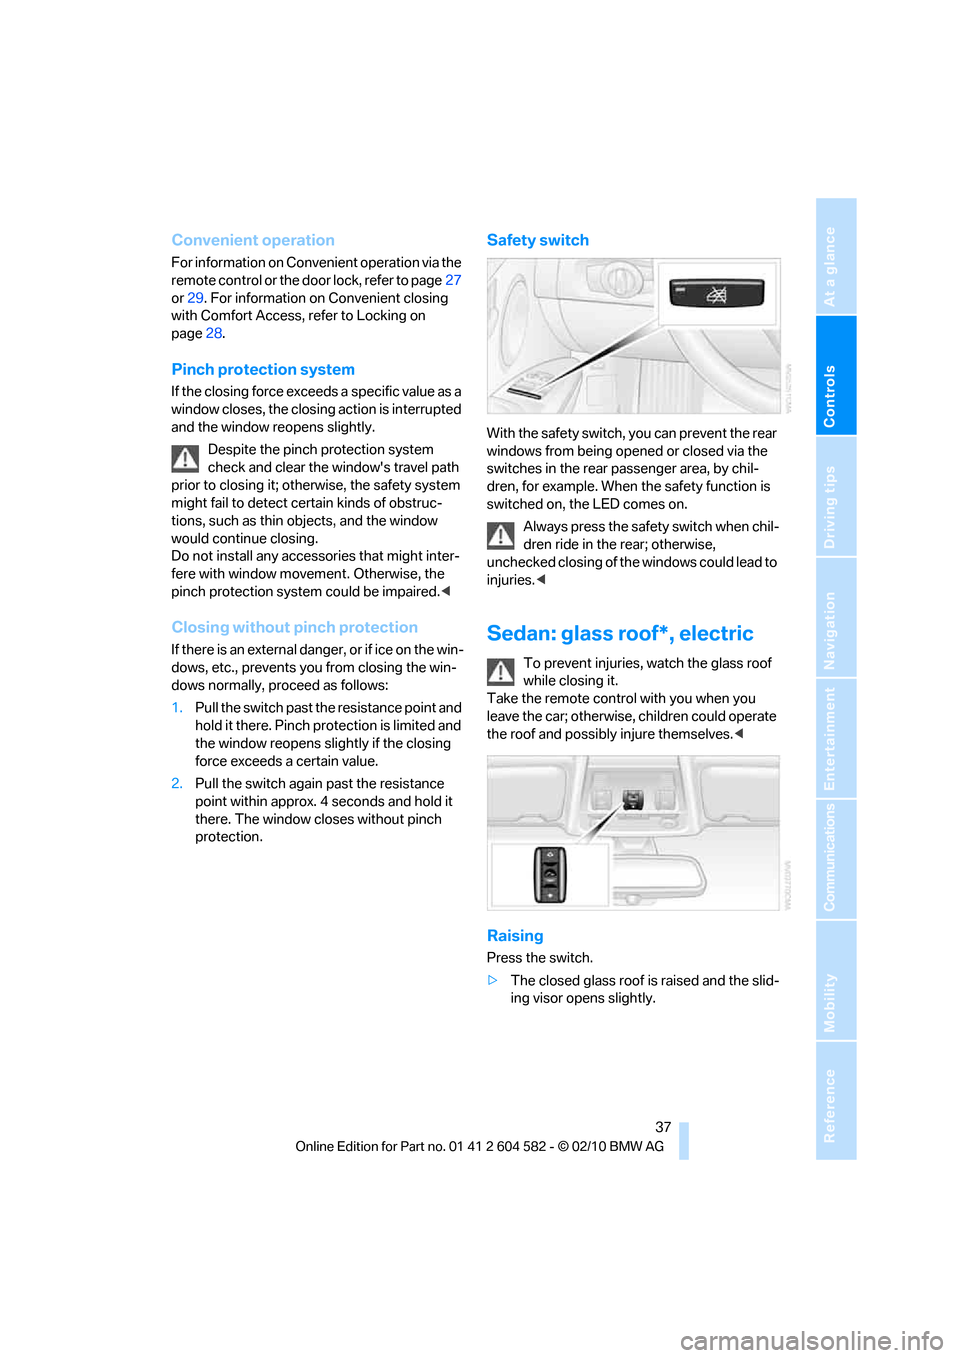
With the safety switch, you can prevent the rear
windows from being opened or closed via the
switches in the rear passenger area, by chil-
dren, for example. When the safety function is
switched on, the LED comes on.
Always press the safety switch when chil-
dren ride in the rear; otherwise,
unchecked closing of the windows could lead to
injuries.<
Sedan: glass roof*, electric
To prevent injuries, watch the glass roof
while closing it.
Take the remote control with you when you
leave the car; otherwise, children could operate
the roof and possibly injure themselves.<
Raising
Press the switch.
>The closed glass roof is raised and the slid-
ing visor opens slightly.
Page 47 of 286
Controls
45Reference
At a glance
Driving tips
Communications
Navigation
Entertainment
Mobility
Front active head restraints
In a rear collision of a sufficient strength, the
active head restraint reduces the distance to
the head.
Do not use seat or head restraint covers
that could impair the function of the active
head restraint. Otherwise, the protective func-
tion of the active head restraint will not be
ensured and its full potential in reducing the risk
of injury in the event of a rear collision may not
be realized.
In the event of malfunctions, deactivation or
triggering of the active head restraints, have the
testing, repair and removal executed only by a
BMW center or a workshop that works accord-
ing to repair procedures of BMW with corre-
spondingly trained personnel and that has the
required explosives licenses. Unprofessional
attempts to work on the system could lead to
failure in an emergency or to undesired airbag
activation, either of which could result in per-
sonal injury.<
For technical reasons, the head restraint
cannot be removed.<
Front seats
Height adjustment
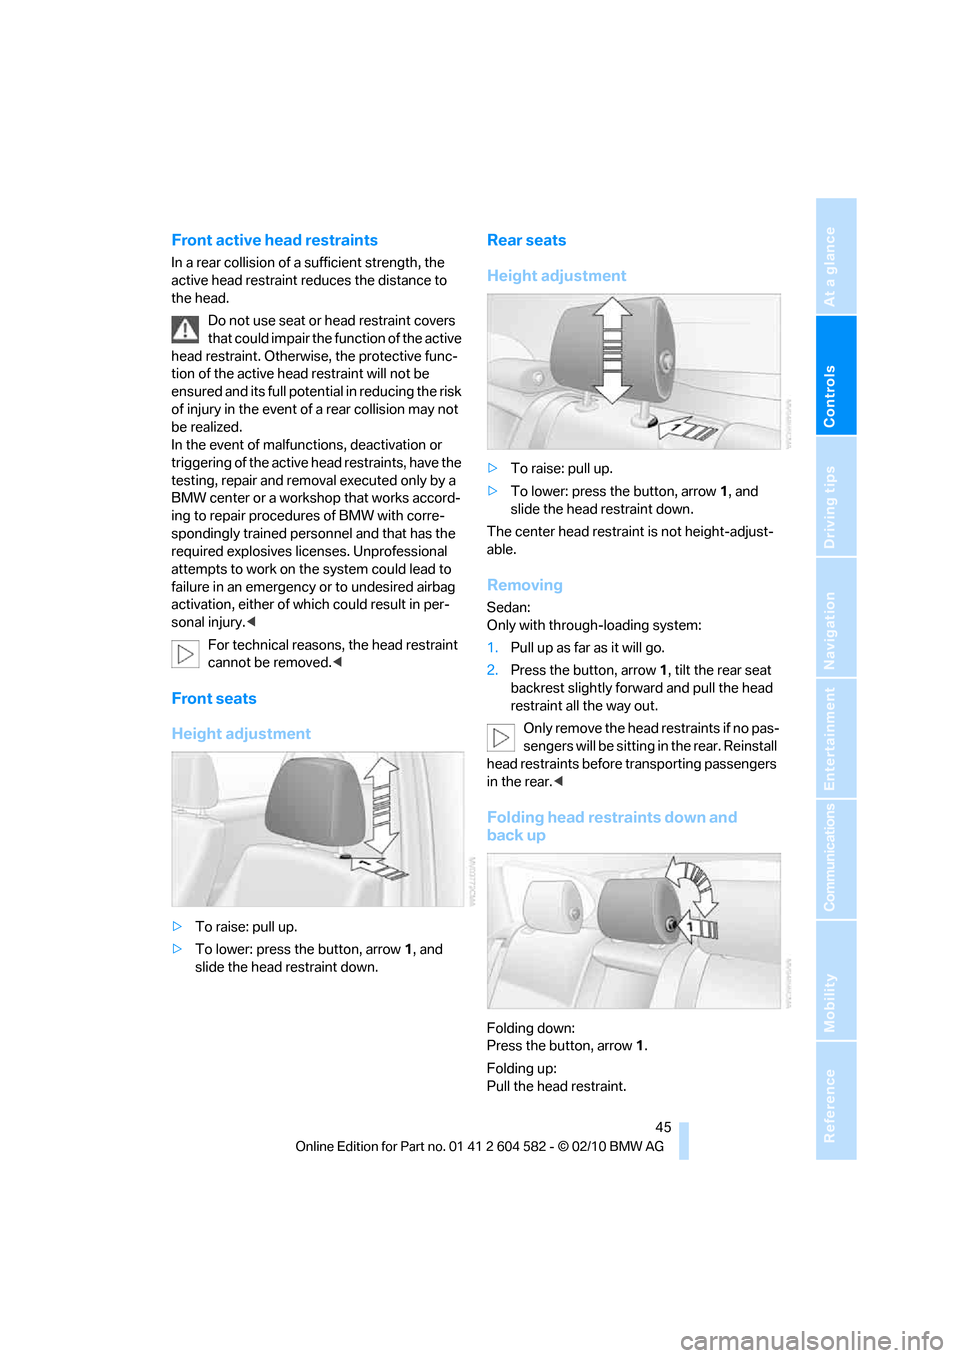
>To raise: pull up.
>To lower: press the button, arrow1, and
slide the head restraint down.
Rear seats
Height adjustment
>To raise: pull up.
>To lower: press the button, arrow1, and
slide the head restraint down.
The center head restraint is not height-adjust-
able.
Removing
Sedan:
Only with through-loading system:
1.Pull up as far as it will go.
2.Press the button, arrow 1, tilt the rear seat
backrest slightly forward and pull the head
restraint all the way out.
Only remove the head restraints if no pas-
sengers will be sitting in the rear. Reinstall
head restraints before transporting passengers
in the rear.<
Folding head restraints down and
back up
Folding down:
Press the button, arrow1.
Folding up:
Pull the head restraint.
Page 51 of 286
Controls
49Reference
At a glance
Driving tips
Communications
Navigation
Entertainment
Mobility
Passenger side mirror tilt function –
automatic curb monitor*
Activating
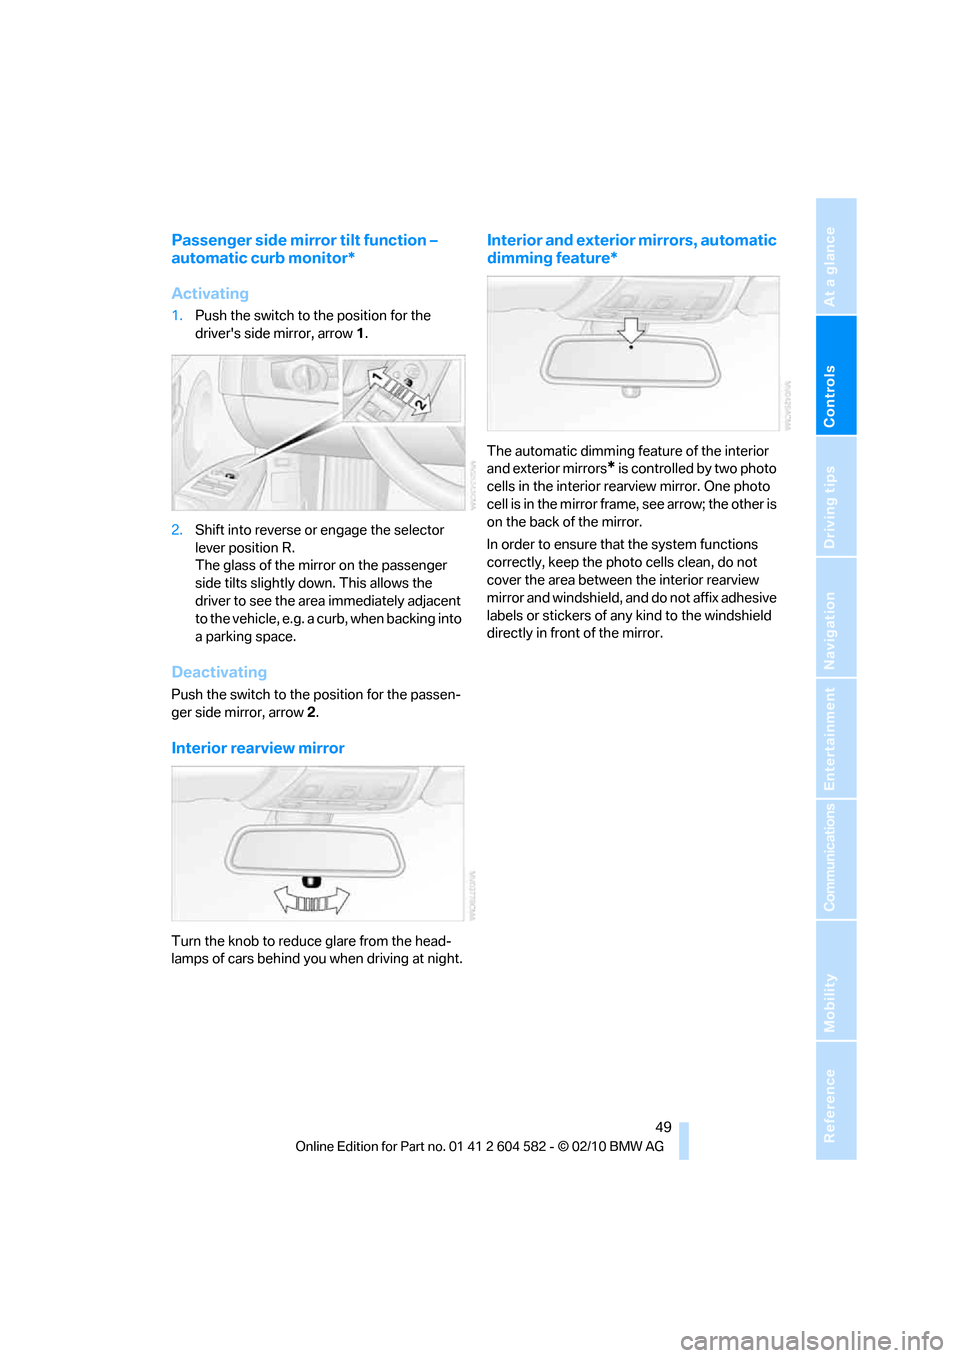
1.Push the switch to the position for the
driver's side mirror, arrow 1.
2.Shift into reverse or engage the selector
lever position R.
The glass of the mirror on the passenger
side tilts slightly down. This allows the
driver to see the area immediately adjacent
to the vehicle, e.g. a curb, when backing into
a parking space.
Deactivating
Push the switch to the position for the passen-
ger side mirror, arrow 2.
Interior rearview mirror
Turn the knob to reduce glare from the head-
lamps of cars behind you when driving at night.
Interior and exterior mirrors, automatic
dimming feature*
The automatic dimming feature of the interior
and exterior mirrors
* is controlled by two photo
cells in the interior rearview mirror. One photo
cell is in the mirror frame, see arrow; the other is
on the back of the mirror.
In order to ensure that the system functions
correctly, keep the photo cells clean, do not
cover the area between the interior rearview
mirror and windshield, and do not affix adhesive
labels or stickers of any kind to the windshield
directly in front of the mirror.
Page 53 of 286
Controls
51Reference
At a glance
Driving tips
Communications
Navigation
Entertainment
Mobility
Transporting children safely
The right place for children
Do not leave children unattended in the
vehicle; otherwise, they could endanger
themselves and/or other persons by opening
the doors, for example.<
The rear center seat is not suitable for installing
child restraint systems for all age groups,
approved for the age group in question.
Children always in the rear
Accident research has shown that the safest
place for children is on the rear seat.
Children under the age of 13 or smaller
than 5 ft/150 cm may be transported only
in the rear in suitable child restraint systems
appropriate for their age, weight and size. Oth-
erwise, there is an increased risk of injury in the
event of an accident.<
Children 13 years of age or older must be buck-
led in with a safety belt as soon as there no
longer is any child restraint system that is
appropriate for their age, size and weight.
Children in the front passenger seat
Should it be necessary to use a child
restraint system on the front passenger
seat, the front and side airbags for the front pas-
senger must be deactivated. Otherwise, a child
traveling on that seat will face a significant risk
of injury if the airbags are triggered off, even
with a child restraint system.<
For more information on automatic deactivation
of the front passenger airbags refer to page95.
Installing child restraint
systems
Observe the child restraint system manu-
facturer's instructions when selecting,
installing and using child restraint systems.
Otherwise, the protective effect may be dimin-
ished. <
Standard child restraint systems are designed
to be secured with a lap belt or with the lap-belt
section of a lap-and-shoulder belt. Incorrectly
or improperly installed child restraint systems
can increase the risk of injury to children.
Always follow the installation instructions for
the system with the greatest care.
On the front passenger seat
After installing a child restraint system on
the front passenger seat, make sure that
the front and side airbags for the front passen-
ger are deactivated; otherwise, there is an
increased risk of injury if the airbags deploy.<
Seat position
Before installing a child restraint system, move
the front passenger seat as far back and up as
possible to obtain the best possible position for
the belt. Do not change the seat position after
this.
Backrest width*
The backrest width of the front passenger
seat must be at its widest possible set-
ting. Do not change the setting after installing
the child seat. Otherwise, the child seat's stabil-
ity on the front passenger seat is limited.<
1.Adjust the backrest width to its widest
setting, refer to page44.
2.Install the child seat.
Page 55 of 286
Controls
53Reference
At a glance
Driving tips
Communications
Navigation
Entertainment
Mobility
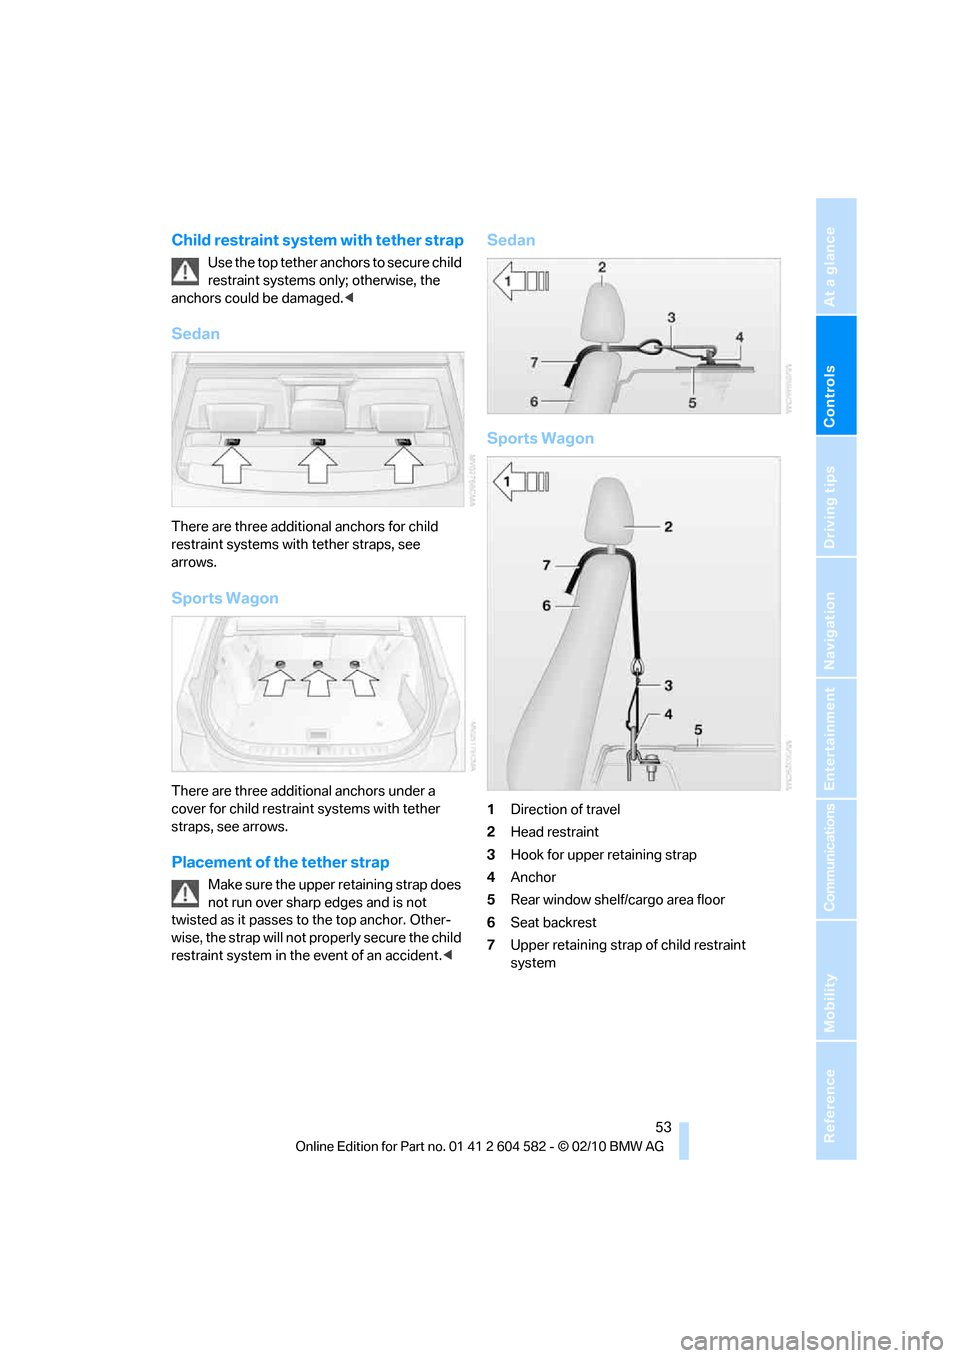
Child restraint system with tether strap
Use the top tether anchors to secure child
restraint systems only; otherwise, the
anchors could be damaged.<
Sedan
There are three additional anchors for child
restraint systems with tether straps, see
arrows.
Sports Wagon
There are three additional anchors under a
cover for child restraint systems with tether
straps, see arrows.
Placement of the tether strap
Make sure the upper retaining strap does
not run over sharp edges and is not
twisted as it passes to the top anchor. Other-
wise, the strap will not properly secure the child
restraint system in the event of an accident.<
Sedan
Sports Wagon
1Direction of travel
2Head restraint
3Hook for upper retaining strap
4Anchor
5Rear window shelf/cargo area floor
6Seat backrest
7Upper retaining strap of child restraint
system
Page 61 of 286
Controls
59Reference
At a glance
Driving tips
Communications
Navigation
Entertainment
Mobility
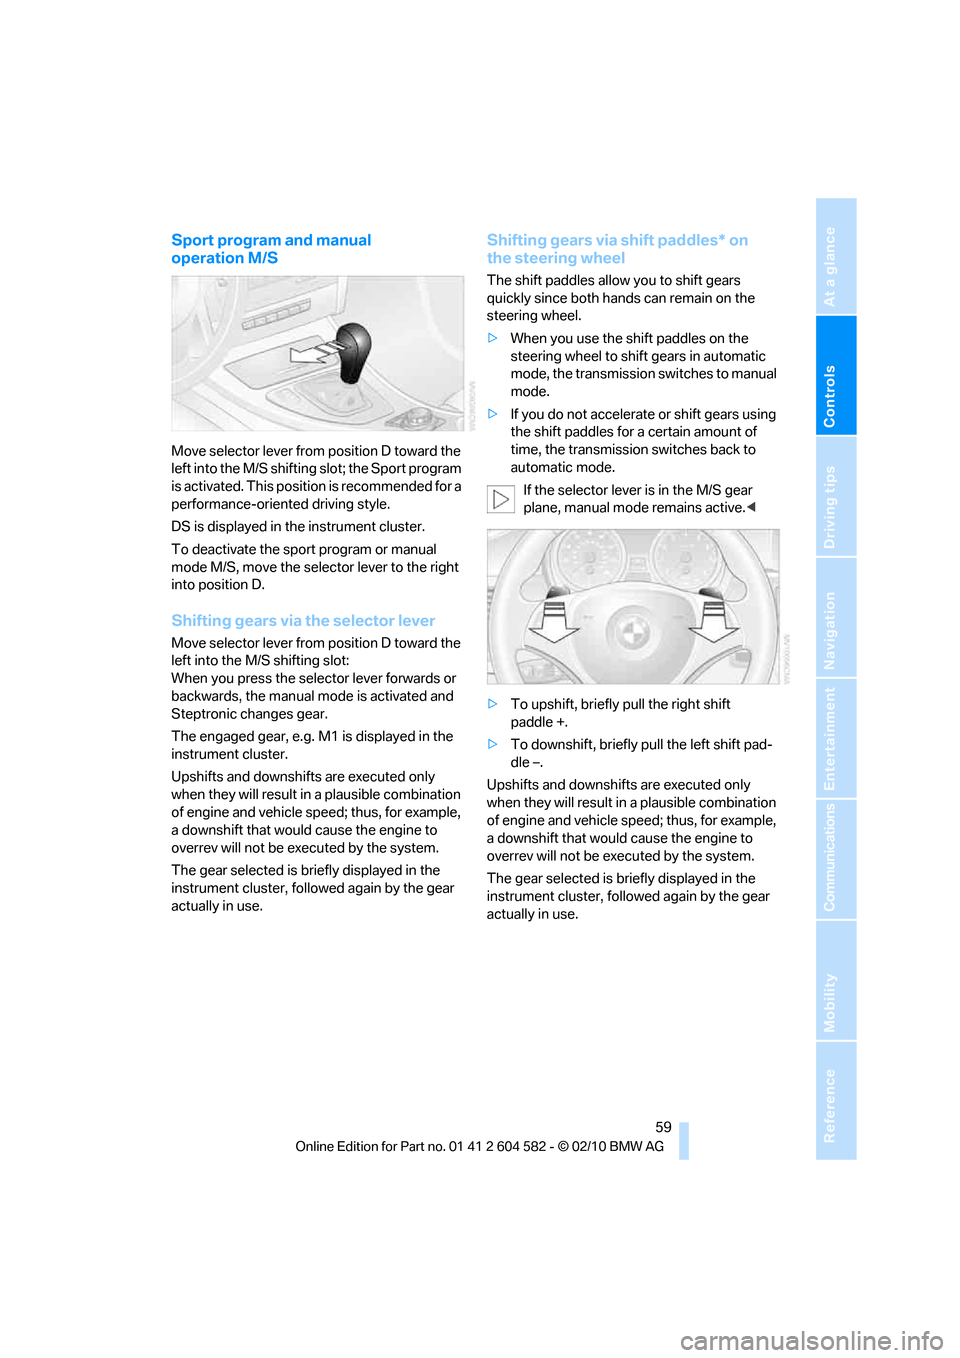
Sport program and manual
operation M/S
Move selector lever from position D toward the
left into the M/S shifting slot; the Sport program
is activated. This position is recommended for a
performance-oriented driving style.
DS is displayed in the instrument cluster.
To deactivate the sport program or manual
mode M/S, move the selector lever to the right
into position D.
Shifting gears via the selector lever
Move selector lever from position D toward the
left into the M/S shifting slot:
When you press the selector lever forwards or
backwards, the manual mode is activated and
Steptronic changes gear.
The engaged gear, e.g. M1 is displayed in the
instrument cluster.
Upshifts and downshifts are executed only
when they will result in a plausible combination
of engine and vehicle speed; thus, for example,
a downshift that would cause the engine to
overrev will not be executed by the system.
The gear selected is briefly displayed in the
instrument cluster, followed again by the gear
actually in use.
Shifting gears via shift paddles* on
the steering wheel
The shift paddles allow you to shift gears
quickly since both hands can remain on the
steering wheel.
>When you use the shift paddles on the
steering wheel to shift gears in automatic
mode, the transmission switches to manual
mode.
>If you do not accelerate or shift gears using
the shift paddles for a certain amount of
time, the transmission switches back to
automatic mode.
If the selector lever is in the M/S gear
plane, manual mode remains active.<
>To upshift, briefly pull the right shift
paddle +.
>To downshift, briefly pull the left shift pad-
dle –.
Upshifts and downshifts are executed only
when they will result in a plausible combination
of engine and vehicle speed; thus, for example,
a downshift that would cause the engine to
overrev will not be executed by the system.
The gear selected is briefly displayed in the
instrument cluster, followed again by the gear
actually in use.
Page 63 of 286
Controls
61Reference
At a glance
Driving tips
Communications
Navigation
Entertainment
Mobility
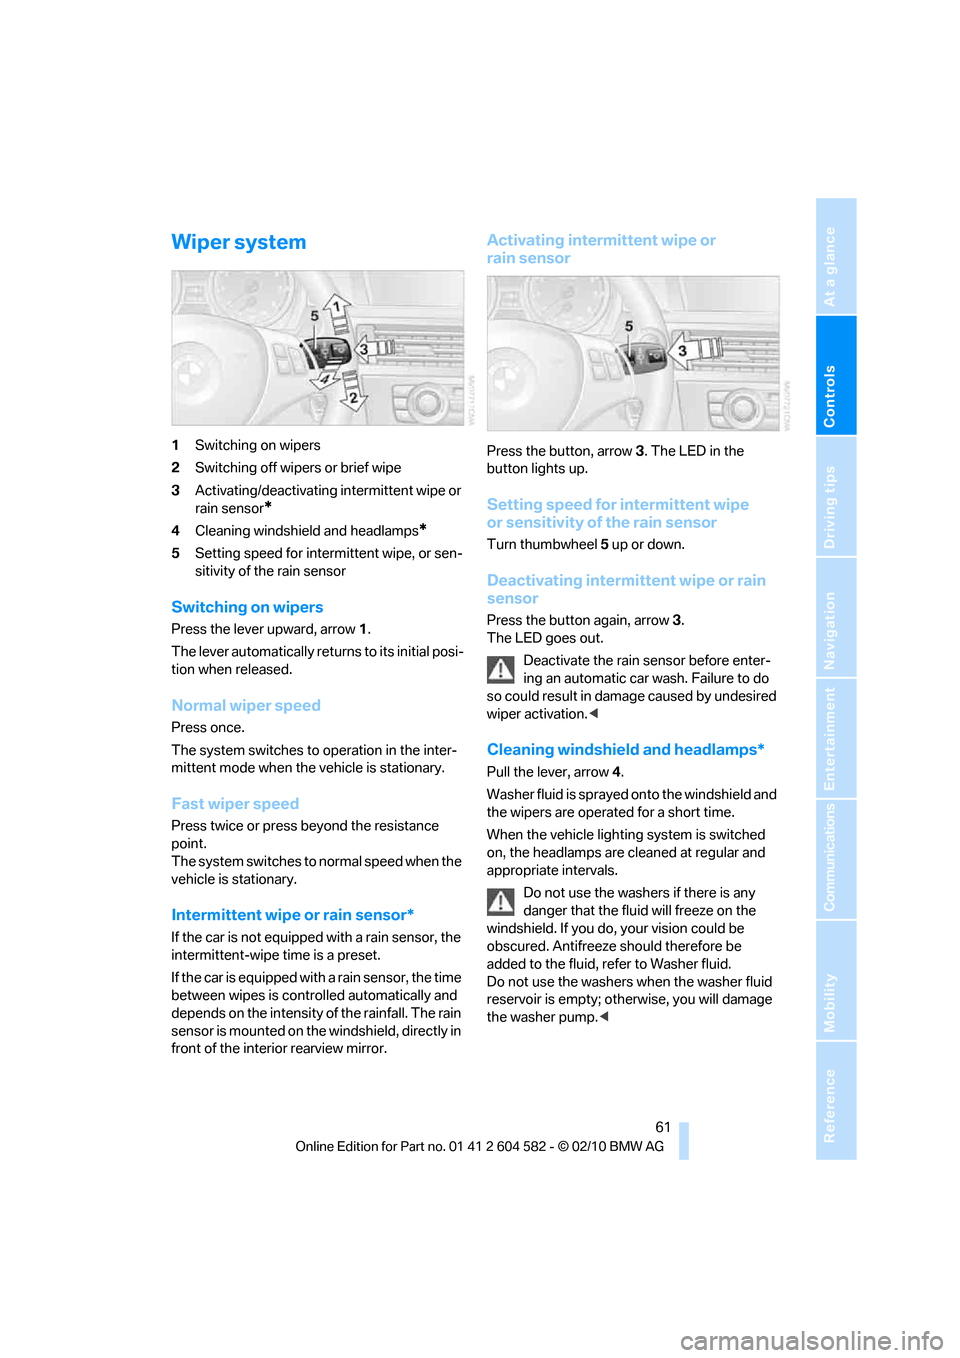
Wiper system
1Switching on wipers
2Switching off wipers or brief wipe
3Activating/deactivating intermittent wipe or
rain sensor
*
4Cleaning windshield and headlamps*
5Setting speed for intermittent wipe, or sen-
sitivity of the rain sensor
Switching on wipers
Press the lever upward, arrow 1.
The lever automatically returns to its initial posi-
tion when released.
Normal wiper speed
Press once.
The system switches to operation in the inter-
mittent mode when the vehicle is stationary.
Fast wiper speed
Press twice or press beyond the resistance
point.
The system switches to normal speed when the
vehicle is stationary.
Intermittent wipe or rain sensor*
If the car is not equipped with a rain sensor, the
intermittent-wipe time is a preset.
If the car is equipped with a rain sensor, the time
between wipes is controlled automatically and
depends on the intensity of the rainfall. The rain
sensor is mounted on the windshield, directly in
front of the interior rearview mirror.
Activating intermittent wipe or
rain sensor
Press the button, arrow3. The LED in the
button lights up.
Setting speed for intermittent wipe
or sensitivity of the rain sensor
Turn thumbwheel5 up or down.
Deactivating intermittent wipe or rain
sensor
Press the button again, arrow3.
The LED goes out.
Deactivate the rain sensor before enter-
ing an automatic car wash. Failure to do
so could result in damage caused by undesired
wiper activation.<
Cleaning windshield and headlamps*
Pull the lever, arrow 4.
Washer fluid is sprayed onto the windshield and
the wipers are operated for a short time.
When the vehicle lighting system is switched
on, the headlamps are cleaned at regular and
appropriate intervals.
Do not use the washers if there is any
danger that the fluid will freeze on the
windshield. If you do, your vision could be
obscured. Antifreeze should therefore be
added to the fluid, refer to Washer fluid.
Do not use the washers when the washer fluid
reservoir is empty; otherwise, you will damage
the washer pump.<
Page 65 of 286
Controls
63Reference
At a glance
Driving tips
Communications
Navigation
Entertainment
Mobility
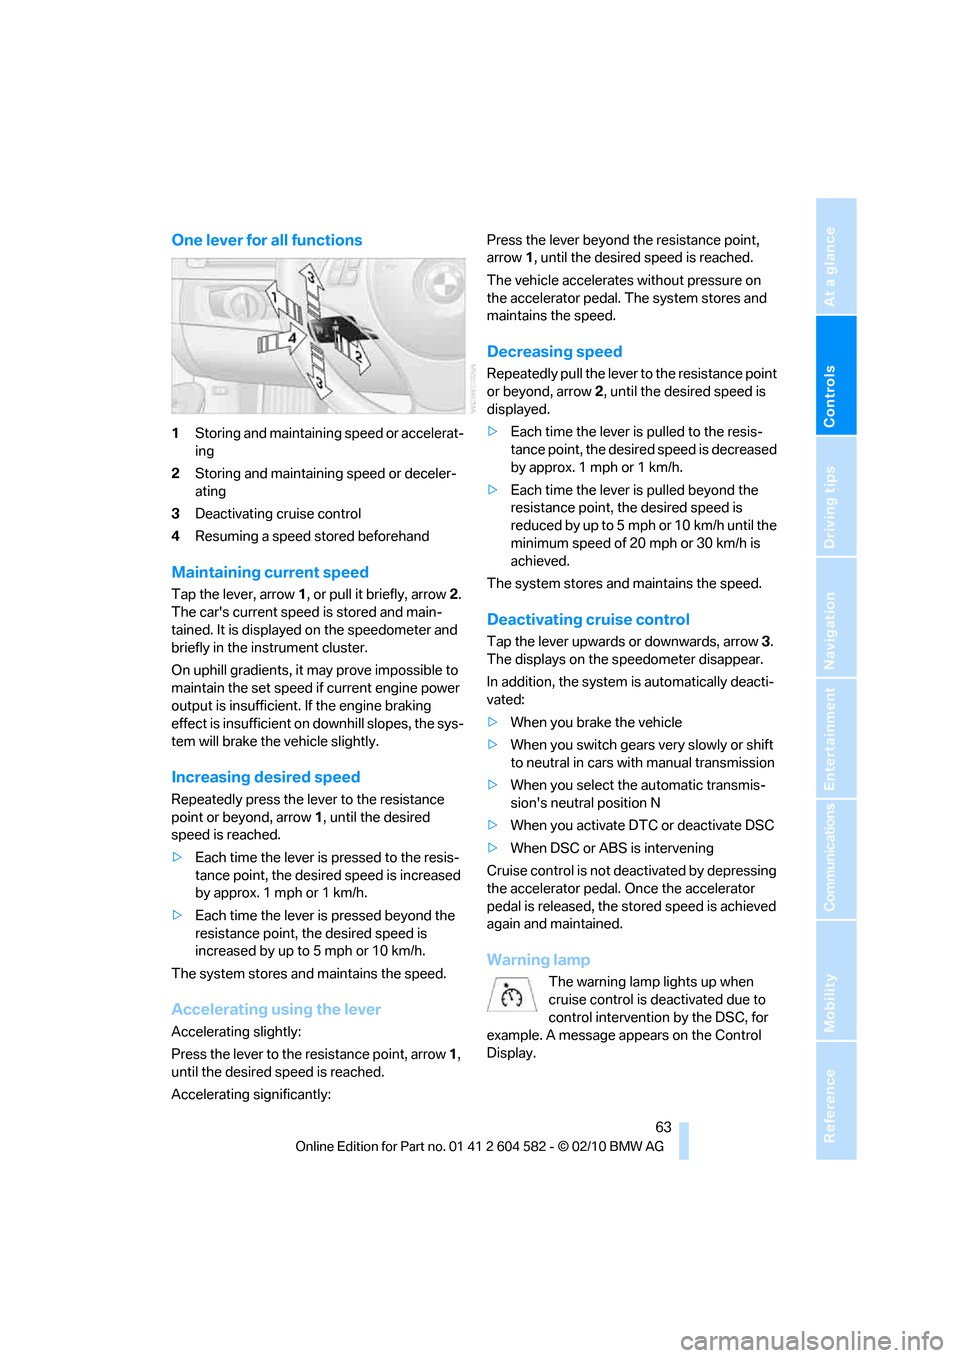
One lever for all functions
1Storing and maintaining speed or accelerat-
ing
2Storing and maintaining speed or deceler-
ating
3Deactivating cruise control
4Resuming a speed stored beforehand
Maintaining current speed
Tap the lever, arrow 1, or pull it briefly, arrow 2.
The car's current speed is stored and main-
tained. It is displayed on the speedometer and
briefly in the instrument cluster.
On uphill gradients, it may prove impossible to
maintain the set speed if current engine power
output is insufficient. If the engine braking
effect is insufficient on downhill slopes, the sys-
tem will brake the vehicle slightly.
Increasing desired speed
Repeatedly press the lever to the resistance
point or beyond, arrow1, until the desired
speed is reached.
>Each time the lever is pressed to the resis-
tance point, the desired speed is increased
by approx. 1 mph or 1 km/h.
>Each time the lever is pressed beyond the
resistance point, the desired speed is
increased by up to 5 mph or 10 km/h.
The system stores and maintains the speed.
Accelerating using the lever
Accelerating slightly:
Press the lever to the resistance point, arrow 1,
until the desired speed is reached.
Accelerating significantly:Press the lever beyond the resistance point,
arrow 1, until the desired speed is reached.
The vehicle accelerates without pressure on
the accelerator pedal. The system stores and
maintains the speed.
Decreasing speed
Repeatedly pull the lever to the resistance point
or beyond, arrow 2, until the desired speed is
displayed.
>Each time the lever is pulled to the resis-
tance point, the desired speed is decreased
by approx. 1 mph or 1 km/h.
>Each time the lever is pulled beyond the
resistance point, the desired speed is
re duc e d by up to 5 mph or 10 k m/h until the
minimum speed of 20 mph or 30 km/h is
achieved.
The system stores and maintains the speed.
Deactivating cruise control
Tap the lever upwards or downwards, arrow3.
The displays on the speedometer disappear.
In addition, the system is automatically deacti-
vated:
>When you brake the vehicle
>When you switch gears very slowly or shift
to neutral in cars with manual transmission
>When you select the automatic transmis-
sion's neutral position N
>When you activate DTC or deactivate DSC
>When DSC or ABS is intervening
Cruise control is not deactivated by depressing
the accelerator pedal. Once the accelerator
pedal is released, the stored speed is achieved
again and maintained.
Warning lamp
The warning lamp lights up when
cruise control is deactivated due to
control intervention by the DSC, for
example. A message appears on the Control
Display.
Page 67 of 286
Controls
65Reference
At a glance
Driving tips
Communications
Navigation
Entertainment
Mobility
Braking sensation
>If you step on the brake pedal while the sys-
tem is braking, pedal sensation will be
slightly different from the usual.
>Possible noises during automatic braking
are normal.
Manual transmission
You can shift gears while cruise control is acti-
vated. The system is deactivated when you
drive at very low engine speeds for an extended
period.
Range of applications
The minimum desired speed is 20 mph or
30 km/h, the maximum desired speed is
110 mph or 180 km/h.
As with conventional cruise control sys-
tems, active cruise control in no way
diminishes or substitutes for the driver’s own
personal responsibility, alertness and aware-
ness in adjusting speed, braking or otherwise
controlling the vehicle. The driver should
decide when to use the system on the basis of
road, traffic, visibility, and weather conditions.
Active cruise control is intended for use on
highway-type roadways where traffic is moving
relatively smoothly. Do not use this system in
city driving; heavy traffic such as during rush
hour; on curvy, winding roads, slippery roads or
roads with sharp curves such as highway off-
ramps; during inclement weather such as snow,
strong rain or fog; or when entering inter-
changes, service/parking areas or toll booths.
It is also important to regulate your vehicle's
speed and distance setting within applicable
legal limits. Always be ready to take action or
apply the brakes if necessary, especially when
the system is actively following a vehicle in front
of you. Otherwise, driving situations could
result that pose the risk of accidents.<
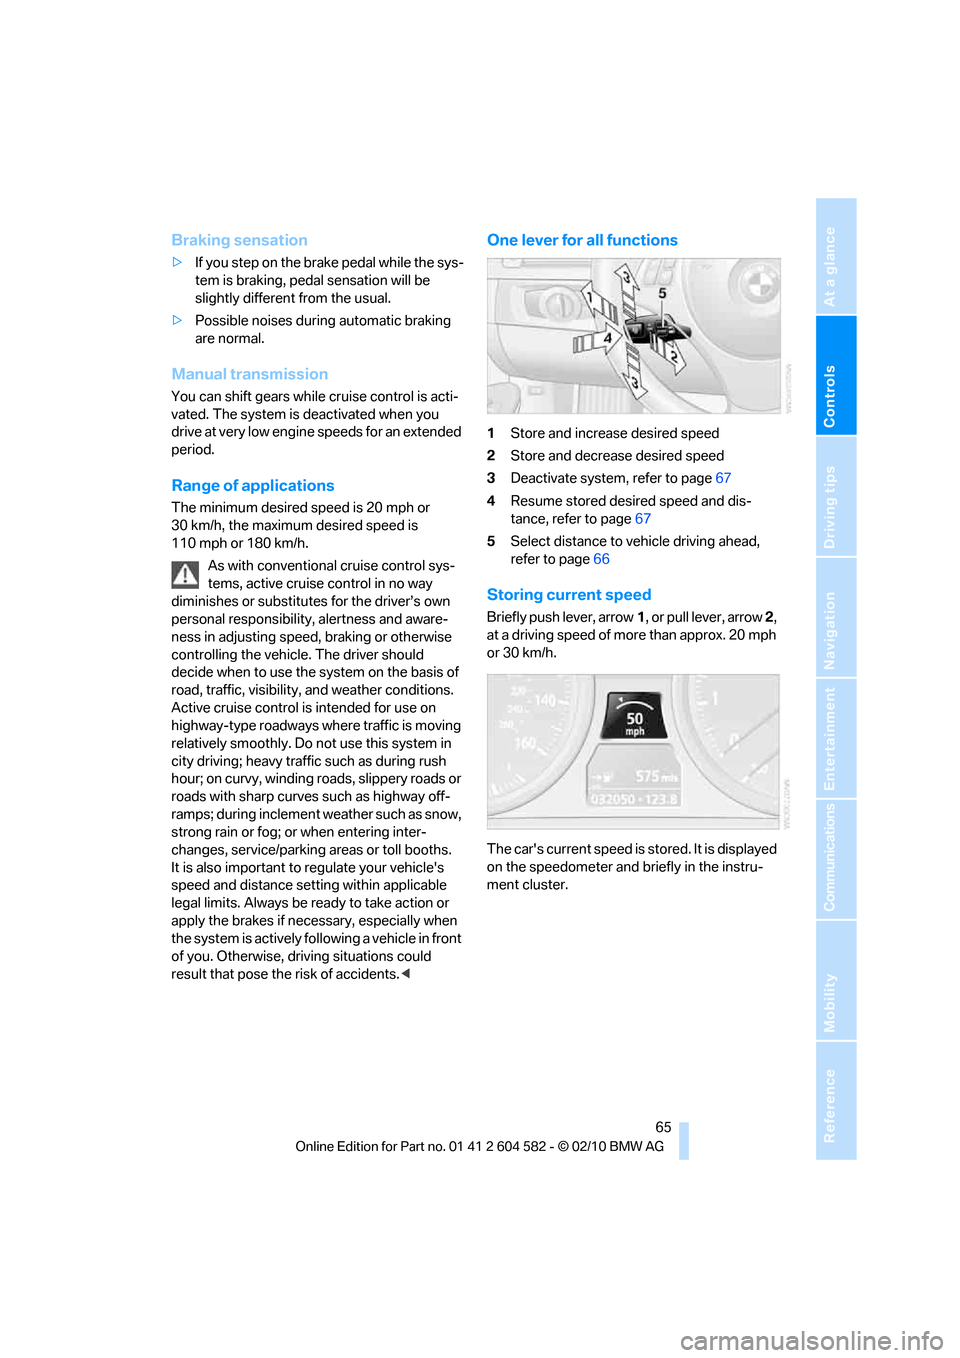
One lever for all functions
1Store and increase desired speed
2Store and decrease desired speed
3Deactivate system, refer to page67
4Resume stored desired speed and dis-
tance, refer to page67
5Select distance to vehicle driving ahead,
refer to page66
Storing current speed
Briefly push lever, arrow1, or pull lever, arrow 2,
at a driving speed of more than approx. 20 mph
or 30 km/h.
The car's current speed is stored. It is displayed
on the speedometer and briefly in the instru-
ment cluster.
Page 69 of 286
Controls
67Reference
At a glance
Driving tips
Communications
Navigation
Entertainment
Mobility
Deactivating cruise control
Press the lever upward or downward, arrow3.
The displays on the speedometer disappear.
In addition, the system is automatically deacti-
vated:
>When you brake the vehicle
>When the speed is reduced to below
20 mph or 30 km/h due to a traffic situation
>When you switch gears very slowly or shift
to neutral in cars with manual transmission
>When you select the automatic transmis-
sion's neutral position N
>When you activate the Dynamic Traction
Control DTC
>When you deactivate the Dynamic Stability
Control DSC
>When DSC or ABS is intervening
>When the system does not recognize any
objects for a longer period of time, e.g. on
infrequently traveled roads without a shoul-
der or guard rails, or if the radar sensor is
covered with dirt, refer to page68
>When you apply the parking brake
When the system is deactivated, you
must brake the vehicle yourself and/or
maneuver as necessary; otherwise, there is a
risk of accidents.<
Warning lamp
The warning lamp comes on when
active cruise control has been auto-
matically deactivated, for example
due to a driving speed below 20 mph or 30 km/
h or a DSC intervention. A message appears on
the Control Display.
Resuming stored desired speed and
distance
Briefly press the button, arrow 4.
The stored speed and distance are regained
and maintained.
In the following instances, the stored speed is
deleted and can no longer be resumed:
>When driving stability control systems are
intervening
>In cars with manual transmission: when you
shift gears very slowly or shift to neutral
>In cars with automatic transmission: when
you engage selector lever position N
>When the ignition is switched off
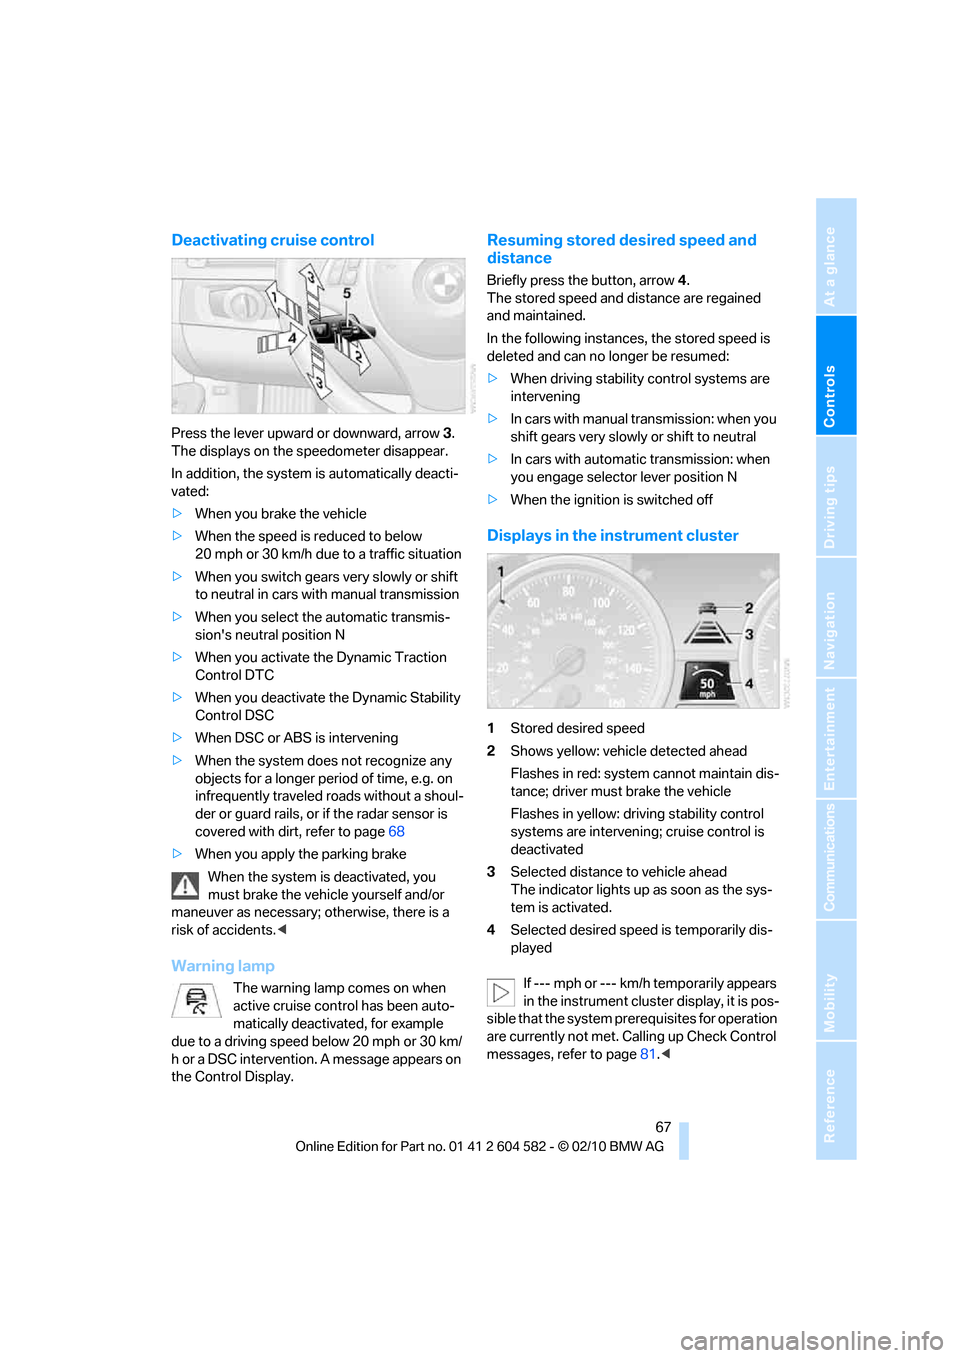
Displays in the instrument cluster
1Stored desired speed
2Shows yellow: vehicle detected ahead
Flashes in red: system cannot maintain dis-
tance; driver must brake the vehicle
Flashes in yellow: driving stability control
systems are intervening; cruise control is
deactivated
3Selected distance to vehicle ahead
The indicator lights up as soon as the sys-
tem is activated.
4Selected desired speed is temporarily dis-
played
If --- mph or --- km/h temporarily appears
in the instrument cluster display, it is pos-
sible that the system prerequisites for operation
are currently not met. Calling up Check Control
messages, refer to page81.<