navigation system BMW 335D 2011 E90 Owner's Guide
[x] Cancel search | Manufacturer: BMW, Model Year: 2011, Model line: 335D, Model: BMW 335D 2011 E90Pages: 286, PDF Size: 8.25 MB
Page 71 of 286
Controls
69Reference
At a glance
Driving tips
Communications
Navigation
Entertainment
Mobility
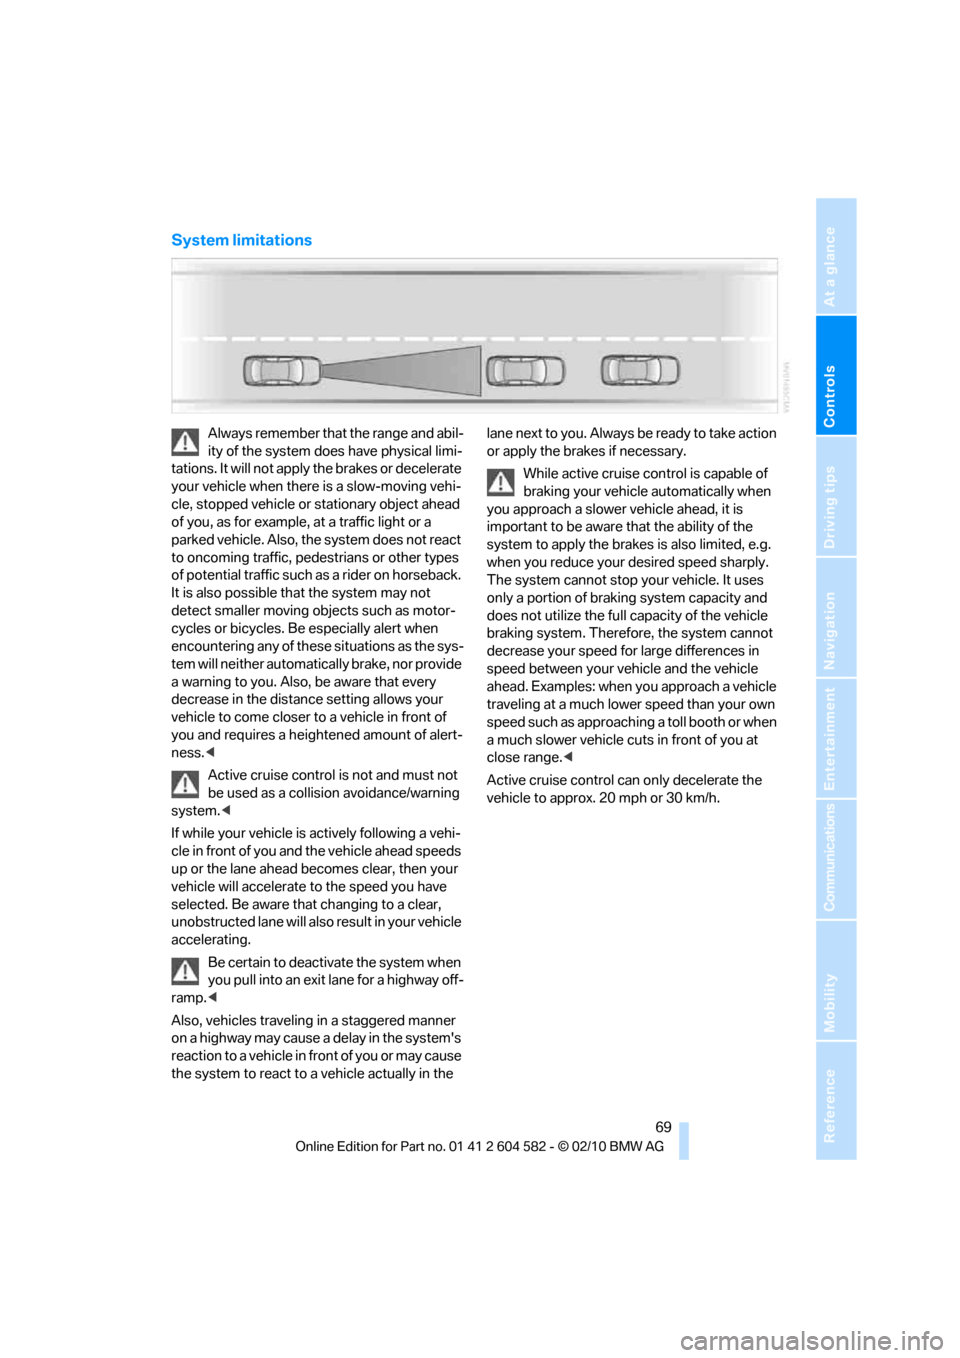
System limitations
Always remember that the range and abil-
ity of the system does have physical limi-
tations. It will not apply the brakes or decelerate
your vehicle when there is a slow-moving vehi-
cle, stopped vehicle or stationary object ahead
of you, as for example, at a traffic light or a
parked vehicle. Also, the system does not react
to oncoming traffic, pedestrians or other types
of potential traffic such as a rider on horseback.
It is also possible that the system may not
detect smaller moving objects such as motor-
cycles or bicycles. Be especially alert when
encountering any of these situations as the sys-
tem will neither automatically brake, nor provide
a warning to you. Also, be aware that every
decrease in the distance setting allows your
vehicle to come closer to a vehicle in front of
you and requires a heightened amount of alert-
ness.<
Active cruise control is not and must not
be used as a collision avoidance/warning
system.<
If while your vehicle is actively following a vehi-
cle in front of you and the vehicle ahead speeds
up or the lane ahead becomes clear, then your
vehicle will accelerate to the speed you have
selected. Be aware that changing to a clear,
unobstructed lane will also result in your vehicle
accelerating.
Be certain to deactivate the system when
you pull into an exit lane for a highway off-
ramp.<
Also, vehicles traveling in a staggered manner
on a highway may cause a delay in the system's
reaction to a vehicle in front of you or may cause
the system to react to a vehicle actually in the lane next to you. Always be ready to take action
or apply the brakes if necessary.
While active cruise control is capable of
braking your vehicle automatically when
you approach a slower vehicle ahead, it is
important to be aware that the ability of the
system to apply the brakes is also limited, e.g.
when you reduce your desired speed sharply.
The system cannot stop your vehicle. It uses
only a portion of braking system capacity and
does not utilize the full capacity of the vehicle
braking system. Therefore, the system cannot
decrease your speed for large differences in
speed between your vehicle and the vehicle
ahead. Examples: when you approach a vehicle
traveling at a much lower speed than your own
speed such as approaching a toll booth or when
a much slower vehicle cuts in front of you at
close range.<
Active cruise control can only decelerate the
vehicle to approx. 20 mph or 30 km/h.
Page 81 of 286
Controls
79Reference
At a glance
Driving tips
Communications
Navigation
Entertainment
Mobility
Clock
The settings are stored for the remote control
currently in use, refer also to Personal Profile on
page26.
Setting the time
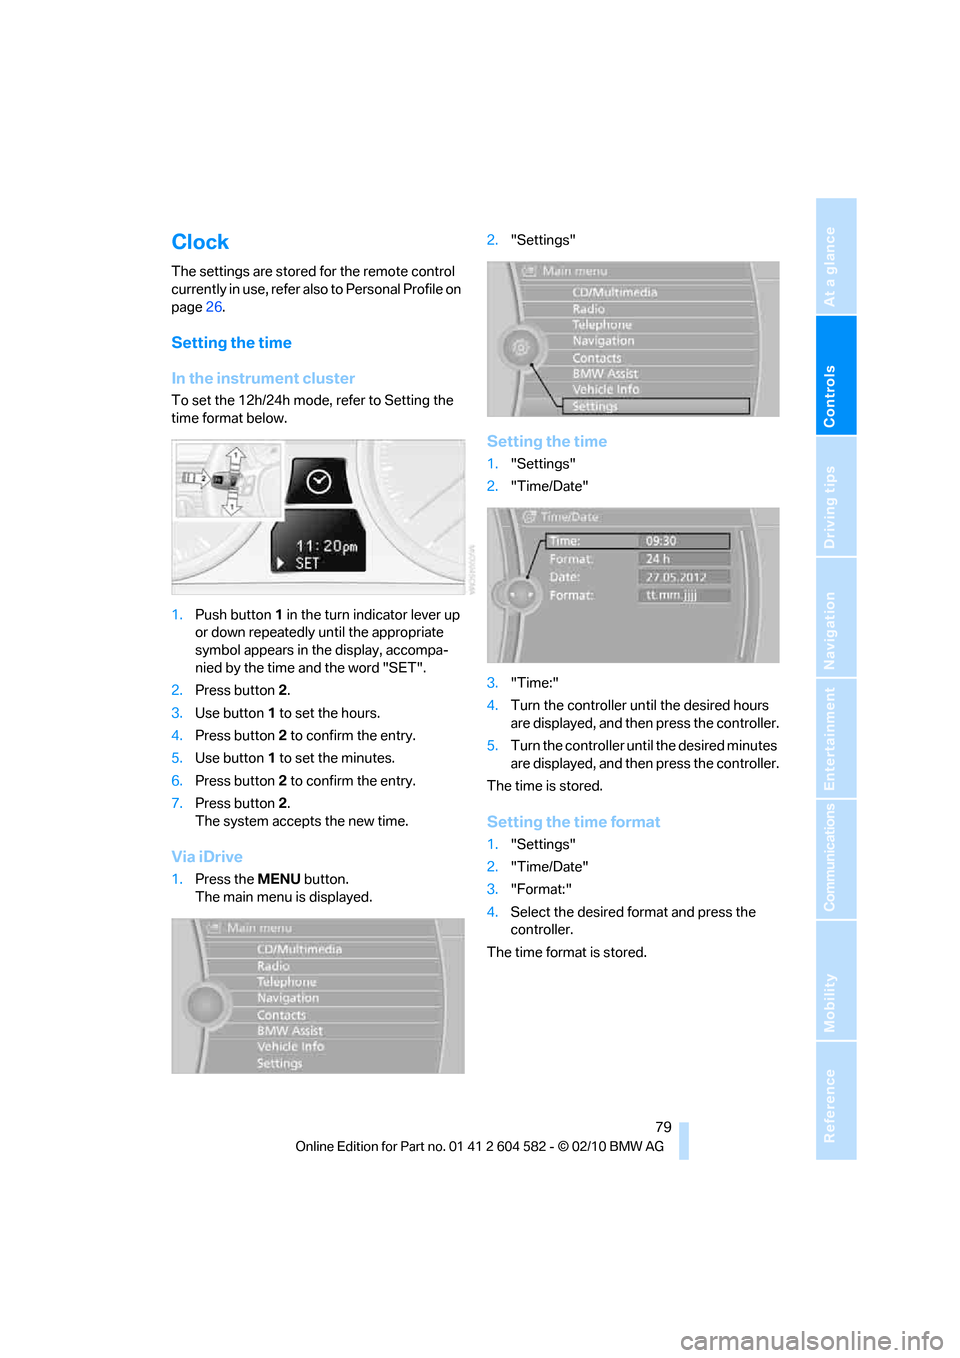
In the instrument cluster
To set the 12h/24h mode, refer to Setting the
time format below.
1.Push button 1 in the turn indicator lever up
or down repeatedly until the appropriate
symbol appears in the display, accompa-
nied by the time and the word "SET".
2.Press button 2.
3.Use button 1 to set the hours.
4.Press button 2 to confirm the entry.
5.Use button 1 to set the minutes.
6.Press button 2 to confirm the entry.
7.Press button 2.
The system accepts the new time.
Via iDrive
1.Press the MENUbutton.
The main menu is displayed.2."Settings"
Setting the time
1."Settings"
2."Time/Date"
3."Time:"
4.Turn the controller until the desired hours
are displayed, and then press the controller.
5.Turn the controller until the desired minutes
are displayed, and then press the controller.
The time is stored.
Setting the time format
1."Settings"
2."Time/Date"
3."Format:"
4.Select the desired format and press the
controller.
The time format is stored.
Page 87 of 286
Controls
85Reference
At a glance
Driving tips
Communications
Navigation
Entertainment
Mobility
System limitations
Even with PDC, final responsibility for
estimating the distance between the
vehicle and any obstructions always remains
with the driver. Even when sensors are pro-
vided, there is a blind spot in which objects can
no longer be detected. The system is also sub-
ject to the physical limits that apply to all forms
of ultrasonic measurement, such as those
encountered with trailer towbars and hitches,
t h i n o r w e d g e - s h a p e d o b j e c t s , e t c . L o w o b j e c t s
that have already been displayed, e.g. curbs,
can disappear again from the detection area of
the sensors before or after a continuous tone
sounds. Higher, protruding objects, e.g. ledges,
cannot be detected. Therefore, always drive
cautiously; otherwise, there is a risk of personal
injury or property damage.
Loud sound sources outside or inside the car
can drown out the PDC signal. Therefore,
always drive cautiously; otherwise, there is
a risk of personal injury or property damage.<
Driving stability control
systems
Your BMW has a number of systems that help
to maintain the vehicle's stability even in
adverse driving conditions.
Antilock Brake System ABS
ABS prevents locking of the wheels during
braking. Safe steering response is maintained
even during full braking. Active safety is thus
increased.
The ABS is operational every time you start the
engine. Braking safely, refer to page124.
Electronic brake-force distribution
EBV
The system controls the brake pressure in the
rear wheels to ensure stable braking behavior.
Dynamic Brake Control DBC
When you apply the brakes rapidly, this system
automatically produces the maximum braking
force boost and thus helps to achieve the short-
est possible braking distance during full brak-
ing. This system exploits all of the benefits pro-
vided by ABS.
Do not reduce the pressure on the brake for the
duration of the full braking application.
Dynamic Stability Control DSC
DSC prevents the driving wheels from losing
traction when you pull away from rest or accel-
erate. The system also recognizes unstable
driving conditions, for example if the rear of the
car is about to swerve or if momentum is acting
at an angle past the front wheels. In these
cases, DSC helps the vehicle maintain a safe
course within physical limits by reducing engine
output and through braking actions at the indi-
vidual wheels.
The laws of physics cannot be repealed,
even with DSC. An appropriate driving
style always remains the responsibility of the
driver. Therefore, do not reduce the additional
s a f e t y m a r g i n a g a i n b y t a k i n g r i s k s , a s t h i s c o u l d
result in an accident.<
Page 91 of 286
Controls
89Reference
At a glance
Driving tips
Communications
Navigation
Entertainment
Mobility
Indication of a flat tire
The warning lamps come on in yellow
and red. A message appears on the
Control Display. In addition, an
acoustic signal sounds. There is a flat
tire or substantial loss of tire pressure.
What to do in case of a flat tire
Run-flat tires
With a damaged tire, is possible to continue
driving at speeds of up to 50 mph/80 km/h.
Do not continue driving if the vehicle is
not equipped with run-flat tires, refer to
page223; continued driving could result in a
severe accident.<
When continuing to drive with a damaged tire:
1.Avoid sudden braking and steering maneu-
vers.
2.Do not exceed a speed of 50 mph/80 km/h.
3.At the next opportunity, check the air pres-
sure in all four tires.
If all four tires are inflated to the cor-
rect pressures, the Flat Tire Monitor
might not have been initialized. The system
must then be initialized.<
Possible travel distance with complete tire
pressure loss:
>With a light load:
1 to 2 persons without luggage:
Approx. 155 miles/250 km
>With a medium load:
2 persons, cargo area full, or 4 persons
without luggage:
Approx. 94 miles/150 km
>With a full load:
4 or more persons, cargo area full:
Approx. 30 miles/50 km
Drive cautiously and do not exceed a
speed of 50 mph/80 km/h.
When there is a tire pressure loss, the handling
characteristics change, e.g. there will be
reduced directional stability during braking,
braking distances will be longer, and self-steer-
ing response will change.
Reduce your speed and bring the vehicle to a
stop; otherwise, tire components may become
detached, which could result in an accident.
Do not continue driving; instead, contact your
BMW center.<
Tire Pressure Monitor TPM*
The concept
Check the inflation pressure in the four installed
tires. The system notifies you if there is a signif-
icant loss of pressure in one or more tires.
Functional requirement
The system has to have been reset at the cor-
rect inflation pressure; otherwise, a reliable
reporting of a flat tire is not assured.
Always use wheels with TPM electronics to
assure a trouble-free function of the system.
Each time a tire inflation pressure has
been corrected or a wheel or tire has been
changed, reset the system.<
System limitations
It is impossible to provide advance warn-
ing of sudden, severe tire damage caused
by outside influences.<
The system does not function correctly if it has
not been reset. For example, a flat tire may be
indicated even though the tire inflation pres-
sures are correct.
The system is inactive and cannot indicate a flat
tire:
>when a wheel without TPM electronics is
installed.
>when other systems or devices that use the
same radio frequency interfere with TPM.
Page 93 of 286
Controls
91Reference
At a glance
Driving tips
Communications
Navigation
Entertainment
Mobility
Message for low tire inflation pressure
The warning lamps come on in yellow
and red. A message appears on the
Control Display. In addition, a signal
sounds.
>There is a flat tire or substantial loss of tire
pressure.
>The system was not reset after a wheel
change and will thus issue warnings at the
last initialized inflation pressures.
Cautiously reduce speed to below 50 mph/
80 km/h. Avoid sudden braking and steering
maneuvers. Do not exceed a speed of 50 mph/
80 km/h.
Do not continue driving if the vehicle is
not equipped with run-flat tires, refer to
page223; continued driving could result in a
severe accident.<
Continuing to drive with a flat tire
Possible travel distance with complete tire
pressure loss:
>With a light load:
1 to 2 persons without luggage:
Approx. 155 miles/250 km
>With a medium load:
2 persons, cargo area full, or 4 persons
without luggage:
Approx. 95 miles/150 km
>With a full load:
4 or more persons, cargo area full:
Approx. 30 miles/50 km
Drive cautiously and do not exceed a
speed of 50 mph/80 km/h.
When there is a tire pressure loss, the handling
characteristics change, e.g. there will be
reduced directional stability during braking,
braking distances will be longer, and self-steer-
ing response will change.<
Vibrations or loud noises during driving
may indicate the final failure of the tire.
Reduce your speed and bring the vehicle to a
stop; otherwise, tire components may become
detached, which could result in an accident. Do
not continue driving; instead, contact your
BMW center.<
Message for unsuccessful
system reset
Yellow warning lamp comes on.
A message appears on the
Control Display.
The system is not reset, e.g. after a wheel
change.
Check the tire inflation pressure and reset the
system, refer to page90.
Malfunction
The small warning lamp flashes in
yellow and then lights up continu-
ously; the large warning lamp comes
on in yellow. The tires appear in gray
in the Control Display. No punctures can be
detected.
Display in the following situations:
>Malfunction
Have the system checked.
>A wheel without TPM electronics has been
installed:
Have it checked by your BMW center.
>Interference from systems or devices that
use the same radio frequency:
The system automatically becomes active
again when the vehicle moves out of the
interference zone.
Declaration according to NHTSA/
FMVSS 138
Tire Pressure Monitoring Systems
Each tire should be checked monthly when cold
and inflated to the inflation pressure recom-
mended by the vehicle manufacturer on the
vehicle placard or tire inflation pressure label. If
your vehicle has tires of a different size than the
size indicated on the vehicle placard or tire infla-
tion pressure label, you should determine the
proper tire inflation pressure for those tires. As
an added safety feature, your vehicle has been
equipped with a tire pressure monitoring sys-
tem, TPMS, that illuminates a low tire pressure
telltale when one or more of your tires are signif-
icantly underinflated. Accordingly, when the
low tire pressure telltale illuminates, you should
Page 96 of 286
Technology for driving comfort and safety
94
Airbags
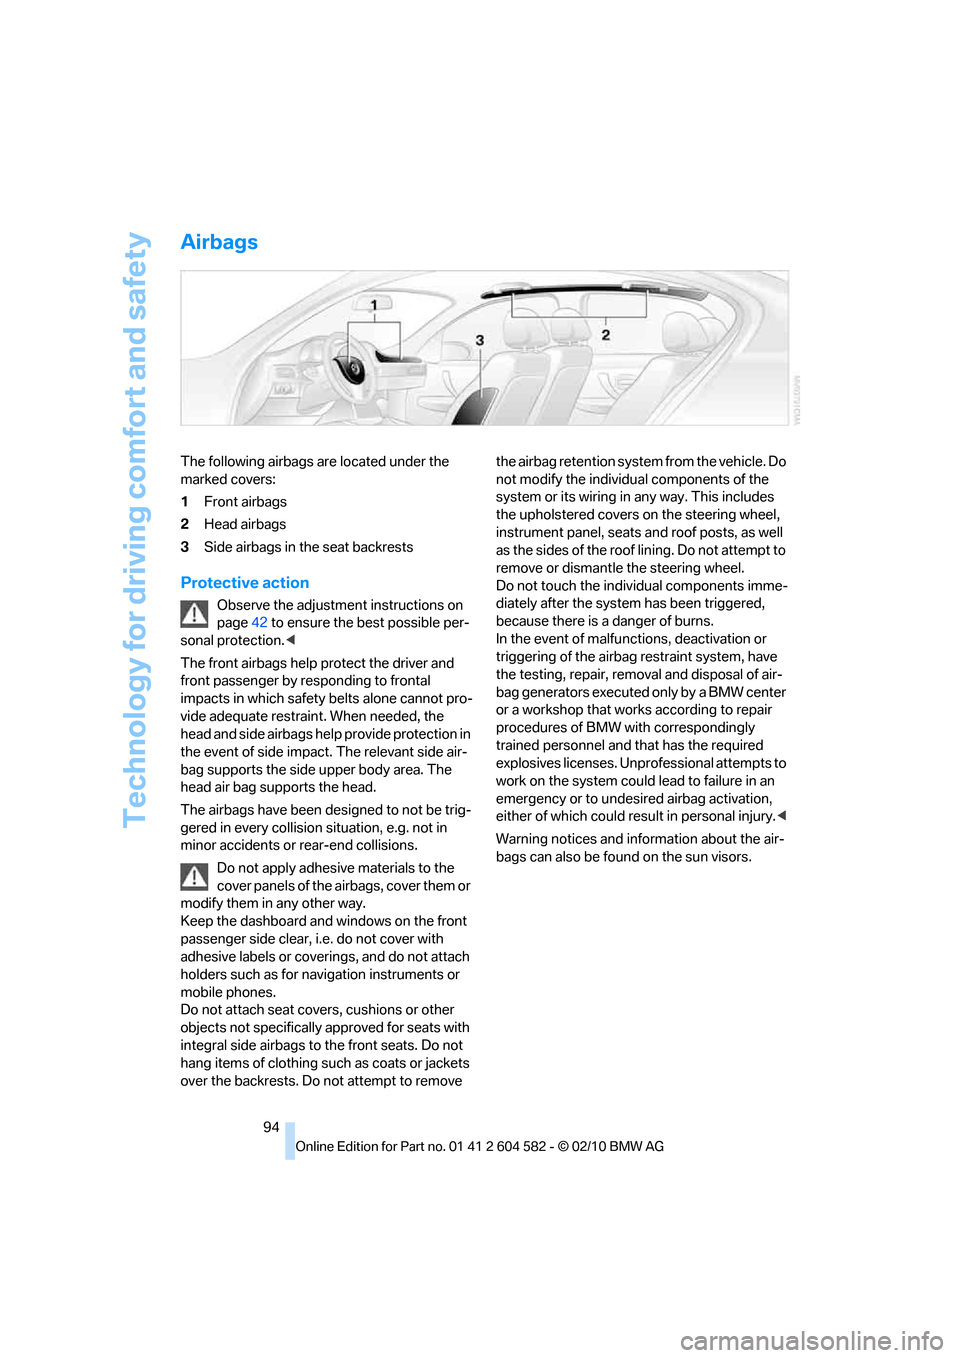
The following airbags are located under the
marked covers:
1Front airbags
2Head airbags
3Side airbags in the seat backrests
Protective action
Observe the adjustment instructions on
page42 to ensure the best possible per-
sonal protection.<
The front airbags help protect the driver and
front passenger by responding to frontal
impacts in which safety belts alone cannot pro-
vide adequate restraint. When needed, the
head and side airbags help provide protection in
the event of side impact. The relevant side air-
bag supports the side upper body area. The
head air bag supports the head.
The airbags have been designed to not be trig-
gered in every collision situation, e.g. not in
minor accidents or rear-end collisions.
Do not apply adhesive materials to the
cover panels of the airbags, cover them or
modify them in any other way.
Keep the dashboard and windows on the front
passenger side clear, i.e. do not cover with
adhesive labels or coverings, and do not attach
holders such as for navigation instruments or
mobile phones.
Do not attach seat covers, cushions or other
objects not specifically approved for seats with
integral side airbags to the front seats. Do not
hang items of clothing such as coats or jackets
over the backrests. Do not attempt to remove the airbag retention system from the vehicle. Do
not modify the individual components of the
system or its wiring in any way. This includes
the upholstered covers on the steering wheel,
instrument panel, seats and roof posts, as well
as the sides of the roof lining. Do not attempt to
remove or dismantle the steering wheel.
Do not touch the individual components imme-
diately after the system has been triggered,
because there is a danger of burns.
In the event of malfunctions, deactivation or
triggering of the airbag restraint system, have
the testing, repair, removal and disposal of air-
bag generators executed only by a BMW center
or a workshop that works according to repair
procedures of BMW with correspondingly
trained personnel and that has the required
explosives licenses. Unprofessional attempts to
work on the system could lead to failure in an
emergency or to undesired airbag activation,
either of which could result in personal injury.<
Warning notices and information about the air-
bags can also be found on the sun visors.
Page 97 of 286
Controls
95Reference
At a glance
Driving tips
Communications
Navigation
Entertainment
Mobility
Automatic deactivation of the front
passenger airbags
An analysis of the impression in the front pas-
senger seat cushion determines whether and
how the seat is occupied. The front and side air-
bags for the front passenger are activated or
deactivated by the system accordingly.
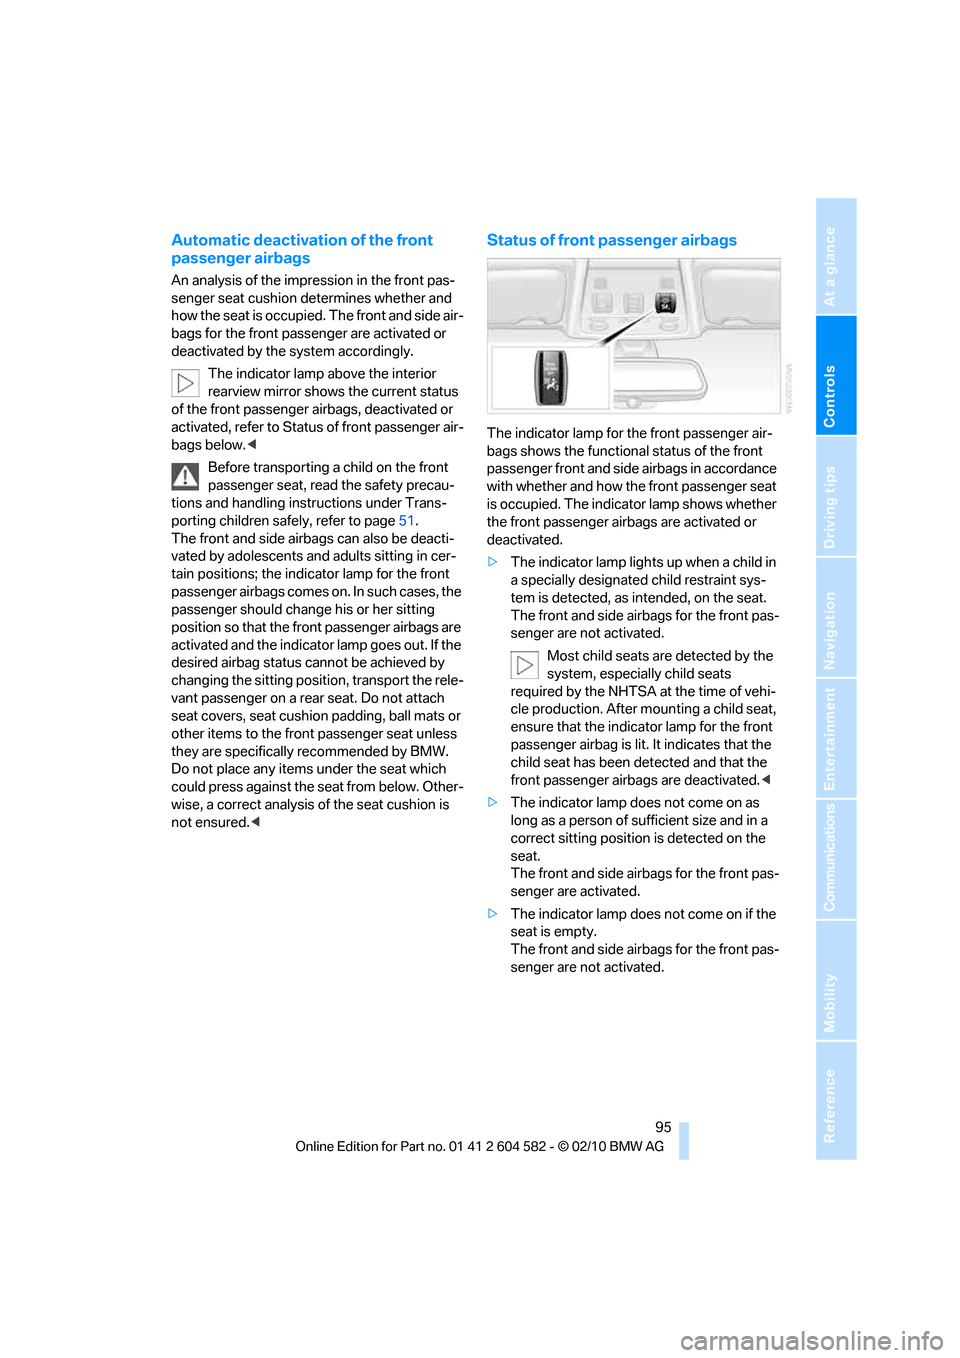
The indicator lamp above the interior
rearview mirror shows the current status
of the front passenger airbags, deactivated or
activated, refer to Status of front passenger air-
bags below.<
Before transporting a child on the front
passenger seat, read the safety precau-
tions and handling instructions under Trans-
porting children safely, refer to page51.
The front and side airbags can also be deacti-
vated by adolescents and adults sitting in cer-
tain positions; the indicator lamp for the front
passenger airbags comes on. In such cases, the
passenger should change his or her sitting
position so that the front passenger airbags are
activated and the indicator lamp goes out. If the
desired airbag status cannot be achieved by
changing the sitting position, transport the rele-
vant passenger on a rear seat. Do not attach
seat covers, seat cushion padding, ball mats or
other items to the front passenger seat unless
they are specifically recommended by BMW.
Do not place any items under the seat which
could press against the seat from below. Other-
wise, a correct analysis of the seat cushion is
not ensured.<
Status of front passenger airbags
The indicator lamp for the front passenger air-
bags shows the functional status of the front
passenger front and side airbags in accordance
with whether and how the front passenger seat
is occupied. The indicator lamp shows whether
the front passenger airbags are activated or
deactivated.
>The indicator lamp lights up when a child in
a specially designated child restraint sys-
tem is detected, as intended, on the seat.
The front and side airbags for the front pas-
senger are not activated.
Most child seats are detected by the
system, especially child seats
required by the NHTSA at the time of vehi-
cle production. After mounting a child seat,
ensure that the indicator lamp for the front
passenger airbag is lit. It indicates that the
child seat has been detected and that the
front passenger airbags are deactivated.<
>The indicator lamp does not come on as
long as a person of sufficient size and in a
correct sitting position is detected on the
seat.
The front and side airbags for the front pas-
senger are activated.
>The indicator lamp does not come on if the
seat is empty.
The front and side airbags for the front pas-
senger are not activated.
Page 99 of 286
Controls
97Reference
At a glance
Driving tips
Communications
Navigation
Entertainment
Mobility
Lamps
Parking lamps/low beams
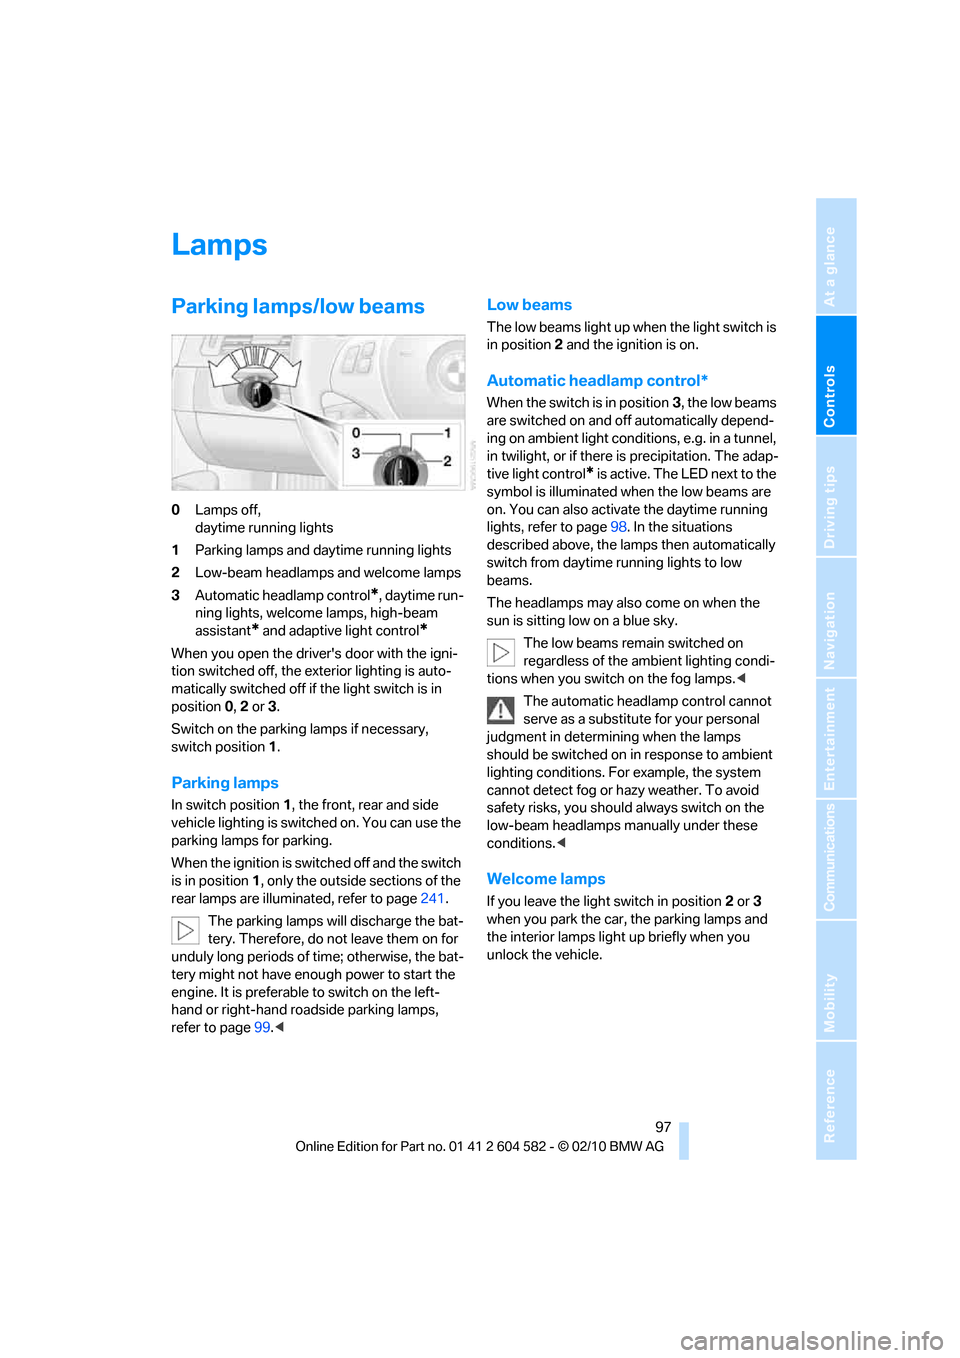
0Lamps off,
daytime running lights
1Parking lamps and daytime running lights
2Low-beam headlamps and welcome lamps
3Automatic headlamp control
*, daytime run-
ning lights, welcome lamps, high-beam
assistant
* and adaptive light control*
When you open the driver's door with the igni-
tion switched off, the exterior lighting is auto-
matically switched off if the light switch is in
position 0, 2 or 3.
Switch on the parking lamps if necessary,
switch position 1.
Parking lamps
In switch position1, the front, rear and side
vehicle lighting is switched on. You can use the
parking lamps for parking.
When the ignition is switched off and the switch
is in position 1, only the outside sections of the
rear lamps are illuminated, refer to page241.
The parking lamps will discharge the bat-
tery. Therefore, do not leave them on for
unduly long periods of time; otherwise, the bat-
tery might not have enough power to start the
engine. It is preferable to switch on the left-
hand or right-hand roadside parking lamps,
refer to page99.<
Low beams
The low beams light up when the light switch is
in position 2 and the ignition is on.
Automatic headlamp control*
When the switch is in position3, the low beams
are switched on and off automatically depend-
ing on ambient light conditions, e.g. in a tunnel,
in twilight, or if there is precipitation. The adap-
tive light control
* is active. The LED next to the
symbol is illuminated when the low beams are
on. You can also activate the daytime running
lights, refer to page98. In the situations
described above, the lamps then automatically
switch from daytime running lights to low
beams.
The headlamps may also come on when the
sun is sitting low on a blue sky.
The low beams remain switched on
regardless of the ambient lighting condi-
tions when you switch on the fog lamps.<
The automatic headlamp control cannot
serve as a substitute for your personal
judgment in determining when the lamps
should be switched on in response to ambient
lighting conditions. For example, the system
cannot detect fog or hazy weather. To avoid
safety risks, you should always switch on the
low-beam headlamps manually under these
conditions.<
Welcome lamps
If you leave the light switch in position 2 or 3
when you park the car, the parking lamps and
the interior lamps light up briefly when you
unlock the vehicle.
Page 101 of 286
Controls
99Reference
At a glance
Driving tips
Communications
Navigation
Entertainment
Mobility
High beams/roadside parking
lamps
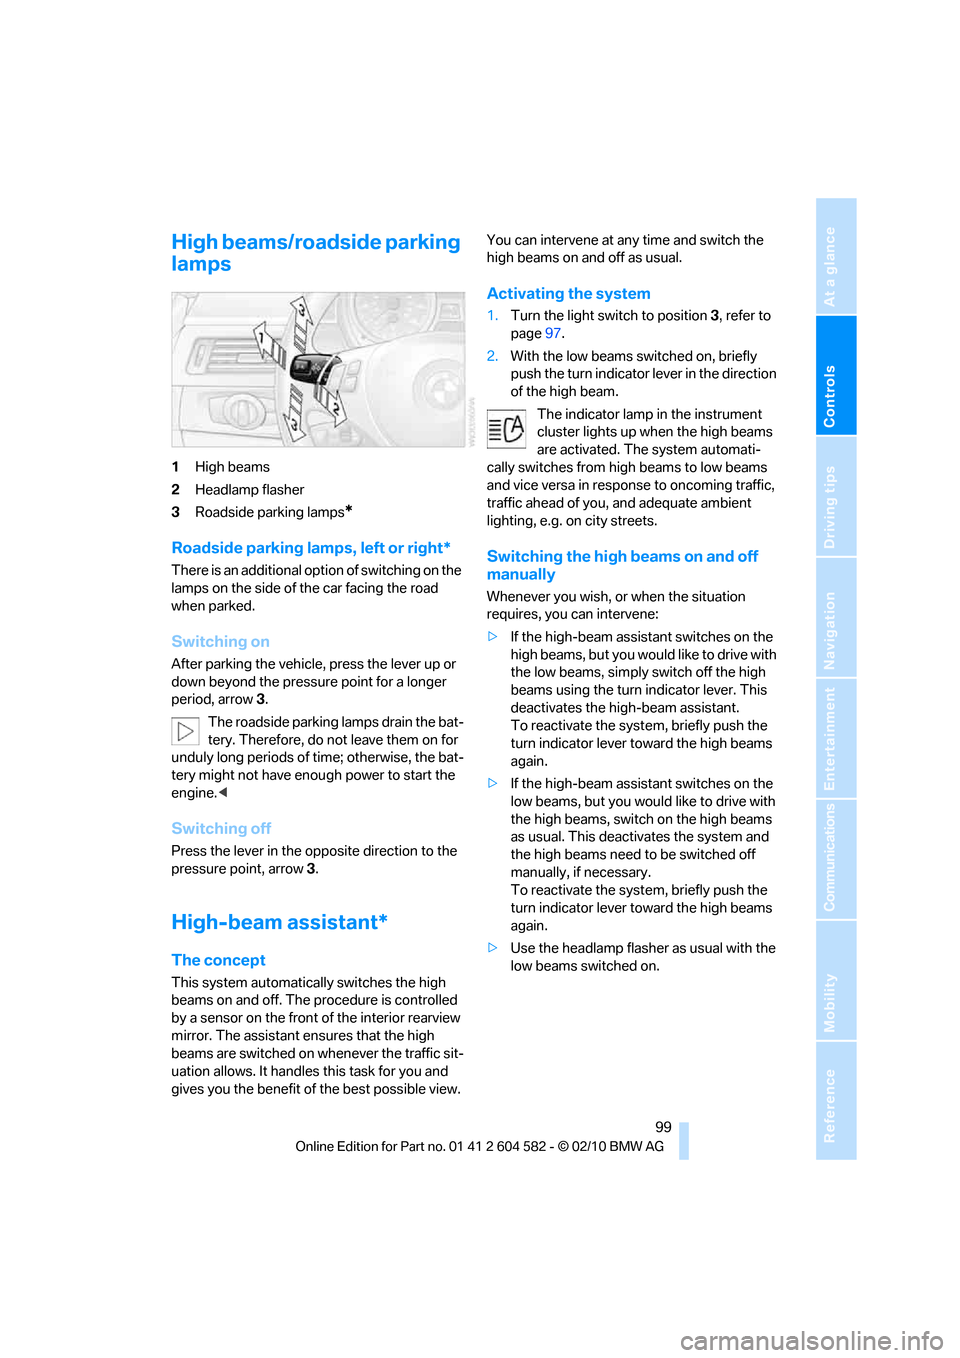
1High beams
2Headlamp flasher
3Roadside parking lamps
*
Roadside parking lamps, left or right*
There is an additional option of switching on the
lamps on the side of the car facing the road
when parked.
Switching on
After parking the vehicle, press the lever up or
down beyond the pressure point for a longer
period, arrow 3.
The roadside parking lamps drain the bat-
tery. Therefore, do not leave them on for
unduly long periods of time; otherwise, the bat-
tery might not have enough power to start the
engine.<
Switching off
Press the lever in the opposite direction to the
pressure point, arrow 3.
High-beam assistant*
The concept
This system automatically switches the high
beams on and off. The procedure is controlled
by a sensor on the front of the interior rearview
mirror. The assistant ensures that the high
beams are switched on whenever the traffic sit-
uation allows. It handles this task for you and
gives you the benefit of the best possible view. You can intervene at any time and switch the
high beams on and off as usual.
Activating the system
1.Turn the light switch to position3, refer to
page97.
2.With the low beams switched on, briefly
push the turn indicator lever in the direction
of the high beam.
The indicator lamp in the instrument
cluster lights up when the high beams
are activated. The system automati-
cally switches from high beams to low beams
and vice versa in response to oncoming traffic,
traffic ahead of you, and adequate ambient
lighting, e.g. on city streets.
Switching the high beams on and off
manually
Whenever you wish, or when the situation
requires, you can intervene:
>If the high-beam assistant switches on the
high beams, but you would like to drive with
the low beams, simply switch off the high
beams using the turn indicator lever. This
deactivates the high-beam assistant.
To reactivate the system, briefly push the
turn indicator lever toward the high beams
again.
>If the high-beam assistant switches on the
low beams, but you would like to drive with
the high beams, switch on the high beams
as usual. This deactivates the system and
the high beams need to be switched off
manually, if necessary.
To reactivate the system, briefly push the
turn indicator lever toward the high beams
again.
>Use the headlamp flasher as usual with the
low beams switched on.
Page 105 of 286
Controls
103Reference
At a glance
Driving tips
Communications
Navigation
Entertainment
Mobility
Automatic climate control
Comfortable interior climate
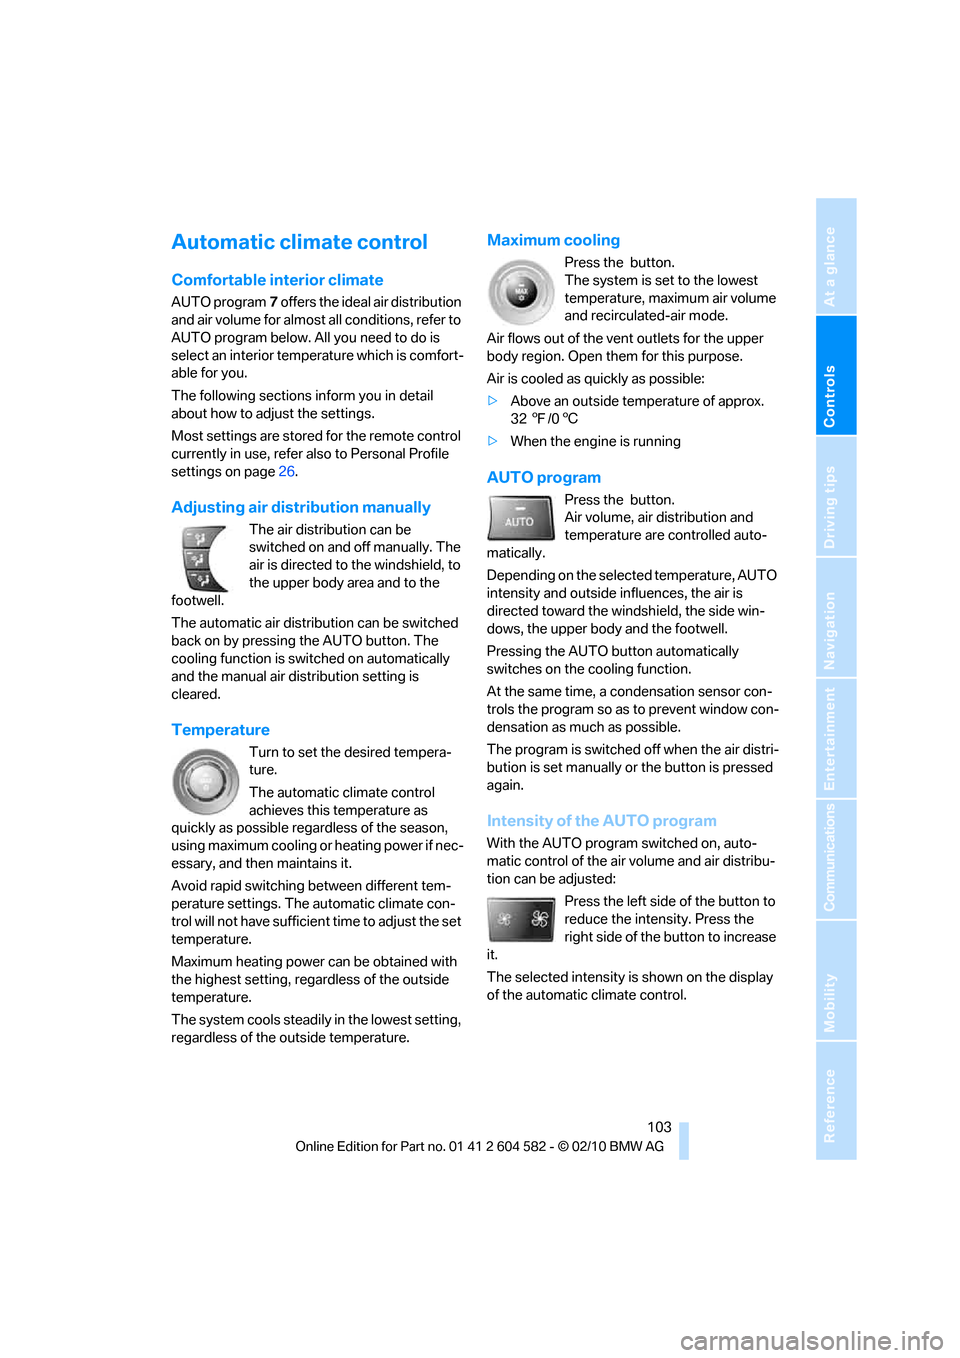
AUTO program7 offers the ideal air distribution
and air volume for almost all conditions, refer to
AUTO program below. All you need to do is
select an interior temperature which is comfort-
able for you.
The following sections inform you in detail
about how to adjust the settings.
Most settings are stored for the remote control
currently in use, refer also to Personal Profile
settings on page26.
Adjusting air distribution manually
The air distribution can be
switched on and off manually. The
air is directed to the windshield, to
the upper body area and to the
footwell.
The automatic air distribution can be switched
back on by pressing the AUTO button. The
cooling function is switched on automatically
and the manual air distribution setting is
cleared.
Temperature
Turn to set the desired tempera-
ture.
The automatic climate control
achieves this temperature as
quickly as possible regardless of the season,
using maximum cooling or heating power if nec-
essary, and then maintains it.
Avoid rapid switching between different tem-
perature settings. The automatic climate con-
trol will not have sufficient time to adjust the set
temperature.
Maximum heating power can be obtained with
the highest setting, regardless of the outside
temperature.
The system cools steadily in the lowest setting,
regardless of the outside temperature.
Maximum cooling
Press the button.
The system is set to the lowest
temperature, maximum air volume
and recirculated-air mode.
Air flows out of the vent outlets for the upper
body region. Open them for this purpose.
Air is cooled as quickly as possible:
>Above an outside temperature of approx.
327/06
>When the engine is running
AUTO program
Press the button.
Air volume, air distribution and
temperature are controlled auto-
matically.
Depending on the selected temperature, AUTO
intensity and outside influences, the air is
directed toward the windshield, the side win-
dows, the upper body and the footwell.
Pressing the AUTO button automatically
switches on the cooling function.
At the same time, a condensation sensor con-
trols the program so as to prevent window con-
densation as much as possible.
The program is switched off when the air distri-
bution is set manually or the button is pressed
again.
Intensity of the AUTO program
With the AUTO program switched on, auto-
matic control of the air volume and air distribu-
tion can be adjusted:
Press the left side of the button to
reduce the intensity. Press the
right side of the button to increase
it.
The selected intensity is shown on the display
of the automatic climate control.