Park distance control BMW 335I COUPE 2009 E92 Owner's Manual
[x] Cancel search | Manufacturer: BMW, Model Year: 2009, Model line: 335I COUPE, Model: BMW 335I COUPE 2009 E92Pages: 260, PDF Size: 7.95 MB
Page 17 of 260
At a glance
15Reference
Controls
Driving tips
Communications
Navigation
Entertainment
Mobility
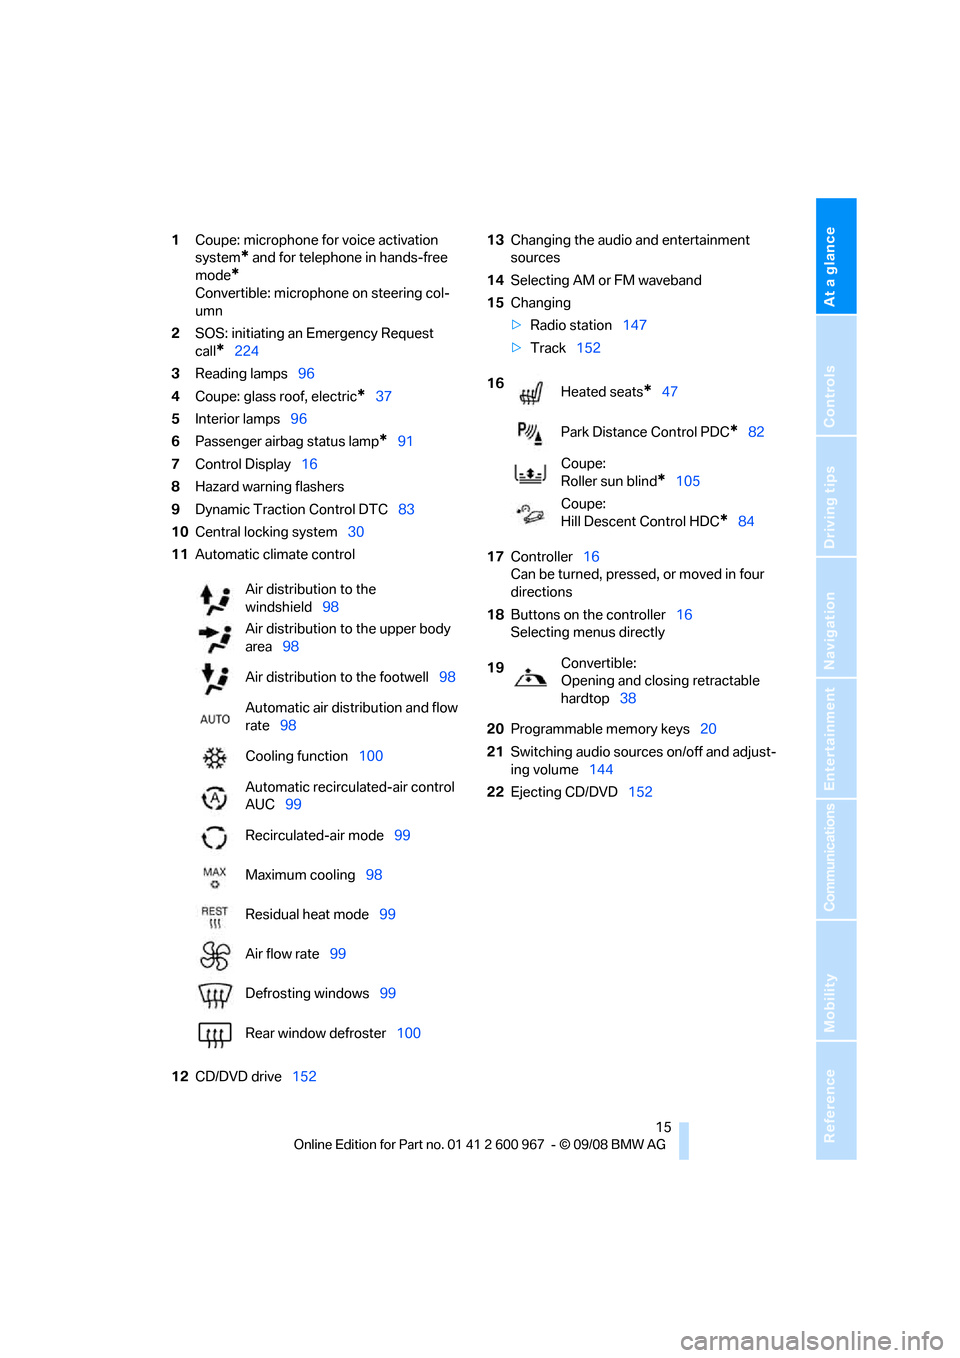
1Coupe: microphone for voice activation
system
* and for telephone in hands-free
mode
*
Convertible: microphone on steering col-
umn
2SOS: initiating an Emergency Request
call
*224
3Reading lamps96
4Coupe: glass roof, electric
*37
5Interior lamps96
6Passenger airbag status lamp
*91
7Control Display16
8Hazard warning flashers
9Dynamic Traction Control DTC83
10Central locking system30
11Automatic climate control
12CD/DVD drive15213Changing the audio and entertainment
sources
14Selecting AM or FM waveband
15Changing
>Radio station147
>Track152
17Controller16
Can be turned, pressed, or moved in four
directions
18Buttons on the controller16
Selecting menus directly
20Programmable memory keys20
21Switching audio sources on/off and adjust-
ing volume144
22Ejecting CD/DVD152 Air distribution to the
windshield98
Air distribution to the upper body
area98
Air distribution to the footwell98
Automatic air distribution and flow
rate98
Cooling function100
Automatic recirculated-air control
AUC99
Recirculated-air mode99
Maximum cooling98
Residual heat mode99
Air flow rate99
Defrosting windows99
Rear window defroster100
16
Heated seats*47
Park Distance Control PDC
*82
Coupe:
Roller sun blind
*105
Coupe:
Hill Descent Control HDC
*84
19Convertible:
Opening and closing retractable
hardtop38
Page 29 of 260
Controls
27Reference
At a glance
Driving tips
Communications
Navigation
Entertainment
Mobility
>Settings for the display on the Control Dis-
play and in the instrument cluster:
>12h/24h format of the clock, refer to
page76
>Date format, refer to page77
>Brightness of Control Display, refer to
page80
>Language on the Control Display, refer
to page80
>Units of measure, refer to page72
>Show visual warning for Park Distance Con-
trol PDC
*, refer to page82
>Light settings:
>Welcome lamps, refer to page93
>Pathway lighting, refer to page94
>Daytime running lamps, refer to page94
>Automatic climate control: activating/deac-
tivating AUTO program, cooling function
and automatic recirculated-air control, set-
ting temperature, air flow rate and distribu-
tion, refer to page98 ff
>Entertainment:
>Audio volume, refer to page144
>Tone control, refer to page144
>Speed-dependent volume control, refer
to page145
Central locking system
The concept
The central locking system functions when the
driver's door is closed.
The system simultaneously engages and
releases the locks on the following:
>Doors
>Luggage compartment lid
>Fuel filler door
>Convertible: glove compartment
Operating from outside
>Via the remote control>Via the door lock
*
>In cars with convenient access*, via the
handles on the driver's and front passen-
ger's doors
In addition, if the remote control is used, the
welcome lamps, interior lamps and the door's
courtesy lamps
* are switched on or off. The
alarm system
* is also armed or disarmed.
For further details of the alarm system,
refer to
page32.
Operating from inside
By means of the button for central locking, refer
to page30.
In the event of a sufficiently severe accident, the
central locking system unlocks automatically. In
addition, the hazard warning flashers and inte-
rior lamps come on.
Opening and closing:
Using the remote control
Persons or animals in a parked vehicle
could lock the doors from the inside. You
should therefore take the remote control with
you when you leave the vehicle so that the latter
can be opened from outside.<
Convertible: to operate the retractable
hardtop with the remote control, the
doors and luggage compartment lid must be
closed and the cargo bay partition must be
folded down and engaged on both sides. Refer
also to page39.<
Unlocking
Press the button.
The interior lamps, the courtesy lamps
* and the
welcome lamps come on.
Setting unlocking characteristics
You can set whether only the driver's door or
the entire vehicle is to be unlocked when the
button is pressed for the first time.
iDrive, for operating principle refer to page16.
Page 30 of 260
Opening and closing
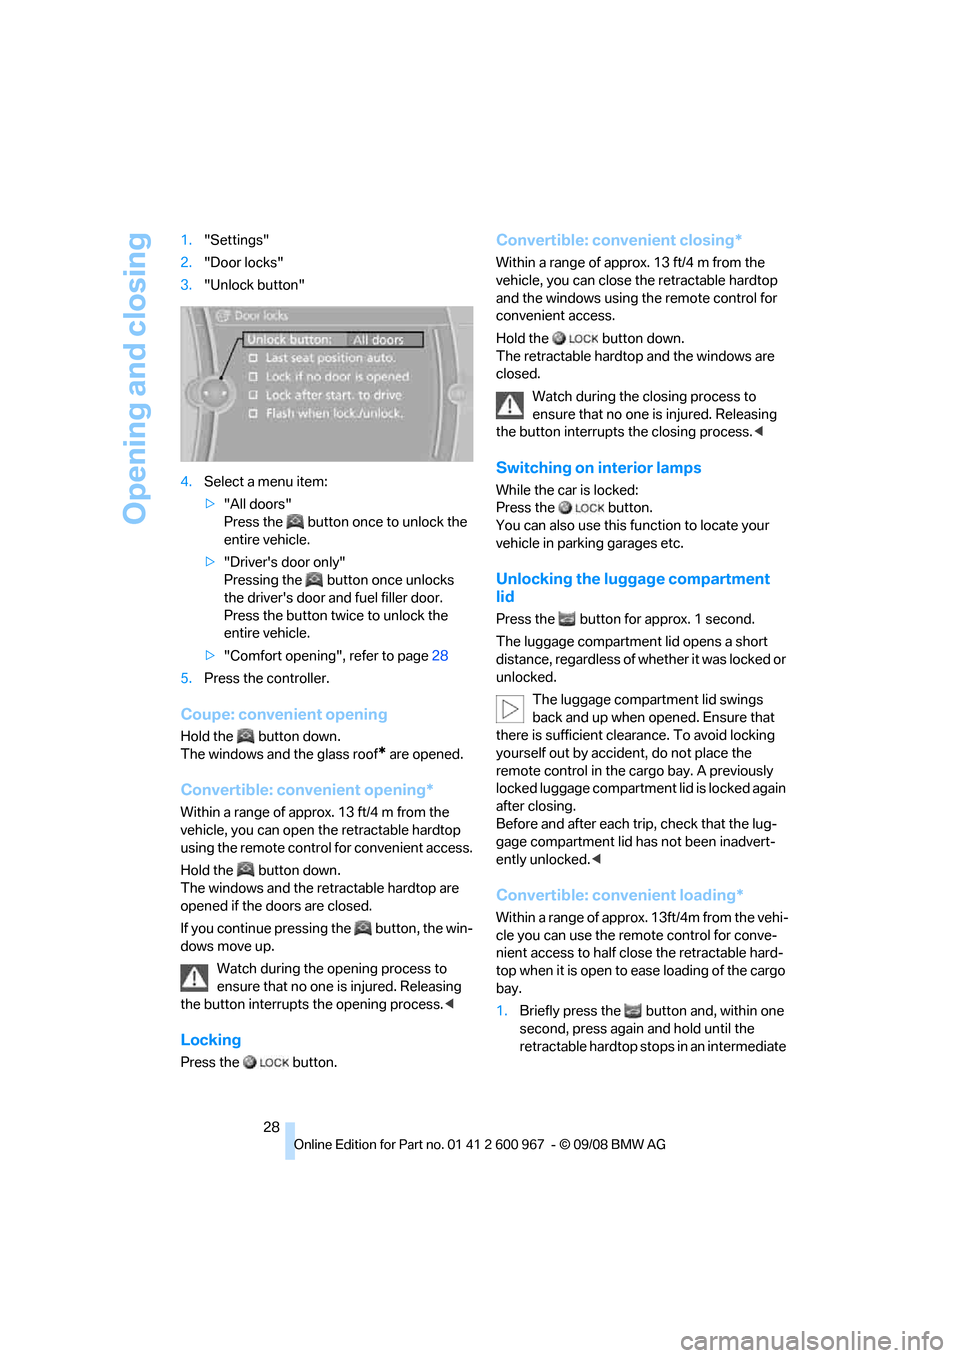
28 1."Settings"
2."Door locks"
3."Unlock button"
4.Select a menu item:
>"All doors"
Press the button once to unlock the
entire vehicle.
>"Driver's door only"
Pressing the button once unlocks
the driver's door and fuel filler door.
Press the button twice to unlock the
entire vehicle.
>"Comfort opening", refer to page28
5.Press the controller.
Coupe: convenient opening
Hold the button down.
The windows and the glass roof
* are opened.
Convertible: convenient opening*
Within a range of approx. 13 ft/4 m from the
vehicle, you can open the retractable hardtop
using the remote control for convenient access.
Hold the button down.
The windows and the retractable hardtop are
opened if the doors are closed.
If you continue pressing the button, the win-
dows move up.
Watch during the opening process to
ensure that no one is injured. Releasing
the button interrupts the opening process.<
Locking
Press the button.
Convertible: convenient closing*
Within a range of approx. 13 ft/4 m from the
vehicle, you can close the retractable hardtop
and the windows using the remote control for
convenient access.
Hold the button down.
The retractable hardtop and the windows are
closed.
Watch during the closing process to
ensure that no one is injured. Releasing
the button interrupts the closing process.<
Switching on interior lamps
While the car is locked:
Press the button.
You can also use this function to locate your
vehicle in parking garages etc.
Unlocking the luggage compartment
lid
Press the button for approx. 1 second.
The luggage compartment lid opens a short
distance, regardless of whether it was locked or
unlocked.
The luggage compartment lid swings
back and up when opened. Ensure that
there is sufficient clearance. To avoid locking
yourself out by accident, do not place the
remote control in the cargo bay. A previously
locked luggage compartment lid is locked again
after closing.
Before and after each trip, check that the lug-
gage compartment lid has not been inadvert-
ently unlocked.<
Convertible: convenient loading*
Within a range of approx. 13ft/4m from the vehi-
cle you can use the remote control for conve-
nient access to half close the retractable hard-
top when it is open to ease loading of the cargo
bay.
1.Briefly press the button and, within one
second, press again and hold until the
retractable hardtop stops in an intermediate
Page 66 of 260
Driving
64 personal responsibility, alertness and aware-
ness in adjusting speed, braking or otherwise
controlling the vehicle. The driver should
decide when to use the system on the basis of
road, traffic, visibility, and weather conditions.
Active cruise control is intended for use on
highway-type roadways where traffic is moving
relatively smoothly. Do not use this system in
city driving; heavy traffic such as during rush
hour; on curvy, winding roads, slippery roads or
roads with sharp curves such as highway off-
ramps; during inclement weather such as snow,
strong rain or fog; or when entering inter-
changes, service/parking areas or toll booths.
It is also important to regulate your vehicle's
speed and distance setting within applicable
legal limits. Always be ready to take action or
apply the brakes if necessary, especially when
the system is actively following a vehicle in front
of you. Otherwise driving situations could result
that pose the risk of accidents.<
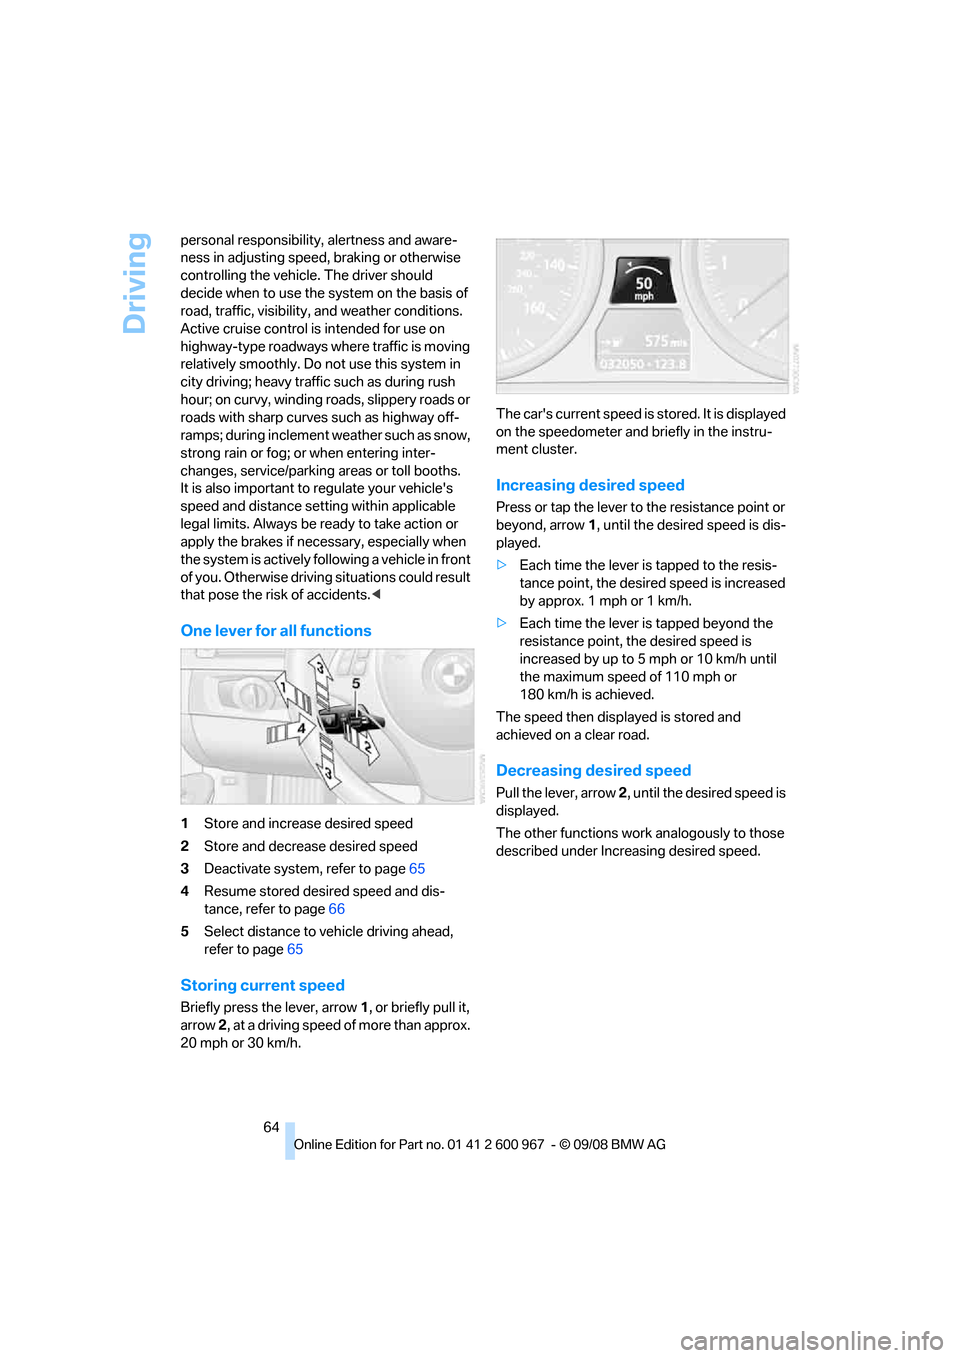
One lever for all functions
1Store and increase desired speed
2Store and decrease desired speed
3Deactivate system, refer to page65
4Resume stored desired speed and dis-
tance, refer to page66
5Select distance to vehicle driving ahead,
refer to page65
Storing current speed
Briefly press the lever, arrow 1, or briefly pull it,
arrow 2, at a driving speed of more than approx.
20 mph or 30 km/h.The car's current speed is stored. It is displayed
on the speedometer and briefly in the instru-
ment cluster.
Increasing desired speed
Press or tap the lever to the resistance point or
beyond, arrow1, until the desired speed is dis-
played.
>Each time the lever is tapped to the resis-
tance point, the desired speed is increased
by approx. 1 mph or 1 km/h.
>Each time the lever is tapped beyond the
resistance point, the desired speed is
increased by up to 5 mph or 10 km/h until
the maximum speed of 110 mph or
180 km/h is achieved.
The speed then displayed is stored and
achieved on a clear road.
Decreasing desired speed
Pull the lever, arrow 2, until the desired speed is
displayed.
The other functions work analogously to those
described under Increasing desired speed.
Page 67 of 260
Controls
65Reference
At a glance
Driving tips
Communications
Navigation
Entertainment
Mobility
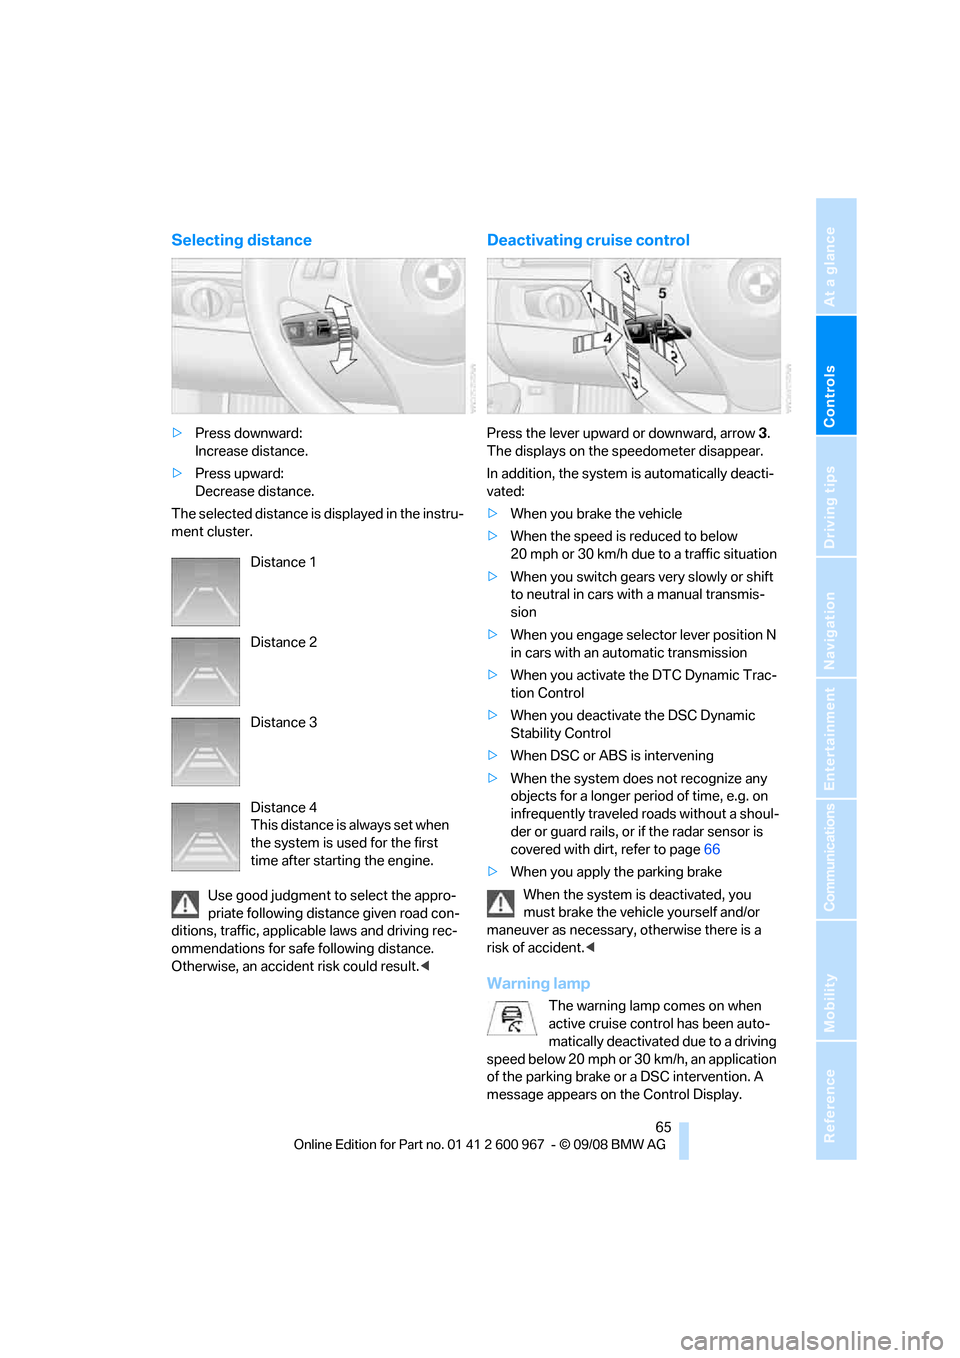
Selecting distance
>Press downward:
Increase distance.
>Press upward:
Decrease distance.
The selected distance is displayed in the instru-
ment cluster.
Use good judgment to select the appro-
priate following distance given road con-
ditions, traffic, applicable laws and driving rec-
ommendations for safe following distance.
Otherwise, an accident risk could result.<
Deactivating cruise control
Press the lever upward or downward, arrow3.
The displays on the speedometer disappear.
In addition, the system is automatically deacti-
vated:
>When you brake the vehicle
>When the speed is reduced to below
20 mph or 30 km/h due to a traffic situation
>When you switch gears very slowly or shift
to neutral in cars with a manual transmis-
sion
>When you engage selector lever position N
in cars with an automatic transmission
>When you activate the DTC Dynamic Trac-
tion Control
>When you deactivate the DSC Dynamic
Stability Control
>When DSC or ABS is intervening
>When the system does not recognize any
objects for a longer period of time, e.g. on
infrequently traveled roads without a shoul-
der or guard rails, or if the radar sensor is
covered with dirt, refer to page66
>When you apply the parking brake
When the system is deactivated, you
must brake the vehicle yourself and/or
maneuver as necessary, otherwise there is a
risk of accident.<
Warning lamp
The warning lamp comes on when
active cruise control has been auto-
matically deactivated due to a driving
speed below 20 mph or 30km/h, an application
of the parking brake or a DSC intervention. A
message appears on the Control Display. Distance 1
Distance 2
Distance 3
Distance 4
This distance is always set when
the system is used for the first
time after starting the engine.
Page 69 of 260
Controls
67Reference
At a glance
Driving tips
Communications
Navigation
Entertainment
Mobility
Malfunction
The warning lamp comes on when
the system has failed. A message appears on the Control Display. You can find
more information starting on page77.
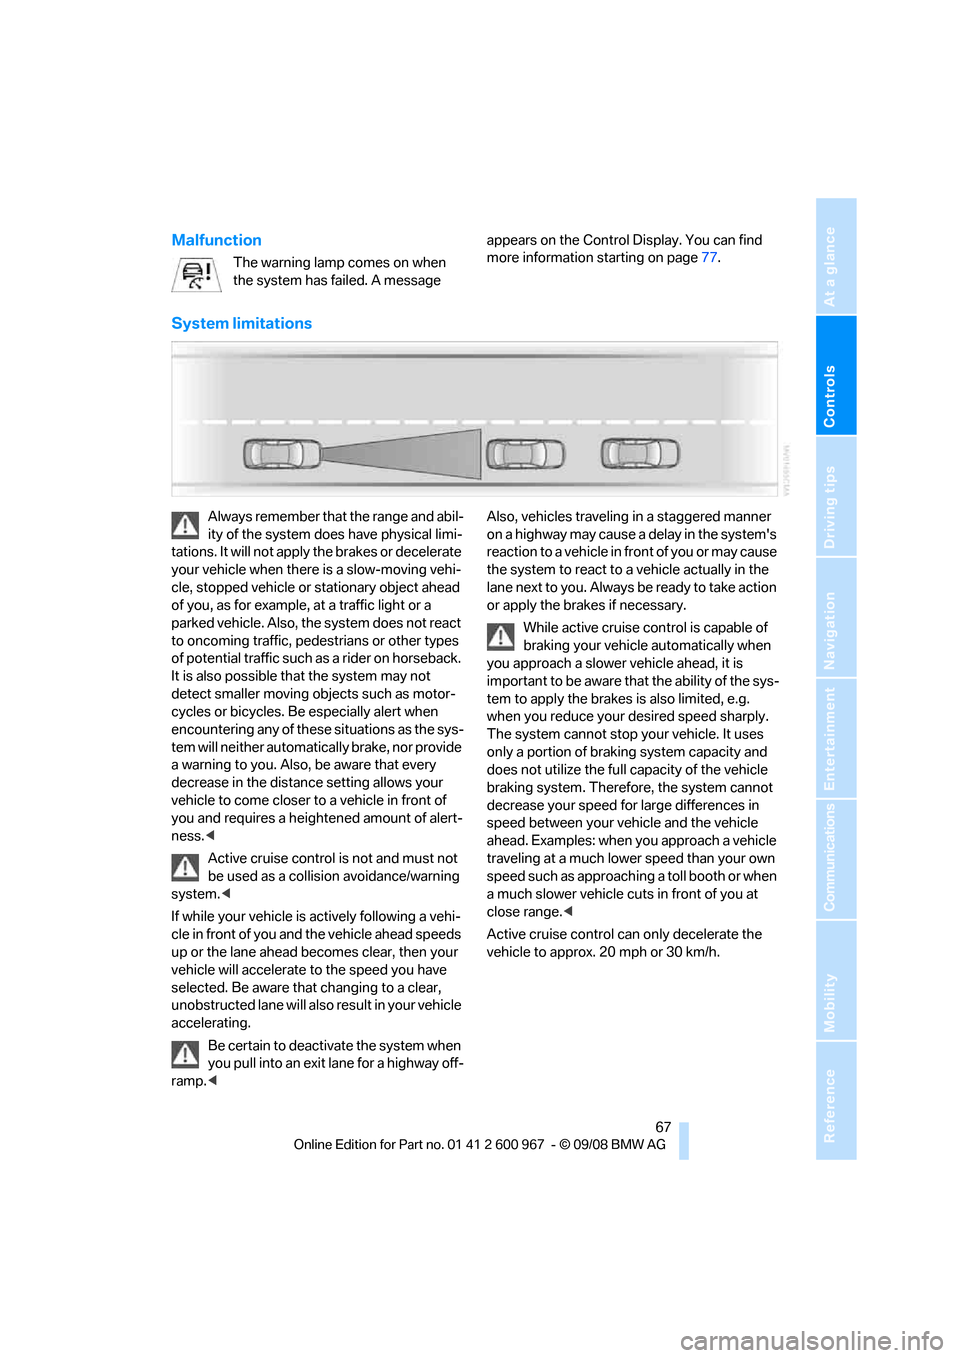
System limitations
Always remember that the range and abil-
ity of the system does have physical limi-
tations. It will not apply the brakes or decelerate
your vehicle when there is a slow-moving vehi-
cle, stopped vehicle or stationary object ahead
of you, as for example, at a traffic light or a
parked vehicle. Also, the system does not react
to oncoming traffic, pedestrians or other types
of potential traffic such as a rider on horseback.
It is also possible that the system may not
detect smaller moving objects such as motor-
cycles or bicycles. Be especially alert when
encountering any of these situations as the sys-
tem will neither automatically brake, nor provide
a warning to you. Also, be aware that every
decrease in the distance setting allows your
vehicle to come closer to a vehicle in front of
you and requires a heightened amount of alert-
ness.<
Active cruise control is not and must not
be used as a collision avoidance/warning
system.<
If while your vehicle is actively following a vehi-
cle in front of you and the vehicle ahead speeds
up or the lane ahead becomes clear, then your
vehicle will accelerate to the speed you have
selected. Be aware that changing to a clear,
unobstructed lane will also result in your vehicle
accelerating.
Be certain to deactivate the system when
you pull into an exit lane for a highway off-
ramp.
reaction to a vehicle in front of you or may cause
the system to react to a vehicle actually in the
lane next to you. Always be ready to take action
or apply the brakes if necessary.
While active cruise control is capable of
braking your vehicle automatically when
you approach a slower vehicle ahead, it is
important to be aware that the ability of the sys-
tem to apply the brakes is also limited, e.g.
when you reduce your desired speed sharply.
The system cannot stop your vehicle. It uses
only a portion of braking system capacity and
does not utilize the full capacity of the vehicle
braking system. Therefore, the system cannot
decrease your speed for large differences in
speed between your vehicle and the vehicle
ahead. Examples: when you approach a vehicle
traveling at a much lower speed than your own
speed such as approaching a toll booth or when
a much slower vehicle cuts in front of you at
close range.<
Active cruise control can only decelerate the
vehicle to approx. 20 mph or 30 km/h.
Page 73 of 260
Controls
71Reference
At a glance
Driving tips
Communications
Navigation
Entertainment
Mobility
Refuel as soon as possible once your
cruising range falls below 30 miles/
50 km, otherwise engine functions are not
ensured and damage can occur.<
Average speed
Periods with the vehicle parked and the engine
switched off are not included in the calculations
of average speed.
With the trip computer, refer to page72, you
can have the average speed for another trip dis-
played.
To reset average speed: press the button in the
turn indicator lever for approx. 2 seconds.
Average fuel consumption
The average fuel consumption is calculated for
the time during which the engine is running.
With the trip computer, refer to page72, you
can have the average consumption for another
trip displayed.
To reset average fuel consumption: press the
button in the turn indicator lever for approx.
2seconds.
Current fuel consumption
Displays the current fuel consumption. This
allows you to see whether your current driving
style is conducive to fuel economy with mini-
mum exhaust emissions.
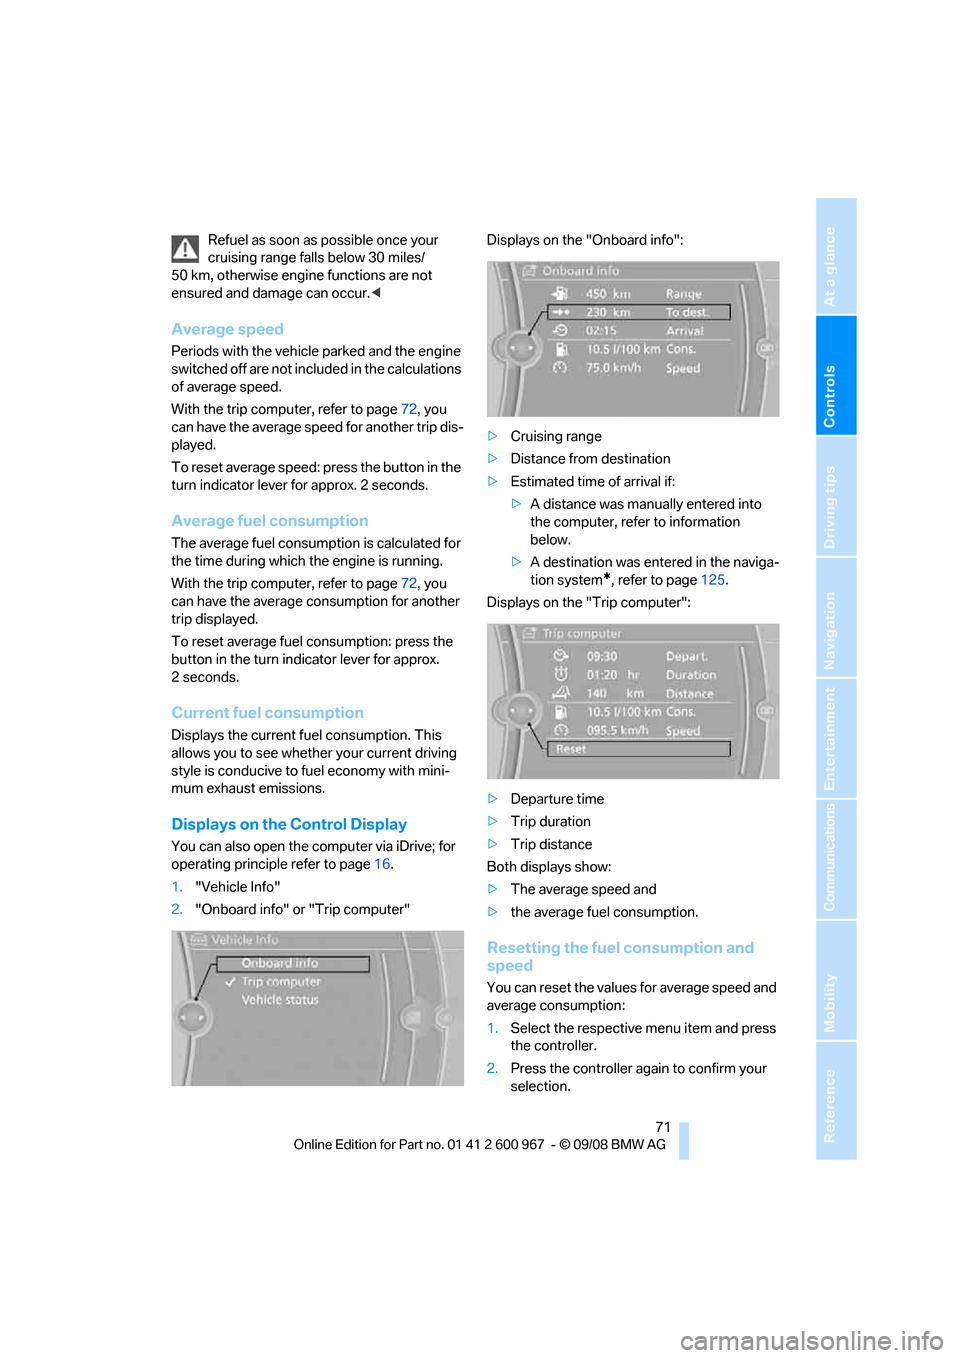
Displays on the Control Display
You can also open the computer via iDrive; for
operating principle refer to page16.
1."Vehicle Info"
2."Onboard info" or "Trip computer"Displays on the "Onboard info":
>Cruising range
>Distance from destination
>Estimated time of arrival if:
>A distance was manually entered into
the computer, refer to information
below.
>A destination was entered in the naviga-
tion system
*, refer to page125.
Displays on the "Trip computer":
>Departure time
>Trip duration
>Trip distance
Both displays show:
>The average speed and
>the average fuel consumption.
Resetting the fuel consumption and
speed
You can reset the values for average speed and
average consumption:
1.Select the respective menu item and press
the controller.
2.Press the controller again to confirm your
selection.
Page 84 of 260
Technology for driving comfort and safety
82
Technology for driving comfort and safety
Park Distance Control PDC*
The concept
The PDC assists you with maneuvering in tight
parking spaces. Acoustic signals and a visual
indicator
warn you of the presence of an object
behind your vehicle. To measure the distance,
there are four ultrasonic sensors in either
bumper.
These sensors have a range of approx. 6.5 ft/
2 m. However, an acoustic warning does not
sound until an object is approx. 24 in/60 cm
from the corner sensors, or approx. 5 ft/1.50 m
from the center sensors.
PDC is a parking aid that can indicate
objects when they are approached
slowly, as is usually the case when parking.
Avoid approaching an object at high speed, oth-
erwise physical circumstances may lead to the
system warning being issued too late.<
Switching on automatically
With the engine running or the ignition switched
on, the system is activated approx. 1 second
after you engage reverse gear or selector lever
or transmission position R. Wait this short
period before driving.
Switching off automatically
After approx. 165 ft/50 m of driving or above
approx. 20 mph/approx. 30 km/h, the system
switches off and the LED goes out.
Signal tones
When nearing an object, its position is indicated
correspondingly by an interval tone. As the dis-
tance between vehicle and object decreases,
the intervals between the tones become
shorter. If the distance to the nearest object
falls to below roughly 1 ft/30 cm, then a contin-
uous tone sounds.
An interval tone is interrupted after approx.
3seconds>if you remain in front of an object that has
been detected by only one of the corner
sensors
>if you are driving parallel to a wall.
Malfunction
The indicator lamp in the instrument
cluster comes on. PDC is malfunc-
tioning. A message appears on the
Control Display. Have the system checked.
To avoid this problem, keep the sensors clean
and free of ice or snow in order to ensure that
they will continue to operate effectively. When
using a high-pressure cleaner, do not spray the
sensors for extended periods of time and only
from a distance of at least 4 in/10 cm.
PDC with visual warning
The approach of the vehicle to an object is
shown on the Control Display. Objects that are
farther away are displayed on the Control Dis-
play before a signal tone sounds. The display
appears on the Control Display as soon as PDC
is activated.
System limitations
Even with PDC, final responsibility for
estimating the distance between the
vehicle and any obstructions always remains
with the driver. Even when sensors are pro-
vided, there is a blind spot in which objects can
no longer be detected. The system is also sub-
ject to the physical limits that apply to all forms
of ultrasonic measurement, such as those
encountered with trailer towbars and hitches,
thin or wedge-shaped objects, etc. Low objects
that have already been displayed, e.g. curbs,
can disappear again from the detection area of
the sensors before or after a continuous tone
sounds. Higher, protruding objects, e.g. ledges,
cannot be detected. Therefore, always drive
cautiously, otherwise there is a risk of personal
injury or property damage.
Loud sound sources outside or inside the car
Page 105 of 260
Controls
103Reference
At a glance
Driving tips
Communications
Navigation
Entertainment
Mobility
The corresponding memory button 1 is now
programmed with the signal of the original
hand-held transmitter.
You can operate the device while the ignition is
switched off.
If the device fails to function even after
repeated programming, check whether
the original hand-held transmitter uses an alter-
nating-code system. To do so, either read the
instructions for the original hand-held transmit-
ter or hold down the programmed memory
button1 of the integrated universal remote
control. If the LED2 on the integrated universal
remote control flashes rapidly and then remains
lit for about two seconds, the original hand-held
transmitter uses an alternating-code system. If
it uses an alternating-code system, program
the memory buttons1 as described under
Alternating-code hand-held transmitters.<
Alternating-code hand-held
transmitters
To program the integrated universal remote
control, consult the operating instructions for
the device to be set. You will find information
there on the possibilities for synchronization.
When programming hand-held transmitters
that employ an alternating code, please observe
the following supplementary instructions:
Programming will be easier with the aid of
a second person.<
1.Park your vehicle within the range of the
remote-controlled device.
2.Program the integrated universal remote
control as described above in the section
Fixed-code hand-held transmitters.
3.Locate the button on the receiver of the
device to be set, e.g. on the drive unit.
4.Press the button on the receiver of the
device to be set. After step 4, you have
approx. 30 seconds for step 5.
5.Press the programmed memory button1 of
the integrated universal remote control
three times.The corresponding memory button 1 is now
programmed with the signal of the original
hand-held transmitter.
If you have any questions, please contact
your BMW center.<
Deleting all stored programs
Press the left and right memory buttons1 for
approx. 20 seconds until the LED2 flashes rap-
idly: all stored programs are deleted.
Reassigning individual programs
1.Hold the original hand-held transmitter at a
distance of approx. 4 to 12 in/10 to 30 cm
from the memory buttons1.
The required distance between the
hand-held transmitter and the mem-
ory buttons1 depends on the system of the
respective original hand-held transmitter
used.<
2.Press the desired memory button1 of the
integrated universal remote control.
3.If the LED2 flashes slowly after approx.
20 seconds, press the transmit key of the
original hand-held transmitter. Release
both buttons as soon as the LED2 flashes
rapidly. If the LED2 does not flash rapidly
after approx. 15 seconds, alter the distance
and repeat this step.
Page 216 of 260
Care
214 When using high-pressure washers, do
not spray against the sensors and cam-
eras, e.g. of the Park Distance Control or Rear
View Camera, for an extended period and main-
tain a distance of at least 12 in/30 cm.<
Manual car wash
When washing the vehicle by hand, use large
quantities of water and car shampoo if neces-
sary. Clean the vehicle with a sponge or wash-
ing brush, applying light pressure only.
Before cleaning the windshield, deacti-
vate the rain sensor or switch off the igni-
tion to prevent unintentional activation of the
wipers.<
Observe local regulations pertaining to
washing vehicles by hand.<
Headlamps
Do not rub them dry and do not use abrasive or
corrosive cleaning agents.
Remove contamination, such as insects, by
soaking with shampoo or insect remover and
then rinsing with plenty of water.
Thaw ice with a windshield de-icer and do not
use an ice scraper.
Windows
Clean the inside and outside surfaces of the
windows and the mirrors with window cleaner.
Do not clean the mirrors with cleaners
containing quartz.<
Wiper blades
Clean with soapy water and replace regularly to
avoid streaking.
Wax and preservative residue and con-
tamination on the window can lead to
streaking when operating the windshield wip-
ers, leading to premature wear of the wiper
blades and causing the rain sensor to malfunc-
tion.<
Convertible: retractable hardtop
Proceed as you would in a normal car wash.When you open a wet hardtop, water
drops may run into the cargo bay. If nec-
essary, remove items from the cargo bay
beforehand to avoid water stains or soiling.<
Paintwork care
Regular care contributes to value retention and
protects the paintwork against the long-term
effects of damaging substances.
Region-specific environmental influences can
damage the vehicle paintwork. Therefore, it is
important to adapt the frequency and scope of
car care accordingly.
Immediately remove very aggressive sub-
stances, e.g. spilled fuel, oil, grease, tree resin
or bird droppings, to prevent damage to the
paintwork.
Repairing paintwork damage
Immediately repair scratches or similar
damage, such as that caused by stones
hitting the vehicle, where necessary to prevent
rusting.<
BMW recommends having paintwork damage
repaired by a professional paint repair work-
shop according to BMW specifications using
original BMW paint materials.
Preservation
A preservation treatment is necessary when
water no longer beads off of the clean paintwork
surface. Only use products for paintwork pres-
ervation that contain carnauba or synthetic
waxes.
Rubber seals
Treat only with water or rubber care products.
Do not use silicon-containing care prod-
ucts on rubber seals, otherwise noise and
damage could occur.<
Chrome parts
Carefully clean vehicle parts, such as the radia-
tor grill, door handles or window frames, with
copious quantities of water and a shampoo