display BMW 335I XDRIVE COUPE 2010 E93 Owner's Manual
[x] Cancel search | Manufacturer: BMW, Model Year: 2010, Model line: 335I XDRIVE COUPE, Model: BMW 335I XDRIVE COUPE 2010 E93Pages: 266, PDF Size: 8.6 MB
Page 6 of 266
Notes
4
Notes
Using this Owner's Manual
We have tried to make all the information in this
Owner's Manual easy to find. The fastest way to
find specific topics is to refer to the detailed
index at the back of the manual. If you wish to
gain an initial overview of your vehicle, you will
find this in the first chapter.
Should you sell your BMW some day, please
remember to hand over the Owner's Manual as
well; it is an important component of your vehi-
cle.
Additional sources of information
Should you have any other questions, your
BMW center will be glad to advise you at any
time.
Information on BMW, e.g. on technical aspects,
can also be found on the Internet at
www.bmwusa.com.
Symbols used
Indicates precautions that must be fol-
lowed precisely in order to avoid the pos-
sibility of personal injury and serious damage to
the vehicle.<
Indicates information that will assist you
in gaining the optimum benefit from your
vehicle and enable you to care more effectively
for your vehicle.<
Refers to measures that can be taken to
help protect the environment.<
*Indicates special equipment, country-spe-
cific equipment and optional accessories, as
well as equipment and functions not yet avail-
able at the time of printing.
"..." Identifies Control Display texts used to
select individual functions.
{...} Verbal instructions to use with the voice
activation system.
{{...}} Identifies the answers generated by the
voice activation system.
Symbols on vehicle components
Indicates that you should consult the rel-
evant section of this Owner's Manual for
information on a particular part or assembly.
Page 11 of 266
At a glance
This overview of buttons, switches and displays
is intended to familiarize you with your vehicle's
operating environment. The section will also
assist you in becoming acquainted with the
control concepts and options available for
operating the various systems.
At a glance
Page 12 of 266
Cockpit
10
Cockpit
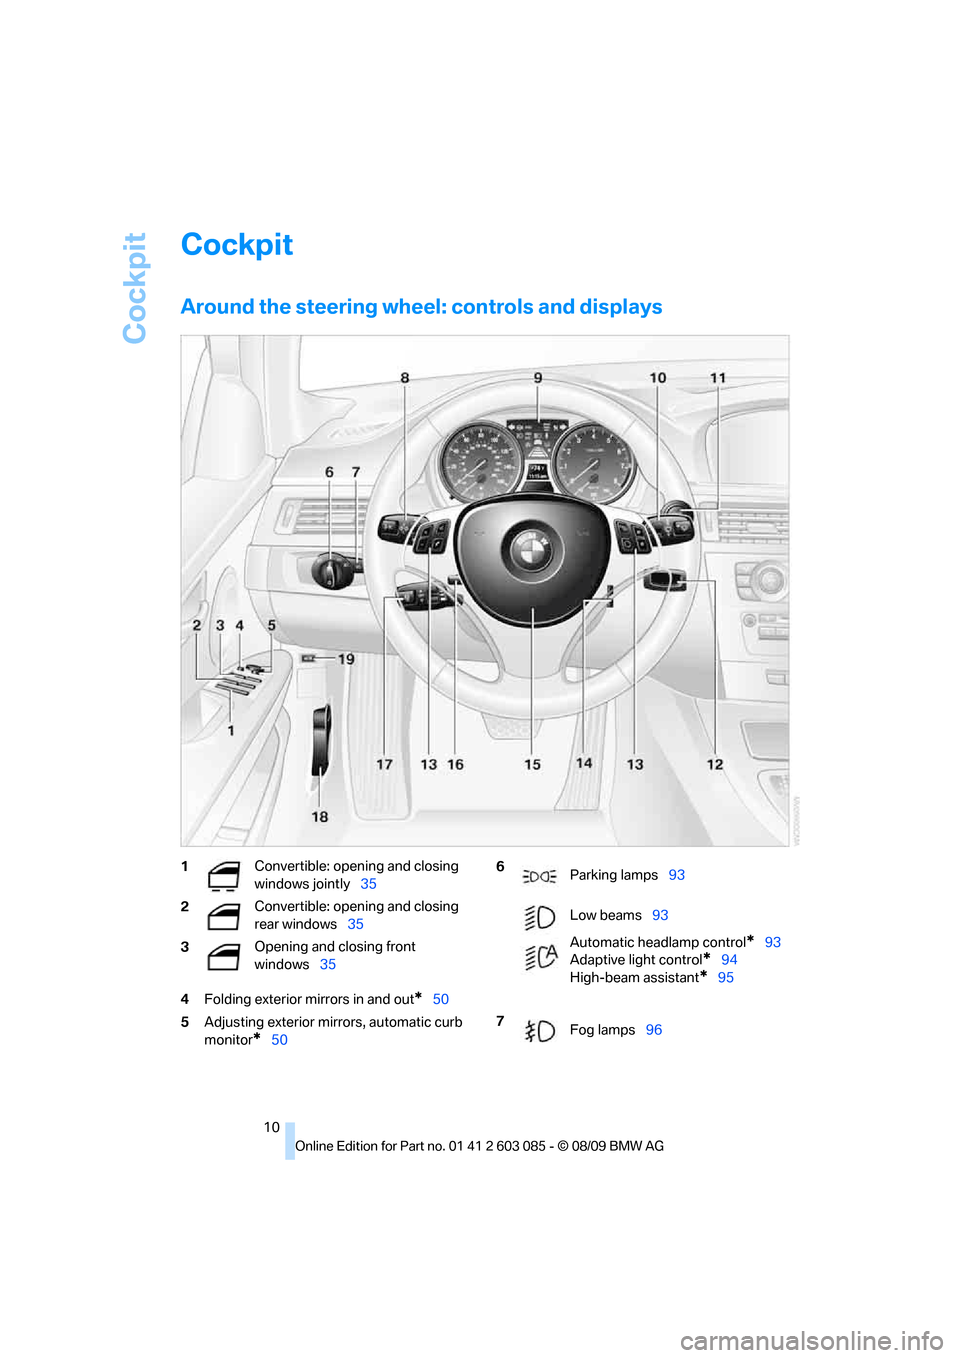
Around the steering wheel: controls and displays
4Folding exterior mirrors in and out*50
5Adjusting exterior mirrors, automatic curb
monitor
*50
1Convertible: opening and closing
windows jointly35
2Convertible: opening and closing
rear windows35
3Opening and closing front
windows35 6
Parking lamps93
Low beams93
Automatic headlamp control
*93
Adaptive light control
*94
High-beam assistant
*95
7
Fog lamps96
Page 14 of 266
Cockpit
12
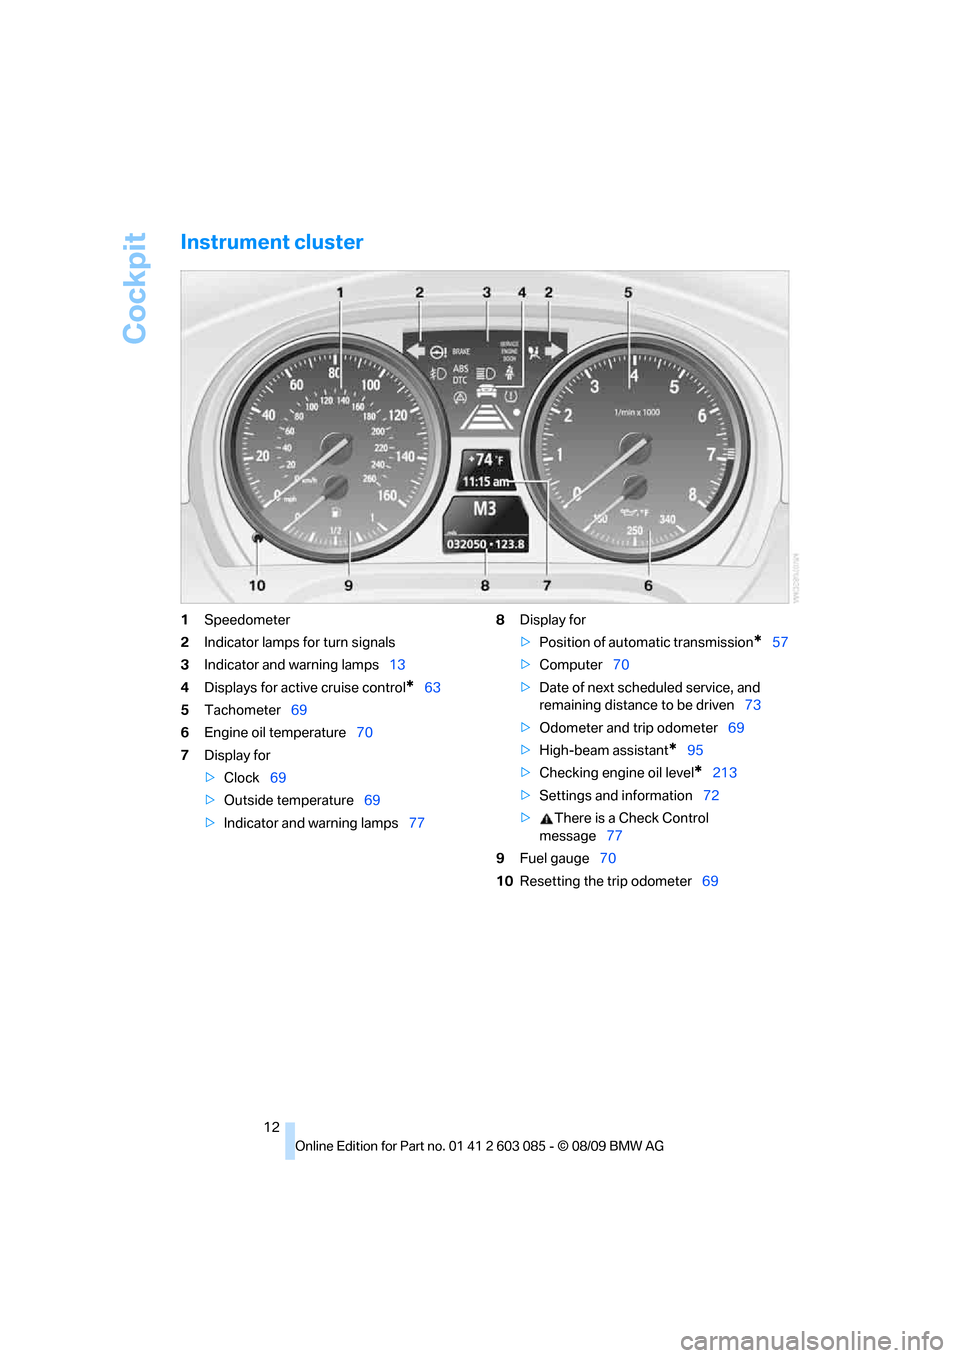
Instrument cluster
1Speedometer
2Indicator lamps for turn signals
3Indicator and warning lamps13
4Displays for active cruise control
*63
5Tachometer69
6Engine oil temperature70
7Display for
>Clock69
>Outside temperature69
>Indicator and warning lamps778Display for
>Position of automatic transmission
*57
>Computer70
>Date of next scheduled service, and
remaining distance to be driven73
>Odometer and trip odometer69
>High-beam assistant
*95
>Checking engine oil level
*213
>Settings and information72
>There is a Check Control
message77
9Fuel gauge70
10Resetting the trip odometer69
Page 15 of 266
At a glance
13Reference
Controls
Driving tips
Communications
Navigation
Entertainment
Mobility
Indicator and warning lamps
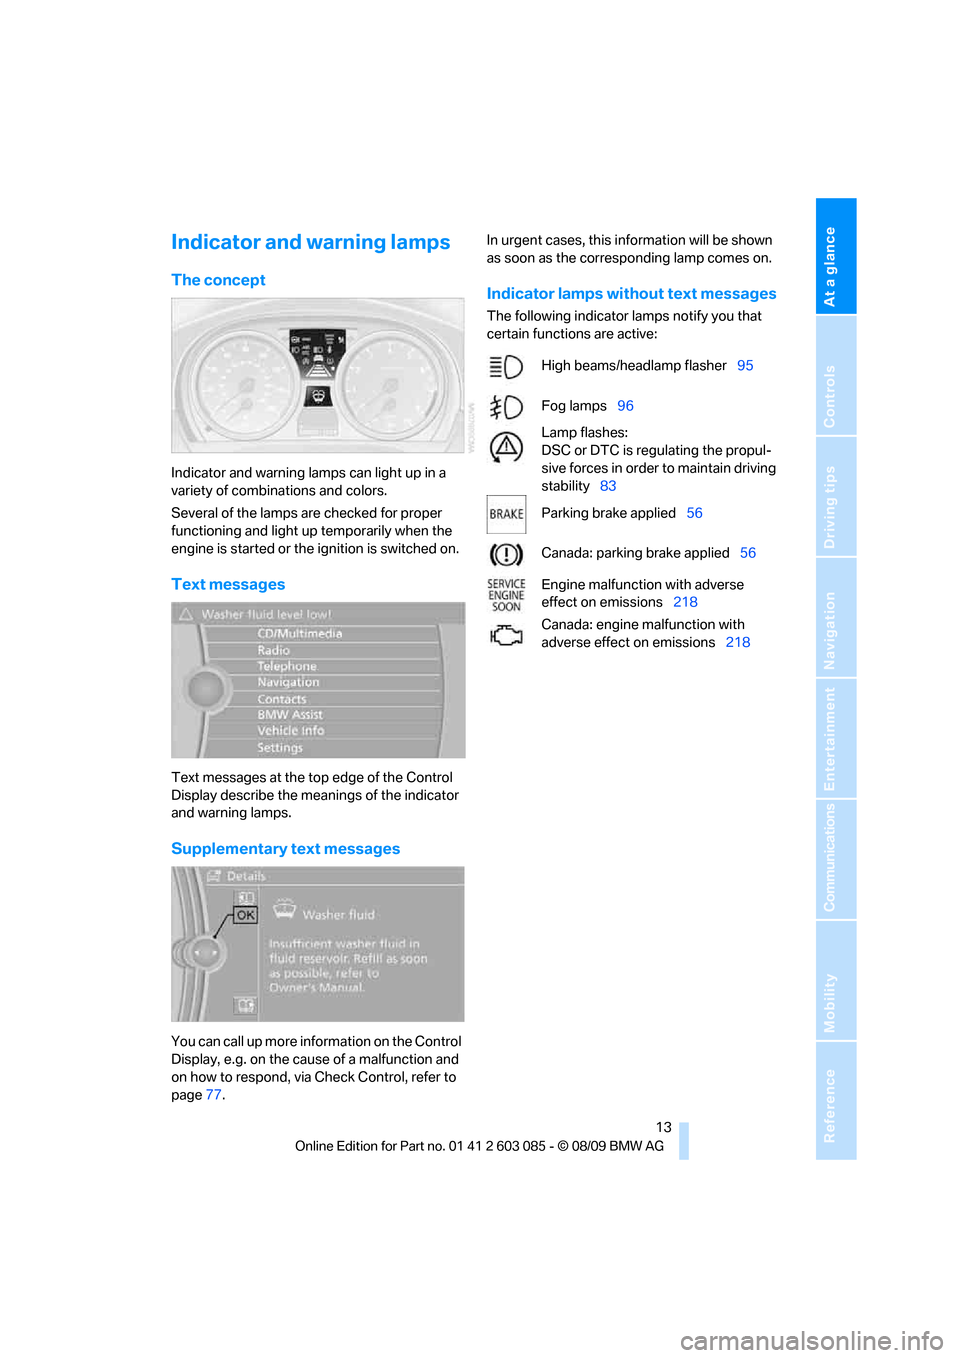
The concept
Indicator and warning lamps can light up in a
variety of combinations and colors.
Several of the lamps are checked for proper
functioning and light up temporarily when the
engine is started or the ignition is switched on.
Text messages
Text messages at the top edge of the Control
Display describe the meanings of the indicator
and warning lamps.
Supplementary text messages
You can call up more information on the Control
Display, e.g. on the cause of a malfunction and
on how to respond, via Check Control, refer to
page77.In urgent cases, this information will be shown
as soon as the corresponding lamp comes on.
Indicator lamps without text messages
The following indicator lamps notify you that
certain functions are active:
High beams/headlamp flasher95
Fog lamps96
Lamp flashes:
DSC or DTC is regulating the propul-
sive forces in order to maintain driving
stability83
Parking brake applied56
Canada: parking brake applied56
Engine malfunction with adverse
effect on emissions218
Canada: engine malfunction with
adverse effect on emissions218
Page 16 of 266
Cockpit
14
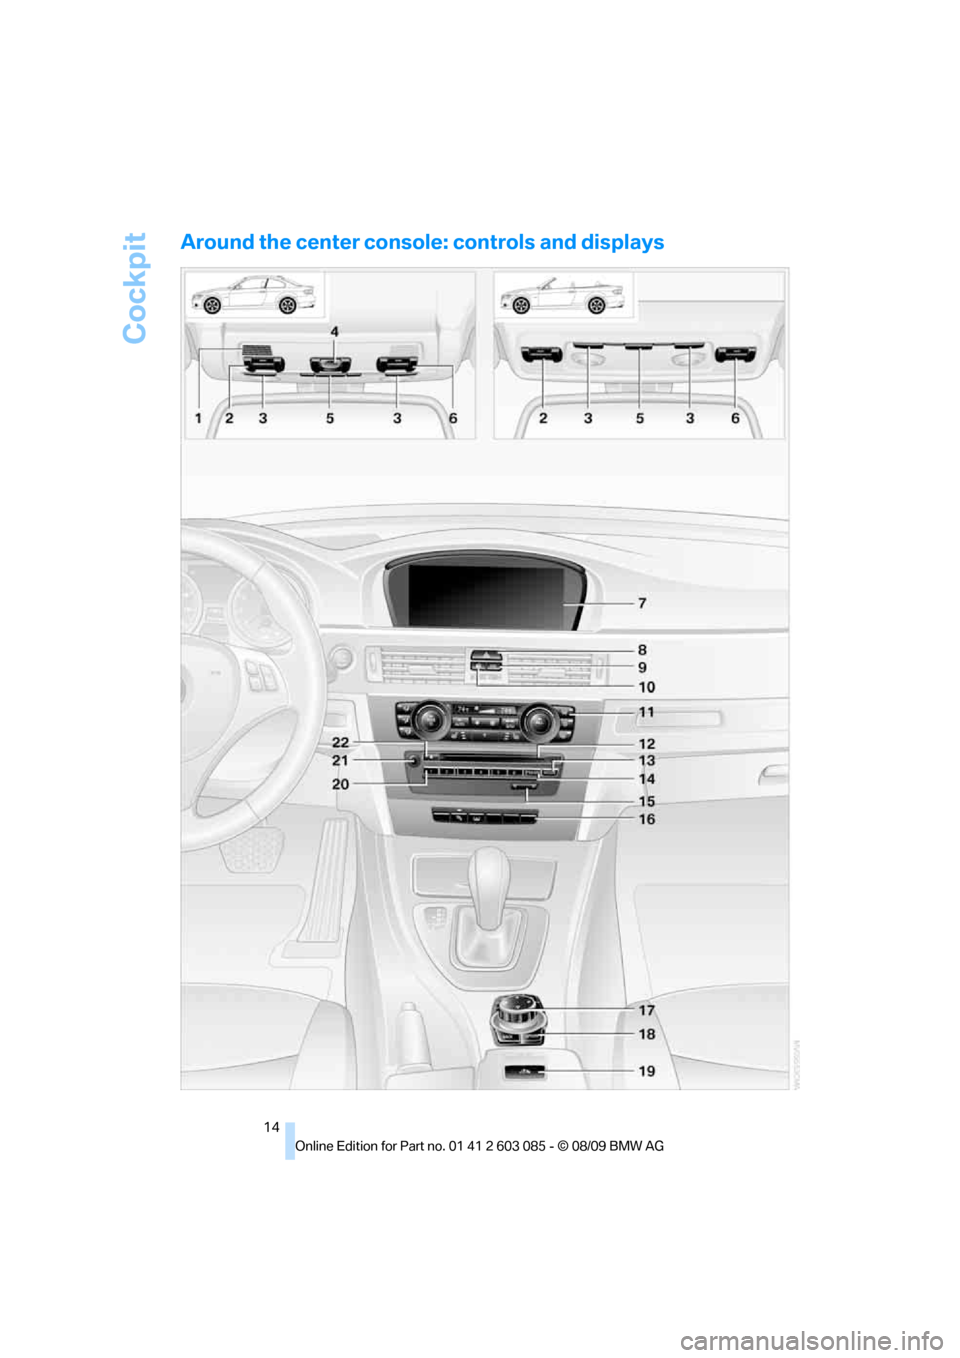
Around the center console: controls and displays
Page 17 of 266
At a glance
15Reference
Controls
Driving tips
Communications
Navigation
Entertainment
Mobility
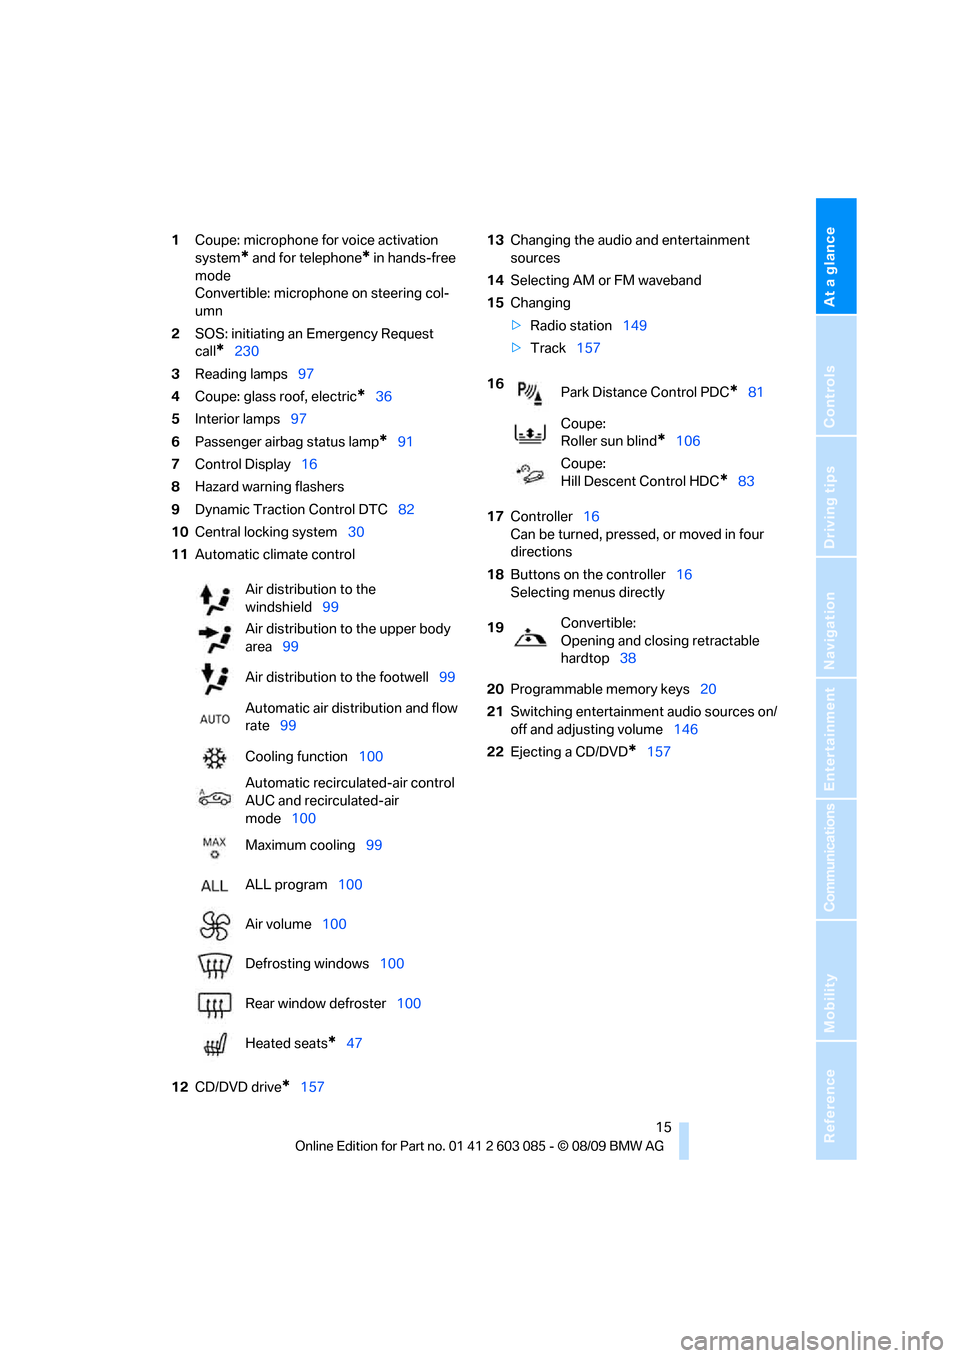
1Coupe: microphone for voice activation
system
* and for telephone* in hands-free
mode
Convertible: microphone on steering col-
umn
2SOS: initiating an Emergency Request
call
*230
3Reading lamps97
4Coupe: glass roof, electric
*36
5Interior lamps97
6Passenger airbag status lamp
*91
7Control Display16
8Hazard warning flashers
9Dynamic Traction Control DTC82
10Central locking system30
11Automatic climate control
12CD/DVD drive
*15713Changing the audio and entertainment
sources
14Selecting AM or FM waveband
15Changing
>Radio station149
>Track157
17Controller16
Can be turned, pressed, or moved in four
directions
18Buttons on the controller16
Selecting menus directly
20Programmable memory keys20
21Switching entertainment audio sources on/
off and adjusting volume146
22Ejecting a CD/DVD
*157 Air distribution to the
windshield99
Air distribution to the upper body
area99
Air distribution to the footwell99
Automatic air distribution and flow
rate99
Cooling function100
Automatic recirculated-air control
AUC and recirculated-air
mode100
Maximum cooling99
ALL program100
Air volume100
Defrosting windows100
Rear window defroster100
Heated seats
*47
16
Park Distance Control PDC*81
Coupe:
Roller sun blind
*106
Coupe:
Hill Descent Control HDC
*83
19Convertible:
Opening and closing retractable
hardtop38
Page 18 of 266
iDrive
16
iDrive
iDrive integrates the functions of a large num-
ber of switches. This allows these functions to
be operated from a single central position. The
following section provides an introduction to basic menu navigation. The control of the indi-
vidual functions is described in connection with
the relevant equipment.
Controls
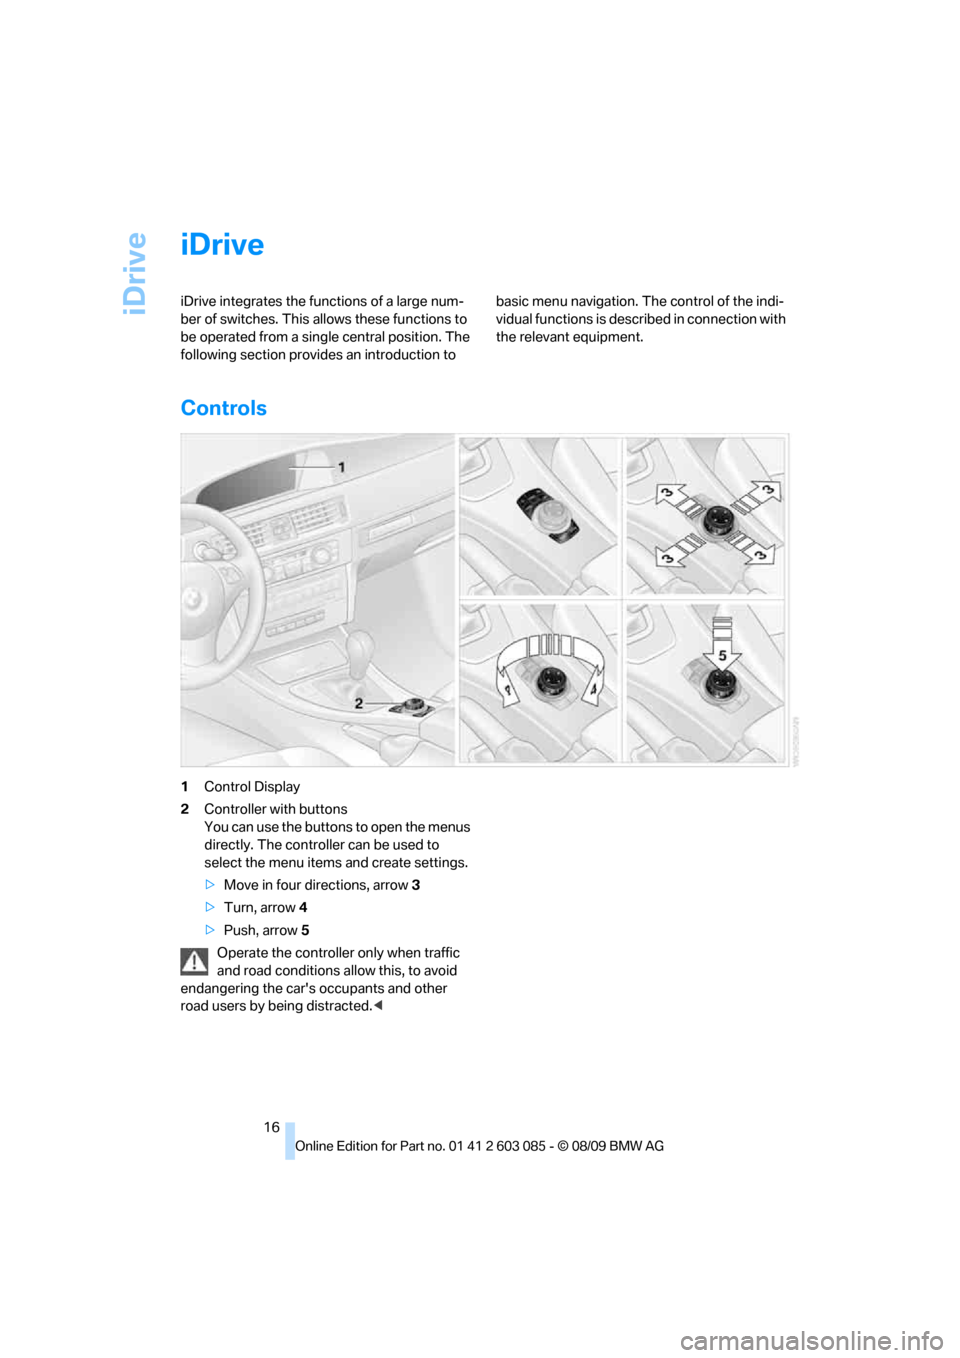
1Control Display
2Controller with buttons
You can use the buttons to open the menus
directly. The controller can be used to
select the menu items and create settings.
>Move in four directions, arrow3
>Turn, arrow 4
>Push, arrow 5
Operate the controller only when traffic
and road conditions allow this, to avoid
endangering the car's occupants and other
road users by being distracted.<
Page 19 of 266
At a glance
17Reference
Controls
Driving tips
Communications
Navigation
Entertainment
Mobility
Buttons on the controller
Operating principle
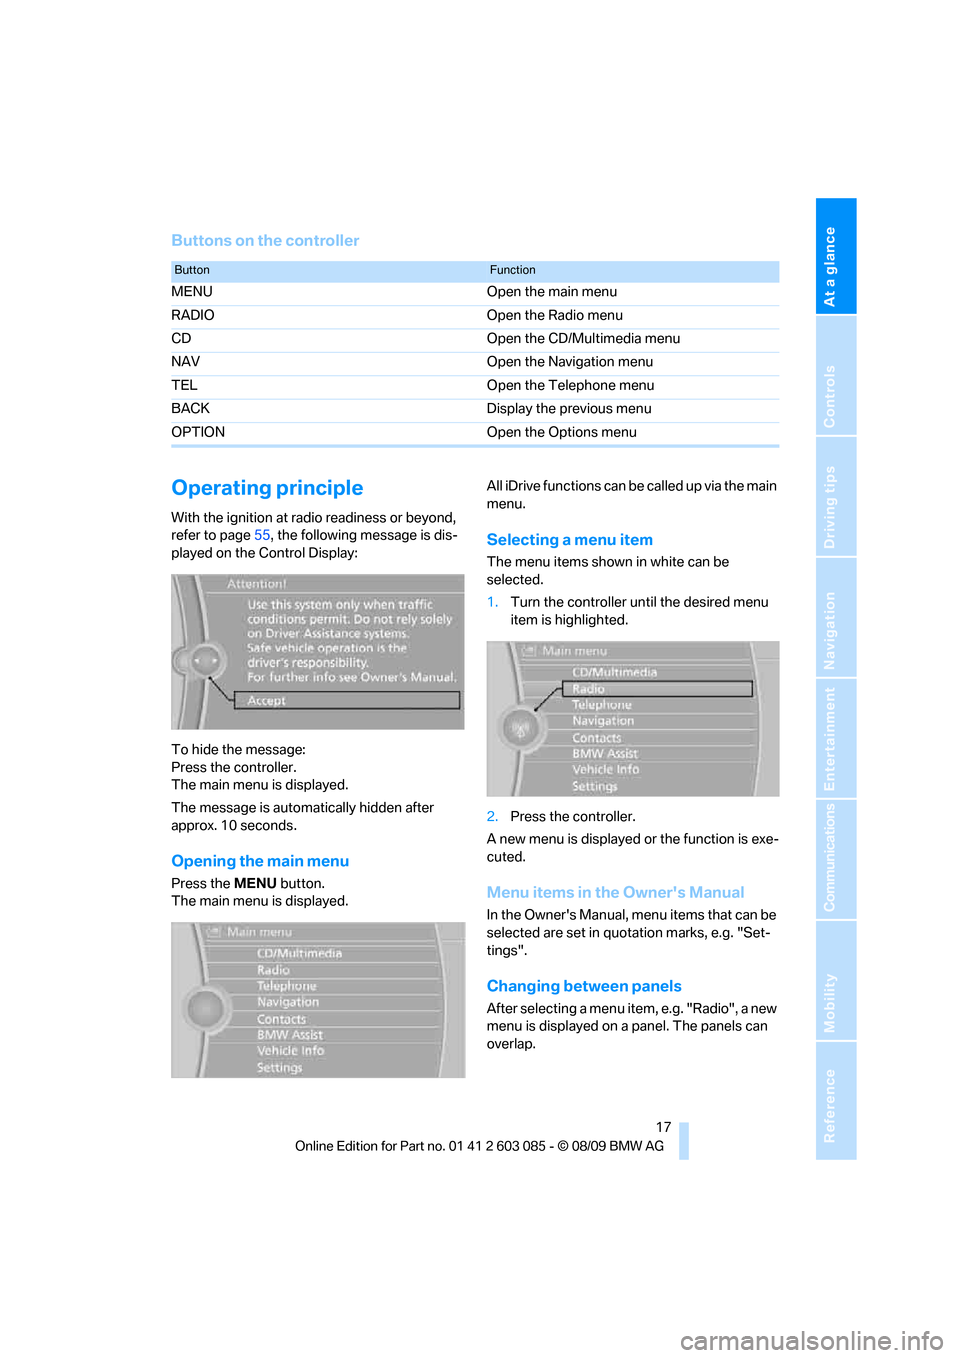
With the ignition at radio readiness or beyond,
refer to page55, the following message is dis-
played on the Control Display:
To hide the message:
Press the controller.
The main menu is displayed.
The message is automatically hidden after
approx. 10 seconds.
Opening the main menu
Press the MENU button.
The main menu is displayed.All iDrive functions can be called up via the main
menu.
Selecting a menu item
The menu items shown in white can be
selected.
1.Turn the controller until the desired menu
item is highlighted.
2.Press the controller.
A new menu is displayed or the function is exe-
cuted.
Menu items in the Owner's Manual
In the Owner's Manual, menu items that can be
selected are set in quotation marks, e.g. "Set-
tings".
Changing between panels
After selecting a menu item, e.g. "Radio", a new
menu is displayed on a panel. The panels can
overlap.
ButtonFunction
MENU Open the main menu
RADIO Open the Radio menu
CD Open the CD/Multimedia menu
NAV Open the Navigation menu
TEL Open the Telephone menu
BACK Display the previous menu
OPTION Open the Options menu
Page 20 of 266
iDrive
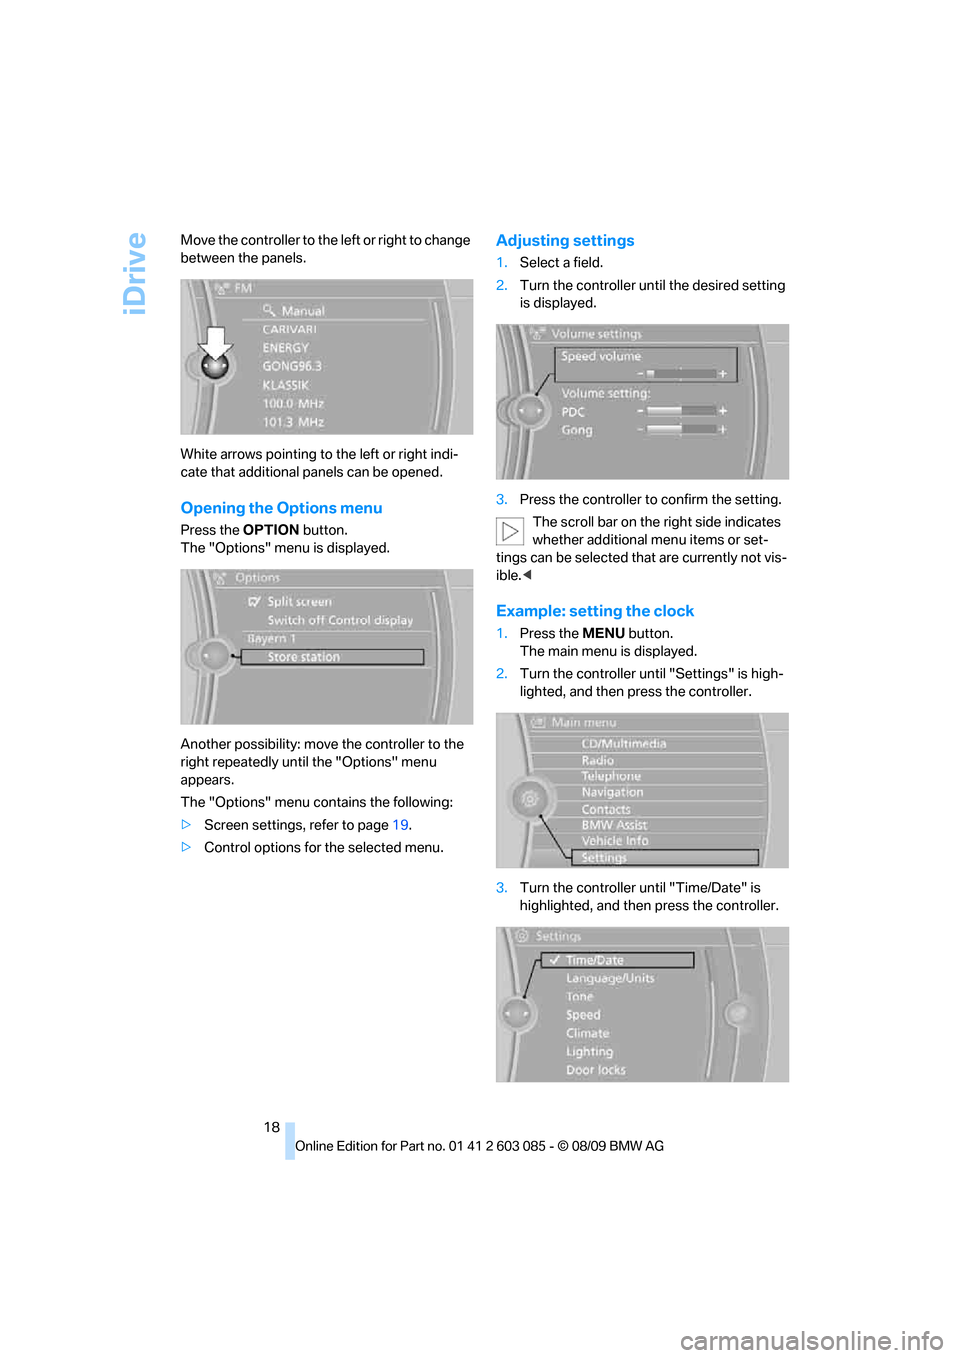
18 Move the controller to the left or right to change
between the panels.
White arrows pointing to the left or right indi-
cate that additional panels can be opened.
Opening the Options menu
Press the OPTION button.
The "Options" menu is displayed.
Another possibility: move the controller to the
right repeatedly until the "Options" menu
appears.
The "Options" menu contains the following:
>Screen settings, refer to page19.
>Control options for the selected menu.
Adjusting settings
1.Select a field.
2.Turn the controller until the desired setting
is displayed.
3.Press the controller to confirm the setting.
The scroll bar on the right side indicates
whether additional menu items or set-
tings can be selected that are currently not vis-
ible.<
Example: setting the clock
1.Press the MENU button.
The main menu is displayed.
2.Turn the controller until "Settings" is high-
lighted, and then press the controller.
3.Turn the controller until "Time/Date" is
highlighted, and then press the controller.