run BMW 335I XDRIVE SEDAN 2011 User Guide
[x] Cancel search | Manufacturer: BMW, Model Year: 2011, Model line: 335I XDRIVE SEDAN, Model: BMW 335I XDRIVE SEDAN 2011Pages: 286, PDF Size: 8.25 MB
Page 38 of 286
Opening and closing
36
Malfunction
Comfort Access may malfunction due to local
radio waves. If this happens, open or close the
vehicle via the buttons on the remote control or
using the integrated key. To start the engine
afterward, insert the remote control into the
ignition lock.
Warning lamps
The warning lamp in the instrument
cluster lights up when you attempt to
start the engine: the engine cannot
be started. The remote control is not inside the
vehicle or is malfunctioning.
Take the remote control with you inside the
vehicle or have it checked. If necessary, insert
another remote control into the ignition lock.
The warning lamp in the instrument
cluster lights up while the engine is
running: the remote control is no
longer inside the vehicle. After the engine is
switched off, the engine can only be restarted
within approx. 10 seconds.
The indicator lamp in the instrument
cluster comes on and a message
appears on the Control Display:
replace the battery in the remote control.
Replacing the battery
The remote control for Comfort Access con-
tains a battery that will need to be replaced from
time to time.
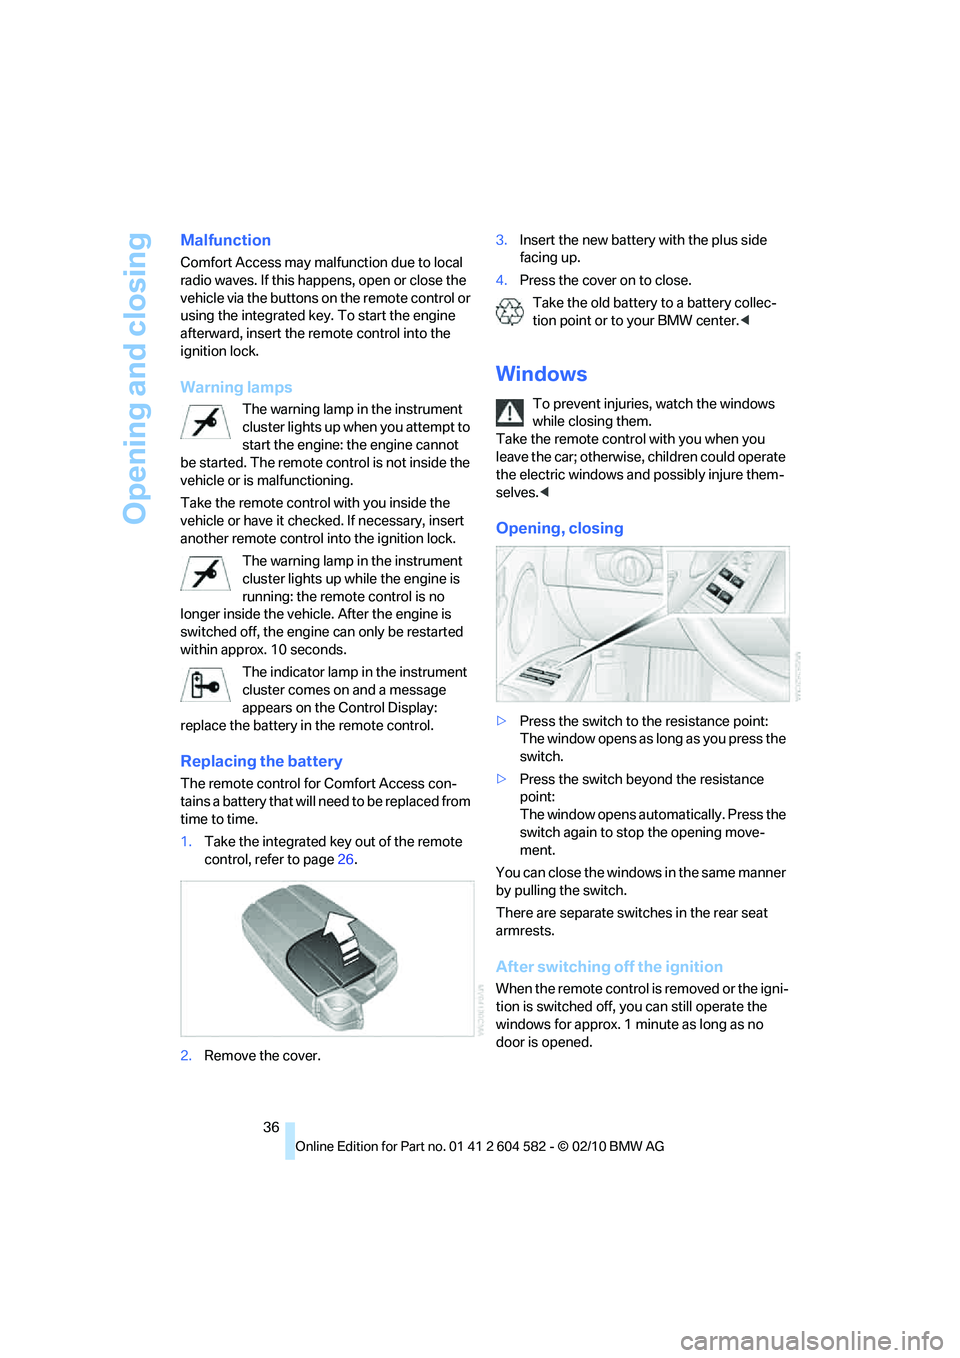
1.Take the integrated key out of the remote
control, refer to page26.
2.Remove the cover.3.Insert the new battery with the plus side
facing up.
4.Press the cover on to close.
Take the old battery to a battery collec-
tion point or to your BMW center.<
Windows
To prevent injuries, watch the windows
while closing them.
Take the remote control with you when you
leave the car; otherwise, children could operate
the electric windows and possibly injure them-
selves.<
Opening, closing
>Press the switch to the resistance point:
The window opens as long as you press the
switch.
>Press the switch beyond the resistance
point:
The window opens automatically. Press the
switch again to stop the opening move-
ment.
You can close the windows in the same manner
by pulling the switch.
There are separate switches in the rear seat
armrests.
After switching off the ignition
When the remote control is removed or the igni-
tion is switched off, you can still operate the
windows for approx. 1 minute as long as no
door is opened.
Page 44 of 286
Adjustments
42
Adjustments
Sitting safely
The ideal sitting position can make a vital con-
tribution to relaxed, fatigue-free driving. In con-
junction with the safety belts, the head
restraints and the airbags, the seated position
has a major influence on your safety in the event
of an accident. To ensure that the safety sys-
tems operate with optimal efficiency, we
strongly urge you to observe the instructions
contained in the following section.
For additional information on transporting chil-
dren safely, refer to page51.
Airbags
Always maintain an adequate distance
between yourself and the airbags. Always
grip the steering wheel on the rim, with your
hands in the 3 o'clock and 9 o'clock positions,
to minimize the risk of injury to the hands or
arms in the event of the airbag being triggered
off.
No one and nothing should come between the
airbags and the seat occupant.
Do not use the cover of the front airbag on the
front passenger side as a storage area. Make
sure that the front passenger is sitting correctly,
e.g. not resting feet or legs on the dashboard;
otherwise, leg injuries can occur if the front air-
bag deploys.
Make sure that passengers keep their heads
away from the side airbag and do not lean
against the cover of the head airbag; otherwise,
serious injuries can result if the airbag
deploys.<
Even if you follow all the instructions, injuries
resulting from contact with airbags cannot be
fully excluded, depending on the circum-
stances. The ignition and inflation noise may
provoke a mild hearing loss in extremely sensi-
tive individuals. This effect is usually only tem-
porary.
For airbag locations and additional information
on airbags, refer to page94.
Head restraint
A correctly adjusted head restraint reduces the
risk of neck injury in the event of an accident.
Adjust the head restraint in such a way
that its center is at approx. ear level.
Otherwise, there is an increased risk of injury in
the event of an accident.<
Head restraints, refer to page44.
Safety belt
Before every drive, make sure that all occupants
wear their safety belts. Airbags complement the
safety belt as an additional safety device, but
they do not represent a substitute.
Your vehicle has five seats, each of which is
equipped with a safety belt.
Never allow more than one person to
wear a single safety belt. Never allow
infants or small children to ride in a passenger's
lap. Make sure that the belt in the lap area sits
low across the hips and does not press against
the abdomen.
The safety belt must not rest against the throat,
run across sharp edges, pass over hard or frag-
ile objects or be pinched. Fasten the safety belt
so that it sits as snugly as possible against the
lap and shoulder without being twisted. Other-
wise, the belt could slide over your hips and
injure your abdomen in the event of a frontal
collision.
Avoid wearing bulky clothing and regularly pull
the belt in the upper-body area taut; otherwise,
its restraining effect could be impaired.
Sports Wagon: if the rear center safety belt is
used, the wider backrest must be locked in
place, refer to page115. Otherwise, the safety
belt will have no restraining effect.<
Safety belts, refer to page47.
Page 50 of 286
Adjustments
48
Damage to safety belts
If the safety belts are damaged or
stressed in an accident: have the belt
system, including any belt tensioners or child
restraint systems, replaced and the belt
anchors checked. Have this work done only by
your BMW center or at a workshop that works
according to BMW repair procedures with cor-
respondingly trained personnel. Otherwise, it is
not guaranteed that the safety devices will func-
tion properly.<
Rear center safety belt
With through-loading system*:
Before using the center rear seat, release the
latch plate from the fixture on the rear window
shelf and insert it into the belt lock of the center
safety belt. Make sure you hear the latch plate
engage.
Mirrors
Exterior mirrors
The front passenger's mirror is more con-
vex than the driver's mirror. The objects
seen in the mirror are closer than they appear.
Do not gauge your distance from traffic behind
you on the basis of what you see in the mirror;
otherwise, there is an increased risk of an acci-
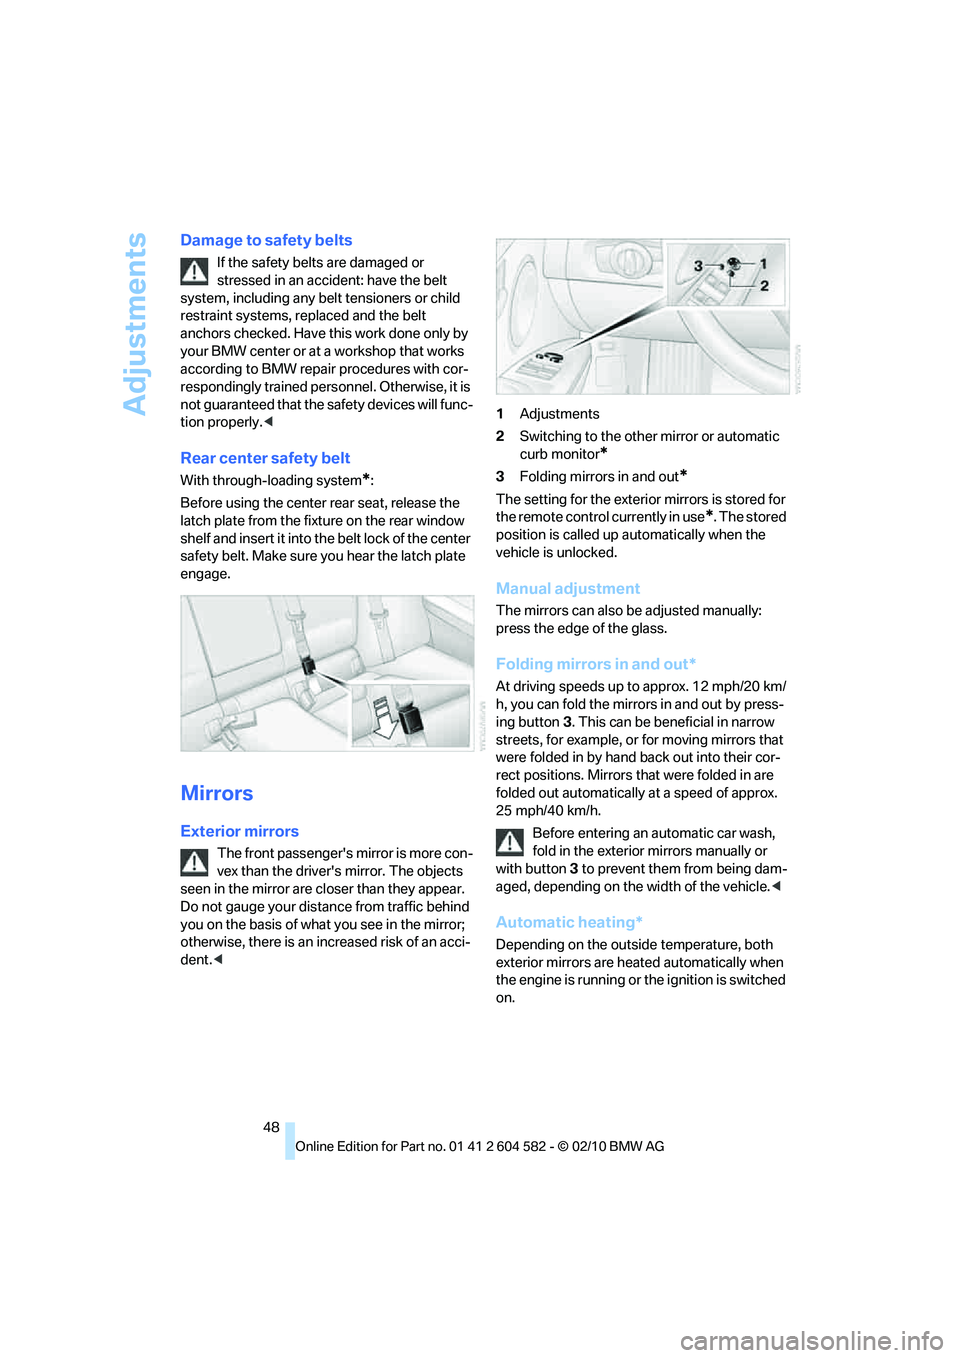
dent.<1Adjustments
2Switching to the other mirror or automatic
curb monitor
*
3Folding mirrors in and out*
The setting for the exterior mirrors is stored for
the remote control currently in use
*. The stored
position is called up automatically when the
vehicle is unlocked.
Manual adjustment
The mirrors can also be adjusted manually:
press the edge of the glass.
Folding mirrors in and out*
At driving speeds up to approx. 12 mph/20 km/
h, you can fold the mirrors in and out by press-
ing button3. This can be beneficial in narrow
streets, for example, or for moving mirrors that
were folded in by hand back out into their cor-
rect positions. Mirrors that were folded in are
folded out automatically at a speed of approx.
25 mph/40 km/h.
Before entering an automatic car wash,
fold in the exterior mirrors manually or
with button3 to prevent them from being dam-
aged, depending on the width of the vehicle.<
Automatic heating*
Depending on the outside temperature, both
exterior mirrors are heated automatically when
the engine is running or the ignition is switched
on.
Page 55 of 286
Controls
53Reference
At a glance
Driving tips
Communications
Navigation
Entertainment
Mobility
Child restraint system with tether strap
Use the top tether anchors to secure child
restraint systems only; otherwise, the
anchors could be damaged.<
Sedan
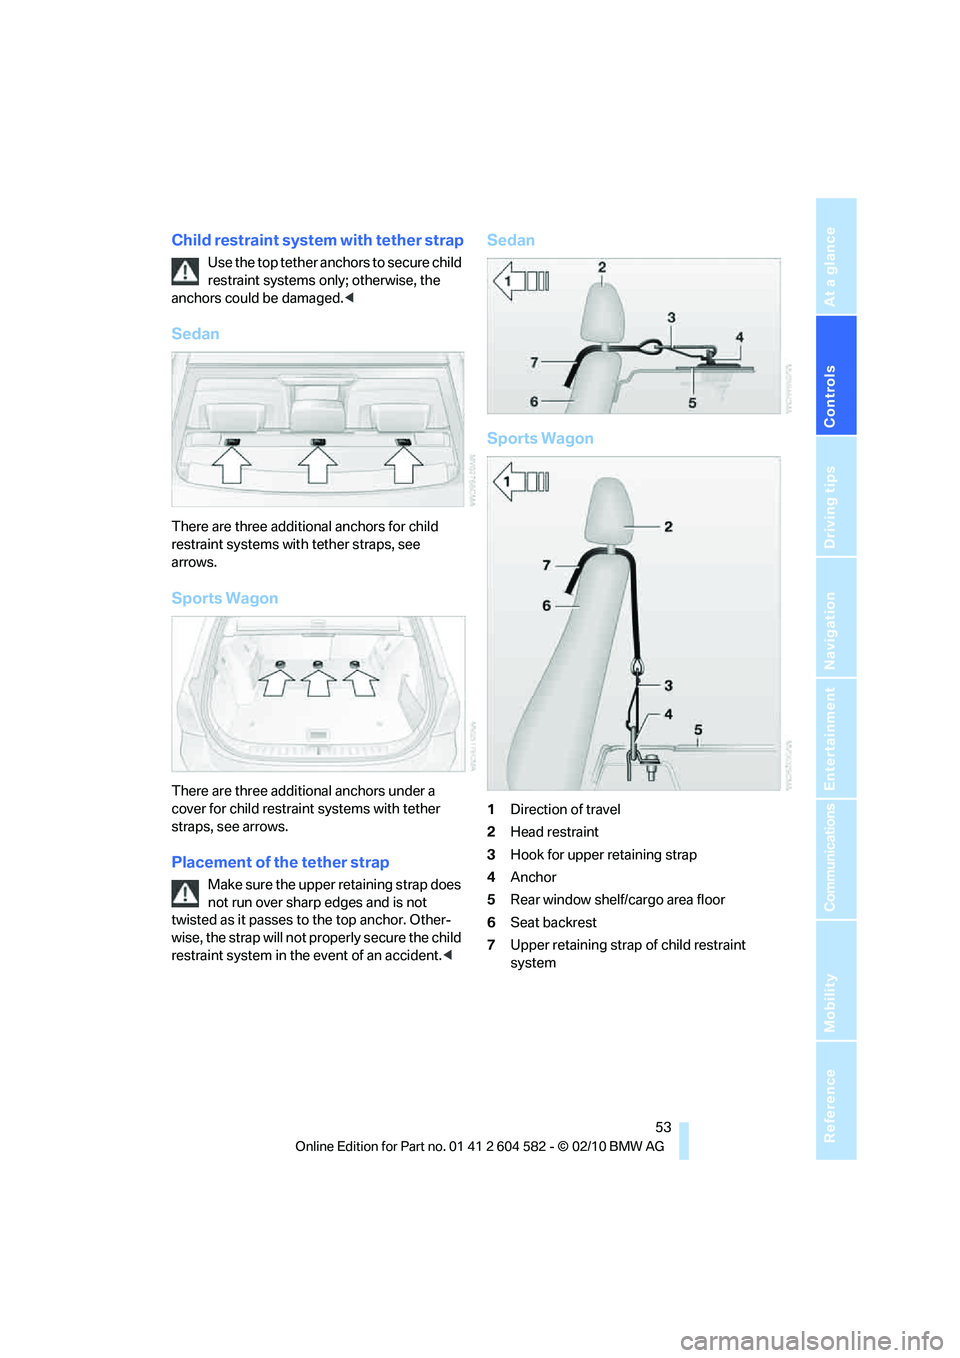
There are three additional anchors for child
restraint systems with tether straps, see
arrows.
Sports Wagon
There are three additional anchors under a
cover for child restraint systems with tether
straps, see arrows.
Placement of the tether strap
Make sure the upper retaining strap does
not run over sharp edges and is not
twisted as it passes to the top anchor. Other-
wise, the strap will not properly secure the child
restraint system in the event of an accident.<
Sedan
Sports Wagon
1Direction of travel
2Head restraint
3Hook for upper retaining strap
4Anchor
5Rear window shelf/cargo area floor
6Seat backrest
7Upper retaining strap of child restraint
system
Page 58 of 286
Driving
56
Radio readiness and ignition off
All indicator and warning lamps as well as dis-
plays in the instrument cluster go out.
Starting the engine
Do not run the engine in enclosed areas;
otherwise, the inhalation of toxic exhaust
gases can cause loss of consciousness and
death. The exhaust gases contain carbon mon-
oxide, an odorless and colorless, but highly
toxic gas. Never leave an unattended vehicle
with the engine running; otherwise, such a vehi-
cle represents a potential safety hazard.
Before leaving the vehicle with the engine run-
ning, always shift into neutral or selector
position P and apply the parking brake force-
fully to prevent the vehicle from rolling.<
Avoid frequent starting in quick succes-
sion as well as repeated start attempts in
which the engine does not start. Otherwise, the
fuel is not burned or incompletely burned and
there is a danger of overheating and damaging
the catalytic converter.<
Do not wait for the engine to warm up while the
vehicle remains stationary. Start driving right
away, but at moderate engine speeds.
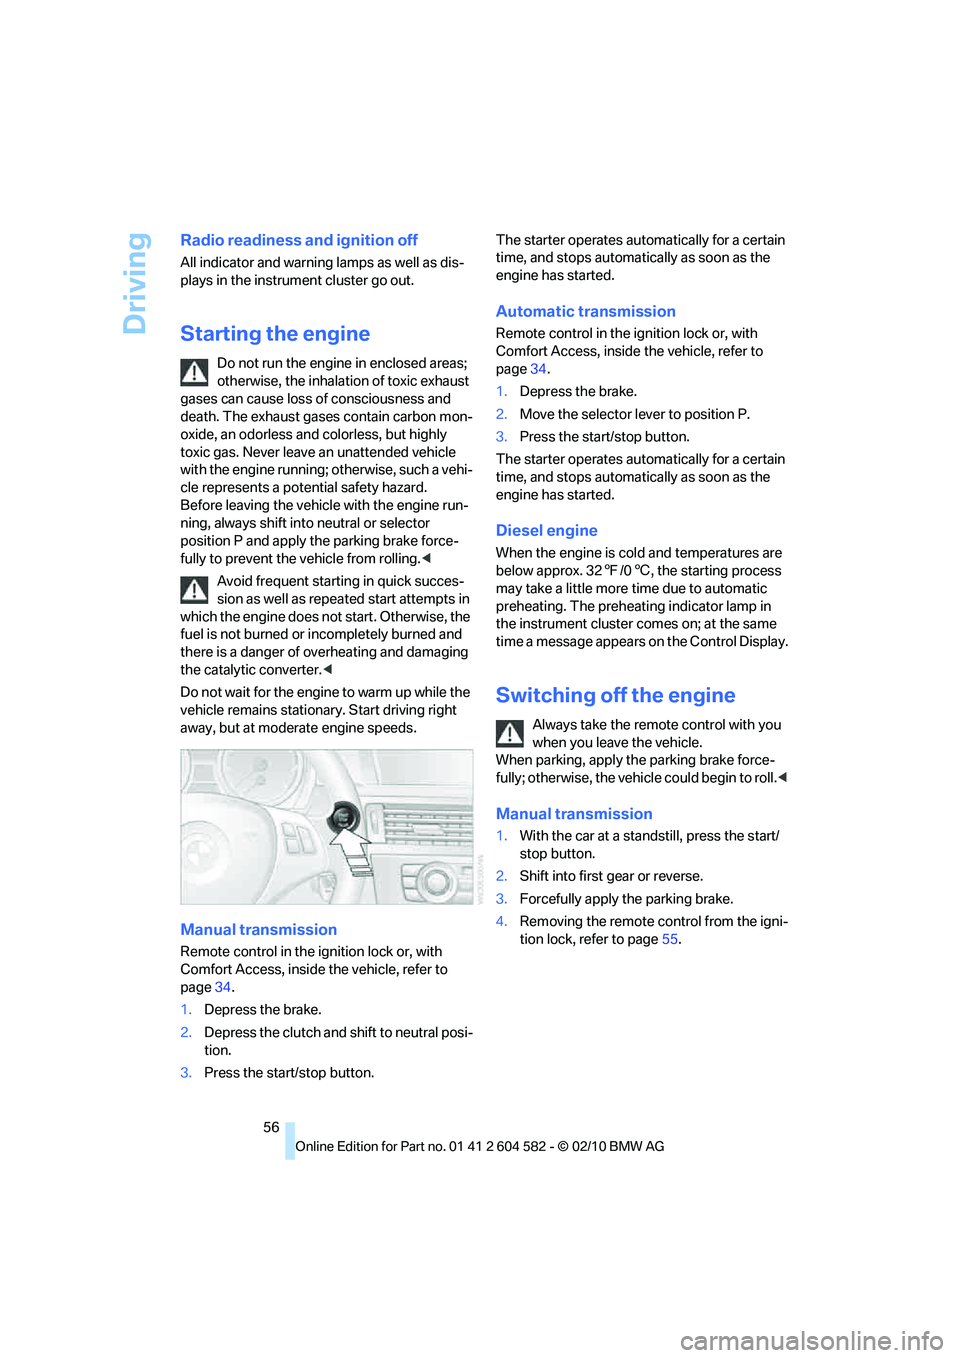
Manual transmission
Remote control in the ignition lock or, with
Comfort Access, inside the vehicle, refer to
page34.
1.Depress the brake.
2.Depress the clutch and shift to neutral posi-
tion.
3.Press the start/stop button.The starter operates automatically for a certain
time, and stops automatically as soon as the
engine has started.
Automatic transmission
Remote control in the ignition lock or, with
Comfort Access, inside the vehicle, refer to
page34.
1.Depress the brake.
2.Move the selector lever to position P.
3.Press the start/stop button.
The starter operates automatically for a certain
time, and stops automatically as soon as the
engine has started.
Diesel engine
When the engine is cold and temperatures are
below approx. 327/06, the starting process
may take a little more time due to automatic
preheating. The preheating indicator lamp in
the instrument cluster comes on; at the same
time a message appears on the Control Display.
Switching off the engine
Always take the remote control with you
when you leave the vehicle.
When parking, apply the parking brake force-
fully; otherwise, the vehicle could begin to roll.<
Manual transmission
1.With the car at a standstill, press the start/
stop button.
2.Shift into first gear or reverse.
3.Forcefully apply the parking brake.
4.Removing the remote control from the igni-
tion lock, refer to page55.
Page 59 of 286
Controls
57Reference
At a glance
Driving tips
Communications
Navigation
Entertainment
Mobility
Automatic transmission
1.With the car at a standstill, move the selec-
tor lever to position P.
2.Press the start/stop button.
3.Forcefully apply the parking brake.
4.Removing the remote control from the igni-
tion lock, refer to page55.
Parking brake
The parking brake is primarily intended to pre-
vent the vehicle from rolling while parked; it
brakes the rear wheels.
Indicator lamp
The indicator lamp is lit, and when you
drive off an acoustic signal sounds in
addition. The parking brake is still
applied.
Indicator lamp for Canadian models.
Applying
The lever locks in position automatically.
Releasing
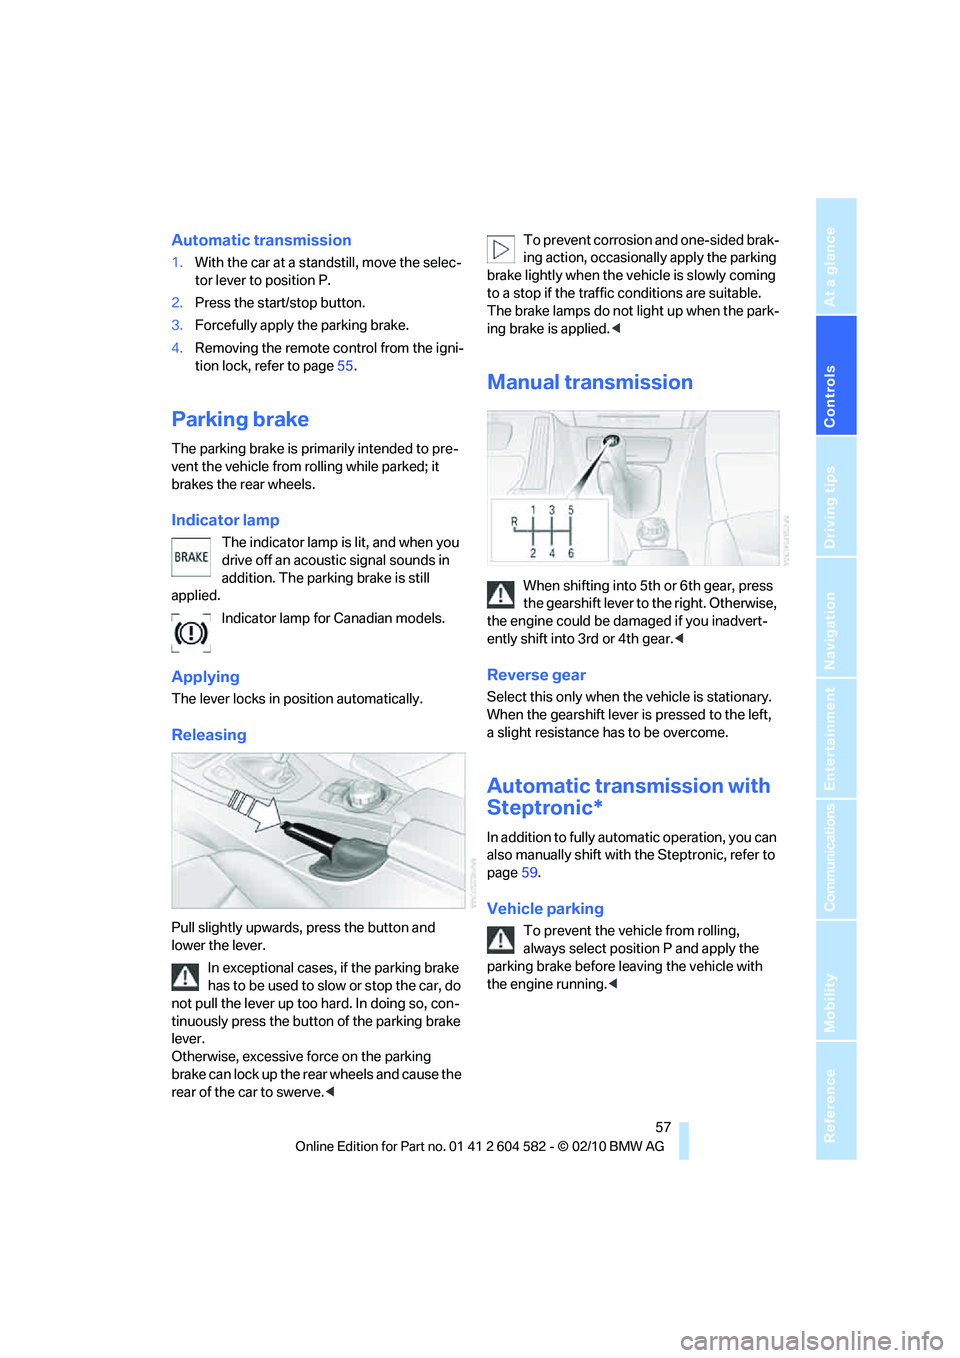
Pull slightly upwards, press the button and
lower the lever.
In exceptional cases, if the parking brake
has to be used to slow or stop the car, do
not pull the lever up too hard. In doing so, con-
tinuously press the button of the parking brake
lever.
Otherwise, excessive force on the parking
brake can lock up the rear wheels and cause the
rear of the car to swerve.
brake lightly when the vehicle is slowly coming
to a stop if the traffic conditions are suitable.
The brake lamps do not light up when the park-
ing brake is applied.<
Manual transmission
When shifting into 5th or 6th gear, press
the gearshift lever to the right. Otherwise,
the engine could be damaged if you inadvert-
ently shift into 3rd or 4th gear.<
Reverse gear
Select this only when the vehicle is stationary.
When the gearshift lever is pressed to the left,
a slight resistance has to be overcome.
Automatic transmission with
Steptronic*
In addition to fully automatic operation, you can
also manually shift with the Steptronic, refer to
page59.
Vehicle parking
To prevent the vehicle from rolling,
always select position P and apply the
parking brake before leaving the vehicle with
the engine running.<
Page 60 of 286
Driving
58
Disengaging the remote control
In order to remove the remote control from the
ignition lock, you must first move the selector
lever to position P and switch off the engine:
interlock. Removing the remote control from
the ignition lock, refer to page55.
Selector lever positions
P R N D M/S + –
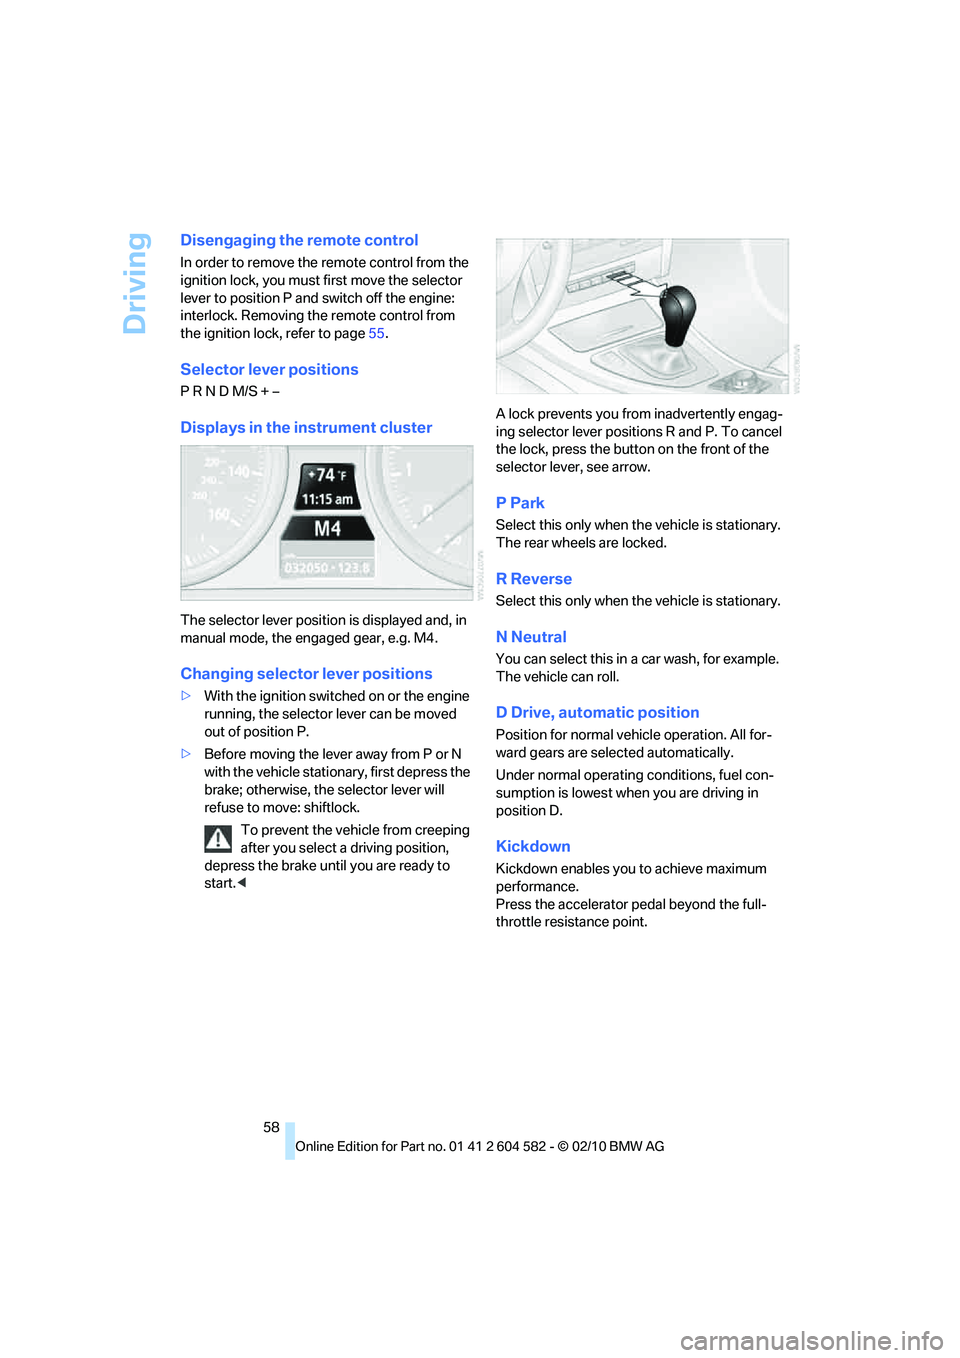
Displays in the instrument cluster
The selector lever position is displayed and, in
manual mode, the engaged gear, e.g. M4.
Changing selector lever positions
>With the ignition switched on or the engine
running, the selector lever can be moved
out of position P.
>Before moving the lever away from P or N
with the vehicle stationary, first depress the
brake; otherwise, the selector lever will
refuse to move: shiftlock.
To prevent the vehicle from creeping
after you select a driving position,
depress the brake until you are ready to
start.
ing selector lever positions R and P. To cancel
the lock, press the button on the front of the
selector lever, see arrow.
P Park
Select this only when the vehicle is stationary.
The rear wheels are locked.
R Reverse
Select this only when the vehicle is stationary.
N Neutral
You can select this in a car wash, for example.
The vehicle can roll.
D Drive, automatic position
Position for normal vehicle operation. All for-
ward gears are selected automatically.
Under normal operating conditions, fuel con-
sumption is lowest when you are driving in
position D.
Kickdown
Kickdown enables you to achieve maximum
performance.
Press the accelerator pedal beyond the full-
throttle resistance point.
Page 64 of 286
Driving
62
Windshield washer nozzles
The windshield washer nozzles are heated
automatically
* while the engine is running or
the ignition is switched on.
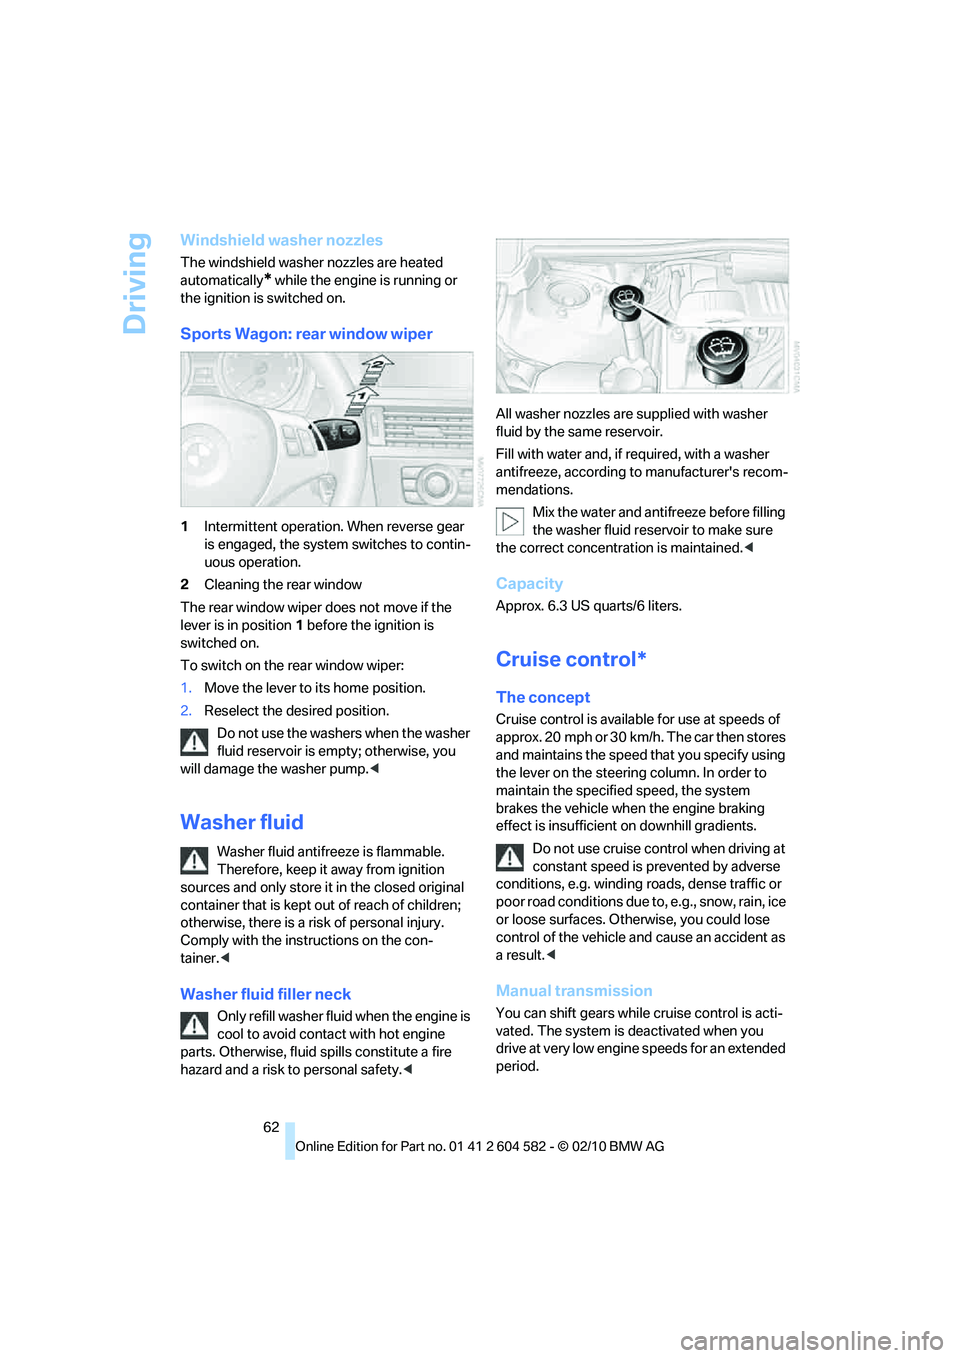
Sports Wagon: rear window wiper
1Intermittent operation. When reverse gear
is engaged, the system switches to contin-
uous operation.
2Cleaning the rear window
The rear window wiper does not move if the
lever is in position1 before the ignition is
switched on.
To switch on the rear window wiper:
1.Move the lever to its home position.
2.Reselect the desired position.
Do not use the washers when the washer
fluid reservoir is empty; otherwise, you
will damage the washer pump.<
Washer fluid
Washer fluid antifreeze is flammable.
Therefore, keep it away from ignition
sources and only store it in the closed original
container that is kept out of reach of children;
otherwise, there is a risk of personal injury.
Comply with the instructions on the con-
tainer.<
Washer fluid filler neck
Only refill washer fluid when the engine is
cool to avoid contact with hot engine
parts. Otherwise, fluid spills constitute a fire
hazard and a risk to personal safety.
Fill with water and, if required, with a washer
antifreeze, according to manufacturer's recom-
mendations.
Mix the water and antifreeze before filling
the washer fluid reservoir to make sure
the correct concentration is maintained.<
Capacity
Approx. 6.3 US quarts/6 liters.
Cruise control*
The concept
Cruise control is available for use at speeds of
approx. 20 mph or 30 km/h. The car then stores
and maintains the speed that you specify using
the lever on the steering column. In order to
maintain the specified speed, the system
brakes the vehicle when the engine braking
effect is insufficient on downhill gradients.
Do not use cruise control when driving at
constant speed is prevented by adverse
conditions, e.g. winding roads, dense traffic or
poor road conditions due to, e.g., snow, rain, ice
or loose surfaces. Otherwise, you could lose
control of the vehicle and cause an accident as
aresult.<
Manual transmission
You can shift gears while cruise control is acti-
vated. The system is deactivated when you
drive at very low engine speeds for an extended
period.
Page 75 of 286
Controls
73Reference
At a glance
Driving tips
Communications
Navigation
Entertainment
Mobility
Computer
Displays in the instrument cluster
Calling up information
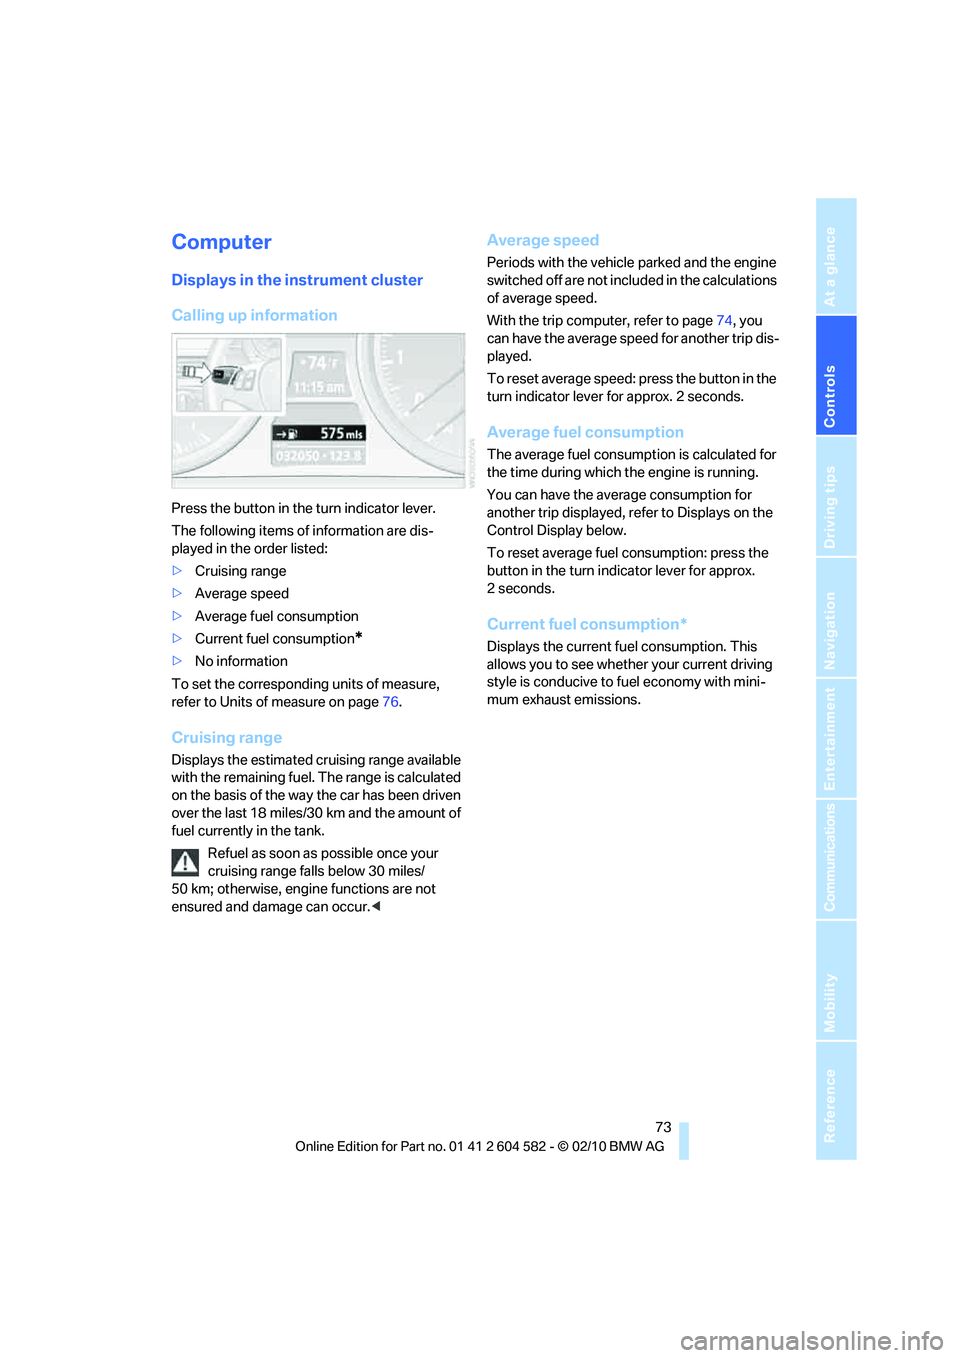
Press the button in the turn indicator lever.
The following items of information are dis-
played in the order listed:
>Cruising range
>Average speed
>Average fuel consumption
>Current fuel consumption
*
>No information
To set the corresponding units of measure,
refer to Units of measure on page76.
Cruising range
Displays the estimated cruising range available
with the remaining fuel. The range is calculated
on the basis of the way the car has been driven
over the last 18 miles/30 km and the amount of
fuel currently in the tank.
Refuel as soon as possible once your
cruising range falls below 30 miles/
50 km; otherwise, engine functions are not
ensured and damage can occur.<
Average speed
Periods with the vehicle parked and the engine
switched off are not included in the calculations
of average speed.
With the trip computer, refer to page74, you
can have the average speed for another trip dis-
played.
To reset average speed: press the button in the
turn indicator lever for approx. 2 seconds.
Average fuel consumption
The average fuel consumption is calculated for
the time during which the engine is running.
You can have the average consumption for
another trip displayed, refer to Displays on the
Control Display below.
To reset average fuel consumption: press the
button in the turn indicator lever for approx.
2seconds.
Current fuel consumption*
Displays the current fuel consumption. This
allows you to see whether your current driving
style is conducive to fuel economy with mini-
mum exhaust emissions.
Page 86 of 286
Technology for driving comfort and safety
84
Technology for driving comfort and safety
Park Distance Control PDC*
The concept
The PDC assists you with maneuvering in tight
parking spaces. Acoustic signals and a visual
indicator
warn you of the presence of an object
behind your vehicle. To measure the distance,
there are four ultrasonic sensors in either
bumper.
These sensors have a range of approx. 6.5 ft/
2 m. However, an acoustic warning does not
sound until an object is approx. 2 ft/60 cm from
the corner sensors, or approx. 5 ft/1.50 m from
the center sensors.
PDC is a parking aid that can indicate
objects when they are approached
slowly, as is usually the case when parking.
Avoid approaching an object at high speed; oth-
erwise, physical circumstances may lead to the
system warning being issued too late.<
Switching on automatically
With the engine running or the ignition switched
on, the system is activated after approx. 1 sec-
ond when you engage reverse gear or move the
automatic transmission selector lever to
position R. Wait this short period before driving.
Switching off automatically
After approx. 55 yd/50 m of driving or above
approx. 20 mph/approx. 30 km/h, the system
switches off and the LED goes out.
Signal tones
When nearing an object, its position is indicated
correspondingly by an interval tone. As the dis-
tance between vehicle and object decreases,
the intervals between the tones become
shorter. If the distance to the nearest object
falls to below roughly 1 ft/30 cm, then a contin-
uous tone sounds.
An interval tone is interrupted after approx.
3seconds
>If you remain in front of an object that has
been detected by only one of the corner
sensors
>If you are driving parallel to a wall.
Malfunction
The indicator lamp in the instrument
cluster comes on. PDC is malfunc-
tioning. A message appears on the
Control Display. Have the system checked.
To avoid this problem, keep the sensors clean
and free of ice or snow in order to ensure that
they will continue to operate effectively. When
using a high-pressure cleaner, do not spray the
sensors for extended periods of time and only
from a distance of at least 1 ft/30 cm.
PDC with visual warning
The approach of the vehicle to an object is
shown on the Control Display. Objects that are
farther away are displayed on the Control Dis-
play before a signal tone sounds. The display
appears on the Control Display as soon as PDC
is activated.