BMW 335IS CONVERTIBLE 2012 Owners Manual
Manufacturer: BMW, Model Year: 2012, Model line: 335IS CONVERTIBLE, Model: BMW 335IS CONVERTIBLE 2012Pages: 314, PDF Size: 7.72 MB
Page 111 of 314
110
ControlsLamps
Lamps
Vehicle equipment
In this chapter, all pr oduction, country, and
optional equipment that is offered in the model
range is described. For this reason, descrip-
tions will be given of some equipment that may
not be available in a vehi cle, for example due to
the special options or national-market version
selected. This also app lies to safety related
functions and systems.
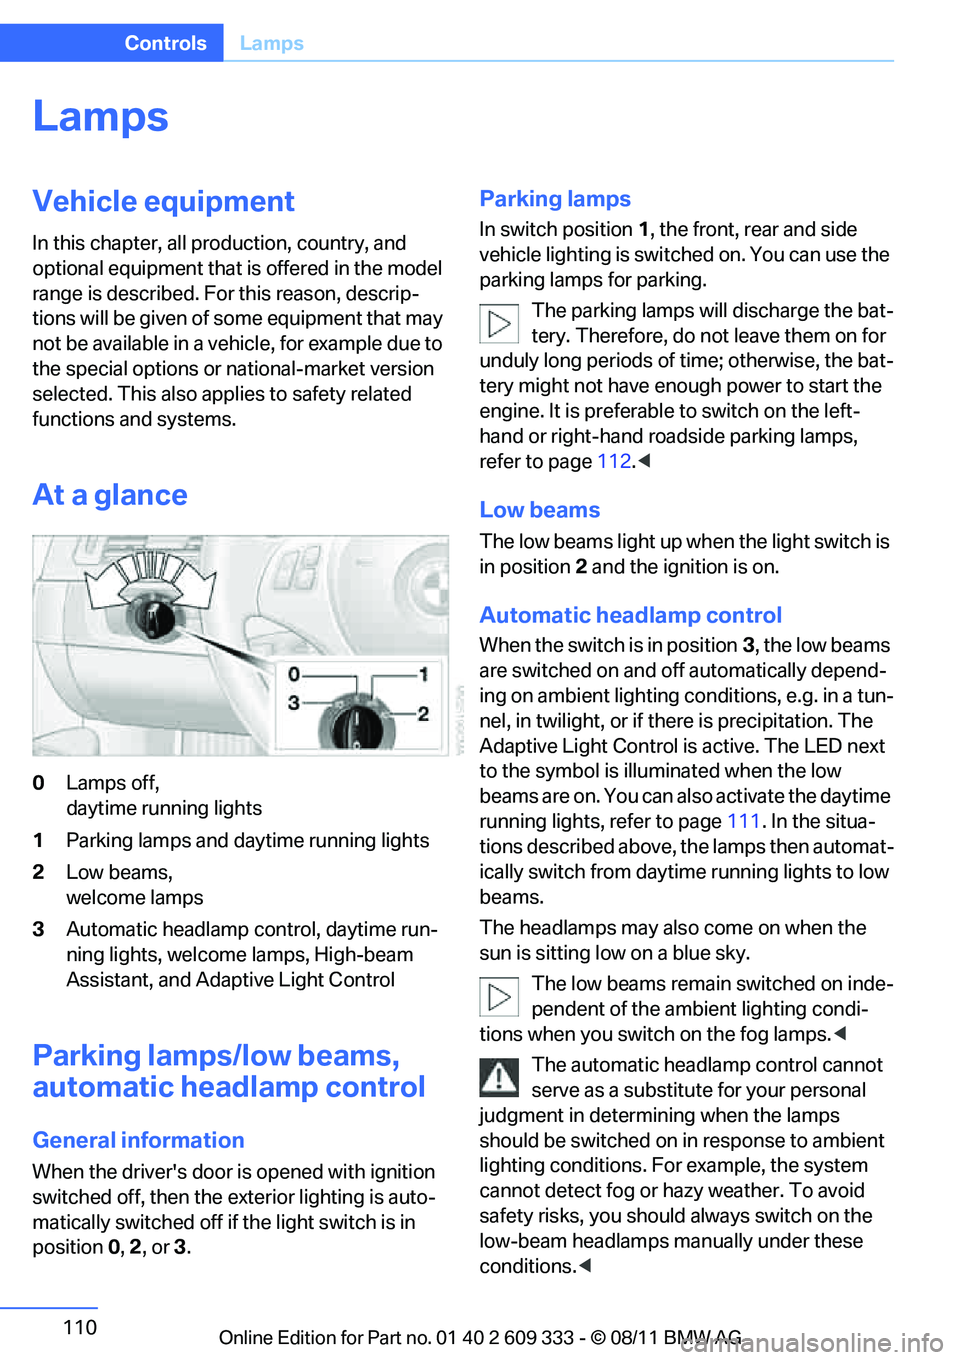
At a glance
0 Lamps off,
daytime running lights
1 Parking lamps and daytime running lights
2 Low beams,
welcome lamps
3 Automatic headlamp control, daytime run-
ning lights, welcome lamps, High-beam
Assistant, and Adaptive Light Control
Parking lamps/low beams,
automatic headlamp control
General information
When the driver's door is opened with ignition
switched off, then the exterior lighting is auto-
matically switched off if the light switch is in
position 0, 2 , or 3.
Parking lamps
In switch position 1, the front, rear and side
vehicle lighting is switch ed on. You can use the
parking lamps for parking.
The parking lamps will discharge the bat-
tery. Therefore, do not leave them on for
unduly long periods of time; otherwise, the bat-
tery might not have enou gh power to start the
engine. It is preferable to switch on the left-
hand or right-hand roadside parking lamps,
refer to page 112.<
Low beams
The low beams light up wh en the light switch is
in position 2 and the ignition is on.
Automatic headlamp control
When the switch is in position 3, the low beams
are switched on and off automatically depend-
ing on ambient lighting conditions, e.g. in a tun-
nel, in twilight, or if there is precipitation. The
Adaptive Light Control is active. The LED next
to the symbol is illu minated when the low
beams are on. You can also activate the daytime
running lights, refer to page 111. In the situa-
tions described above, the lamps then automat-
ically switch from daytime running lights to low
beams.
The headlamps may also come on when the
sun is sitting low on a blue sky.
The low beams remain switched on inde-
pendent of the ambient lighting condi-
tions when you switch on the fog lamps. <
The automatic headlamp control cannot
serve as a substitute for your personal
judgment in determining when the lamps
should be switched on in response to ambient
lighting conditions. For example, the system
cannot detect fog or ha zy weather. To avoid
safety risks, you should always switch on the
low-beam headlamps ma nually under these
conditions. <
Online Edition for Part no. 01 40 2 609 333 - \251 08/11 BMW AG
Page 112 of 314
111
Lamps
Controls
Welcome lamps
If you leave the light switch in position
2 or 3
when you park the car, the parking lamps and
the interior lamps light up briefly when you
unlock the vehicle.
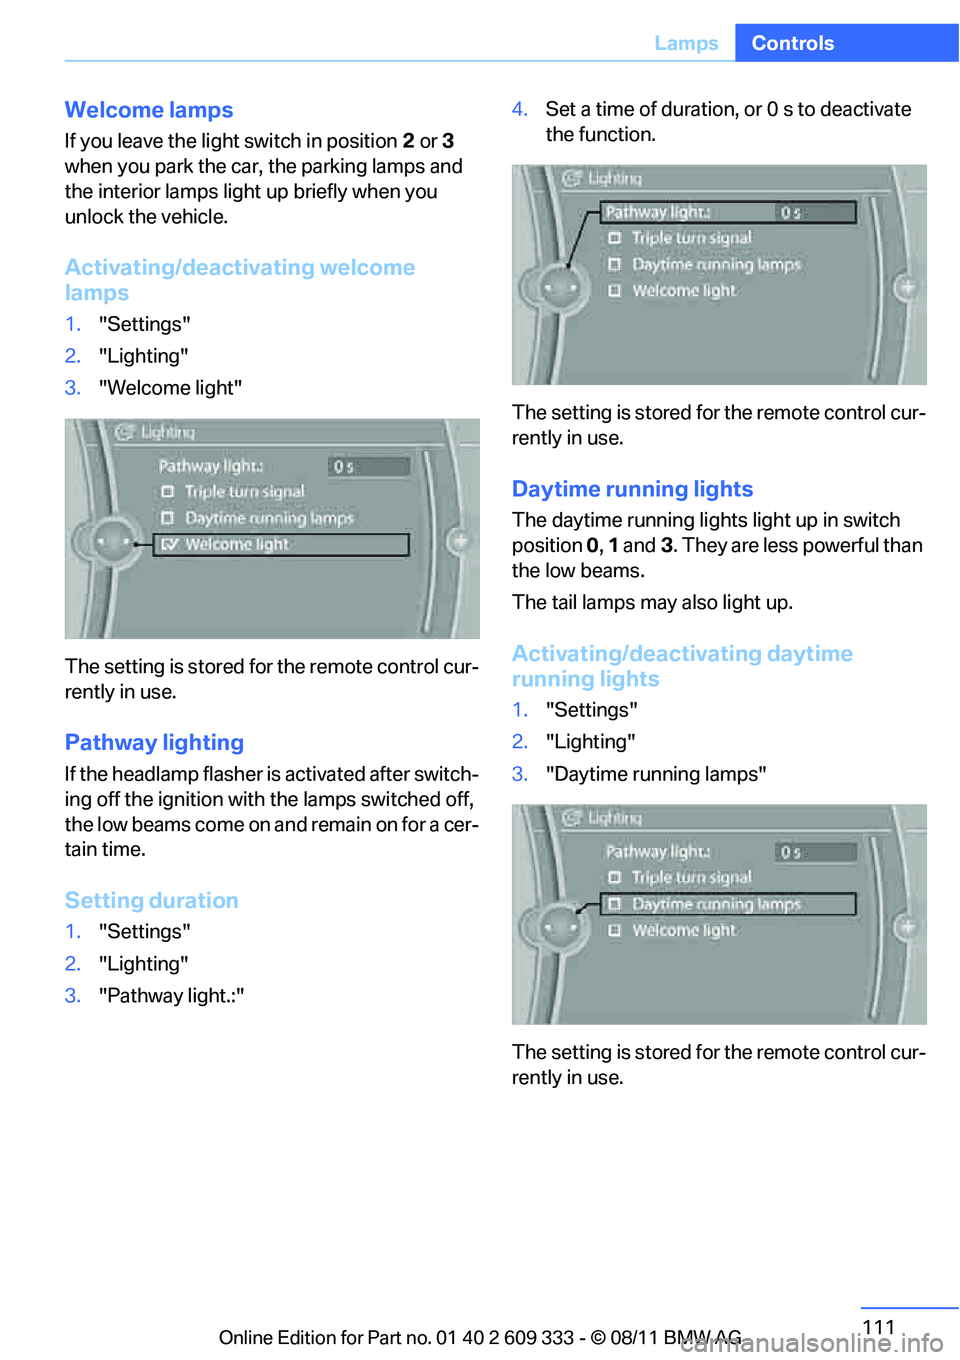
Activating/deactivating welcome
lamps
1. "Settings"
2. "Lighting"
3. "Welcome light"
The setting is stored for the remote control cur-
rently in use.
Pathway lighting
If the headlamp flasher is activated after switch-
ing off the ignition with the lamps switched off,
the low beams come on and remain on for a cer-
tain time.
Setting duration
1. "Settings"
2. "Lighting"
3. "Pathway light.:" 4.
Set a time of duration, or 0 s to deactivate
the function.
The setting is stored for the remote control cur-
rently in use.
Daytime running lights
The daytime running light s light up in switch
position 0, 1 and 3. They are less powerful than
the low beams.
The tail lamps may also light up.
Activating/deactivating daytime
running lights
1. "Settings"
2. "Lighting"
3. "Daytime running lamps"
The setting is stored for the remote control cur-
rently in use.
Online Edition for Part no. 01 40 2 609 333 - \251 08/11 BMW AG
Page 113 of 314
112
ControlsLamps
Adaptive Light Control
The concept
Adaptive Light Control is a variable headlamp
control system that en ables better illumination
of the road surface. Depending on the steering
angle and other parameters, the light from the
headlamp follows the course of the road.
I n t i g h t c u r v e s a t s p e e d s u p t o 4 0 m p h / 7 0 k m / h ,
e.g. on mountainous roads or when turning, an
additional, corner-illumina ting lamp is switched
on that lights up the inside area of the curve.
Activating Adaptive Light Control
With the ignition switched on, turn the light
switch to position 3, refer to page 110.
The corner-illuminating lamp is switched on
automatically, depending on the steering wheel
angle or turn signal indicator.
Standstill function: to avoid blinding oncoming
traffic, the Adaptive Light Control directs light
toward the front passenge r side when the vehi-
cle is at a standstill.
When you are reversing, only the corner-illumi-
nating lamps are switched on and active on
both sides.
Malfunction
The warning lamp lights up. A mes-
sage appears on the Control Display.
The Adaptive Light Control is mal-
functioning or failed. Ha ve the system checked
as soon as possible.
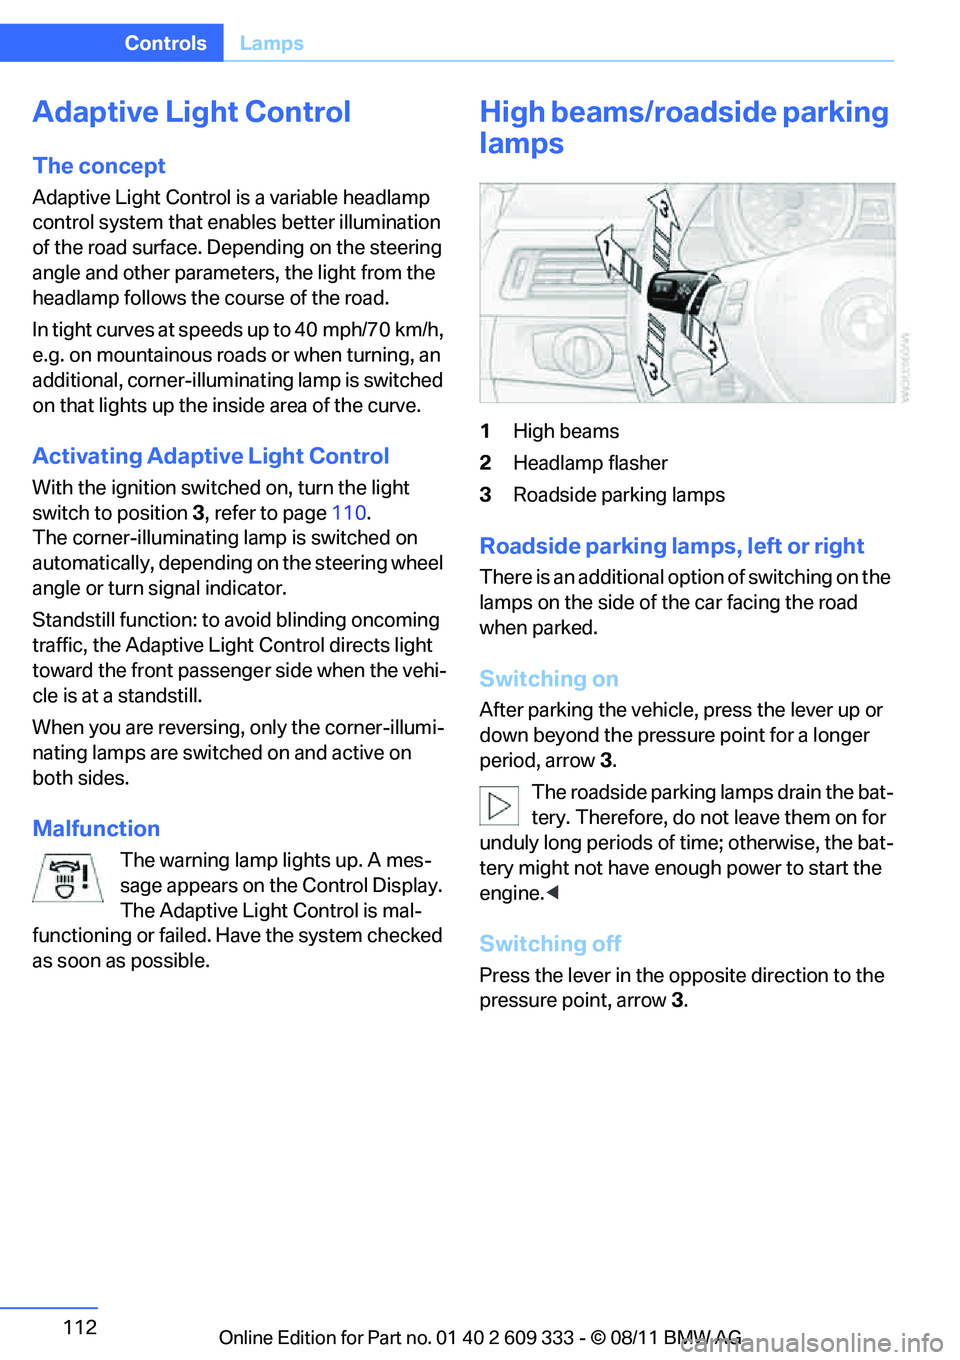
High beams/roadside parking
lamps
1 High beams
2 Headlamp flasher
3 Roadside parking lamps
Roadside parking lamps, left or right
There is an additional option of switching on the
lamps on the side of the car facing the road
when parked.
Switching on
After parking the vehicle, press the lever up or
down beyond the pressu re point for a longer
period, arrow 3.
The roadside parking lamps drain the bat-
tery. Therefore, do not leave them on for
unduly long periods of time; otherwise, the bat-
tery might not have enou gh power to start the
engine. <
Switching off
Press the lever in the o pposite direction to the
pressure point, arrow 3.
Online Edition for Part no. 01 40 2 609 333 - \251 08/11 BMW AG
Page 114 of 314
113
Lamps
Controls
High-beam Assistant
The concept
This system automatica
lly switches the high
beams on and off. The procedure is controlled
by a sensor on the front of the interior rearview
mirror. The assistant ensures that the high
beams are switched on whenever the traffic sit-
uation allows. It handle s this task for you and
gives you the benefit of the best possible view.
You can intervene at any time and switch the
high beams on and off as usual.
Activating the system
1. Turn the light switch to position 3, refer to
page 110.
2. With the low beams switched on, briefly
push the turn signal/high beam lever in the
direction of the high beam.
The indicator lamp in the instrument
cluster lights up when the high beams
are activated. The system automati-
cally switches from hi gh beams to low beams
and vice versa in response to oncoming traffic,
traffic ahead of you, and adequate ambient
lighting, e.g. on city streets.
Switching the high beams on and off
manually
Whenever you wish, or when the situation
requires, you can intervene:
> If the High-beam Assistant switches on the
high beams, but you would like to drive with
the low beams, simply switch off the high
beams using the turn signal/high beam
lever. This deacti vates the High-beam
Assistant.
To reactivate the syst em, briefly push the
turn signal/high beam lever toward the high
beams again. >
If the High-beam Assistant switches on the
low beams, but you would like to drive with
the high beams, switch on the high beams
as usual. This deacti vates the system and
the high beams need to be switched off
manually, if necessary.
To reactivate the system, briefly push the
turn signal/high beam lever toward the high
beams again.
> Use the headlamp flasher as usual with the
low beams switched on.
System limitations
The High-beam Assistant cannot serve
as a substitute for the driver's personal
judgment of when to use the high beams.
Therefore, manually switch off the high beams
in situations where this is required to avoid a
safety risk.<
The system is not fully fu nctional in situations
such as the following, and driver intervention
may be necessary:
> In very unfavorable weather conditions,
such as fog or heavy precipitation
> In detecting poorly-lit road users, such as
pedestrians, cyclists, horseback riders and
wagons; when driving close to train or ship
traffic; and at animal crossings
> In tight curves, on hilltops or in depressions,
in cross traffic or half-obscured oncoming
traffic on highways
> In poorly lit towns and cities and in the pres-
ence of highly reflective signs
> At low speeds
> When the windshield in front of the interior
rearview mirror is fogged over, dirty or cov-
ered with stickers, etc.
> If the sensor is dirty. Clean the sensor on
the front of the interior rearview mirror using
a cloth moistened with a small amount of
glass cleaner.
Online Edition for Part no. 01 40 2 609 333 - \251 08/11 BMW AG
Page 115 of 314
114
ControlsLamps
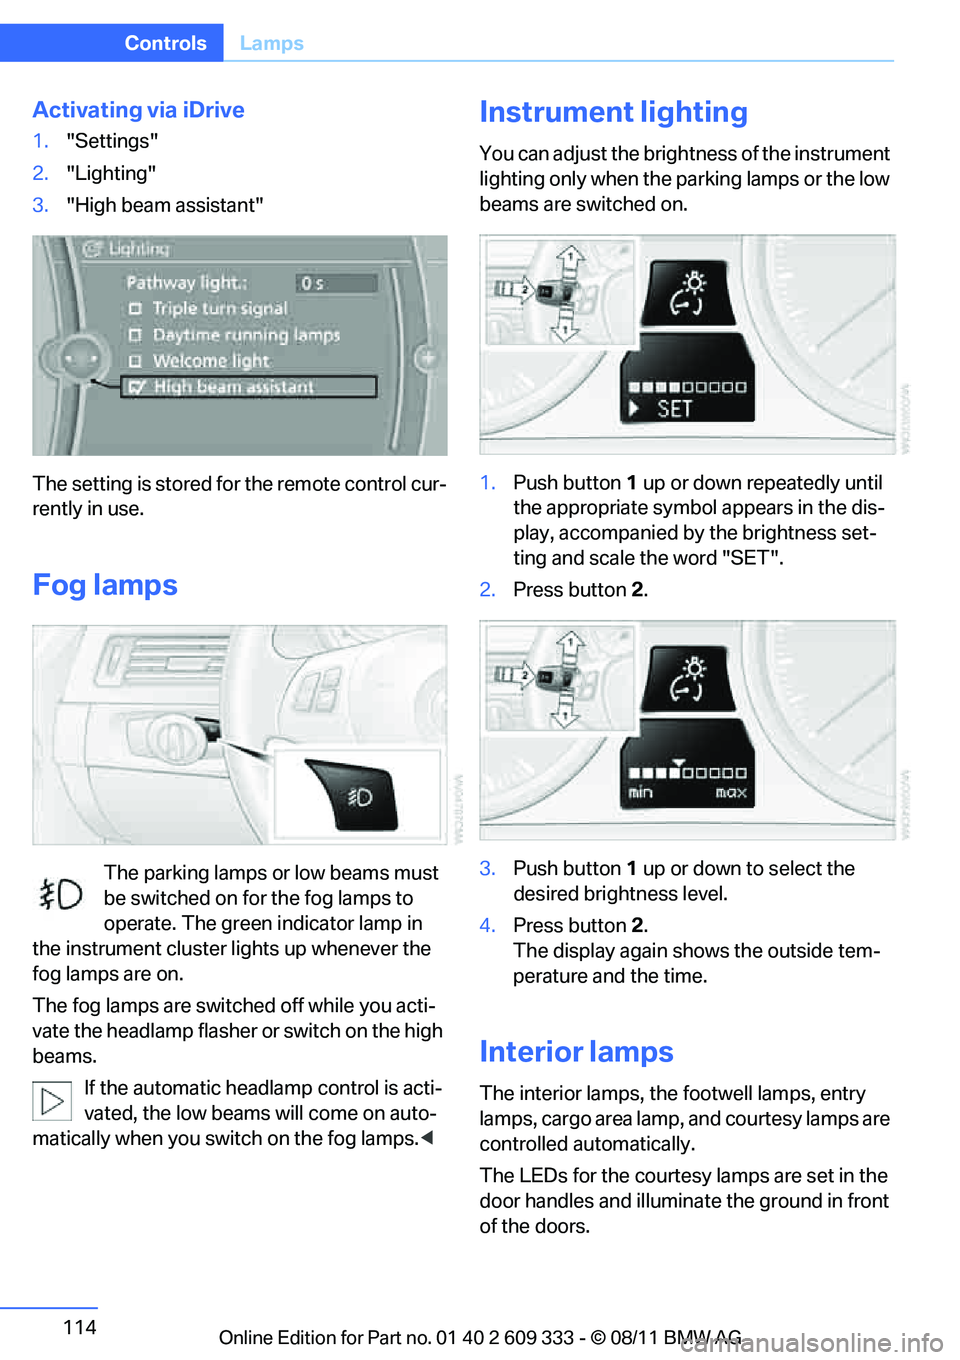
Activating via iDrive
1."Settings"
2. "Lighting"
3. "High beam assistant"
The setting is stored for the remote control cur-
rently in use.
Fog lamps
The parking lamps or low beams must
be switched on for the fog lamps to
operate. The green indicator lamp in
the instrument cluster lights up whenever the
fog lamps are on.
The fog lamps are switched off while you acti-
vate the headlamp flasher or switch on the high
beams.
If the automatic headla mp control is acti-
vated, the low beams will come on auto-
matically when you swit ch on the fog lamps.<
Instrument lighting
You can adjust the brightness of the instrument
lighting only when the pa rking lamps or the low
beams are switched on.
1. Push button 1 up or down repeatedly until
the appropriate symbol appears in the dis-
play, accompanied by the brightness set-
ting and scale the word "SET".
2. Press button 2.
3. Push button 1 up or down to select the
desired brightness level.
4. Press button 2.
The display again shows the outside tem-
perature and the time.
Interior lamps
The interior lamps, the footwell lamps, entry
lamps, cargo area lamp, and courtesy lamps are
controlled automatically.
The LEDs for the courtesy lamps are set in the
door handles and illuminate the ground in front
of the doors.
Online Edition for Part no. 01 40 2 609 333 - \251 08/11 BMW AG
Page 116 of 314
115
Lamps
Controls
To reduce the drain
on the battery, a few
minutes after the radio readiness is
switched off, refer to Start/Stop button on
page 61, all lights in the vehicle's passenger
compartment are switched off. <
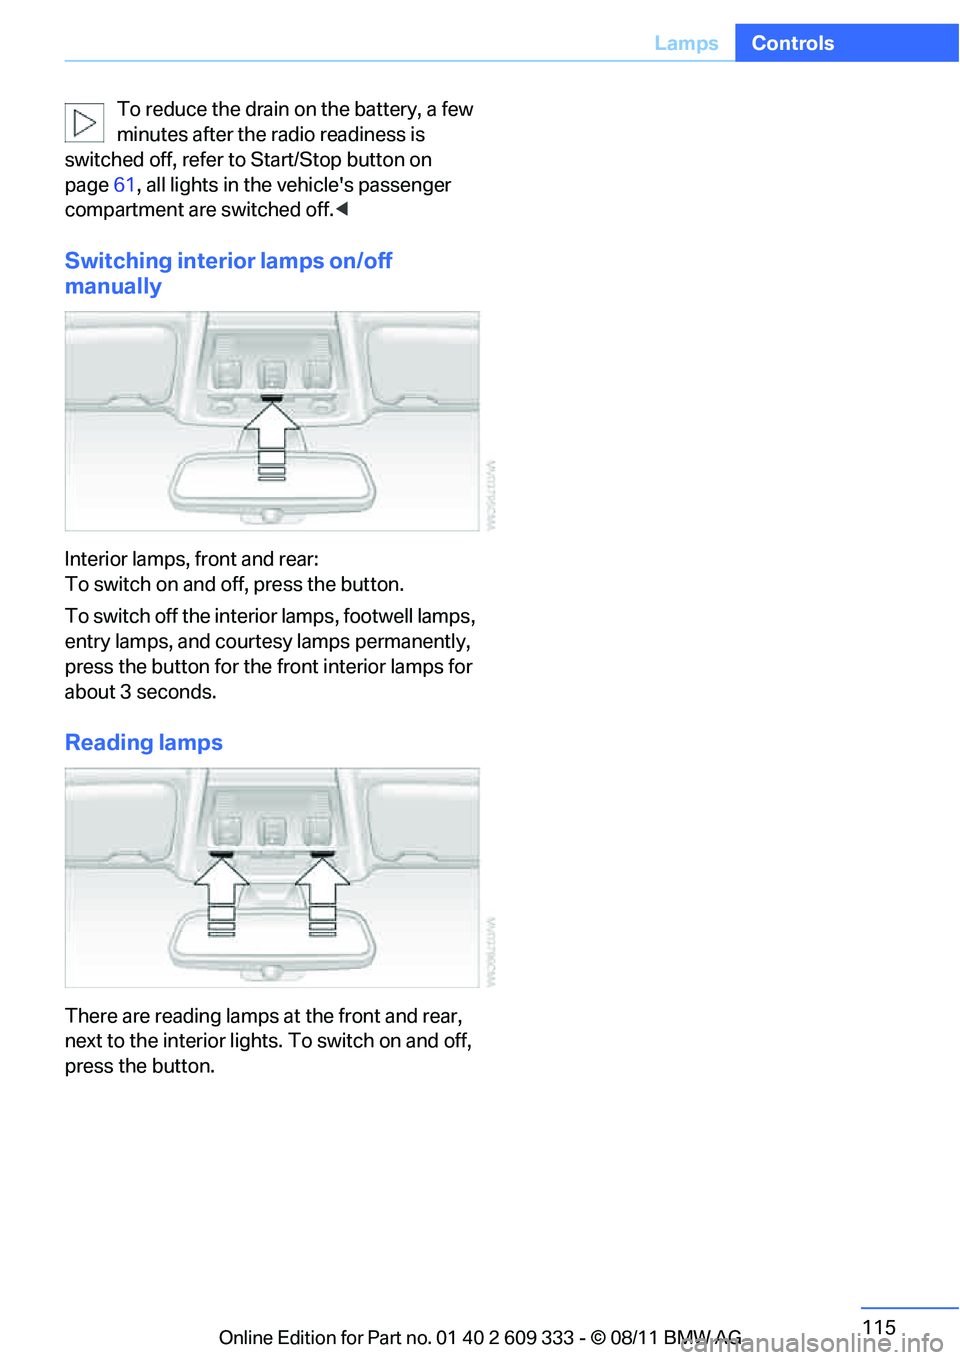
Switching interior lamps on/off
manually
Interior lamps, front and rear:
To switch on and off, press the button.
To switch off the interior lamps, footwell lamps,
entry lamps, and courtesy lamps permanently,
press the button for the front interior lamps for
about 3 seconds.
Reading lamps
There are reading lamps at the front and rear,
next to the interior lights. To switch on and off,
press the button.
Online Edition for Part no. 01 40 2 609 333 - \251 08/11 BMW AG
Page 117 of 314
116
ControlsClimate
Climate
Vehicle equipment
In this chapter, all pr oduction, country, and
optional equipment that is offered in the model
range is described. For this reason, descrip-
tions will be given of some equipment that may not be available in a vehi
cle, for example due to
the special options or national-market version
selected. This also app lies to safety related
functions and systems.
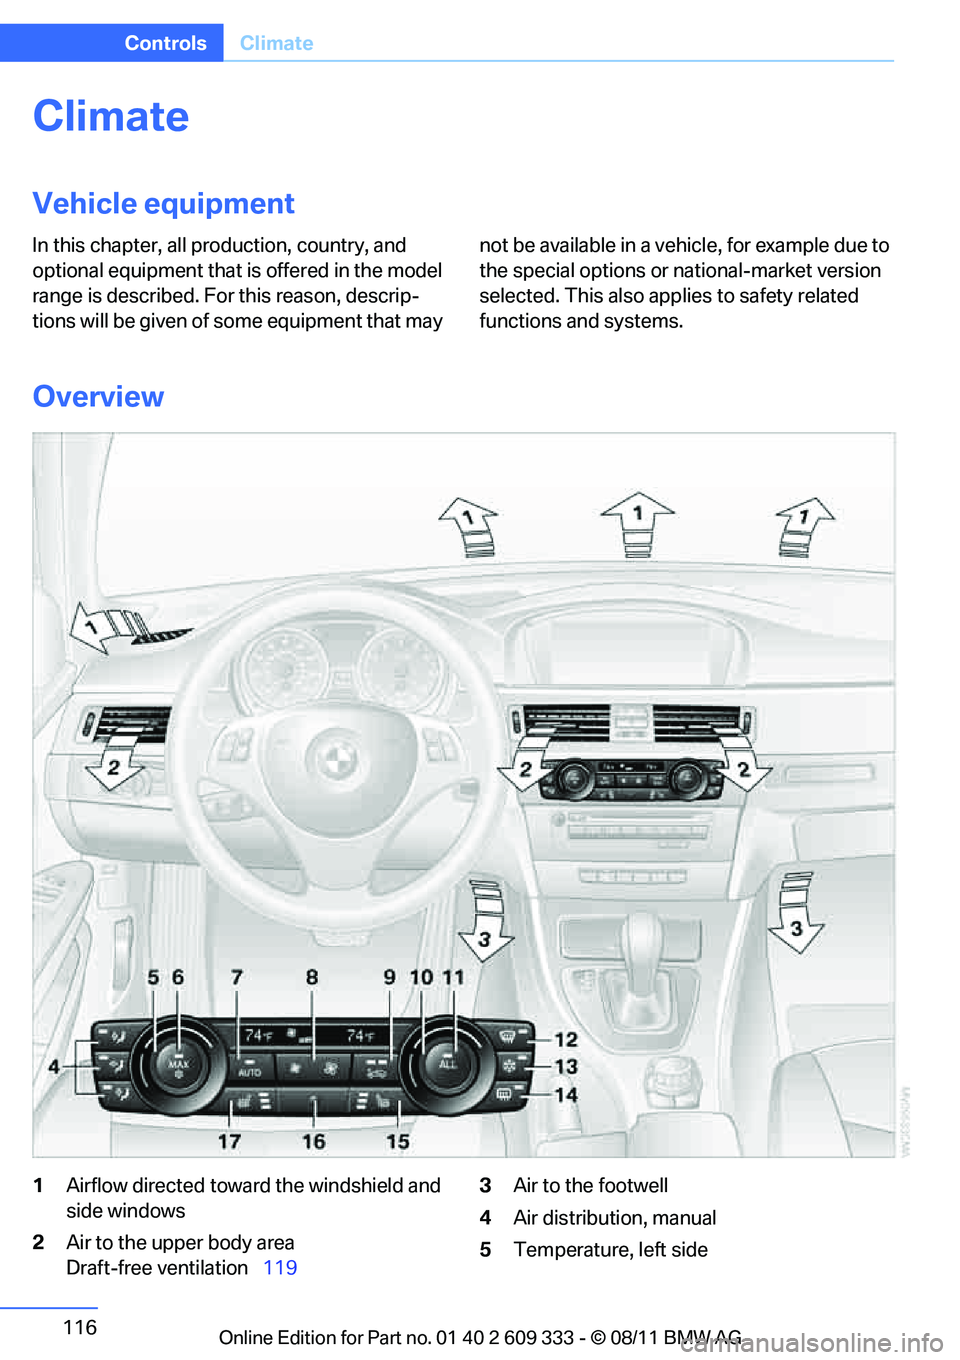
Overview
1 Airflow directed toward the windshield and
side windows
2 Air to the upper body area
Draft-free ventilation 119 3
Air to the footwell
4 Air distribution, manual
5 Temperature, left side
Online Edition for Part no. 01 40 2 609 333 - \251 08/11 BMW AG
Page 118 of 314
117
Climate
Controls
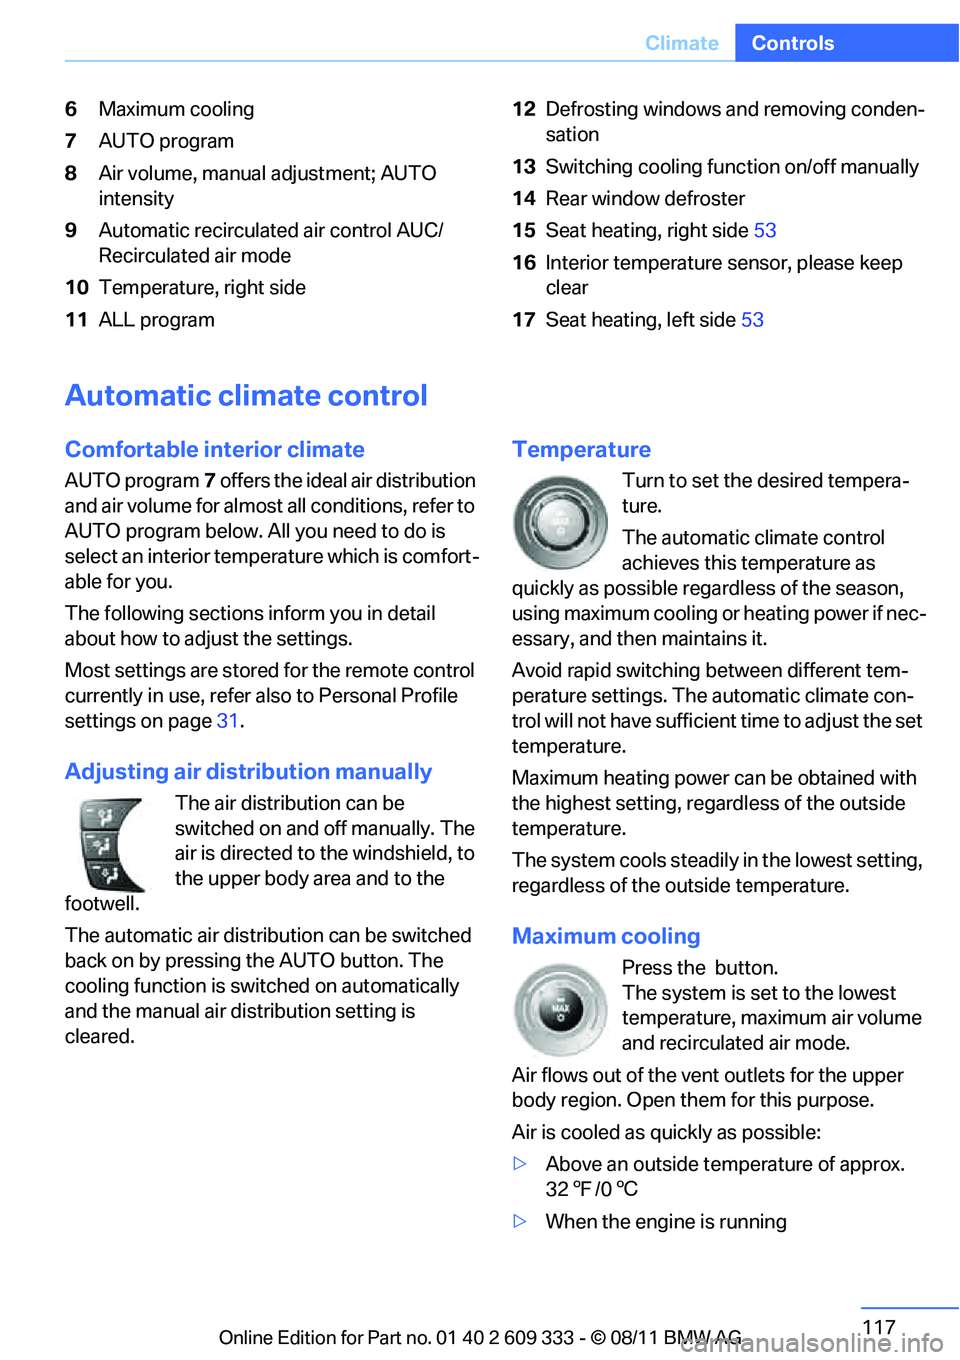
6
Maximum cooling
7 AUTO program
8 Air volume, manual adjustment; AUTO
intensity
9 Automatic recirculated air control AUC/
Recirculated air mode
10 Temperature, right side
11 ALL program 12
Defrosting windows and removing conden-
sation
13 Switching cooling func tion on/off manually
14 Rear window defroster
15 Seat heating, right side 53
16 Interior temperature sensor, please keep
clear
17 Seat heating, left side 53
Automatic climate control
Comfortable interior climate
AUTO program7 offers the ideal air distribution
and air volume for almost all conditions, refer to
AUTO program below. All you need to do is
select an interior temperature which is comfort-
able for you.
The following sections inform you in detail
about how to adjust the settings.
Most settings are stored for the remote control
currently in use, refer also to Personal Profile
settings on page 31.
Adjusting air distribution manually
The air distribution can be
switched on and off manually. The
air is directed to the windshield, to
the upper body area and to the
footwell.
The automatic air distribution can be switched
back on by pressing the AUTO button. The
cooling function is swit ched on automatically
and the manual air distribution setting is
cleared.
Temperature
Turn to set the desired tempera-
ture.
The automatic climate control
achieves this temperature as
quickly as possible rega rdless of the season,
using maximum cooling or heating power if nec-
essary, and then maintains it.
Avoid rapid switching between different tem-
perature settings. The automatic climate con-
trol will not have sufficient time to adjust the set
temperature.
Maximum heating power can be obtained with
the highest setting, regardless of the outside
temperature.
The system cools steadily in the lowest setting,
regardless of the outside temperature.
Maximum cooling
Press the button.
The system is set to the lowest
temperature, maximum air volume
and recirculated air mode.
Air flows out of the vent outlets for the upper
body region. Open them for this purpose.
Air is cooled as quickly as possible:
> Above an outside temperature of approx.
327/06
> When the engine is running
Online Edition for Part no. 01 40 2 609 333 - \251 08/11 BMW AG
Page 119 of 314
118
ControlsClimate
AUTO program
Press the button.
Air volume, air distribution and
temperature are controlled auto-
matically.
Depending on the selected temperature, AUTO
intensity and outside influences, the air is
directed toward the wi ndshield, the side win-
dows, the upper body and the footwell.
Pressing the AUTO button automatically
switches on the cooling function.
At the same time, a condensation sensor con-
trols the program so as to prevent window con-
densation as much as possible.
The program is switched off when the air distri-
bution is set manually or the button is pressed
again.
Intensity of the AUTO program
With the AUTO progra m switched on, auto-
matic control of the air volume and air distribu-
tion can be adjusted:
Press the left side of the button to
reduce the intensity. Press the
right side of the button to
increase it.
The selected intensity is shown on the display
of the automatic climate control.
Convertible program
The Convertible program is active when the
hardtop is open and the AUTO program is
switched on. In the Convertible program, the
automatic climate control is optimized for driv-
ing with the hardtop open . In addition, the air
volume is increased as vehicle speed increases.
The effectiveness of the Convertible pro-
gram can be enhanced considerably by
installing the wind deflector. <
Adjusting air volume manually
To be able to manually adjust the air volume,
switch off the AUTO program first.
Press the left side of the button to
reduce the air volume. Press the
right side of the button to
increase it.
The air flow rate is lowered or switched off
entirely to reduce the drain on the battery. The
display remains the same.
Automatic recirculated air control
AUC/Recirculated air mode
You can respond to unpleasant odors or pollut-
ants in the immediate environment by tempo-
rarily suspending the supply of outside air. The
system then recirculates the air currently within
the vehicle.
Press the button repeatedly to
select an operating mode:
> LED off: outside air fl ows in continuously.
> Left-hand LED on, AUC mode: a sensor
detects pollutants in the outside air and
controls the shut-off automatically.
> Right-hand LED on, recirculated air mode:
the supply of outside air is permanently
shut off. If the windows fog over, switch off
recirculated air mode and increase the air
volume, if necessary. Ma ke sure that air can
flow onto the windshield.
The recirculated air mode should not be
used over an extended period of time;
otherwise, the air quality inside the car will dete-
riorate continuously. <
Via the button on the steering wheel
You can switch quickly between the recircu-
lated air mode and the previous mode using a
button on the steering wheel, refer to page 11.
Online Edition for Part no. 01 40 2 609 333 - \251 08/11 BMW AG
Page 120 of 314
119
Climate
Controls
ALL program
Press the button.
The current temperature setting
on the driver's side is transferred to
the front passenger side.
If the temperature setting on the driver's side is
changed, the temperature on the front passen-
ger side is changed as well.
The program is switched off when the setting is
adjusted on the front passenger side or the but-
ton is pressed again.
Defrosting windows and removing
condensation
Press the button.
Quickly removes ice and conden-
sation from the windshield and
front side windows.
For this purpose, also switch on the cooling
function.
Switching cooling function on/off
The passenger compartment can only be
cooled while the engine is running.
Press the button.
The air is cooled and dehumidified
and – depending on the tempera-
ture setting – warmed again.
Depending on the weathe r, the windshield may
fog up briefly when the engine is started.
Pressing the AUTO button automatically
switches on the cooling function.
Rear window defroster
Press the button.
The defroster is switched off auto-
matically after a certain time.
Depending on your vehicle's equipment, the
upper wires serve as an antenna and are not
part of the rear window defroster.
Switching the system on/off
Switching off
With the blower at its lowest set-
ting, press the left side of the but-
ton to switch off the automatic cli-
mate control.
All displays are cleared except for the rear win-
dow defroster if it is switched on.
The outside air supply is blocked when
the automatic climate control is switched
off. If the air quality de teriorates or the window
fogs over, switch the system back on and
increase the air volume. <
Switching on
Press any button except the ALL or the rear
window defroster button to reactivate the auto-
matic climate control.
Ventilation
1Use the thumbwheels to smoothly open
and close the air vents
2 Use the levers to change the direction of the
airflow
3 Thumbwheel for more or less cool air from
the vents for the upper body area
Ventilation for cooling
Adjust the vent outlets to direct the flow of cool
air in your direction, e.g. if it has become too hot
in the car.
Online Edition for Part no. 01 40 2 609 333 - \251 08/11 BMW AG