tow bar BMW 4 SERIES GRAN COUPE 2016 F36 Owner's Manual
[x] Cancel search | Manufacturer: BMW, Model Year: 2016, Model line: 4 SERIES GRAN COUPE, Model: BMW 4 SERIES GRAN COUPE 2016 F36Pages: 249, PDF Size: 5.3 MB
Page 139 of 249
Settings are stored for the profile currently in
use.
Visual warning
The approach of the vehicle to an object can
be shown on the Control Display. Objects that
are farther away are already displayed on the
Control Display before a signal sounds.
A display appears as soon as Park Distance
Control (PDC) is activated.
The range of the sensors is represented in the
colors green, yellow and red.
When the image of the rearview camera is dis‐
played, the reel can be made to PDC:
"Rear view camera"
System limits
Limits of ultrasonic measurement
Ultrasonic measuring might not function under
the following circumstances:
▷For small children and animals.▷For persons with certain clothing, e.g.
coats.▷With external interference of the ultra‐
sound, e.g. from passing vehicles or loud
machines.▷When sensors are dirty, iced over, dam‐
aged or out of position.▷Under certain weather conditions such as
high relative humidity, rain, snowfall, ex‐
treme heat or strong wind.▷With tow bars and trailer couplings of other
vehicles.▷With thin or wedge-shaped objects.▷With moving objects.▷With elevated, protruding objects such as
ledges or cargo.▷With objects with corners and sharp edges.▷With objects with a fine surface structure
such as fences.▷For objects with porous surfaces.
Low objects already displayed, e.g., curbs, can
move into the blind area of the sensors before
or after a continuous tone sounds.
False warnings
PDC may issue a warning under the following conditions even though there is no obstacle
within the detection range:
▷In heavy rain.▷When sensors are very dirty or covered
with ice.▷When sensors are covered in snow.▷On rough road surfaces.▷On uneven surfaces, such as speed
bumps.▷In large buildings with right angles and
smooth walls, e.g., in underground ga‐
rages.▷In automatic car washes.▷Through heavy pollution.▷Due to other ultrasound sources, e.g.,
sweeping machines, high pressure steam
cleaners or neon lights.
The malfunction is signaled by a continu‐
ous tone alternating between the front and
rear speakers. As soon as the malfunction
due to other ultrasound sources is no lon‐
ger present, the system is again fully func‐
tional.
Malfunction
A Check Control message is displayed.
The range of the sensors is shown as a shaded
area on the Control Display.
PDC has failed. Have the system checked.
To ensure full functionality:
▷Keep the sensors clean and free of ice.▷dimmedDo not put any stickers on sen‐
sors.Seite 135Driving comfortControls135
Online Edition for Part no. 01 40 2 960 707 - II/15
Page 149 of 249
▷For small children and animals.▷For persons with certain clothing, e.g.
coats.▷With external interference of the ultra‐
sound, e.g. from passing vehicles or loud
machines.▷When sensors are dirty, iced over, dam‐
aged or out of position.▷Under certain weather conditions such as
high relative humidity, rain, snowfall, ex‐
treme heat or strong wind.▷With tow bars and trailer couplings of other
vehicles.▷With thin or wedge-shaped objects.▷With moving objects.▷With elevated, protruding objects such as
ledges or cargo.▷With objects with corners and sharp edges.▷With objects with a fine surface structure
such as fences.▷For objects with porous surfaces.
Low objects already displayed, e.g., curbs, can
move into the blind area of the sensors before
or after a continuous tone sounds.
The parking assistant may identify parking
spaces that are not suitable for parking.
Malfunction
A Check Control message is displayed.
The parking assistant failed. Have the system
checked.
Seite 145Driving comfortControls145
Online Edition for Part no. 01 40 2 960 707 - II/15
Page 202 of 249
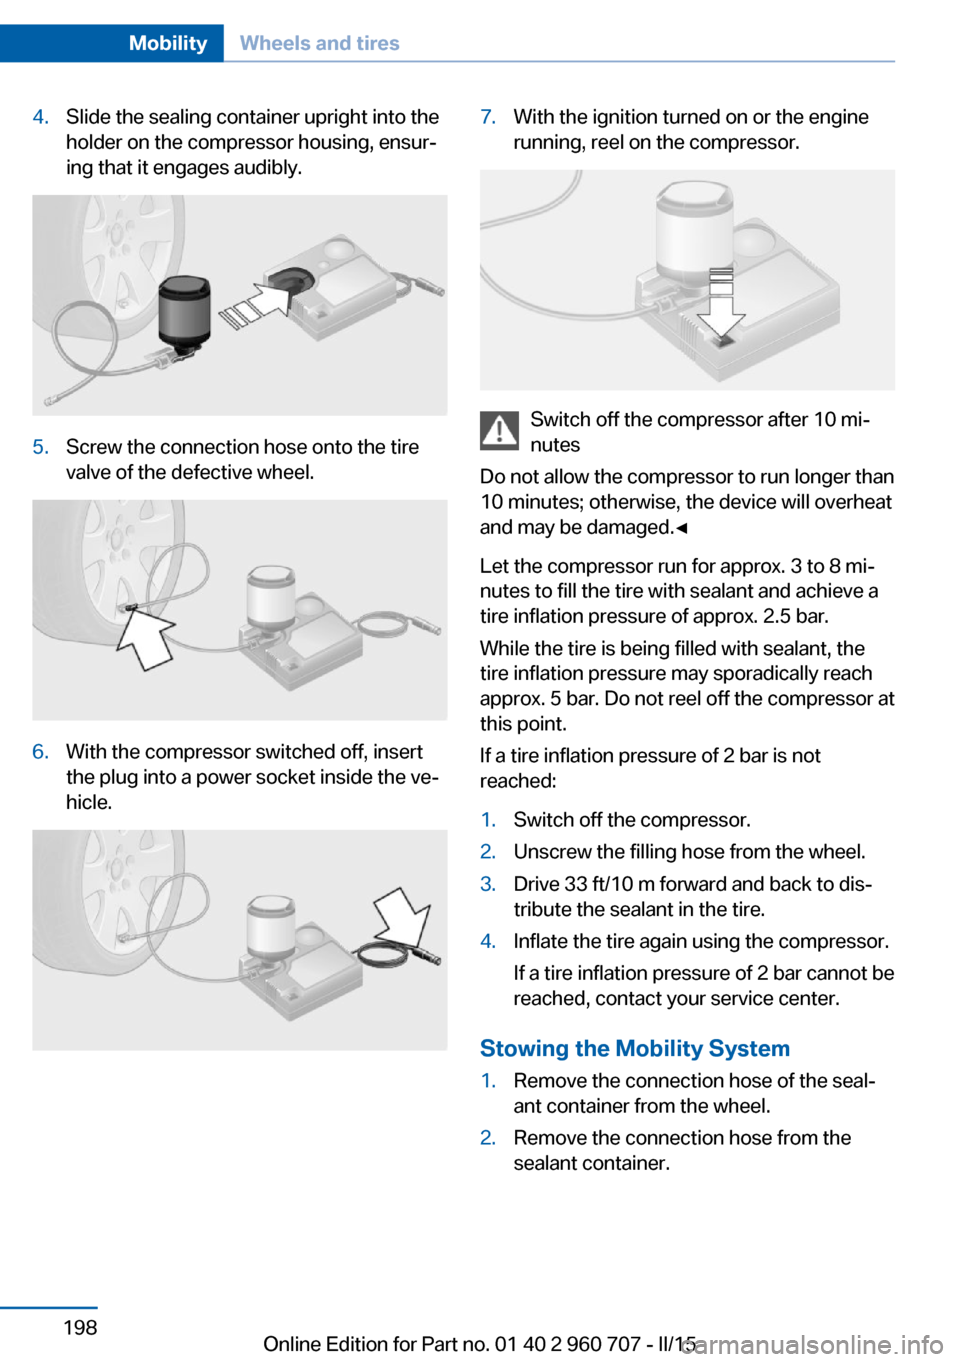
4.Slide the sealing container upright into the
holder on the compressor housing, ensur‐
ing that it engages audibly.5.Screw the connection hose onto the tire
valve of the defective wheel.6.With the compressor switched off, insert
the plug into a power socket inside the ve‐
hicle.7.With the ignition turned on or the engine
running, reel on the compressor.
Switch off the compressor after 10 mi‐
nutes
Do not allow the compressor to run longer than
10 minutes; otherwise, the device will overheat
and may be damaged.◀
Let the compressor run for approx. 3 to 8 mi‐
nutes to fill the tire with sealant and achieve a
tire inflation pressure of approx. 2.5 bar.
While the tire is being filled with sealant, the
tire inflation pressure may sporadically reach
approx. 5 bar. Do not reel off the compressor at
this point.
If a tire inflation pressure of 2 bar is not
reached:
1.Switch off the compressor.2.Unscrew the filling hose from the wheel.3.Drive 33 ft/10 m forward and back to dis‐
tribute the sealant in the tire.4.Inflate the tire again using the compressor.
If a tire inflation pressure of 2 bar cannot be
reached, contact your service center.
Stowing the Mobility System
1.Remove the connection hose of the seal‐
ant container from the wheel.2.Remove the connection hose from the
sealant container.Seite 198MobilityWheels and tires198
Online Edition for Part no. 01 40 2 960 707 - II/15
Page 203 of 249
3.Wrap the empty sealant container and con‐
nection hose in suitable material to avoid
dirtying the cargo area.4.Stow the Mobility System back in the vehi‐
cle.
Distributing the sealant
Immediately drive approx. 5 miles/10 km to en‐
sure that the sealant is evenly distributed in the
tire.
Do not exceed a speed of 50 mph/80 km/h.
If possible, do not drive at speeds less than
12 mph/20 km/h.
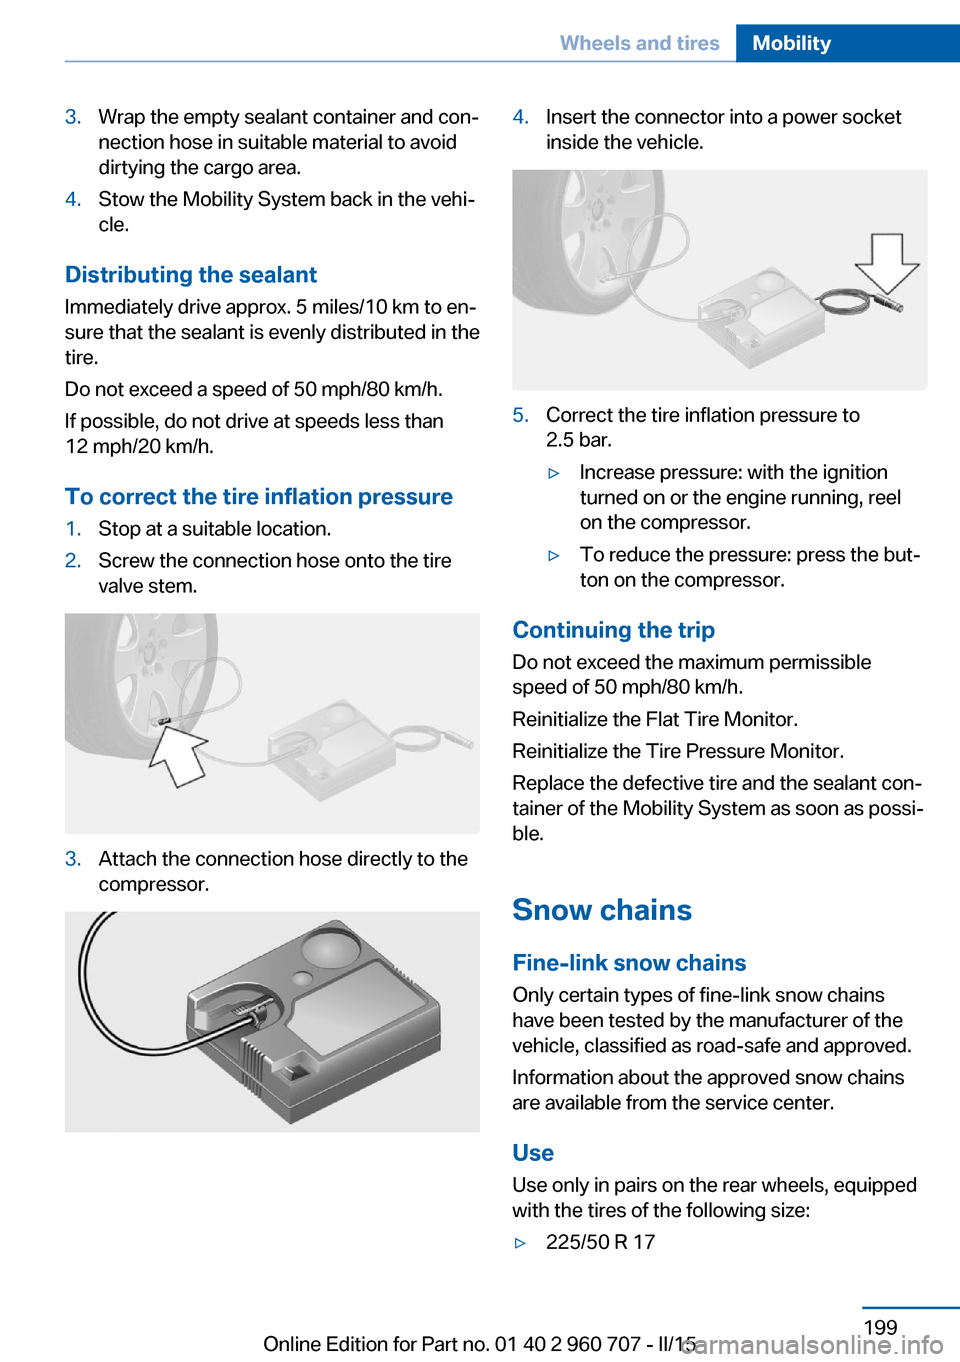
To correct the tire inflation pressure
1.Stop at a suitable location.2.Screw the connection hose onto the tire
valve stem.3.Attach the connection hose directly to the
compressor.4.Insert the connector into a power socket
inside the vehicle.5.Correct the tire inflation pressure to
2.5 bar.▷Increase pressure: with the ignition
turned on or the engine running, reel
on the compressor.▷To reduce the pressure: press the but‐
ton on the compressor.
Continuing the trip
Do not exceed the maximum permissible
speed of 50 mph/80 km/h.
Reinitialize the Flat Tire Monitor.
Reinitialize the Tire Pressure Monitor.
Replace the defective tire and the sealant con‐
tainer of the Mobility System as soon as possi‐
ble.
Snow chains Fine-link snow chains
Only certain types of fine-link snow chains
have been tested by the manufacturer of the
vehicle, classified as road-safe and approved.
Information about the approved snow chains
are available from the service center.
Use
Use only in pairs on the rear wheels, equipped
with the tires of the following size:
▷225/50 R 17Seite 199Wheels and tiresMobility199
Online Edition for Part no. 01 40 2 960 707 - II/15
Page 225 of 249
Tow-starting and towingNote Tow-starting and towing
For tow-starting or towing, switch off the
Intelligent Safety systems; otherwise malfunc‐
tions of the individual braking systems might
lead to accidents.◀
Manual transmission Gearshift lever in neutral position.
Towing Follow the towing instructions
Follow all towing instructions; otherwise,
vehicle damage or accidents may occur.◀▷Make sure that the ignition is switched on;
otherwise, the low beams, tail lights, turn
signals, and wipers may be unavailable.▷Do not tow the vehicle with the rear axle
tilted, as the front wheels could turn.▷When the engine is stopped, there is no
power assist. Consequently, more force
needs to be applied when braking and
steering.▷Larger steering wheel movements are re‐
quired.▷The towing vehicle must not be lighter
than the vehicle being towed; otherwise,
it will not be possible to control the vehi‐
cle's response.Tow truck
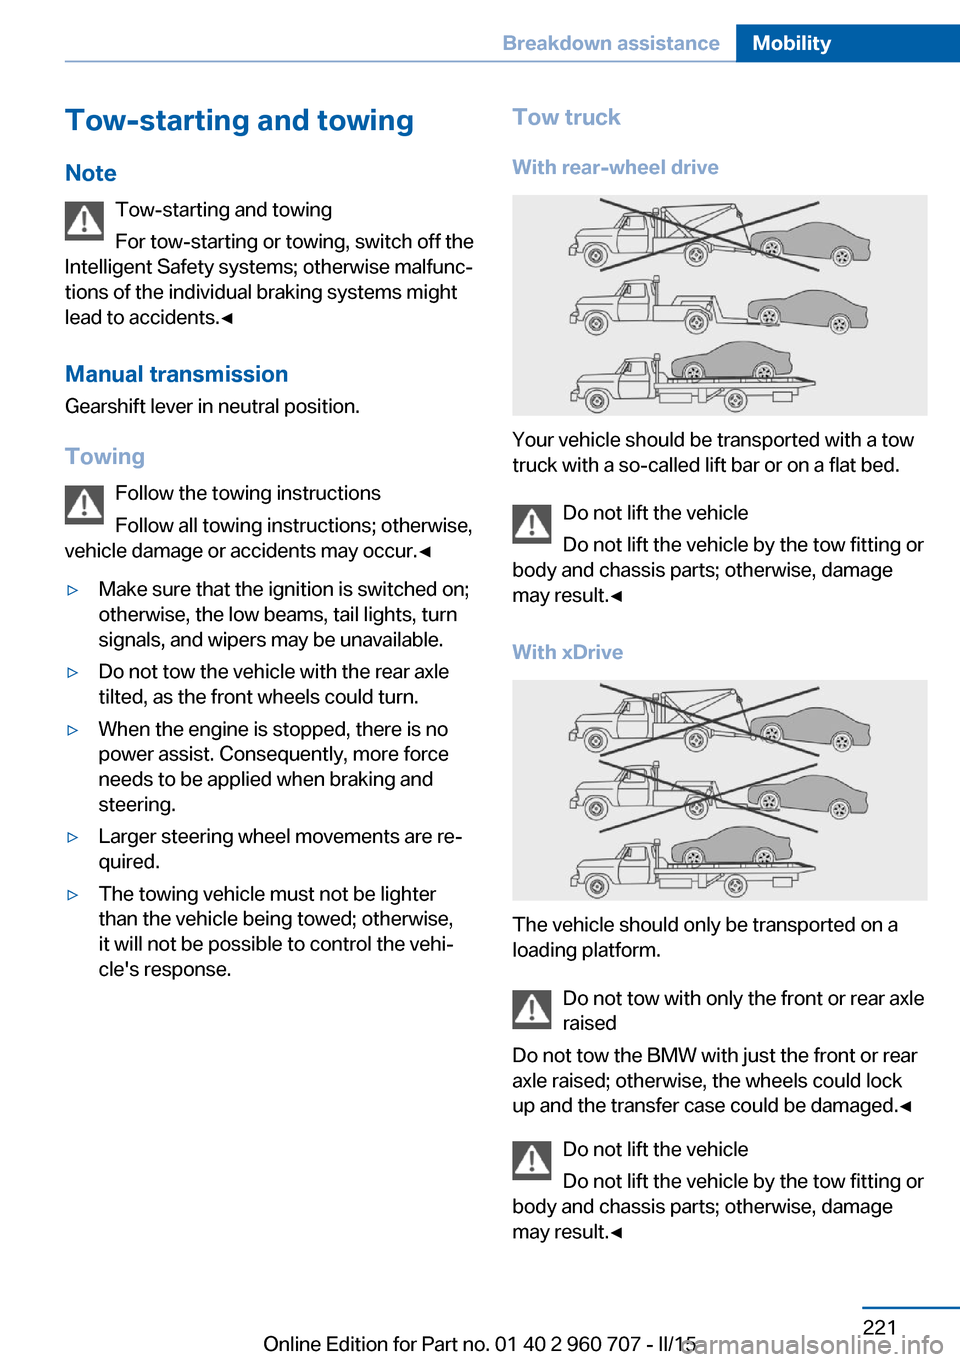
With rear-wheel drive
Your vehicle should be transported with a tow
truck with a so-called lift bar or on a flat bed.
Do not lift the vehicle
Do not lift the vehicle by the tow fitting or
body and chassis parts; otherwise, damage
may result.◀
With xDrive
The vehicle should only be transported on a
loading platform.
Do not tow with only the front or rear axle
raised
Do not tow the BMW with just the front or rear
axle raised; otherwise, the wheels could lock
up and the transfer case could be damaged.◀
Do not lift the vehicle
Do not lift the vehicle by the tow fitting or
body and chassis parts; otherwise, damage
may result.◀
Seite 221Breakdown assistanceMobility221
Online Edition for Part no. 01 40 2 960 707 - II/15
Page 226 of 249
Steptronic transmission: transporting
your vehicle
Note Your vehicle is not permitted to be towed.
Therefore, contact a service center in the
event of a breakdown.
Do not have the vehicle towed
Have your vehicle transported on a load‐
ing platform only; otherwise, damage may oc‐
cur.◀
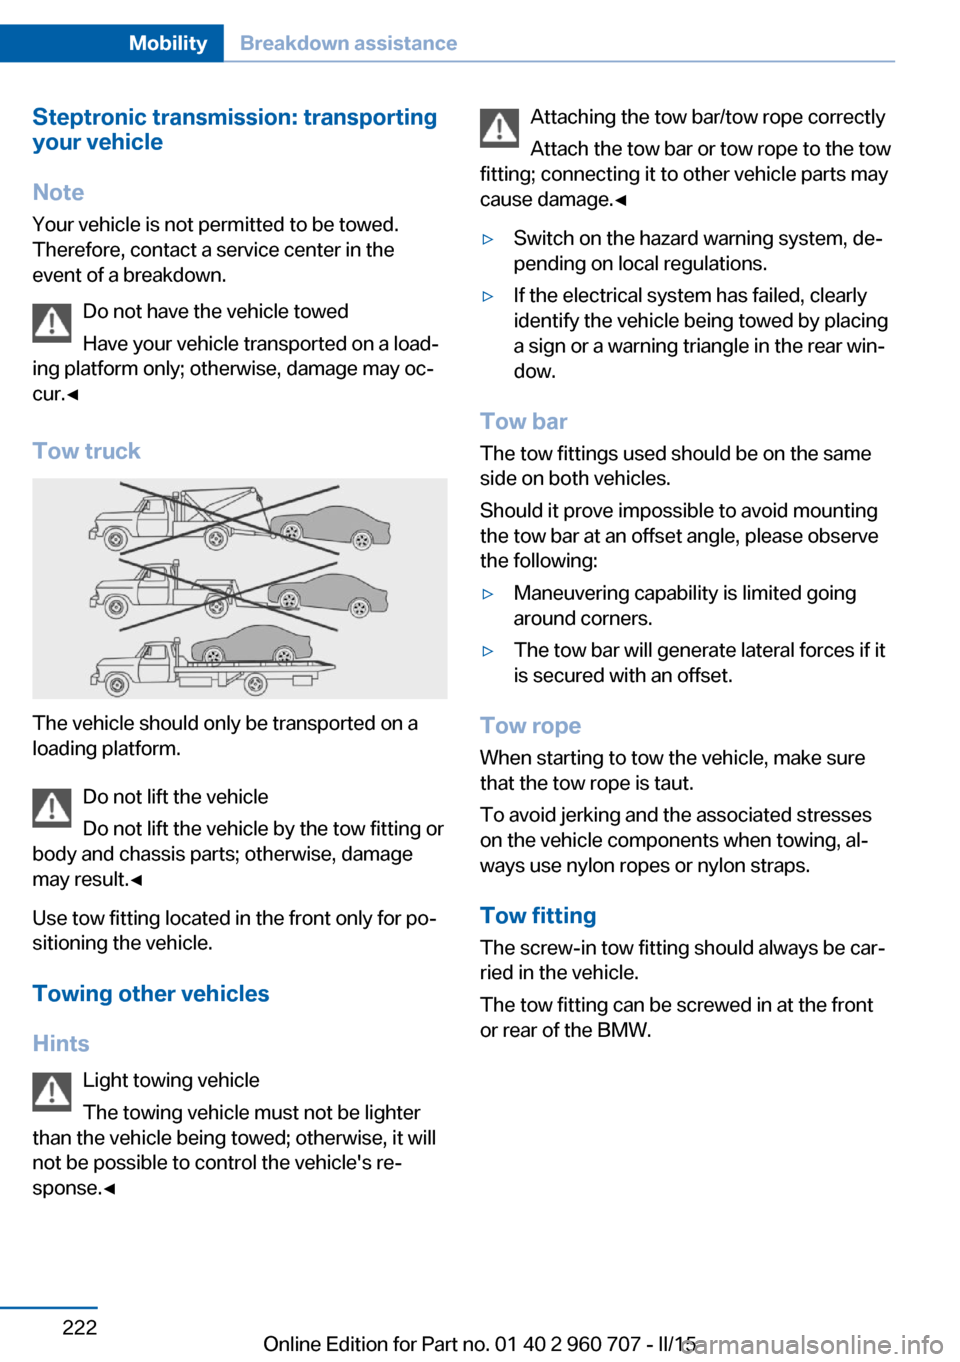
Tow truck
The vehicle should only be transported on a
loading platform.
Do not lift the vehicle
Do not lift the vehicle by the tow fitting or
body and chassis parts; otherwise, damage
may result.◀
Use tow fitting located in the front only for po‐
sitioning the vehicle.
Towing other vehicles
Hints Light towing vehicle
The towing vehicle must not be lighter
than the vehicle being towed; otherwise, it will
not be possible to control the vehicle's re‐
sponse.◀
Attaching the tow bar/tow rope correctly
Attach the tow bar or tow rope to the tow
fitting; connecting it to other vehicle parts may
cause damage.◀▷Switch on the hazard warning system, de‐
pending on local regulations.▷If the electrical system has failed, clearly
identify the vehicle being towed by placing
a sign or a warning triangle in the rear win‐
dow.
Tow bar
The tow fittings used should be on the same
side on both vehicles.
Should it prove impossible to avoid mounting
the tow bar at an offset angle, please observe
the following:
▷Maneuvering capability is limited going
around corners.▷The tow bar will generate lateral forces if it
is secured with an offset.
Tow rope
When starting to tow the vehicle, make sure
that the tow rope is taut.
To avoid jerking and the associated stresses
on the vehicle components when towing, al‐
ways use nylon ropes or nylon straps.
Tow fitting
The screw-in tow fitting should always be car‐
ried in the vehicle.
The tow fitting can be screwed in at the front
or rear of the BMW.
Seite 222MobilityBreakdown assistance222
Online Edition for Part no. 01 40 2 960 707 - II/15
Page 227 of 249
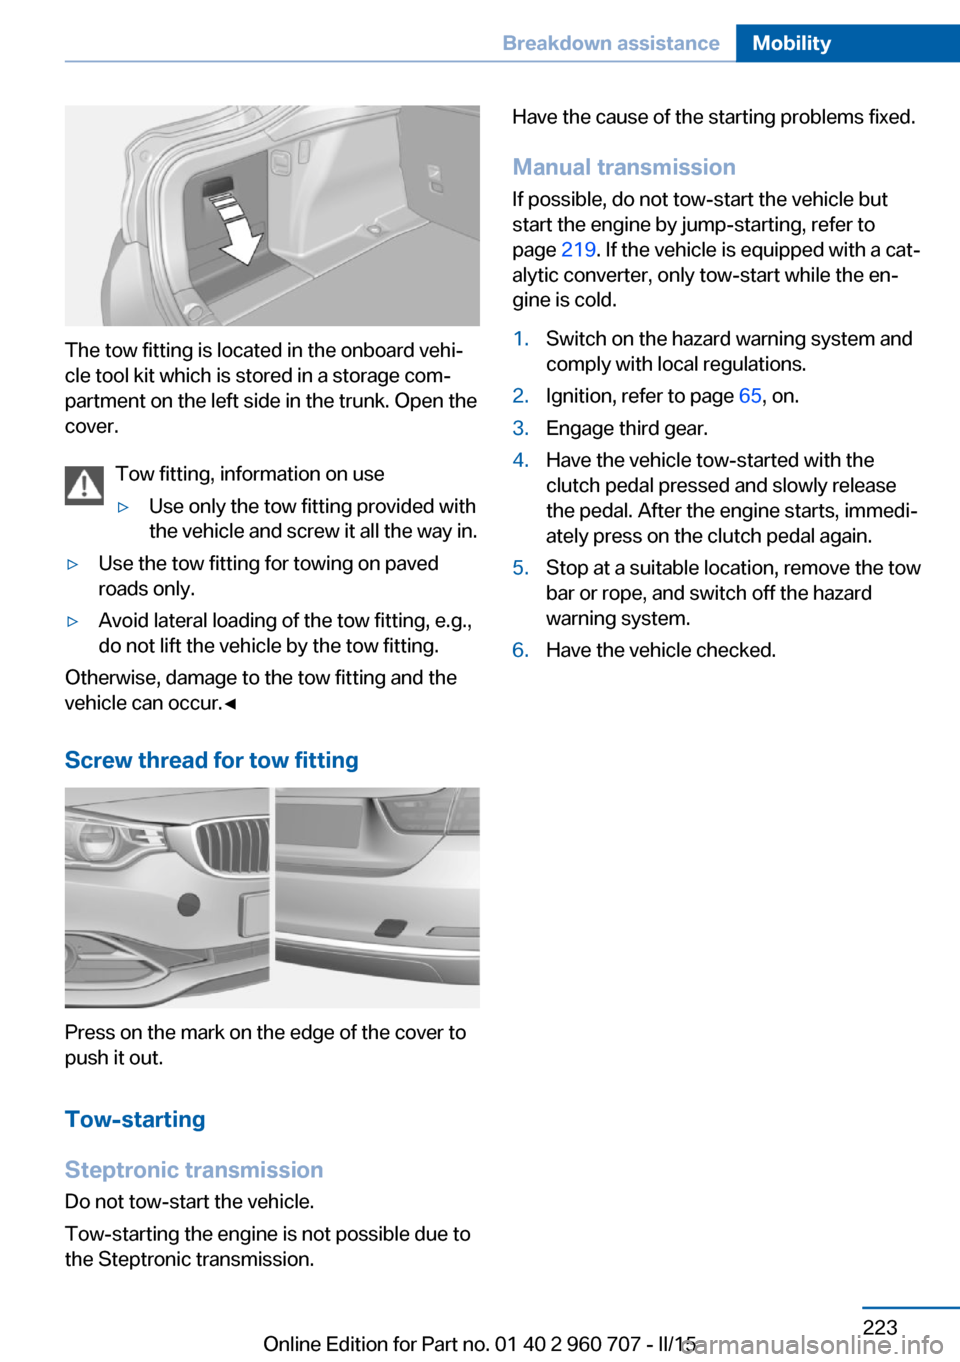
The tow fitting is located in the onboard vehi‐
cle tool kit which is stored in a storage com‐
partment on the left side in the trunk. Open the
cover.
Tow fitting, information on use
▷Use only the tow fitting provided with
the vehicle and screw it all the way in.▷Use the tow fitting for towing on paved
roads only.▷Avoid lateral loading of the tow fitting, e.g.,
do not lift the vehicle by the tow fitting.
Otherwise, damage to the tow fitting and the
vehicle can occur.◀
Screw thread for tow fitting
Press on the mark on the edge of the cover to
push it out.
Tow-starting
Steptronic transmission
Do not tow-start the vehicle.
Tow-starting the engine is not possible due to
the Steptronic transmission.
Have the cause of the starting problems fixed.
Manual transmission If possible, do not tow-start the vehicle but
start the engine by jump-starting, refer to
page 219. If the vehicle is equipped with a cat‐
alytic converter, only tow-start while the en‐
gine is cold.1.Switch on the hazard warning system and
comply with local regulations.2.Ignition, refer to page 65, on.3.Engage third gear.4.Have the vehicle tow-started with the
clutch pedal pressed and slowly release
the pedal. After the engine starts, immedi‐
ately press on the clutch pedal again.5.Stop at a suitable location, remove the tow
bar or rope, and switch off the hazard
warning system.6.Have the vehicle checked.Seite 223Breakdown assistanceMobility223
Online Edition for Part no. 01 40 2 960 707 - II/15
Page 238 of 249
Everything from A to Z
IndexA ABS, Antilock Brake Sys‐ tem 120
ACC, Active Cruise Control with Stop & Go 125
Acceleration Assistant, refer to Launch Control 76
Accessories and parts 7
Activated-charcoal filter 151
Active Blind Spot Detec‐ tion 117
Active Cruise Control with Stop & Go, ACC 125
Adaptive brake lights, refer to Brake force display 119
Adaptive Light Control 94
Additives, oil 204
Adjustments, seats/head re‐ straints 51
After washing vehicle 225
Airbags 98
Airbags, indicator/warning light 99
Air circulation, refer to Recir‐ culated-air mode 147, 150
Air, dehumidifying, refer to Cooling function 147, 150
Air distribution, manual 147, 150
Air flow, air conditioner 147
Air flow, automatic climate control 150
Air pressure, tires 188
Air vents, refer to Ventila‐ tion 151
Alarm system 46
Alarm, unintentional 47
All around the center con‐ sole 16
All around the roofliner 17 All around the steering
wheel 14
All-season tires, refer to Win‐ ter tires 195
All-wheel-drive 121
Alternating-code hand-held transmitter 154
Alternative oil types 205
Ambient light 97
Antifreeze, washer fluid 72
Antilock Brake System, ABS 120
Anti-slip control, refer to DSC 120
Approved axle load 230
Approved engine oils, see Suitable engine oil
types 205
Arrival time 89
Ash tray 157
Assistance when driving off 124
Assist system information, on Control Display 91
Attentiveness assistant 119
AUTO intensity 149
Automatic car wash 224
Automatic climate con‐ trol 146
Automatic climate control with enhanced features 148
Automatic Cruise Control with Stop & Go 125
Automatic Curb Monitor 59
Automatic deactivation, front- seat passenger airbags 100
Automatic headlight con‐ trol 94
Automatic locking 45
Automatic recirculated-air control 150 Automatic tailgate 40
Automatic transmission, see Steptronic transmission 73
AUTO program, automatic cli‐ mate control 149
AUTO program, climate con‐ trol 147
AUTO program, intensity 149
Auto Start/Stop function 67
Average fuel consumption 88
Average speed 88
Axle loads, weights 230
B Backrest curvature, refer to Lumbar support 53
Backrest, width 53
Band-aids, refer to First aid kit 219
Bar for tow-starting/ towing 222
Battery replacement, vehicle battery 215
Battery replacement, vehicle remote control 35
Battery, vehicle 215
Belts, safety belts 54
Beverage holder, cu‐ pholder 163
BMW Assist, see user's manual for Navigation, En‐
tertainment and Communi‐
cation
BMW Driver’s Guide App 6
BMW Homepage 6
BMW Internet page 6
BMW maintenance sys‐ tem 207
Bonus range, ECO PRO 176 Seite 234ReferenceEverything from A to Z234
Online Edition for Part no. 01 40 2 960 707 - II/15
Page 243 of 249
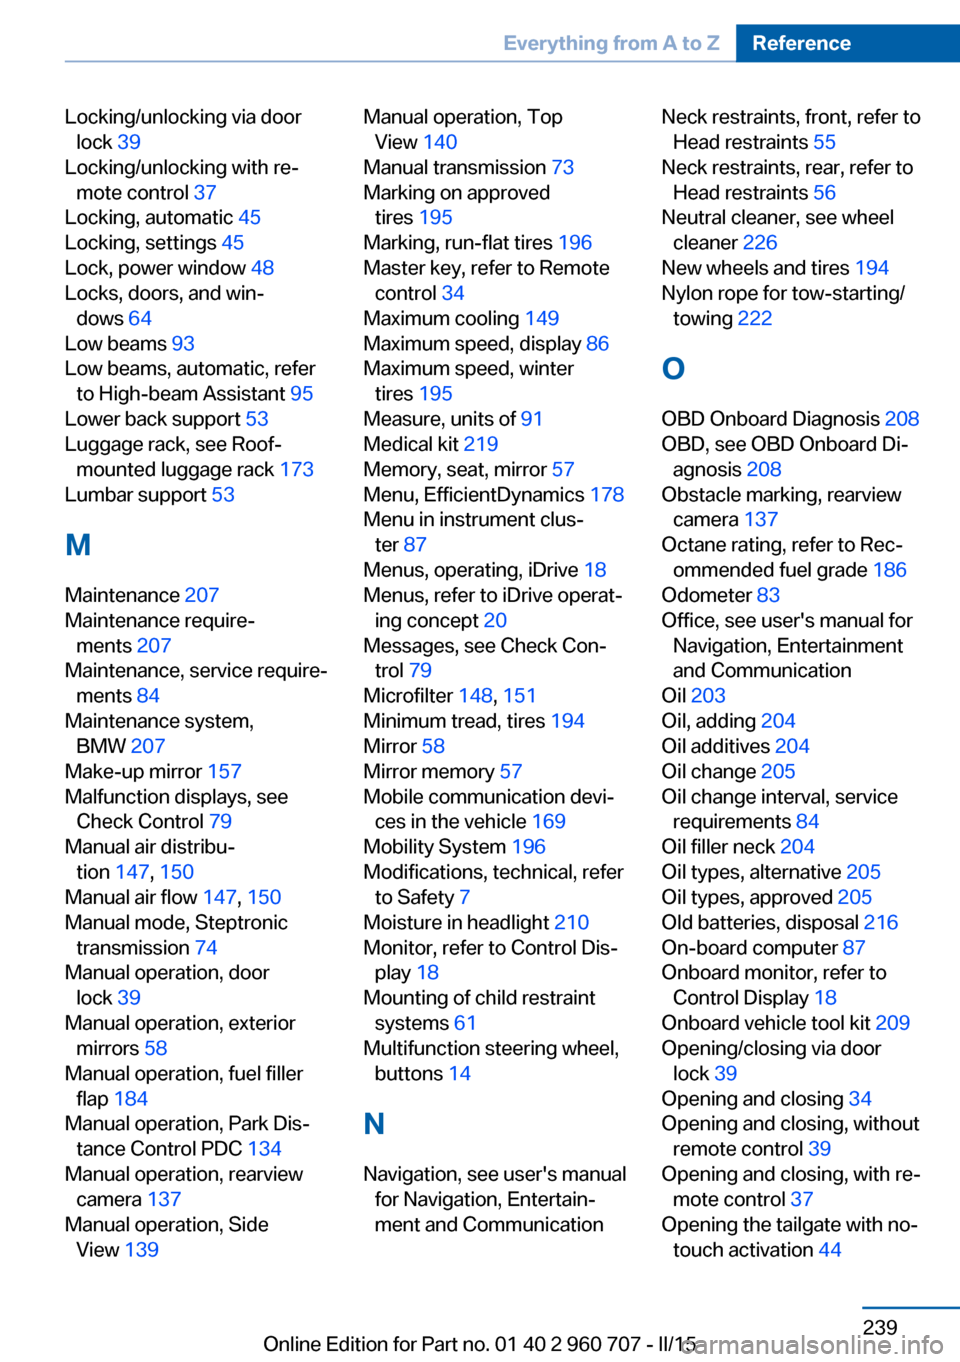
Locking/unlocking via doorlock 39
Locking/unlocking with re‐ mote control 37
Locking, automatic 45
Locking, settings 45
Lock, power window 48
Locks, doors, and win‐ dows 64
Low beams 93
Low beams, automatic, refer to High-beam Assistant 95
Lower back support 53
Luggage rack, see Roof- mounted luggage rack 173
Lumbar support 53
M
Maintenance 207
Maintenance require‐ ments 207
Maintenance, service require‐ ments 84
Maintenance system, BMW 207
Make-up mirror 157
Malfunction displays, see Check Control 79
Manual air distribu‐ tion 147, 150
Manual air flow 147, 150
Manual mode, Steptronic transmission 74
Manual operation, door lock 39
Manual operation, exterior mirrors 58
Manual operation, fuel filler flap 184
Manual operation, Park Dis‐ tance Control PDC 134
Manual operation, rearview camera 137
Manual operation, Side View 139 Manual operation, Top
View 140
Manual transmission 73
Marking on approved tires 195
Marking, run-flat tires 196
Master key, refer to Remote control 34
Maximum cooling 149
Maximum speed, display 86
Maximum speed, winter tires 195
Measure, units of 91
Medical kit 219
Memory, seat, mirror 57
Menu, EfficientDynamics 178
Menu in instrument clus‐ ter 87
Menus, operating, iDrive 18
Menus, refer to iDrive operat‐ ing concept 20
Messages, see Check Con‐ trol 79
Microfilter 148, 151
Minimum tread, tires 194
Mirror 58
Mirror memory 57
Mobile communication devi‐ ces in the vehicle 169
Mobility System 196
Modifications, technical, refer to Safety 7
Moisture in headlight 210
Monitor, refer to Control Dis‐ play 18
Mounting of child restraint systems 61
Multifunction steering wheel, buttons 14
N
Navigation, see user's manual for Navigation, Entertain‐
ment and Communication Neck restraints, front, refer to Head restraints 55
Neck restraints, rear, refer to Head restraints 56
Neutral cleaner, see wheel cleaner 226
New wheels and tires 194
Nylon rope for tow-starting/ towing 222
O OBD Onboard Diagnosis 208
OBD, see OBD Onboard Di‐ agnosis 208
Obstacle marking, rearview camera 137
Octane rating, refer to Rec‐ ommended fuel grade 186
Odometer 83
Office, see user's manual for Navigation, Entertainment
and Communication
Oil 203
Oil, adding 204
Oil additives 204
Oil change 205
Oil change interval, service requirements 84
Oil filler neck 204
Oil types, alternative 205
Oil types, approved 205
Old batteries, disposal 216
On-board computer 87
Onboard monitor, refer to Control Display 18
Onboard vehicle tool kit 209
Opening/closing via door lock 39
Opening and closing 34
Opening and closing, without remote control 39
Opening and closing, with re‐ mote control 37
Opening the tailgate with no- touch activation 44 Seite 239Everything from A to ZReference239
Online Edition for Part no. 01 40 2 960 707 - II/15