ignition BMW 5 SERIES 2012 Owner's Manual
[x] Cancel search | Manufacturer: BMW, Model Year: 2012, Model line: 5 SERIES, Model: BMW 5 SERIES 2012Pages: 335, PDF Size: 13.42 MB
Page 91 of 335
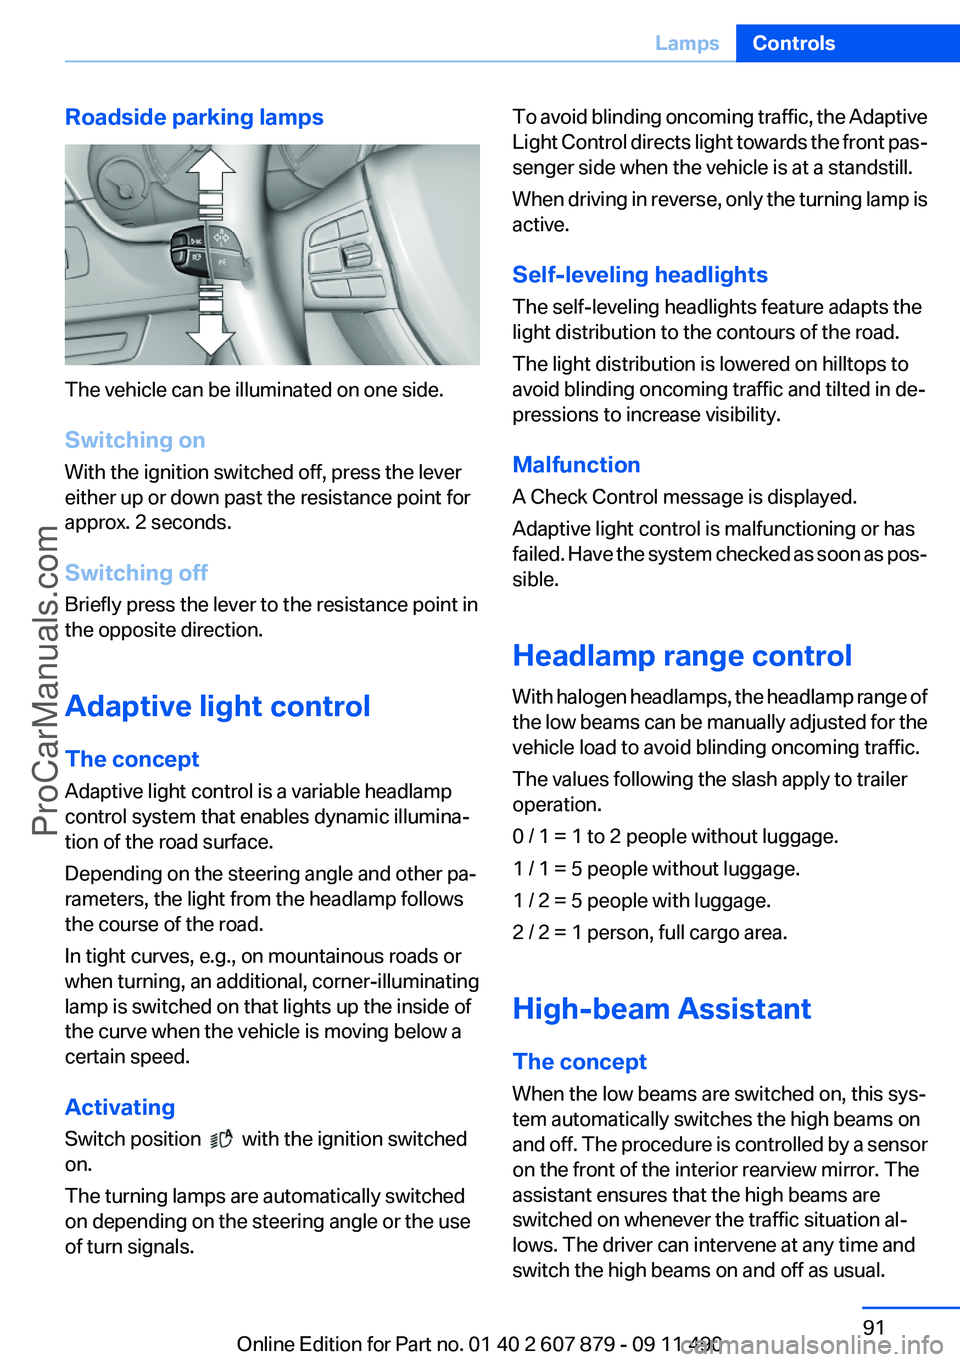
Roadside parking lamps
The vehicle can be illuminated on one side.
Switching on
With the ignition switched off, press the lever
either up or down past the resistance point for
approx. 2 seconds.
Switching off
Briefly press the lever to the resistance point in
the opposite direction.
Adaptive light control
The concept
Adaptive light control is a variable headlamp
control system that enables dynamic illumina‚Äź
tion of the road surface.
Depending on the steering angle and other pa‚Äź
rameters, the light from the headlamp follows
the course of the road.
In tight curves, e.g., on mountainous roads or
when turning, an additional, corner-illuminating
lamp is switched on that lights up the inside of
the curve when the vehicle is moving below a
certain speed.
Activating
Switch position
with the ignition switched
on.
The turning lamps are automatically switched
on depending on the steering angle or the use
of turn signals.
To avoid blinding oncoming traffic, the Adaptive
Light Control directs light towards the front pas‚Äź
senger side when the vehicle is at a standstill.
When driving in reverse, only the turning lamp is
active.
Self-leveling headlights
The self-leveling headlights feature adapts the
light distribution to the contours of the road.
The light distribution is lowered on hilltops to
avoid blinding oncoming traffic and tilted in de‚Äź
pressions to increase visibility.
Malfunction
A Check Control message is displayed.
Adaptive light control is malfunctioning or has
failed. Have the system checked as soon as pos‚Äź
sible.
Headlamp range control
With halogen headlamps, the headlamp range of
the low beams can be manually adjusted for the
vehicle load to avoid blinding oncoming traffic.
The values following the slash apply to trailer
operation.
0 / 1 = 1 to 2 people without luggage.
1 / 1 = 5 people without luggage.
1 / 2 = 5 people with luggage.
2 / 2 = 1 person, full cargo area.
High-beam Assistant
The concept
When the low beams are switched on, this sys‚Äź
tem automatically switches the high beams on
and off. The procedure is controlled by a sensor
on the front of the interior rearview mirror. The
assistant ensures that the high beams are
switched on whenever the traffic situation al‚Äź
lows. The driver can intervene at any time and
switch the high beams on and off as usual.Seite 91LampsControls91
Online Edition for Part no. 01 40 2 607 879 - 09 11 490
ProCarManuals.com
Page 95 of 335
Protective action
Airbags are not triggered in every impact situa‚Äź
tion, e.g., in less severe accidents or rear-end
collisions.
Information on how to ensure the optimal
protective effect of the airbags‚Ė∑Keep at a distance from the airbags.‚Ė∑Always grasp the steering wheel on the
steering wheel rim, holding your hands at
the 3 o'clock and 9 o'clock positions, to keep
the danger of injury to your hands or arms as
low as possible if the airbag is triggered.‚Ė∑There should be no people, animals, or ob‚Äź
jects between an airbag and a person.‚Ė∑Do not use the cover of the front airbag on
the front passenger side as a storage area.‚Ė∑Keep the dashboard and window on the
front passenger side clear, i.e., do not cover
with adhesive labels or coverings, and do not
attach holders such as for navigation instru‚Äź
ments and mobile phones.‚Ė∑Make sure that the front passenger is sitting
correctly, i.e., keeps his or her feet and legs
in the footwell; otherwise, leg injuries can
occur if the front airbag is triggered.‚Ė∑Do not place slip covers, seat cushions or
other objects on the front passenger seat
that are not approved specifically for seats
with integrated side airbags.‚Ė∑Do not hang pieces of clothing, such as jack‚Äź
ets, over the backrests.‚Ė∑Make sure that occupants keep their heads
away from the side airbag and do not rest
against the head airbag; otherwise, injuries
can occur if the airbags are triggered.‚Ė∑Do not remove the airbag restraint system.‚Ė∑Do not remove the steering wheel.‚Ė∑Do not apply adhesive materials to the air‚Äź
bag cover panels, cover them or modify
them in any way.‚Ė∑Never modify either the individual compo‚Äź
nents or the wiring in the airbag system. This
also applies to steering wheel covers, the
dashboard, the seats, the roof pillars and the
sides of the headliner.‚óÄ
Even when all instructions are followed closely,
injury from contact with the airbags cannot be
ruled out in certain situations.
The ignition and inflation noise may lead to
short-term and, in most cases, temporary hear‚Äź
ing impairment in sensitive individuals.
In the case of a malfunction, deactivation
and after triggering of the airbags
Do not touch the individual components imme‚Äź
diately after the system has been triggered; oth‚Äź
erwise, there is the danger of burns.
Only have the airbags checked, repaired or dis‚Äź
mantled and the airbag generator scrapped by
your service center or a workshop that has the
necessary authorization for handling explosives.
Non-professional attempts to service the sys‚Äź
tem could lead to failure in an emergency or un‚Äź
desired triggering of the airbag, either of which
could result in injury.‚óÄ
Warnings and information on the airbags are
also found on the sun visors.
Functional readiness of the airbag
system
When the ignition is switch on, the warn‚Äź
ing lamp in the instrument cluster lights
up briefly and thereby indicates the op‚Äź
erational readiness of the entire airbag system
and the belt tensioner.
Airbag system malfunctioning
‚Ė∑Warning lamp does not come on when the
ignition is turned on.‚Ė∑The warning lamp lights up continuously.Seite 95SafetyControls95
Online Edition for Part no. 01 40 2 607 879 - 09 11 490
ProCarManuals.com
Page 116 of 335
DistanceSelecting a distance
Adjust the distance according to the traffic
and weather conditions; otherwise, there is the
danger of an accident occurring. Maintain the
prescribed safety distance.‚óÄ
Reduce distance Press the button repeatedly until the
desired distance is set.
The selected distance, refer to page 117, is dis‚Äź
played in the instrument cluster.
Increase distance Press the button repeatedly until the
desired distance is set.
The selected distance, refer to page 117, is dis‚Äź
played in the instrument cluster.
Calling up the desired speed and
distance
While driving Press the button with the system
switched on.
In the following cases, the stored speed value is
deleted and cannot be called up again:‚Ė∑When the system is switched off.‚Ė∑When the ignition is switched off.
While standing
Before leaving the vehicle, secure it
against rolling.
Before leaving the vehicle with the engine run‚Äź
ning, engage position P of the automatic trans‚Äź
mission and apply the parking brake. Otherwise,
the vehicle may begin to roll.‚óÄ
The system brought the vehicle to a complete
standstill.
‚Ė∑Green mark in the speedometer during a
brief idle phase:
The vehicle ahead of you drives away while
the mark is green: your vehicle accelerates
without anything having to be done.‚Ė∑Switch to orange of the mark in the speed‚Äź
ometer after approx. 2 sec.:
The vehicle ahead of you drives away, while
the mark is orange: in order to accelerate,
briefly press the gas pedal or press the RES
button or SET button.
Rolling bars in the distance indicator mean that
the vehicle ahead of you has driven off.
You actively braked your vehicle to a halt by
pressing on the brake pedal and it is standing
behind another vehicle:
1. Press the button to call up a stored
desired speed.2.Release the brake pedal.3.Press on the accelerator briefly, or press the
RES button or the rocker switch when the
vehicle ahead of you drives away.
Displays in the instrument cluster
Desired speed
‚Ė∑The marking lights up in
green: the system is active.‚Ė∑The marking lights up in or‚Äź
ange: the system has been
interrupted.‚Ė∑The marking does not light up: the system is
switched off.
Brief status display
Selected desired speed.
If --- appears briefly on the display for Check
Control messages, it is possible that the system
Seite 116ControlsDriving comfort116
Online Edition for Part no. 01 40 2 607 879 - 09 11 490
ProCarManuals.com
Page 133 of 335
Watch the parking space and parking procedure
closely and intervene if necessary; otherwise,
there is the danger of an accident.‚óÄ
Check the traffic situation as well
Loud sounds outside and within the vehi‚Äź
cle can drown out the signal tones of the parking
assistant and PDC.
Check the traffic situation around the vehicle
with your own eyes; otherwise, there is the dan‚Äź
ger of an accident.‚óÄ1.Switch on the parking assistant and activate
it if necessary.
The status of the parking space search is in‚Äź
dicated on the Control Display.2.Follow the instructions on the Control Dis‚Äź
play.
The end of the parking procedure is indi‚Äź
cated on the Control Display.3.Adjust the parking position yourself if nec‚Äź
essary.
Notes
‚Ė∑The parking assistant takes control of steer‚Äź
ing for as long as the symbol for active park‚Äź
ing appears on the display.‚Ė∑The system maneuvers the vehicle to posi‚Äź
tion it properly in smaller parking spaces, for
example.‚Ė∑To achieve the best possible parking posi‚Äź
tion, wait for the automatic steering wheel
movement after the gear change when the
vehicle is stationary.‚Ė∑When parking in parking spaces on the driv‚Äź
er's side, the corresponding turn signal must
be set.
Interrupting manually
The parking assistant can be interrupted at any
time by:
‚Ė∑Grasping the steering wheel and steering
yourself.‚Ė∑ " Parking Assistant" Select the symbol on
the Control Display.
Interrupting automatically
The procedure is interrupted automatically:
‚Ė∑If the vehicle speed exceeds approx. 6 mph/
10 km/h.‚Ė∑On snow-covered or slippery road surfaces
if necessary.‚Ė∑If doors are open.
A Check Control message is displayed.
Continuing
An interrupted parking procedure can be con‚Äź
tinued if necessary.
Follow the instructions on the Control Display to
do this.
Switching off
The system can be deactivated as follows:
‚Ė∑Press the button.‚Ė∑Switch off the ignition.
Malfunction
A Check Control message is displayed.
The parking assistant failed. Have the system
checked.
System limits Changes to the parking space
Changes to the parking space after it was
measured are not taken into account by the sys‚Äź
tem.
Therefore, always be alert and ready to inter‚Äź
vene; otherwise, there is the danger of an acci‚Äź
dent occurring.‚óÄ
Transporting loads
Loads that extend beyond the perimeter
of the vehicle are not taken into account by the
system during the parking procedure.
Seite 133Driving comfortControls133
Online Edition for Part no. 01 40 2 607 879 - 09 11 490
ProCarManuals.com
Page 142 of 335

Switching on1.Switch off the ignition.2. Press the right side of the button on
the driver's side.
is shown on the display of the automatic cli‚Äź
mate control.
The interior temperature, air volume and air dis‚Äź
tribution can be adjusted with the ignition
switched on.
Switching off
At the lowest fan speed, press the left side of the
button on the driver's side.
on the display of the automatic climate control
goes out.
Switching the system on/off
Switching off
‚Ė∑Complete system: At the lowest fan speed, press the
left side of the button on the driver's
side.‚Ė∑On the front passenger side:
At the lowest fan speed, press the
left side of the button on the front
passenger side.
Switching on
Press any button.
Microfilter/activated-charcoal filter
The microfilter removes dust and pollen from
the incoming air.
The activated-charcoal filter removes gaseous
pollutants from the outside air that enters the
vehicle.
This combined filter should be replaced during
scheduled maintenance, refer to page 288, of
your vehicle.
Ventilation
Front ventilation‚Ė∑Thumbwheels for adjusting the tempera‚Äź
ture, arrows 1.
Toward blue: colder.
Toward red: warmer.‚Ė∑Lever for changing the air flow direction, ar‚Äź
row 2.‚Ė∑Thumbwheels for opening and closing the
vents continuously, arrows 3.
Ventilation levels
‚Ė∑Draft-free ventilation:
Thumbwheel, arrow 3, in level
: the air
current is fanned out.
‚Ė∑Maximum air volume:
Thumbwheel, arrow 3, in level
: the air is
partially fanned out and partially bundled.
This maximizes the air supply.
‚Ė∑Direct ventilation:
Thumbwheel, arrow 3, in level
: the air is
bundled and can be directed to a specific
point.
Adjusting the ventilation
‚Ė∑Ventilation for cooling:
Adjust the vent to direct the air in your di‚Äź
rection, e.g., if the vehicle interior is hot from
the sun.‚Ė∑Draft-free ventilation:
Adjust the vent to let the air flow past you.Seite 142ControlsClimate control142
Online Edition for Part no. 01 40 2 607 879 - 09 11 490
ProCarManuals.com
Page 146 of 335
Interior equipmentVehicle equipment
All standard, country-specific and optional
equipment that is offered in the model series is
described in this chapter. Therefore, equipment
is also described that is not available in a vehicle,
e. g., because of the selected optional equip‚Äź
ment or country variant. This also applies for
safety-related functions and systems.
Integrated universal remote
control
The concept
This system can replace up to three different
hand-held transmitters for various types of re‚Äź
mote-controlled equipment, such as garage
doors or lighting systems.
The hand-held transmitter signal can be pro‚Äź
grammed on one of the three memory buttons.
The corresponding device can then be operated
using the programmed memory button.
The LED indicates that a signal is being trans‚Äź
mitted.
When selling the vehicle, delete the stored pro‚Äź
grams for security reasons.
During programming
During programming and before activat‚Äź
ing a device using the integrated universal re‚Äź
mote control, ensure that there are no people,
animals, or objects in the range of movement of
the remote-controlled device; otherwise, there
is a risk of injury or damage.
Also follow the safety instructions of the hand-
held transmitter.‚óÄ
Compatibility If this symbol is printed on the packaging
or in the instructions of the hand-heldtransmitter, the remote-controlled device is
generally compatible with the integrated univer‚Äź
sal remote control.
If you have any questions, please contact:‚Ė∑Your service center.‚Ė∑www.homelink.com on the Internet.
HomeLink is a registered trademark of Johnson
Controls, Inc.
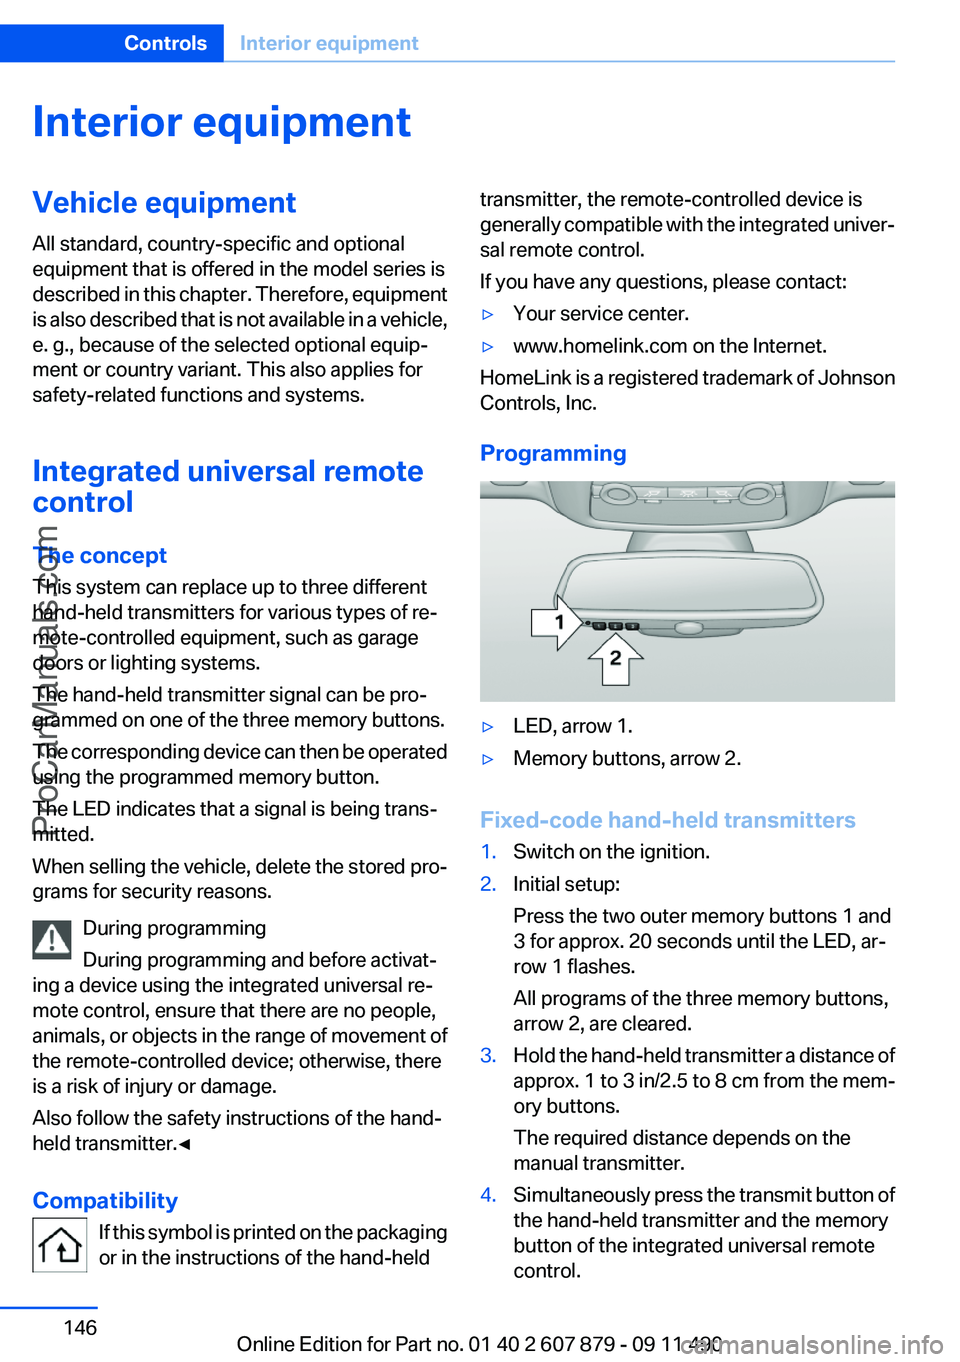
Programming
‚Ė∑LED, arrow 1.‚Ė∑Memory buttons, arrow 2.
Fixed-code hand-held transmitters
1.Switch on the ignition.2.Initial setup:
Press the two outer memory buttons 1 and
3 for approx. 20 seconds until the LED, ar‚Äź
row 1 flashes.
All programs of the three memory buttons,
arrow 2, are cleared.3.Hold the hand-held transmitter a distance of
approx. 1 to 3 in/2.5 to 8 cm from the mem‚Äź
ory buttons.
The required distance depends on the
manual transmitter.4.Simultaneously press the transmit button of
the hand-held transmitter and the memory
button of the integrated universal remote
control.Seite 146ControlsInterior equipment146
Online Edition for Part no. 01 40 2 607 879 - 09 11 490
ProCarManuals.com
Page 147 of 335
The LED flashes slowly.5.Release both buttons when the LED flashes
rapidly.
If the LED does not flash rapidly after approx.
60 seconds, change the distance and repeat
the step.
Canada: if the LED is not flashing rapidly af‚Äź
ter approx. 60 seconds, change the distance
and repeat the step, or, if the programming
was interrupted by the hand-held transmit‚Äź
ter, hold down the memory button and press
and release the button on the hand-held
transmitter again for 2 seconds.6.To program other hand-held transmitters,
repeat steps 3 to 5.
The device can be operated using the memory
button with the engine running or the ignition
switched on.
Malfunction
If the device cannot be used after repeated at‚Äź
tempts at programming, please check whether
the hand-held transmitter is equipped with an
alternating code system.
To do so:
‚Ė∑Read the instructions of the hand-held
transmitter.‚Ė∑Hold down the memory button of the
integrated universal remote control longer.
If the LED of the integrated universal remote
control flashes rapidly for a brief period and then
lights up continuously, the hand-held transmit‚Äź
ter is equipped with an alternating code system.
In this case, program the memory buttons as
described under Alternating-code hand-held
transmitters.
Alternating-code hand-held
transmitters
Please obtain information on synchronizing the
device in the operating manual of the device be‚Äź
ing set up.
Programming will be easier with the aid of a sec‚Äź
ond person.1.Park the vehicle within range of the remote-
controlled device.2.Program the integrated universal remote
control as described above under Fixed-
code hand-held transmitters.3.Locate the button on the receiver of the de‚Äź
vice to be set, e.g., on the drive.4.Press the button on the receiver of the de‚Äź
vice to be set. You have approx. 30 seconds
for the next step.5.Hold down the programmed memory button
of the integrated universal remote for ap‚Äź
prox. 3 seconds. Repeat this work step, if
necessary, up to three times.
The device can be operated using the memory
button with the engine running or the ignition
switched on.
Reassigning individual programs
1.Switch on the ignition.2.Hold the hand-held transmitter a distance of
approx. 1 to 3 in/2.5 to 8 cm from the mem‚Äź
ory buttons.
The required distance depends on the
manual transmitter.3.Hold down the memory button of the
integrated universal remote control.4.If the LED flashes slowly after approx.
20 seconds, press the transmit button on
the hand-held transmitter.5.Release both buttons when the LED flashes
rapidly.
If the LED does not flash rapidly after approx.
60 seconds, change the distance and repeat
the step.
Canada: if the LED is not flashing rapidly after
approx. 60 seconds, change the distance and
repeat the step, or, if the programming was in‚Äź
terrupted by the hand-held transmitter, hold
down the memory button and press and release
Seite 147Interior equipmentControls147
Online Edition for Part no. 01 40 2 607 879 - 09 11 490
ProCarManuals.com
Page 148 of 335
the button on the hand-held transmitter again
for 2 seconds.
Deleting all stored programs
Press the two outer memory buttons for approx.
20 seconds until the LED flashes rapidly.
All stored programs are deleted.
The programs cannot be deleted individually.
Ashtray/cigarette lighter
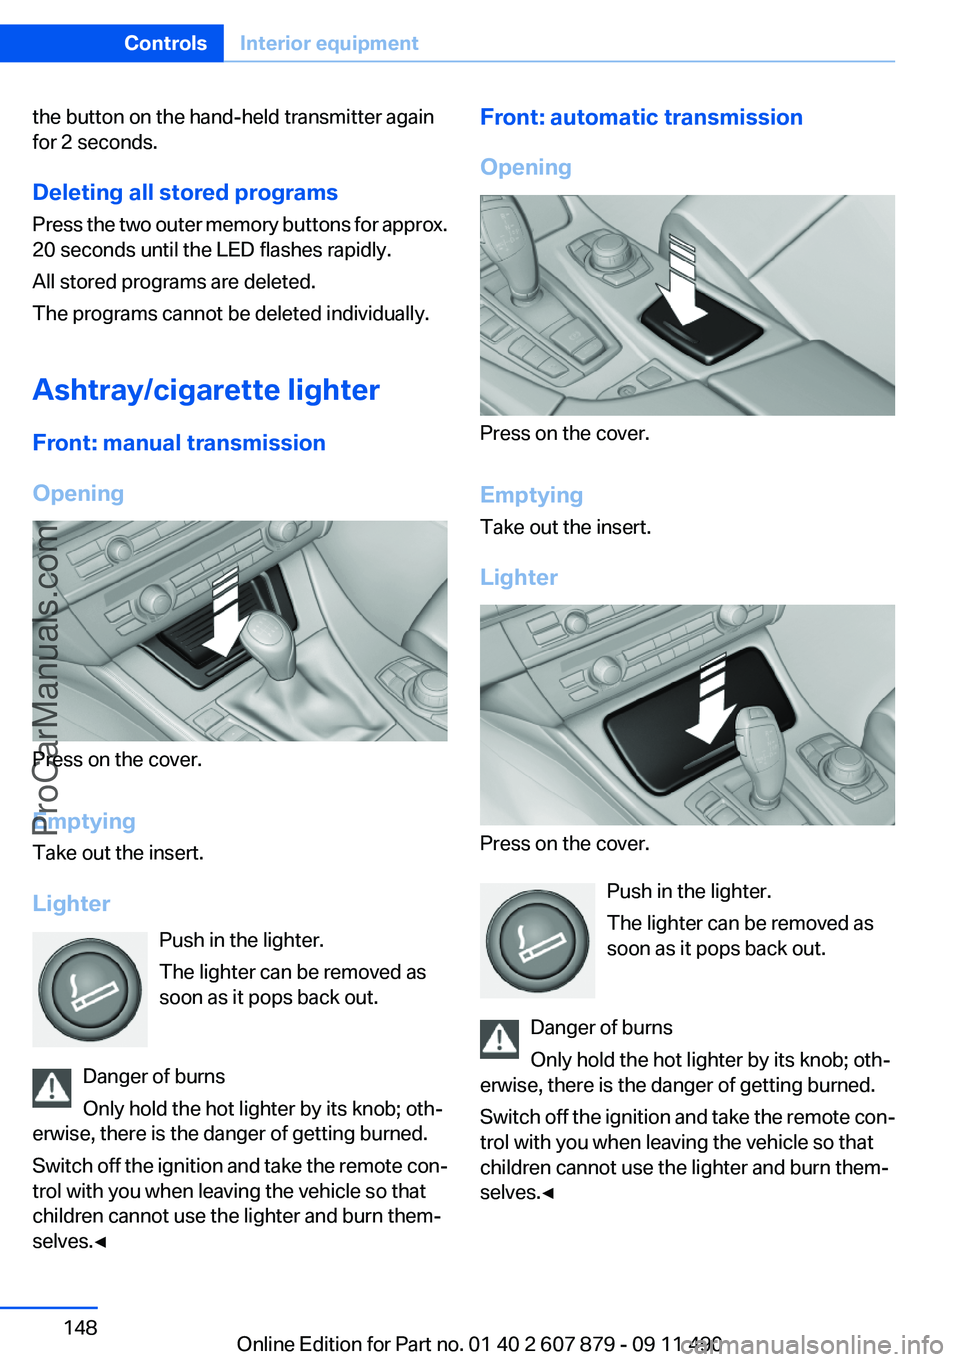
Front: manual transmission
Opening
Press on the cover.
Emptying
Take out the insert.
Lighter Push in the lighter.
The lighter can be removed as
soon as it pops back out.
Danger of burns
Only hold the hot lighter by its knob; oth‚Äź
erwise, there is the danger of getting burned.
Switch off the ignition and take the remote con‚Äź
trol with you when leaving the vehicle so that
children cannot use the lighter and burn them‚Äź
selves.‚óÄ
Front: automatic transmission
Opening
Press on the cover.
Emptying
Take out the insert.
Lighter
Press on the cover. Push in the lighter.
The lighter can be removed as
soon as it pops back out.
Danger of burns
Only hold the hot lighter by its knob; oth‚Äź
erwise, there is the danger of getting burned.
Switch off the ignition and take the remote con‚Äź
trol with you when leaving the vehicle so that
children cannot use the lighter and burn them‚Äź
selves.‚óÄ
Seite 148ControlsInterior equipment148
Online Edition for Part no. 01 40 2 607 879 - 09 11 490
ProCarManuals.com
Page 149 of 335
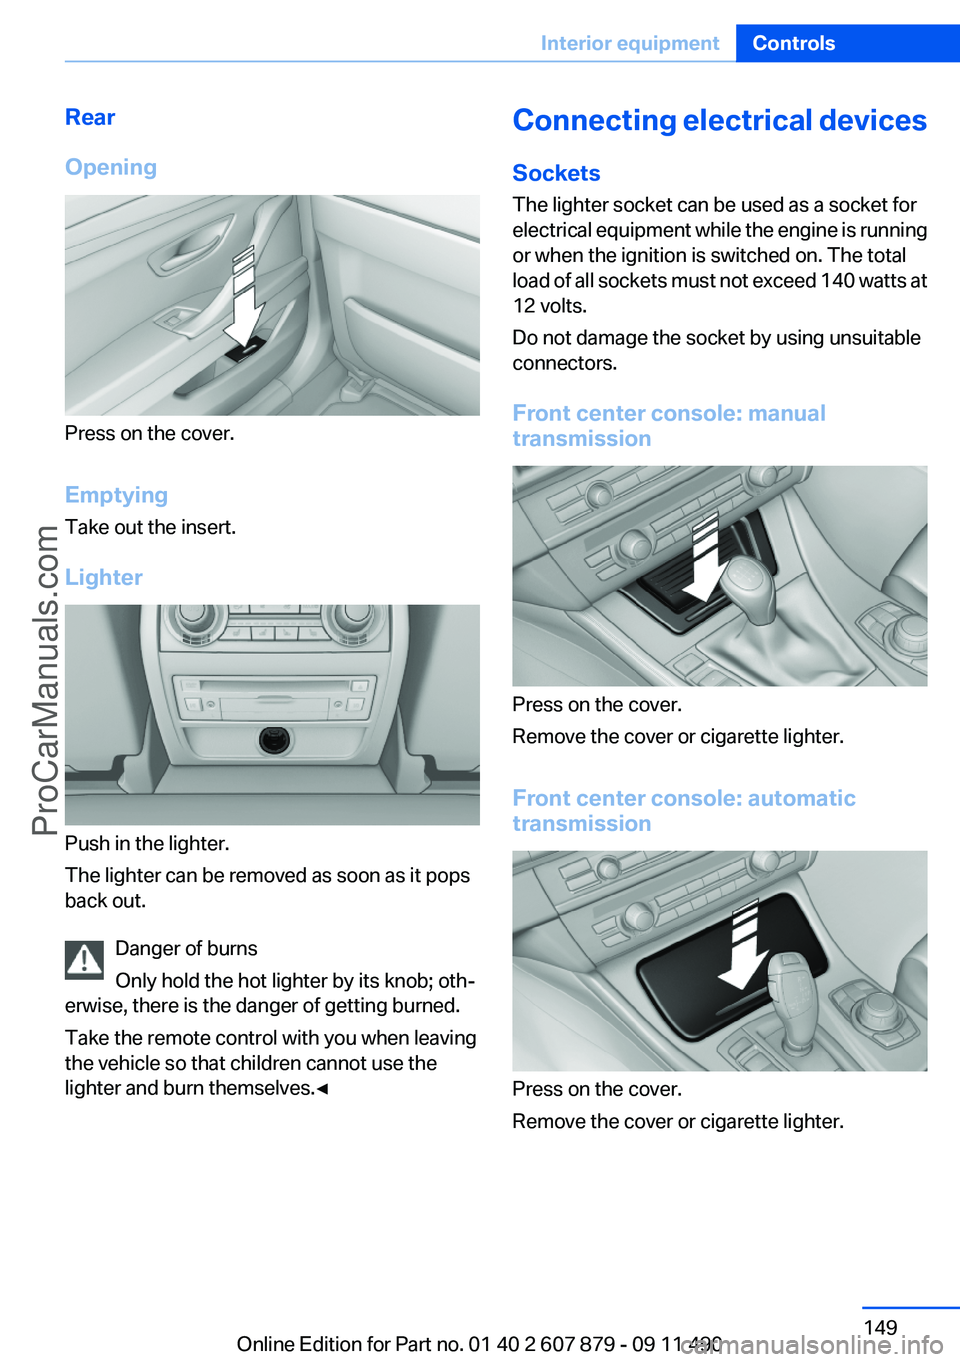
Rear
Opening
Press on the cover.
Emptying
Take out the insert.
Lighter
Push in the lighter.
The lighter can be removed as soon as it pops
back out.
Danger of burns
Only hold the hot lighter by its knob; oth‚Äź
erwise, there is the danger of getting burned.
Take the remote control with you when leaving
the vehicle so that children cannot use the
lighter and burn themselves.‚óÄ
Connecting electrical devices
Sockets
The lighter socket can be used as a socket for
electrical equipment while the engine is running
or when the ignition is switched on. The total
load of all sockets must not exceed 140 watts at
12 volts.
Do not damage the socket by using unsuitable
connectors.
Front center console: manual
transmission
Press on the cover.
Remove the cover or cigarette lighter.
Front center console: automatic
transmission
Press on the cover.
Remove the cover or cigarette lighter.
Seite 149Interior equipmentControls149
Online Edition for Part no. 01 40 2 607 879 - 09 11 490
ProCarManuals.com
Page 192 of 335
RadioVehicle equipment
All standard, country-specific and optional
equipment that is offered in the model series is
described in this chapter. Therefore, equipment
is also described that is not available in a vehicle,
e. g., because of the selected optional equip‚Äź
ment or country variant. This also applies for
safety-related functions and systems.
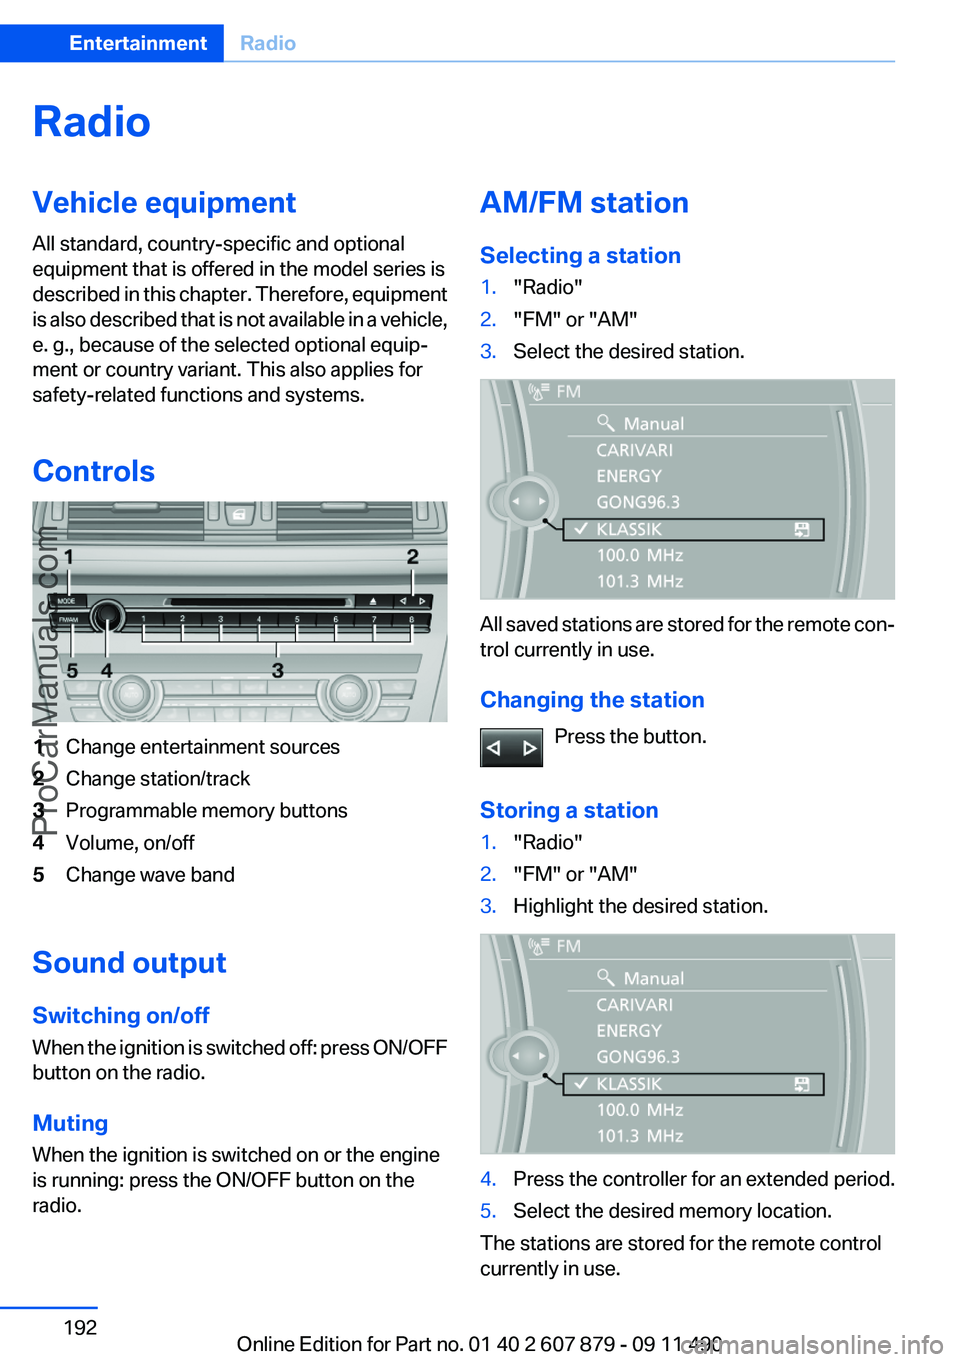
Controls1Change entertainment sources2Change station/track3Programmable memory buttons4Volume, on/off5Change wave band
Sound output
Switching on/off
When the ignition is switched off: press ON/OFF
button on the radio.
Muting
When the ignition is switched on or the engine
is running: press the ON/OFF button on the
radio.
AM/FM station
Selecting a station1."Radio"2."FM" or "AM"3.Select the desired station.
All saved stations are stored for the remote con‚Äź
trol currently in use.
Changing the station Press the button.
Storing a station
1."Radio"2."FM" or "AM"3.Highlight the desired station.4.Press the controller for an extended period.5.Select the desired memory location.
The stations are stored for the remote control
currently in use.
Seite 192EntertainmentRadio192
Online Edition for Part no. 01 40 2 607 879 - 09 11 490
ProCarManuals.com