bulb BMW 5 SERIES GRAN TURISMO 2014 F07 Owner's Manual
[x] Cancel search | Manufacturer: BMW, Model Year: 2014, Model line: 5 SERIES GRAN TURISMO, Model: BMW 5 SERIES GRAN TURISMO 2014 F07Pages: 259, PDF Size: 5.68 MB
Page 8 of 259
Addendum
disregarded and the following text
read in lieu thereof:
The manufacturer of your vehicle
recommends that you have
maintenance and repair performed
by your BMW dealer’s service
center or another service center or
repair shop that employs trained
personnel that can perform
maintenance and repair work on
your vehicle in accordance with
BMW specifications. The
manufacturer of your vehicle
recommends that you maintain
records of all maintenance and
repair work performed on your
vehicle.
20.At page 222 and page 223, where it
reads: “Do not perform work/bulb
replacement on xenon headlamps,”
that text should be disregarded and
in lieu thereof the following text
should be read: “Xenon headlamp
work or replacement can cause
serious and fatal injuries.” In the
text that follows, where it reads:
“[h]ave any work on the xenon
lighting system . . . ,” the following
words should be read as preceding
that passage: “It is strongly
suggested that you . . . .”
21.At page 226, under the “Battery
replacement” section, the text
should be disregarded and in lieu
thereof the following text should be
read:
Use of recommended vehicle
batteries
The manufacturer of your vehicle
recommends that you use vehicle
batteries that it has tested and
recommends for use in your vehicle;
otherwise the vehicle could be
damaged and systems or functions
may not be fully available.
After a battery replacement, the
manufacturer of your vehicle
recommends that you have the
battery registered on your vehicle
by a service center to ensure that all
comfort functions are fully available,
and that any “check control”
messages of these comfort
functions are no longer displayed.
Page 81 of 259
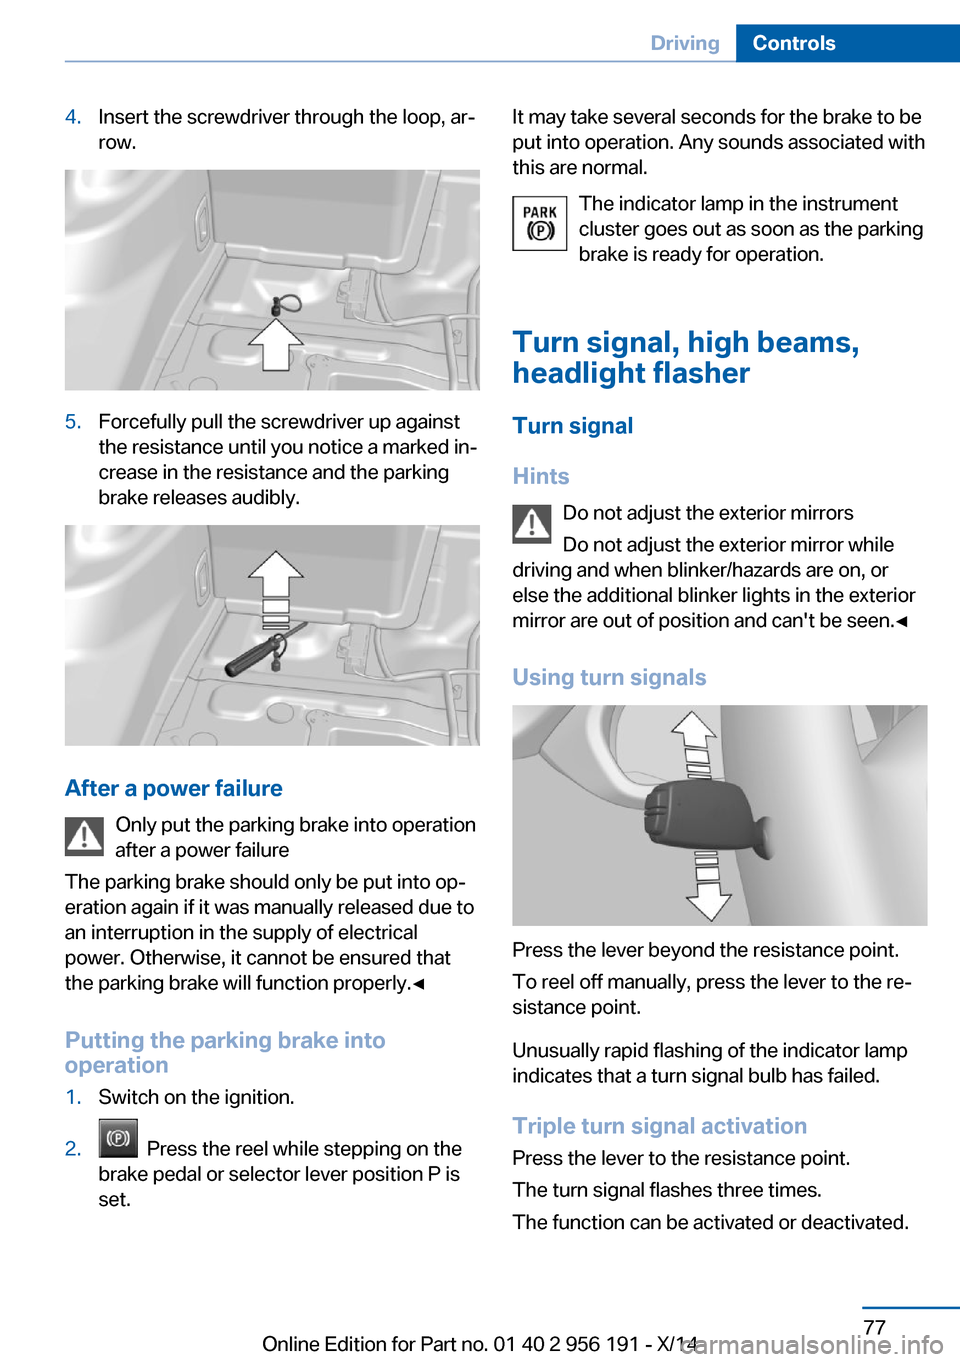
4.Insert the screwdriver through the loop, ar‐
row.5.Forcefully pull the screwdriver up against
the resistance until you notice a marked in‐
crease in the resistance and the parking
brake releases audibly.
After a power failure
Only put the parking brake into operation
after a power failure
The parking brake should only be put into op‐
eration again if it was manually released due to
an interruption in the supply of electrical
power. Otherwise, it cannot be ensured that
the parking brake will function properly.◀
Putting the parking brake into
operation
1.Switch on the ignition.2. Press the reel while stepping on the
brake pedal or selector lever position P is
set.It may take several seconds for the brake to be
put into operation. Any sounds associated with
this are normal.
The indicator lamp in the instrument
cluster goes out as soon as the parking
brake is ready for operation.
Turn signal, high beams,
headlight flasher
Turn signal
Hints Do not adjust the exterior mirrors
Do not adjust the exterior mirror while
driving and when blinker/hazards are on, or
else the additional blinker lights in the exterior
mirror are out of position and can't be seen.◀
Using turn signals
Press the lever beyond the resistance point.
To reel off manually, press the lever to the re‐
sistance point.
Unusually rapid flashing of the indicator lamp
indicates that a turn signal bulb has failed.
Triple turn signal activation Press the lever to the resistance point.
The turn signal flashes three times.
The function can be activated or deactivated.
Seite 77DrivingControls77
Online Edition for Part no. 01 40 2 956 191 - X/14
Page 94 of 259
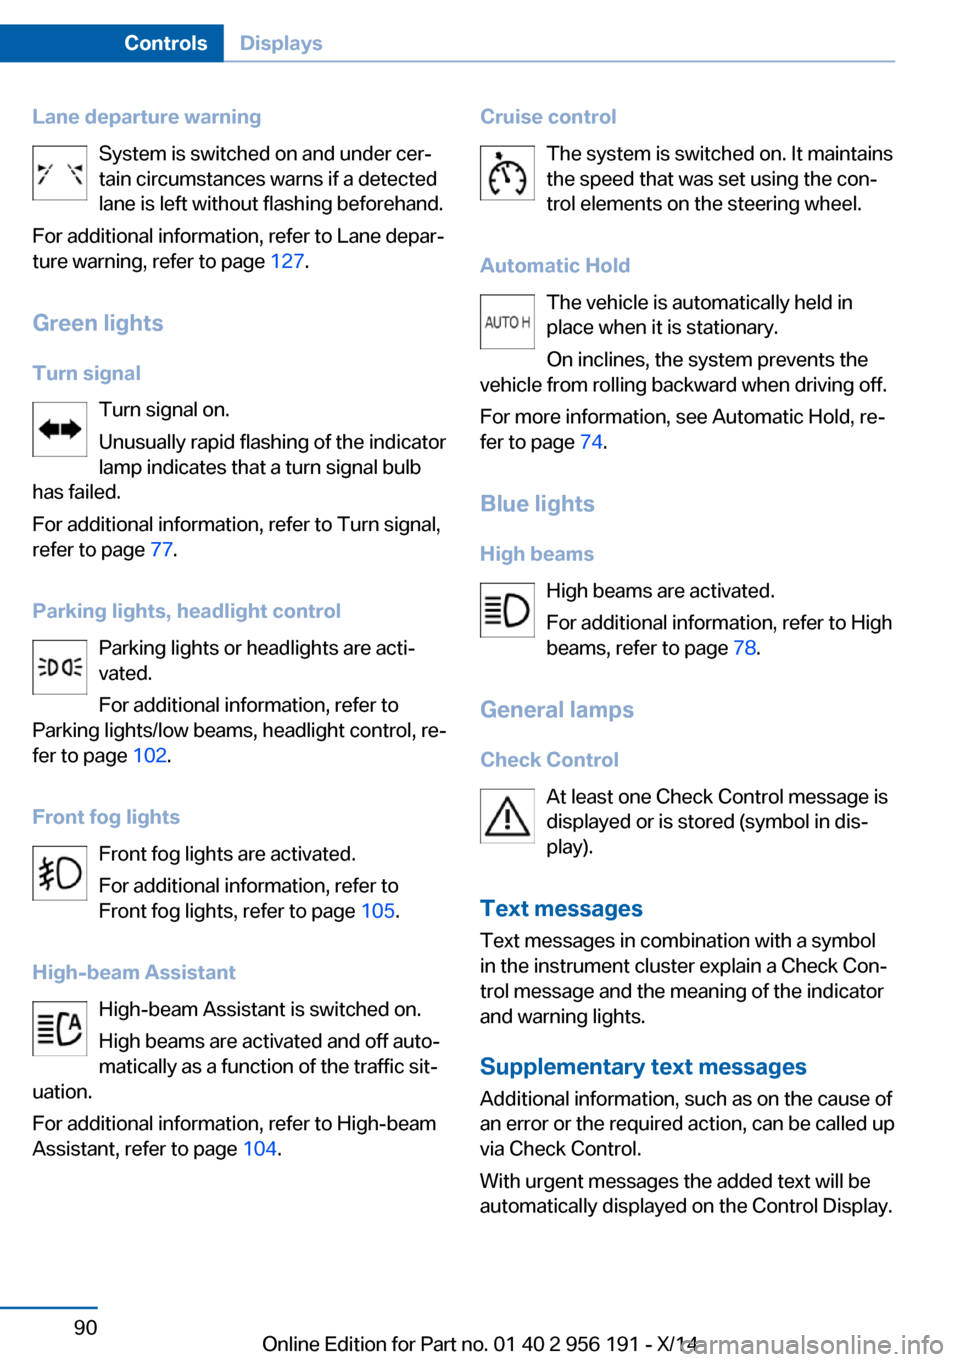
Lane departure warningSystem is switched on and under cer‐
tain circumstances warns if a detected
lane is left without flashing beforehand.
For additional information, refer to Lane depar‐
ture warning, refer to page 127.
Green lights Turn signal Turn signal on.
Unusually rapid flashing of the indicator
lamp indicates that a turn signal bulb
has failed.
For additional information, refer to Turn signal,
refer to page 77.
Parking lights, headlight control Parking lights or headlights are acti‐
vated.
For additional information, refer to
Parking lights/low beams, headlight control, re‐
fer to page 102.
Front fog lights Front fog lights are activated.
For additional information, refer to
Front fog lights, refer to page 105.
High-beam Assistant High-beam Assistant is switched on.
High beams are activated and off auto‐
matically as a function of the traffic sit‐
uation.
For additional information, refer to High-beam
Assistant, refer to page 104.Cruise control
The system is switched on. It maintains
the speed that was set using the con‐
trol elements on the steering wheel.
Automatic Hold The vehicle is automatically held in
place when it is stationary.
On inclines, the system prevents the
vehicle from rolling backward when driving off.
For more information, see Automatic Hold, re‐
fer to page 74.
Blue lights
High beams High beams are activated.
For additional information, refer to High
beams, refer to page 78.
General lamps
Check Control At least one Check Control message is
displayed or is stored (symbol in dis‐
play).
Text messages Text messages in combination with a symbol
in the instrument cluster explain a Check Con‐
trol message and the meaning of the indicator
and warning lights.
Supplementary text messages
Additional information, such as on the cause of
an error or the required action, can be called up
via Check Control.
With urgent messages the added text will be
automatically displayed on the Control Display.Seite 90ControlsDisplays90
Online Edition for Part no. 01 40 2 956 191 - X/14
Page 225 of 259
Replacing componentsVehicle features and optionsThis chapter describes all standard, country-
specific and optional features offered with the
series. It also describes features that are not
necessarily available in your car, e. g., due to
the selected options or country versions. This
also applies to safety-related functions and
systems.
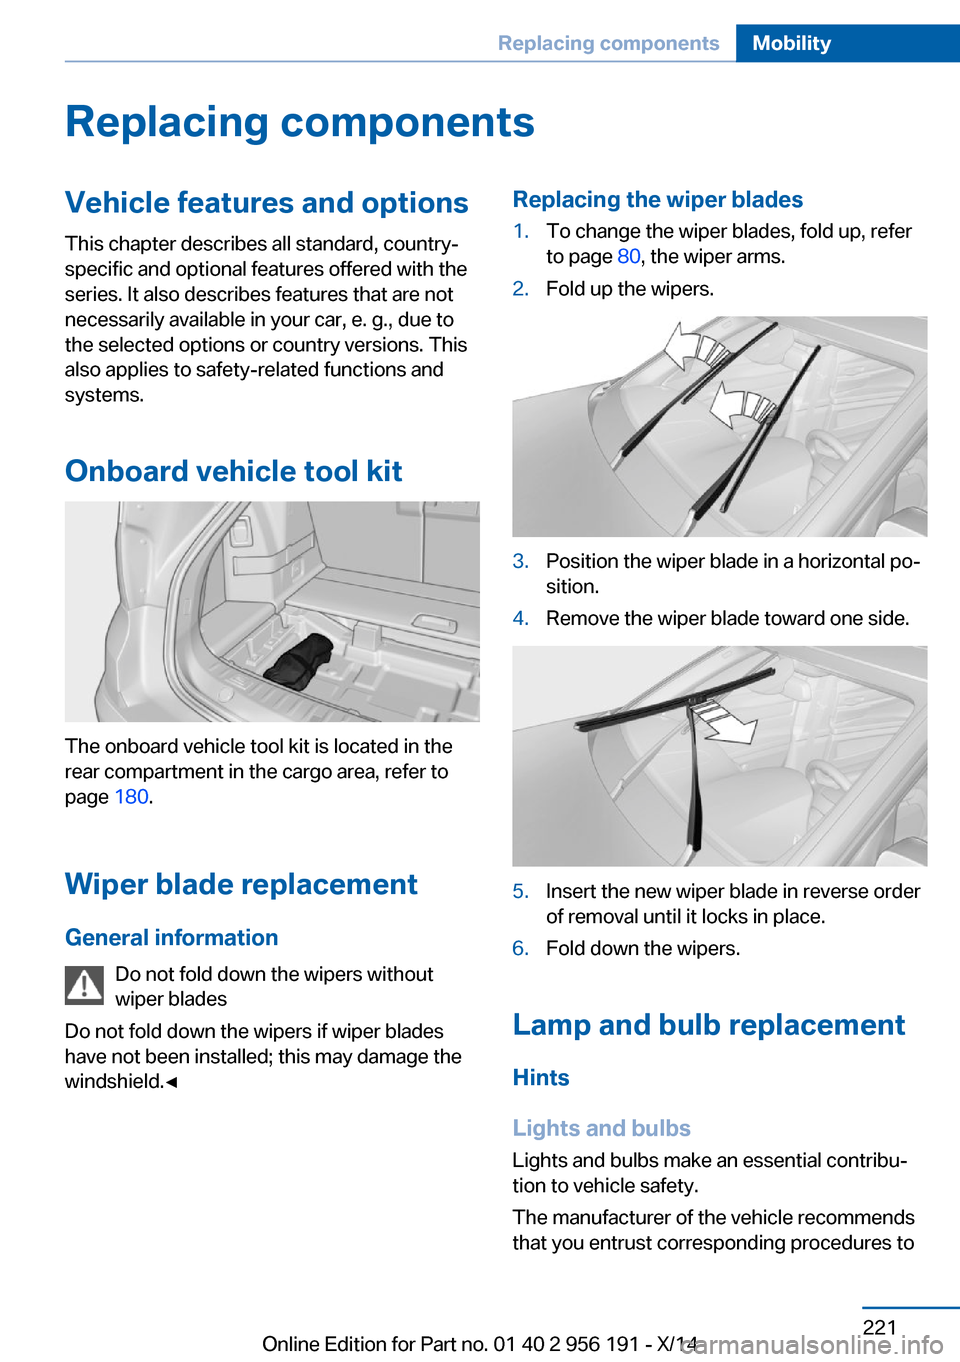
Onboard vehicle tool kit
The onboard vehicle tool kit is located in the
rear compartment in the cargo area, refer to
page 180.
Wiper blade replacement General information Do not fold down the wipers without
wiper blades
Do not fold down the wipers if wiper blades
have not been installed; this may damage the
windshield.◀
Replacing the wiper blades1.To change the wiper blades, fold up, refer
to page 80, the wiper arms.2.Fold up the wipers.3.Position the wiper blade in a horizontal po‐
sition.4.Remove the wiper blade toward one side.5.Insert the new wiper blade in reverse order
of removal until it locks in place.6.Fold down the wipers.
Lamp and bulb replacement
Hints
Lights and bulbs
Lights and bulbs make an essential contribu‐
tion to vehicle safety.
The manufacturer of the vehicle recommends
that you entrust corresponding procedures to
Seite 221Replacing componentsMobility221
Online Edition for Part no. 01 40 2 956 191 - X/14
Page 226 of 259
the service center if you are unfamiliar those or
if they have not been described here.
You can obtain a selection of replacement
bulbs at the service center.
Danger of burns
Only change bulbs when they are cool;
otherwise, there is a danger of getting
burned.◀
Working on the lighting system
When working on the lighting system,
you should always reel off the lights affected to
prevent short circuits.
To avoid possible injury or equipment damage
when replacing bulbs, observe any instructions
provided by the bulb manufacturer.◀
Do not perform work/bulb replacement
on xenon headlights
Have any work on the xenon lighting system,
including bulb replacement, performed only by
a service center. Due to the high voltage
present in the system, there is a danger of fatal
injuries if work is carried out improperly.◀
Do not touch the bulbs
Do not touch the glass of new bulbs with
your bare hands, as even minute amounts of
contamination will burn into the bulb's surface
and reduce its service life.
Use a clean tissue, cloth or something similar,
or hold the bulb by its base.◀
Light-emitting diodes (LEDs)
Some items of equipment use light-emitting
diodes installed behind a cover as a light
source.
These light-emitting diodes, which are related
to conventional lasers, are officially designated as Class 1 light-emitting diodes.Do not remove the covers
Do not remove the covers, and never
stare into the unfiltered light for several hours;
otherwise, irritation of the retina could result.◀
Headlight glass
Condensation can form on the inside of the ex‐
ternal lights in cool or humid weather. When
driving with the light switched on, the conden‐
sation evaporates after a short time. The head‐
light glass does not need to be changed.
If the headlights do not dim despite driving
with the light switched on, increasing humidity
forms, e. g. water droplets in the light, have the service center check this.
Headlight setting The headlight adjustments can be affected by
changing lights and bulbs. Have the head‐
lights' settings checked and corrected by serv‐
ice after a replacement.
Front lights, bulb replacement
Xenon headlights
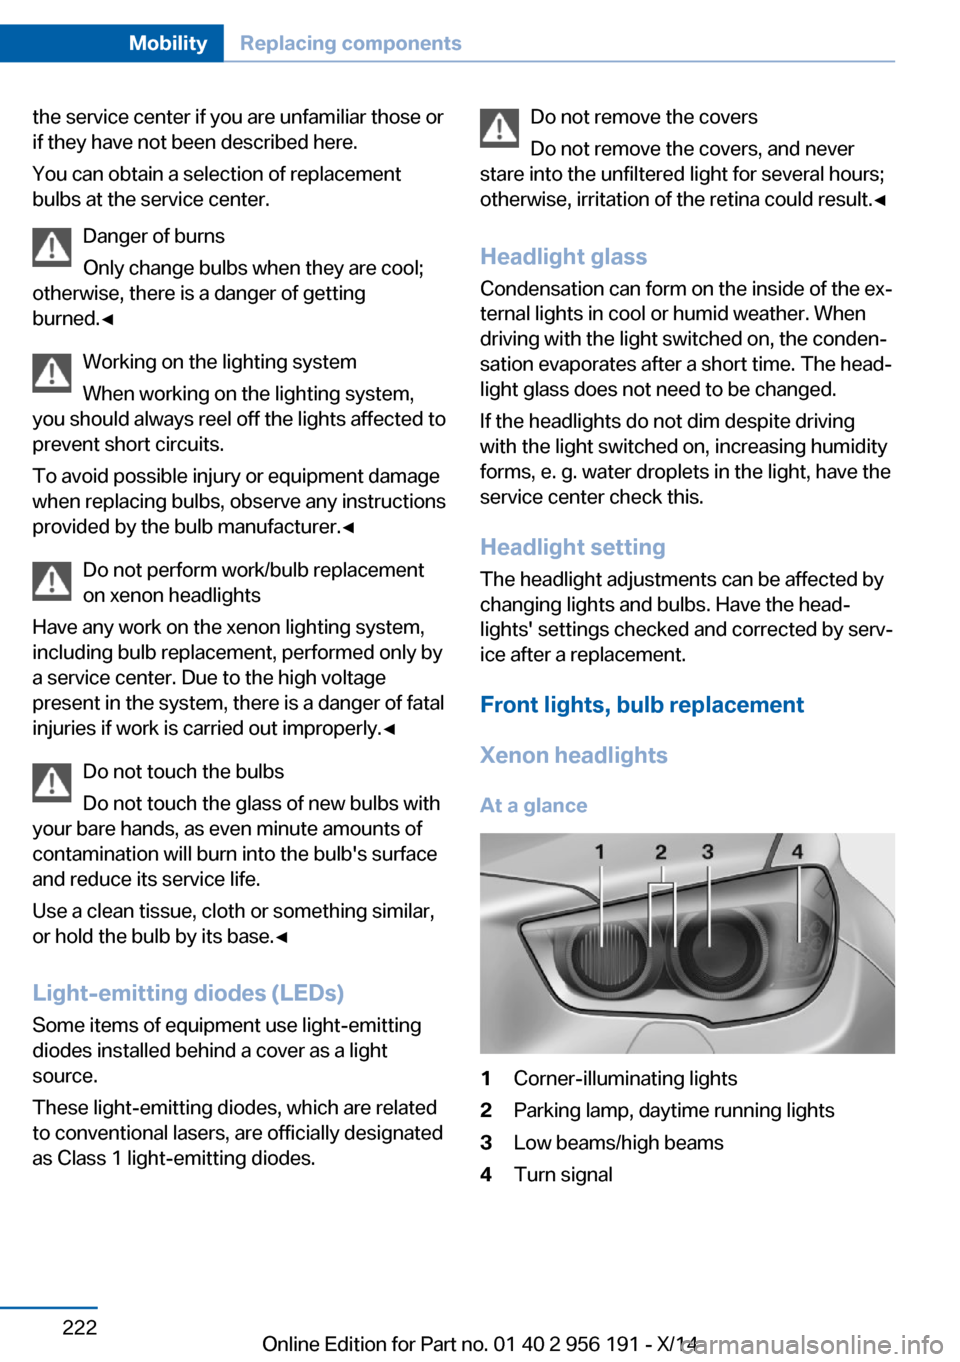
At a glance1Corner-illuminating lights2Parking lamp, daytime running lights3Low beams/high beams4Turn signalSeite 222MobilityReplacing components222
Online Edition for Part no. 01 40 2 956 191 - X/14
Page 227 of 259
Hints
Because of the long life of these bulbs, the
likelihood of failure is very low. Switching the
lights on and off frequently shortens their life.
If a bulb fails, reel on the front fog lights and
continue the trip with great care. Comply with
local regulations.
Do not perform work/bulb replacement
on xenon headlights
Have any work on the xenon lighting system,
including bulb replacement, performed only by
a service center. Due to the high voltage
present in the system, there is a danger of fatal
injuries if work is carried out improperly.◀
For checking and adjusting headlamp aim,
please contact your BMW center.
Parking lights and roadside parking lamp,
turn signal lights
Follow general instructions, refer to page 221.
These lights feature LED technology.
Contact your service center in the event of a
malfunction.
Corner-illuminating lights
Follow general instructions, refer to page 221.
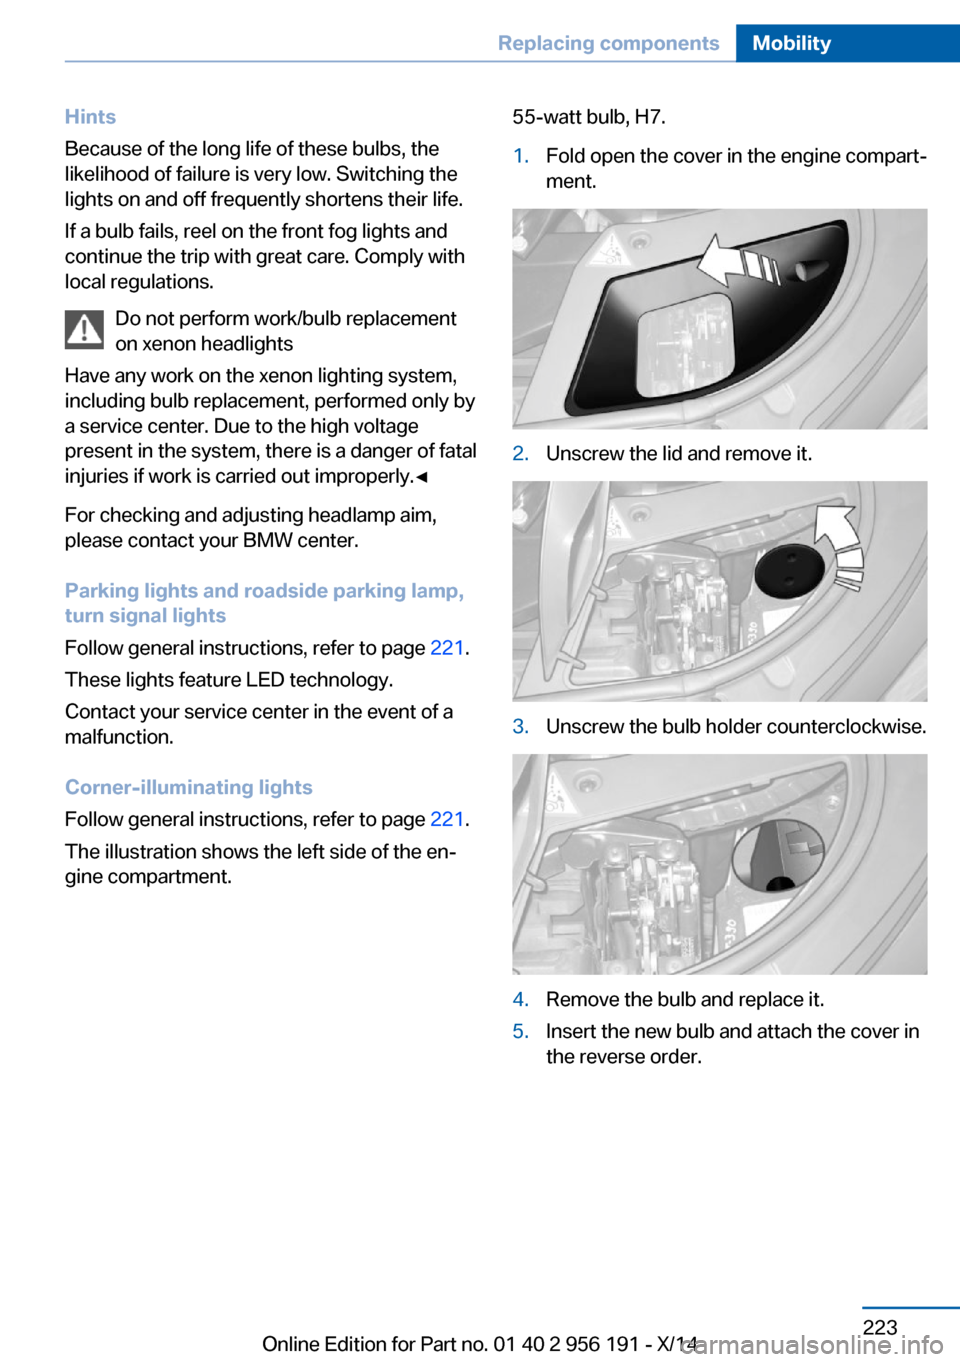
The illustration shows the left side of the en‐
gine compartment.55-watt bulb, H7.1.Fold open the cover in the engine compart‐
ment.2.Unscrew the lid and remove it.3.Unscrew the bulb holder counterclockwise.4.Remove the bulb and replace it.5.Insert the new bulb and attach the cover in
the reverse order.Seite 223Replacing componentsMobility223
Online Edition for Part no. 01 40 2 956 191 - X/14
Page 228 of 259
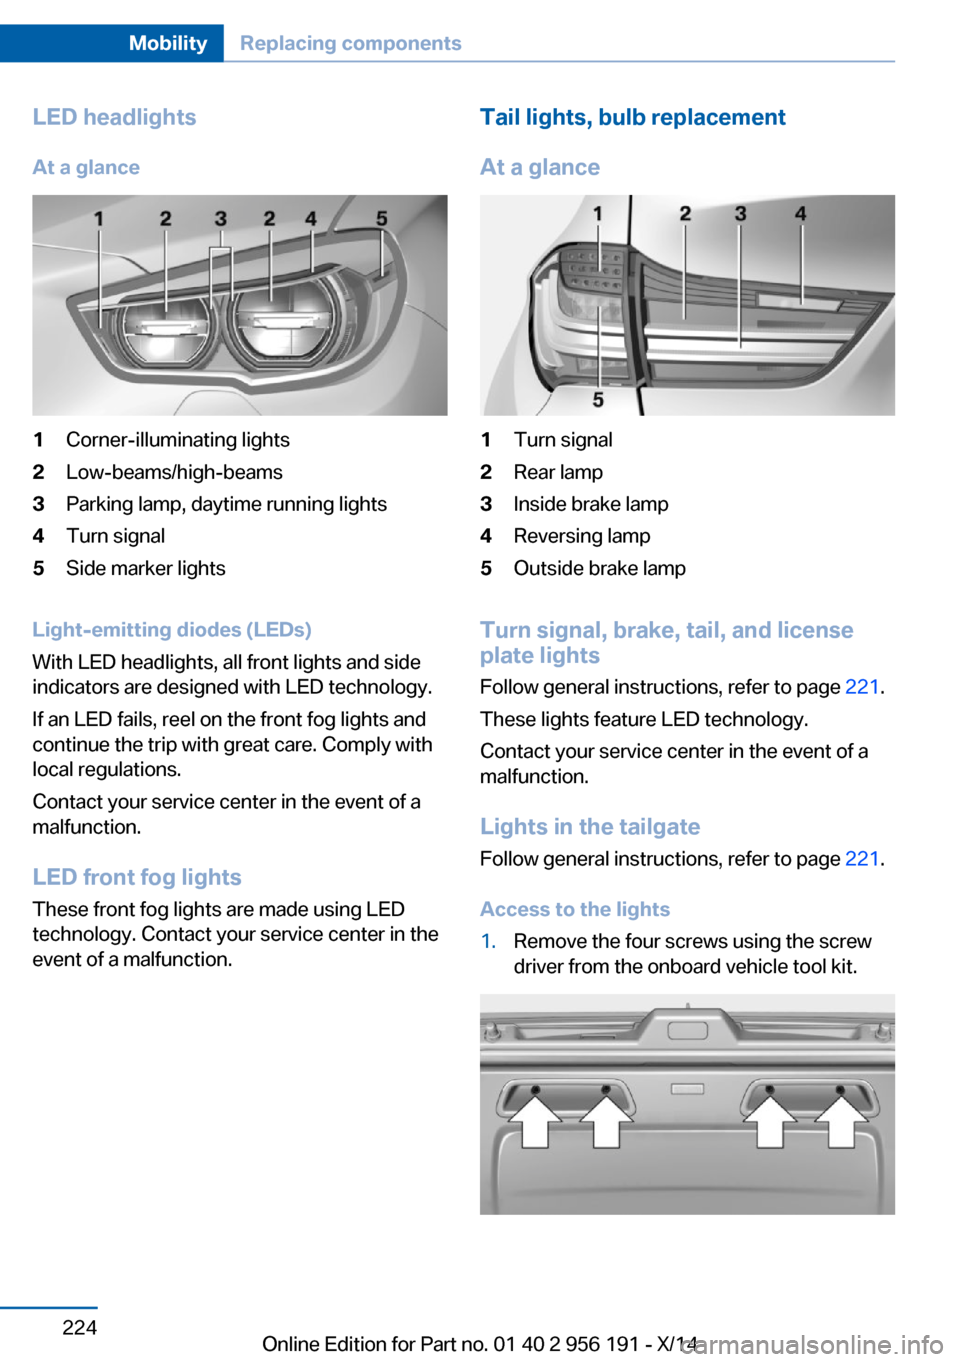
LED headlightsAt a glance1Corner-illuminating lights2Low-beams/high-beams3Parking lamp, daytime running lights4Turn signal5Side marker lights
Light-emitting diodes (LEDs)
With LED headlights, all front lights and side
indicators are designed with LED technology.
If an LED fails, reel on the front fog lights and
continue the trip with great care. Comply with
local regulations.
Contact your service center in the event of a
malfunction.
LED front fog lights
These front fog lights are made using LED
technology. Contact your service center in the
event of a malfunction.
Tail lights, bulb replacement
At a glance1Turn signal2Rear lamp3Inside brake lamp4Reversing lamp5Outside brake lamp
Turn signal, brake, tail, and license
plate lights
Follow general instructions, refer to page 221.
These lights feature LED technology.
Contact your service center in the event of a
malfunction.
Lights in the tailgate Follow general instructions, refer to page 221.
Access to the lights
1.Remove the four screws using the screw
driver from the onboard vehicle tool kit.Seite 224MobilityReplacing components224
Online Edition for Part no. 01 40 2 956 191 - X/14
Page 229 of 259
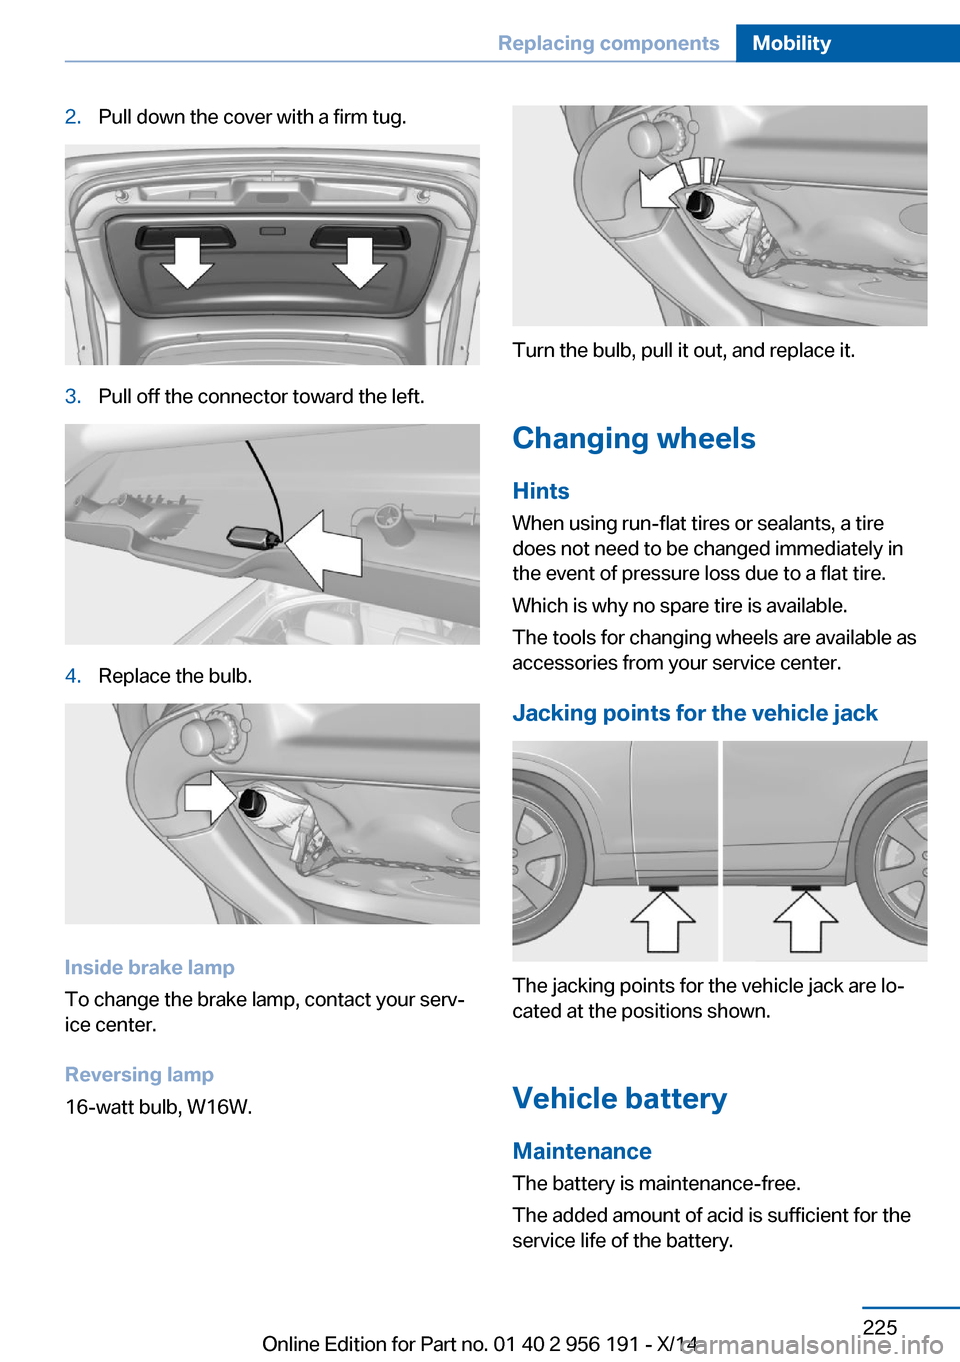
2.Pull down the cover with a firm tug.3.Pull off the connector toward the left.4.Replace the bulb.
Inside brake lamp
To change the brake lamp, contact your serv‐
ice center.
Reversing lamp
16-watt bulb, W16W.
Turn the bulb, pull it out, and replace it.
Changing wheels
Hints
When using run-flat tires or sealants, a tire
does not need to be changed immediately in
the event of pressure loss due to a flat tire.
Which is why no spare tire is available.
The tools for changing wheels are available as
accessories from your service center.
Jacking points for the vehicle jack
The jacking points for the vehicle jack are lo‐
cated at the positions shown.
Vehicle battery Maintenance
The battery is maintenance-free.
The added amount of acid is sufficient for the
service life of the battery.
Seite 225Replacing componentsMobility225
Online Edition for Part no. 01 40 2 956 191 - X/14
Page 249 of 259
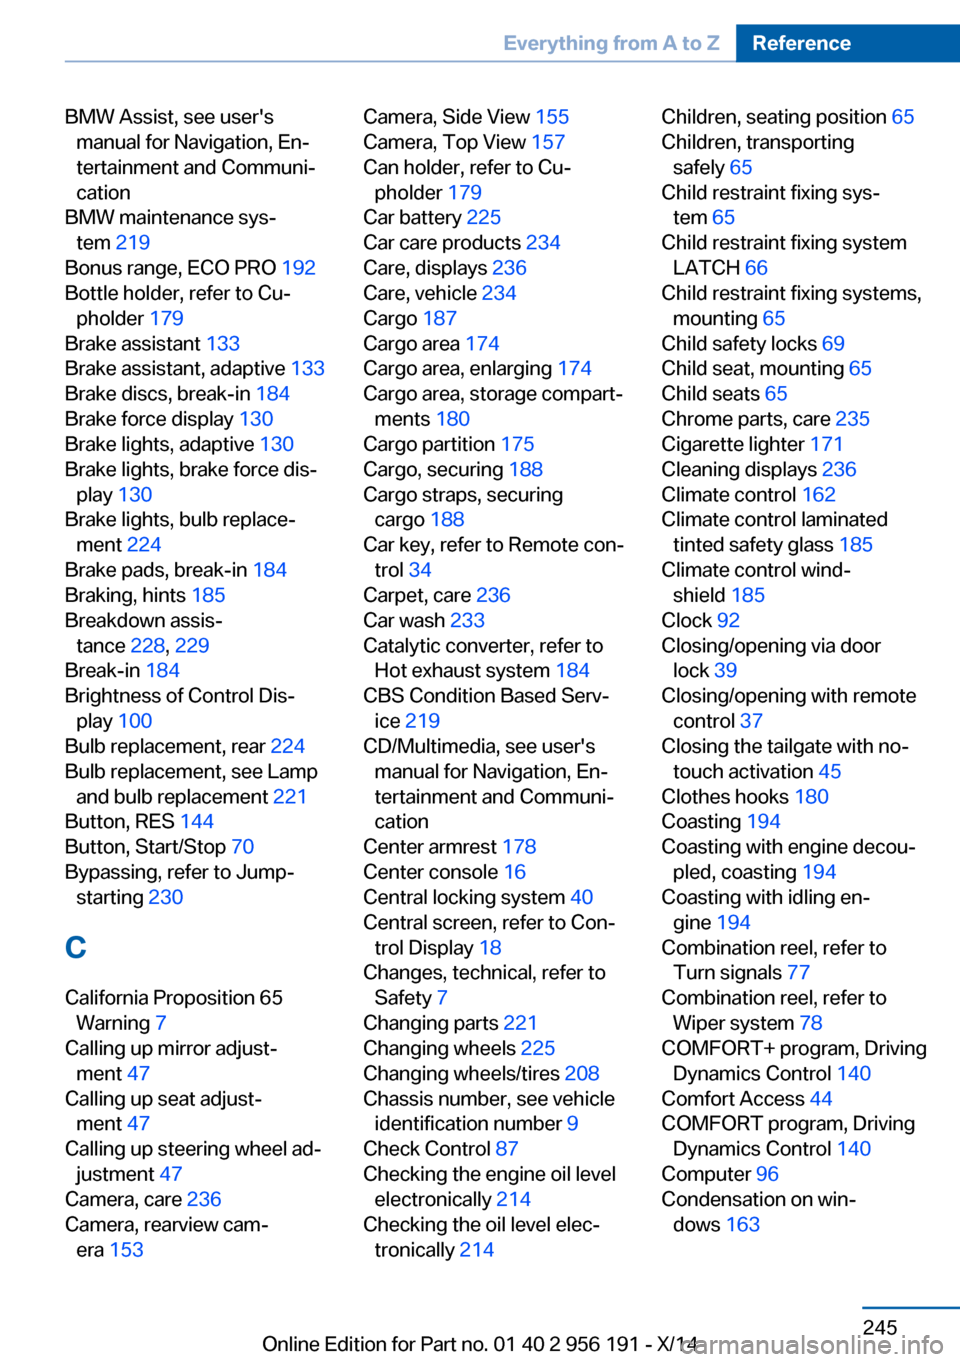
BMW Assist, see user'smanual for Navigation, En‐
tertainment and Communi‐
cation
BMW maintenance sys‐ tem 219
Bonus range, ECO PRO 192
Bottle holder, refer to Cu‐ pholder 179
Brake assistant 133
Brake assistant, adaptive 133
Brake discs, break-in 184
Brake force display 130
Brake lights, adaptive 130
Brake lights, brake force dis‐ play 130
Brake lights, bulb replace‐ ment 224
Brake pads, break-in 184
Braking, hints 185
Breakdown assis‐ tance 228, 229
Break-in 184
Brightness of Control Dis‐ play 100
Bulb replacement, rear 224
Bulb replacement, see Lamp and bulb replacement 221
Button, RES 144
Button, Start/Stop 70
Bypassing, refer to Jump- starting 230
C
California Proposition 65 Warning 7
Calling up mirror adjust‐ ment 47
Calling up seat adjust‐ ment 47
Calling up steering wheel ad‐ justment 47
Camera, care 236
Camera, rearview cam‐ era 153 Camera, Side View 155
Camera, Top View 157
Can holder, refer to Cu‐ pholder 179
Car battery 225
Car care products 234
Care, displays 236
Care, vehicle 234
Cargo 187
Cargo area 174
Cargo area, enlarging 174
Cargo area, storage compart‐ ments 180
Cargo partition 175
Cargo, securing 188
Cargo straps, securing cargo 188
Car key, refer to Remote con‐ trol 34
Carpet, care 236
Car wash 233
Catalytic converter, refer to Hot exhaust system 184
CBS Condition Based Serv‐ ice 219
CD/Multimedia, see user's manual for Navigation, En‐
tertainment and Communi‐
cation
Center armrest 178
Center console 16
Central locking system 40
Central screen, refer to Con‐ trol Display 18
Changes, technical, refer to Safety 7
Changing parts 221
Changing wheels 225
Changing wheels/tires 208
Chassis number, see vehicle identification number 9
Check Control 87
Checking the engine oil level electronically 214
Checking the oil level elec‐ tronically 214 Children, seating position 65
Children, transporting safely 65
Child restraint fixing sys‐ tem 65
Child restraint fixing system LATCH 66
Child restraint fixing systems, mounting 65
Child safety locks 69
Child seat, mounting 65
Child seats 65
Chrome parts, care 235
Cigarette lighter 171
Cleaning displays 236
Climate control 162
Climate control laminated tinted safety glass 185
Climate control wind‐ shield 185
Clock 92
Closing/opening via door lock 39
Closing/opening with remote control 37
Closing the tailgate with no- touch activation 45
Clothes hooks 180
Coasting 194
Coasting with engine decou‐ pled, coasting 194
Coasting with idling en‐ gine 194
Combination reel, refer to Turn signals 77
Combination reel, refer to Wiper system 78
COMFORT+ program, Driving Dynamics Control 140
Comfort Access 44
COMFORT program, Driving Dynamics Control 140
Computer 96
Condensation on win‐ dows 163 Seite 245Everything from A to ZReference245
Online Edition for Part no. 01 40 2 956 191 - X/14
Page 251 of 259
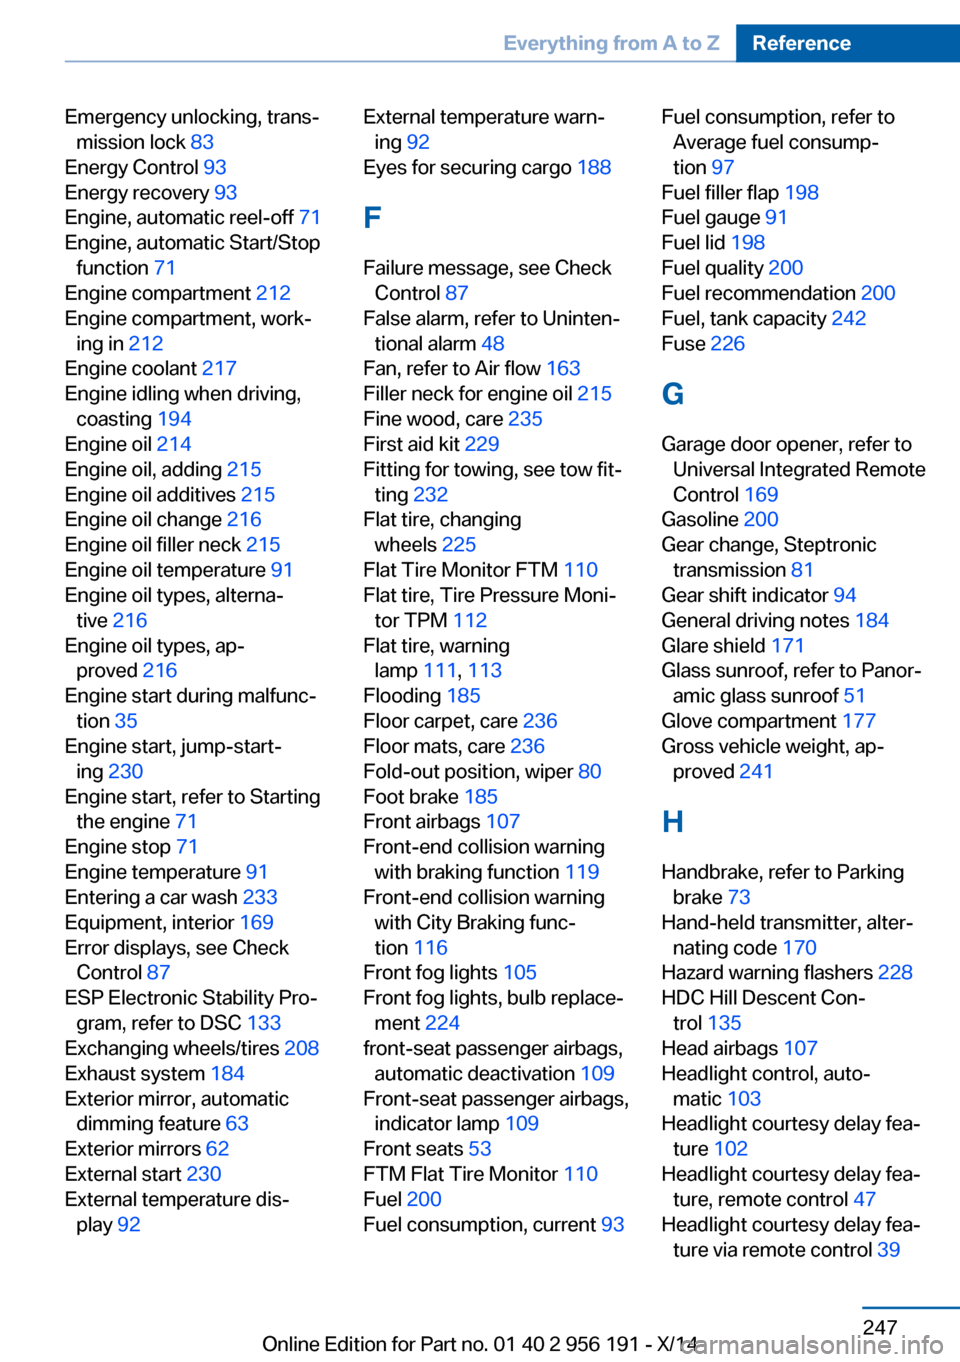
Emergency unlocking, trans‐mission lock 83
Energy Control 93
Energy recovery 93
Engine, automatic reel-off 71
Engine, automatic Start/Stop function 71
Engine compartment 212
Engine compartment, work‐ ing in 212
Engine coolant 217
Engine idling when driving, coasting 194
Engine oil 214
Engine oil, adding 215
Engine oil additives 215
Engine oil change 216
Engine oil filler neck 215
Engine oil temperature 91
Engine oil types, alterna‐ tive 216
Engine oil types, ap‐ proved 216
Engine start during malfunc‐ tion 35
Engine start, jump-start‐ ing 230
Engine start, refer to Starting the engine 71
Engine stop 71
Engine temperature 91
Entering a car wash 233
Equipment, interior 169
Error displays, see Check Control 87
ESP Electronic Stability Pro‐ gram, refer to DSC 133
Exchanging wheels/tires 208
Exhaust system 184
Exterior mirror, automatic dimming feature 63
Exterior mirrors 62
External start 230
External temperature dis‐ play 92 External temperature warn‐
ing 92
Eyes for securing cargo 188
F
Failure message, see Check Control 87
False alarm, refer to Uninten‐ tional alarm 48
Fan, refer to Air flow 163
Filler neck for engine oil 215
Fine wood, care 235
First aid kit 229
Fitting for towing, see tow fit‐ ting 232
Flat tire, changing wheels 225
Flat Tire Monitor FTM 110
Flat tire, Tire Pressure Moni‐ tor TPM 112
Flat tire, warning lamp 111, 113
Flooding 185
Floor carpet, care 236
Floor mats, care 236
Fold-out position, wiper 80
Foot brake 185
Front airbags 107
Front-end collision warning with braking function 119
Front-end collision warning with City Braking func‐
tion 116
Front fog lights 105
Front fog lights, bulb replace‐ ment 224
front-seat passenger airbags, automatic deactivation 109
Front-seat passenger airbags, indicator lamp 109
Front seats 53
FTM Flat Tire Monitor 110
Fuel 200
Fuel consumption, current 93 Fuel consumption, refer to
Average fuel consump‐
tion 97
Fuel filler flap 198
Fuel gauge 91
Fuel lid 198
Fuel quality 200
Fuel recommendation 200
Fuel, tank capacity 242
Fuse 226
G
Garage door opener, refer to Universal Integrated Remote
Control 169
Gasoline 200
Gear change, Steptronic transmission 81
Gear shift indicator 94
General driving notes 184
Glare shield 171
Glass sunroof, refer to Panor‐ amic glass sunroof 51
Glove compartment 177
Gross vehicle weight, ap‐ proved 241
H
Handbrake, refer to Parking brake 73
Hand-held transmitter, alter‐ nating code 170
Hazard warning flashers 228
HDC Hill Descent Con‐ trol 135
Head airbags 107
Headlight control, auto‐ matic 103
Headlight courtesy delay fea‐ ture 102
Headlight courtesy delay fea‐ ture, remote control 47
Headlight courtesy delay fea‐ ture via remote control 39 Seite 247Everything from A to ZReference247
Online Edition for Part no. 01 40 2 956 191 - X/14