clock BMW 525i 1998 E39 Owner's Manual
[x] Cancel search | Manufacturer: BMW, Model Year: 1998, Model line: 525i, Model: BMW 525i 1998 E39Pages: 1002
Page 218 of 1002
Downloaded from www.Manualslib.com manuals search engine
11 6-42
/ Cvlinder Head and Valvetrain
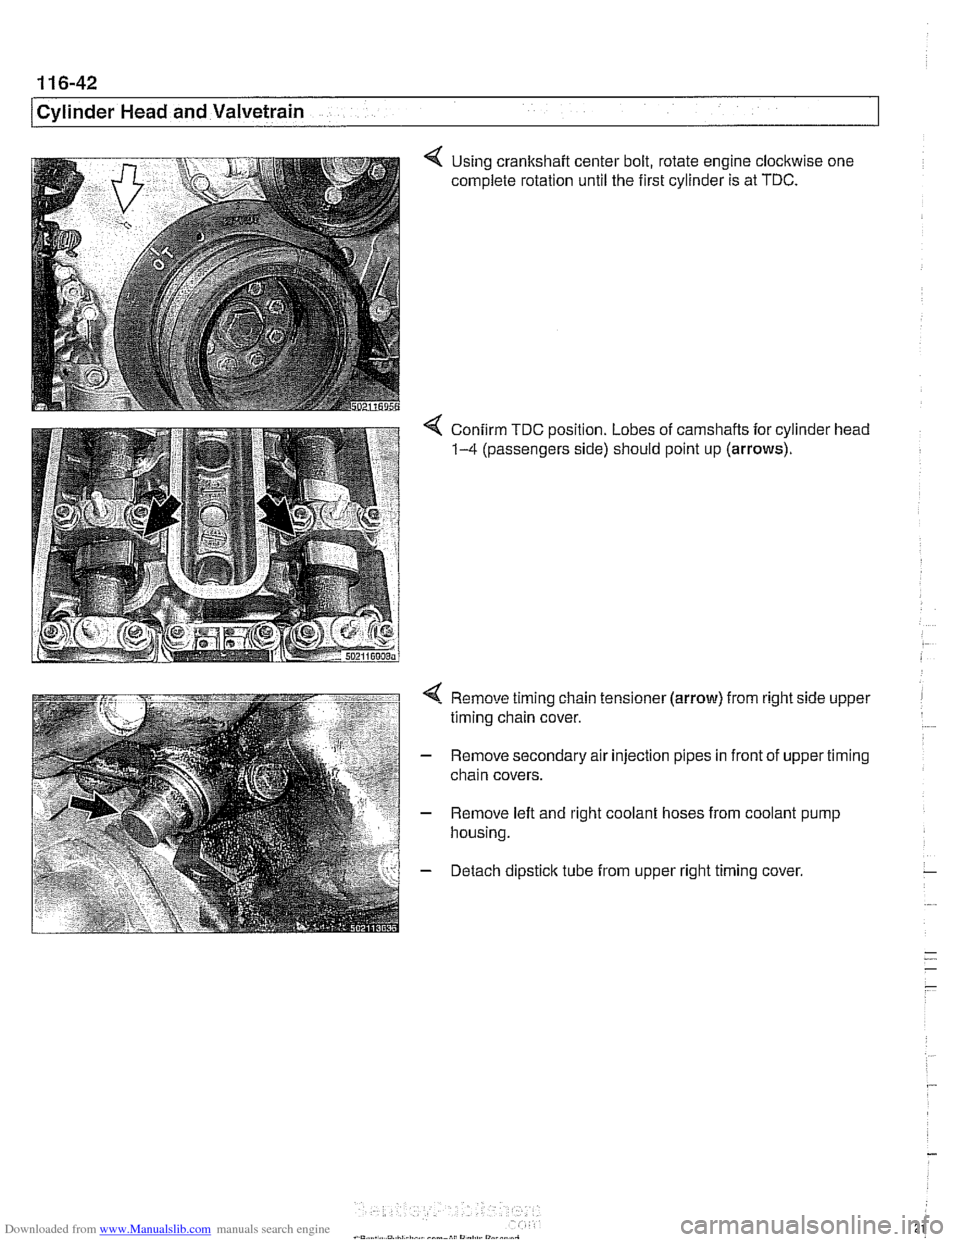
4 Using crankshaft center bolt, rotate engine clockwise one
complete rotation until the first cylinder is at TDC.
4 Confirm TDC position. Lobes of camshafts for cylinder head
1-4 (passengers side) should point up (arrows).
4 Remove timing chain tensioner (arrow) from right side upper
timing chain cover.
- Remove secondary air injection pipes in front of upper timing
chain covers.
- Remove left and right coolant hoses from coolant pump
housing.
- Detach dipsticlc tube from upper right timing cover,
Page 220 of 1002
Downloaded from www.Manualslib.com manuals search engine
..
ICylinder Head and Valvetrain -.I
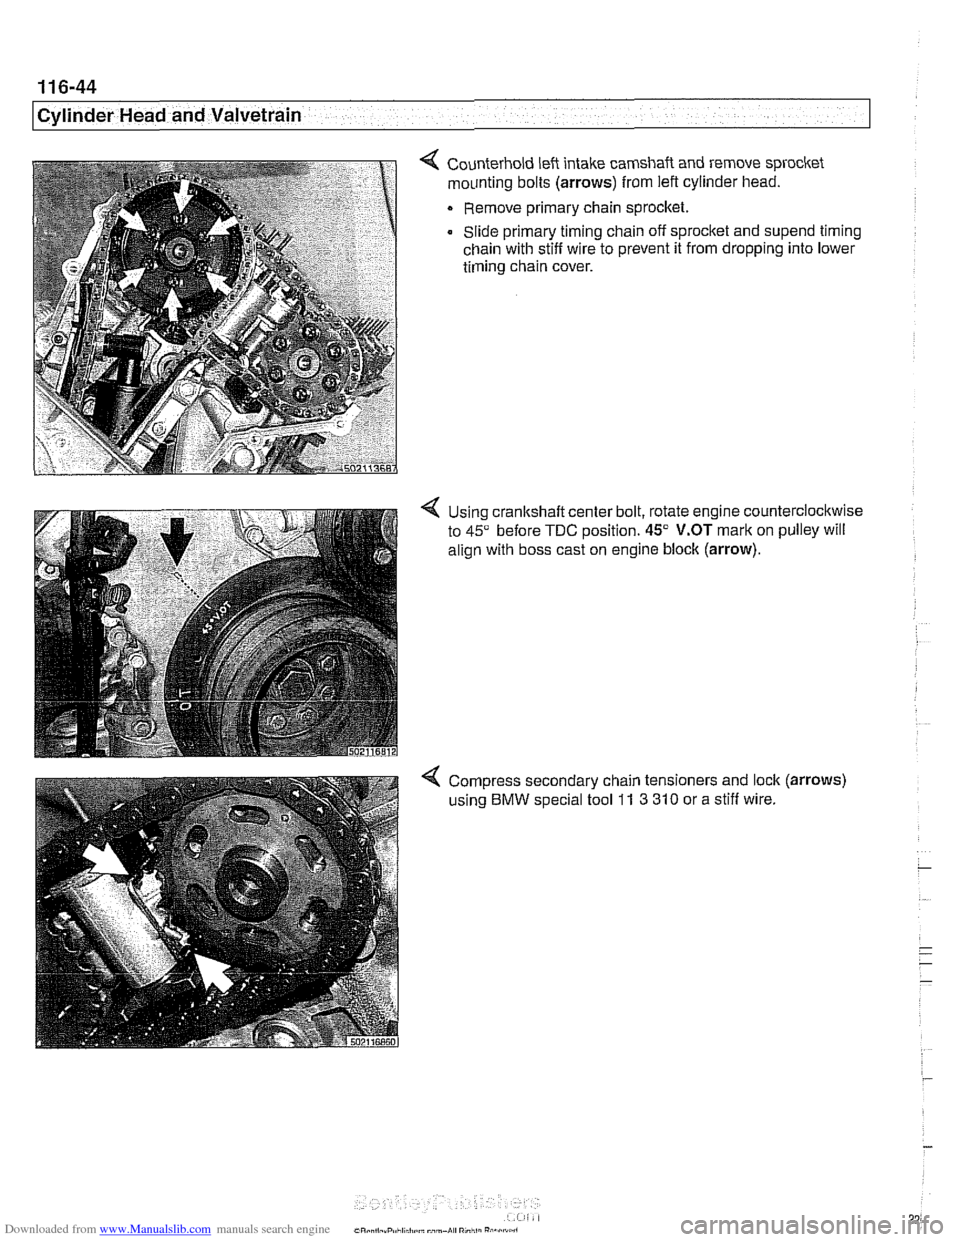
4 Counterhold left intake camshaft and remove sprocket
mounting bolts
(arrows) from left cylinder head.
Remove primary chain sprocket.
Slide primary timing chain off sprocket and
supend timing
chain with stiff wire to prevent it from dropping into lower
timing chain cover.
4 Using cranltshaft center bolt, rotate engine counterclockwise
to
45" before TDC position. 45" V.OT mark on pulley will
align with boss cast on engine block
(arrow).
4 Compress secondary chain tensioners and lock (arrows)
using BMW special tool 11 3 310 or a stiff wire.
Page 228 of 1002
Downloaded from www.Manualslib.com manuals search engine
ICylinder Head and Valvetrain -.
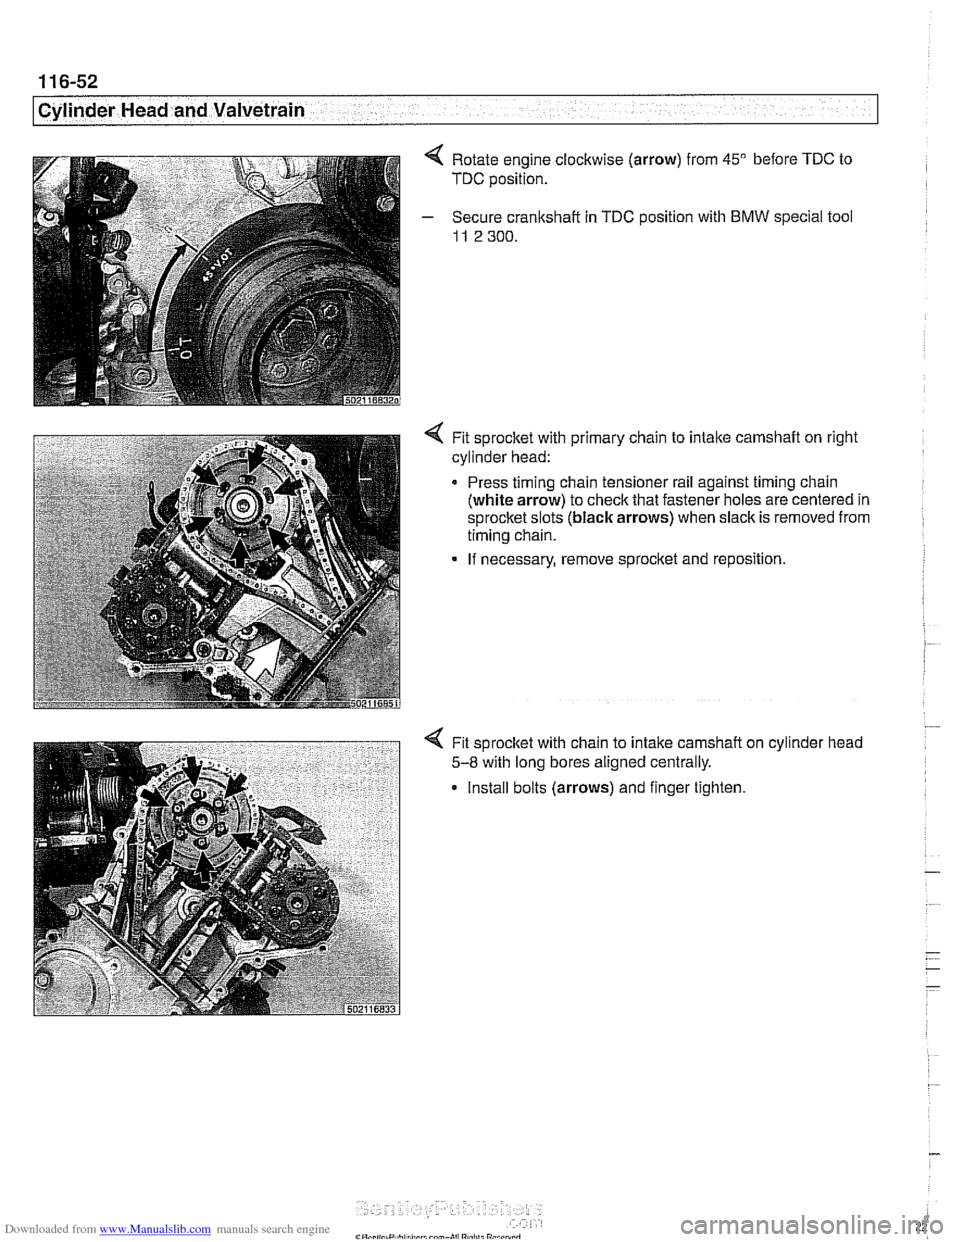
Rotate engine clockwise (arrow) from 45" before TDC to
TDC position.
Secure crankshaft in
TDC position with BMW special tool
11 2 300.
4 Fit sprocket with primary chain to intaite camshaft on right
cylinder head:
Press timing chain tensioner rail against timing chain
(white arrow) to check that fastener holes are centered in
sprocket slots (black arrows) when slack is removed from
timing chain.
If necessary, remove sprocket and reposition.
Fit sprocket with chain to intake camshaft
5-8 with long bores aligned centrally.
Install bolts (arrows) and finger tighten cylinder
head
Page 254 of 1002
Downloaded from www.Manualslib.com manuals search engine
117-18
Camshaft Timing Chain
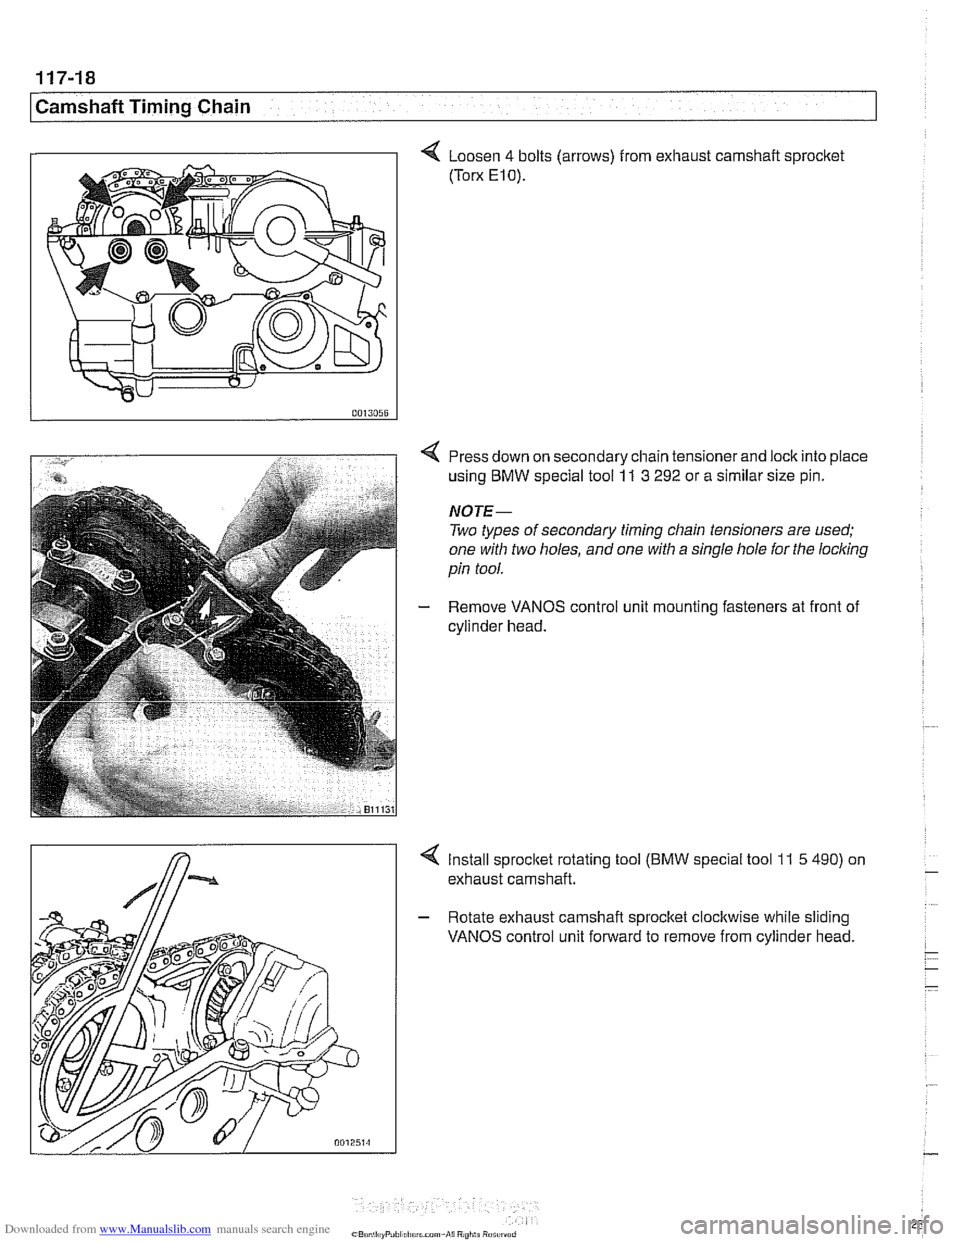
4 Loosen 4 bolts (arrows) from exhaust camshait sprocket
(Torx E10).
Press down on secondary chain tensioner and lock into place
using BMW special tool
11 3 292 or a similar size pin.
NOTE-
Two types of secondary timing chain tensioners are used;
one with two holes, and one with a single hole for the
locl
Remove VANOS control unit mounting fasteners at front of
cylinder head.
4 Install sprocltet rotating tool (BMW special tool 11 5 490) on
exhaust camshaft.
- Rotate exhaust camshaft sprocket clockwise while sliding
VANOS control unit forward to remove from cylinder head.
Page 256 of 1002
Downloaded from www.Manualslib.com manuals search engine
11 7-20
Camshaft Timing Chain
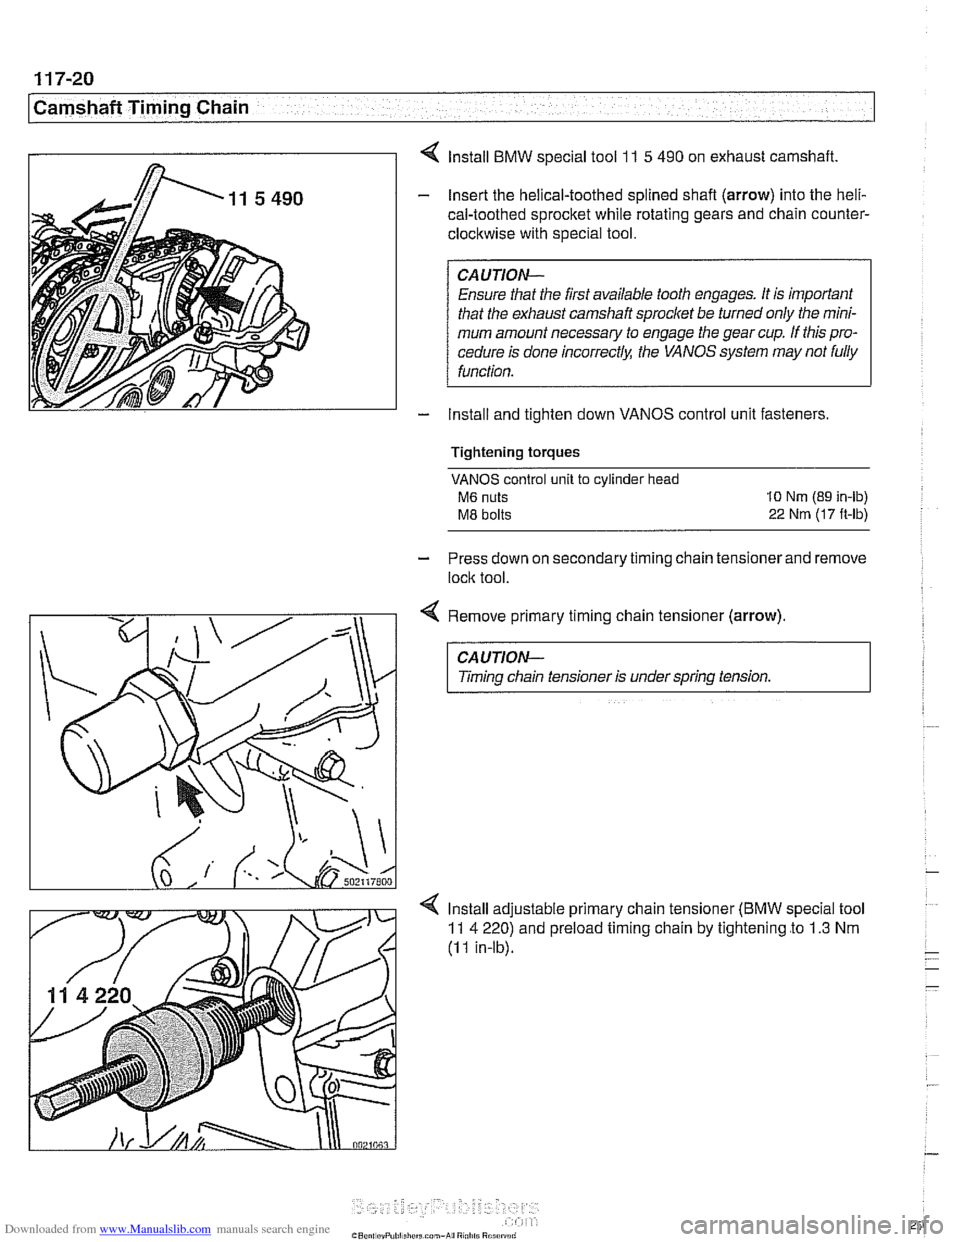
4 lnstall BMW special tool 1 I 5 490 on exhaust camshaft.
- Insert the helical-toothed splined shafl (arrow) into the heli-
cal-toothed sprocket while rotating gears and chain counter-
clockwise with special tool.
CAUTION- Ensure
that the first available tooth engages. It is important
that the exhaust camshaft sprocket be turned only the mini-
mum amount necessary to engage the gear cup. If this pro-
cedure is done
incorrectlq: the VANOS system may not fully
function.
- Install and tighten down VANOS control unit fasteners
Tightening torques
VANOS control unit to cylinder head
M6 nuts 10 Nm (89 in-lb)
M8 bolts 22 Nrn (17 ft-lbj
- Press down on secondary timing chain tensioner and remove
lock tool.
Remove primary timing chain tensioner
(arrow)
CAUTION-
Timing chain tensioner is under spring tension.
lnstall adjustable primary chain tensioner
(BMW special tool
11 4 220) and preload timing chain by tightening to 1.3 Nm
(I I in-lb).
Page 276 of 1002
Downloaded from www.Manualslib.com manuals search engine
. .. ~-
Camshaft Timing Chain -
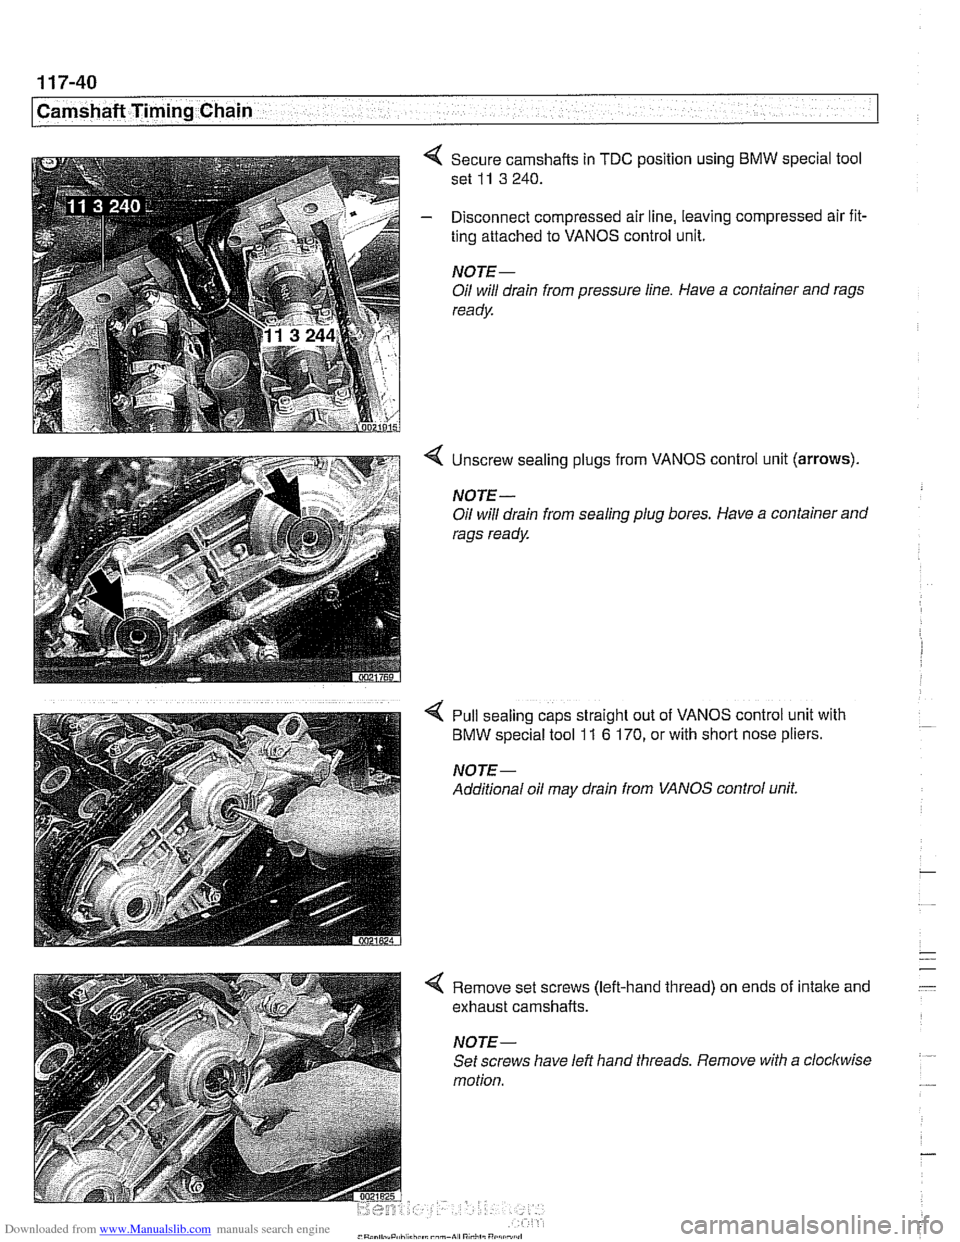
4 Secure camshafts in TDC position using BMW special tool
set
11 3 240.
- Disconnect compressed air line, leaving compressed air fit-
ting attached to VANOS control unit.
NOTE -
Oil will drain from pressure line. Have a container and rags
ready
4 Unscrew sealing plugs from VANOS control unit (arrows).
NOTE-
Oil will drain from sealing plug bores. Have a container and
rags ready
4 Pull sealing caps straight out of VANOS control unit with
BMW special tool 11 6 170, or with short nose pliers.
NOTE-
Additional oil may drain from VANOS control unit.
4 Remove set screws (left-hand thread) on ends of intake and
exhaust camshafts.
NOTE-
Set screws have left hand threads. Remove with a clockwise
motion.
Page 281 of 1002
Downloaded from www.Manualslib.com manuals search engine
Camshaft Timing chain1
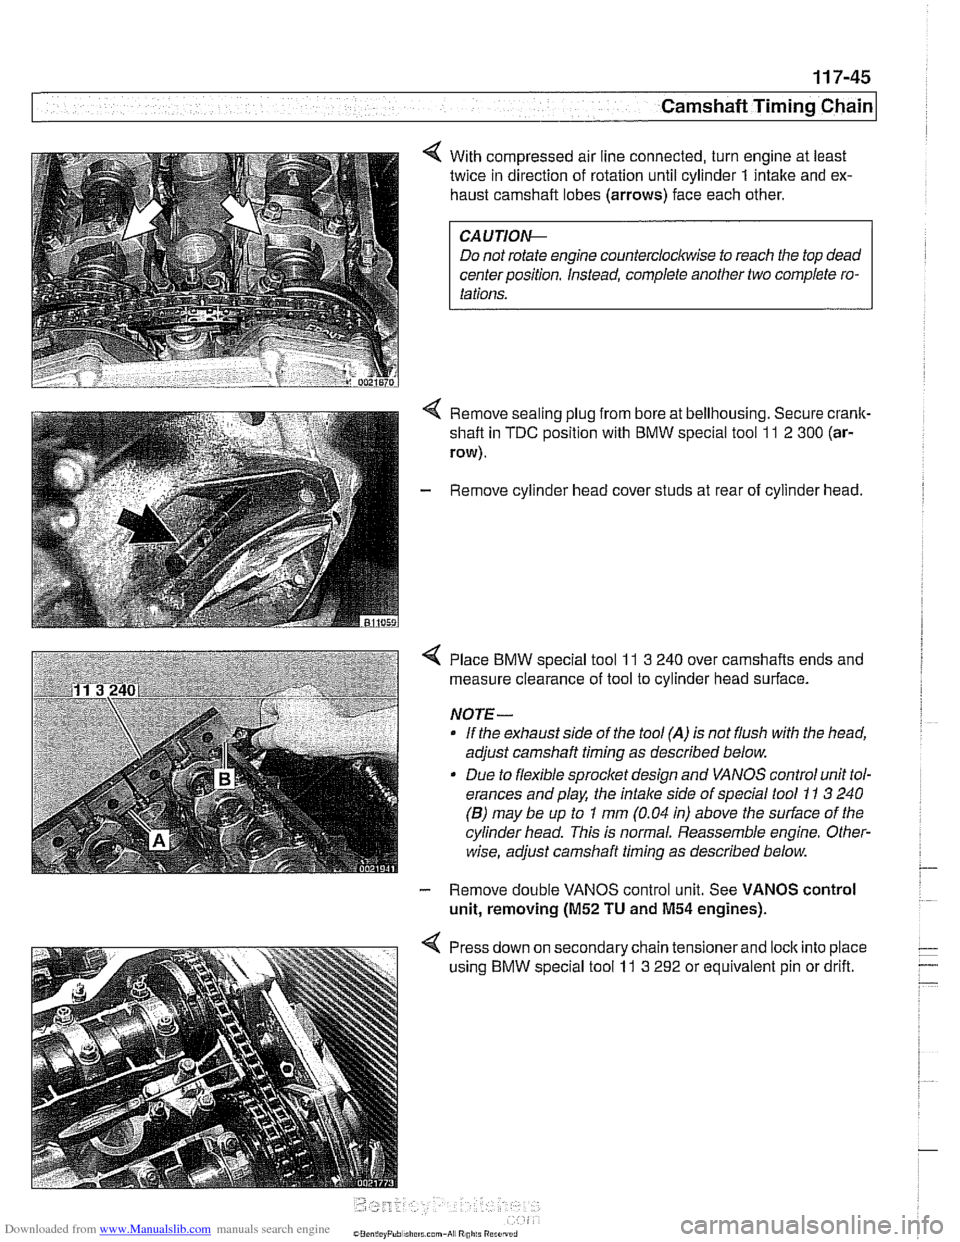
< With compressed air line connected, turn engine at least
twice in direction of rotation until cylinder
1 intake and ex-
haust camshaft lobes (arrows) face each other.
Do not rotate engine counterclockwise to reach the top dead
center position. Instead, complete another two complete ro-
Remove sealing plug from bore at bellhousing. Secure crank-
shaft in
TDC position with BMW special tool 11 2 300 (ar-
row).
- Remove cylinder head cover studs at rear of cylinder head.
< Place BMW special tool 11 3 240 over camshafts ends and
measure clearance of tool to cylinder head surface.
NOTE-
If the exhaust side of the tool (A) is not flush with the head,
adjust camshaft timing as described below.
Due to flexible sprocket design and VANOS control unit tol-
erances and play, the
intake side of special tool 11 3 240
(B) may be up to 1 mm (0.04 in) above the surface of the
cylinder head. This is normal. Reassemble engine. Other-
wise, adjust camshaft timing as described below.
- Remove double VANOS control unit. See VANOS control
unit, removing
(M52 TU and M54 engines).
< Press down on secondary chain tensionerand lock into place
using BMW special tool
11 3 292 or equivalent pin or drift.
Page 317 of 1002
Downloaded from www.Manualslib.com manuals search engine
Camshaft Timing chain1 - -- -
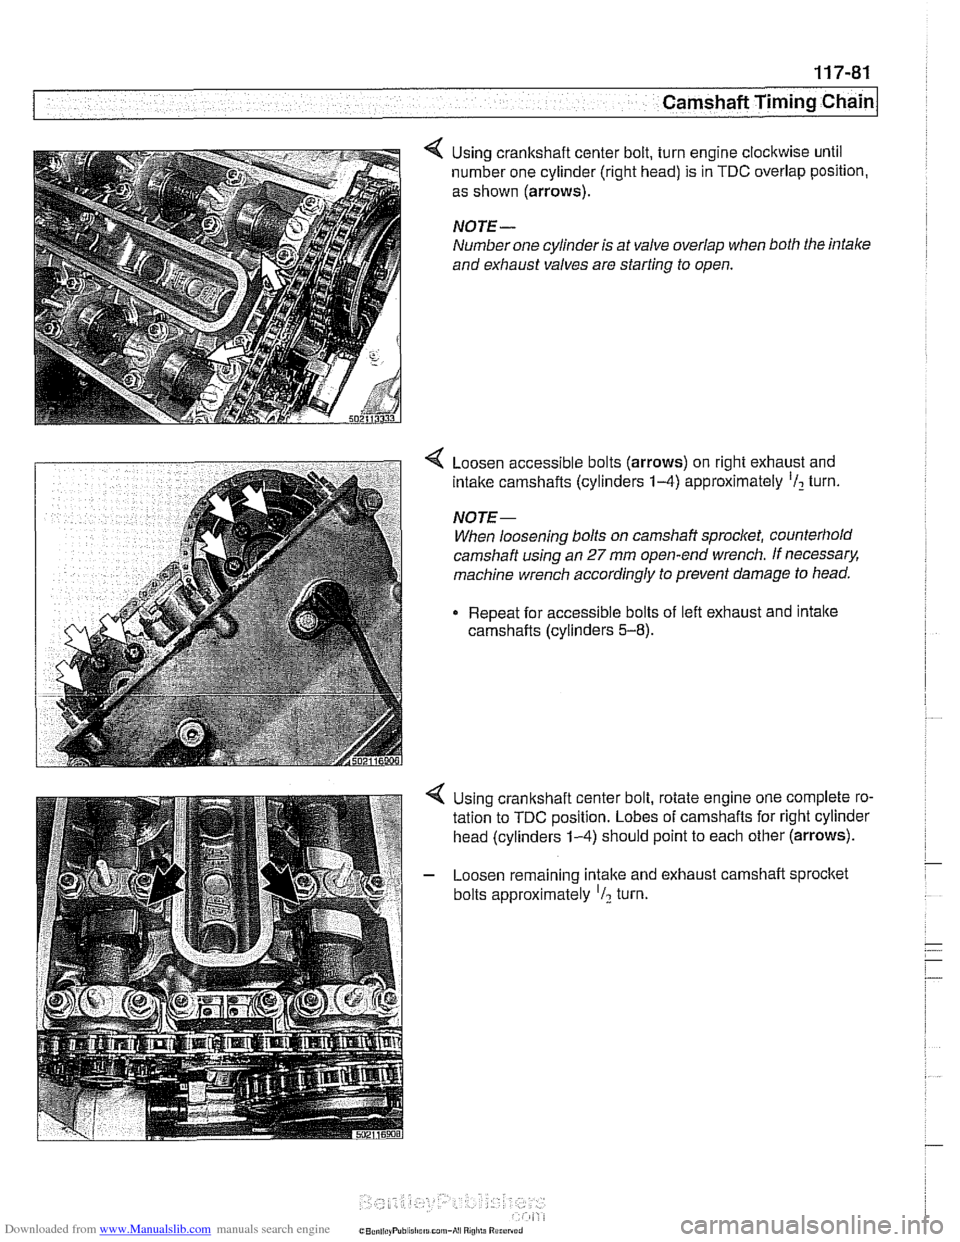
Using crankshaft center bolt, turn engine clockwise until
number one cylinder (right head) is in
TDC overlap position,
as shown
(arrows).
NOTE-
Number one cylinder is at valve overlap when both the intale
and exhaust valves are starting to open.
< Loosen accessible bolts (arrows) on right exhaust and
intake camshafts (cylinders
1-4) approximately 'I2 turn.
NOTE-
When loosening bolts on camshaft sprocket, counterhold
camshaft using an
27 mm open-end wrench. If necessary.
machine wrench accordingly to prevent damage
to head.
Repeat for accessible bolts of left exhaust and intake
camshafts (cylinders
5-8).
Using crankshaft center bolt, rotate engine one complete ro-
tation to
TDC position. Lobes of camshafts for right cylinder
head (cylinders
1-4) should point to each other (arrows).
- Loosen remaining intake and exhaust camshaft sprocltet
bolts approximately
'I2 turn.
Page 319 of 1002
Downloaded from www.Manualslib.com manuals search engine
Camshaft Timing chain/
- Tighten accessible sprocket retaining bolts in the following
order:
Leit exhaust camshaft
Right exhaust
camshait
Leit intake camshaft
Right
intalte camshait
Tightening torque
Sprocket bolts to camshaft flange
15 Nm (1 1 ft-lb)
- Remove BMW special tool 11 2 300 from tool bore at bell-
housing and remove
camshaft loclting tools from cylinder
heads.
Using crankshaft center bolt, turn engine over clockwise at
least one
comolete rotation so that remainino camshaft
sprocltet
retaking bolts are accessible. -
- Tighten remaining camshait sprocket retaining bolts
Tightening torque Sprocket bolts to camshaft
flange 15 Nm (I 1 It-lb)
- Remove BMW special tool 11 3 390 from primary timing
chain tensioner bore and reinstall primary chain tensioner
- Remainder of installation is reverse or removal, noting the fol-
lowing:
Remove gasket residue from cylinder head sealing sur-
face.
Apply a thin bead of Three Bond 1209
O sealing com-
pound to joints at cylinder head cover and timing case cov-
er and at half-moon sections at rear of cylinder heads.
Replace cylinder head cover
gaskets if necessary.
Page 342 of 1002
Downloaded from www.Manualslib.com manuals search engine
/Lubrication System
Oil pump, removing and installing
(&cylinder)
Oil pump assembly
(6-cylinder from 9/98)
CAUTIOI\C
Oil pump sproclcet nut has left-hand threads. Turn clockwise
to loosen.
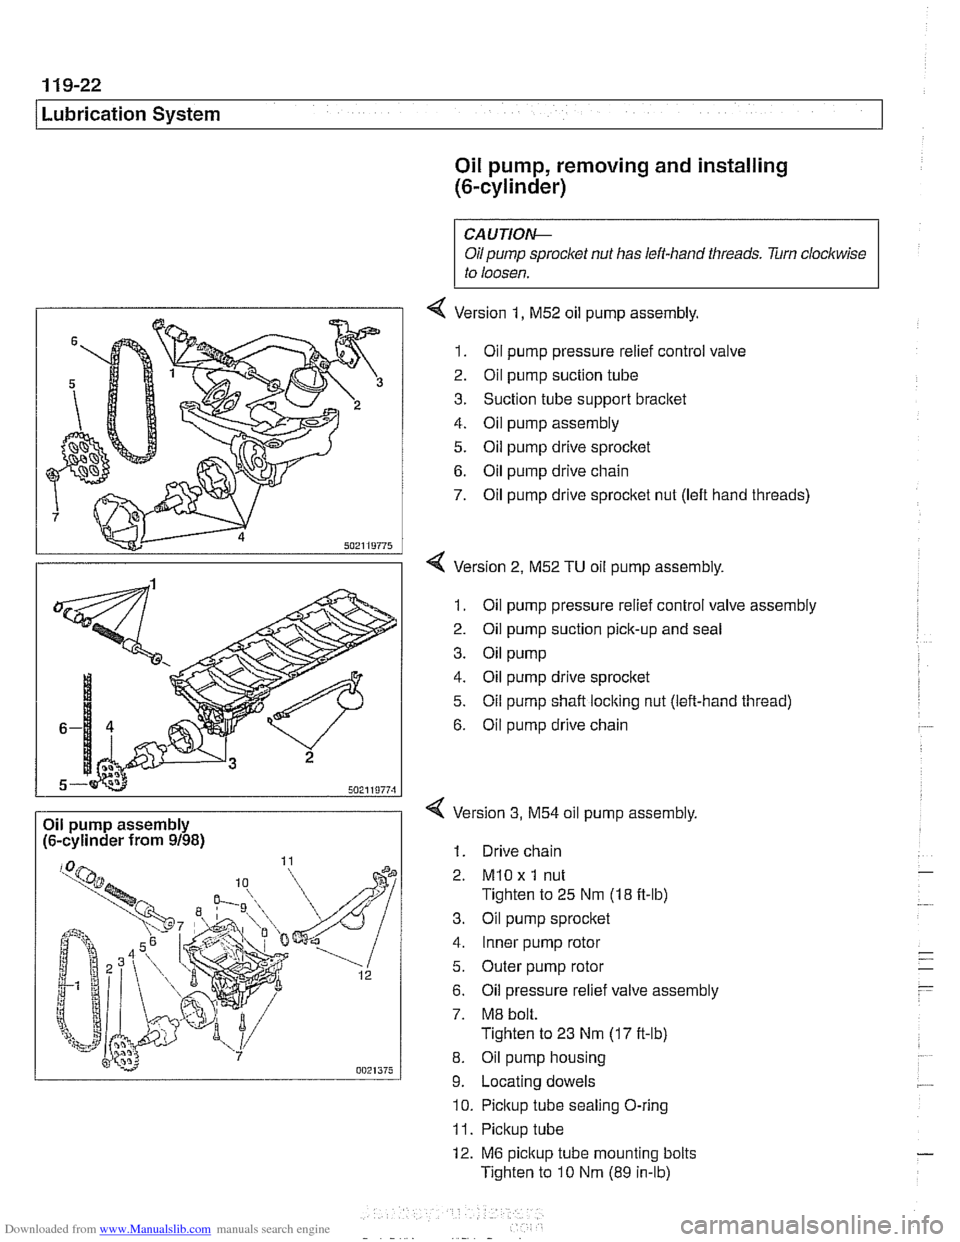
4 Version 1, M52 oil pump assembly.
1. Oil pump pressure relief control valve
2. Oil pump suction tube
3. Suction tube support bracket
4. Oil pump assembly
5. Oil pump drive sprocltet
6. Oil pump drive chain
7. Oil pump drive sprocket nut (left hand threads)
4 Version 2, M52 TU oil pump assembly.
1. Oil pump pressure relief control valve assembly
2. Oil pump suction pick-up and seal
3. Oil pump
4. Oil pump drive sprocket
5. Oil pump shaft locking nut (left-hand thread)
6. Oil pump drive chain
Version
3, M54 oil pump assembly,
1. Drive chain
2.
MlO x 1 nut
Tighten to 25 Nm (18 ft-lb)
3. Oil pump sprocket
4. Inner pump rotor
5. Outer pump rotor
6. Oil pressure relief valve assembly
7. M8 bolt.
Tighten to 23 Nm
(17 it-lb)
8. Oil pump housing
9. Locating dowels
10. Pickup tube sealing O-ring
11. Pickup tube
12. M6 pickup tube mounting bolts
Tighten to
10 Nm (89 in-lb)