lock BMW 525XI 2006 Service Manual
[x] Cancel search | Manufacturer: BMW, Model Year: 2006, Model line: 525XI, Model: BMW 525XI 2006Pages: 248, PDF Size: 8.58 MB
Page 183 of 248
TeleService, BMW Assist
182
Adapting TeleService or
BMW Assist
Displaying and updating services
If the offering from TeleService or BMW Assist
changes, you will be notified. In this case you
should update the services.
1.Open the start menu.
2.Press the controller to open the menu.
3.Select "Communication settings" and
press the controller.
4.Select "BMW Service settings" and press
the controller.
5.Select "Service Status" and press the con-
troller.
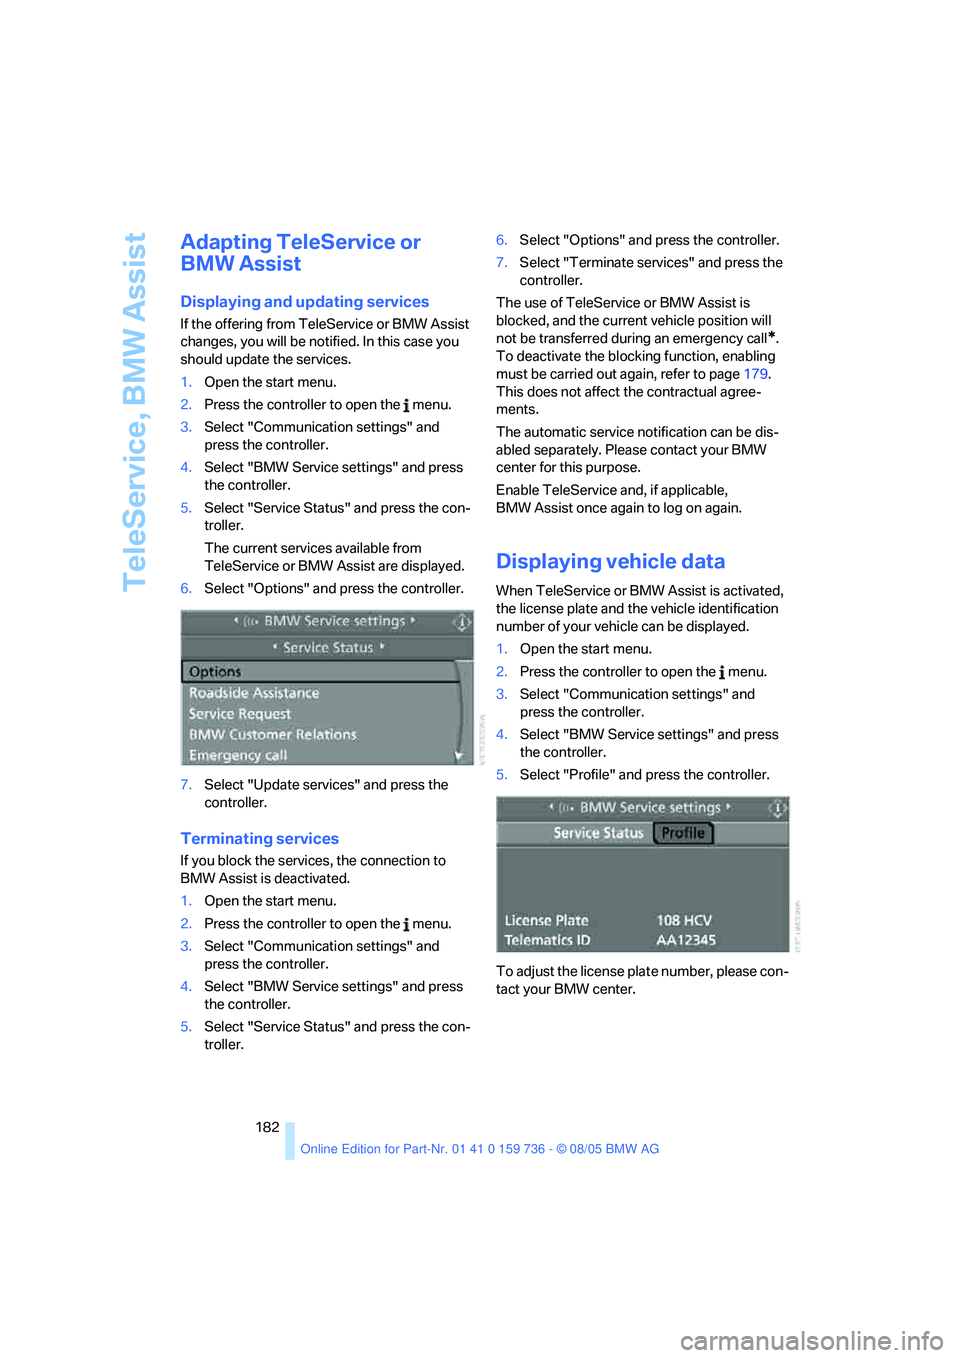
The current services available from
TeleService or BMW Assist are displayed.
6.Select "Options" and press the controller.
7.Select "Update services" and press the
controller.
Terminating services
If you block the services, the connection to
BMW Assist is deactivated.
1.Open the start menu.
2.Press the controller to open the menu.
3.Select "Communication settings" and
press the controller.
4.Select "BMW Service settings" and press
the controller.
5.Select "Service Status" and press the con-
troller.6.Select "Options" and press the controller.
7.Select "Terminate services" and press the
controller.
The use of TeleService or BMW Assist is
blocked, and the current vehicle position will
not be transferred during an emergency call
*.
To deactivate the blocking function, enabling
must be carried out again, refer to page179.
This does not affect the contractual agree-
ments.
The automatic service notification can be dis-
abled separately. Please contact your BMW
center for this purpose.
Enable TeleService and, if applicable,
BMW Assist once again to log on again.
Displaying vehicle data
When TeleService or BMW Assist is activated,
the license plate and the vehicle identification
number of your vehicle can be displayed.
1.Open the start menu.
2.Press the controller to open the menu.
3.Select "Communication settings" and
press the controller.
4.Select "BMW Service settings" and press
the controller.
5.Select "Profile" and press the controller.
To adjust the license plate number, please con-
tact your BMW center.
Page 187 of 248
Refueling
186
Refueling
Always switch off the engine before refu-
eling, otherwise no fuel can be filled into
the tank and a message is displayed.<
When handling fuel, always observe all
applicable precautionary measures and
regulations. Never transport reserve fuel con-
tainers in the vehicle. These could become
leaky and cause an explosion or a fire in an acci-
dent.<
Fuel filler door
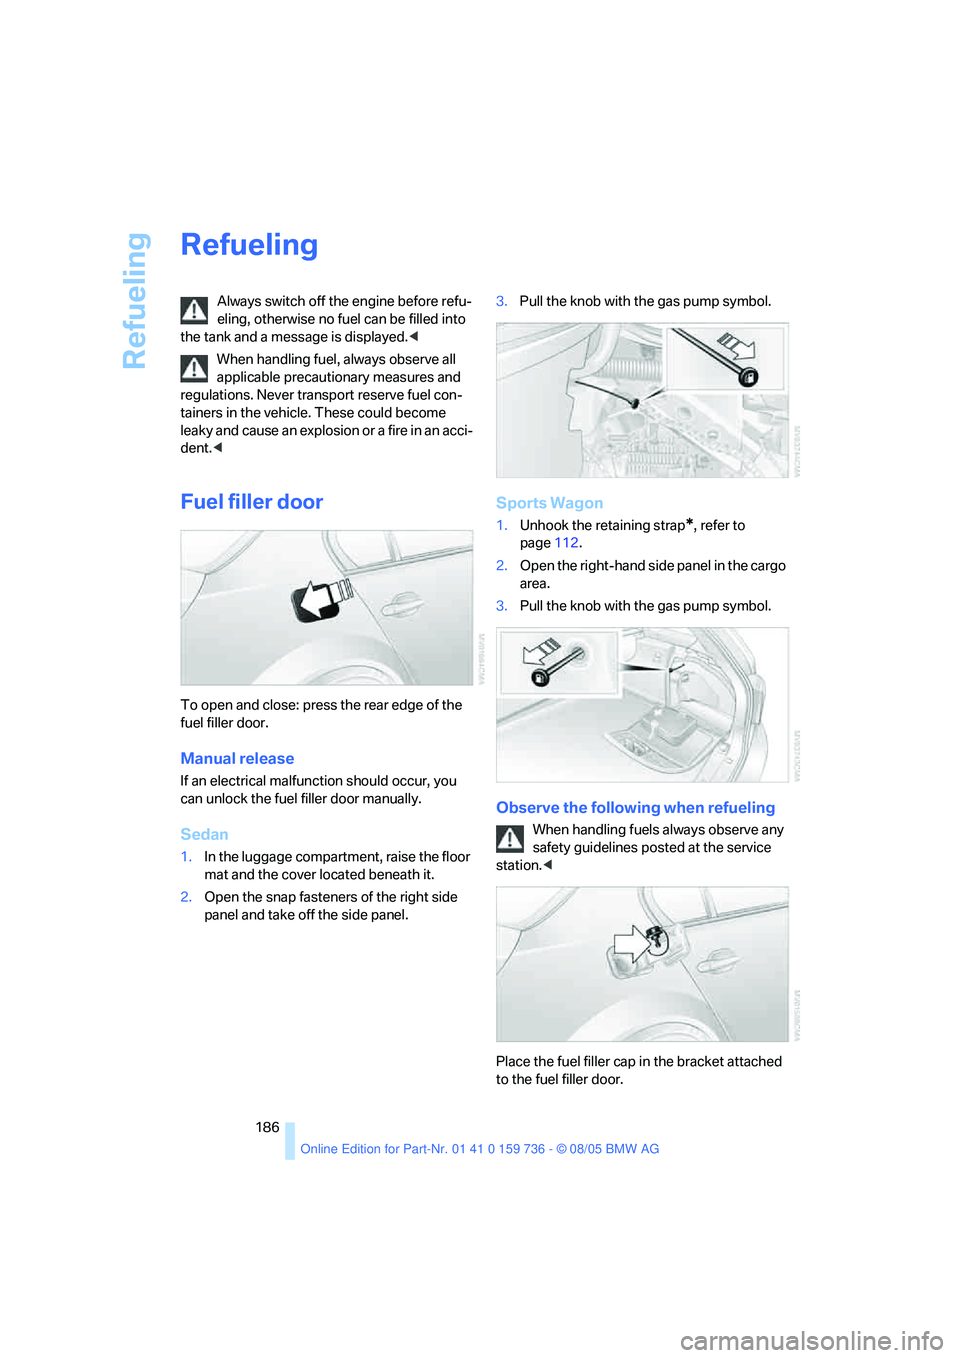
To open and close: press the rear edge of the
fuel filler door.
Manual release
If an electrical malfunction should occur, you
can unlock the fuel filler door manually.
Sedan
1.In the luggage compartment, raise the floor
mat and the cover located beneath it.
2.Open the snap fasteners of the right side
panel and take off the side panel.3.Pull the knob with the gas pump symbol.
Sports Wagon
1.Unhook the retaining strap*, refer to
page112.
2.Open the right-hand side panel in the cargo
area.
3.Pull the knob with the gas pump symbol.
Observe the following when refueling
When handling fuels always observe any
safety guidelines posted at the service
station.<
Place the fuel filler cap in the bracket attached
to the fuel filler door.
Page 188 of 248
Mobility
187Reference
At a glance
Controls
Driving tips
Communications
Navigation
Entertainment
When refueling, insert the filler nozzle com-
pletely into the filler pipe. Lifting the filler nozzle
during refueling leads to
>premature pump shutoff
>a reduced efficiency of the fuel-vapor
recovery system.
The fuel tank is full when the filler nozzle clicks
off the first time.
Fuel tank capacity
Approx. 18.5 gallons/70 liters, including the
reserve capacity of approx. 2.1 gallons/8 liters.
Refuel as soon as possible once your
cruising range falls below 30 miles/
50 km, otherwise engine functions are not
ensured and damage can occur.<
Fuel filler cap
Closing
Fit the cap and turn it clockwise until you clearly
hear a click.
Do not jam the strap attached to the fuel
filler cap between the fuel filler cap and
the vehicle. A message is displayed if the cap is
loose or missing.<
Fuel specifications
Do not use leaded gasoline, otherwise
permanent damage to the catalytic con-
verter will result.<
Required fuel
Premium Unleaded Gasoline
The minimum Octane Rating is 91.
If you use gasoline with this minimum Octane
Rating, the engine may produce knocking
sounds when starting at high outside tempera-
tures. This has no affect on the engine life.
Minimum octane rating corresponds to the Anti
Knock Index AKI and is determined according
to the so-called (R+M)/2 method.
Use high-quality brands
Field experience has indicated significant dif-
ferences in fuel quality: volatility, composition,
additives, etc., among gasolines offered for sale
in the United States and Canada. Fuels contain-
ing up to and including 10 % ethanol or other
oxygenates with up to 2.8 % oxygen by weight,
that is, 15 % MTBE or 3 % methanol plus an
equivalent amount of co-solvent, will not void
the applicable warranties with respect to
defects in materials or workmanship.
The use of poor-quality fuels may result in
drivability, starting and stalling problems
especially under certain environmental condi-
tions such as high ambient temperature and
high altitude.
Should you encounter drivability problems
which you suspect could be related to the fuel
you are using, we recommend that you respond
by switching to a recognized high-quality
brand.
Failure to comply with these recommendations
may also result in unscheduled maintenance.<
Page 200 of 248
Mobility
199Reference
At a glance
Controls
Driving tips
Communications
Navigation
Entertainment
Your BMW center will be happy to answer
detailed questions on BMW High Perfor-
mance Synthetic Oil or approved synthetic
oils.<
You can also call BMW of North America at
1-800-831-1117 or visit the website at
www.bmwusa.com to obtain this information.
Viscosity grades
Viscosity is a measure of an oil's flow rating and
is specified in SAE grades.
The choice of the right SAE grade is based on
the climatic conditions in the region in which
you normally drive your BMW.
Approved oils belong to the SAE grades
5W-40 and 5W-30.<
These oils can be used for driving at all outside
temperatures.
Coolant
Do not add coolant to the cooling system
when the engine is hot. Escaping coolant
can cause burns.<
Coolant is comprised of water and coolant addi-
tive. Not all commercially available additives are
suitable for your BMW. Ask your BMW center
for suitable additives.
Only use suitable additives, otherwise
engine damage may result. The additives
present a health hazard; observe the instruc-
tions on the containers.<
Comply with the appropriate environ-
mental protection regulations when dis-
posing of coolant additives.<
Checking coolant level
1.The engine must be at ambient tempera-
ture.
2.Turn the cap of the expansion tank counter-
clockwise to allow any accumulated pres-
sure to escape, then continue turning to
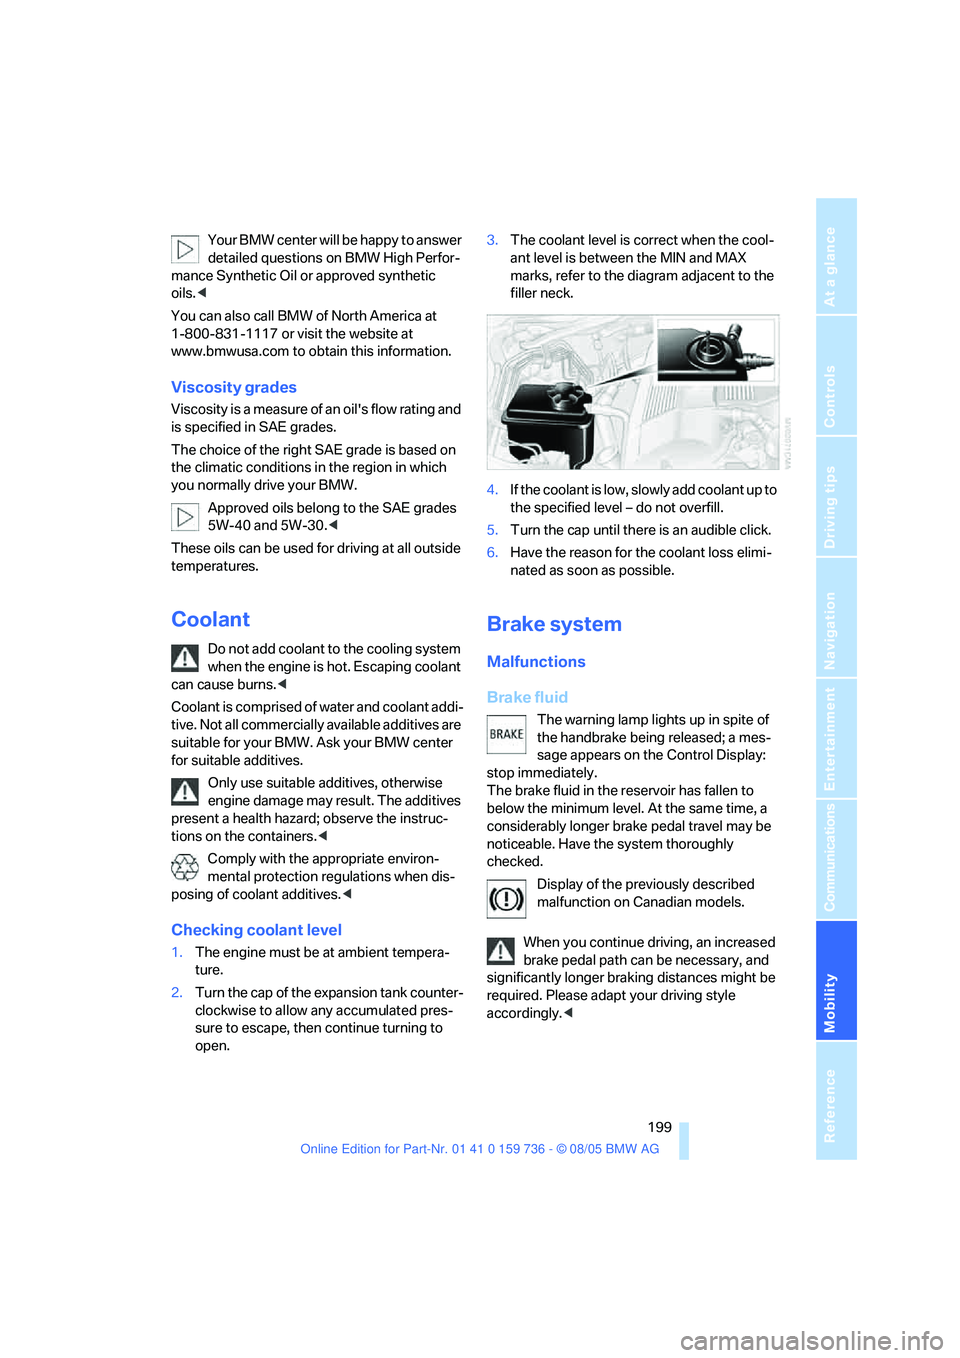
open.3.The coolant level is correct when the cool-
ant level is between the MIN and MAX
marks, refer to the diagram adjacent to the
filler neck.
4.If the coolant is low, slowly add coolant up to
the specified level – do not overfill.
5.Turn the cap until there is an audible click.
6.Have the reason for the coolant loss elimi-
nated as soon as possible.
Brake system
Malfunctions
Brake fluid
The warning lamp lights up in spite of
the handbrake being released; a mes-
sage appears on the Control Display:
stop immediately.
The brake fluid in the reservoir has fallen to
below the minimum level. At the same time, a
considerably longer brake pedal travel may be
noticeable. Have the system thoroughly
checked.
Display of the previously described
malfunction on Canadian models.
When you continue driving, an increased
brake pedal path can be necessary, and
significantly longer braking distances might be
required. Please adapt your driving style
accordingly.<
Page 208 of 248
Mobility
207Reference
At a glance
Controls
Driving tips
Communications
Navigation
Entertainment
Changing wheels
Safety precautions in the event of a flat
tire or wheel change: park the vehicle as
far as possible from passing traffic and on solid
ground. Switch on the hazard warning flashers.
Lock the steering wheel in straight-ahead set-
ting of the wheels. Apply the handbrake and
engage first gear, reverse gear or selector lever
position P.
Have all vehicle occupants get out of the vehicle
and ensure that they remain outside the imme-
diate area in a safe place, such as behind a
guardrail.
If a warning triangle
* or portable hazard warning
lamp is required, set it up on the roadside at an
appropriate distance from the rear of the vehi-
cle. Comply with all safety guidelines and regu-
lations.
Change the wheel only on a level, firm surface
which is not slippery. The vehicle or the jack
could slip to the side if you attempt to raise the
vehicle on a soft or slippery surface such as
snow, ice, tiles, etc.
Position the jack on a firm support surface.
Do not use a wooden block or similar object as a
support base for the jack, as this would prevent
it from extending to its full support height and
reduce its load-carrying capacity.
To avoid serious or fatal injury: never lie under
the vehicle, and never start the engine while it is
supported by the jack.<
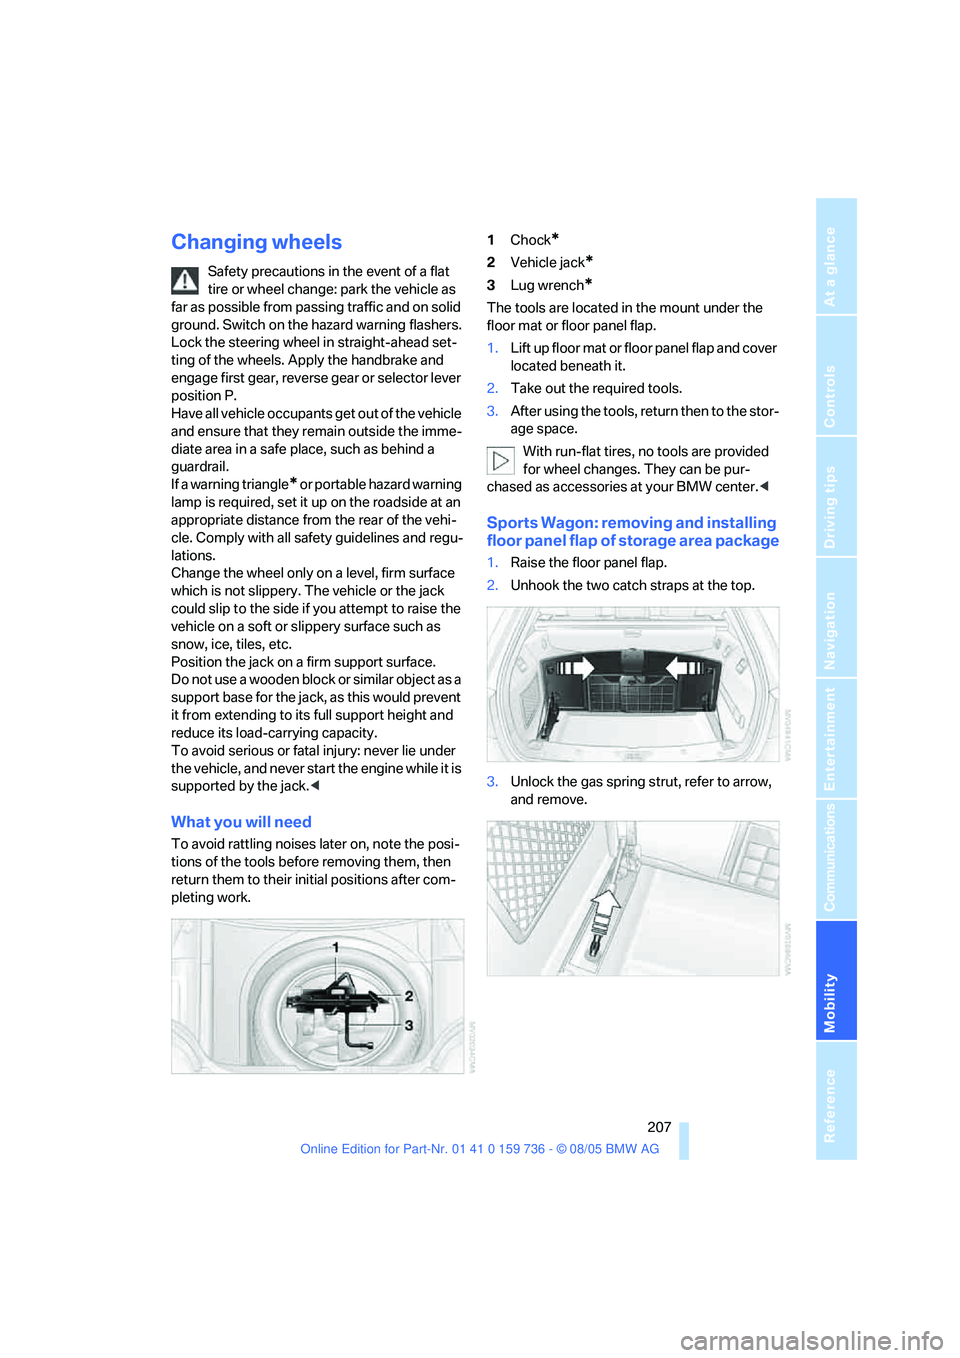
What you will need
To avoid rattling noises later on, note the posi-
tions of the tools before removing them, then
return them to their initial positions after com-
pleting work.1Chock
*
2Vehicle jack*
3Lug wrench*
The tools are located in the mount under the
floor mat or floor panel flap.
1.Lift up floor mat or floor panel flap and cover
located beneath it.
2.Take out the required tools.
3.After using the tools, return then to the stor-
age space.
With run-flat tires, no tools are provided
for wheel changes. They can be pur-
chased as accessories at your BMW center.<
Sports Wagon: removing and installing
floor panel flap of storage area package
1.Raise the floor panel flap.
2.Unhook the two catch straps at the top.
3.Unlock the gas spring strut, refer to arrow,
and remove.
Page 213 of 248
Giving and receiving assistance
212
Sports Wagon
Release the two quick-release fasteners and
fold down the trim piece.
First-aid kit*
Some of the articles contained in the first-aid kit
have a limited service life. Therefore, check the
expiration dates of the contents regularly and
replace the contents concerned in good time if
necessary.
Sedan
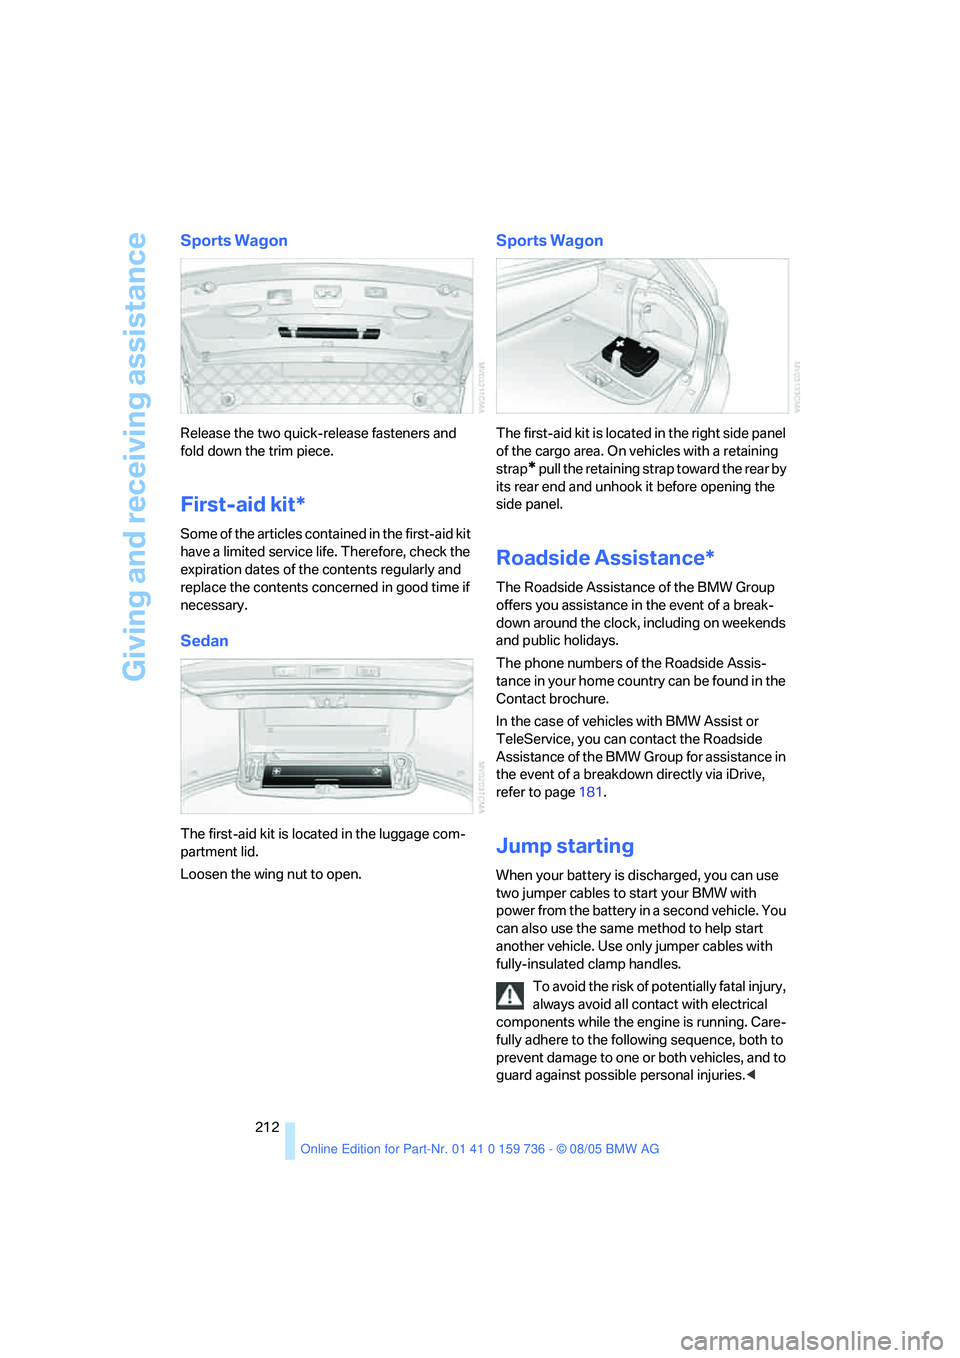
The first-aid kit is located in the luggage com-
partment lid.
Loosen the wing nut to open.
Sports Wagon
The first-aid kit is located in the right side panel
of the cargo area. On vehicles with a retaining
strap
* pull the retaining strap toward the rear by
its rear end and unhook it before opening the
side panel.
Roadside Assistance*
The Roadside Assistance of the BMW Group
offers you assistance in the event of a break-
down around the clock, including on weekends
and public holidays.
The phone numbers of the Roadside Assis-
tance in your home country can be found in the
Contact brochure.
In the case of vehicles with BMW Assist or
TeleService, you can contact the Roadside
Assistance of the BMW Group for assistance in
the event of a breakdown directly via iDrive,
refer to page181.
Jump starting
When your battery is discharged, you can use
two jumper cables to start your BMW with
power from the battery in a second vehicle. You
can also use the same method to help start
another vehicle. Use only jumper cables with
fully-insulated clamp handles.
To avoid the risk of potentially fatal injury,
always avoid all contact with electrical
components while the engine is running. Care-
fully adhere to the following sequence, both to
prevent damage to one or both vehicles, and to
guard against possible personal injuries.<
Page 215 of 248
Giving and receiving assistance
214 Sedan:
It is located in the toolkit in the luggage com-
partment lid, refer to page203.
Sports Wagon:
It is located in the toolkit behind the left side
panel in the cargo area, refer to page203.
Use only the tow fitting provided with the
vehicle and screw it all the way in. Use the
tow fitting for towing only on roads. Avoid lateral
loading of the tow fitting, e.g. do not lift the vehi-
cle by the tow fitting. Otherwise damage to the
tow fitting and the vehicle can occur.<
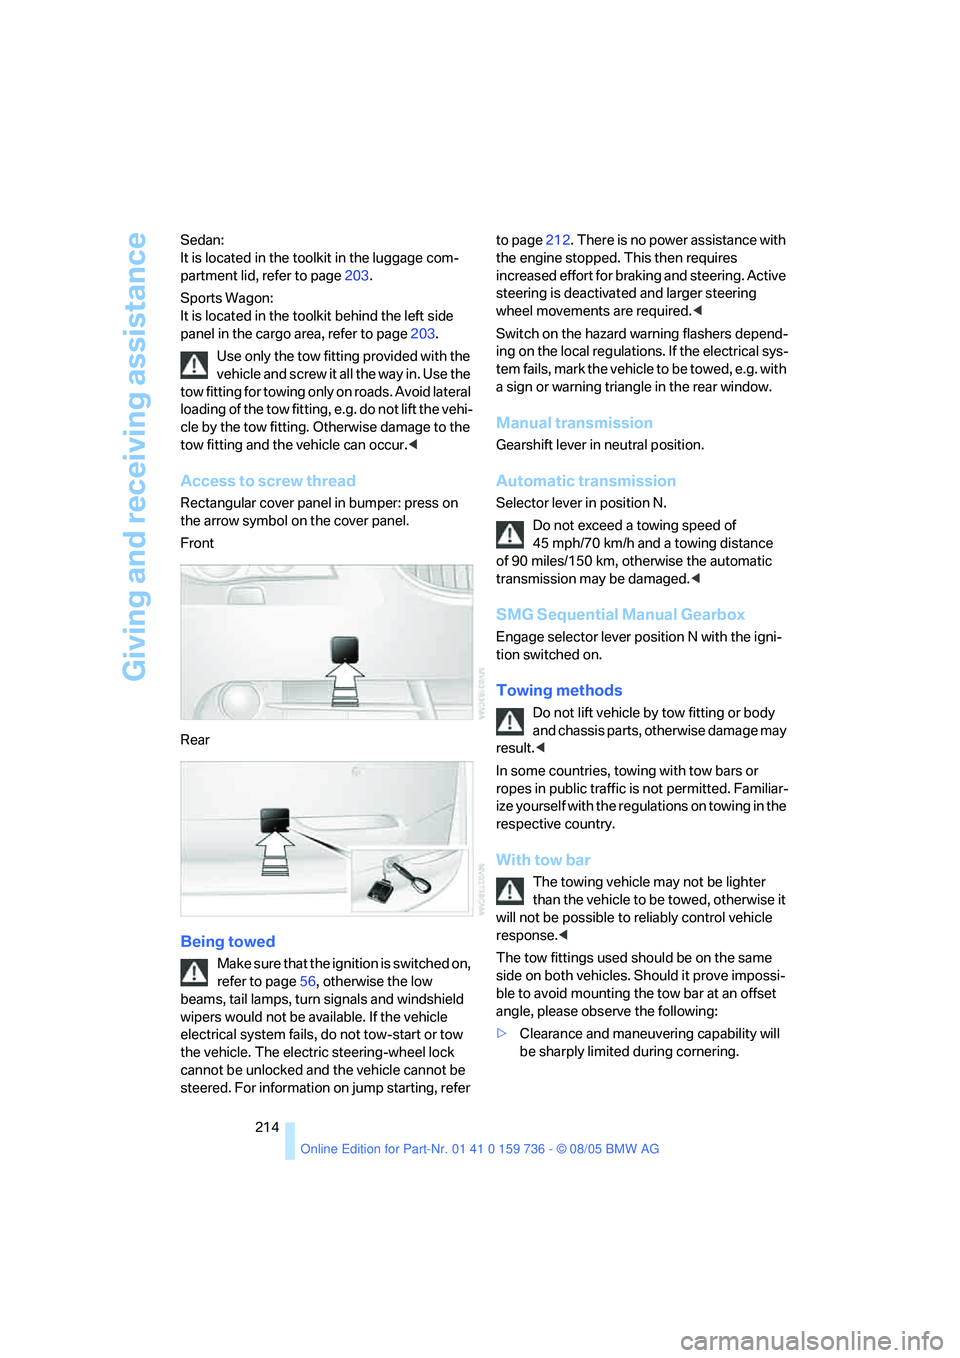
Access to screw thread
Rectangular cover panel in bumper: press on
the arrow symbol on the cover panel.
Front
Rear
Being towed
Make sure that the ignition is switched on,
refer to page56, otherwise the low
beams, tail lamps, turn signals and windshield
wipers would not be available. If the vehicle
electrical system fails, do not tow-start or tow
the vehicle. The electric steering-wheel lock
cannot be unlocked and the vehicle cannot be
steered. For information on jump starting, refer to page212. There is no power assistance with
the engine stopped. This then requires
increased effort for braking and steering. Active
steering is deactivated and larger steering
wheel movements are required.<
Switch on the hazard warning flashers depend-
ing on the local regulations. If the electrical sys-
tem fails, mark the vehicle to be towed, e.g. with
a sign or warning triangle in the rear window.
Manual transmission
Gearshift lever in neutral position.
Automatic transmission
Selector lever in position N.
Do not exceed a towing speed of
45 mph/70 km/h and a towing distance
of 90 miles/150 km, otherwise the automatic
transmission may be damaged.<
SMG Sequential Manual Gearbox
Engage selector lever position N with the igni-
tion switched on.
Towing methods
Do not lift vehicle by tow fitting or body
and chassis parts, otherwise damage may
result.<
In some countries, towing with tow bars or
ropes in public traffic is not permitted. Familiar-
ize yourself with the regulations on towing in the
respective country.
With tow bar
The towing vehicle may not be lighter
than the vehicle to be towed, otherwise it
will not be possible to reliably control vehicle
response.<
The tow fittings used should be on the same
side on both vehicles. Should it prove impossi-
ble to avoid mounting the tow bar at an offset
angle, please observe the following:
>Clearance and maneuvering capability will
be sharply limited during cornering.
Page 216 of 248
Mobility
215Reference
At a glance
Controls
Driving tips
Communications
Navigation
Entertainment
>When mounted at an angle, the tow bar will
exert lateral forces, tending to push the
vehicle sideways.
Only attach the tow bar to the tow fittings,
as attachment to other vehicle parts can
lead to damage.<
With tow rope
When starting off in the towing vehicle, make
sure that the tow rope is taut.
To avoid jerking and the associated
stresses on vehicle components when
towing, always use nylon ropes or nylon straps.
Only attach tow ropes to the tow fittings, as
attachment to other vehicle parts can lead to
damage.<
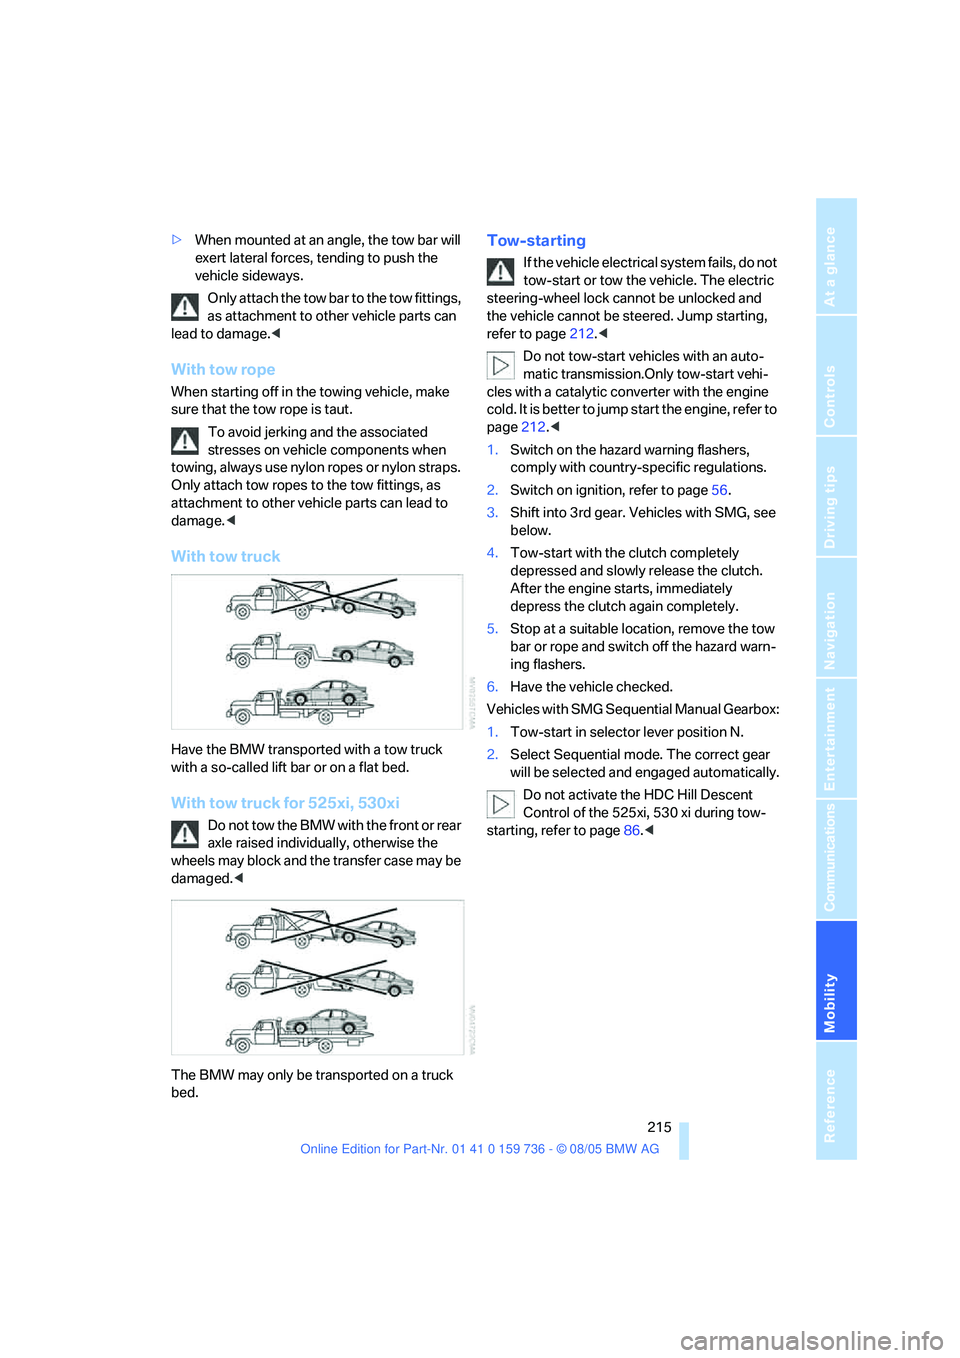
With tow truck
Have the BMW transported with a tow truck
with a so-called lift bar or on a flat bed.
With tow truck for 525xi, 530xi
Do not tow the BMW with the front or rear
axle raised individually, otherwise the
wheels may block and the transfer case may be
damaged.<
The BMW may only be transported on a truck
bed.
Tow-starting
If the vehicle electrical system fails, do not
tow-start or tow the vehicle. The electric
steering-wheel lock cannot be unlocked and
the vehicle cannot be steered. Jump starting,
refer to page212.<
Do not tow-start vehicles with an auto-
matic transmission.Only tow-start vehi-
cles with a catalytic converter with the engine
cold. It is better to jump start the engine, refer to
page212.<
1.Switch on the hazard warning flashers,
comply with country-specific regulations.
2.Switch on ignition, refer to page56.
3.Shift into 3rd gear. Vehicles with SMG, see
below.
4.Tow-start with the clutch completely
depressed and slowly release the clutch.
After the engine starts, immediately
depress the clutch again completely.
5.Stop at a suitable location, remove the tow
bar or rope and switch off the hazard warn-
ing flashers.
6.Have the vehicle checked.
Vehicles with SMG Sequential Manual Gearbox:
1.Tow-start in selector lever position N.
2.Select Sequential mode. The correct gear
will be selected and engaged automatically.
Do not activate the HDC Hill Descent
Control of the 525xi, 530 xi during tow-
starting, refer to page86.<
Page 227 of 248
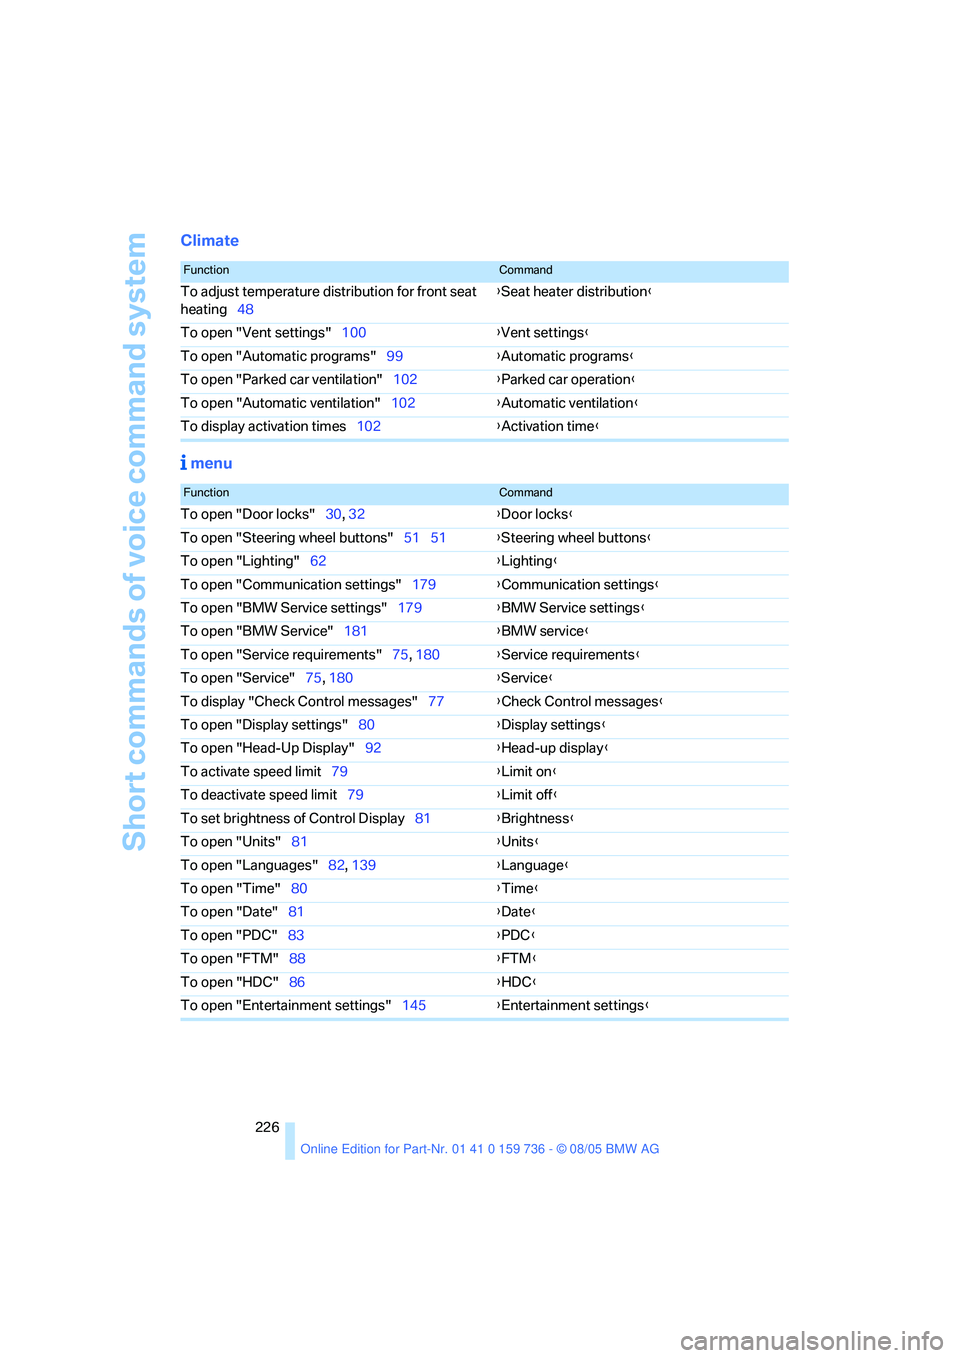
Short commands of voice command system
226
Climate
menu
FunctionCommand
To adjust temperature distribution for front seat
heating48{Seat heater distribution}
To open "Vent settings"100{Vent settings}
To open "Automatic programs"99{Automatic programs}
To open "Parked car ventilation"102{Parked car operation}
To open "Automatic ventilation"102{Automatic ventilation}
To display activation times102{Activation time}
FunctionCommand
To open "Door locks"30, 32{Door locks}
To open "Steering wheel buttons"51 51{Steering wheel buttons}
To open "Lighting"62{Lighting}
To open "Communication settings"179{Communication settings}
To open "BMW Service settings"179{BMW Service settings}
To open "BMW Service"181{BMW service}
To open "Service requirements"75, 180{Service requirements}
To open "Service"75, 180{Service}
To display "Check Control messages"77{Check Control messages}
To open "Display settings"80{Display settings}
To open "Head-Up Display"92{Head-up display}
To activate speed limit79{Limit on}
To deactivate speed limit79{Limit off}
To set brightness of Control Display81{Brightness}
To open "Units"81{Units}
To open "Languages"82, 139{Language}
To open "Time"80{Time}
To open "Date"81{Date}
To open "PDC"83{
PDC}
To open "FTM"88{FTM}
To open "HDC"86{HDC}
To open "Entertainment settings"145{Entertainment settings}
Page 228 of 248
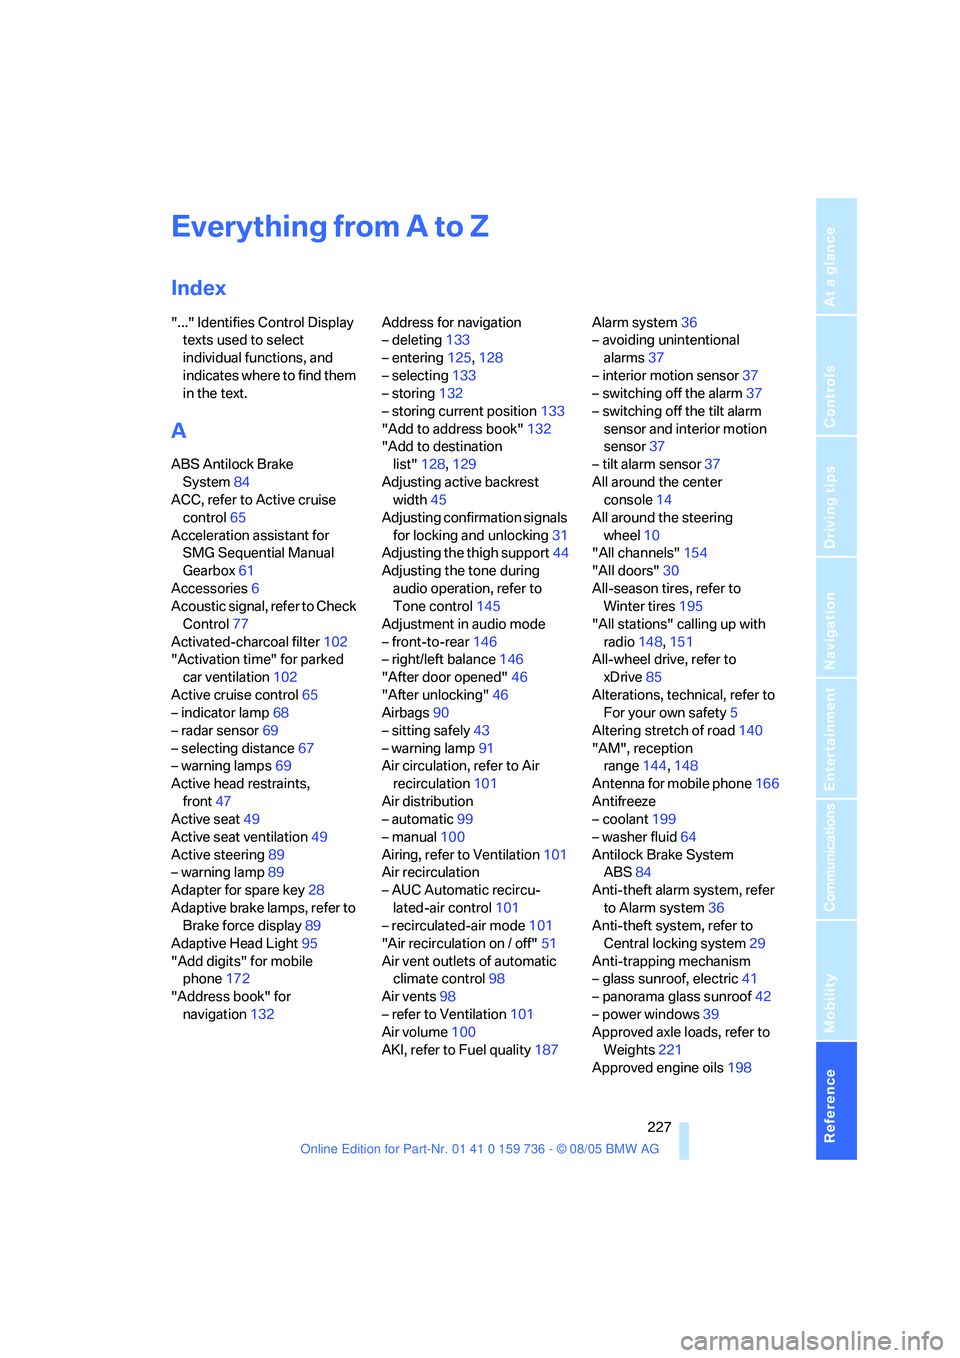
227Reference
At a glance
Controls
Driving tips
Communications
Navigation
Entertainment
Mobility
Everything from A to Z
Index
"..." Identifies Control Display
texts used to select
individual functions, and
indicates where to find them
in the text.
A
ABS Antilock Brake
System84
ACC, refer to Active cruise
control65
Acceleration assistant for
SMG Sequential Manual
Gearbox61
Accessories6
Acoustic signal, refer to Check
Control77
Activated-charcoal filter102
"Activation time" for parked
car ventilation102
Active cruise control65
– indicator lamp68
– radar sensor69
– selecting distance67
– warning lamps69
Active head restraints,
front47
Active seat49
Active seat ventilation49
Active steering89
– warning lamp89
Adapter for spare key28
Adaptive brake lamps, refer to
Brake force display89
Adaptive Head Light95
"Add digits" for mobile
phone172
"Address book" for
navigation132Address for navigation
– deleting133
– entering125,128
– selecting133
– storing132
– storing current position133
"Add to address book"132
"Add to destination
list"128,129
Adjusting active backrest
width45
Adjusting confirmation signals
for locking and unlocking31
Adjusting the thigh support44
Adjusting the tone during
audio operation, refer to
Tone control145
Adjustment in audio mode
– front-to-rear146
– right/left balance146
"After door opened"46
"After unlocking"46
Airbags90
– sitting safely43
– warning lamp91
Air circulation, refer to Air
recirculation101
Air distribution
– automatic99
– manual100
Airing, refer to Ventilation101
Air recirculation
– AUC Automatic recircu-
lated-air control101
– recirculated-air mode101
"Air recirculation on / off"51
Air vent outlets of automatic
climate control98
Air vents98
– refer to Ventilation101
Air volume100
AKI, refer to Fuel quality187Alarm system36
– avoiding unintentional
alarms37
– interior motion sensor37
– switching off the alarm37
– switching off the tilt alarm
sensor and interior motion
sensor37
– tilt alarm sensor37
All around the center
console14
All around the steering
wheel10
"All channels"154
"All doors"30
All-season tires, refer to
Winter tires195
"All stations" calling up with
radio148,151
All-wheel drive, refer to
xDrive85
Alterations, technical, refer to
For your own safety5
Altering stretch of road140
"AM", reception
range144,148
Antenna for mobile phone166
Antifreeze
– coolant199
– washer fluid64
Antilock Brake System
ABS84
Anti-theft alarm system, refer
to Alarm system36
Anti-theft system, refer to
Central locking system29
Anti-trapping mechanism
– glass sunroof, electric41
– panorama glass sunroof42
– power windows39
Approved axle loads, refer to
Weights221
Approved engine oils
198