driver seat adjustment BMW 525XI 2006 Owners Manual
[x] Cancel search | Manufacturer: BMW, Model Year: 2006, Model line: 525XI, Model: BMW 525XI 2006Pages: 248, PDF Size: 8.58 MB
Page 46 of 248
Controls
45Reference
At a glance
Driving tips
Communications
Navigation
Entertainment
Mobility
The upper hips and spinal column receive sup-
plementary support to help you maintain a
relaxed, upright sitting position.
>Increase or decrease curvature: push
switch forward or back.
>Shift curvature up or down: push switch up
or down.
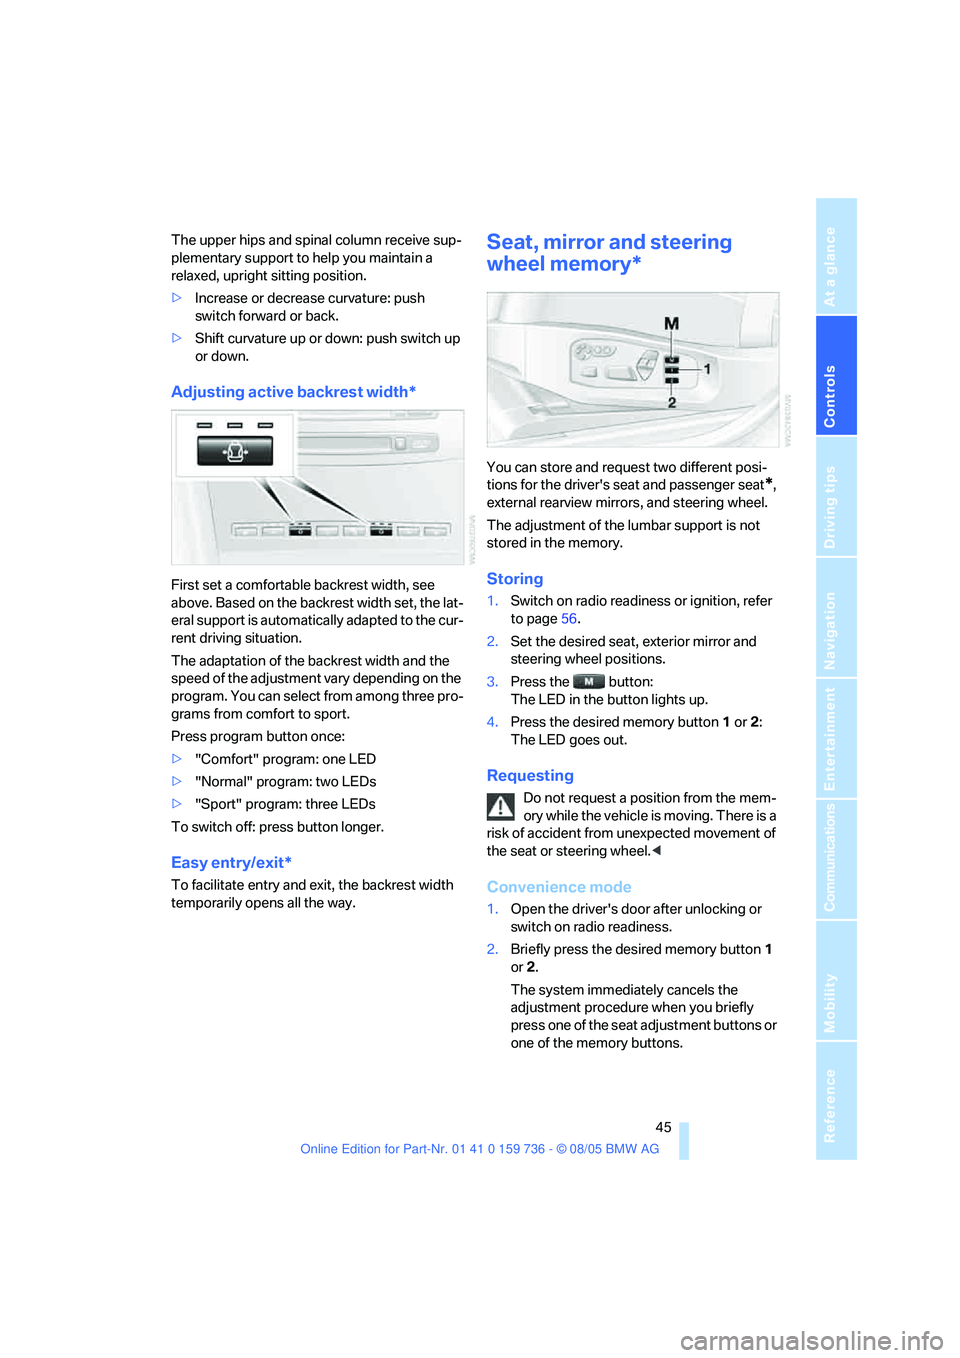
Adjusting active backrest width*
First set a comfortable backrest width, see
above. Based on the backrest width set, the lat-
eral support is automatically adapted to the cur-
rent driving situation.
The adaptation of the backrest width and the
speed of the adjustment vary depending on the
program. You can select from among three pro-
grams from comfort to sport.
Press program button once:
>"Comfort" program: one LED
>"Normal" program: two LEDs
>"Sport" program: three LEDs
To switch off: press button longer.
Easy entry/exit*
To facilitate entry and exit, the backrest width
temporarily opens all the way.
Seat, mirror and steering
wheel memory*
You can store and request two different posi-
tions for the driver's seat and passenger seat
*,
external rearview mirrors, and steering wheel.
The adjustment of the lumbar support is not
stored in the memory.
Storing
1.Switch on radio readiness or ignition, refer
to page56.
2.Set the desired seat, exterior mirror and
steering wheel positions.
3.Press the button:
The LED in the button lights up.
4.Press the desired memory button1 or2:
The LED goes out.
Requesting
Do not request a position from the mem-
ory while the vehicle is moving. There is a
risk of accident from unexpected movement of
the seat or steering wheel.<
Convenience mode
1.Open the driver's door after unlocking or
switch on radio readiness.
2.Briefly press the desired memory button1
or2.
The system immediately cancels the
adjustment procedure when you briefly
press one of the seat adjustment buttons or
one of the memory buttons.
Page 47 of 248
Adjustments
46
Safety feature
1.Close the driver's door and switch the igni-
tion on or off.
2.Press the desired memory button1 or2
and maintain pressure until the adjustment
process has been completed.
If the button was pressed inadvertently:
press the button again; the LED goes out.
Activating with remote control
The last positions of the driver's seat, the exter-
nal rearview mirrors, and steering wheel are
stored for the remote key currently in use.
You can choose when the position is requested:
>Request when unlocking vehicle
>Request when opening driver's door
iDrive, for principle details, refer to page16.
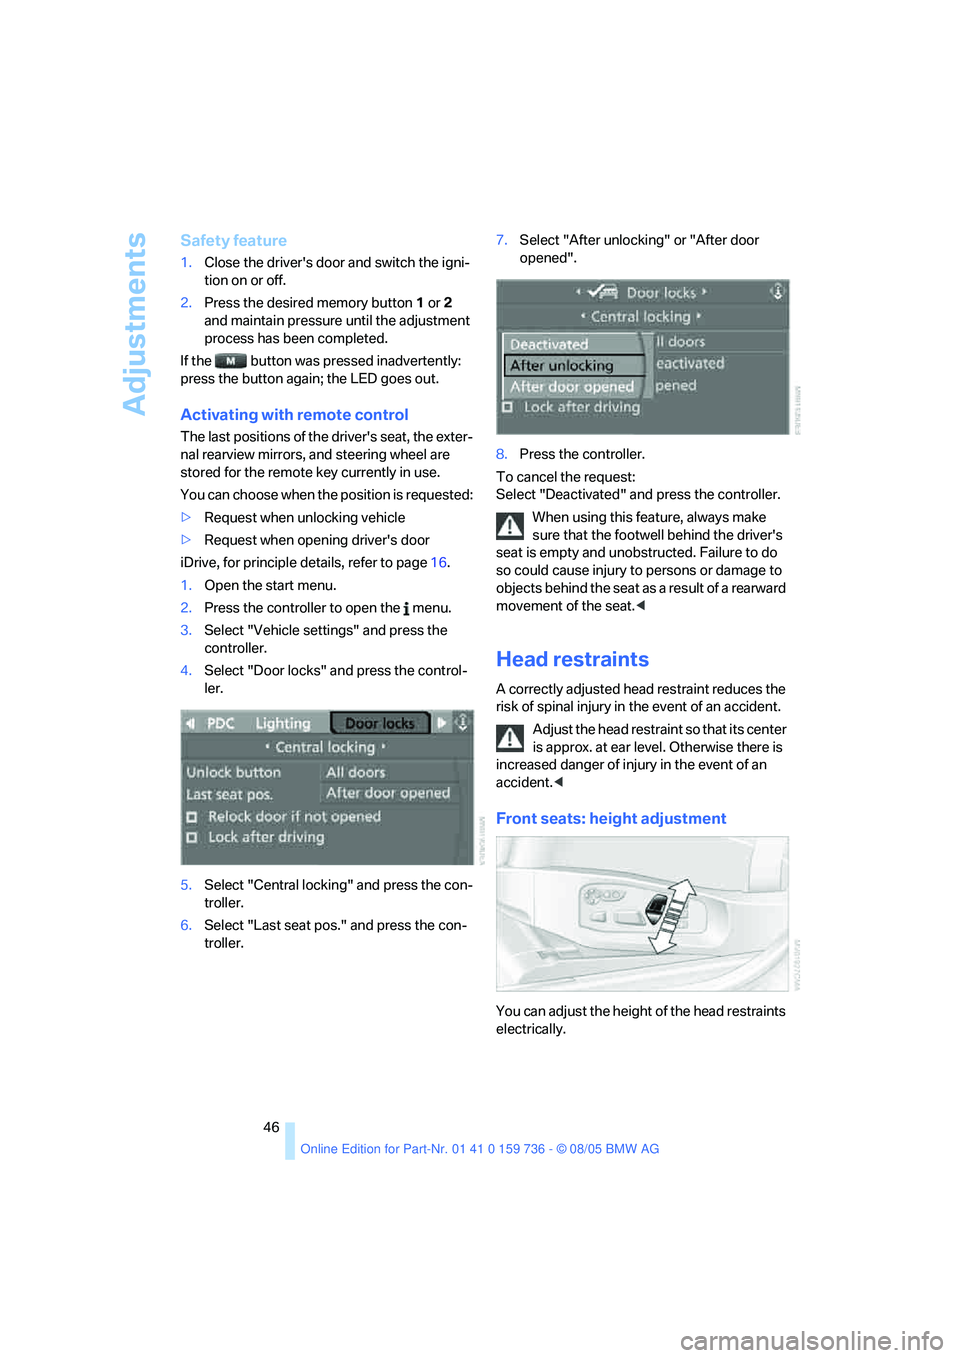
1.Open the start menu.
2.Press the controller to open the menu.
3.Select "Vehicle settings" and press the
controller.
4.Select "Door locks" and press the control-
ler.
5.Select "Central locking" and press the con-
troller.
6.Select "Last seat pos." and press the con-
troller.7.Select "After unlocking" or "After door
opened".
8.Press the controller.
To cancel the request:
Select "Deactivated" and press the controller.
When using this feature, always make
sure that the footwell behind the driver's
seat is empty and unobstructed. Failure to do
so could cause injury to persons or damage to
objects behind the seat as a result of a rearward
movement of the seat.<
Head restraints
A correctly adjusted head restraint reduces the
risk of spinal injury in the event of an accident.
Adjust the head restraint so that its center
is approx. at ear level. Otherwise there is
increased danger of injury in the event of an
accident.<
Front seats: height adjustment
You can adjust the height of the head restraints
electrically.
Page 48 of 248
Controls
47Reference
At a glance
Driving tips
Communications
Navigation
Entertainment
Mobility
Front seats: angle adjustment
Swivel the head restraint.
With the comfort seat, use the shoulder support
to set the distance to the back of the head.
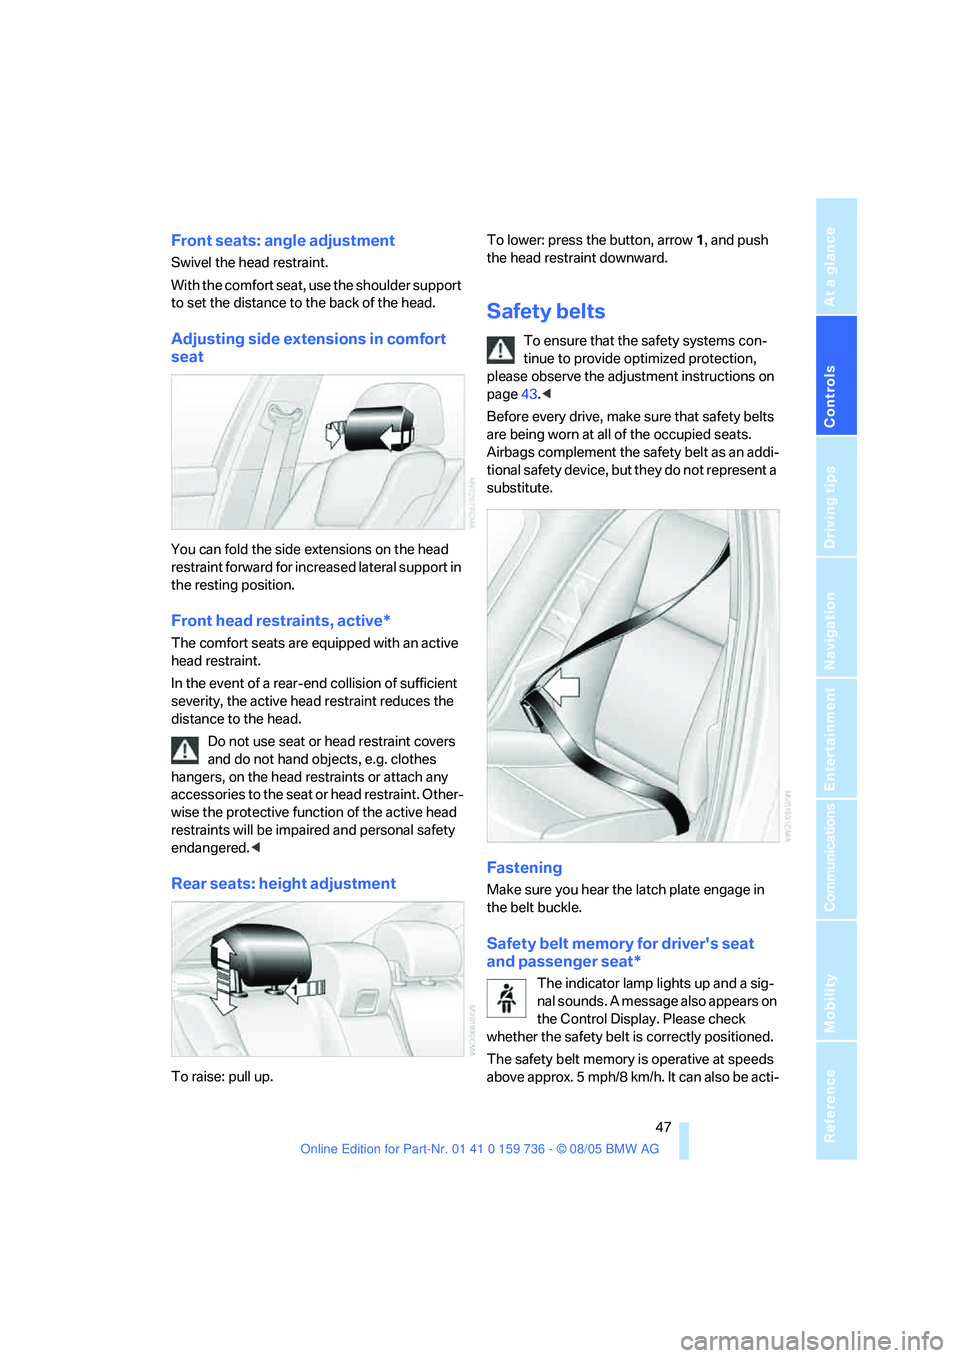
Adjusting side extensions in comfort
seat
You can fold the side extensions on the head
restraint forward for increased lateral support in
the resting position.
Front head restraints, active*
The comfort seats are equipped with an active
head restraint.
In the event of a rear-end collision of sufficient
severity, the active head restraint reduces the
distance to the head.
Do not use seat or head restraint covers
and do not hand objects, e.g. clothes
hangers, on the head restraints or attach any
accessories to the seat or head restraint. Other-
wise the protective function of the active head
restraints will be impaired and personal safety
endangered.<
Rear seats: height adjustment
To raise: pull up.To lower: press the button, arrow1, and push
the head restraint downward.
Safety belts
To ensure that the safety systems con-
tinue to provide optimized protection,
please observe the adjustment instructions on
page43.<
Before every drive, make sure that safety belts
are being worn at all of the occupied seats.
Airbags complement the safety belt as an addi-
tional safety device, but they do not represent a
substitute.
Fastening
Make sure you hear the latch plate engage in
the belt buckle.
Safety belt memory for driver's seat
and passenger seat*
The indicator lamp lights up and a sig-
nal sounds. A message also appears on
the Control Display. Please check
whether the safety belt is correctly positioned.
The safety belt memory is operative at speeds
above approx. 5 mph/8 km/h. It can also be acti-
Page 49 of 248
Adjustments
48 vated if objects are placed onto the passenger
seat.
Releasing
1.Grasp the belt firmly.
2.Press the red button in the buckle.
3.Guide the belt into its reel.
The shoulder strap's anchorage point will be
correct for adult seat occupants of every build if
the seat is correctly adjusted, refer to page44.
The two rear safety belt buckles integrated into
the rear seat are for passengers sitting on the
left and right. The belt buckle embossed with
the word CENTER is intended exclusively for
use by passengers riding in the center position.
Damage to safety belts
In case of loading due to an accident or
damage, replace the belt system includ-
ing the safety belt tensioners and have the belt
anchor points checked. Only have this work
carried out at a BMW center or at a workshop
that works according to BMW repair proce-
dures with correspondingly trained personnel.
Otherwise correct operation of this safety
equipment is not guaranteed.<
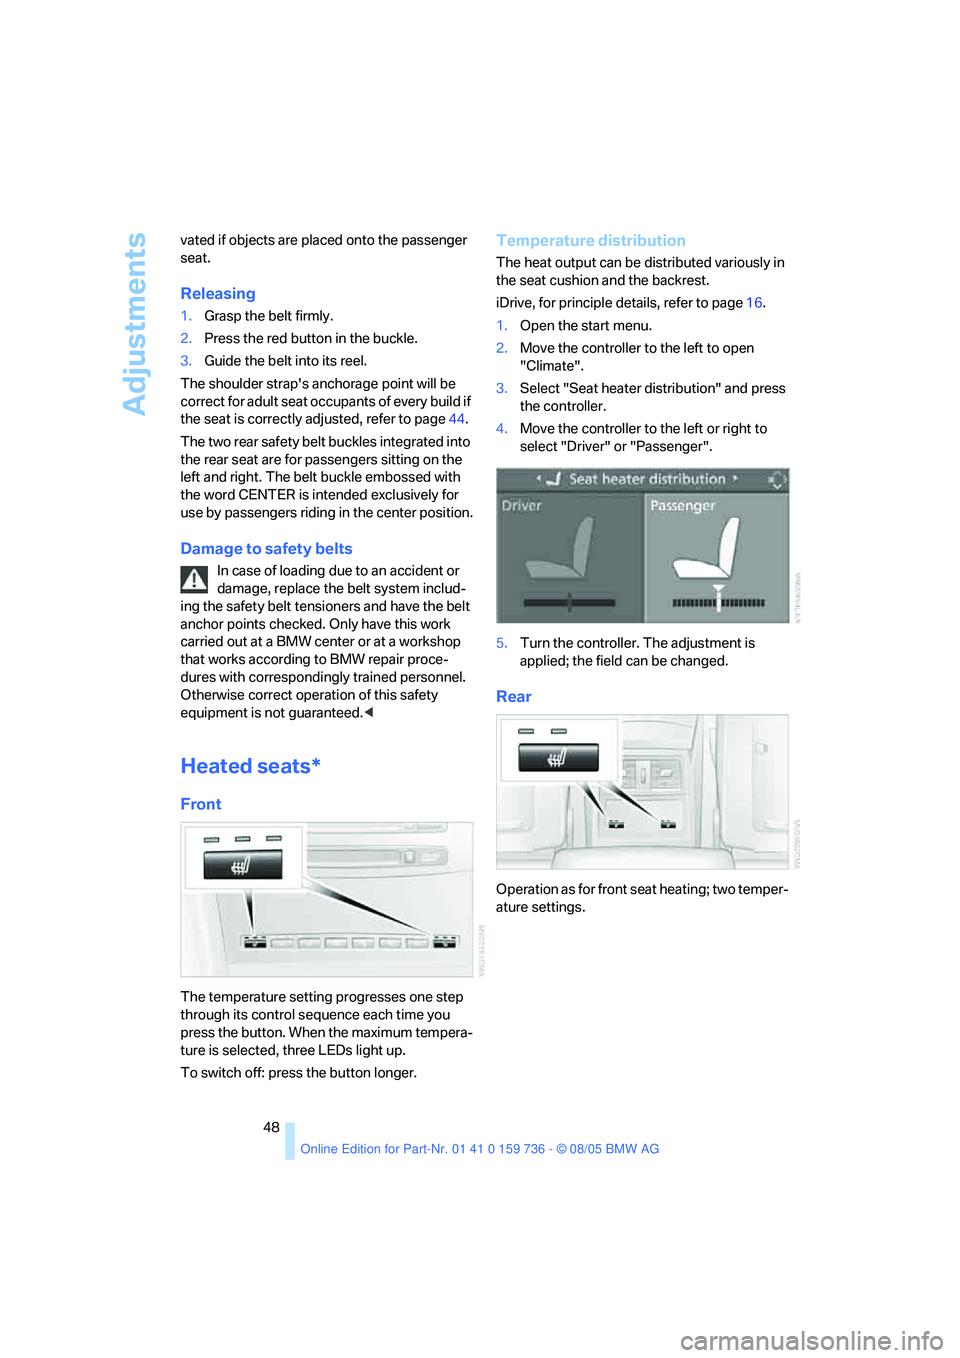
Heated seats*
Front
The temperature setting progresses one step
through its control sequence each time you
press the button. When the maximum tempera-
ture is selected, three LEDs light up.
To switch off: press the button longer.
Temperature distribution
The heat output can be distributed variously in
the seat cushion and the backrest.
iDrive, for principle details, refer to page16.
1.Open the start menu.
2.Move the controller to the left to open
"Climate".
3.Select "Seat heater distribution" and press
the controller.
4.Move the controller to the left or right to
select "Driver" or "Passenger".
5.Turn the controller. The adjustment is
applied; the field can be changed.
Rear
Operation as for front seat heating; two temper-
ature settings.
Page 50 of 248
Controls
49Reference
At a glance
Driving tips
Communications
Navigation
Entertainment
Mobility
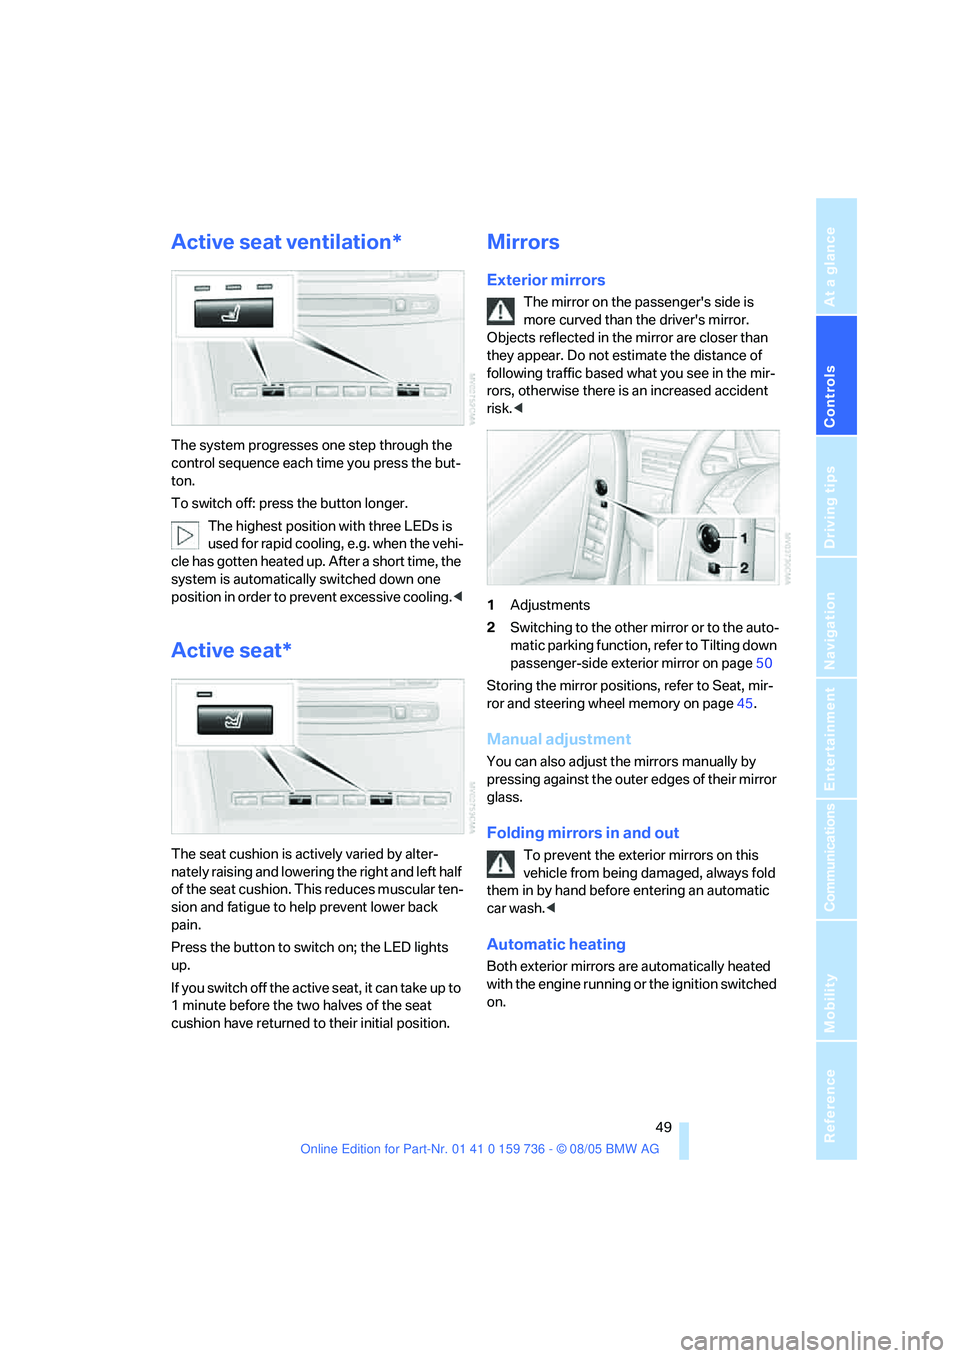
Active seat ventilation*
The system progresses one step through the
control sequence each time you press the but-
ton.
To switch off: press the button longer.
The highest position with three LEDs is
used for rapid cooling, e.g. when the vehi-
cle has gotten heated up. After a short time, the
system is automatically switched down one
position in order to prevent excessive cooling.<
Active seat*
The seat cushion is actively varied by alter-
nately raising and lowering the right and left half
of the seat cushion. This reduces muscular ten-
sion and fatigue to help prevent lower back
pain.
Press the button to switch on; the LED lights
up.
If you switch off the active seat, it can take up to
1 minute before the two halves of the seat
cushion have returned to their initial position.
Mirrors
Exterior mirrors
The mirror on the passenger's side is
more curved than the driver's mirror.
Objects reflected in the mirror are closer than
they appear. Do not estimate the distance of
following traffic based what you see in the mir-
rors, otherwise there is an increased accident
risk.<
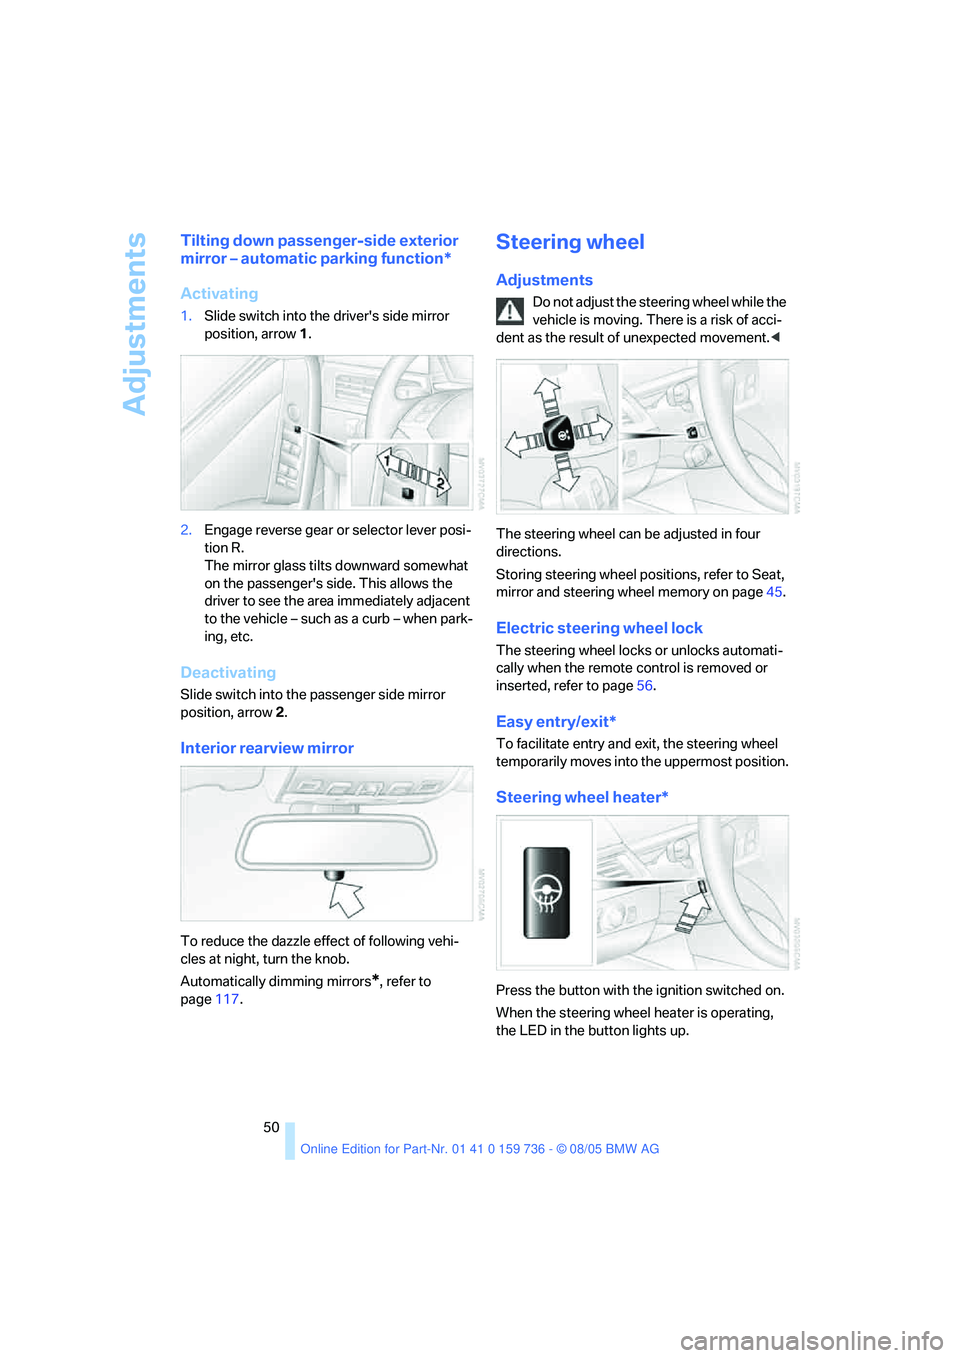
1Adjustments
2Switching to the other mirror or to the auto-
matic parking function, refer to Tilting down
passenger-side exterior mirror on page50
Storing the mirror positions, refer to Seat, mir-
ror and steering wheel memory on page45.
Manual adjustment
You can also adjust the mirrors manually by
pressing against the outer edges of their mirror
glass.
Folding mirrors in and out
To prevent the exterior mirrors on this
vehicle from being damaged, always fold
them in by hand before entering an automatic
car wash.<
Automatic heating
Both exterior mirrors are automatically heated
with the engine running or the ignition switched
on.
Page 51 of 248
Adjustments
50
Tilting down passenger-side exterior
mirror – automatic parking function*
Activating
1.Slide switch into the driver's side mirror
position, arrow 1.
2.Engage reverse gear or selector lever posi-
tion R.
The mirror glass tilts downward somewhat
on the passenger's side. This allows the
driver to see the area immediately adjacent
to the vehicle – such as a curb – when park-
ing, etc.
Deactivating
Slide switch into the passenger side mirror
position, arrow 2.
Interior rearview mirror
To reduce the dazzle effect of following vehi-
cles at night, turn the knob.
Automatically dimming mirrors
*, refer to
page117.
Steering wheel
Adjustments
Do not adjust the steering wheel while the
vehicle is moving. There is a risk of acci-
dent as the result of unexpected movement.<
The steering wheel can be adjusted in four
directions.
Storing steering wheel positions, refer to Seat,
mirror and steering wheel memory on page45.
Electric steering wheel lock
The steering wheel locks or unlocks automati-
cally when the remote control is removed or
inserted, refer to page56.
Easy entry/exit*
To facilitate entry and exit, the steering wheel
temporarily moves into the uppermost position.
Steering wheel heater*
Press the button with the ignition switched on.
When the steering wheel heater is operating,
the LED in the button lights up.
Page 54 of 248
Controls
53Reference
At a glance
Driving tips
Communications
Navigation
Entertainment
Mobility
Backrest width*
The backrest width adjustment of the
passenger seat must be opened com-
pletely. After mounting the child's seat, no
memory position may be called up and the
active backrest width adjustment must be
deactivated, otherwise the stability of the
child's seat on the front passenger seat is lim-
ited.<
1.After unlocking the vehicle, place on the
front passenger seat and close the door to
call up the memory position.
2.Completely open the backrest width adjust-
ment, refer to page44.
3.Deactivate active backrest width adjust-
ment, refer to page45.
4.Install child's seat.
Child seat security
All rear safety belts and the safety belt for the
front passenger can be locked against pulling
out to secure child restraint systems.
Locking safety belt
1.Secure the child restraint system with the
belt.
2.Pull out the belt webbing completely.
3.Allow the belt webbing to be pulled in and
pull taut against the child restraint system.
The safety belt is locked.
Unlocking safety belt
1.Open the belt buckle.
2.Remove the child restraint system.
3.Allow the belt webbing to be pulled in com-
pletely.
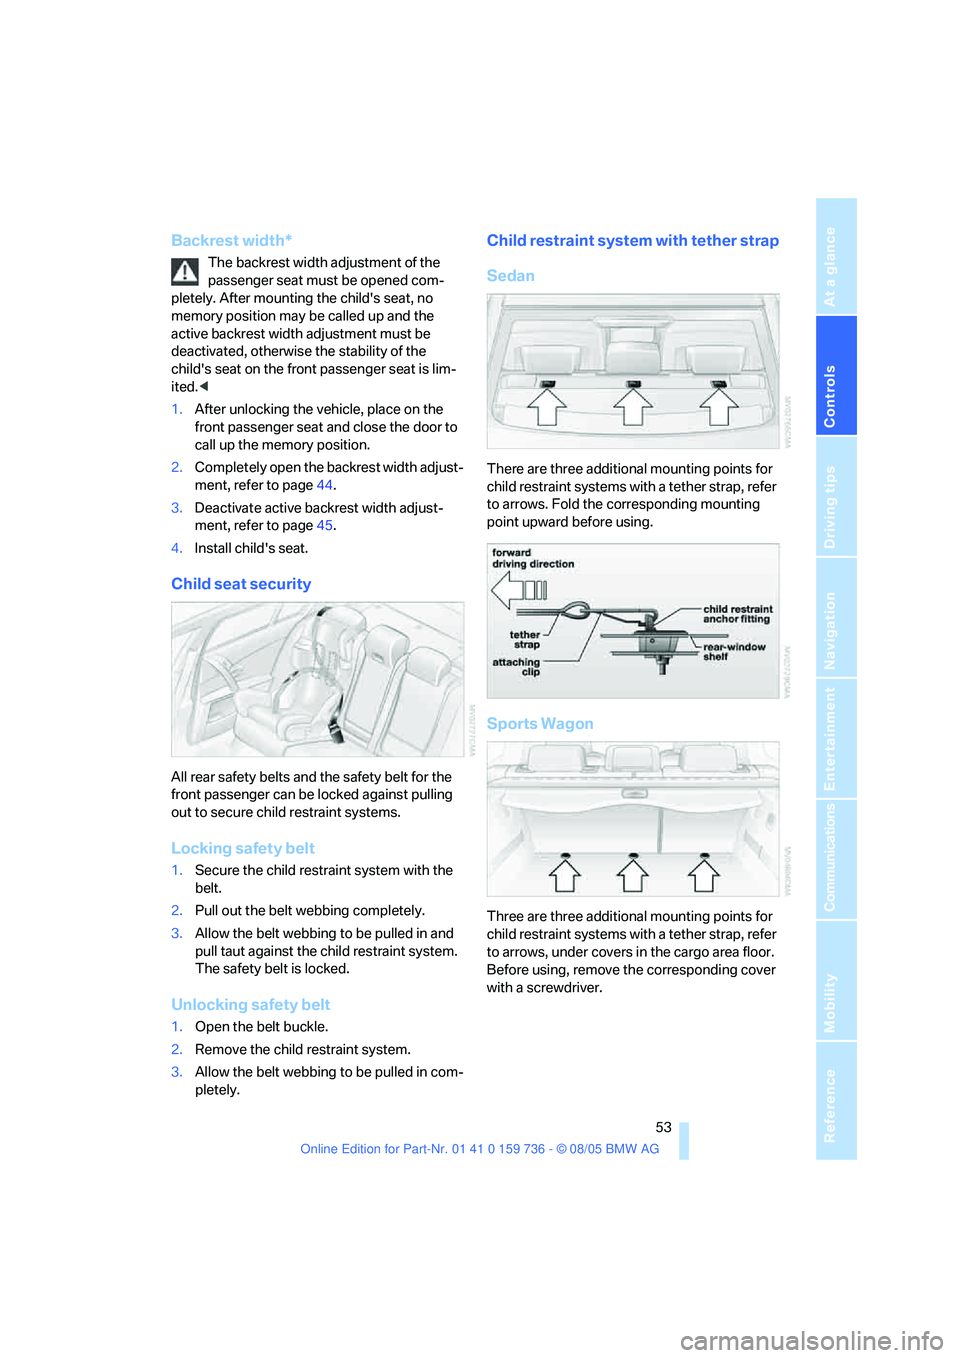
Child restraint system with tether strap
Sedan
There are three additional mounting points for
child restraint systems with a tether strap, refer
to arrows. Fold the corresponding mounting
point upward before using.
Sports Wagon
Three are three additional mounting points for
child restraint systems with a tether strap, refer
to arrows, under covers in the cargo area floor.
Before using, remove the corresponding cover
with a screwdriver.
Page 91 of 248
Technology for comfort, convenience and safety
90
Airbags
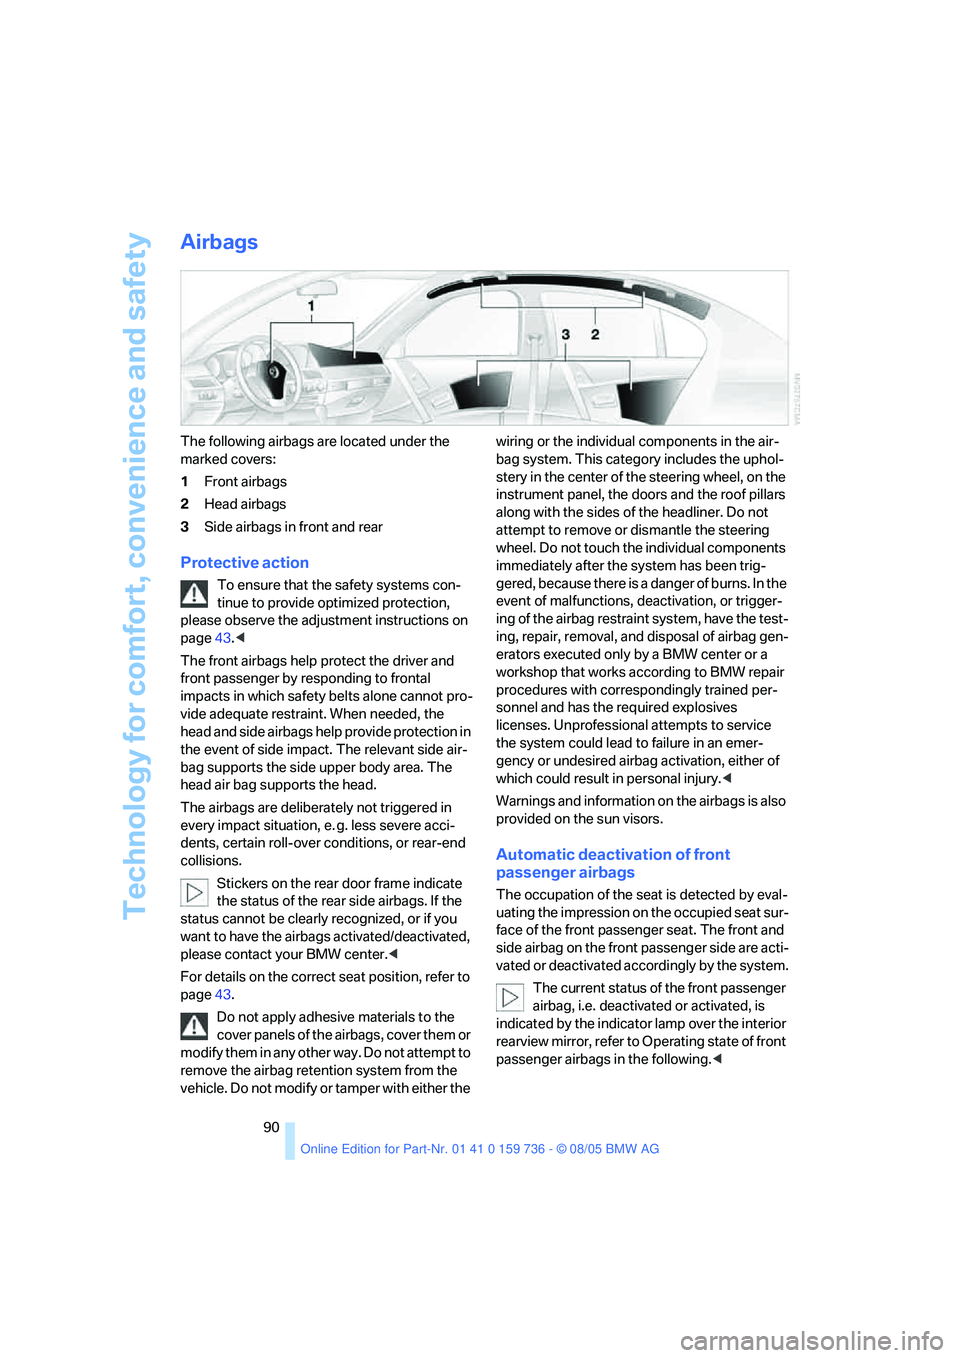
The following airbags are located under the
marked covers:
1Front airbags
2Head airbags
3Side airbags in front and rear
Protective action
To ensure that the safety systems con-
tinue to provide optimized protection,
please observe the adjustment instructions on
page43.<
The front airbags help protect the driver and
front passenger by responding to frontal
impacts in which safety belts alone cannot pro-
vide adequate restraint. When needed, the
head and side airbags help provide protection in
the event of side impact. The relevant side air-
bag supports the side upper body area. The
head air bag supports the head.
The airbags are deliberately not triggered in
every impact situation, e. g. less severe acci-
dents, certain roll-over conditions, or rear-end
collisions.
Stickers on the rear door frame indicate
the status of the rear side airbags. If the
status cannot be clearly recognized, or if you
want to have the airbags activated/deactivated,
please contact your BMW center.<
For details on the correct seat position, refer to
page43.
Do not apply adhesive materials to the
cover panels of the airbags, cover them or
modify them in any other way. Do not attempt to
remove the airbag retention system from the
vehicle. Do not modify or tamper with either the wiring or the individual components in the air-
bag system. This category includes the uphol-
stery in the center of the steering wheel, on the
instrument panel, the doors and the roof pillars
along with the sides of the headliner. Do not
attempt to remove or dismantle the steering
wheel. Do not touch the individual components
immediately after the system has been trig-
gered, because there is a danger of burns. In the
event of malfunctions, deactivation, or trigger-
ing of the airbag restraint system, have the test-
ing, repair, removal, and disposal of airbag gen-
erators executed only by a BMW center or a
workshop that works according to BMW repair
procedures with correspondingly trained per-
sonnel and has the required explosives
licenses. Unprofessional attempts to service
the system could lead to failure in an emer-
gency or undesired airbag activation, either of
which could result in personal injury.<
Warnings and information on the airbags is also
provided on the sun visors.
Automatic deactivation of front
passenger airbags
The occupation of the seat is detected by eval-
uating the impression on the occupied seat sur-
face of the front passenger seat. The front and
side airbag on the front passenger side are acti-
vated or deactivated accordingly by the system.
The current status of the front passenger
airbag, i.e. deactivated or activated, is
indicated by the indicator lamp over the interior
rearview mirror, refer to Operating state of front
passenger airbags in the following.<