Expansion tank hose BMW 528i 1997 E39 Workshop Manual
[x] Cancel search | Manufacturer: BMW, Model Year: 1997, Model line: 528i, Model: BMW 528i 1997 E39Pages: 1002
Page 83 of 1002
Downloaded from www.Manualslib.com manuals search engine
Engine Removal and installatid
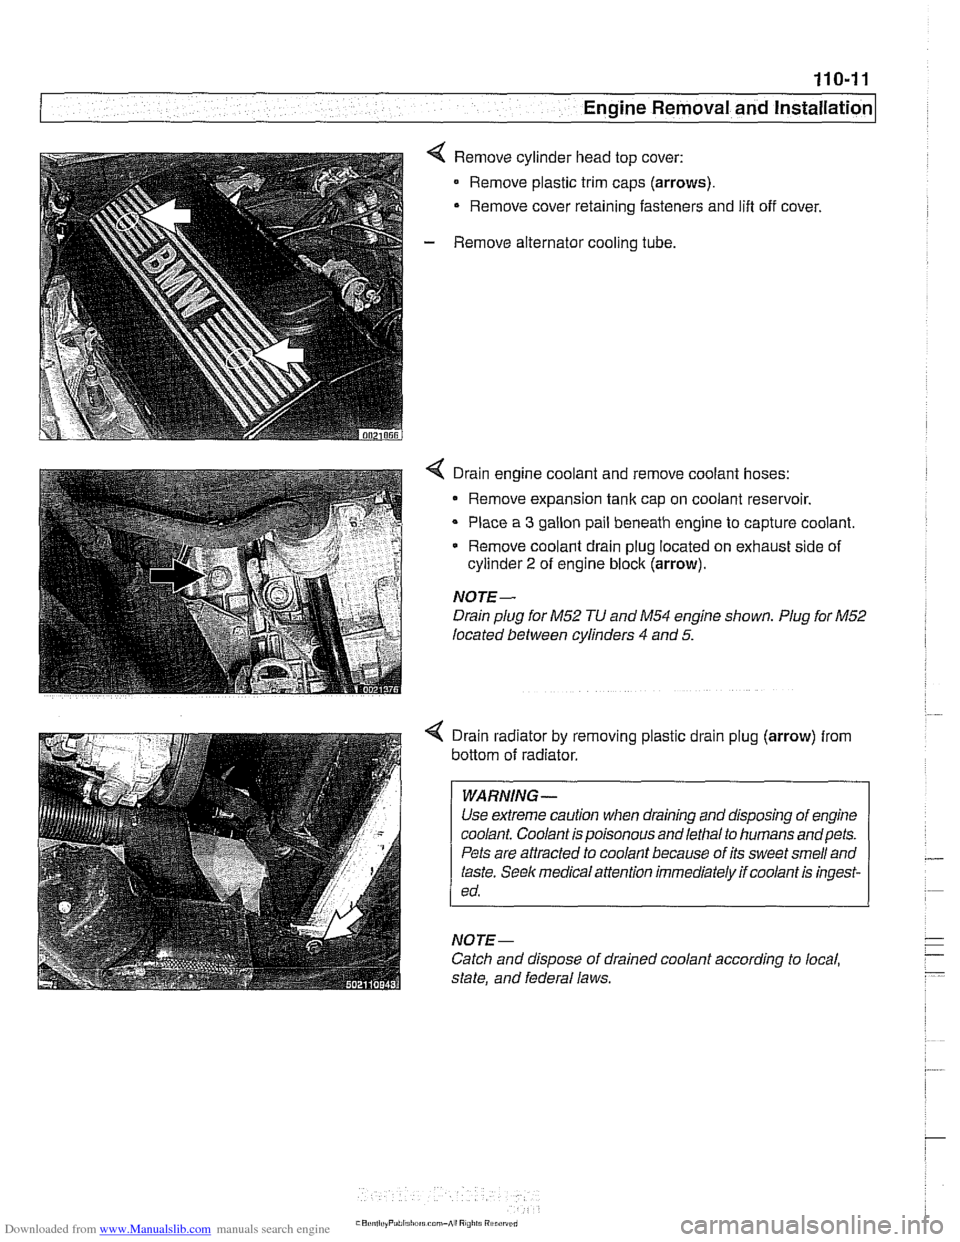
4 Remove cylinder head top cover:
Remove plastic trim caps
(arrows).
Remove cover retaining fasteners and lifl off cover.
- Remove alternator cooling tube.
4 Drain engine coolant and remove coolant hoses:
* Remove expansion tank cap on coolant reservoir.
Place a
3 gallon pail beneath engine to capture coolant,
* Remove coolant drain plug located on exhaust side of
cylinder
2 of engine block (arrow).
NOTE-
Drain plug for M52 TU and M54 engine shown. Plug for M52
located between cylinders 4 and 5.
Drain radiator by removing plastic drain plug (arrow) from
bottom of radiator.
WARNING-
Use extreme caution when draining and disposing of engine
coolant Coolant is poisonous andlethal to humans andpets.
Pets are attracted to coolant because of its sweet smell and
taste. Seek medical attention immediately if coolant is ingest-
ed.
NOTE-
Catch and dispose of drained coolant according to local,
state, and federal laws.
Page 92 of 1002
Downloaded from www.Manualslib.com manuals search engine
11 0-20
Engine Removal and Installation
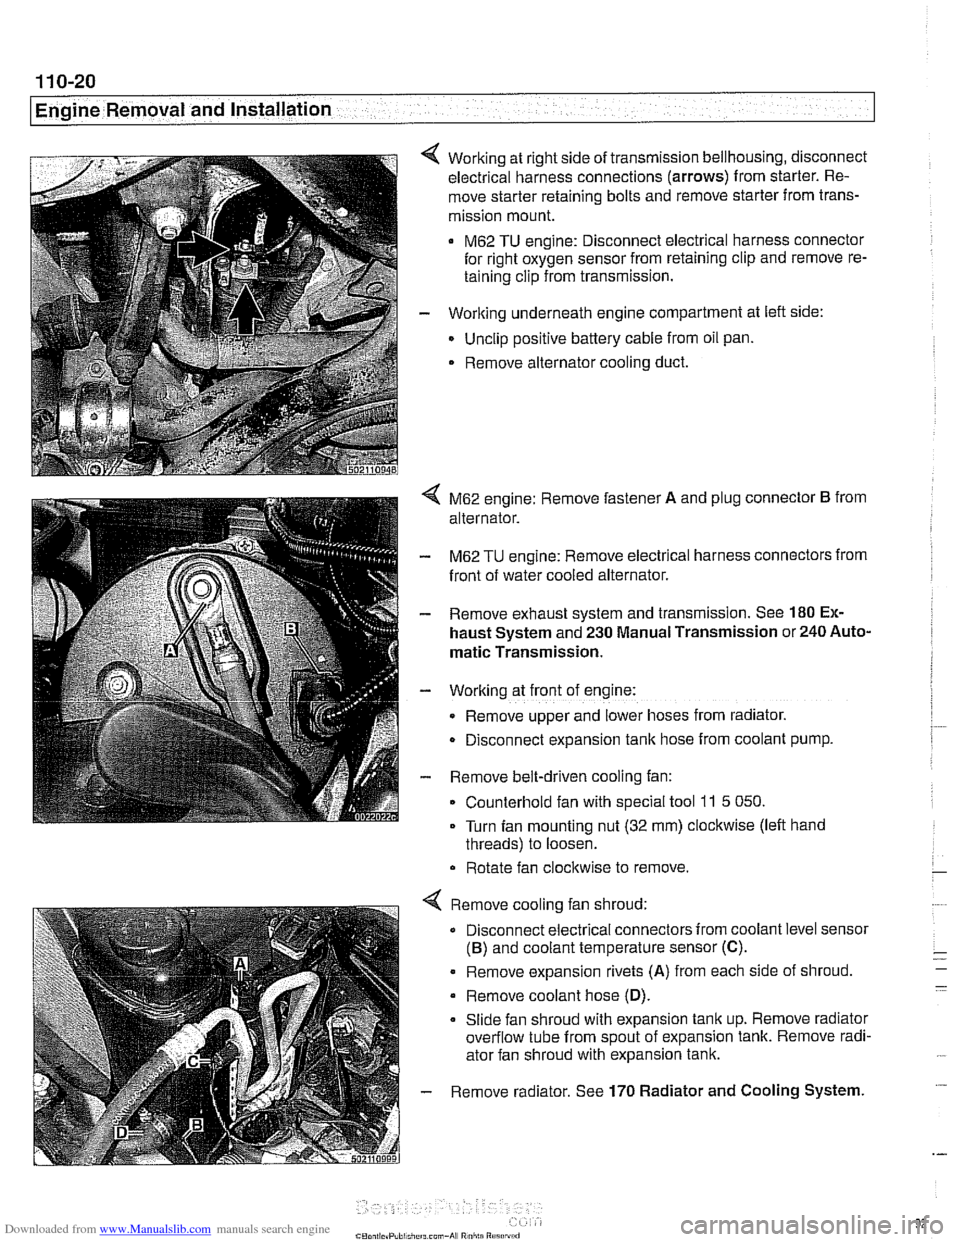
Working at right side of transmission bellhousing, disconnect
electrical harness connections (arrows) from starter. Re-
move starter retaining bolts and remove starter from trans-
mission mount.
M62 TU engine: Disconnect electrical harness connector
for right oxygen sensor from retaining clip and remove re-
taining clip from transmission.
- Working underneath engine compartment at left side:
Unclip positive battery cable from oil pan.
. Remove alternator cooling duct.
4 M62 engine: Remove fastener A and plug connector B from
alternator.
- M62 TU engine: Remove electrical harness connectors from
front of water cooled alternator.
- Remove exhaust system and transmission. See 180 Ex-
haust System and 230 Manual Transmission or 240 Auto-
matic Transmission.
- Working at front of engine:
Remove upper and lower hoses from radiator.
D~sconnect expansion tank hose from coolant pump.
- Remove belt-driven cooling fan:
Counterhold fan with special tool
11 5 050.
Turn fan mounting nut (32 mm) clockwise (left hand
threads) to loosen.
Rotate fan clockwise to remove.
Remove cooling fan shroud:
Disconnect electrical connectors from coolant level sensor
(B) and coolant temperature sensor (C).
. Remove expansion rivets (A) from each side of shroud
Remove coolant hose
(D).
Slide fan shroud with expansion tank up. Remove radiator
overflow tube from spout of expansion tank. Remove radi-
ator fan shroud with expansion tank.
Remove radiator. See
170 Radiator and Cooling System.
Page 122 of 1002
Downloaded from www.Manualslib.com manuals search engine
I Cylinder Head Removal and Installation
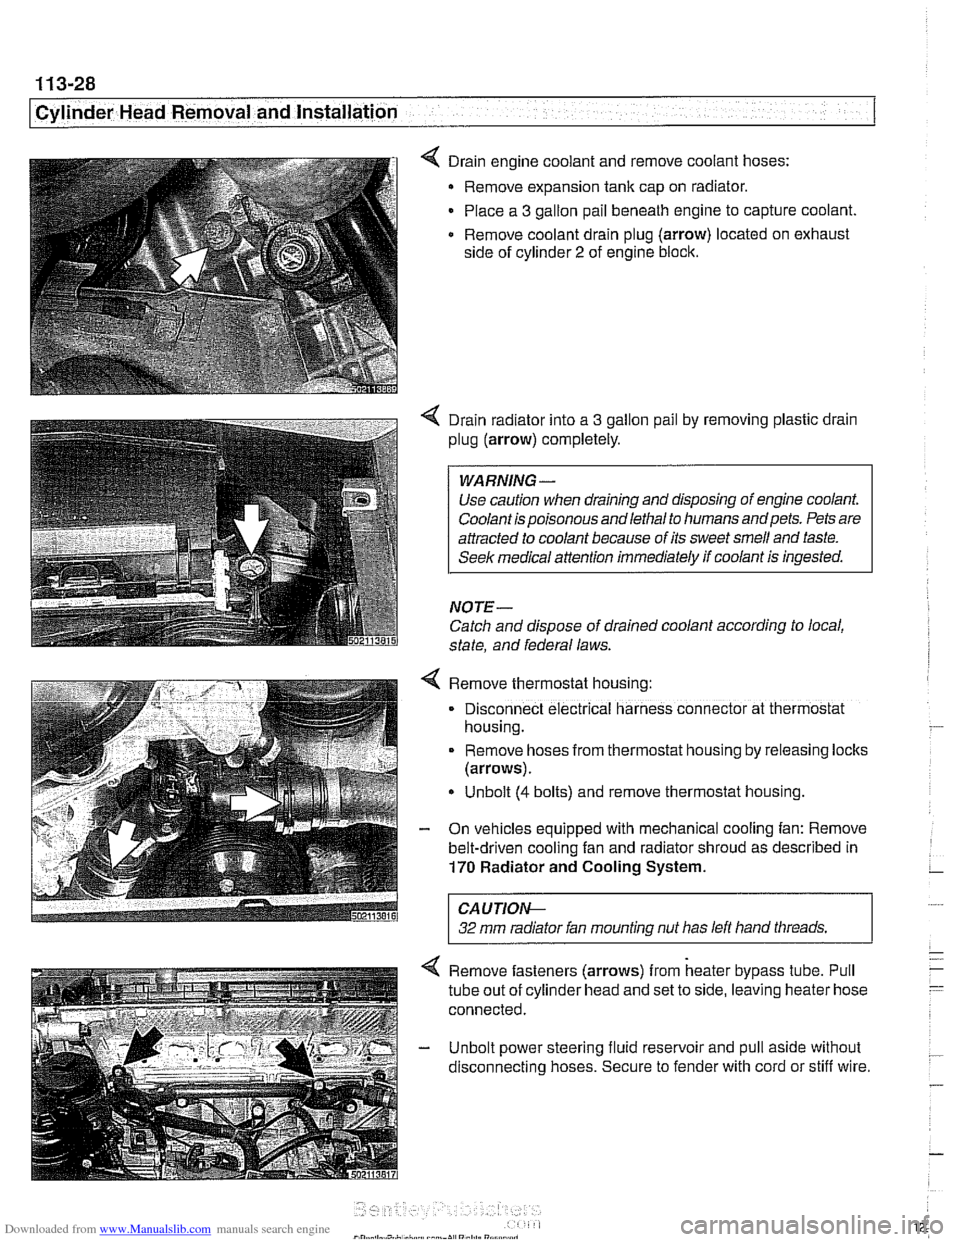
4 Drain engine coolant and remove coolant hoses:
Remove expansion tank cap on radiator.
Place a
3 gallon pail beneath engine to capture coolant
Remove coolant drain plug (arrow) located on exhaust
side of cylinder
2 of engine block.
4 Drain radiator into a 3 gallon pail by removing plastic drain
plug (arrow) completely.
Use caution when draining and disposing of engine coolant.
Coolant is poisonous andlethal to humans andpets. Pets are
attracted to coolant because of its sweet smell and taste.
Seek medical
attention immediately if coolant is ingested.
NOTE-
Catch and dispose of drained coolant according to local,
state, and federal laws.
4 Remove thermostat housing:
. Disconnect electrical harness connector at thermostat
housing.
. Remove hoses from thermostat hous~ng by releasing loclts
(arrows).
Unbolt
(4 bolts) and remove thermostat hous~ng.
- On vehicles equipped with mechanical cooling fan: Remove
belt-driven cooling fan and radiator shroud as described in
170 Radiator and Cooling System.
CAUTIOI\C
32 mm radiator fan mounting nut has left hand threads. r
4 Remove fasteners (arrows) from heater bypass tube. Pull
tube out of cylinder head and set to side, leaving heater hose
connected.
- Unbolt power steering fluid reservoir and pull aside without
disconnecting hoses. Secure to fender with cord or stiff wire.
Page 490 of 1002
Downloaded from www.Manualslib.com manuals search engine
--
I Fuel Tank and Fuel Pump
The plastic fuel tank is mounted underneath the center of the
car (underneath the rear seat). Mounted in the fuel tank are
the fuel pump and fuel level sending units. Connecting lines
for the evaporative emission control system and expansion
tank are also attached to the tank.
Fuel
tank capacity for E39 models
Tank capacity
70 liters (18.5 gal)
Reserve capacity
8 liters (2.1 gal)
Fuel tank, draining
Drain fuel tank into a safe storage unit using an approved fuel
pumping device.
WARNING-
# Before removing tank, be sure that all hot components,
such as the exhaust system, are completely cooled down.
Fuel may be spilled. Do not smoke or
work near heat-
ers or other fire hazards.
- Start engine and allow to run 10 - 15 seconds to fill fuel com-
pensating siphon assembly. This will allow both lobes of fuel
tank to he drawn off through fuel filler pipe,
- Disconnect negative cable from battery.
CAUTION-
Prior to disconnecting the batteg read the battery discon-
nection cautions given
in 001 General Warnings and Cau-
tions.
- Remove fuel tank filler cap
- Slide suction hose into filler neck about 130 cm (51 in.), twist-
ing as necessary. Withdraw fuel into storage unit.
- Monitor fuel level reduction in both lobes:
- Remove rear seat cushion and access both fuel tank send-
er harness connectors.
Use multimeter to measure resistance at both senders,
Resistance should drop as fuel level drops.
- If siphoning mechanism is faulty, drain left tank lobe sepa-
rately by removing sender cover and pumping fuel directly
out of left lobe.
Page 493 of 1002

Downloaded from www.Manualslib.com manuals search engine
.- Fuel Tank and Fuel pump( -
Fuel expansion tank, removing
and installing
- Raise rear end of car and support safely.
CA U TIOG
Make sure the car is stable and well supported at all times.
Use a professional automotive lift
orjack stands designed for
the
ouroose. A floor iack is not adequate support
- Remove left rear wheel and wheel housing inner shield.
4 Remove plastic nut (A) and disconnect hose (B).
4 Tilt vent tank down and loosen or cut off hose clamps
(arrows). Pull hoses off fittings.
- Release vacuum line loclting clips and remove tank
- Installation is reverse of removal. Use new hose clamps.
Tightening torques
Hose clamp 8 - 13 mm dia. 2 Nrn (18 in-lb)
Hose clamp 13 - 16 mm dia. 3 Nm (27 in-lb)
Hose clamp
42 - 48 mm dia. 4 Nm (36 in-lb)
Page 494 of 1002
Downloaded from www.Manualslib.com manuals search engine
Fuel Tank and Fuel Pump 1
Activated carbon canister I fuel tank leak
detection unit
(LDP or DMTL), removing . . -
and installing
- Raise rear end of car and support safely.
CAUTION-
Make sure the car is stable and well supported at all times.
Use a professional automotive lift
orjack stands designed for
the purpose.
A floor jack is not adequate support.
- Remove left rear wheel and inner fender panel
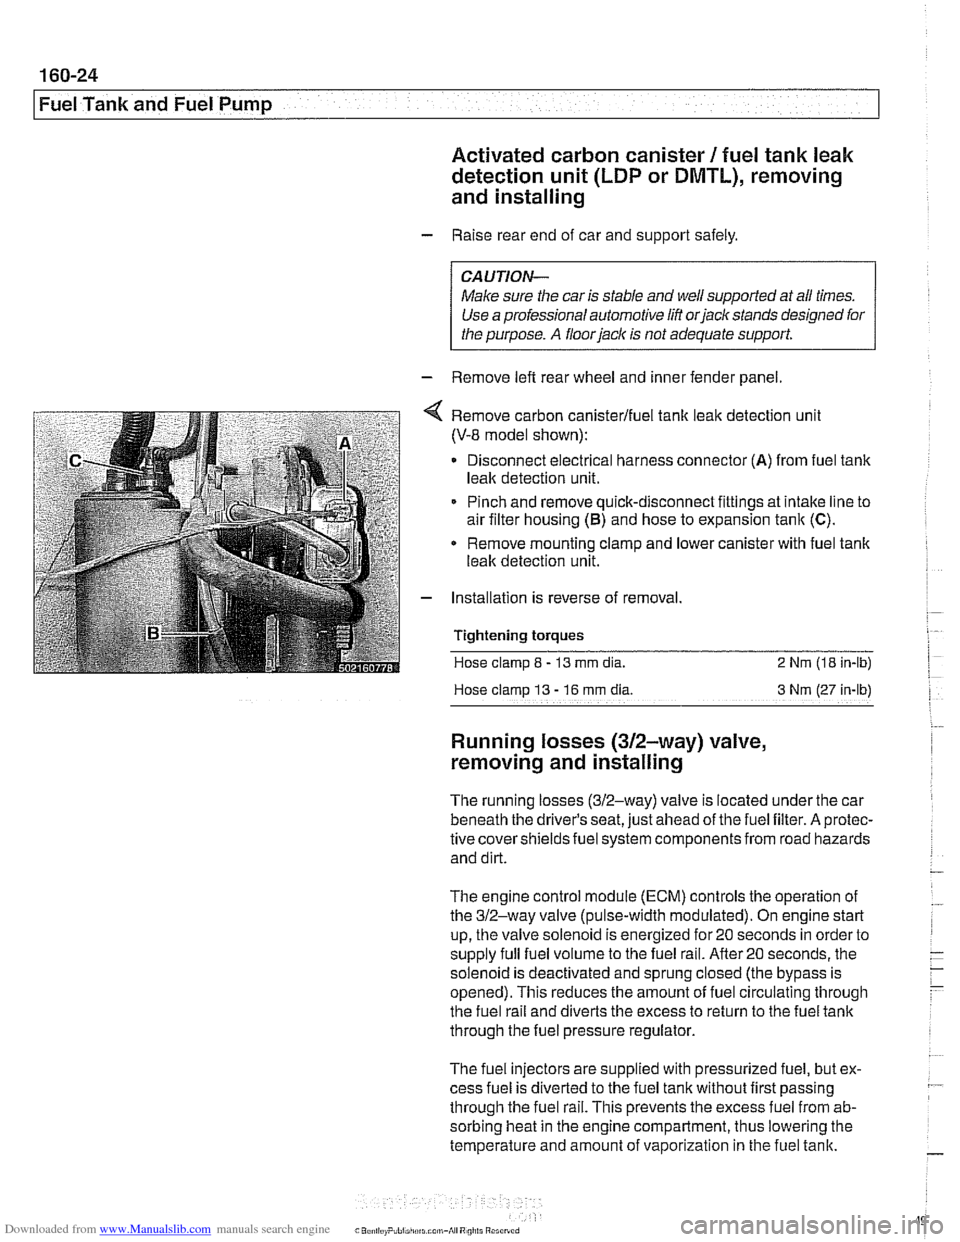
Remove carbon canisterlfuel tank leak detection unit
(V-8 model shown):
Disconnect electrical harness connector
(A) from fuel tank
leak detection unit.
Pinch and remove quick-disconnect fittings at intake line to
air filter housing
(5) and hose to expansion tank (C).
* Remove mounting clamp and lower canister with fuel tank
leak detection unit.
Installation is reverse of removal.
Tightening
torques
Hose clamp 8 - 13 mm dia. 2 Nrn (18 in-lb)
Hose clamp
13 - 16 rnm dia 3 Nm (27 in-lb)
Running losses (312-way) valve,
removing and installing
The running losses (312-way) valve is located under the car
beneath the driver's seat, just ahead of the fuel filter. A protec-
tive covershieldsfuel system components from road hazards
and dirt.
The engine control module
(ECM) controls the operation of
the 312-way valve (pulse-width modulated). On engine start
up, the valve solenoid is energized for 20 seconds in order to
supply full fuel volume to the fuel rail.
After20 seconds, the
solenoid is deactivated and sprung closed (the bypass is
opened). This reduces the amount of fuel circulating through
the fuel rail and diverts the excess to return to the fuel tank
through the fuel pressure regulator.
The fuel injectors are supplied with pressurized fuel, but ex-
cess fuel is diverted to the fuel tank without first passing
through the fuel rail. This prevents the excess fuel from ab-
sorbing heat in the engine compartment, thus lowering the
temperature and amount of vaporization in the fuel tank.
Page 507 of 1002
Downloaded from www.Manualslib.com manuals search engine
170-1 1
Radiator and Cooling system/
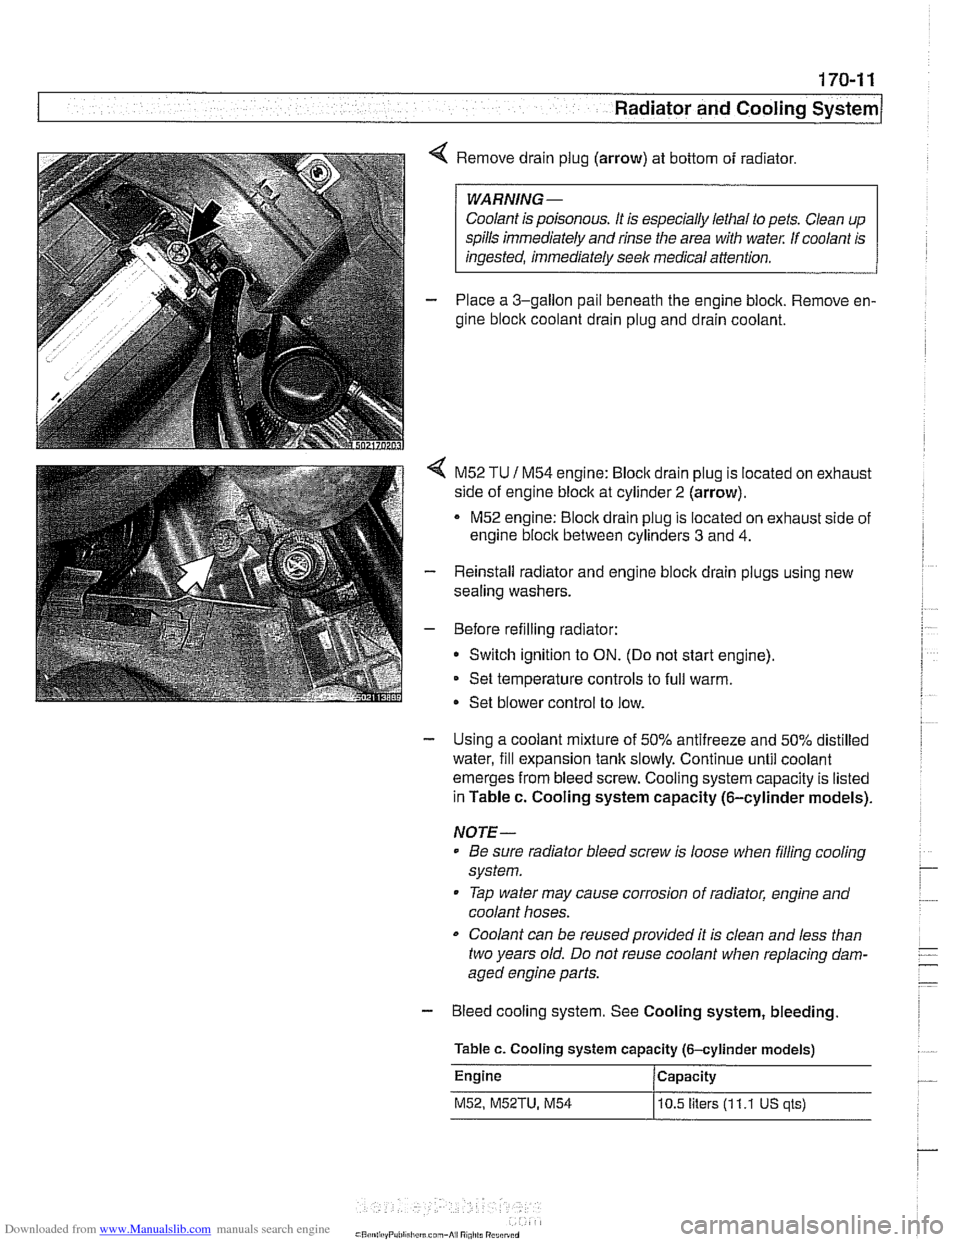
4 Remove drain plug (arrow) at bottom of radiator.
Coolant is poisonous. It is especially lethal to pets. Clean up
spills immediately and rinse the area with
wate,: If coolant is
- Place a 3-gallon pail beneath the engine block. Remove en-
gine block coolant drain plug and drain coolant.
< M52 TU 1 M54 engine: Bloclc drain plug is located on exhaust
side of engine block at cylinder
2 (arrow).
M52 engine:
Bloclc drain plug is located on exhaust side of
engine
bloclc between cylinders 3 and 4.
- Reinstall radiator and engine block drain plugs using new
sealing washers.
- Before refilling radiator:
Switch ignition to
ON. (Do not start engine).
Set temperature controls to full warm.
Set blower control to low.
- Using a coolant mixture of 50% antifreeze and 50% distilled
water, fill expansion tank slowly. Continue until coolant
emerges from bleed screw. Cooling system capacity is listed
in Table c. Cooling system capacity (6-cylinder models).
NOTE-
Be sure radiator bleed screw is loose when filling cooling
system.
Tap water may cause corrosion of radiator, engine and
coolant hoses.
Coolant can be reusedprovided it is clean and less than
two years old. Do not reuse coolant when replacing dam-
aged engine parts.
- Bleed cooling system. See Cooling system, bleeding
Table c. Cooling system capacity (6-cylinder models)
Engine Capacity
M52, M52TU, M54
10.5 liters (1 1.1 US qls)
Page 508 of 1002
Downloaded from www.Manualslib.com manuals search engine
170-1 2
I Radiator and Cooling System
Tightening torques
Block drain plug to
block 25 Nm (1 8 ft-ib)
Radiator drain plug to radiator
2-3 Nm (18-27 in-lb)
Coolant, draining and filling (V-8 models)
WARNING -
Allow the cooling system to cool before opening or draining
the cooling system.
- Raise front of car and support safely.
I WARNING- 1
Make sure the car is stable and well supported at all times.
Use a professional automotive lift
orjack stands designed for
I the purpose. A floorjack is not adequate support 1
- Remove splash shield from under engine.
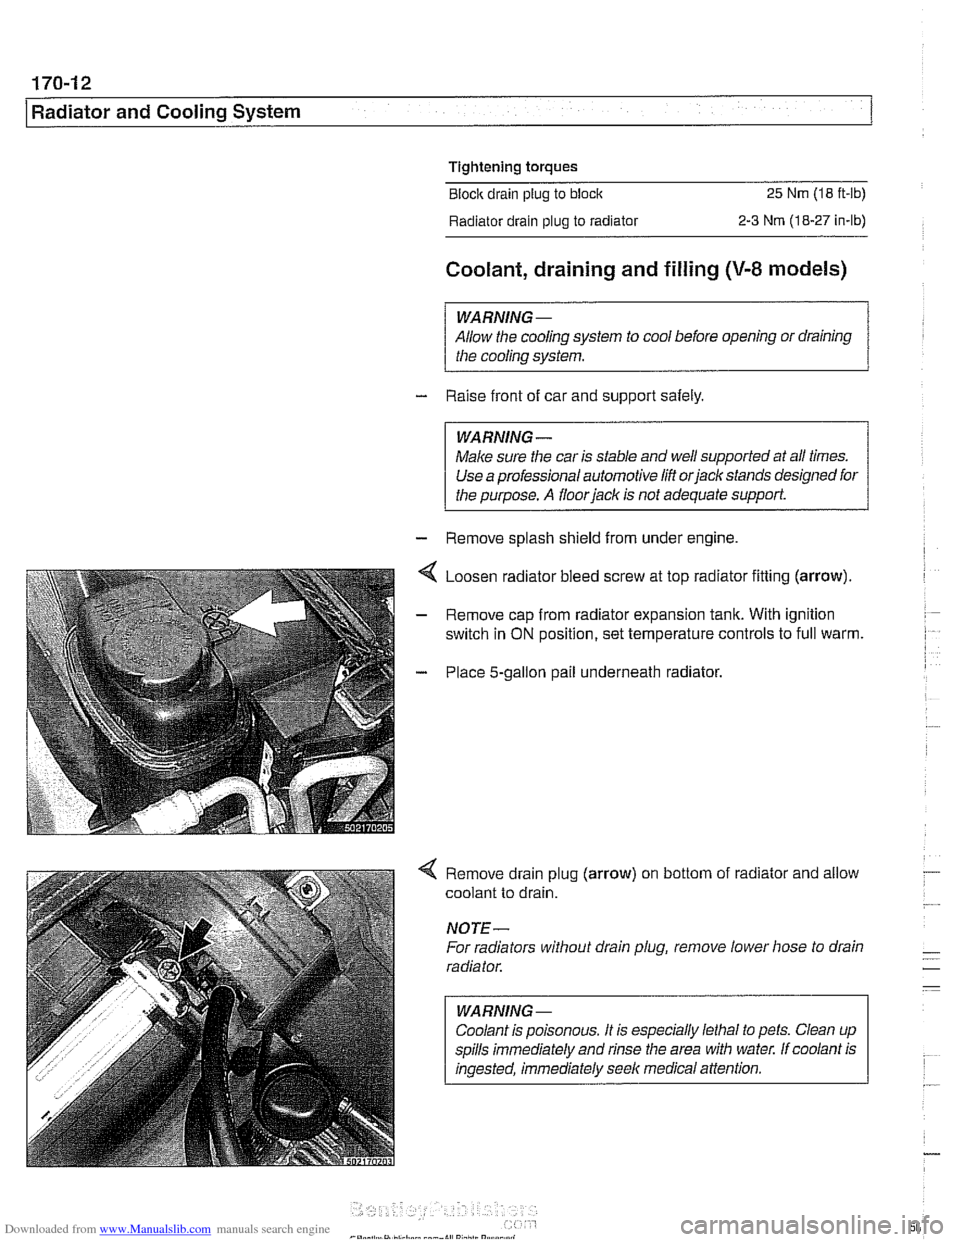
Loosen radiator bleed screw at top radiator fining (arrow).
Remove cap from radiator expansion tank. With ignition
switch in
ON position, set temperature controls to full warm.
Place 5-gallon pail underneath radiator.
4 Remove drain plug (arrow) on bottom of radiator and allow
coolant to drain.
NOTE-
For radiators without drain plug, remove lower hose to drain
radiator.
WARNING
-
Coolant is poisonous. It is especially lethal to pets. Clean up
spills immediately and rinse the area with water. If coolant is
ingested, immediately seek medical attention.
Page 509 of 1002
Downloaded from www.Manualslib.com manuals search engine
170-1 3
Radiator and Cooling ~vsteml
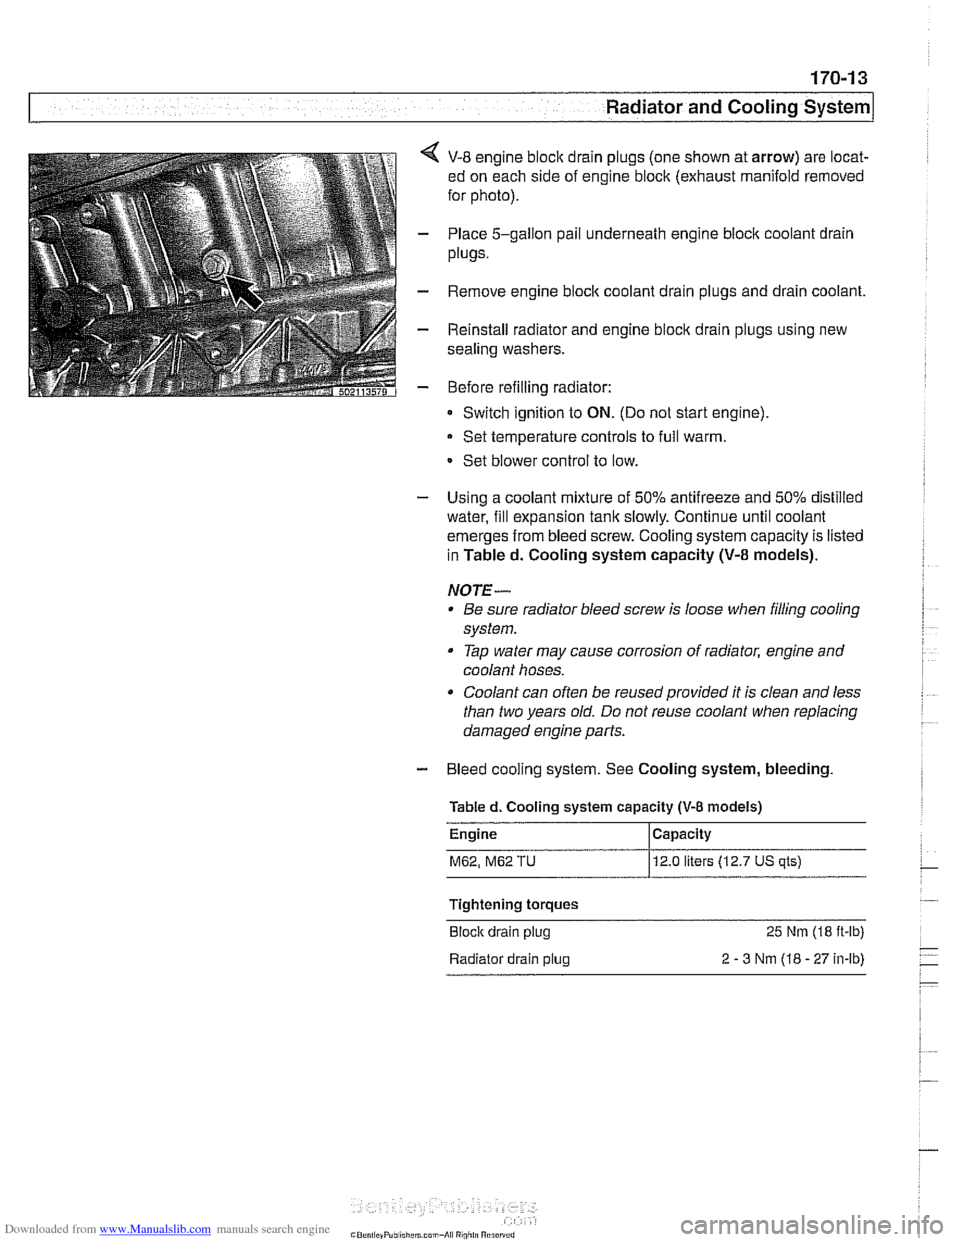
< V-8 engine bloclc drain plugs (one shown at arrow) are locat-
ed on each side of engine block (exhaust manifold removed
for photo).
- Place 5-gallon pail underneath engine block coolant drain
plugs.
- Remove engine bloclc coolant drain plugs and drain coolant.
- Reinstall radiator and engine block drain plugs using new
sealing washers.
- Before refilling radiator:
Switch ignition to
ON. (Do not start engine)
Set temperature controls to full warm.
- Set blower control to low.
- Using a coolant mixture of 50% antifreeze and 50% distilled
water, fill expansion tank slowly. Continue until coolant
emerges from bleed screw. Cooling system capacity is listed
in Tabled. Cooling system capacity
(V-8 models).
NOTE- Be sure radiator bleed screw is loose when filling cooling
system.
Tap water may cause corrosion of radiator, engine and
coolant hoses.
Coolant can often be reused provided it is clean and less
than two years old. Do not reuse coolant when replacing
damaged engine parts.
- Bleed cooling system. See Cooling system, bleeding
Tabled. Cooling system
capacity (V-8 models)
M62, M62 TU 12.0 liters (12.7 US qts)
Tightening torques
Block drain plug
25 Nm (18 ft-lb)
Radiator drain plug
2 - 3 Nm (18 - 27 in-lb)
Page 510 of 1002
Downloaded from www.Manualslib.com manuals search engine
Radiator and Cooling System
Cooling system, bleeding
Trapped air in the cooling system can prevent proper coolant
circulation and overheating. Wheneverthe coolant is drained
and filled, bleed the cooling system to remove trapped air.
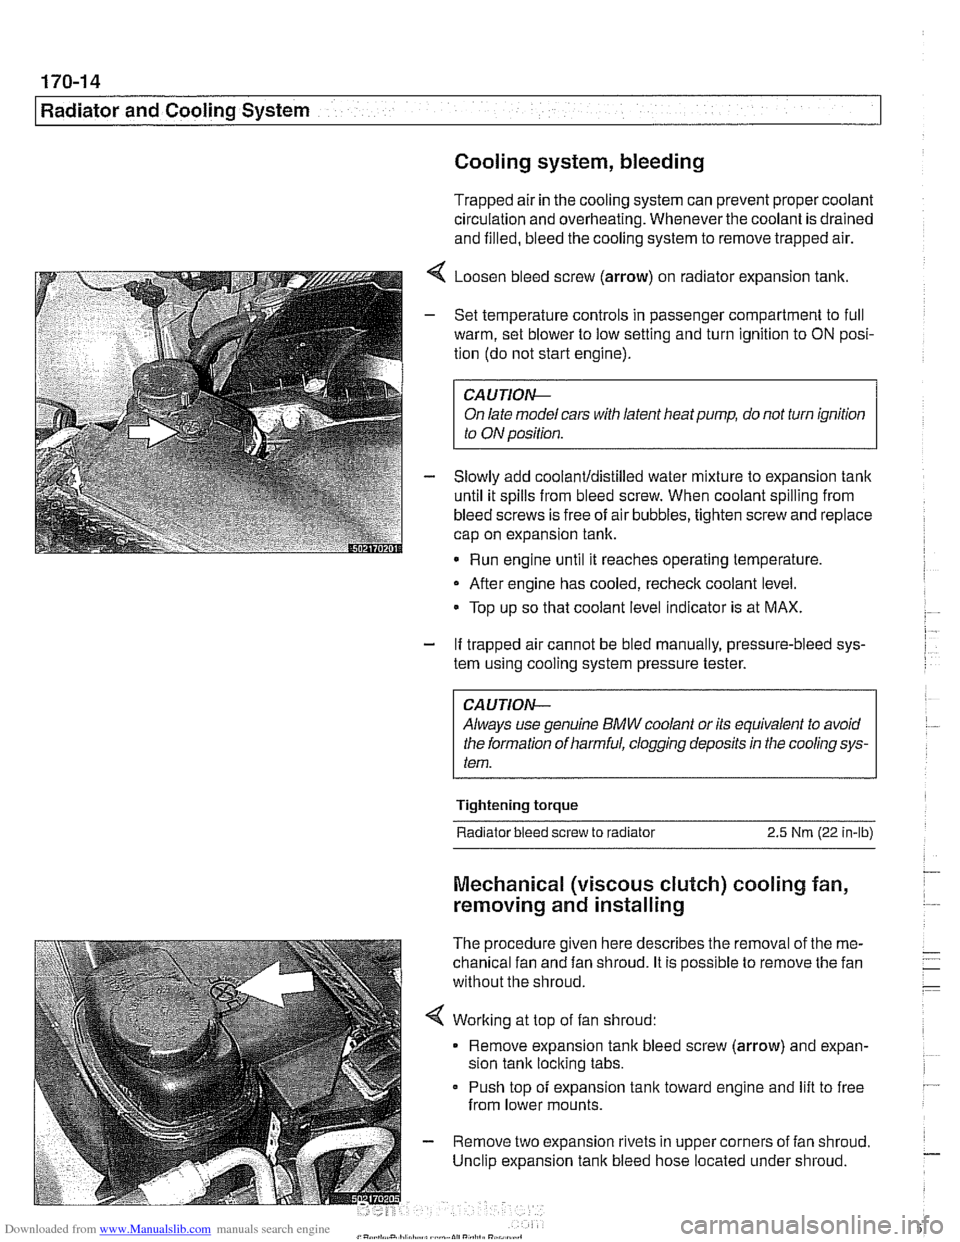
4 Loosen bleed screw (arrow) on radiator expansion tank.
- Set temperature controls in passenger compartment to full
warm, set blower to low setting and turn ignition to
ON posi-
tion (do not start engine).
CAUTIOIG
On late model cars with latent heat pump, do not turn ignition
to ON position.
- Slowly add coolanUdistilled water mixture to expansion tank
until it spills from bleed screw. When coolant spilling from
bleed screws is free of air bubbles, tighten screw and replace
cap on expansion tank.
Run engine until it reaches operating temperature,
- After engine has cooled, recheck coolant level.
Top up so that coolant level indicator is at MAX.
- If trapped air cannot be bled manually, pressure-bleed sys-
tem using cooling system pressure tester.
CA UTlON--
Always use genuine BMW coolant or its equivalent to avoid
the formation of harmful, clogging deposits
in the cooling sys-
tem.
Tightening torque
Radiator bleed screw to radiator 2.5 Nm (22 in-lb)
Mechanical (viscous clutch) cooling fan,
removing and installing
The procedure given here describes the removal of the me-
chanical fan and fan shroud. It is possible to remove the fan
without the shroud.
< Working at top of fan shroud:
Remove expansion tank bleed screw (arrow) and expan-
sion tank locking tabs.
Push top of expansion
tank toward engine and lift to free
from lower mounts.
- Remove two expansion rivets in upper corners of fan shroud.
Unclip expansion tank bleed hose located under shroud.