wheel front BMW 528i 1998 E39 Owner's Guide
[x] Cancel search | Manufacturer: BMW, Model Year: 1998, Model line: 528i, Model: BMW 528i 1998 E39Pages: 1002
Page 634 of 1002
Downloaded from www.Manualslib.com manuals search engine
300-1 4
I Susoension. Steerina and Brakes - General
DSC system I
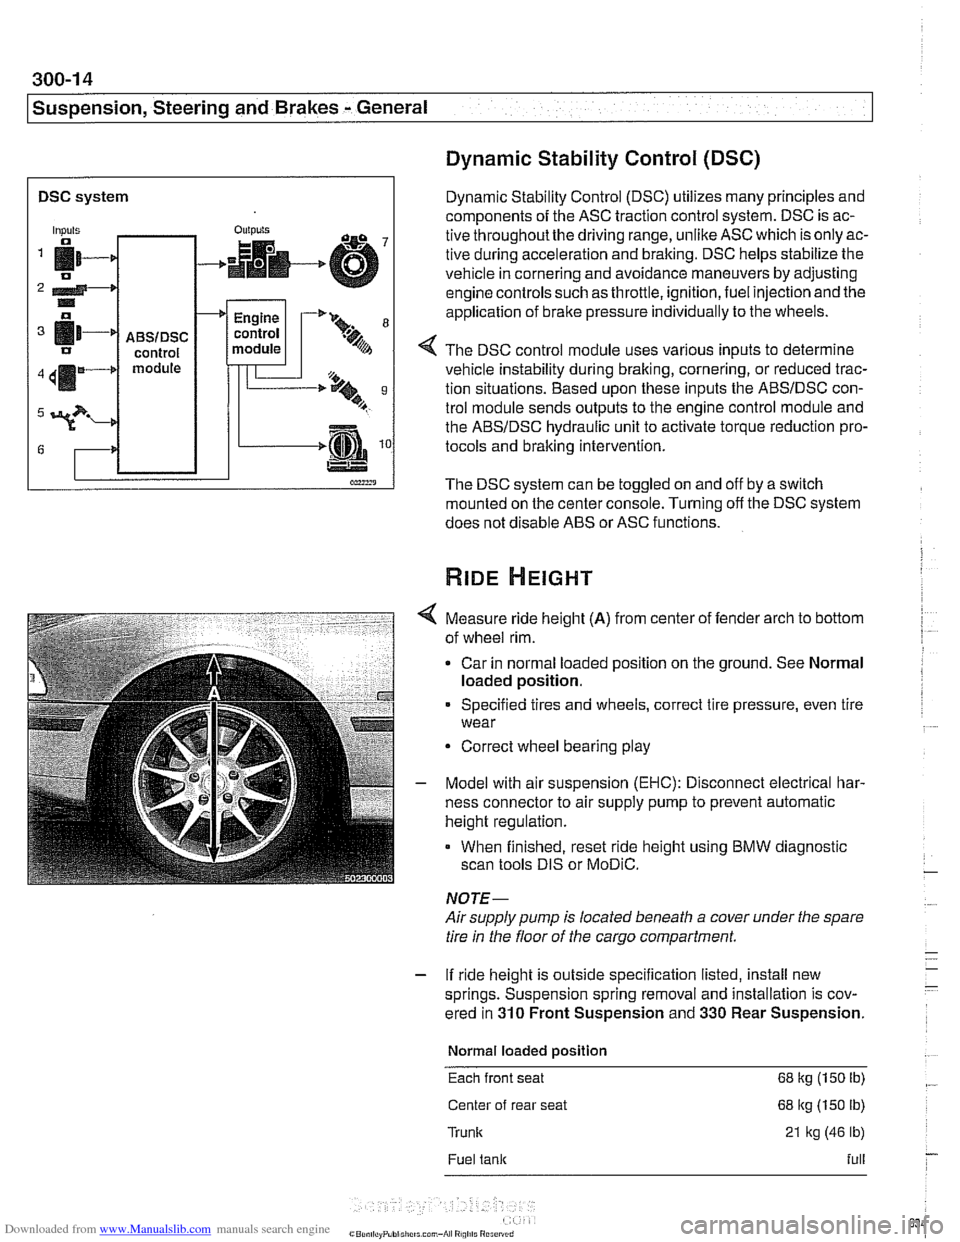
Dynamic Stability Control (DSC)
Dynamic Stability Control (DSC) utilizes many principles and
components of the ASC traction control system. DSC is ac-
tive throughoutthe driving range, unlike ASC which is only ac-
tive during acceleration and braking. DSC helps stabilize the
vehicle in cornering and avoidance maneuvers by adjusting
engine controls such as throttle, ignition, fuel injection and the
application of
brake pressure individually to the wheels.
Inputs
fi- 0
2 4-* .. o
[11-' IJ
411m4
3?-
G
4 The DSC control module uses various inputs to determine
vehicle instability during braking, cornering, or reduced trac-
tion situations. Based upon these inputs the ABSIDSC con-
trol module sends outputs to the engine control module and
the ABSIDSC hydraulic unit to activate torque reduction pro-
tocols and braking intervention.
-
ABSIDSC control module
OUI~YIS
4
The DSC system can be toggled on and off by a switch
mounted on the center console. Turning off the DSC system
does not disable ABS or ASC functions.
+
Measure ride height (A) from center of fender arch to bottom
of wheel rim.
Car in normal loaded position on the ground. See Normal
loaded position.
Engine
control
module
Specified tires and wheels, correct tire pressure, even tire
wear
-'* 9-
.%A
Correct wheel bearing play
T'== ..t, 9 B
-.m
Model with air suspension (EHC): Disconnect electrical har-
ness connector to air supply pump to prevent automatic
height regulation.
When finished, reset ride height using BMW diagnostic
scan tools DIS or
MoDiC.
NOTE-
Airsupply pump is located beneath a cover under the spare
tire in the floor of the cargo compartment.
- If ride height is outside specification listed, install new
springs. Suspension spring removal and installation is cov-
ered in
310 Front Suspension and 330 Rear Suspension.
Normal loaded position
Each front seat 68 kg (150 Ib)
Center of rear seat 68 kg (150 lb)
Trunk 21 kg (46 lb)
Fuel tank full
Page 635 of 1002
Downloaded from www.Manualslib.com manuals search engine
Suspension, Steering and Brakes - General
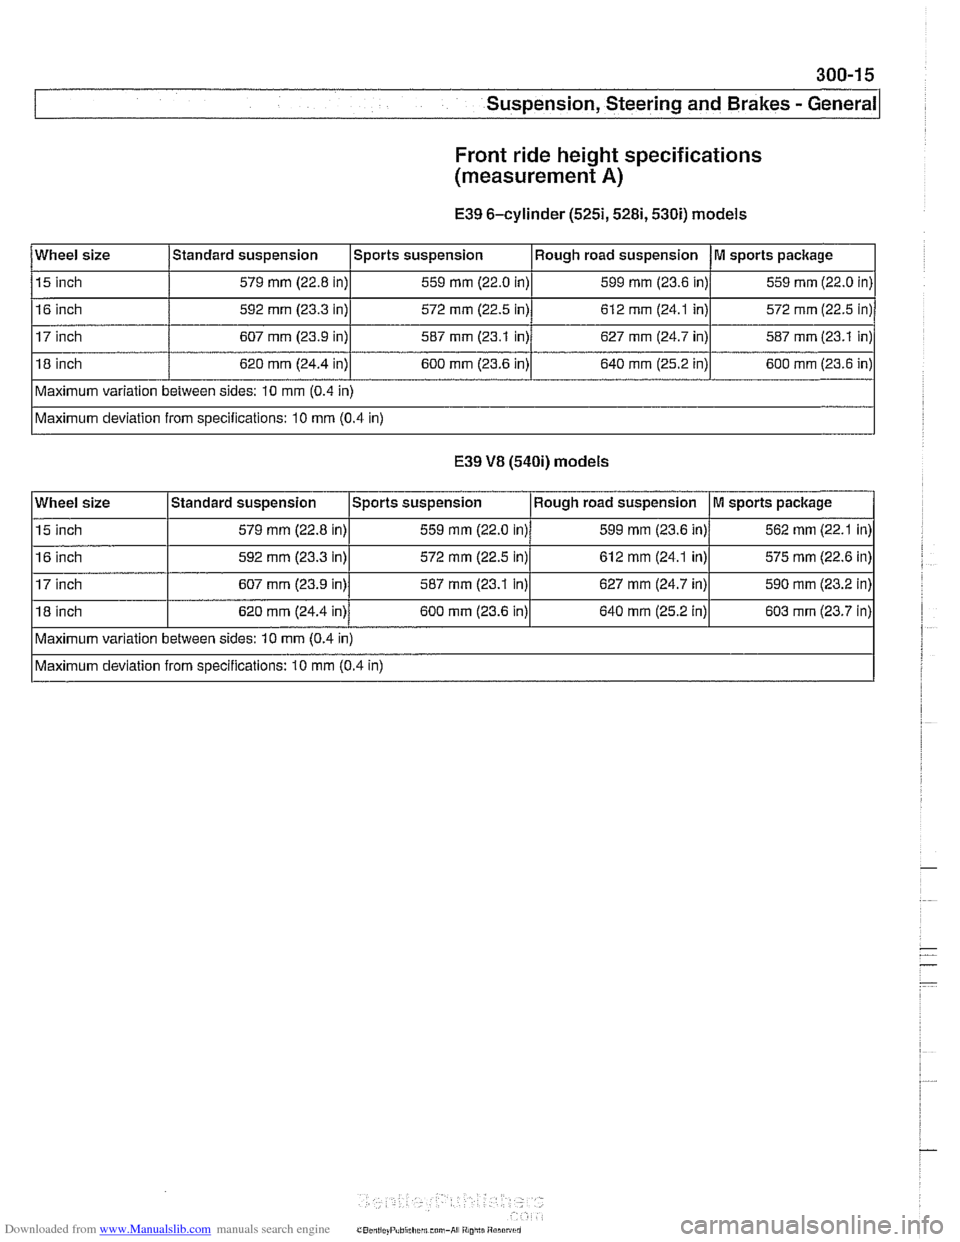
Front ride height specifications
(measurement
A)
E39 6-cylinder (5251,5281,530i) models
E39
V8 (540i) models
Wheel size
15 inch
16 inch
17 inch
18 inch
Maximum variation between sides: 10 mm (0.4 in)
Maximum deviation from specifications: 10 mm (0.4 in)
Standard
suspension
579 mm (22.8 in)
592 mm (23.3 in)
607 mm (23.9 in)
620 mm (24.4 in)
Wheel size
15 inch
16 inch
17 inch
18 inch Sports suspension
559
mm (22.0 in)
572 mm (22.5 in)
587 mm (23.1 in)
600 mm (23.6 in)
Maximum variation between sides: 10 mm (0.4 in)
Maximum deviation from specifications: 10 mm (0.4 in)
Standard
suspension
579 mm (22.8 in)
592
mm (23.3 in)
607 mm (23.9 in)
620 mm (24.4 in) Rough
road suspension
599
mm (23.6 in)
612 mm (24.1 in)
627 mm (24.7 in)
640 mm (25.2 in)
Sports suspension
559 mm (22.0 in)
572 mm (22.5 in)
587 mm (23.1 in)
600
mm (23.6 in)
M sports package
559 mm (22.0 in)
572 mm (22.5 in)
587 mm (23.1 in)
600 mm (23.6 in)
Rough road suspension 599 mm (23.6 in)
612
mm (24.1 in)
627
mm (24.7 in)
640
mm (25.2 in)
M sports package
562 mm (22.1 in)
575 mm (22.6 in)
590
mm (23.2 in)
603
mm (23.7 in)
Page 637 of 1002
Downloaded from www.Manualslib.com manuals search engine
31 0 Front Suspension
General . . . . . . . . . . . . . . . . . . . . . . . . . . . .310-2 Front Suspension Arms . . . . . . . . . . . 310-1 2
Special tools . . . . . . . . . . . . . . . . . . . . . . . . ,310-2 Control arm, removing and installing
Front suspension variations
. . . . . . . . . . . . ,310-4 (6-cylinder models) . . . . . . . . . . . . . . . . . . 31 0-1 2
Control arm, removing and installing Front Strut ' ' ' ' ' ' ' ' ' ' ' ' ' ' '310-4 ("-8 models) , , , , , , , , , , , , , , , , , , , , , , , 310-13 Front strut assembly, removing
Tension strut, removing and installing . . . . 310-16 and installing . . . . . . . . . . . . . . . . . . . . . . . . ,310-5 Tension strut bushing, replacing . . . . . . . . 310-18 Front strut assembly components
(6-cylinder models)
. . . . . . . . . . . . . . . . . . ,310-9 Wheel Bearings, Front . . . . . . . . . . . . . 310-18
iron; strut assembly, disassembling Front Stabilizer Bar . . . . . . . . . . . . . . . 310-22 and assembling . . . . . . . . . . . . . . . . . . . . . ,310-9 Stabilizer bar, removing and installing . . . . 310-22
Page 641 of 1002
Downloaded from www.Manualslib.com manuals search engine
31 0-5
Front ~uspensionl
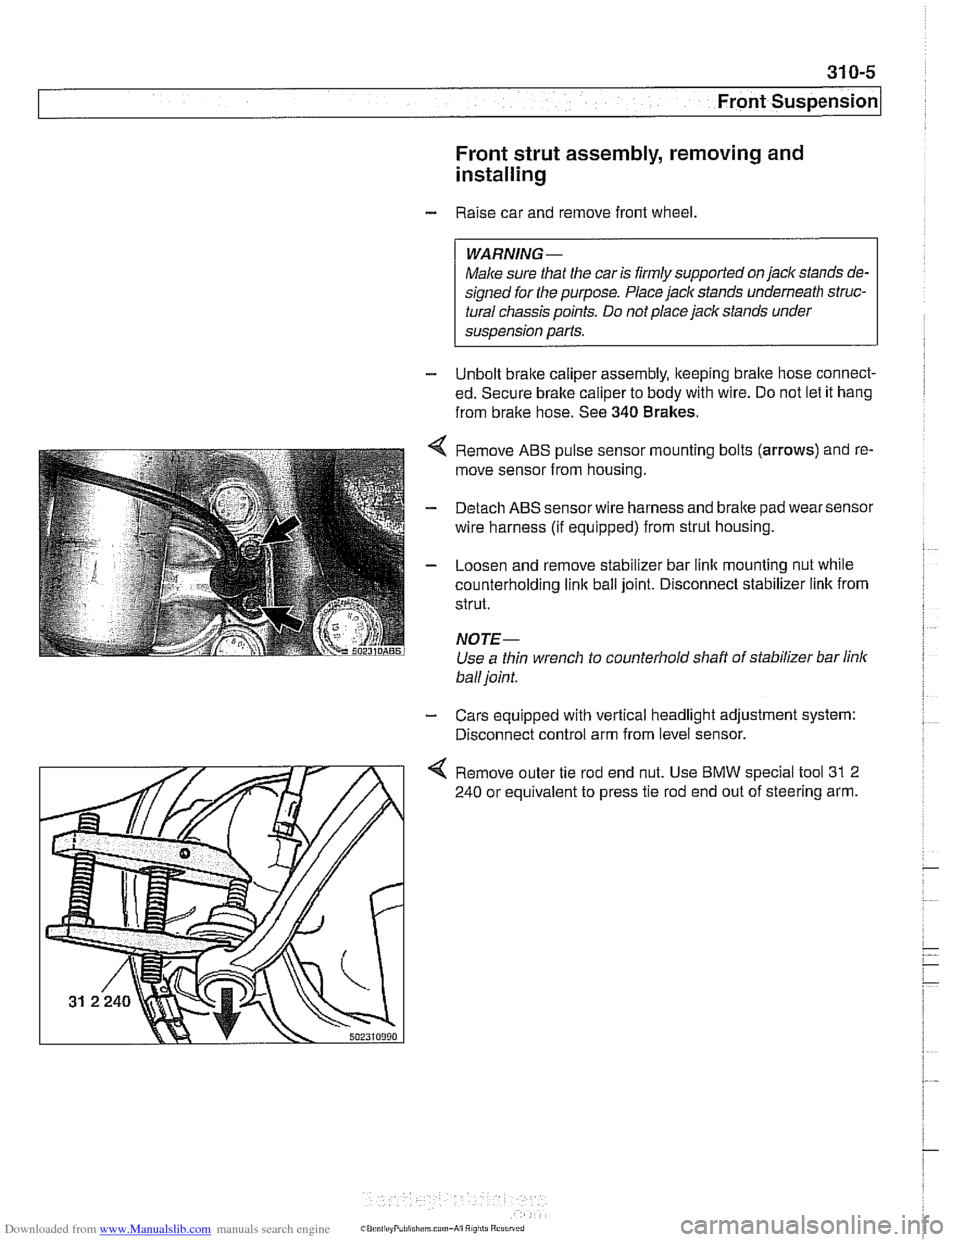
Front strut assembly, removing and
installing
- Raise car and remove front wheel.
WARNING-
Make sure that the car is firmly supported on jack stands de-
signed for the purpose. Place jack stands underneath struc-
tural chassis points.
Do not place jack stands under
suspension
parts.
- Unbolt bralte caliper assembly, lkeeping bralte hose connect-
ed. Secure brake caliper to body with wire. Do not let it hang
from brake hose. See
340 Brakes.
Remove ABS pulse sensor mounting bolts (arrows) and re-
move sensor from housing.
Detach ABS sensor wire harness and bralte pad wear sensor
wire harness (if equipped) from strut housing.
Loosen and remove stabilizer bar link mounting nut while
counterholding
link ball joint. Disconnect stabilizer link from
strut.
NOTE-
Use a thin wrench to counterhold shaft of stabilizer bar link
ball joint.
- Cars equipped with vertical headlight adjustment system:
Disconnect control arm from level sensor.
4 Remove outer tie rod end nut. Use BMW special tool 31 2
240 or equivalent to press tie rod end out of steering arm.
Page 643 of 1002
Downloaded from www.Manualslib.com manuals search engine
Front ~us~ensionl
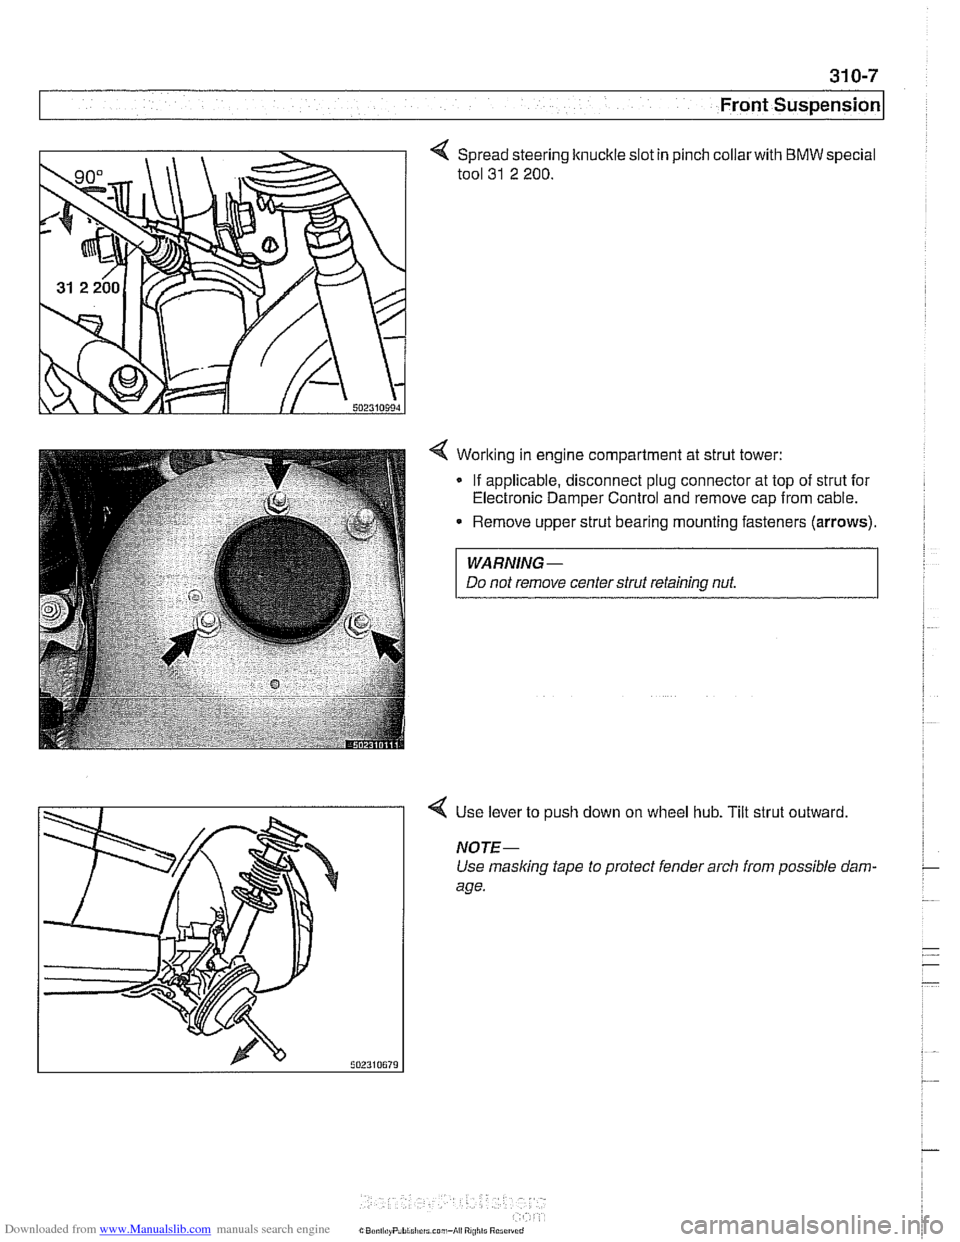
Spread steering knuckle slot in
tool
31 2 200.
pinch collarwith BMW special
4 Worlting in engine compartment at strut tower:
- If applicable, disconnect plug connector at top of strut for
Electronic Damper Control and remove cap from cable.
Remove upper strut bearing mounting fasteners
(arrows).
WARNING-
Do not remove centerstrut retaining nut.
4 Use lever to push down on wheel hub. Tilt strut outward
NOTE-
Use masking tape to protect fender arch from possible dam-
age.
Page 644 of 1002
Downloaded from www.Manualslib.com manuals search engine
31 0-8
Front Suspension
Slide strut assembly out of steering lknucltle pinch collar. If
necessary use pry bar.
CA UTIOI\C
Do notpullstrut out of steering knuckle with twisting motion.
This can scratch and damage the strut.
Disassemble and reassemble strut assembly as described
later.
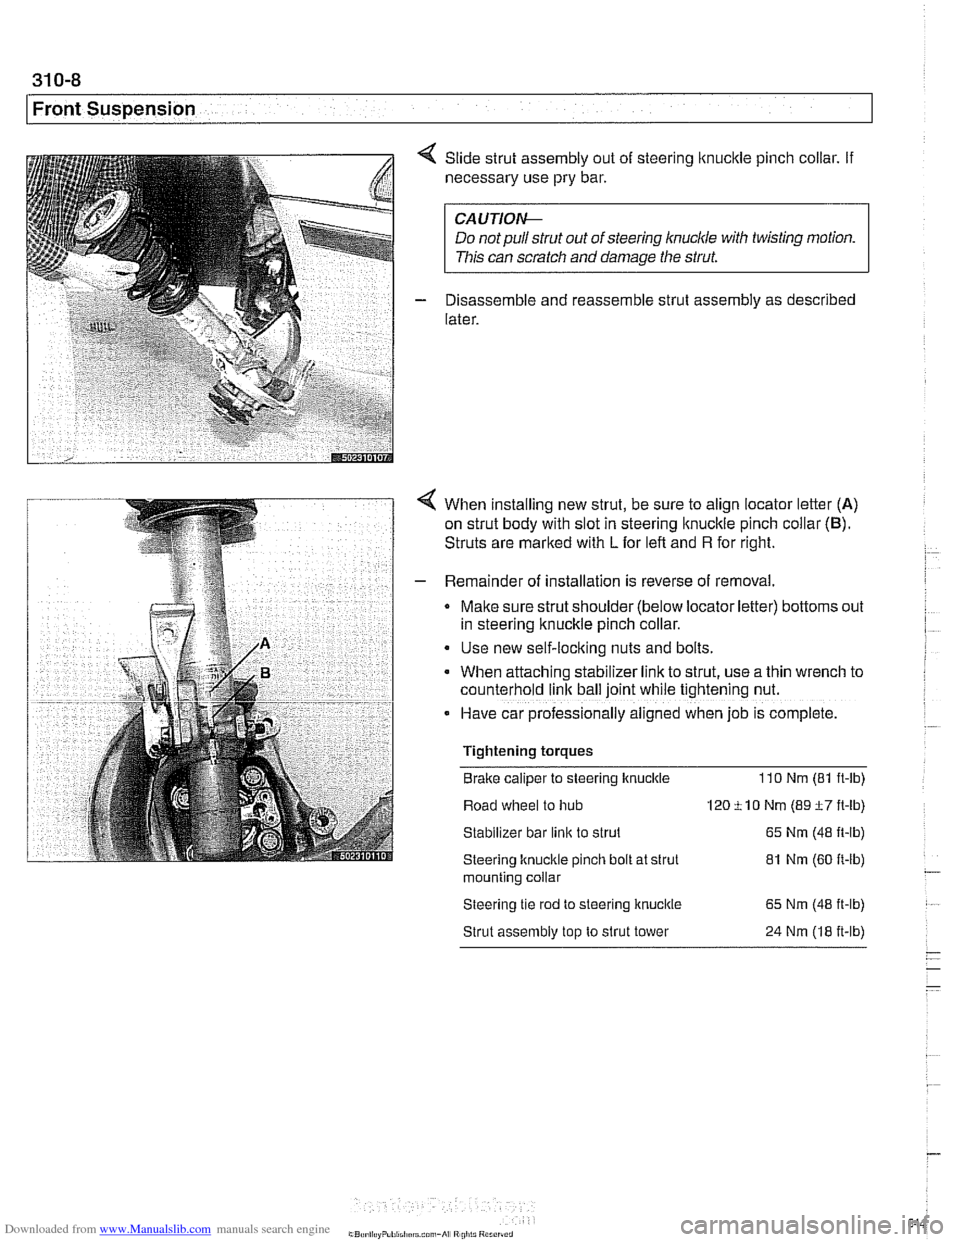
When installing new strut, be sure to align locator letter (A)
on strut body with slot in steering
lknuckle pinch collar (6).
Struts are marked with L for left and R for right.
Remainder of installation is reverse of removal.
Make sure strut shoulder (below locator letter) bottoms out
in steering knuckle pinch collar.
Use new self-locking nuts and bolts.
When attaching stabilizer
lrnk to strut, use a thin wrench to
counterhold
link ball joint while t~ghtening nut.
- Have car professionally al~gned when job IS complete.
Tightening torques
Brake caliper to steering knuckle
110 Nm (81 ft-ib)
Road wheel to hub 120 ti0 Nm (89 t7 ft-lb)
Stabilizer bar
link to strut 65 Nm (48 It-lb)
Steering knucltle pinch bolt at strut 81 Nm (60 It-lb) - mountlng collar
Steering tle rod to steerlng knuckle 65 Nm (48 it-lb)
Strut assembly top to strut tower 24 Nm (18 it-lb)
- - -
Page 648 of 1002
Downloaded from www.Manualslib.com manuals search engine
/~ront Susaension
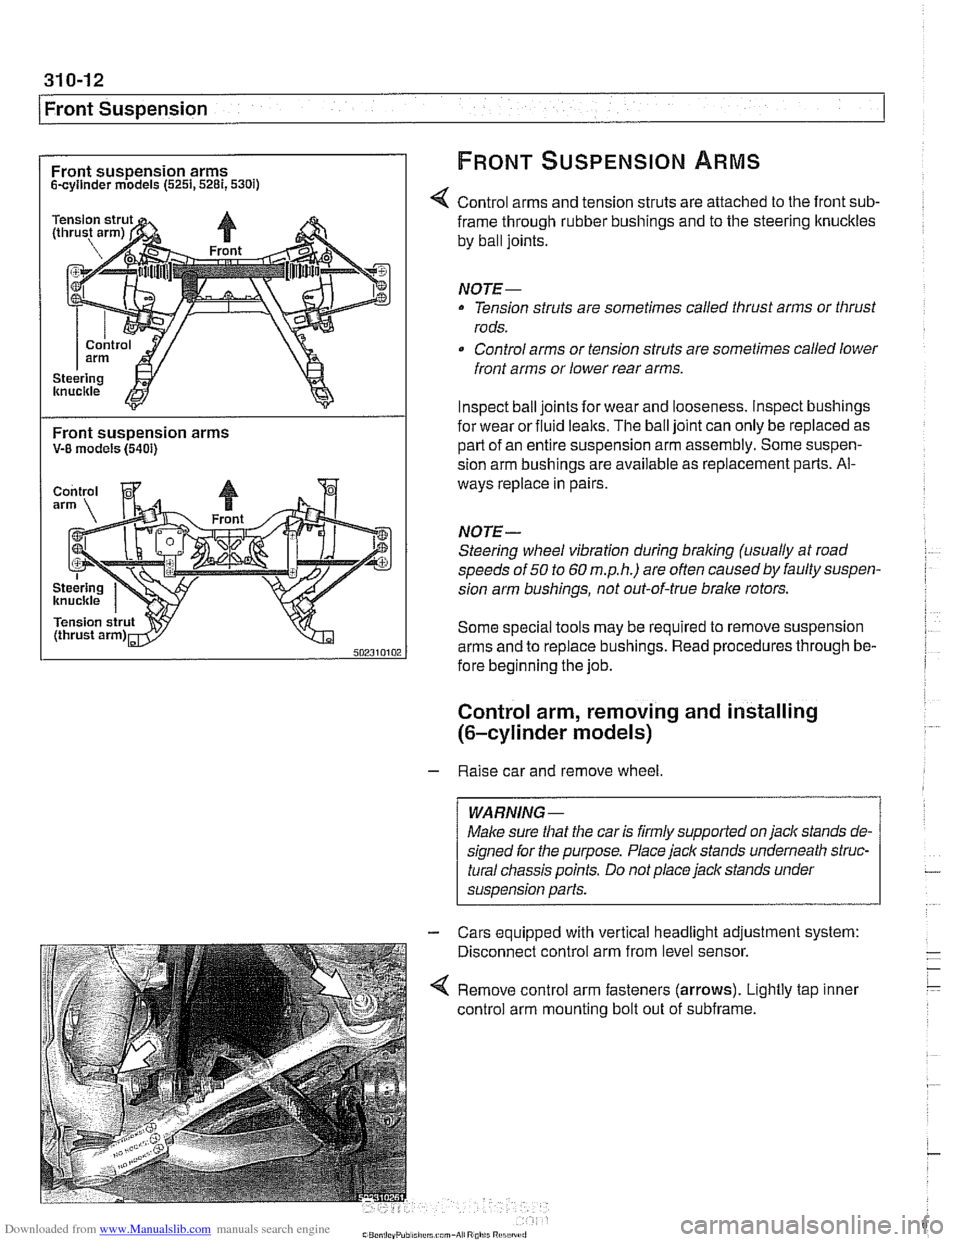
Front suspension arms FRONT SUSPENSION ARMS
Scyllnder models (5251,5281,530i)
Control arms and tension struts are attached to the front sub-
Front suspension arms V-8 models (5401)
frame through rubber bushings and to the steering ltnuckles
by ball joints.
NOTE-
Tension struts are sometimes called thrust arms or thrust
rods.
Control arms or tension struts are sometimes called lower
front arms or lower rear arms.
Inspect ball joints for wear and looseness. lnspect bushings
for wear or fluid
lealts. The ball joint can only be replaced as
part of an entire suspension arm assembly. Some suspen-
sion arm
bushinas are available as re~lacement Darts. Al-
ways replace in pairs
NOTE-
Steering wheel vibration during braking (usually at road
speeds of
50 to 60 m.p.h.) are often causedby faulty suspen-
sion arm bushings, not out-of-true brake rotors.
Some special tools may be required to remove suspension
arms and to replace bushings. Read procedures through be-
fore beginning the job.
Control arm, removing and installing
(6-cylinder models)
- Raise car and remove wheel
Male sure
that the car is firmly supported on jack stands de-
signed for the purpose. Place jack stands underneath struc-
tural chassis points. Do not place jack stands under
suspension
parfs.
Cars equipped with vertical headlight adjustment system:
Disconnect control arm from level sensor.
Remove control arm fasteners (arrows). Lightly tap inner
control arm mounting bolt out of subframe.
Page 649 of 1002
Downloaded from www.Manualslib.com manuals search engine
Front Suspension
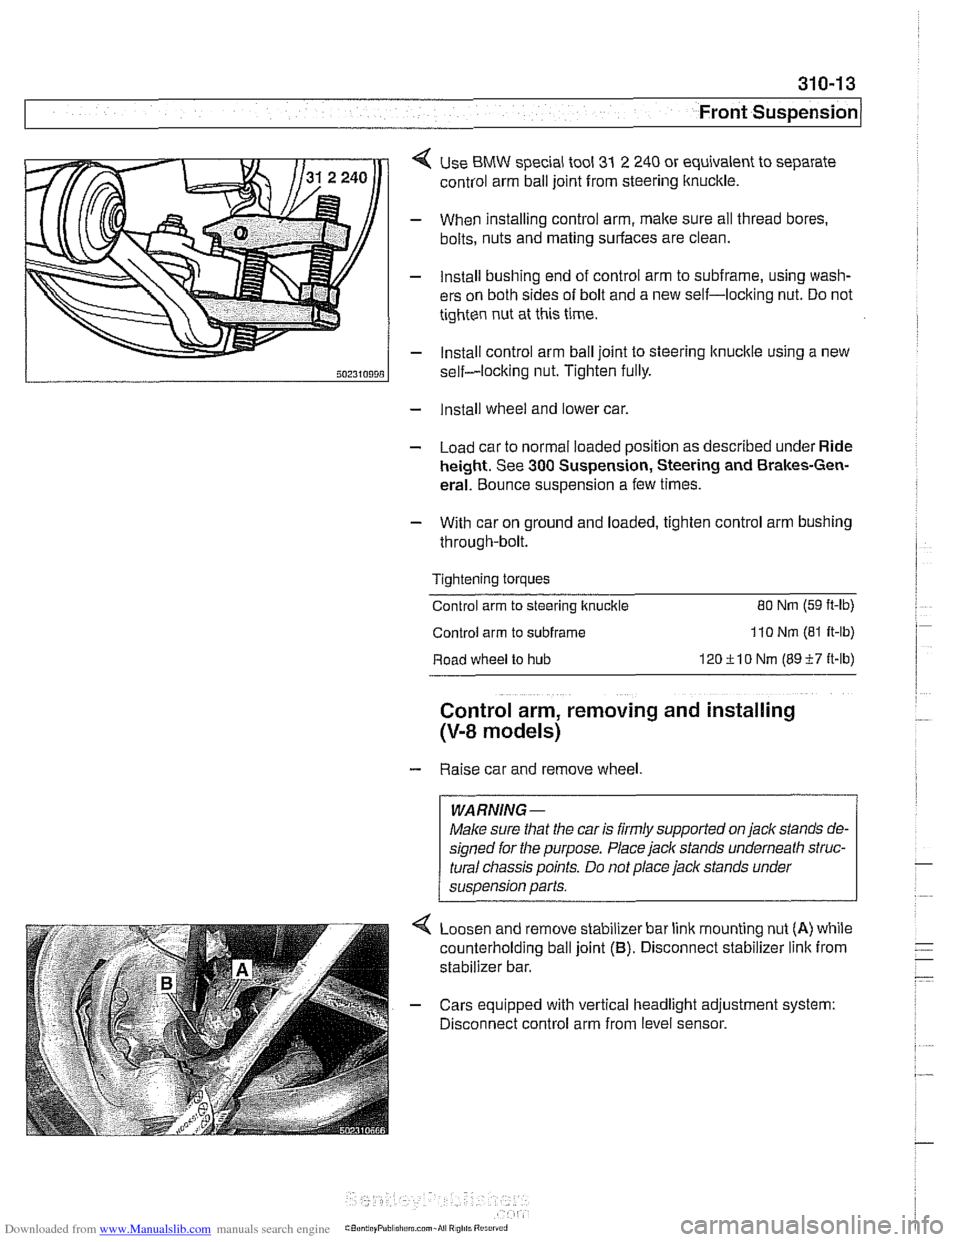
< Use BMW special tool 31 2 240 or equivalent to separate
control arm ball joint from steering ltnuckle.
- When installing control arm, make sure all thread bores.
bolts, nuts and mating surfaces are clean.
- Install bushing end of control arm to subframe, using wash-
ers on both sides of bolt and a new self-locking nut. Do not
tighten nut at this time.
- Install control arm ball joint to steering lknucltle using a new
self-locking nut. Tighten fully.
- Install wheel and lower car.
- Load car to normal loaded position as described under Ride
height. See
300 Suspension, Steering and Brakes-Gen-
eral. Bounce suspension a few times.
- With car on ground and loaded, tighten control arm bushing
through-bolt.
Tightening torques
Control arm to steering ltnuckle
80 Nm (59 ft-lb)
Control arm to subframe 110 Nm (81 It-lb)
Road wheel to hub 120ilO Nm (8957 it-lb)
Control arm, removing and installing
(V-8 models)
- Raise car and remove wheel
WARNING-
Make sure that the car is firmly supported on jack stands de-
signed for the purpose. Place jack stands underneath struc-
tural
cliassis points. Do not place jack stands under
suspension parts.
Loosen and remove stabilizer bar link mounting nut
(A) while
counterholding ball joint
(B). Disconnect stabilizer link from
stabilizer bar.
- Cars equipped with vertical headlight adjustment system:
Disconnect control arm from level sensor.
Page 651 of 1002
Downloaded from www.Manualslib.com manuals search engine
310-1 5
Front ~us~ension/
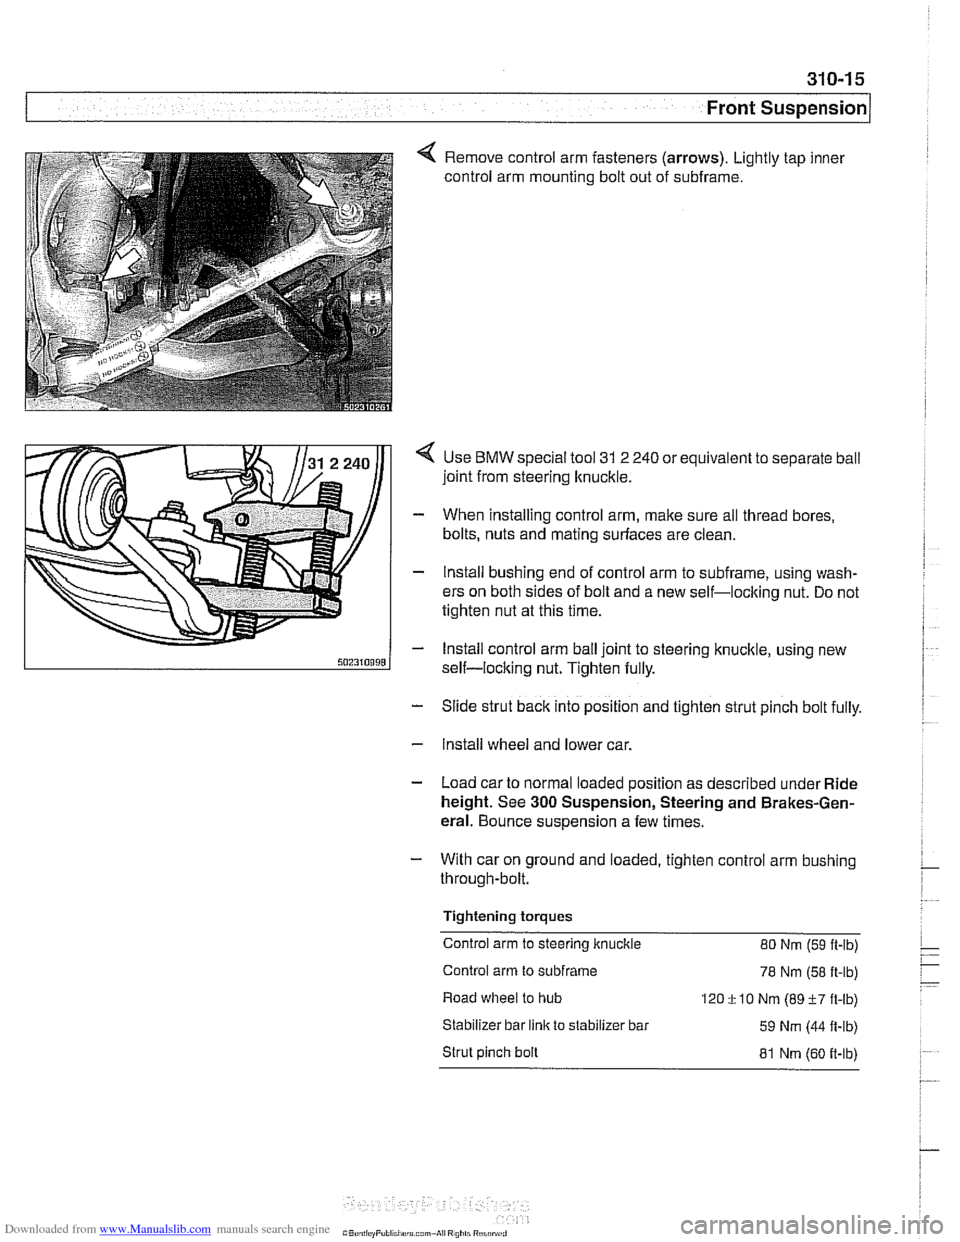
4 Remove control arm fasteners (arrows). Lightly tap inner
control arm mounting bolt out of subframe.
Use
BMW special tool 31 2 240 or equivalent to separate ball
joint from steering knuckle.
When installing control arm, make sure all thread bores,
bolts, nuts and mating surfaces are clean.
lnstall bushing end of control arm to subframe, using wash-
ers on both sides of bolt and a new self-loclting nut. Do not
tighten nut at this time.
lnstall control arm ball joint to steering knuckle, using new
self-locking nut. Tighten fully.
- Slide strut back into position and tighten strut pinch bolt fully.
- Install wheel and lower car.
- Load car to normal loaded position as described under Ride
height. See
300 Suspension, Steering and Brakes-Gen-
eral. Bounce suspension a few times.
- With car on ground and loaded, tighten control arm bushing
through-bolt.
Tightening torques
Control arm to steering knuckle 80 Nm
(59 ft-lb)
Control arm to
subframe 78 Nm (58 ft-lb)
Road wheel to hub
120
f 10 Nm (89 +7 ft-lb)
Stabilizer bar
link to stabilizer bar
59 Nm (44 fl-lb)
Strut pinch bolt
81 Nm (60 it-lb)
Page 652 of 1002
Downloaded from www.Manualslib.com manuals search engine
I Front Suspension
Tension strut, removing
and installing
- Raise car and remove wheel.
WARNING-
Make sure that the car is firmly supported on jack stands de-
signed for the purpose. Place jack stands underneath struc-
tural chassis points. Do not place
jack stands under
suspension parts.
- Remove engine splash shield
6-cylinder models: Remove
brake cooling duct.
V-8 models: Detach stabilizer bar from front subframe.
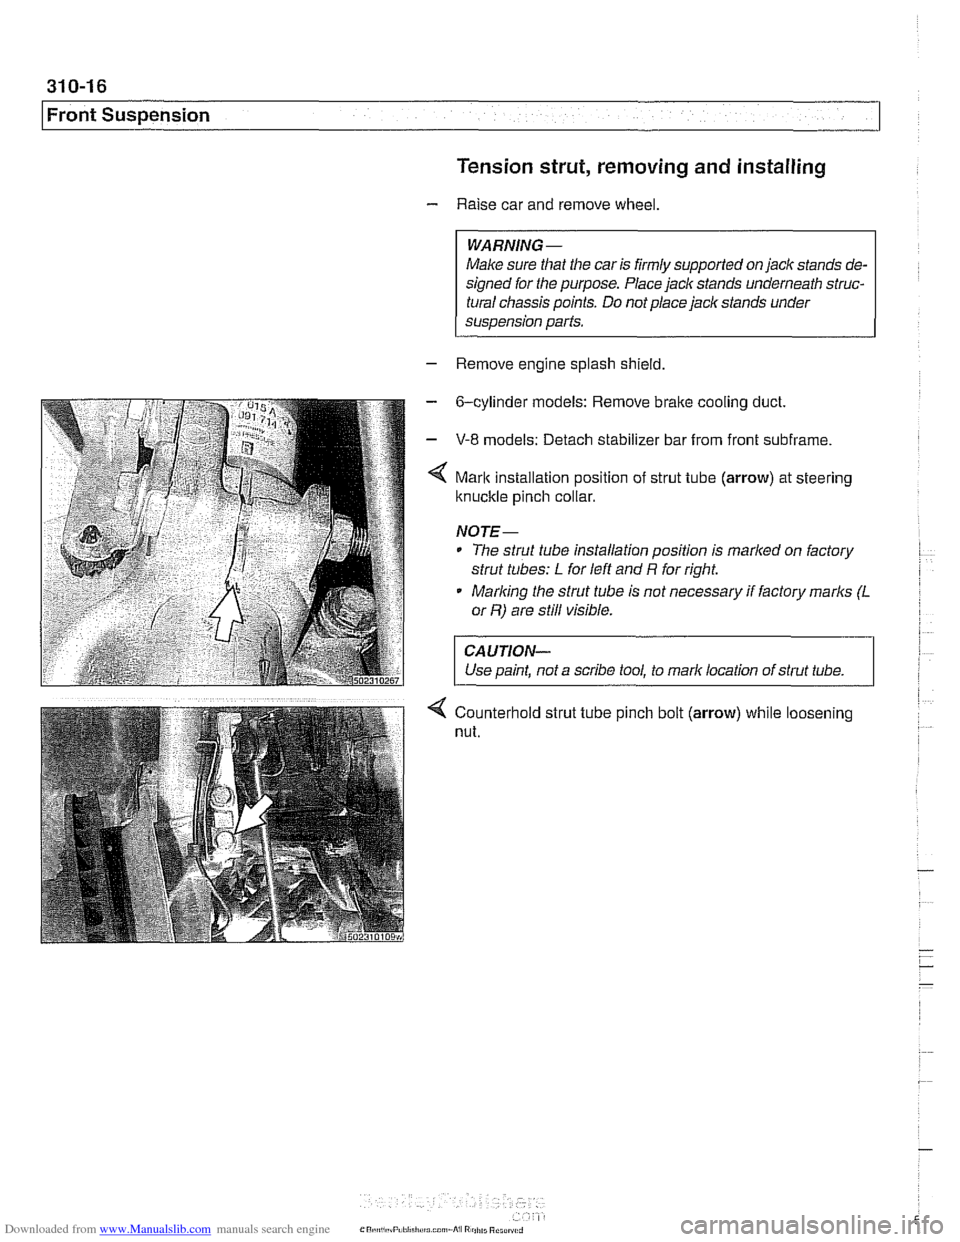
Mark installation position of strut tube (arrow) at steering
ltnuckle pinch collar.
NOJE-
* The strut tube installation position is marlted on factory
strut tubes:
L for left and R for right.
* Marlting the strut tube is not necessary if factory marks (L
or R) are still visible.
CAUJION-
Use paint, not a scribe tool, to mark location of strut tube. 1
4 Counterhold strut tube pinch bolt (arrow) while loosening
nut.