BMW 528i 1998 E39 Workshop Manual
Manufacturer: BMW, Model Year: 1998, Model line: 528i, Model: BMW 528i 1998 E39Pages: 1002
Page 931 of 1002
Downloaded from www.Manualslib.com manuals search engine
Sunroof, normalization
During normalization the mechanical end positions of sunroof
movement are detected and stored by the General Module
(GM
Ill).
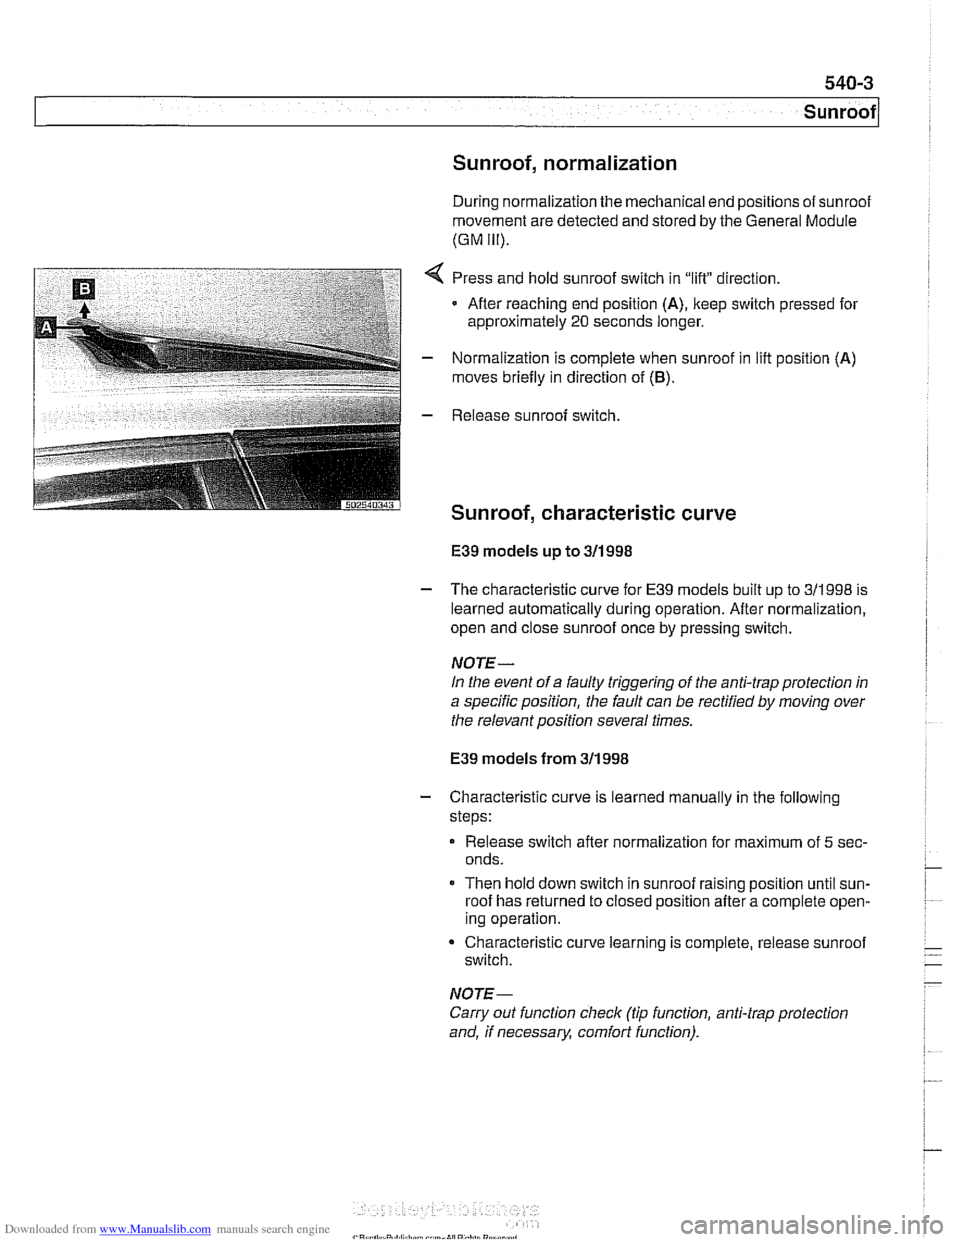
,:..I:,* *:3F$&-T , a,.,-. . 2 *i;.'I . :i_(,*,,_ _* Press and hold sunroof switch in "lift" direction.
Afler reaching end position
(A), keep switch pressed for
approximately
20 seconds longer.
- Normalization is complete when sunroof in lifl position (A)
moves briefly in direction of (6).
E39 models up to 311 998
- The characteristic curve for E39 models built up to 311998 is
learned automatically during operation. After normalization,
open and close sunroof once by pressing switch.
NOTE-
In the event of a faulty triggering of the anti-trap protection in
a specific position, the fault can be rectified
by moving over
the relevant position several times.
E39 models from 311 998
- Characteristic curve is learned manually in the following
steps:
Release switch after normalization for maximum of
5 sec-
onds.
Then hold down switch in sunroof raising position until sun-
roof has returned to closed position after a complete open-
ing operation.
Characteristic curve learning is complete, release sunroof
switch.
NOTE-
Carry out function check (tip function, anti-trap protection
and, if necessary, comfort function).
Page 932 of 1002
Downloaded from www.Manualslib.com manuals search engine
-.
Sunroof
Sunroof panel, emergency closing
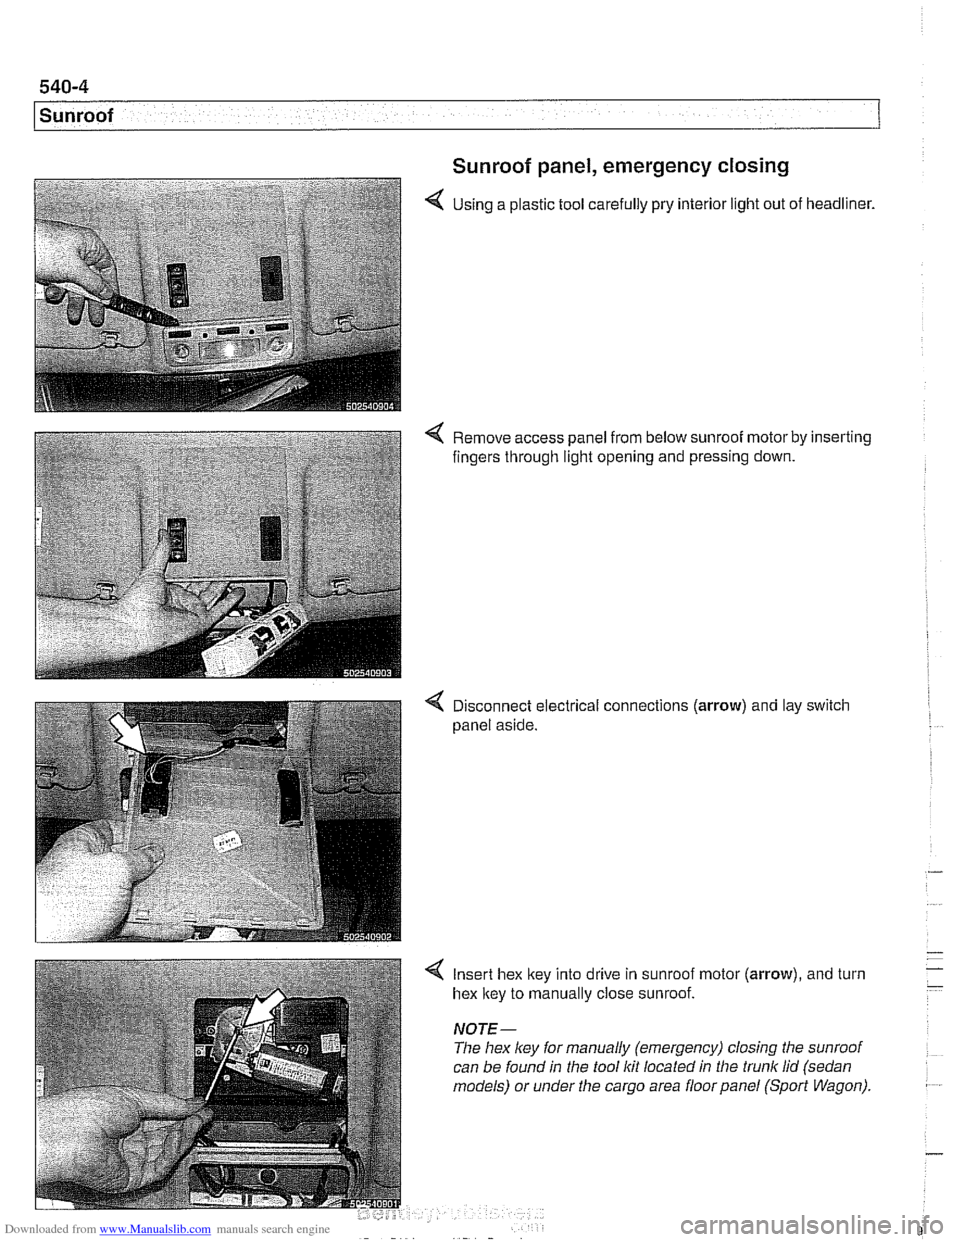
4 Using a plastic tool carefully pry interior light out of headliner.
4 Remove access panel from below sunroof motor by inserting
fingers through light opening and pressing down.
4 Disconnect electrical connections (arrow) and lay switch
panel aside.
4 Insert hex ltey into drive in sunroof motor (arrow), and turn
hex ltey to manually close sunroof.
NOTE-
The hex ley for manually (emergency) closing the sunroof
can be found in the tool
Itit located in the trunk lid (sedan
models) or under the cargo area floor panel (Sport Wagon).
Page 933 of 1002
Downloaded from www.Manualslib.com manuals search engine
Sunroof, adjusting
The sunroof is controlled by a set of cables that move the sun-
roof panel along guide rails when the motor is operated. The
sunroof can be adjusted without removing it from the car.
NOTE-
Be sure to check drains in front corners of sunroof carrier if
water is entering car through headliner.
- The sunroof panel should be adjusted under the following cir-
cumstances:
Sunroof misaligned with roof.
Sunroof does not close squarely.
* Wind noise at high speeds (sunroof closed).
Sunroof has been removed.
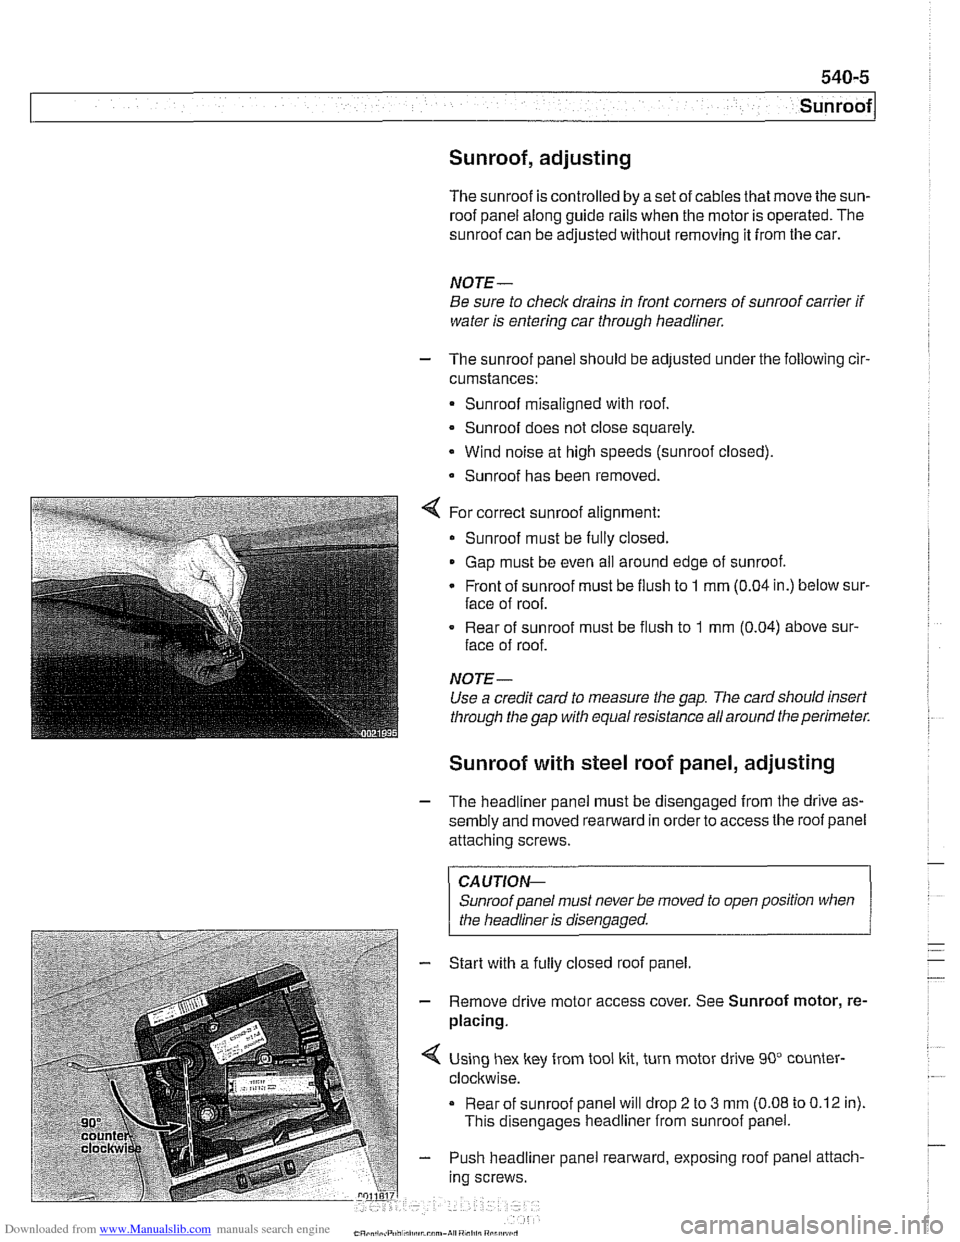
For correct sunroof alignment:
Sunroof must be fully closed.
Gap must be even all around edge of sunroof.
Front of sunroof must be flush to
1 mm (0.04 in.) below sur-
face of roof.
. Rear of sunroof must be flush to 1 mm (0.04) above sur-
face of roof.
NOTE-
Use a credit card to measure the gap. The card sllould insert
through the gap with equal resistance all around the perimeter.
Sunroof with steel roof panel, adjusting
- The headliner panel must be disengaged from the drive as-
sembly and moved rearward in order to access the roof panel
attaching screws.
CAUTIOI\C
Sunroof panel must never be moved to open position when . .
I the headliner is disenaaaed. 1
- Start with a fully closed roof panel.
- Remove drive motor access cover. See Sunroof motor, re-
placing.
Using hex key from tool kit, turn motor drive 90" counter-
clockwise.
Rear of sunroof panel will drop
2 to 3 mm (0.08 to 0.12 in).
This disengages headliner from sunroof panel.
- Push headliner panel rearward, exposing roof panel attach-
ing screws.
Page 934 of 1002
Downloaded from www.Manualslib.com manuals search engine
l Sunroof
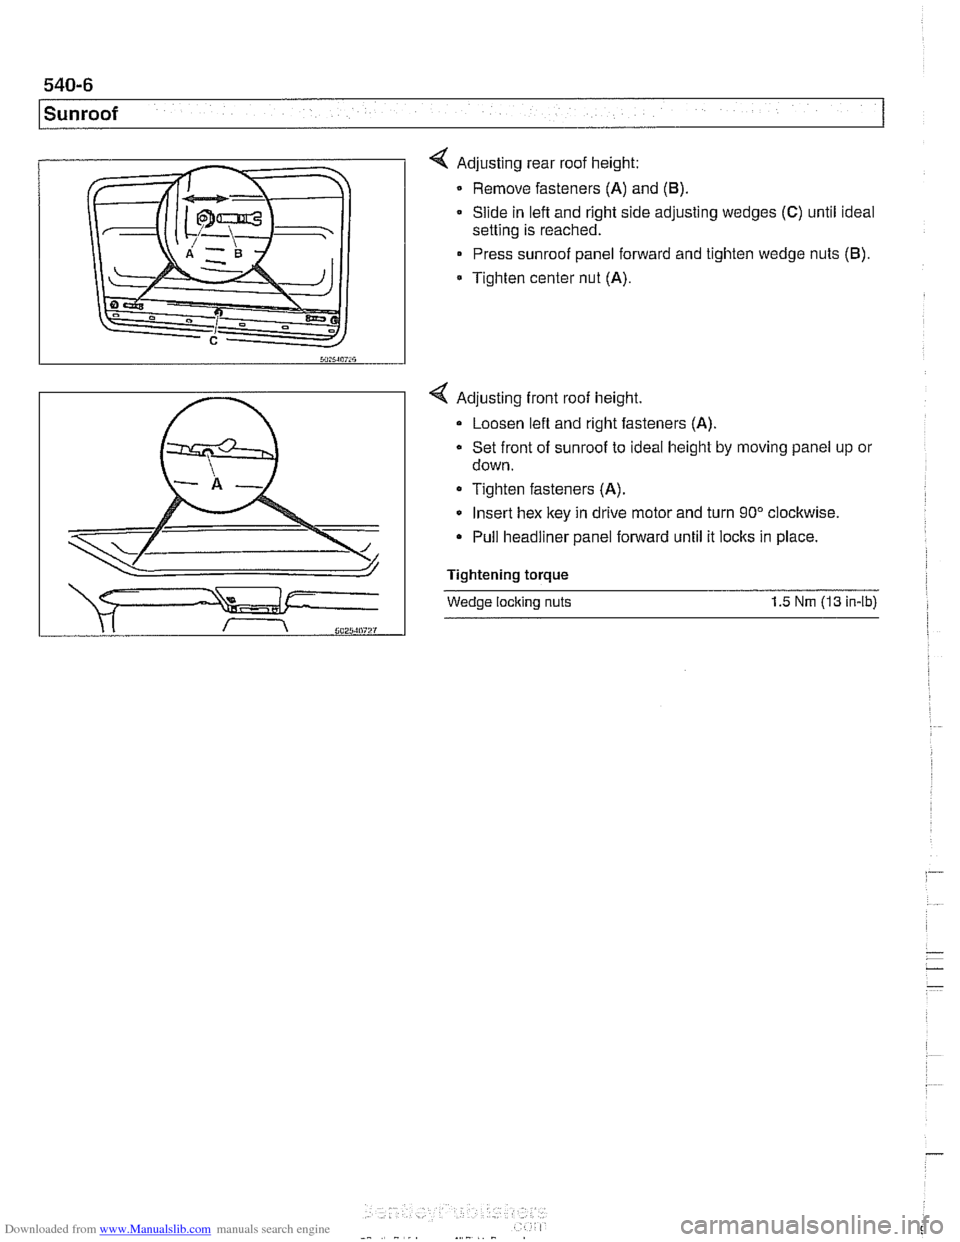
4 Adjusting rear roof height:
Remove fasteners
(A) and (6)
Slide in left and right side adjusting wedges (C) until ideal
setting is reached.
Press sunroof panel forward and tighten wedge nuts
(6).
* Tighten center nut (A).
4 Adjusting front roof height.
Loosen lefl and right fasteners
(A)
Set front of sunroof to ideal height by moving panel up or
down.
Tighten fasteners
(A).
Insert hex key in drive motor and turn 90" clockwise.
Pull headliner panel forward until it locks in place.
Tightening torque
Wedge locking nuts 1.5 Nm (1 3 in-lb)
Page 935 of 1002
Downloaded from www.Manualslib.com manuals search engine
Sunroof
Sunroof with glass roof panel, adjusting - -
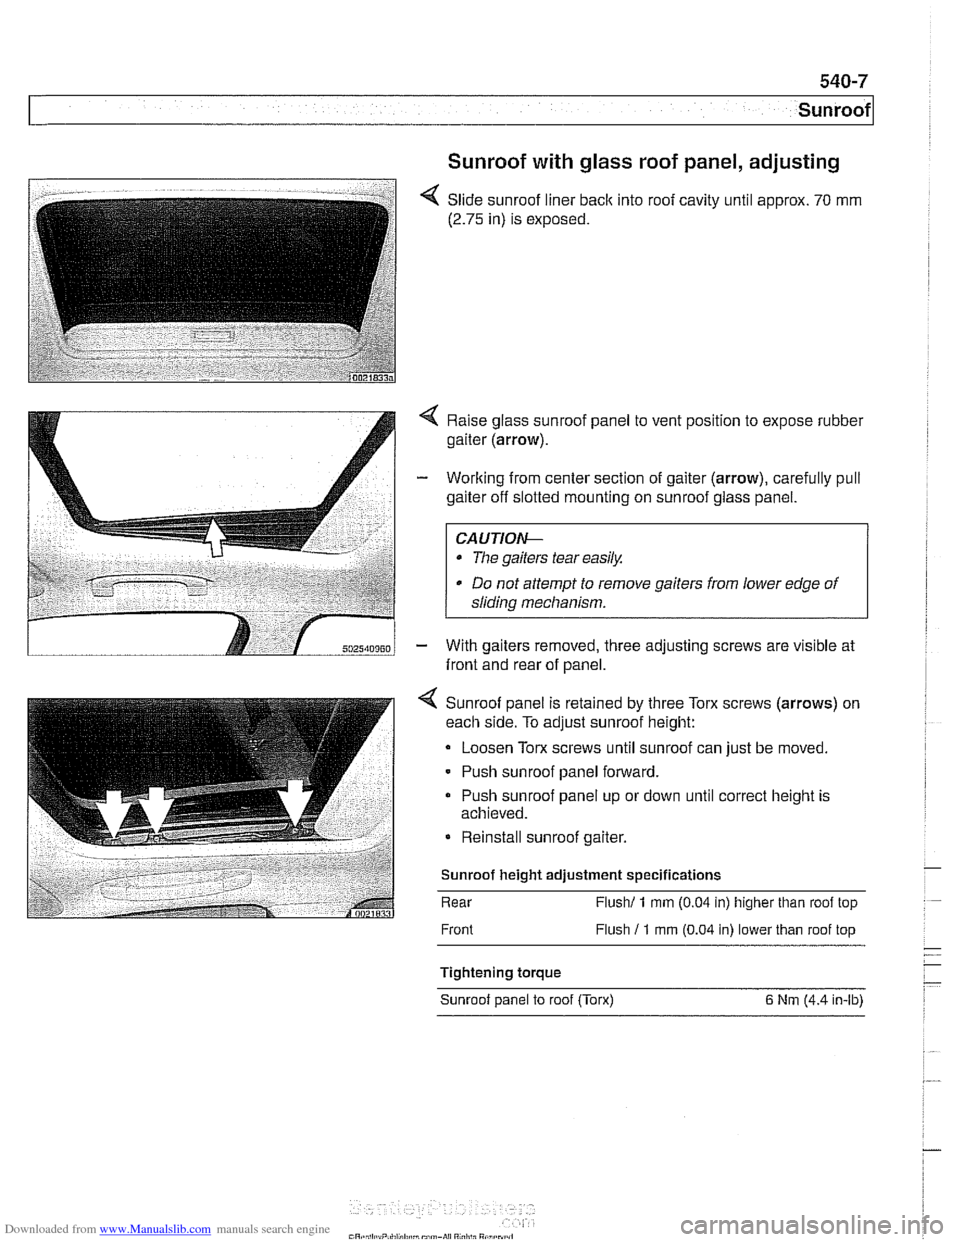
< Slide sunroof liner back into roof cavity until approx. 70 mm
(2.75 in) is exposed.
Raise glass sunroof panel to vent position to expose rubber
gaiter (arrow).
- Working from center section of gaiter (arrow), carefully pull
gaiter off slotted mounting on sunroof glass panel.
CA UTIOW-
The gaiters tear easik
* Do not attempt to remove gaiters from lower edge of
sliding mechanism.
- With gaiters removed, three adjusting screws are visible at
front and rear of panel.
4 Sunroof panel is retained by three Torx screws (arrows) on
each side. To adjust sunroof height:
Loosen Torx screws until sunroof can just be moved.
- Push sunroof panel forward.
Push sunroof panel up or down until correct height is
achieved.
Reinstall sunroof gaiter.
Sunroof height adjustment specifications
Rear
Flush1 1 rnrn (0.04 in) higher than roof top
Front Flush
11 rnrn (0.04 in) lower than roof top
Tightening torque Sunroof panel to roof (Torx)
6 Nrn (4.4 in-lb)
Page 936 of 1002
Downloaded from www.Manualslib.com manuals search engine
1 Sunroof
Sunroof assembly removal and installation involves headliner
removal, and is not covered in this manual. After sunroof re-
pairs, be sure to follow initialization and adjustment proce-
dures given earlier.
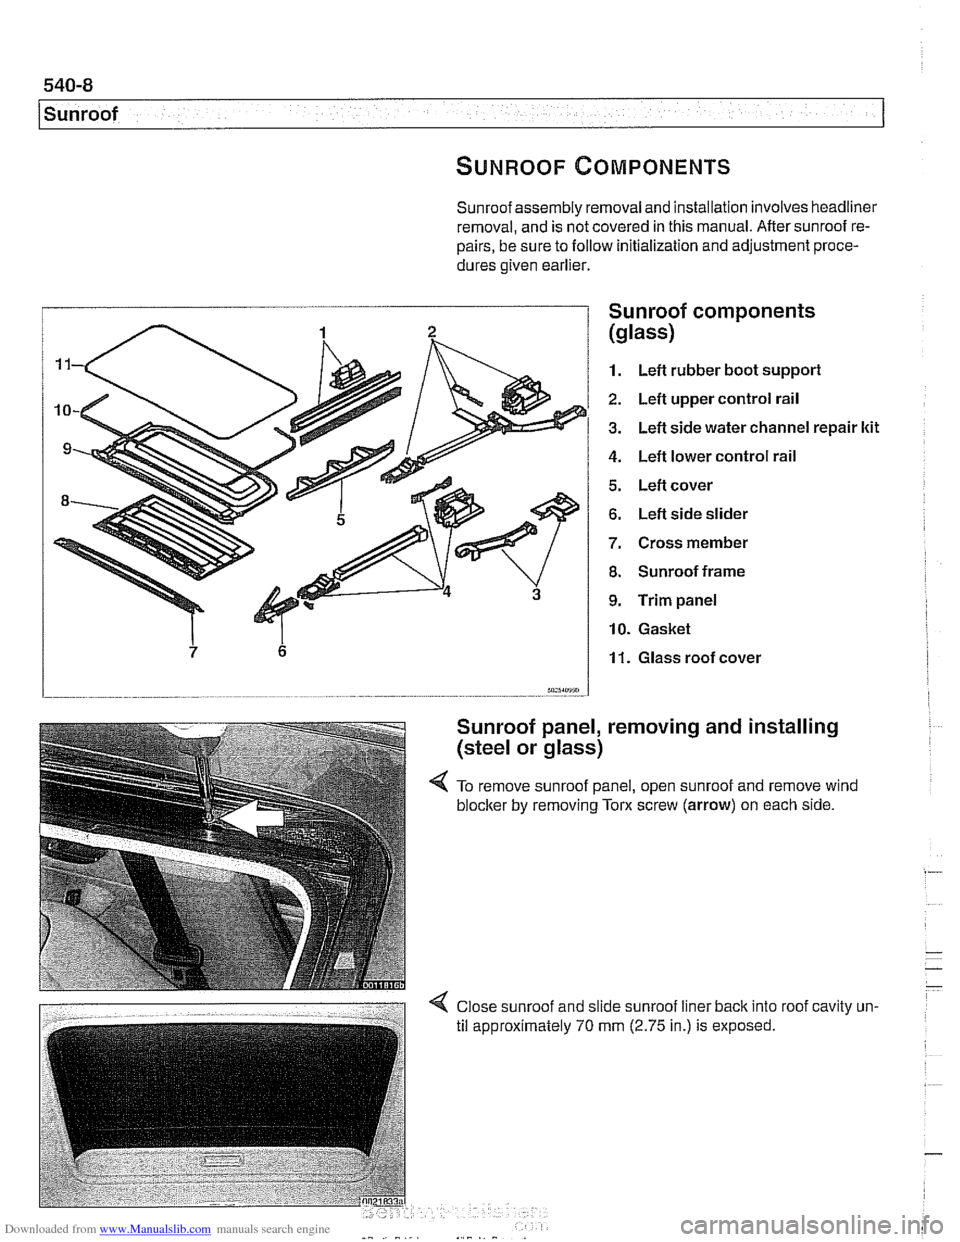
I Sunroof comDonents
1. Left rubber boot suppori
2. Left upper control rail
3. Left side water channel repair ltit
4. Left lower control rail
5. Left cover
6. Left side slider
7. Cross member
8. Sunroof frame
9. Trim panel
10. Gasket
11. Glass roof cover
m5sm.7 - -.
Sunroof panel, removing and installing
(steel or glass)
4 To remove sunroof panel, open sunroof and remove wind
blocker
by removing Tom screw (arrow) on each side.
Page 937 of 1002
Downloaded from www.Manualslib.com manuals search engine
Sunroof
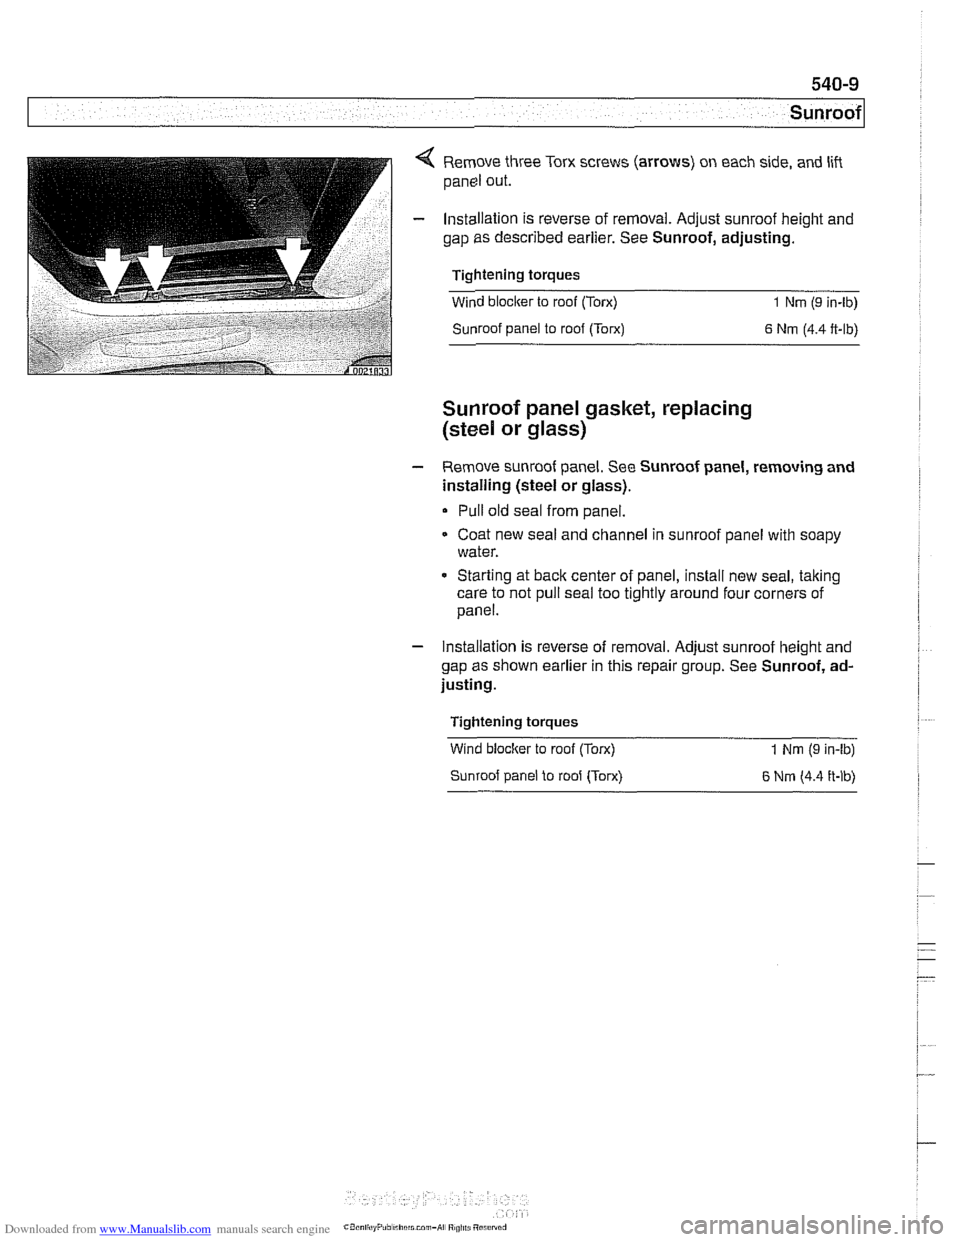
4 Remove three Torx screws (arrows) on each side, and lift
panel out.
- Installation is reverse of removal. Adjust sunroof height and
gap as described earlier. See Sunroof, adjusting.
Tightening torques
Wind blocker to roof (Torx)
1 Nm (9 in-lb)
Sunroof panel to roof (Torx)
6 Nm (4.4 ft-lb)
Sunroof panel gasket, replacing
(steel
or glass)
- Remove sunroof panei. See Sunroof panei, removing and
installing (steel or glass).
Pull old seal from panel.
Coat new seal and channel in sunroof panel with soapy
water.
* Starting at back center of panel, install new seal, taking
care to not pull seal too tightly around four corners of
panel.
- Installation is reverse of removal. Adjust sunroof height and
gap as shown earlier in this repair group. See Sunroof, ad-
justing.
Tightening torques
Wind
bloclter to roof (Torx)
Sunroof panel to roof (Torx) 1 Nm (9 in-lb)
6 Nrn (4.4 ft-lb)
Page 938 of 1002
Downloaded from www.Manualslib.com manuals search engine
.-
Sunroof
Sunroof motor, replacing
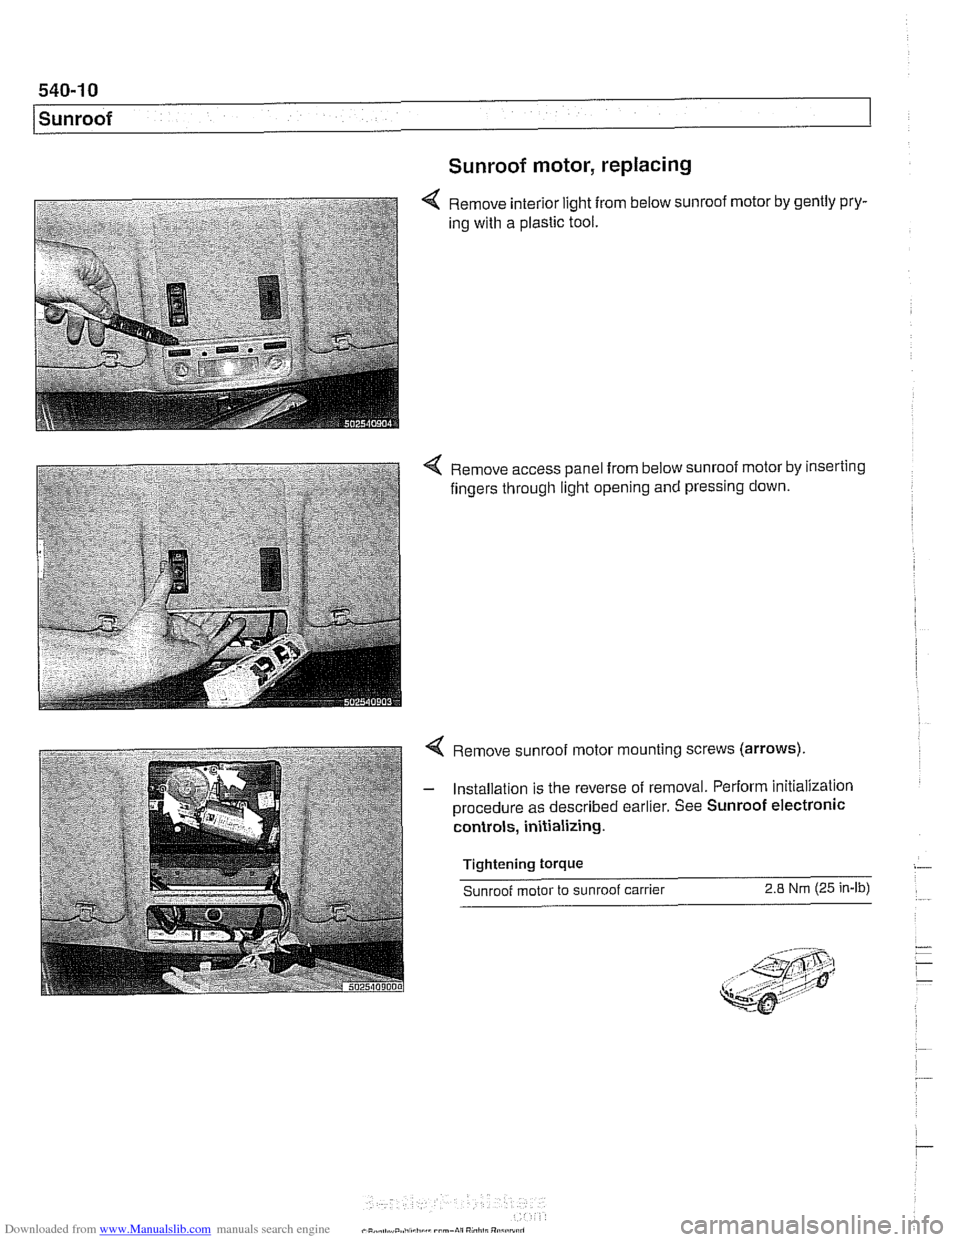
Remove interior light from below sunroof motor by gently pry-
ing with a plastic tool.
4 Remove access panel from below sunroof motor by inserting
fingers through light opening and pressing down.
4 Remove sunroof motor mounting screws (arrows).
- Installation is the reverse of removal. Perform initialization
procedure as described earlier. See Sunroof electronic
controls, initializing.
Tightening
torque
Sunroof motor to sunroof carrier 2.8 Nm (25 in-lb)
Page 939 of 1002
Downloaded from www.Manualslib.com manuals search engine
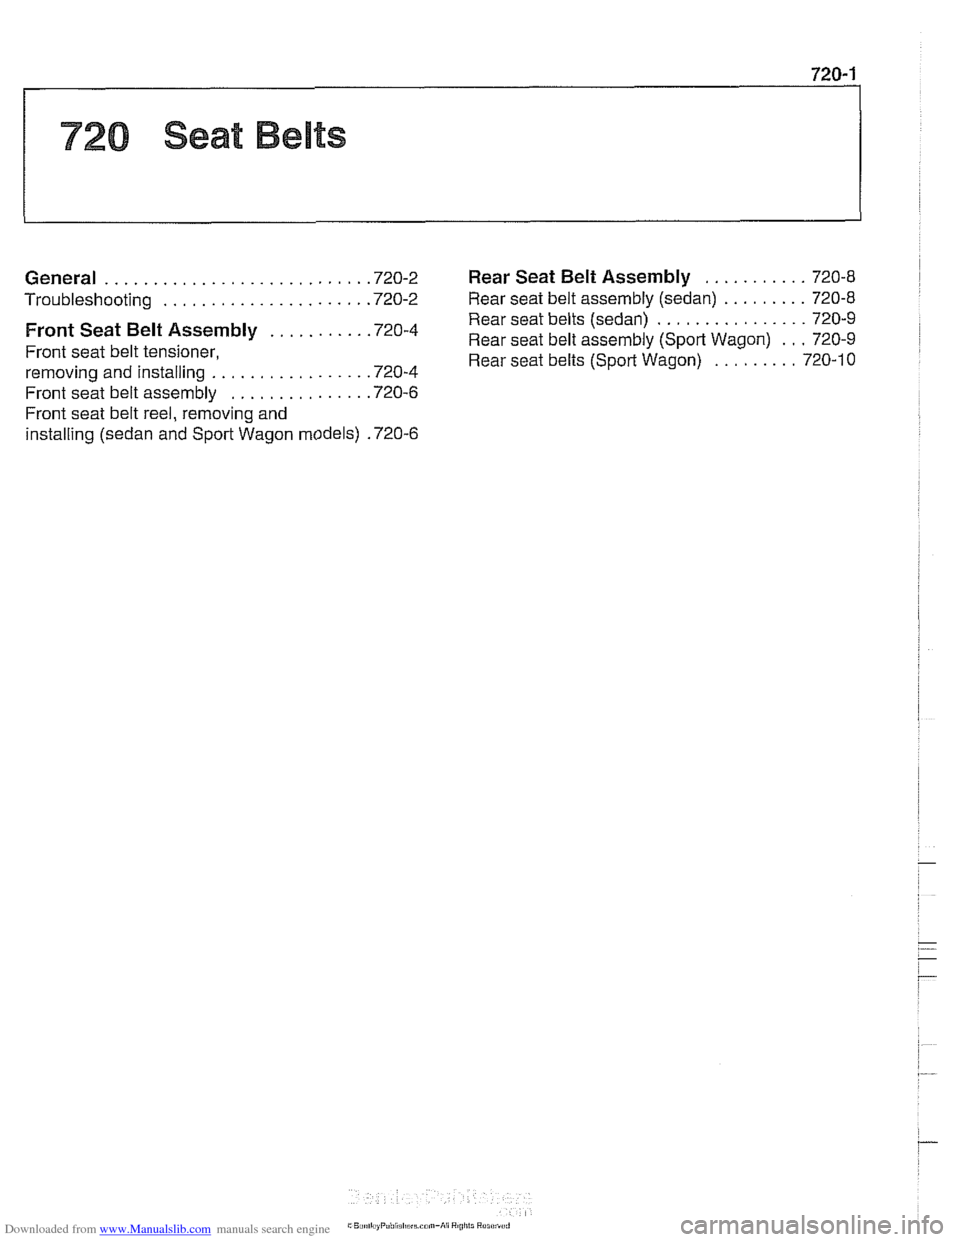
........... General ........................... .72 0.2 Rear Seat Belt Assembly 720-8
......... Troubleshooting ..................... .72 0.2 Rear seat belt assembly (sedan) 720-8
................ Rear seat belts (sedan) 720-9
... .......... Front Seat Assembly '720-4 Rear seat belt assembly (Sport Wagon) 720-9
Front seat belt tensioner,
......... Rear seat belts (Sport Wagon) 720-10
removing and installing ................ .72 0.4
Front seat belt assembly
.............. .72 0.6
Front seat belt reel. removing and
installing (sedan and Sport Wagon models)
.72 0.6
Page 940 of 1002
Downloaded from www.Manualslib.com manuals search engine
I Seat Belts
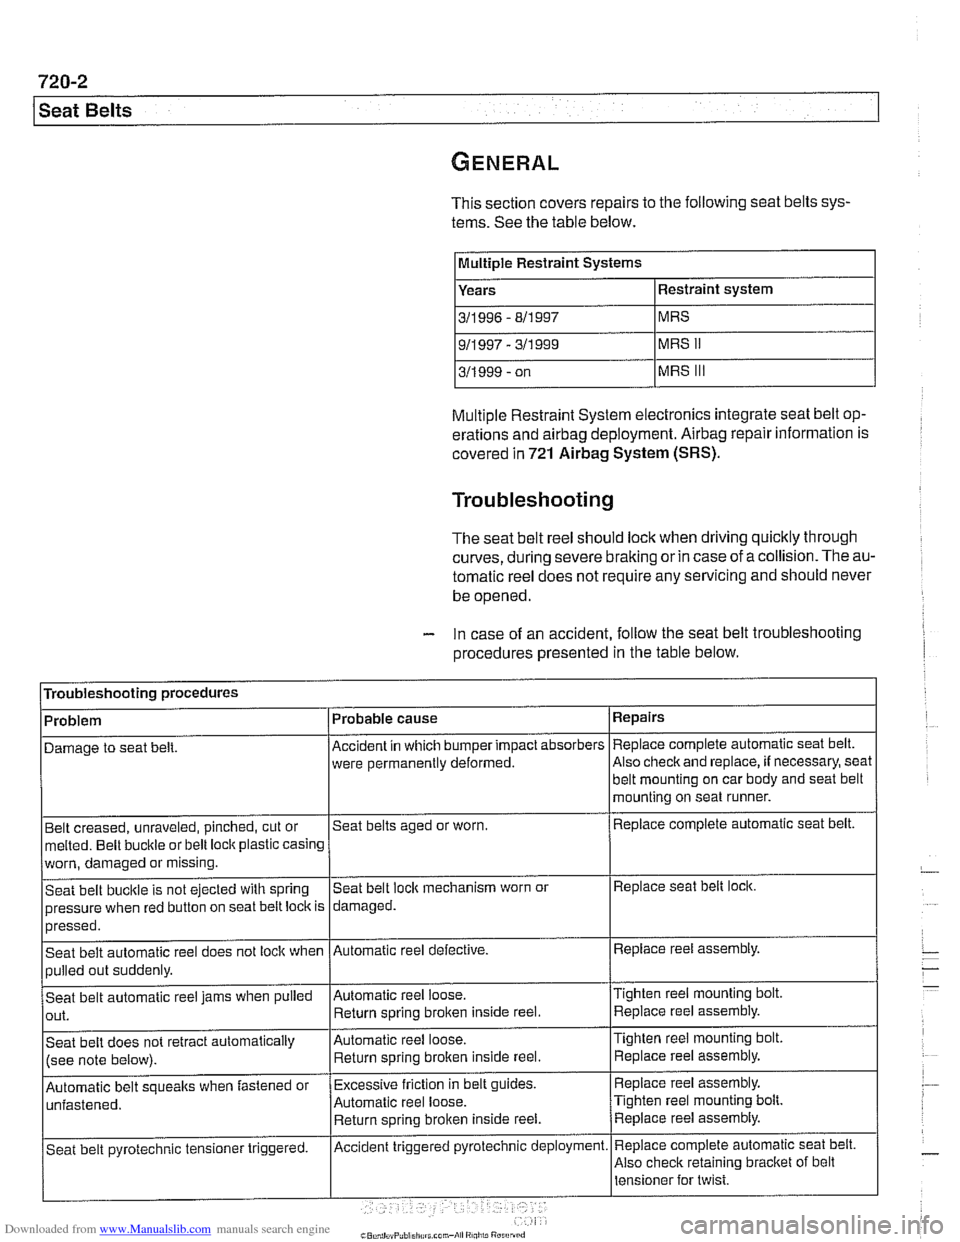
This section covers repairs to the following seat belts sys-
tems. See the table below.
IMultIple Restraint Systems I
Years
311 996 - 811 997
Multiple Restraint System electronics integrate seat belt op-
erations and
airbag deployment. Airbag repair information is
covered
in 721 Airbag System (SRS).
Troubleshooting
The seat belt reel should lock when driving quicltly through
curves,
during severe braking or in case of a collision. The au-
tomatic reel does not require any servicing and should never
be opened.
- In case of an accident, follow the seat belt troubleshooting
procedures presented
in the table below.
Troubleshooting procedures
Belt creased, unraveled, pinched, cut or
melted. Belt buckle or belt loclt plastic casing Repairs
Replace complete automatic
seat belt.
Also
checlt and replace, if necessary, seat
Problem
Damage to seat
belt.
worn, damaged or missing.
Seat belt bucltle is not ejected with spring
pressure when red button on seat belt loclt is
>--- I I
Automatic belt soueaks when fastened or I~xcessive friction in belt guides. I Replace reel assembly.
Probable
cause
Accident in which bumper impact absorbers
were permanently deformed.
Seat belts aged or worn.
pressed.
Seat belt automatic reel does not lock when
pulled out suddenly.
Seat belt automatic reel jams when pulled
out.
Seat belt does not retract automatically
(see note below).
Automatic reel loose. Return sorino broken inside reel. belt mounting on car body and
seat belt
mounting on seat runner.
Replace complete automatic seat belt.
Seat belt
loclt mechanism worn or
damaged.
Tighten reel mounting bolt Replace reel assembly.
Replace seat belt lock.
Automatic reel defective.
Automatic reel loose. Return spring
broken inside reel.
Automatic reel loose.
Return spring brolten inside reel. Replace reel
assembly.
Tighten reel mounting
bolt.
Replace reel assembly.
Tighten reel mounting bolt. Replace reel assembly.
~ ~-~~ , - I'
Replace complete automatic seat belt.
Also check retaining bracket of belt
Seat belt
pyrotechnic tensioner triggered. Accident triggered pyrotechnic deployment.