bolt BMW 528i 1999 E39 Workshop Manual
[x] Cancel search | Manufacturer: BMW, Model Year: 1999, Model line: 528i, Model: BMW 528i 1999 E39Pages: 1002
Page 862 of 1002
Downloaded from www.Manualslib.com manuals search engine
I Exterior Trim, Bumpers
Tightening torques Impact absorber to chassis
(M8 nut) 20 Nm (15 ft-lb)
Impact absorber to chassis
(M6 nut) 9 Nm (80 In-lb
Bumper bracket to impact absorber 45 Nm (32 ft-lb)
(MI0 bolt)
Front bumper height, adjusting
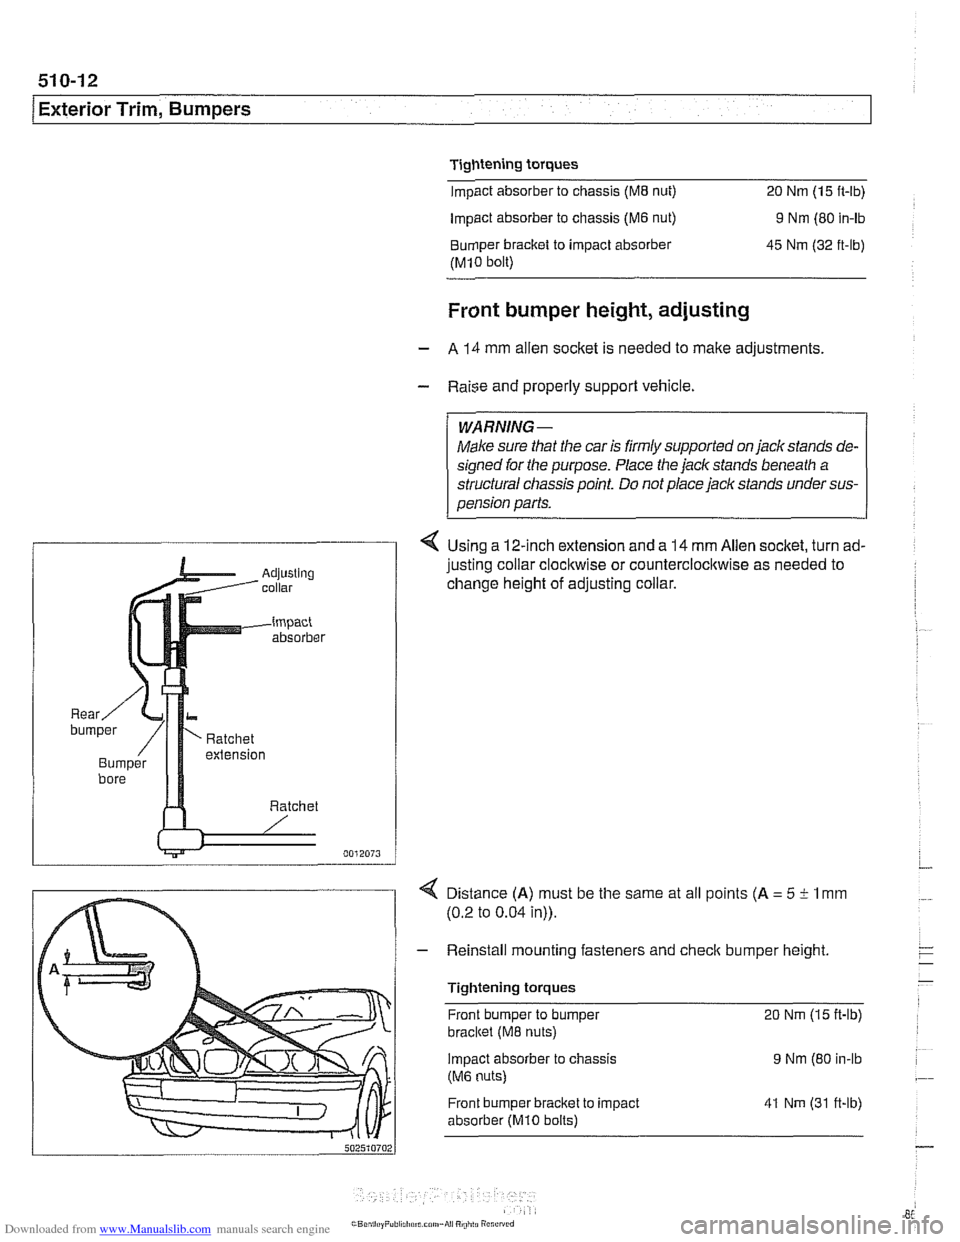
- A 14 mm allen socket is needed to make adjustments
- Raise and properly support vehicle.
WARNING-
Make sure that the car is firmly supported on jackstands de-
signed for the purpose. Place the jack stands beneath a
structural chassis point.
Do not place jack stands under sus-
pension parts.
4 Using a 12-inch extension and a 14 mm Allen socket, turn ad-
justing collar
clocl~wise or counterclocl~wise as needed to
change height of adjusting collar.
4 Distance (A) must be the same at all points (A = 5 i- 1 mm
(0.2 to 0.04 in)).
- Reinstall mounting fasteners and check bumper height
Tightening torques Front bumper to bumper
20 Nm (15 ft-lb)
bracltet (M8 nuts)
Impact absorber
to chassis 9 Nm (80 in-lb
(M6 nuts)
Front bumper bracket to impact
absorber
(MI0 bolts)
41 Nm (31 ft-lb)
Page 875 of 1002
Downloaded from www.Manualslib.com manuals search engine
Door Windows
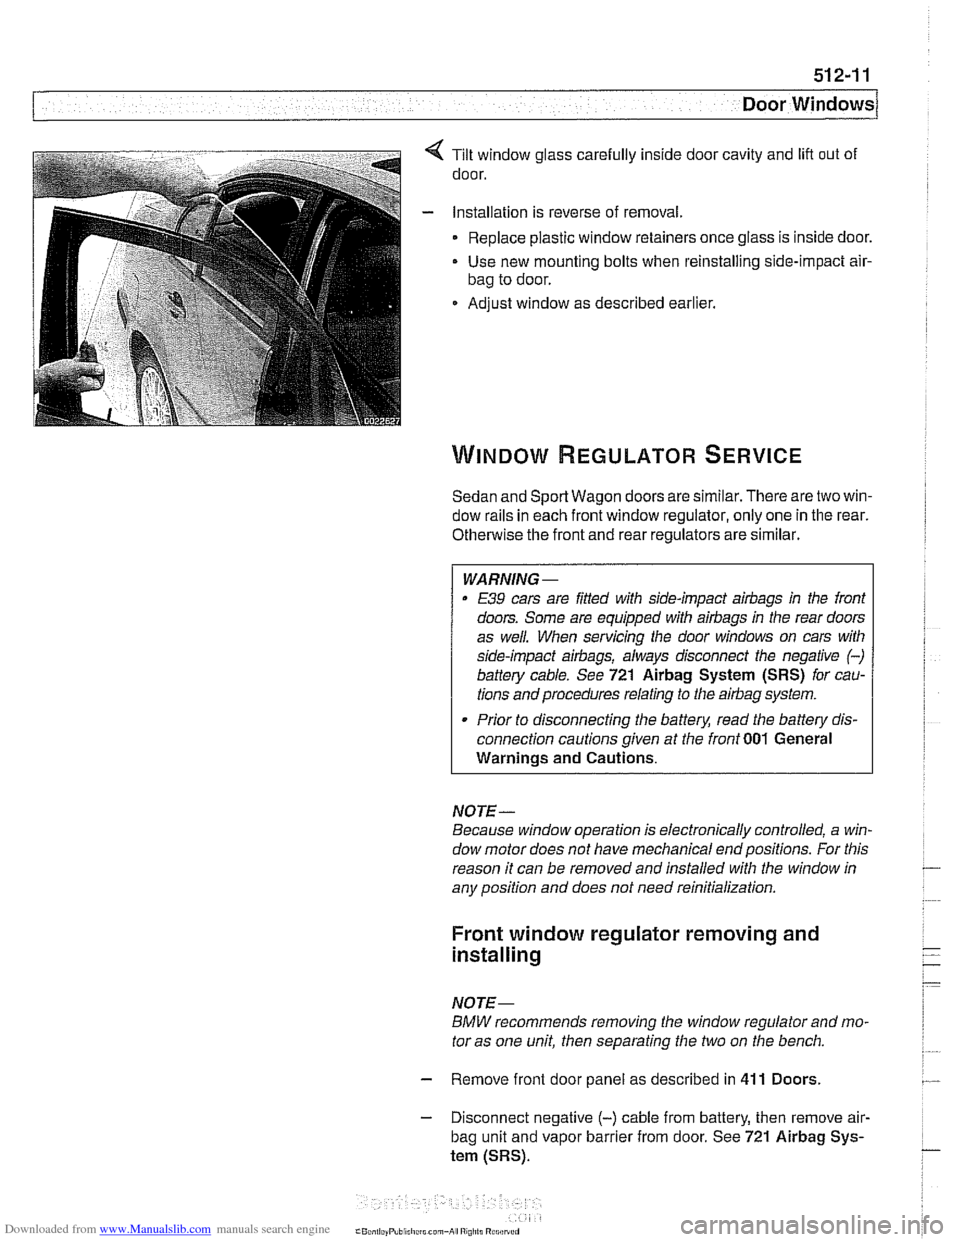
Tilt window glass carefully inside door cavity and lift out of
door.
Installation is reverse of removal.
Replace plastic window retainers once glass is inside door.
Use new mounting bolts when reinstalling side-impact
air-
bag to door.
Adjust window as described earlier,
Sedan and Sport Wagon doors are similar. There are two win-
dow rails in each front window regulator, only one in the rear.
Otherwise the front and rear regulators are similar.
WARNING-
E39 cars are Wed with side-impact airbags in the front
doors. Some are equipped with
airbags in the rear doors
as well. When servicing the door windows on cars with
side-impact airbags, always disconnect the negative
(-)
battery cable. See 721 Airbag System (SRS) for cau-
tions and procedures relating to the
airbag system.
Prior to disconnecting the battery, read the battery dis-
connection cautions given at the front
001 General
Warnings and Cautions.
NOTE-
Because window operation is electronically controlled, a win-
dow motor does not have mechanical endpositions. For this
reason it can be removed and installed with the window in
any position and does not need reinitialization.
Front window regulator removing and
installing
NOTE-
BMW recommends removing the window regulator and mo-
tor as one unit, then separating the two on the bench.
- Remove front door panel as described in 411 Doors.
- Disconnect negative (-) cable from battery, then remove air-
bag unit and vapor barrier from door. See 721 Airbag Sys-
tem (SRS).
Page 915 of 1002
Downloaded from www.Manualslib.com manuals search engine
51 5-21
Central Locking and Anti-Theft
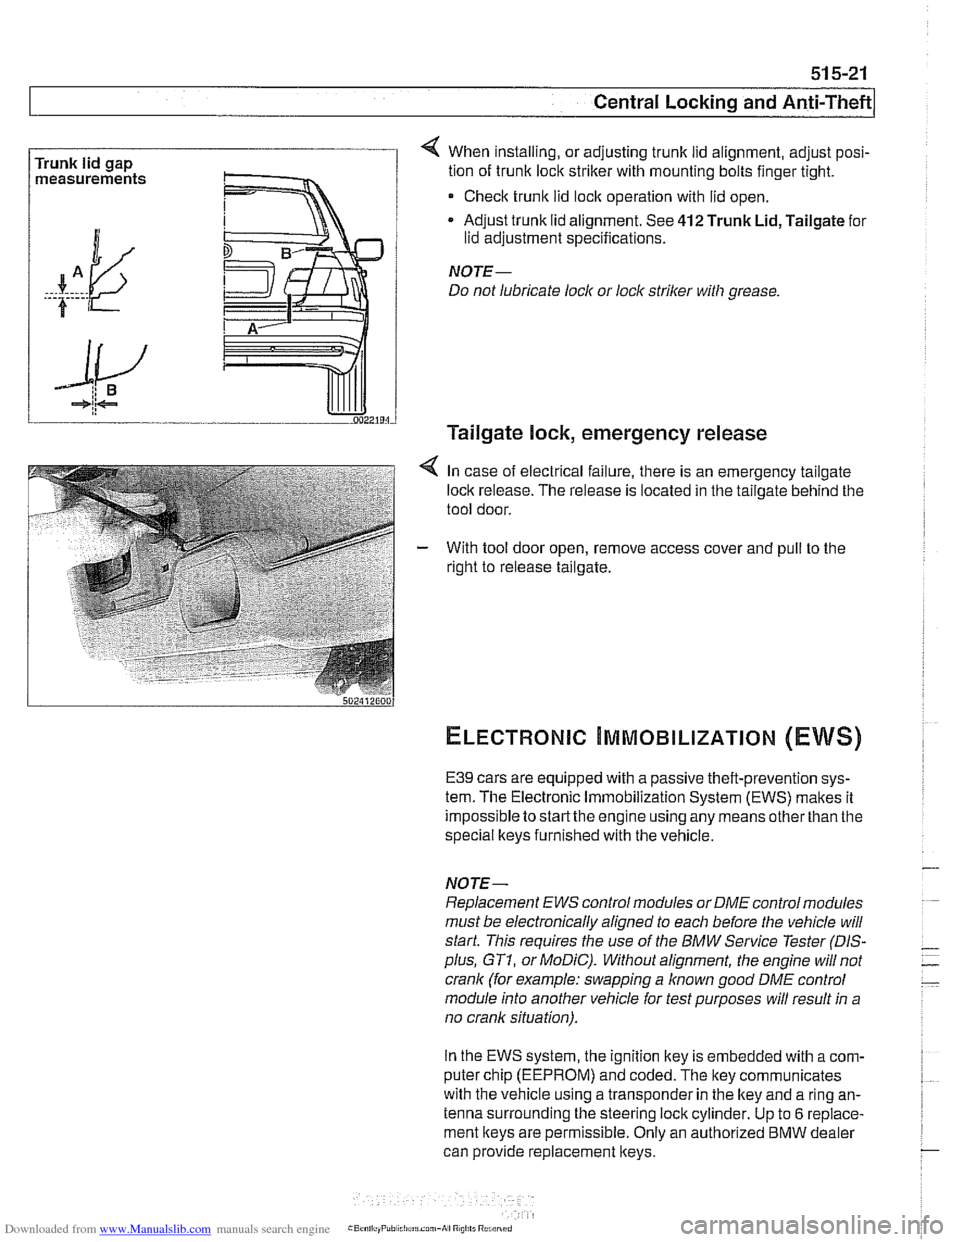
Trunk lid gap
measurements 4 When installing, or adjusting trunk lid alignment, adjust posi-
tion of trunk
loclc striker with mounting bolts finger tight.
* Check trunk lid loclc operation with lid open.
Adjust trunk lid alignment. See
412 Trunk Lid, Tailgate for
lid adjustment specifications.
NOTE-
Do not lubricate lock or lock striker with grease.
Tailgate lock, emergency release
4 In case of electrical failure, there is an emergency tailgate
loclk release. The release is located in the tailgate behind the
tool door.
- With tool door open, remove access cover and pull to the
right to release tailgate.
ELECTRONIC ~MMOBILIZATION (EWS)
E39 cars are equipped with a passive theft-prevention sys-
tem. The Electronic Immobilization System (EWS) makes it
impossible to
startthe engine using any means other than the
special lkeys furnished with the vehicle.
NOTE-
Replacement EWS control modules or DME control modules
must be electronically aligned to each before the vehicle will
start. This requires the use of the BMW Service Tester
(DIS-
plus, GT1, or MoDiC). Without alignment, the engine will not
crank (for example: swapping a
known good DME control
module into another vehicle for test purposes will result in a
no crank situation).
In the EWS system, the ignition key is embedded with
acom-
puter chip (EEPROM) and coded. The key communicates
with the vehicle using a transponder in the lkey and a ring an-
tenna surrounding the steering lock cylinder. Up to
6 replace-
ment keys are permissible. Only an authorized
BMW dealer
can provide replacement keys.
Page 940 of 1002
Downloaded from www.Manualslib.com manuals search engine
I Seat Belts
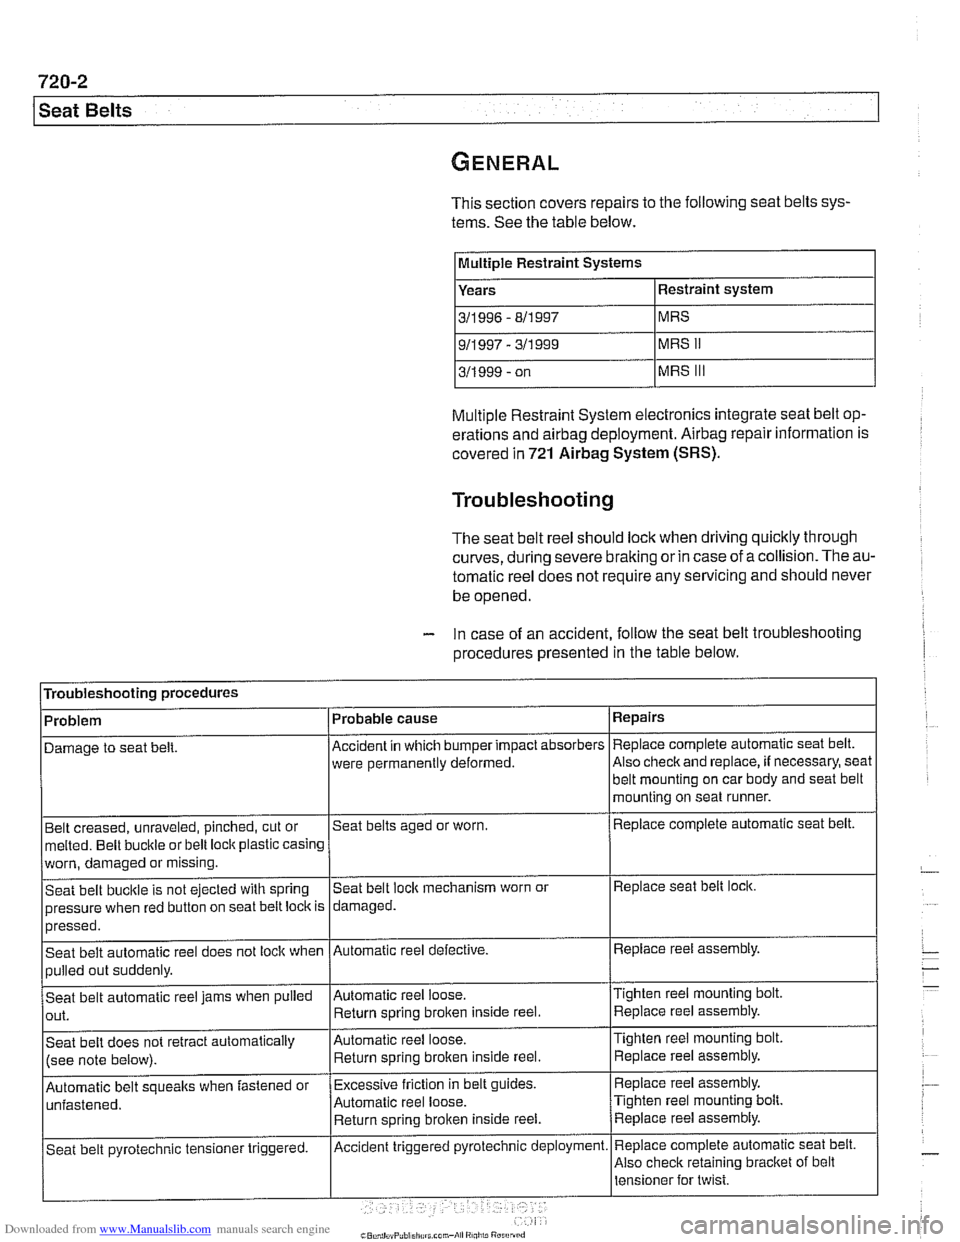
This section covers repairs to the following seat belts sys-
tems. See the table below.
IMultIple Restraint Systems I
Years
311 996 - 811 997
Multiple Restraint System electronics integrate seat belt op-
erations and
airbag deployment. Airbag repair information is
covered
in 721 Airbag System (SRS).
Troubleshooting
The seat belt reel should lock when driving quicltly through
curves,
during severe braking or in case of a collision. The au-
tomatic reel does not require any servicing and should never
be opened.
- In case of an accident, follow the seat belt troubleshooting
procedures presented
in the table below.
Troubleshooting procedures
Belt creased, unraveled, pinched, cut or
melted. Belt buckle or belt loclt plastic casing Repairs
Replace complete automatic
seat belt.
Also
checlt and replace, if necessary, seat
Problem
Damage to seat
belt.
worn, damaged or missing.
Seat belt bucltle is not ejected with spring
pressure when red button on seat belt loclt is
>--- I I
Automatic belt soueaks when fastened or I~xcessive friction in belt guides. I Replace reel assembly.
Probable
cause
Accident in which bumper impact absorbers
were permanently deformed.
Seat belts aged or worn.
pressed.
Seat belt automatic reel does not lock when
pulled out suddenly.
Seat belt automatic reel jams when pulled
out.
Seat belt does not retract automatically
(see note below).
Automatic reel loose. Return sorino broken inside reel. belt mounting on car body and
seat belt
mounting on seat runner.
Replace complete automatic seat belt.
Seat belt
loclt mechanism worn or
damaged.
Tighten reel mounting bolt Replace reel assembly.
Replace seat belt lock.
Automatic reel defective.
Automatic reel loose. Return spring
broken inside reel.
Automatic reel loose.
Return spring brolten inside reel. Replace reel
assembly.
Tighten reel mounting
bolt.
Replace reel assembly.
Tighten reel mounting bolt. Replace reel assembly.
~ ~-~~ , - I'
Replace complete automatic seat belt.
Also check retaining bracket of belt
Seat belt
pyrotechnic tensioner triggered. Accident triggered pyrotechnic deployment.
Page 944 of 1002
Downloaded from www.Manualslib.com manuals search engine
I Seat Belts
a
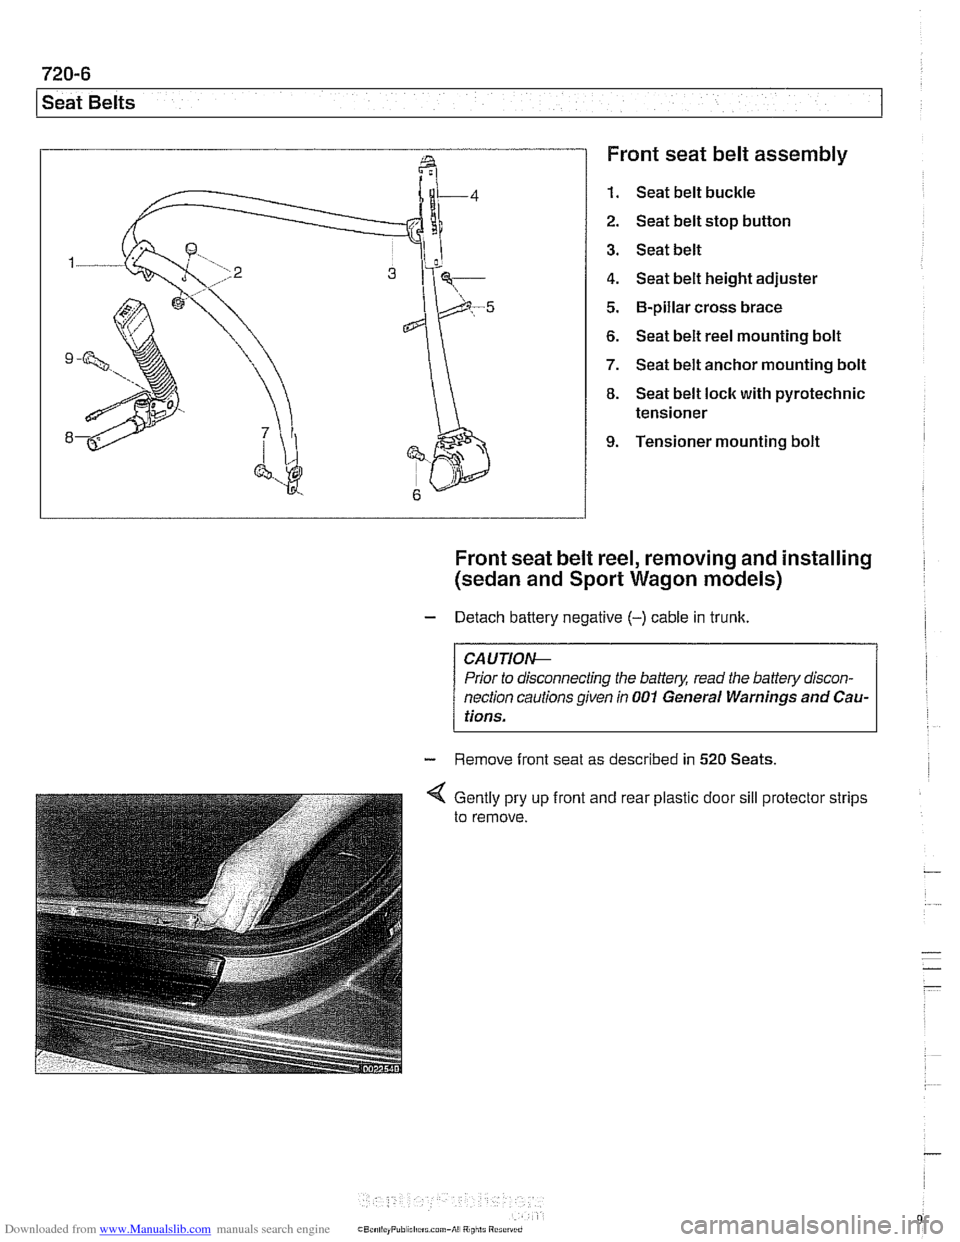
Front seat belt assembly
1. Seat belt buckle
2. Seat belt stop button
3. Seat belt
4. Seat belt height adjuster
5.
6-pillar cross brace
6. Seat belt reel mounting bolt
7. Seat belt anchor mounting bolt
8. Seat belt lock with pyrotechnic
tensioner
9. Tensioner mounting bolt
Front seat belt reel, removing and installing
(sedan and Sport Wagon models)
- Detach battery negative (-) cable in trunk.
~~-~
Prior to disconnecting the battery, read the battery discon-
nection cautions given in
001 General Warnings and Cau-
l tions. I
- Remove front seat as described in 520 Seats
4 Gently pry up front and rear plastic door sill protector strips
to remove.
Page 945 of 1002
Downloaded from www.Manualslib.com manuals search engine
Seat Belts
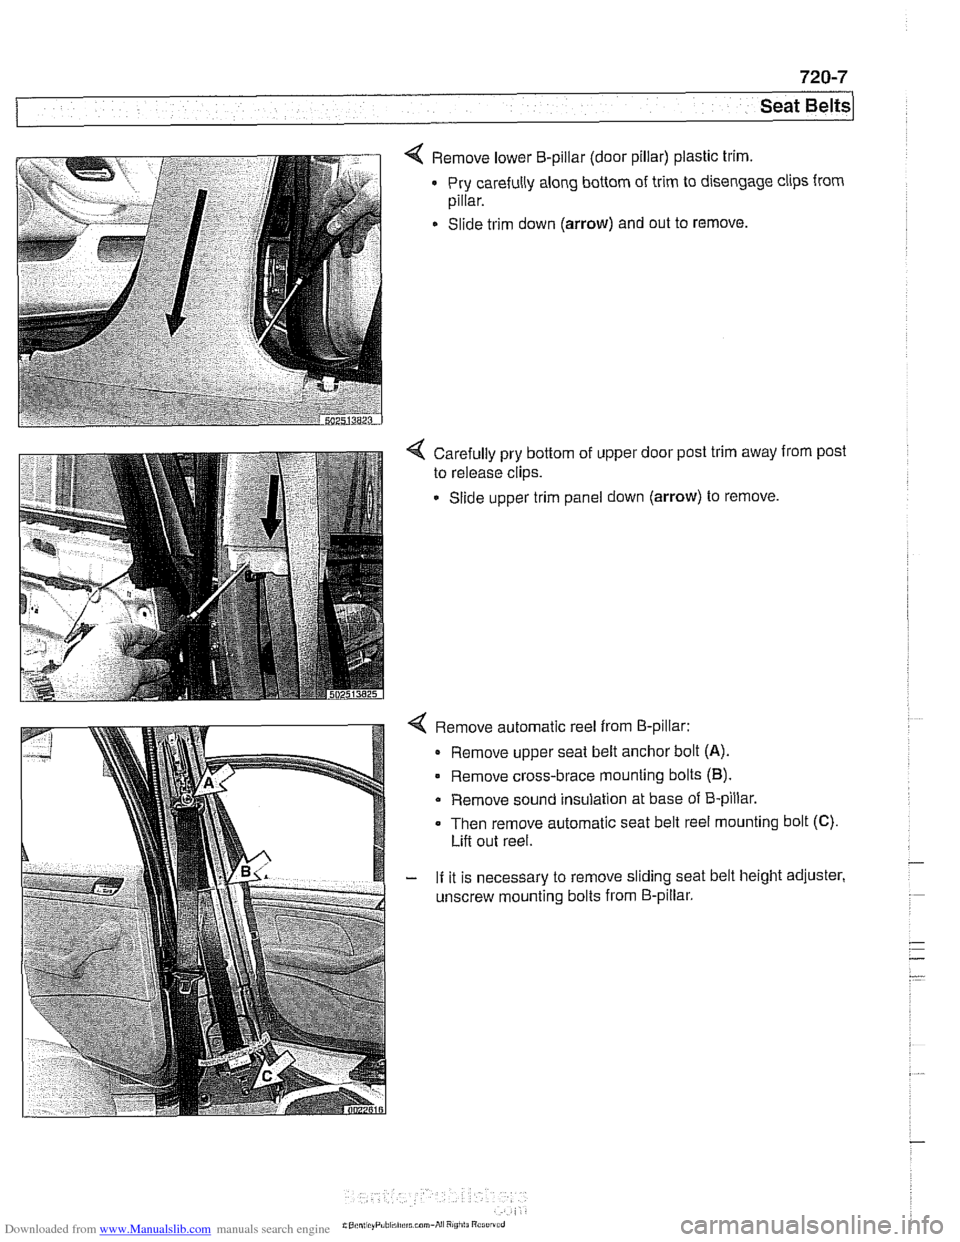
Remove lower B-pillar (door pillar) plastic trim
Pry carefully along bottom of trim to disengage
pillar.
Slide trim down (arrow) and out to remove. clips
from
4 Carefully pry bottom of upper door post trim away from post
to release clips.
Slide upper trim panel down (arrow) to remove.
Remove automatic reel from B-pillar:
- Remove upper seat belt anchor bolt (A).
Remove cross-brace mounting bolts (B).
Remove sound insulation at base of 8-pillar.
Then remove automatic seat belt reel mounting bolt
(C).
Lift out reel.
If it is necessary to remove sliding seat belt height adjuster,
unscrew mounting bolts from B-pillar.
Page 946 of 1002
Downloaded from www.Manualslib.com manuals search engine
720-8
I Seat Belts
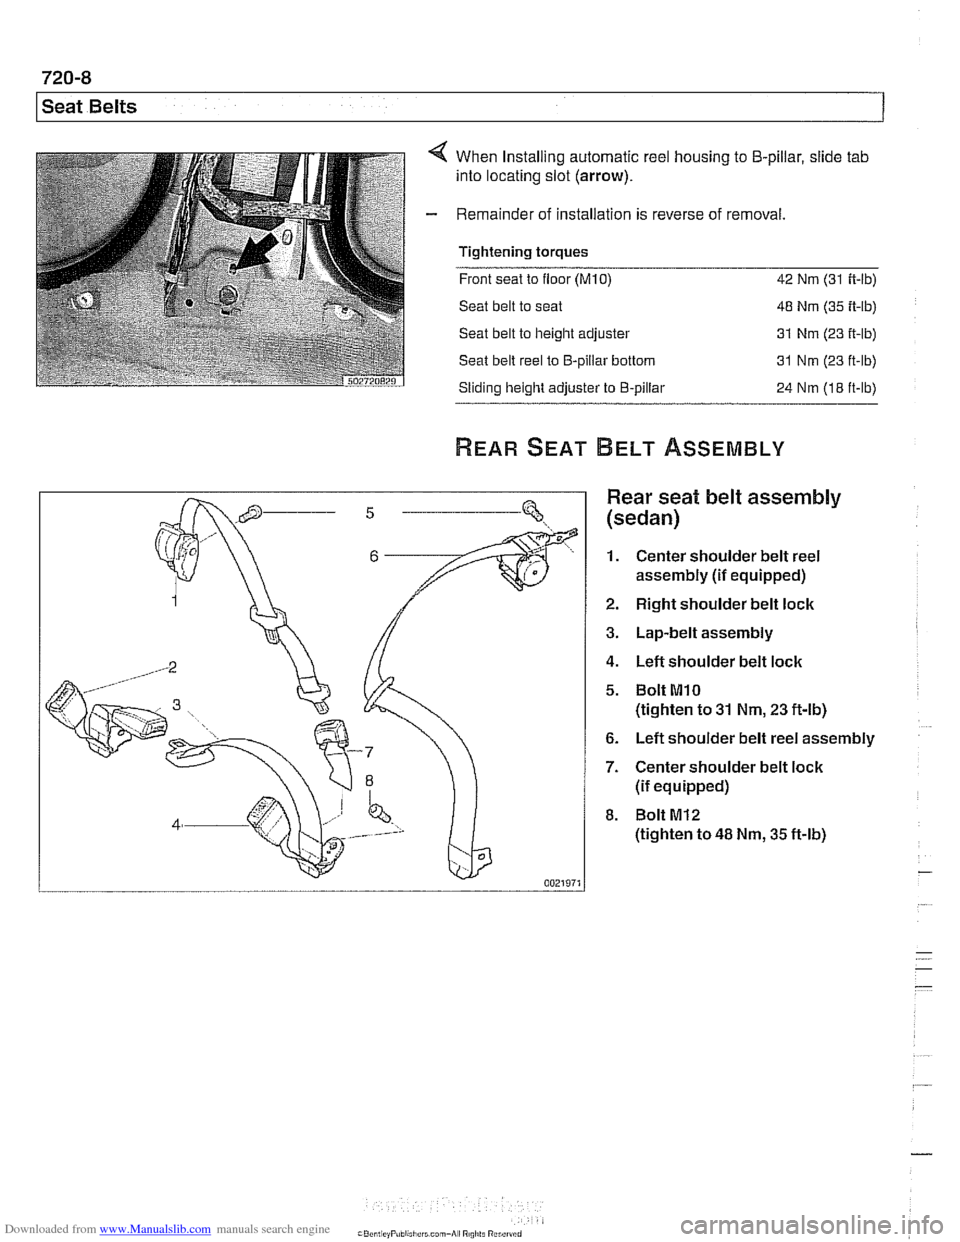
When Installing automatic reel housing to 5-pillar, slide tab
into locating slot (arrow).
Remainder of installation is reverse of removal
Tightening torques
- -.
Front seat to floor (M10) 42 Nm (31 ft-lb)
Seat belt to seat 48 Nm (35 ft-lb)
Seat belt to height adjuster 31 Nm
(23 it-lb)
Seat belt reel to €3-pillar bottom 31 Nm (23 ft-lb)
Sliding height adjuster to €3-pillar
24 Nm (18 ft-lb)
Rear seat belt assembly
(sedan)
1. Center shoulder belt reel
assembly
(if equipped)
2. Right shoulder belt lock
3. Lap-belt assembly
4. Left shoulder belt lock
5. Bolt MlO
(tighten to 31 Nm, 23 ft-lb)
6. Left shoulder belt reel assembly
7. Center shoulder belt lock
(if equipped)
8. Bolt M12
(tighten to 48 Nm, 35 ft-lb)
Page 947 of 1002
Downloaded from www.Manualslib.com manuals search engine
-- -
Seat Belts
Rear seat belts (sedan)
- Remove rear parcel shelf to access shoulder belt assembly
mounting bolts. See 513 Interior Trim.
- Remove rear seat cushion to access rear seat belt lock
mounting bolts. See 520 Seats.
- When installing seat belt lock straps:
Install right lock strap (which is shorter) underneath middle
lock strap.
Install left lock strap underneath middle lap belt strap.
Metal strap ends must rest against stop on floor under-
neath seat.
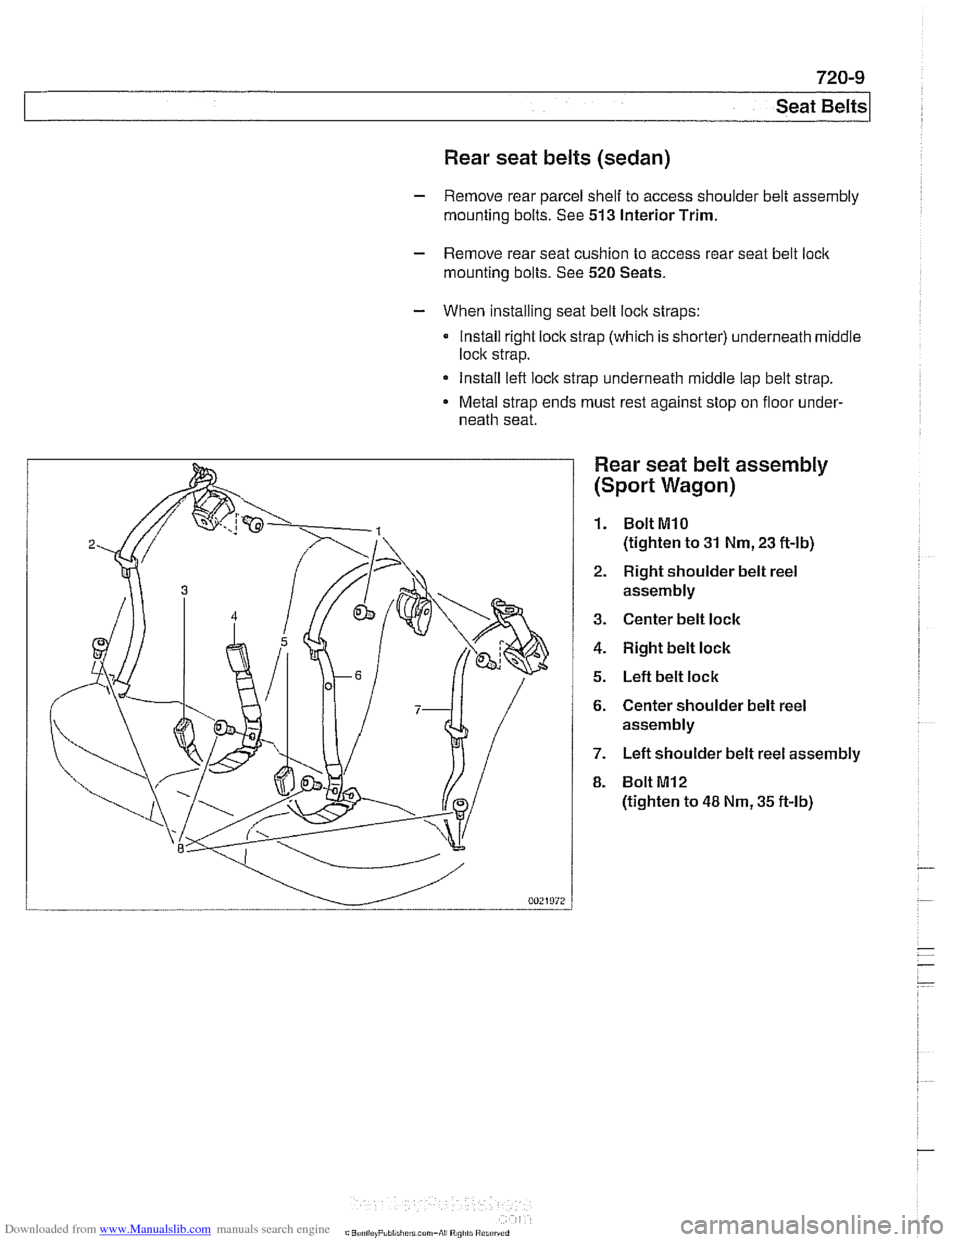
Rear seat belt assembly
(Sport Wagon)
1. BoltMlO
(tighten to 31 Nm, 23 ft-lb)
2. Right shoulder belt reel
assembly
3. Center belt lock
4. Right belt lock
5. Left belt lock
6. Center shoulder belt reel
assembly
7. Left shoulder belt reel assembly
8. Bolt
MI2
(tighten to 48 Nm, 35 ft-lb)
Page 948 of 1002
Downloaded from www.Manualslib.com manuals search engine
720-1 0
Seat Belts
Rear seat belts (Sport Wagon)
- Center shoulder belt:
Remove shoulder belt guide trim at top of seat backrest.
Feed belt out through slot in trim. Working in cargo com-
partment, partially remove backrest cover to access shoul-
der belt reel.
Remove shoulder belt reel mounting bolt inside backrest.
- Outboard shoulder belt:
Remove roof-pillar (C-pillar) trim.
Remove center shoulder belt.
- Lift up rear seat cushion(s) to access rear seat belt loclc
mounting
bolt(s).
- When installing seat belt loclc straps:
Install right belt loclc strap (which is shorter) underneath
center belt lock strap.
Install left belt loclc strap underneath center lap belt strap.
- Metal strap ends must rest against stop on floor underneath
seat.
Page 958 of 1002
Downloaded from www.Manualslib.com manuals search engine
721 -1 0
/Airbag System (SRS)
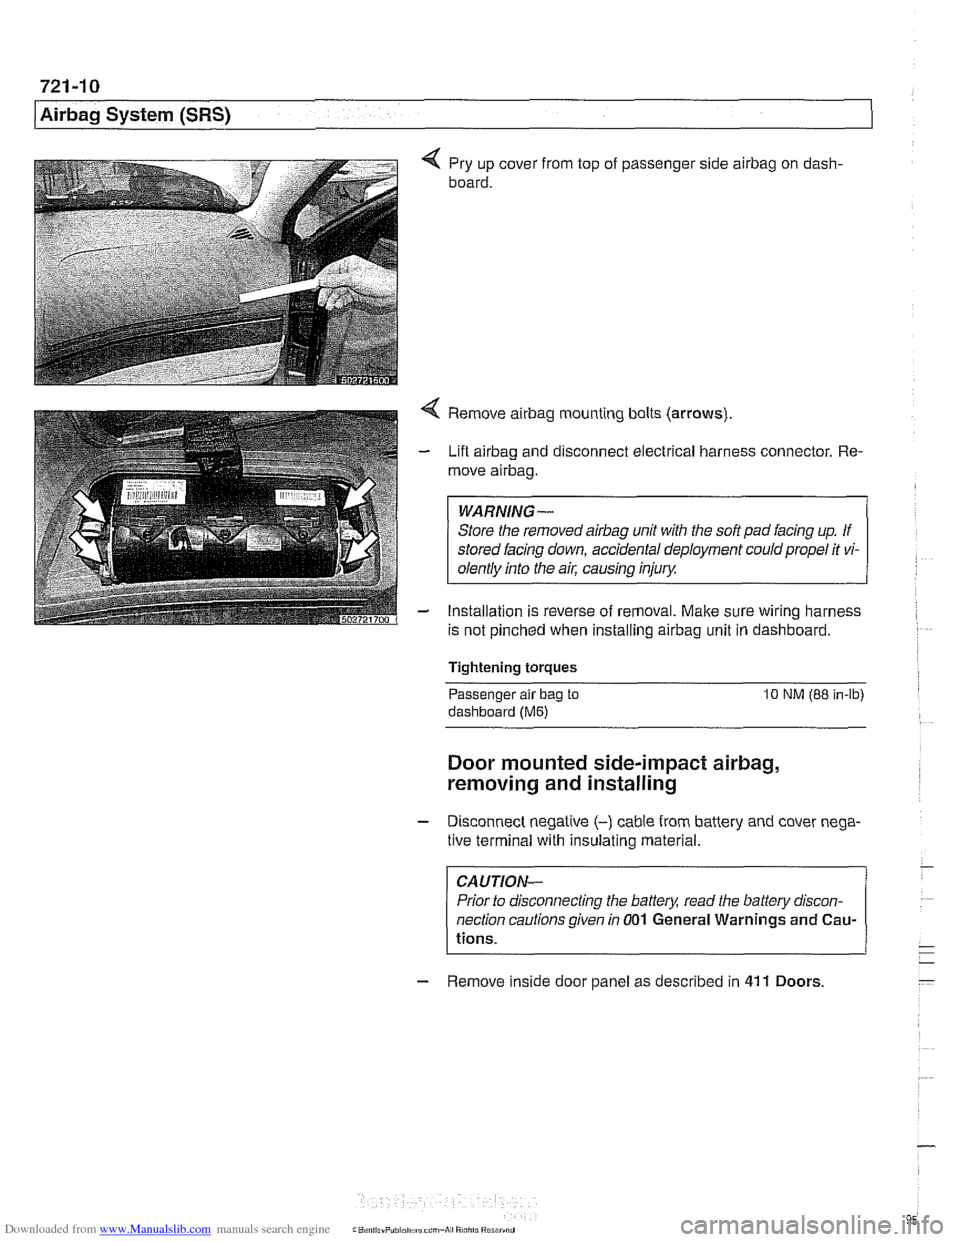
4 Pry up cover from top of passenger side airbag on dash-
board.
4 Remove airbag mounting bolts (arrows)
- Lift airbag and disconnect electrical harness connector. Re-
move
airbag.
WARNING-
Store the removed airbag unit with the soft pad facing up. If
stored facing down, accidental deployment could propel it vi-
olentlv into the
ail: causino inium
- Installation is reverse of removal. Make sure wiring harness
is not pinched when installing
airbag unit in dashboard.
Tightening torques
-
Passenger alr bag to 10 NM (88 in-lb)
dashboard (Me)
Door mounted side-impact airbag,
removing and installing
- Disconnect negatlve (-) cable from battery and cover nega-
tive terminal with insulating material.
CAUTION-
Prior to disconnecting the battea read the battery discon-
nection cautions given
in 001 General Warnings and Cau-
tions.
- Remove inside door panel as described in 41 1 Doors