Reverse BMW 528i 1999 E39 Repair Manual
[x] Cancel search | Manufacturer: BMW, Model Year: 1999, Model line: 528i, Model: BMW 528i 1999 E39Pages: 1002
Page 422 of 1002
Downloaded from www.Manualslib.com manuals search engine
Fuel Injection
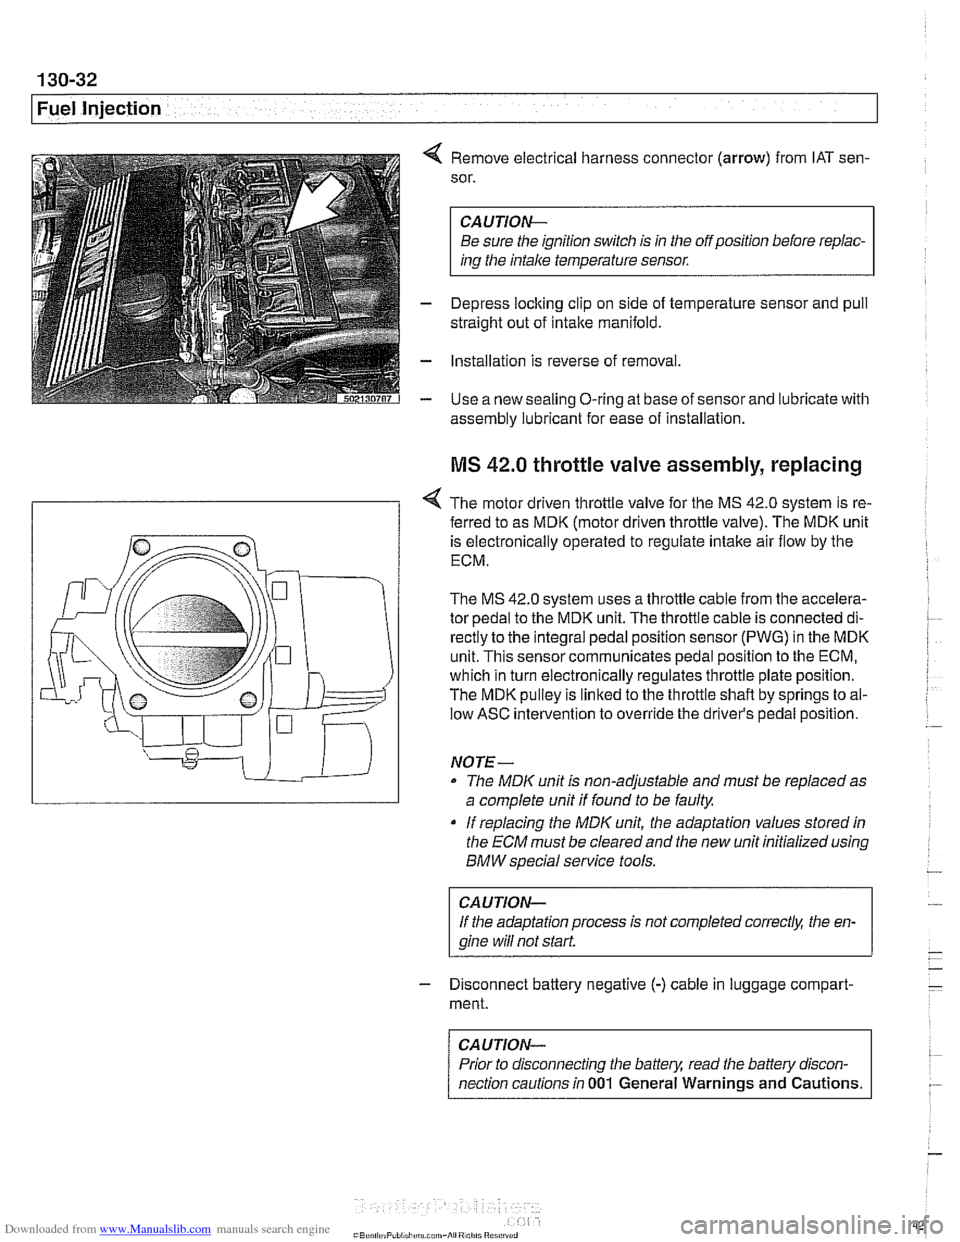
4 Remove electrical harness connector (arrow) from IAT sen-
sor.
CAUTION-
Be sure the ignition switch is in the off position before repiac-
ins the intake temperature sensor.
- Depress loclting clip on side of temperature sensor and pull
straight out of intake manifold.
- Installation is reverse of removal
- Use a new sealing O-ring at base of sensor and lubricate with
assembly lubricant for
ease of installation
MS 42.0 throttle valve assembly, replacing
< The motor driven throttle valve for the MS 42.0 system is re-
- ferred to as MDK (motor driven throttle valve). The MDK unit
is electronically operated to regulate intake air flow by the
ECM.
The
MS 42.0 system uses a throttle cable from the accelera-
tor pedal to the MDK unit. The throttle cable is connected di-
rectly to the integral pedal position sensor
(PWG) in the MDK
unit. This sensor communicates pedal position to the ECM,
which in turn electronically regulates throttle plate position.
The MDK pulley is linked to the throttle shaft by springs to al-
low ASC intervention to override the driver's pedal position.
NO TE -
The MDIC unit is non-adjustable and must be replaced as
a complete unit if found to be faulty.
if replacing the
MDK unit, the adaptation values stored in
the ECM must be clearedand the new unit initialized using
BMW special service tools.
CAUTION-
If the adaptation process is not completed correct& the en-
gine wiii
not start.
- Disconnect battery negative (-) cable in luggage compart-
ment.
CAUTION-
Prior to disconnecting the battern read the battely discon-
nection cautions in
001 General Warnings and Cautions.
Page 424 of 1002
Downloaded from www.Manualslib.com manuals search engine
/Fuel Injection
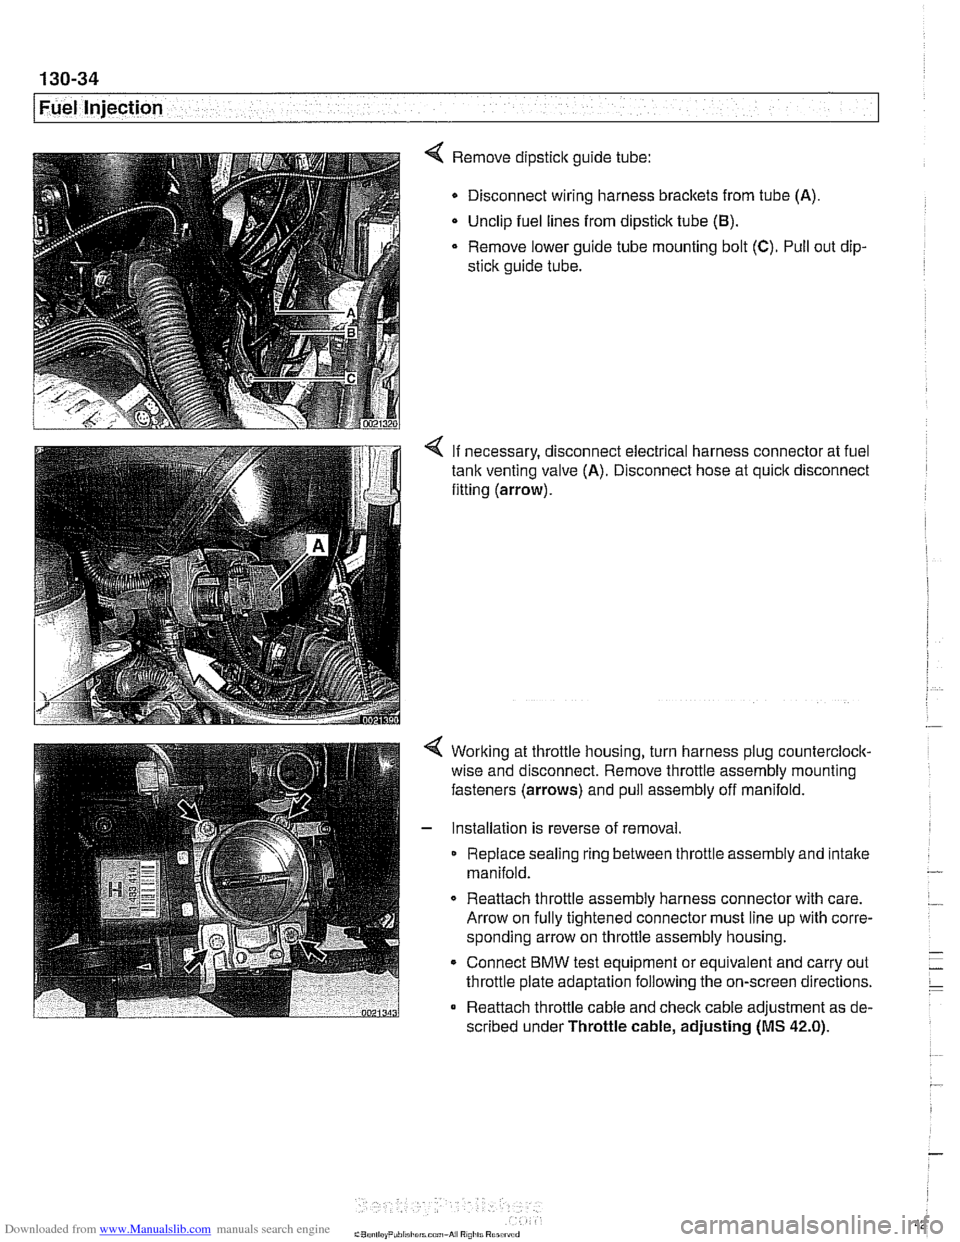
4 Remove dipstick guide tube:
Disconnect wiring harness brackets from tube (A).
Unclip fuel lines from dipstick tube
(El).
Remove lower guide tube mounting bolt (C). Pull out dip-
stick guide tube.
< If necessary, disconnect electrical harness connector at fuel
tank venting valve (A). Disconnect hose at quick disconnect
fitting (arrow).
Working at throttle housing, turn harness plug counterclock-
wise and disconnect. Remove throttle assembly mounting
fasteners (arrows) and pull assembly off manifold.
Installation is reverse of removal
Replace sealing ring between throttle assembly and intake
manifold.
0 Reattach throttle assembly harness connector with care.
Arrow on fully tightened connector must line up with corre-
sponding arrow on throttle assembly housing.
* Connect BMW test equipment or equivalent and carry out
throttle plate adaptation following the on-screen directions.
Reattach throttle cable and check cable adjustment as de-
scribed under Throttle cable, adjusting
(MS 42.0).
Page 427 of 1002
Downloaded from www.Manualslib.com manuals search engine
-.
Fuel Injection 1
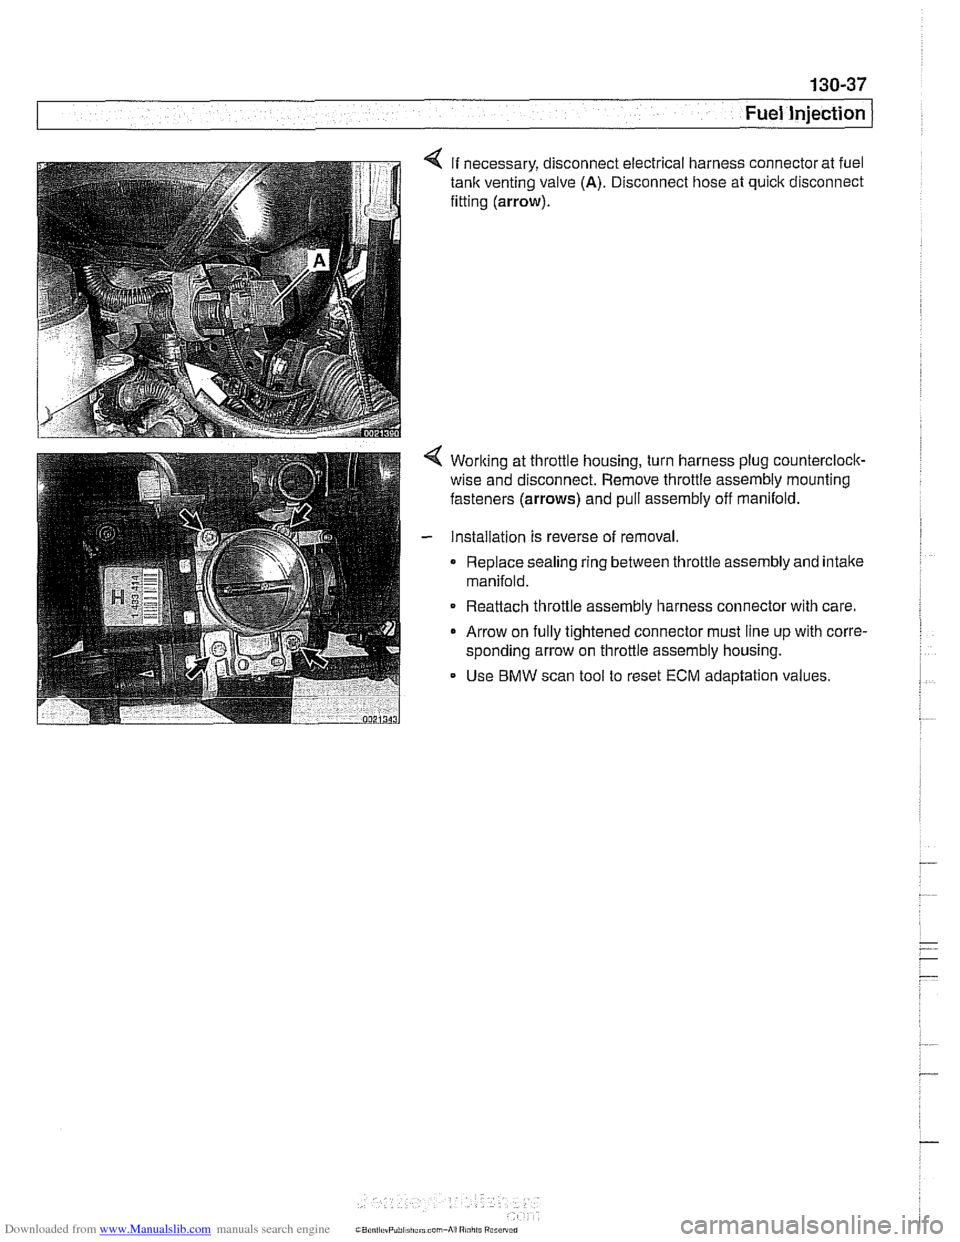
4 If necessary, disconnect electrical harness connector at fuel
tank venting valve (A). Disconnect hose at quick disconnect
fitting
(arrow).
< Worlting at throttle housing, turn harness plug counterclock-
wise and disconnect. Remove throttle assembly mounting
fasteners
(arrows) and pull assembly off manifold.
- Installation is reverse of removal.
0 Replace sealing ring between throttle assembly and intake
manifold.
Reattach throttle assembly harness connector with care.
0 Arrow on fully tightened connector must line up with corre-
sponding arrow on throttle assembly housing.
- Use BMW scan tool to reset ECM adaptation values.
Page 431 of 1002
Downloaded from www.Manualslib.com manuals search engine
. -
Fuel Injection I
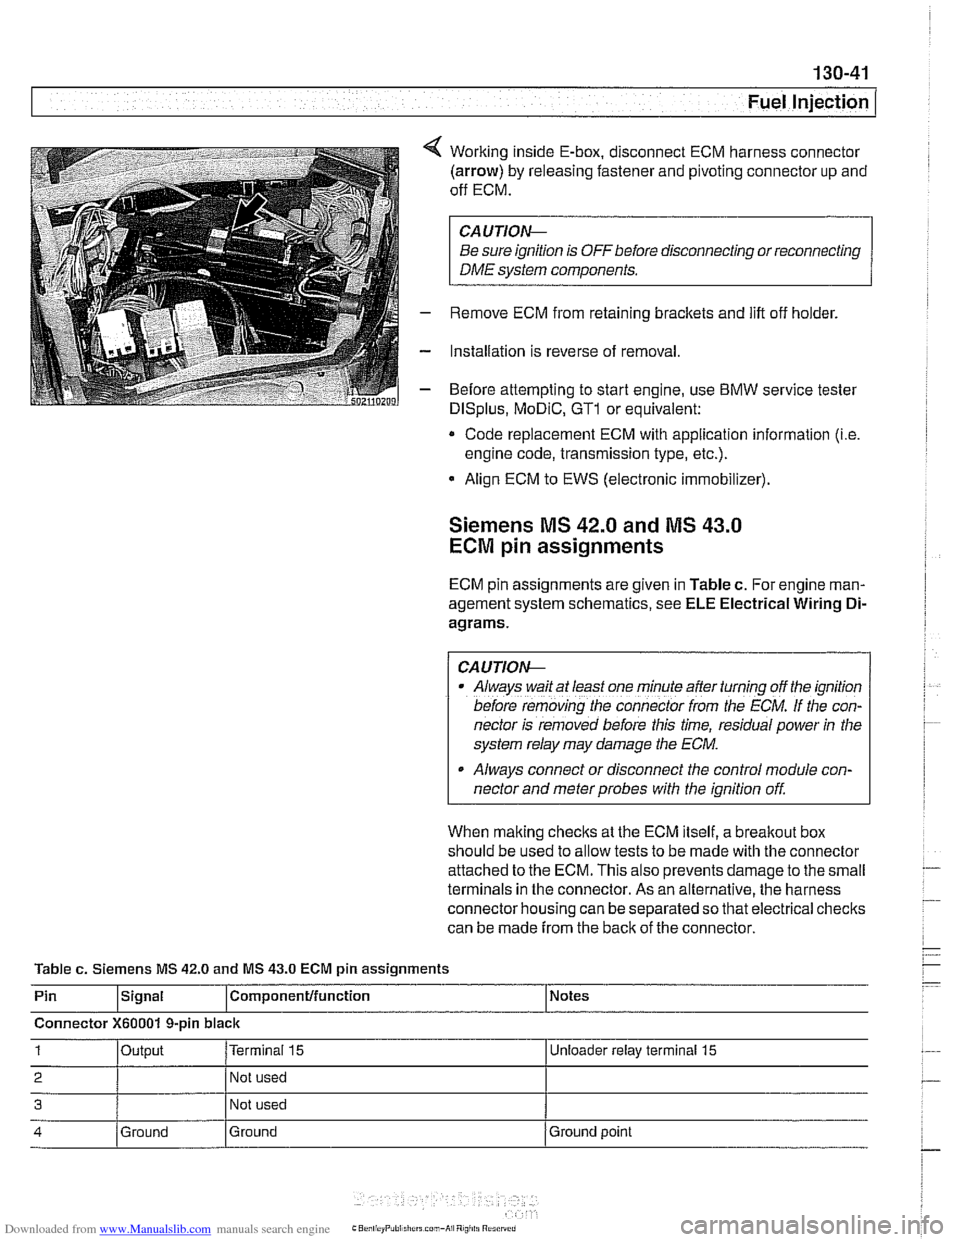
Working inside E-box, disconnect ECM harness connector
(arrow) by releasing fastener and pivoting connector up and
off ECM.
CA UTIOW
Be sure ignition is OFF before disconnecting or reconnecting
DME system components.
Remove ECM from retaining brackets and lift off holder.
Installation is reverse of removal
Before attempting to start engine, use
BMW service tester
DISplus, MoDiC, GTl or equivalent:
* Code replacement ECM with application information (i.e
engine code, transmission type, etc.).
Align ECM to EWS (electronic immobilizer).
Siemens MS 42.0 and MS 43.0
ECM pin assignments
ECM pin assignments are given in Table c. For engine man-
agement system schematics, see
ELE Electrical Wiring Di-
agrams.
/ CAUTIOW I
Al~ays wait at least one mfnule after turning off the ignition
before
remov;ng [he connecror irom rhe ECM. If the con-
nector is removed before this time, residual power
in the
system relay may damage the
ECM.
Always connect or disconnect the control module con-
nector and meter probes with the ignition off.
When making checks at the ECM itself, a
breakout box
should be used to allow tests to be made with the connector
attached to the ECM. This also prevents damage to the small
terminals in the connector. As an alternative, the harness
connector housing can be separated so that electrical checks
can be made from the back of the connector.
Table
c. Siemens MS 42.0 and MS 43.0 ECM pin assignments
Pin
lslgnal l~om~onentlfunction 1 Notes
Connector
X60001 9-pin black
1 loutput I~erminai 15 I Unloeder relay terminal 15
2 I 1 Not used I
3 Not used
4 Ground
Ground Ground
point
Page 443 of 1002
Downloaded from www.Manualslib.com manuals search engine
Fuel Injection I
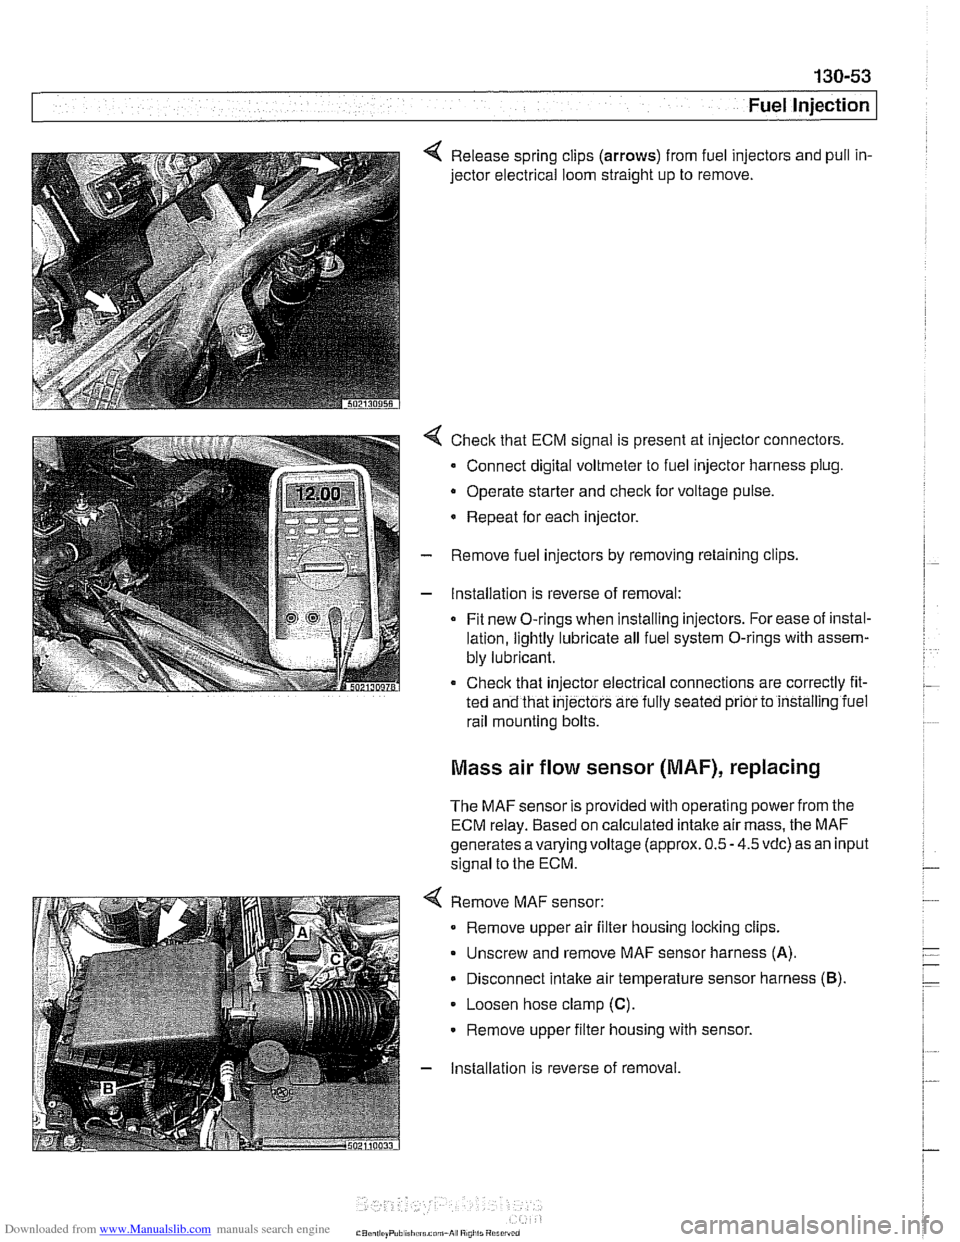
4 Release spring clips (arrows) from fuel injectors and pull in-
jector electrical loom straight up to remove.
4 Check that ECM signal is present at injector connectors.
- Connect digital voltmeter to fuel injector harness plug.
Operate starter and
check for voltage pulse.
* Repeat for each injector.
- Remove fuel injectors by removing retaining clips
- Installation is reverse of removal:
Fit new O-rings when installing injectors. For ease of instal-
lation, lightly lubricate all fuel system O-rings with assem-
bly lubricant.
Check that injector electrical connections are correctly fit-
ted and that
injectors are fully seated prior to installing iuel
rail mounting bolts.
Mass air flow sensor (MAF), replacing
The MAF sensor is provided with operating power from the
ECM relay. Based on calculated intake air mass, the MAF
generates
avarying voltage (approx. 0.5 - 4.5 vdc) as an input
signal to the ECM.
4 Remove MAF sensor:
Remove upper air filter housing locking clips.
Unscrew and remove MAF sensor harness
(A).
Disconnect intake air temperature sensor harness (B).
Loosen hose clamp (C).
Remove upper filter housing with sensor.
- Installation is reverse of removal
Page 447 of 1002
Downloaded from www.Manualslib.com manuals search engine
Fuel Injection
Intake air temperature
([AT) sensor,
testing and replacing
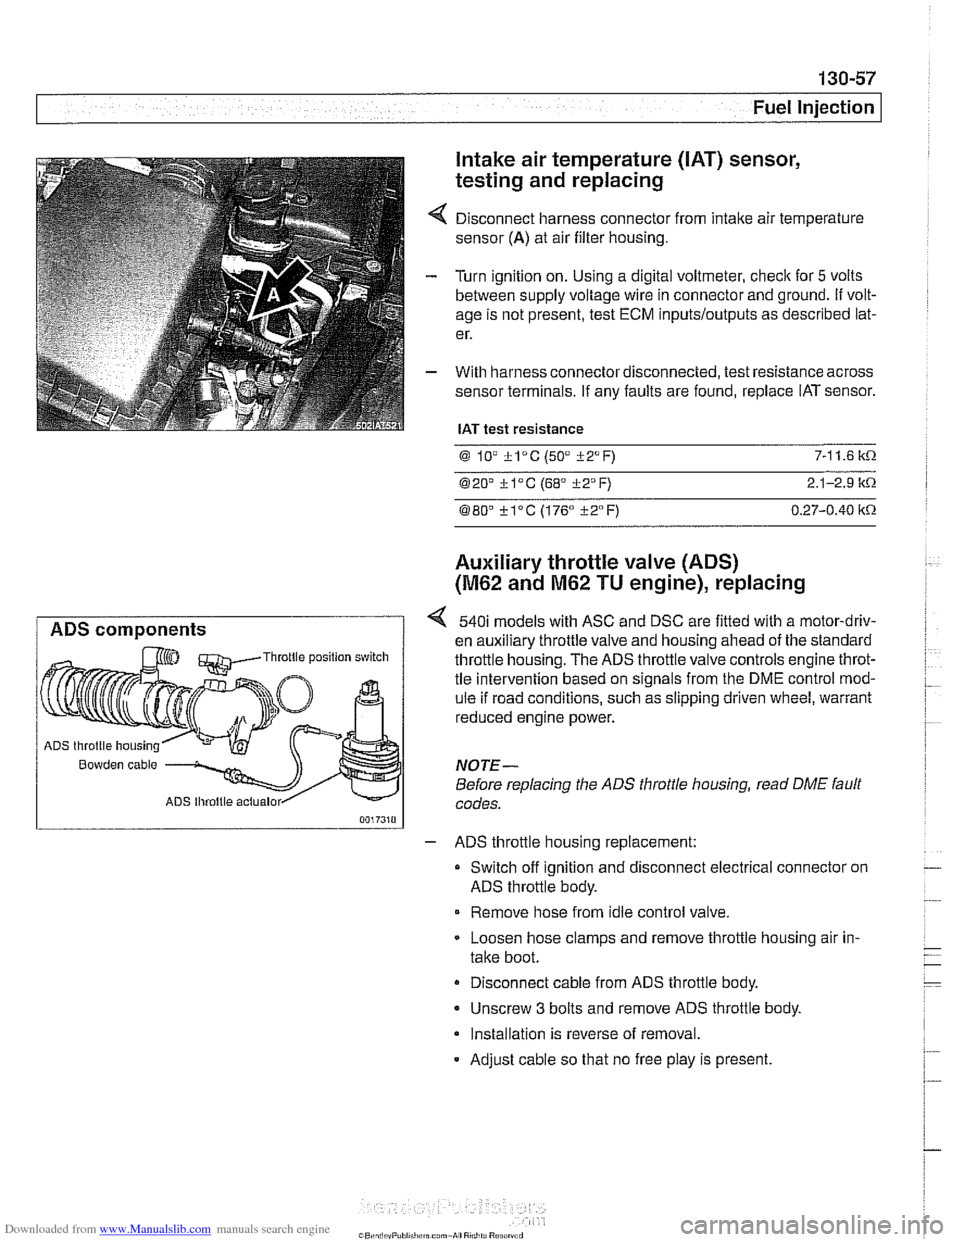
Disconnect harness connector from intake air temperature
sensor
(A) at air filter housing.
Turn ignition on. Using a digital voltmeter, check for
5 volts
between supply voltage wire in connector and ground.
If volt-
age is not present, test ECM
inputs/outputs as described lat-
er.
With harness connector disconnected, test resistance across
sensor terminals. If any faults are found, replace IAT sensor.
IAT test resistance
0 lV *lac (50" i-2°F) 7-1 1.6 k.0.
020' kl°C (68' 322°F) 2.1-2.9 it.0.
080" ?lac (176" i-2°F) 0.27-0.40 itn
Auxiliary throttle valve (ADS)
(M62 and M62 TU engine), replacing
ADS components 540i models with ASC and DSC are fitted with a motor-driv-
en auxiliary throttle valve and housing ahead of the standard Throttle position switch throttle housing. The ADS throttle valve controls engine throt-
tle intervention based on signals from the DME control mod-
ule if road conditions, such as slipping driven wheel, warrant
reduced engine power.
ADS throttle housing
Bowden cable NOTE-
Before replacing the ADS throttle housing, read DME fault
ADS lhroltle actualor codes.
- ADS throttle housing replacement:
Switch off ignition and disconnect electrical connector on
ADS throttle body.
Remove hose from idle control valve.
Loosen hose clamps and remove throttle housing air in-
take boot.
Disconnect cable from ADS throttle body.
- Unscrew 3 bolts and remove ADS throttle body.
Installation is reverse of removal.
- Adjust cable so that no free play is present.
Page 463 of 1002
Downloaded from www.Manualslib.com manuals search engine
( Mass Air Flow Sensor
1" Intake air temp. (NTC)
Sensor qround
Reference voltage . . . -., f fitr mass signal I
Fuel Injection I
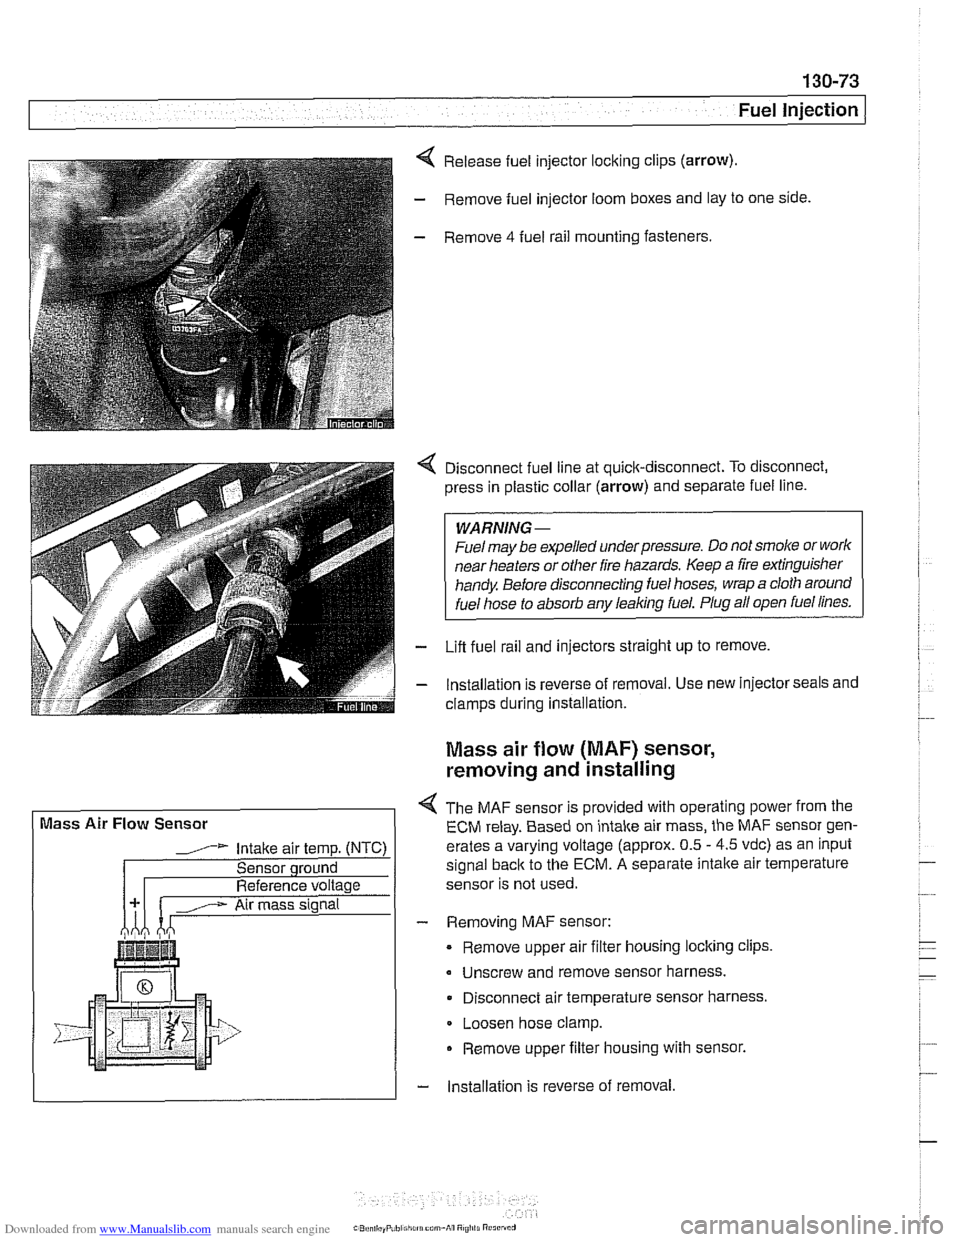
Release fuel injector locking clips (arrow).
- Remove fuel injector loom boxes and lay to one side.
- Remove 4 fuel rail mounting fasteners.
4 Disconnect fuel line at quick-disconnect. To disconnect,
press in plastic collar (arrow) and separate fuel line.
WARNING -
Fuel may be expelled underpressure. Do not srnol(e or work
near heaters or
other fire hazards. Keep a fire extinguisher
handy. Before disconnecting fuel hoses, wrap a cloth around
fuel hose
to absorb anv leakinq fuel. Plug all open fuel lines.
- Lifl fuel rail and injectors straight up to remove.
- lnstallation is reverse of removal. Use new injector seals and
clamps during installation.
Mass air flow (MAF) sensor,
removing and installing
4 The MAF sensor is provided with operating power from the
ECM relay. Based on intake air mass, the MAF sensor gen-
erates a varying voltage (approx. 0.5
- 4.5 vdc) as an input
signal
back to the ECM. A separate intalte air temperature
sensor is not used.
- Removing MAF sensor:
Remove upper air filter housing locking clips
Unscrew and remove sensor harness.
Disconnect air temperature sensor harness.
Loosen hose clamp.
Remove upper filter housing with sensor.
- lnstallation is reverse of removal
Page 488 of 1002
Downloaded from www.Manualslib.com manuals search engine
/ ~uel Tank and Fuel Pump
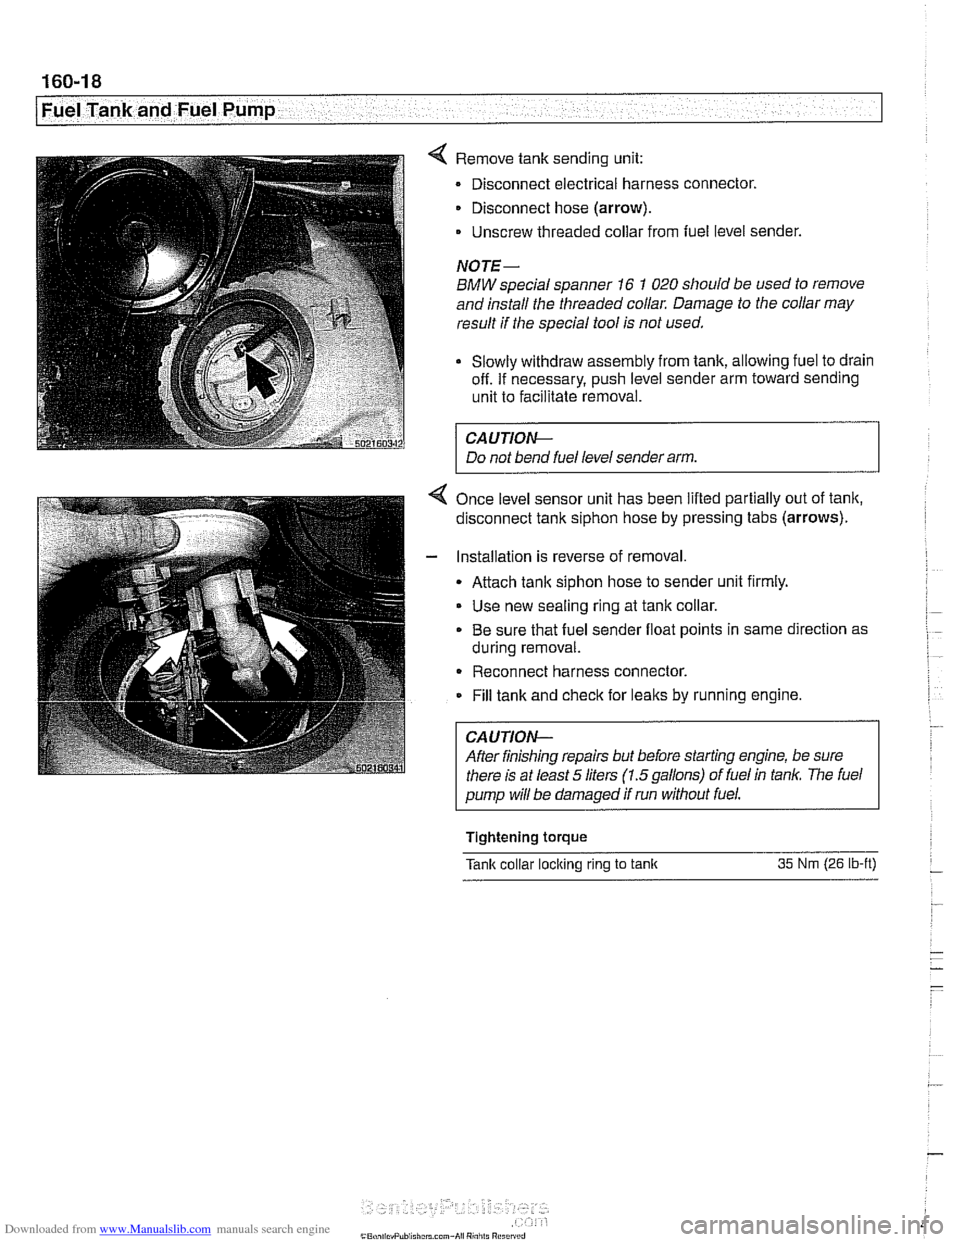
4 Remove tank sending unit:
Disconnect electrical harness connector.
Disconnect hose (arrow).
- Unscrew threaded collar from fuel level sender.
NOTE-
BMW special spanner 16 1 020 should be used to remove
and install the threaded collar. Damage to the collar may
result if the special tool is not used.
Slowly withdraw assembly from tank, allowing fuel to drain
off. If necessary, push level sender arm toward sending
unit to facilitate removal.
CA UTIOW-
Do not bend fuel level sender arm.
4 Once level sensor unit has been lifted partially out of tank,
disconnect tank siphon hose by pressing tabs (arrows).
- Installation is reverse of removal
Attach tank siphon hose to sender unit firmly.
Use new sealing ring at tank collar.
. Be sure that fuel sender float points in same direction as
during removal.
- Reconnect harness connector.
Fill tank and
check for leaks by running engine.
CAUTION-
After finishing repairs but before starting engine, be sure
there is at least
5 liters (1.5gallons) of fuel in tan/(. The fuel
pump will be damaged if run without fuel.
Tightening
torque
Tank collar loclting rlng to tanlt 35 Nm (26 lb-ft) -
Page 489 of 1002
Downloaded from www.Manualslib.com manuals search engine
7 .- A Fuel Tank and Fuel Pump
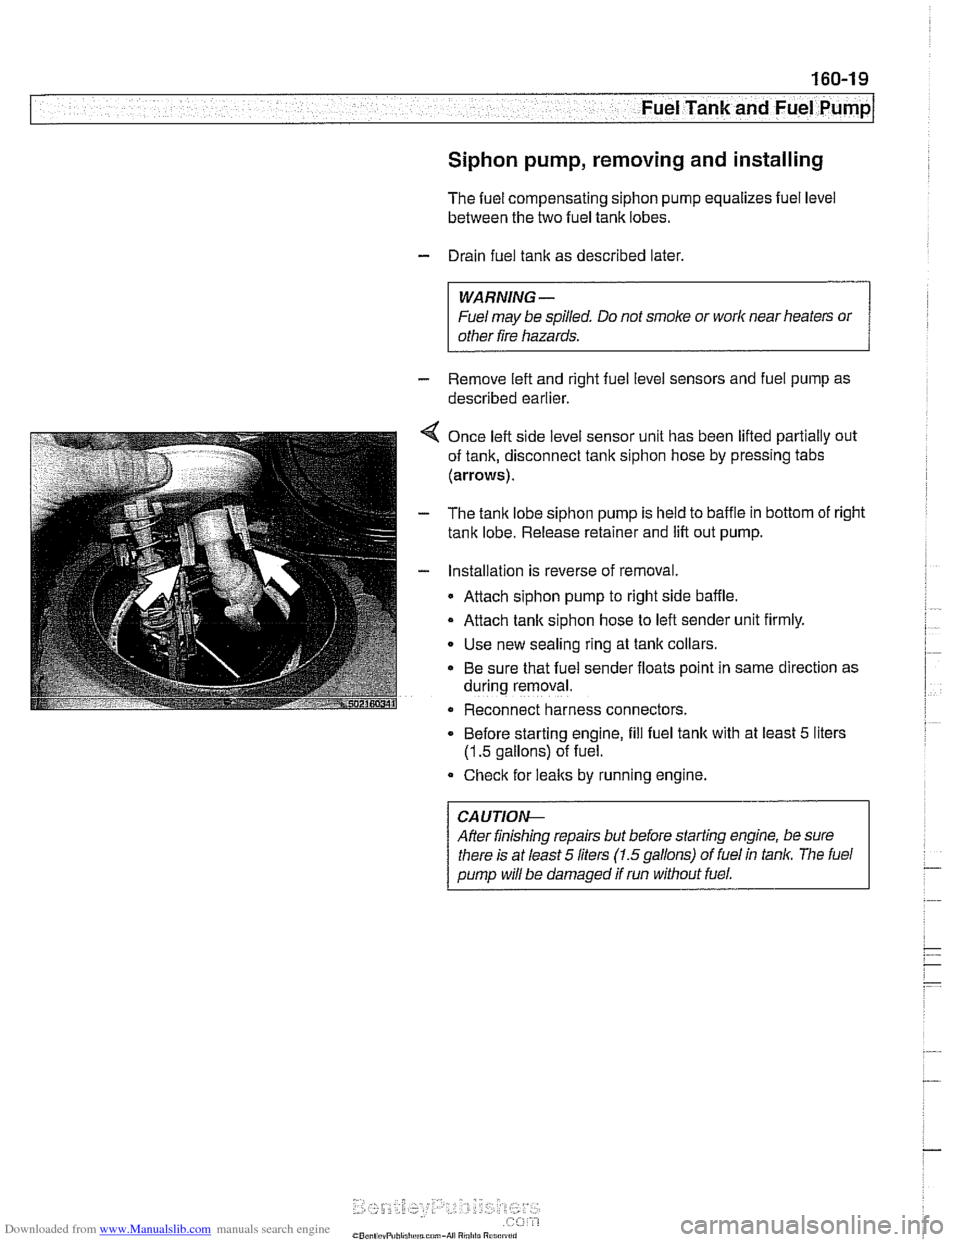
Siphon pump, removing and installing
The fuel compensating siphon pump equalizes fuel level
between the two fuel tank lobes.
- Drain fuel tank as described later,
WARNING -
Fuel may be spilled. Do not smoke or work near heaters or
other fire hazards.
- Remove left and right fuel level sensors and fuel pump as
described earlier.
4 Once left side level sensor unit has been lifted partially out
of tank, disconnect tank siphon hose by pressing tabs
(arrows).
- The tank lobe siphon pump is held to baffle in bottom of right
tank lobe. Release retainer and lift out pump.
- Installation is reverse of removal.
Attach siphon pump to right side baffle.
Attach tank siphon hose to left sender unit firmly.
Use new sealing ring at tank collars
Be sure that fuel sender floats point in same direction as
during removal.
Reconnect harness connectors.
. Before starting engine, fill fuel tank with at least 5 liters
(1.5 gallons) of fuel.
Check for
leaks by running engine.
Afler finishing repairs but before starting engine, be sure
Page 493 of 1002

Downloaded from www.Manualslib.com manuals search engine
.- Fuel Tank and Fuel pump( -
Fuel expansion tank, removing
and installing
- Raise rear end of car and support safely.
CA U TIOG
Make sure the car is stable and well supported at all times.
Use a professional automotive lift
orjack stands designed for
the
ouroose. A floor iack is not adequate support
- Remove left rear wheel and wheel housing inner shield.
4 Remove plastic nut (A) and disconnect hose (B).
4 Tilt vent tank down and loosen or cut off hose clamps
(arrows). Pull hoses off fittings.
- Release vacuum line loclting clips and remove tank
- Installation is reverse of removal. Use new hose clamps.
Tightening torques
Hose clamp 8 - 13 mm dia. 2 Nrn (18 in-lb)
Hose clamp 13 - 16 mm dia. 3 Nm (27 in-lb)
Hose clamp
42 - 48 mm dia. 4 Nm (36 in-lb)