bolt BMW 528i 1999 E39 Workshop Manual
[x] Cancel search | Manufacturer: BMW, Model Year: 1999, Model line: 528i, Model: BMW 528i 1999 E39Pages: 1002
Page 7 of 1002
Downloaded from www.Manualslib.com manuals search engine
001 General Warnings and Cautions
PLEASE READ THESE WARNINGS AND CAUTIONS
BEFORE PROCEEDING
WITH MAINTENANCE AND REPAIR WORK.
WARNINGS-
See also CAUTIONS
- Some repairs may be beyond your capability. If you lack the skills, - Catch draining fuel, oil, or brake fluid in suitable containers. Do
tools and equipment, or a suitable workplace for any procedure
not use
foodor beverage containers that might mislead someone
described in this manual, we suggest you leave such repairs to
into
drinking from them. Store flammable fluids away from fire
an authorized BMW dealer service department or other qualified
hazards. Wipe up spills at once, but do not store the oily rags,
shop. which can ignite and burn spontaneously.
. Do not reuse any fasteners that are worn or deformed. Many fas- Always observe good worRshop practices. Wear qoqqles when
teners are designed to be used only once and become
unreliable you operate machine tools or work with battery acid:kloves or
and mav fail when used a second time. This includes, but is not other
~rotective clothino should be worn whenever the iob re-
limited io, nuts, bolts, washers, self-locking nuts or bolts, clrclips yires' working with harmful substances.
and cotter pins. Always replace these fasteners with new parts.
Greases, lubricants and other automotive chemicals contain toxic
. Never work under a lifted car unless it is solidly supported on
substances, many of which are absorbed directly through the
stands
desiqned for the purpose. Do not supeort a car on cinder
skin. Read the manufacturer's instructions and warninos careful-
blochs, hollow tiles orotherbrops that may drurnbie undercontin-
uous toad. Never work under a car that is supported solely by a
iack. Never work under the car
while the enqine is runninq. - -
If you aregoing to work underacaron the ground, makesure that
the ground is level. Block the wheels to
keep the car from rolling.
Disconnect the battery negative
(-) terminal to prevent others
from starting the car while you are under it.
- Never run the engine unless the work area is well ventilated. Car-
bon monoxide kills.
Rings, bracelets and other jewelry should be removed so that
they cannot cause electrical shorts, get caught in running ma-
chinery, or be crushed by heavy parts.
- Tie long hair behind your head. Do not wear a necktie, a scarf.
loose clothing, or a necklace when you work near machine tools
or running engines. if your hair, clothing, or jewelry were to get
caught in the machinery, severe injury could result.
DO not attempt to
work on your car if you do not feel well. You in-
crease the
danger of injuryto yourseliand others if you are tired,
uDset or have taken medication or anv other substance that mav
keep you from being fully alert.
Illuminate your work area adequately but safely. Use a portable
iy. Use hand and eye protection. Avoid direct skin conGct.
Disconnect the battery negative (-) terminal whenever you work
on the fuel system
orthe electrical system. Do not smokeorwork
near heaters or other fire hazards. Keep an approved fire extin-
guisher handy.
. Friction materials (such as brake pads or shoes or clutch discs)
contain asbestos fibers or other friction materials. Do not create
dust by grinding, sanding, or by cleaning with compressed air.
Avoid breathing dust. Breathing any
friclion material dust can
lead to serious diseases and may result in death.
Batteries
giveoff explosive hydrogen gas during charging. Keep
sparks, lighted matches and open flame away from the top of the
battery. If hydrogen gas escaping from the cap vents is ignited, it
will ignite gas trapped in the cells and cause the battery to ex-
plode.
Connect and disconnect battery cables, jumper cables or a bat-
tery charger only wilh the ignition switched off. Do not disconnect
the battery while the engine is running.
Do not quick-charge the battery (for boost starting) for longer
than one minute. Wait at least one minute before boosting the
battery a second time.
. . safety lighiforworking lnsideor under the car. Make sure the bulb - Do not allow battery charging vollage to exceed 16.5 volts. If the
is enclosed bv a wire caoe. The hot filament of an accidentallv
batten! beoins ~roducina oas or boilino violentiv, reduce the
broken bulb can ignite spilled
fuel, vapors or oil. , - - - charglng rate. ~oostlng a sutfaled battery at a igh charging rate
can cause an
explosion.
-
Continued on next page
Page 15 of 1002
Downloaded from www.Manualslib.com manuals search engine
General
Much of the necessary maintenance and minor repairthat an
automobile will need can be done with ordinary tools. Below
you'll find important information on how to work safely, a dis-
cussion of what tools will be needed and how to use them.
Safety
Although an automobile presents many hazards, common
sense and good equipment can help ensure safety. Many ac-
cidents happen because of carelessness. Pay attention and
stick to the safety rules in this manual.
Lifting the car
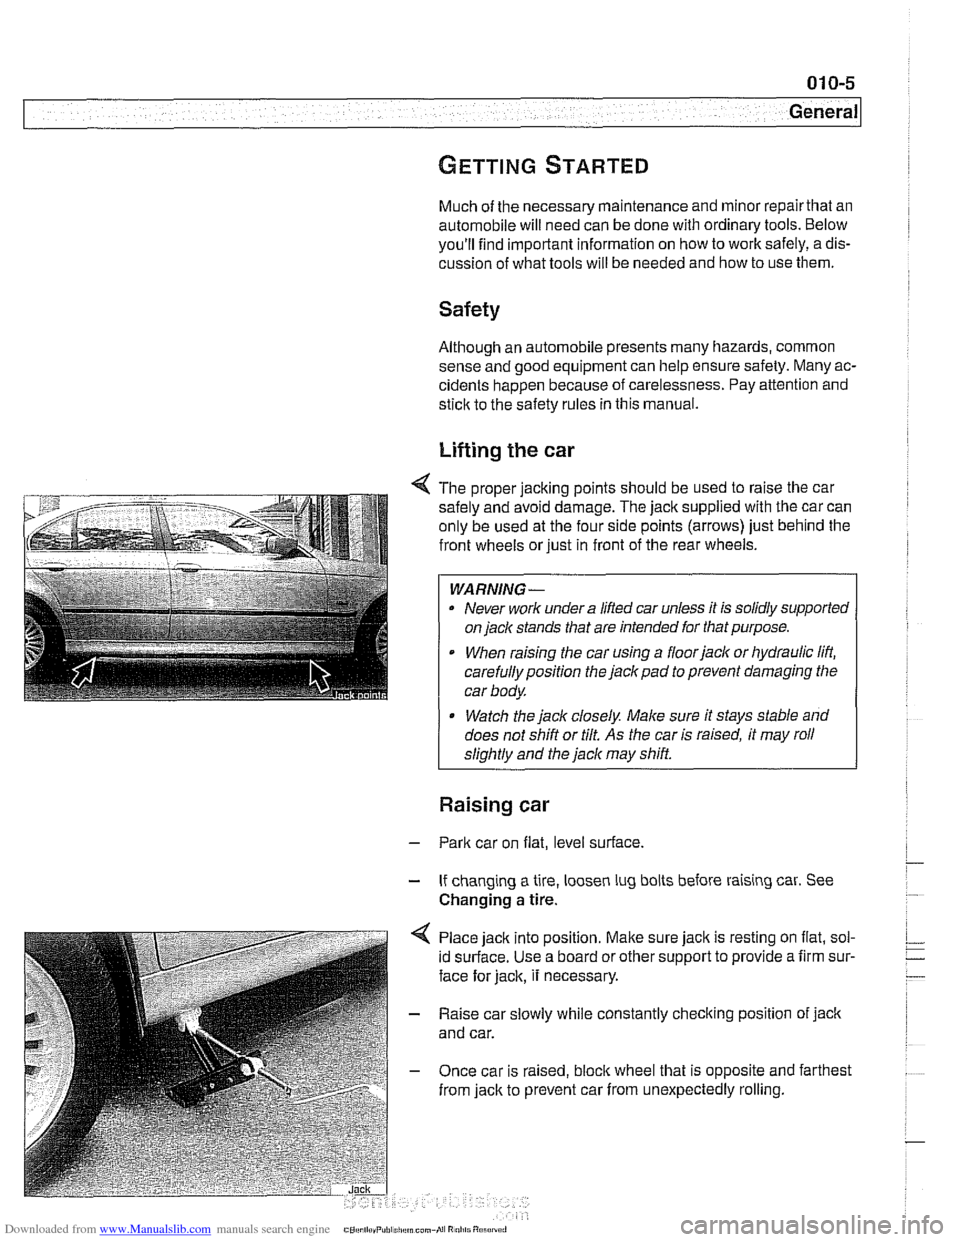
4 The proper jacking points should be used to raise the car
safely and avoid damage. The
jack supplied with the car can
only be used at the four side points (arrows) just behind the
front wheels or just in front of the rear wheels.
WARNING-
. Never work under a lifted car unless it is solidly supported
on
jack stands that are intended for that purpose.
When raising the car using a floorjack or hydraulic lift,
carefully position the jack pad to prevent damaging the
car body.
* Watch the jack closely. Male sure it stays stable and
does not shift or tilt.
As the car is raised, it may roll
sliahtlv and the
jack mav shift.
Raising car
- Park car on flat, level surface.
- If changing a tire, loosen lug bolts before raising car. See
Changing
a tire.
Place jack into position.
Malte sure jack is resting on flat, sol-
id surface. Use a board or other support to provide a firm sur-
face for jack, it necessary.
- Raise car slowly while constantly checking position of jack
and car.
- Once car is raised, bloclc wheel that is opposite and farthest
from jack to prevent car from unexpectedly rolling.
Page 17 of 1002
Downloaded from www.Manualslib.com manuals search engine
General
ADVICE FOR THE BEGINNER
The tips that follow are general advice to help the do-it-your-
self BMW owner
periorm repairs and maintenance taslts
more easily and more professionally.
Planning ahead
Know what the whole job requires before starting. Read the
procedure thoroughly, from beginning to end, in
orderto know
just what to expect and what parts will have to be replaced.
Workshop practices
Keeping things organized, neat, and clean is essential to do-
ing a good job. When working under the hood, iender covers
will protectthe finish from scratches and otherdamage. Make
sure the car finish is clean so that dirt under the cover does
not scratch the iinish.
Any repair job will be less troublesome if the parts are clean
For cleaning old parts, there are many solvents and parts
cleaners commercially available.
For cleaning parts prior to assembly, commercially available
aerosol cans of parts cleaner or brake cleaner are handy to
use, and the cleaner will evaporate completely.
WARNING-
Most solvents used for cleaning parts are highly flammable
as well as toxic, especially in aerosol form. Use with extreme
care. Do not smoke. Do not use these products indoors or
near any source of heat, sparks or flame.
Non reusable fasteners
Many fasteners used on the cars covered by this manual
must be replaced with new ones once they are removed.
These include but are not limited to: bolts, nuts (self-locking,
nylock, etc.), roll pins, clips and washers. Genuine BMW
parts should be the only replacement parts used for this pur-
pose.
Some bolts are designed to stretch during assembly and are
permanently altered, rendering them unreliable once re-
moved. These are known as torque-to-yield fasteners. Al-
ways replace fasteners where instructed to do so. Failure to
replace these fasteners could cause personal injury
orvehi-
cle damage. See an authorized BMW dealer for applications
and ordering information.
Page 18 of 1002
Downloaded from www.Manualslib.com manuals search engine
General Tightening fasteners
When tightening the bolts ornuts on acomponent, it is always
good practice to tighten the bolts gradually and evenly to
avoid misalignment or over-stressing any one portion of the
component. For components sealed with gaskets, this meth-
od helps to ensure that the
gasket will seal properly.
WARNING
-
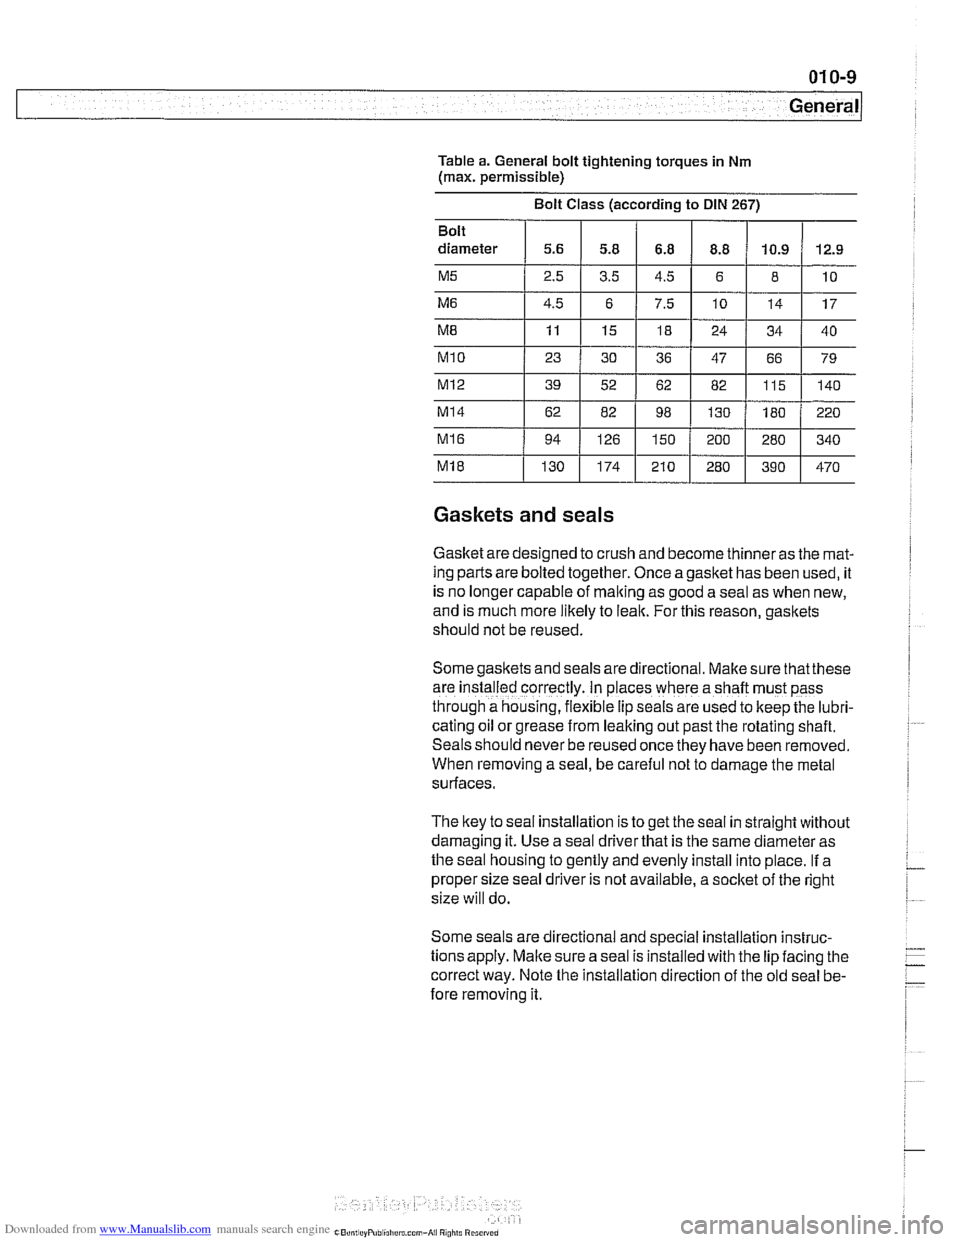
Table a: General bolt tightening torques in Nm (max.
permissible) is
a general reference only The values listedin
the table are not intended to be usedas a substitute for tor-
ques specifically called out in the text or in manufacturer's in-
formation.
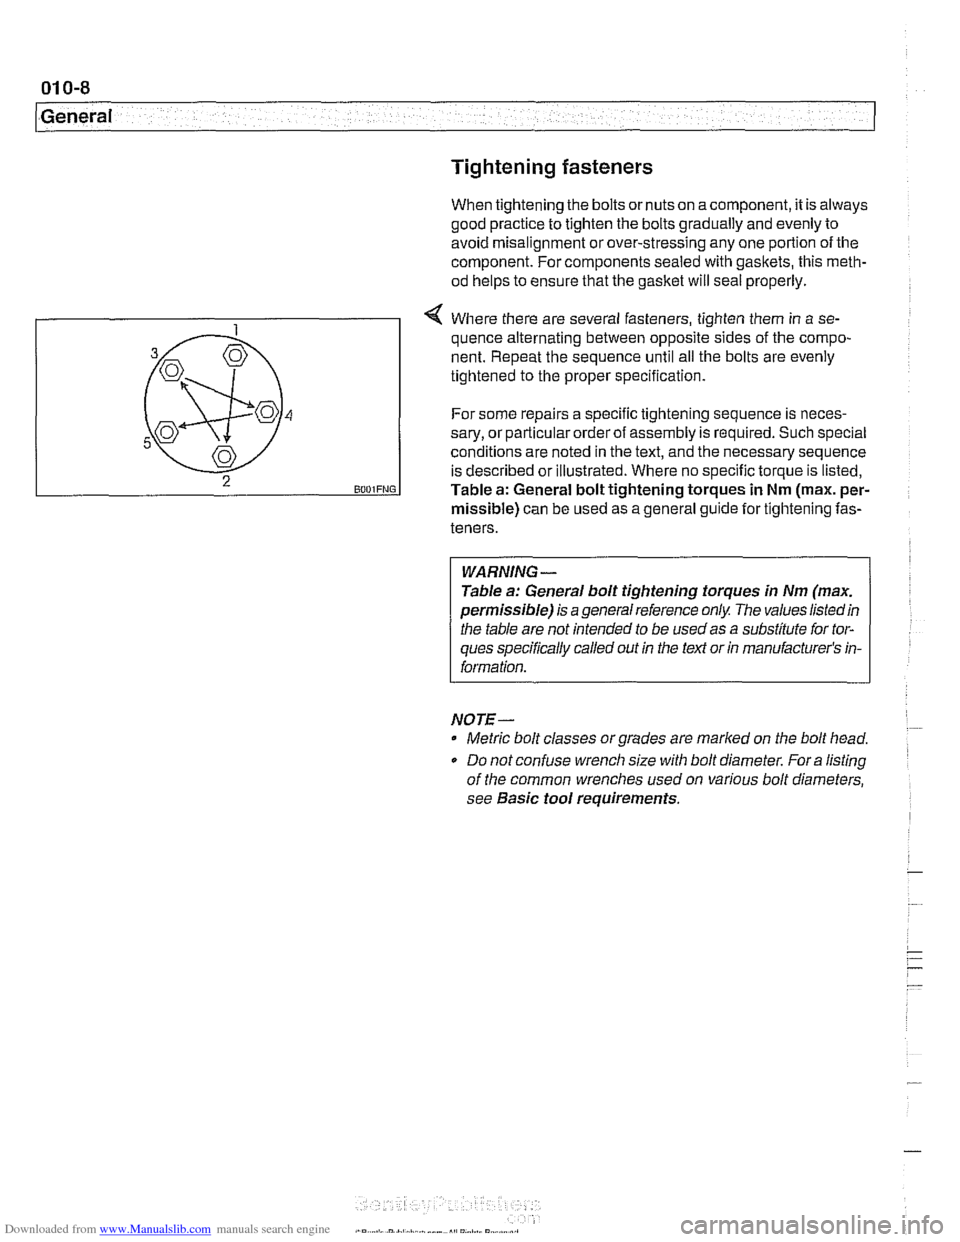
4 Where there are several fasteners, tighten them in a se-
NOTE-
* Metric bolt classes or grades are rnarlced on the bolt head.
* Do not confuse wrench size with bolt diameter. Fora listing
of the common wrenches used on various bolt
diameters,
see Basic tool requirements.
2 BOO~FNG
quence alternating between opposite sides of the compo-
nent. Repeat the sequence until all the bolts are evenly
tightened to the proper specification.
For some repairs a specific tightening sequence is
neces-
sary, or particular order of assembly is required. Such special
conditions are noted in the text, and the necessary sequence
is described or illustrated. Where no specific torque is listed,
Table
a: General bolt tightening torques in Nm (max. per-
missible) can be used as a general guide for tightening fas-
teners.
Page 19 of 1002
Downloaded from www.Manualslib.com manuals search engine
General
Table a. General bolt tightening torques in Nm
(max. permissible)
Bolt Class (according to DIN
267)
Gaskets and seals
Gasket aredesigned to crush and become thinner as the mat-
ing parts are bolted together. Once agasket has been used, it
is no longer capable
;f malting as good a seal as when new,
and is much more likely to leak.
Forthis reason, gaskets
should not be reused.
Some gaskets and seals are
d~rectional. Make sure thatthese
are
~nstalled correctly. In places where a shaft must pass
through a housing,
flex~ble lip seals are used to keep the lubri-
cating
011 or grease from leaking out past the rotatlng shaft.
Seals should never be reused once they have been removed.
When
rernovlng a seal, be careful not to damage the metal
surfaces.
The ltey to seal installation is to get the seal in straight without
damaging it. Use a seal driver that is the same diameter as
the seal housing to gently and evenly install into place.
If a
proper size seal driver is not available, a socket of the right
size will do.
Some seals are directional and special installation instruc-
tions apply. Make sure a seal is installed with the lip facing the
correct way. Note the installation direction of the old seal be-
fore removing it.
Page 24 of 1002
Downloaded from www.Manualslib.com manuals search engine
01 0-1 4
General
Specialty tool suppliers
Peake Research, Automotive Products Division
P.O. Box 28776
San Jose, CA 95159
408-369-0406
[email protected]
http://www.peakeresearch.com
Basic tool requirements
The basic hand tools described below can be used to accom-
plish most of the simple maintenance and repair tasks.
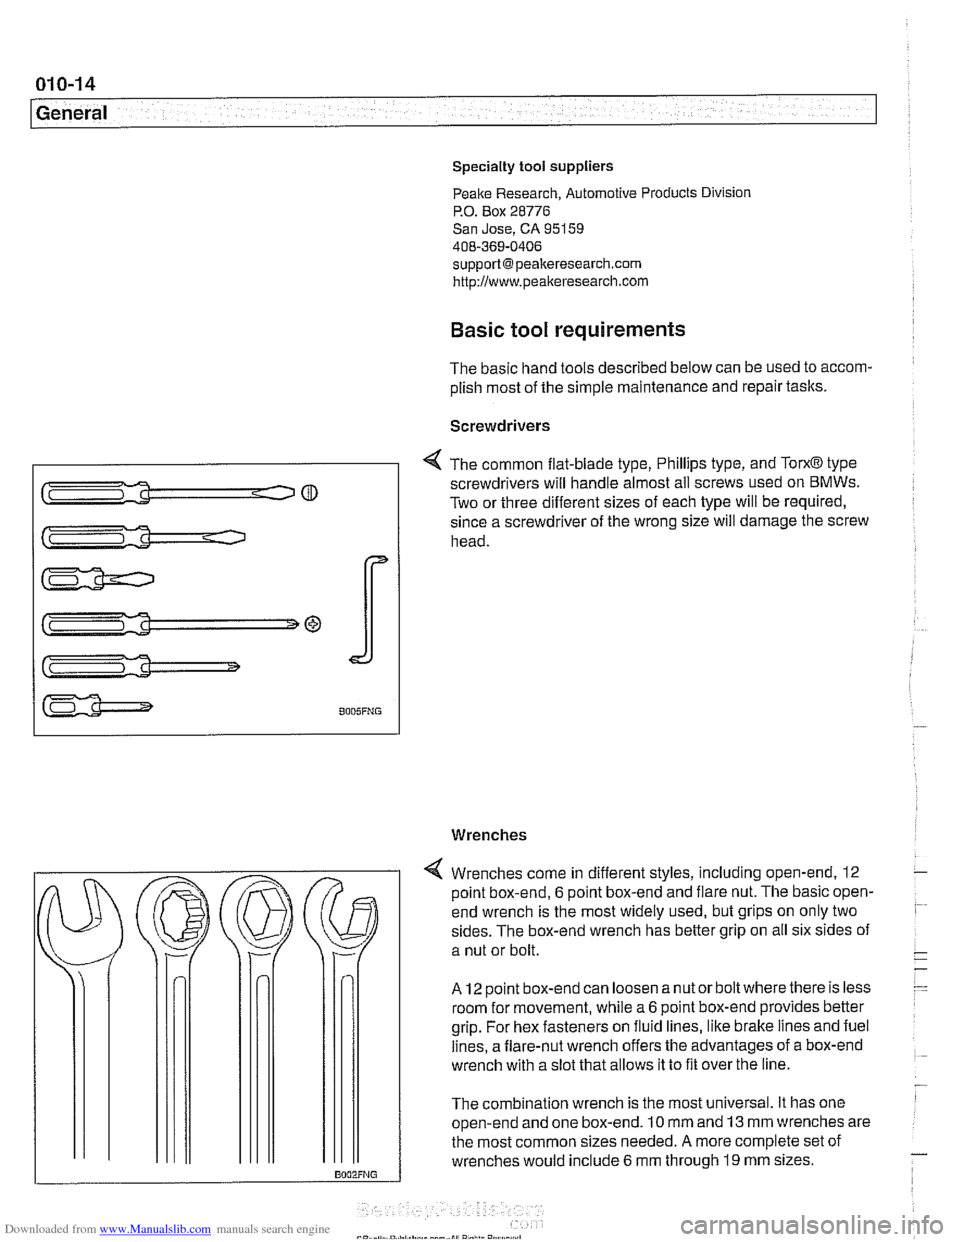
Screwdrivers
4 The common flat-blade type, Phillips type, and TorxO type
screwdrivers will handle almost all screws used on
BMWs.
Two or three different sizes of each type will be required,
since a screwdriver of the wrong size will damage the screw
head.
Wrenches
4 Wrenches come in different styles, including open-end. 12
point box-end,
6 point box-end and flare nut. The basic open-
end wrench is the most widely used, but grips on only two
sides. The box-end wrench has better grip on all six sides of
a nut or bolt.
A 12 point box-end can loosen a nut or bolt where there is less
room for movement, while
a 6 point box-end provides better
grip. For hex fasteners on fluid lines, like brake lines and fuel
lines, a flare-nut wrench offers the advantages of a box-end
wrench with a slot that allows it to fit over the line.
The combination wrench is the most universal. It has one
open-end and one box-end. 10 mm and 13 mm wrenches are
the most common sizes needed.
A more complete set of
wrenches would include
6 mm through 19 mm sizes.
Page 25 of 1002
Downloaded from www.Manualslib.com manuals search engine
Sockets Socltets are used with a ratchet handle for speed and conve-
nience and can be combined with extensions and universal
joints (swivels) to reach fasteners more easily. The most
common socket drive sizes are
114 inch, 318 inch and 112 inch.
Sockets come in
6 point and 12 point styles. The 6 point offers
a better grip on tight nuts and bolts.
6 mm to 19 mm socltets
are the most needed sizes. Below is a list of typical bolt
diarn-
eters and the corresponding wrench sizes.
Common bolt diameters and wrench sizes
M5 8 rnrn
M6
10 rnm
M8 12rnrnor13rnrn
MI 0 17 rnrn
MI2 19 rnrn
M14 22 mm
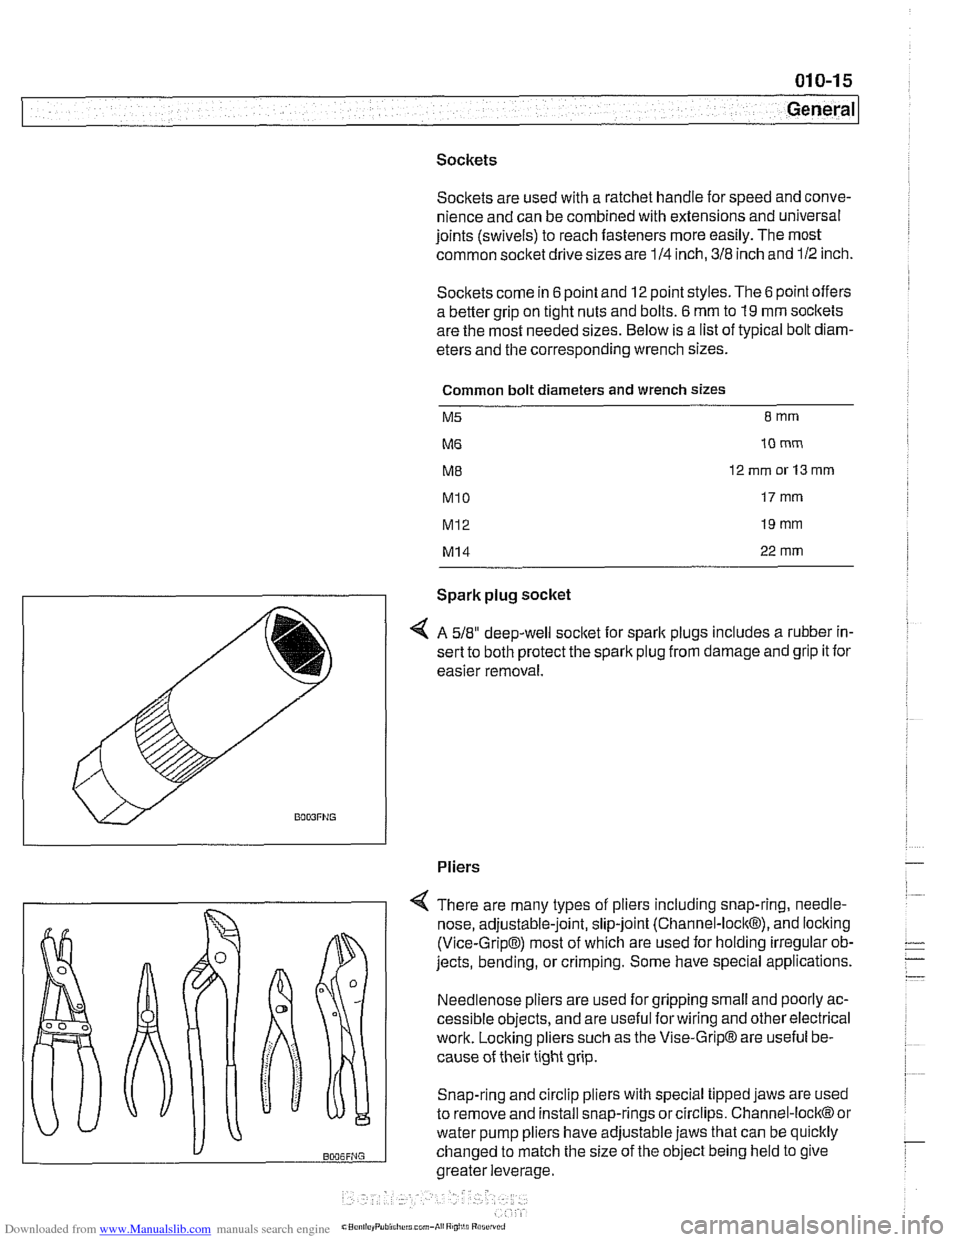
Spark plug socket
4 A 518" deep-well socket for sparlt plugs includes a rubber in-
sert to both protect the spark plug from damage and grip it for
easier removal.
Pliers
There are many types of pliers including snap-ring,
needle-
nose, adjustable-joint, slip-joint (Channel-lock@), and locking
(Vice-Grip@) most of which are used for holding irregular ob-
jects, bending, or crimping. Some have special applications.
Needlenose pliers are used for gripping small and poorly ac-
cessible objects, and are useful forwiring and other electrical
work. Locking pliers such as the Vise-Grip@ are useful be-
cause of their tight grip.
Snap-ring and circlip pliers with special tipped jaws are used
to remove and install snap-rings or circlips. Channel-lock@ or
water pump pliers have adjustable jaws that can be quicltly
changed to match the size of the object being held to give
greater leverage,
Page 26 of 1002
Downloaded from www.Manualslib.com manuals search engine
.-
General
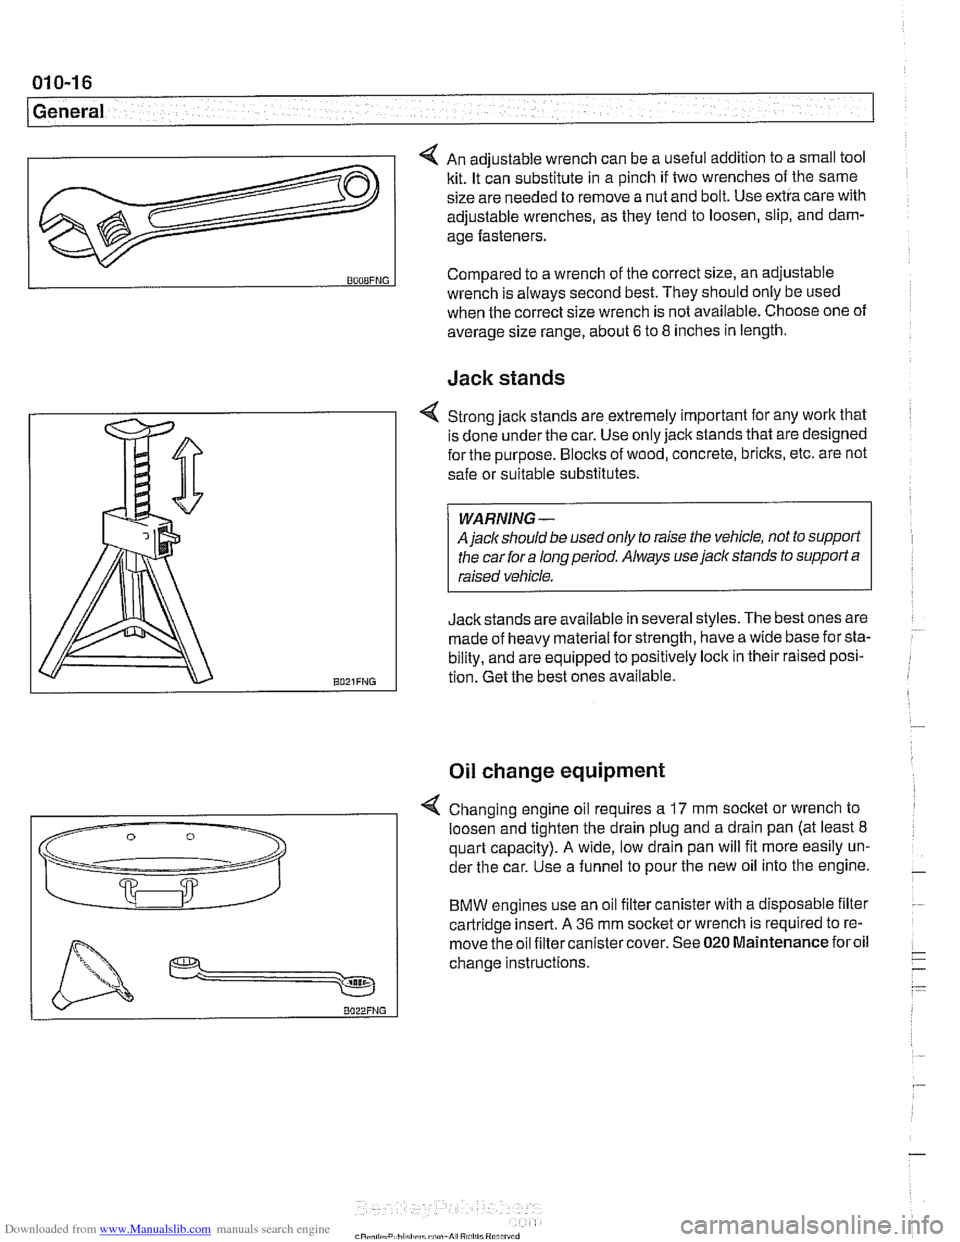
4 An adjustable wrench can be a useful addition to a small tool
kit. It can substitute in a pinch if two wrenches of the same
size are needed to remove a nut and bolt. Use extra care with
adjustable wrenches, as they tend to loosen, slip, and dam-
age fasteners.
Jack stands
v
BOOBFNG
4 Strong jack stands are extremely important for any work that
is done under the car. Use only jack stands that are designed
for the purpose.
Blocks of wood, concrete, bricks, etc. are not
safe or suitable substitutes.
A
jaclc should be used only to raise the vehicle, not to support
the car for a long period. Always use
jack stands to support a
Jackstands are available in several styles. The best ones are
:
made of heavy material for strength, have a wide base for sta-
bility, and are equipped to positively lock in their raised posi-
tion. Get the best ones available.
Compared to
a wrench of the correct size, an adjustable
Oil change equipment
wrench is always second best. They should only be used
when the correct size wrench is not available. Choose one of
average size range, about
6 to 8 inches in length.
4 Changing engine oil requires a 17 mm socket or wrench to
loosen and tighten the drain plug and a drain pan (at least
8
quart capacity). A wide, low drain pan will fit more easily un-
der the car. Use a funnel to pour the new oil into the engine.
BMW engines use an oil filter canister with a disposable filter
cartridge insert. A
36 mm socket or wrench is required to re-
move the oil filtercanistercover. See
020 Maintenance foroil
change instructions.
Page 28 of 1002
Downloaded from www.Manualslib.com manuals search engine
-
General
BMW special tools
Many repairs covered in this manual call for the use of BMW
special tools. Many of the BMW special tools mentioned in
this manual are simply the best thing to use to do the job cor-
rectly. In these cases, the tool is identified with a
BMW parl
number. See your authorized BMW dealer parts department
for information on how to order special tools.
There are some jobs for which expensive special tools are es-
sential, and not a cost-effective purchase for a one time repair
by the do-it-yourself owner. This manual includes such re-
pairs for the benefit of those with the necessary experience
and access to tools. For the do-it-yourselfer, the need for spe-
cial tools is noted in the text, and whether or not BMW dealer
service is recommended.
Changing a tire
- Stop car on as flat a surface as possible, in a place where you
can be easily seen by other drivers. Avoid stopping just over
the crest of a hill.
WARNING -
If a tire goes flat while driving, pull well off the road. Changing
a tire on a busy slreet or liigliway is very dangerous. If
nec-
essag drive a short distance on the flat tire to get to a safe
place. It is much better to ruin a tire or rim than to
risk being
hit.
-
- Turn on emergency flashers, and set out flares or emergency
markers well behind car.
Choclc wheel (wheel chock located
in trunk) diagonally opposite to the one being changed. Pas-
sengers should get out of car and stand well away from road.
- Take jaclc and tools from tool area beneath trunk mat. Re-
move spare tire from tire storage tray.
- Loosen wheel bolts while car is on ground, but leave them a
little snug.
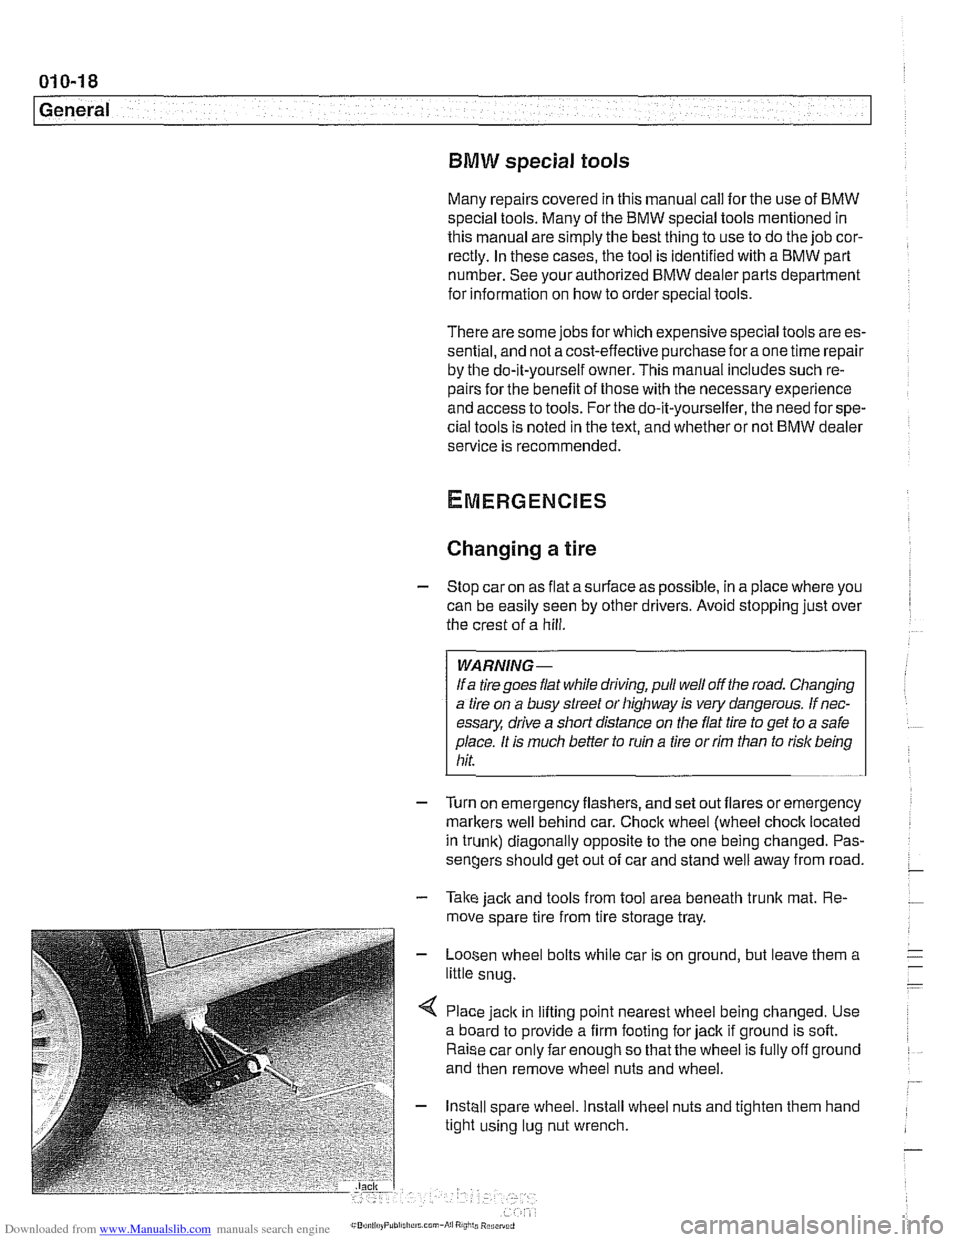
< Place jack in lifting point nearest wheel being changed. Use
a board to provide a firm footing for jack if ground is soft.
Raise car only far enough so that the wheel is fully off ground
and then remove wheel nuts and wheel.
- Install spare wheel. Install wheel nuts and tighten them hand
tight using lug nut wrench.
Page 50 of 1002
Downloaded from www.Manualslib.com manuals search engine
020-1 8
Maintenance
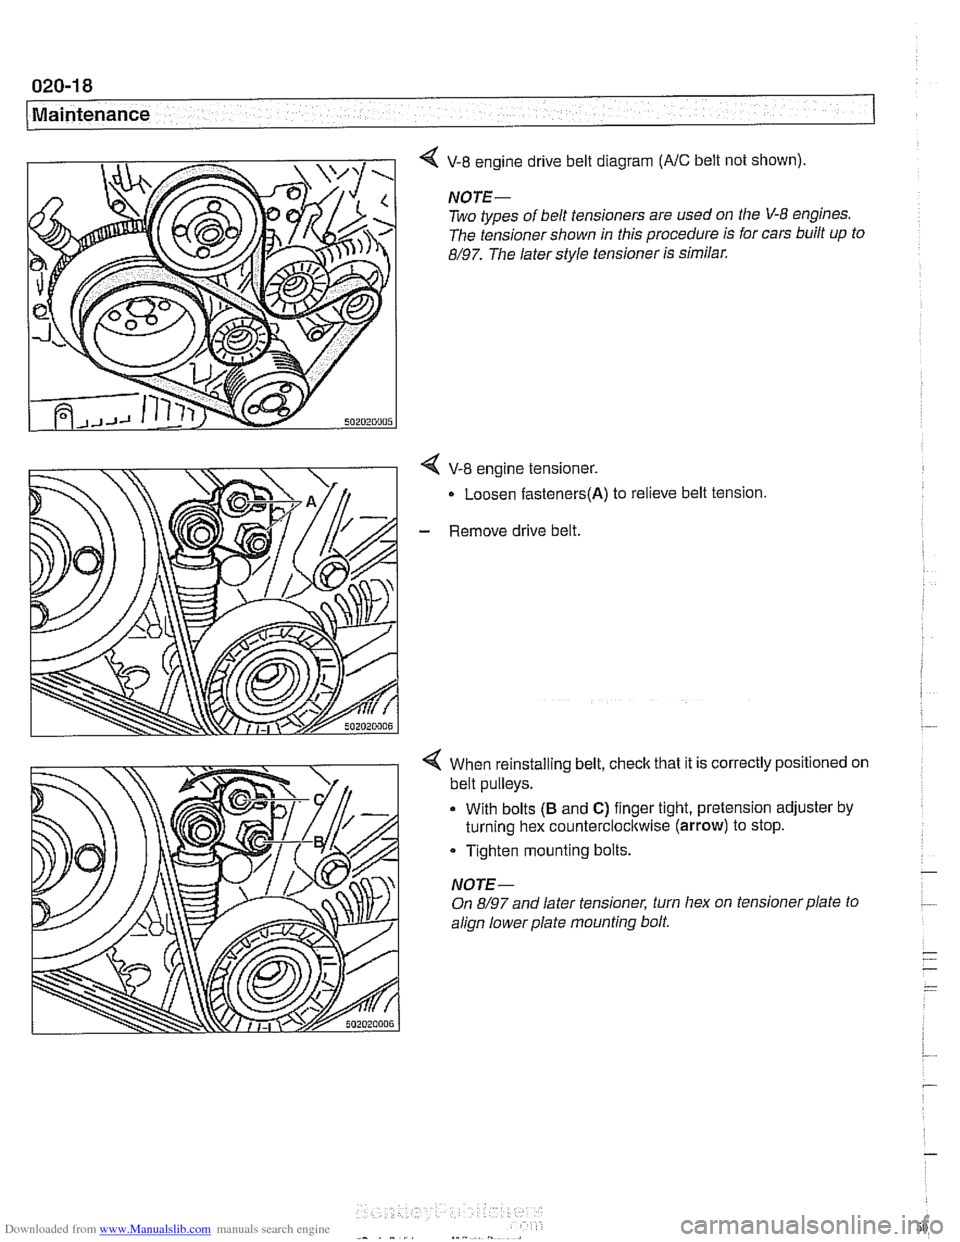
V-8 engine drive belt diagram (NC belt not shown).
NOTE-
Two types of belt tensioners are used on the V-8 engines.
The tensioner shown in this procedure is for cars built up to
8/97. The later style tensioner is similar.
4 V-8 engine tensioner.
Loosen
fasteners(A) to relieve belt tension
- Remove drive belt.
4 When reinstalling belt, check that it is correctly positioned on
belt pulleys.
With bolts
(B and C) finger tight, pretension adjuster by
turning hex counterclocltwise
(arrow) to stop.
Tighten mounting bolts.
NOTE-
On 8/97 and later tensioner, turn hex on tensioner plate to
align lowerplate mounting bolt.