audio BMW 528I SEDAN 2009 E60 Owner's Guide
[x] Cancel search | Manufacturer: BMW, Model Year: 2009, Model line: 528I SEDAN, Model: BMW 528I SEDAN 2009 E60Pages: 294, PDF Size: 9.55 MB
Page 188 of 294
CD player and CD changer
186
Compressed audio files*
1.Select the current track and press the con-
troller.
2.Select the desired menu item:
>To play all tracks of the current directory
in random order, select "Random direc-
tory" and press the controller.
>To play all tracks of the CD in random
order, select "Random all" and press the
controller.
To stop random function:
1.Press the controller.
2.Select "Random directory" or "Random all"
and press the controller.
Fast forward/reverse
Buttons next to CD player:
Press and hold the button for the corre-
sponding direction.
CD magazine
The BMW CD changer for six CDs is installed in
the glove compartment.
Removing CD magazine
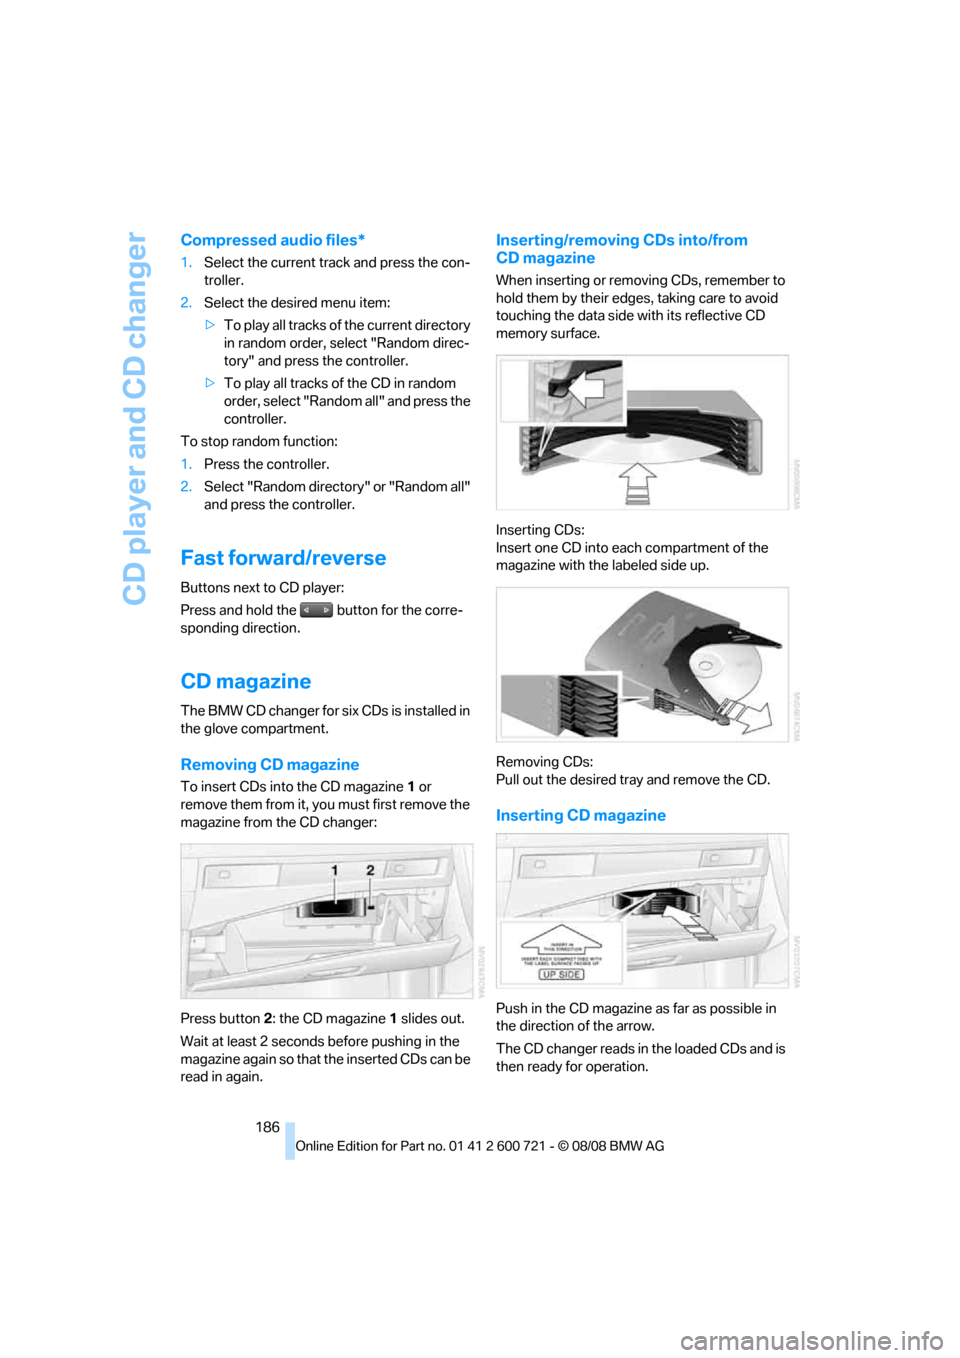
To insert CDs into the CD magazine 1 or
remove them from it, you must first remove the
magazine from the CD changer:
Press button2: the CD magazine1 slides out.
Wait at least 2 seconds before pushing in the
magazine again so that the inserted CDs can be
read in again.
Inserting/removing CDs into/from
CD magazine
When inserting or removing CDs, remember to
hold them by their edges, taking care to avoid
touching the data side with its reflective CD
memory surface.
Inserting CDs:
Insert one CD into each compartment of the
magazine with the labeled side up.
Removing CDs:
Pull out the desired tray and remove the CD.
Inserting CD magazine
Push in the CD magazine as far as possible in
the direction of the arrow.
The CD changer reads in the loaded CDs and is
then ready for operation.
Page 190 of 294
AUX-IN connection
188
AUX-IN connection
You can connect an external audio device, e.g.
an MP3 player, and play the sound via the vehi-
cle speakers. The sound can be adjusted via
iDrive.
Connecting
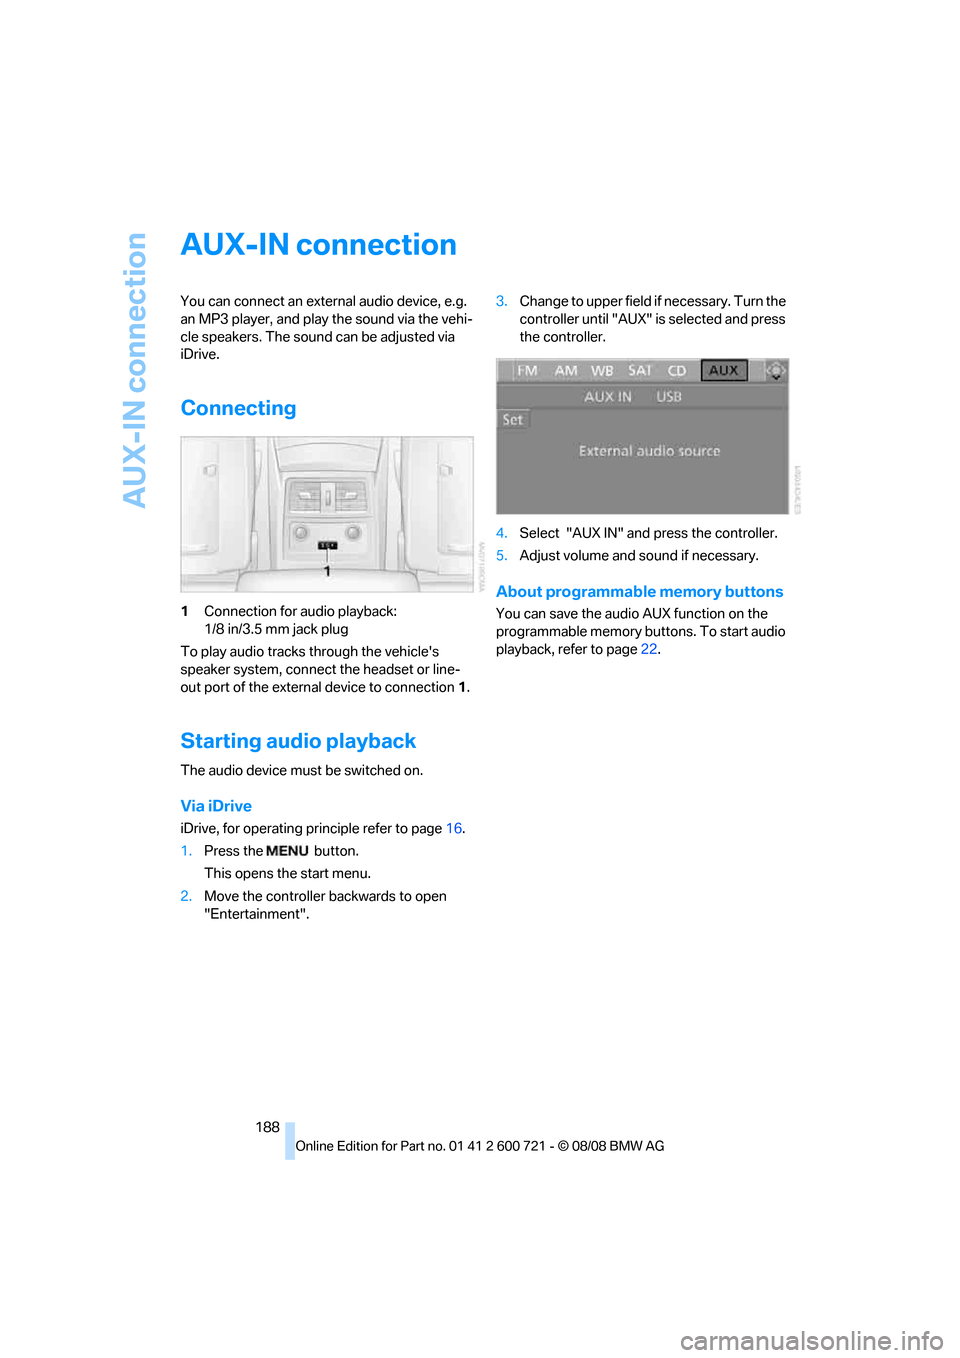
1Connection for audio playback:
1/8 in/3.5 mm jack plug
To play audio tracks through the vehicle's
speaker system, connect the headset or line-
out port of the external device to connection 1.
Starting audio playback
The audio device must be switched on.
Via iDrive
iDrive, for operating principle refer to page16.
1.Press the button.
This opens the start menu.
2.Move the controller backwards to open
"Entertainment".3.Change to upper field if necessary. Turn the
controller until "AUX" is selected and press
the controller.
4.Select "AUX IN" and press the controller.
5.Adjust volume and sound if necessary.
About programmable memory buttons
You can save the audio AUX function on the
programmable memory buttons. To start audio
playback, refer to page22.
Page 191 of 294
Navigation
Entertainment
Driving tips
189Reference
At a glance
Controls
Communications
Mobility
USB-audio interface/mobile phone audio
interface
You can connect audio devices, e. g. an iPod/
iPhone or a USB device (MP3 player, USB flash
drive), to the USB-audio interface. You can then
operate these via iDrive.
When using an iPhone / mobile phone as a
music player, connect the device to the snap-in
adapter, refer to the separate operating instruc-
tions. Playback is only possible if a device is not
connected to the USB-audio interface.
The system can play back common audio files,
e.g. MP3, WMA, WAV (PCM) and AAC, as well
as playback lists in the M3U format.
Due to the large number of audio devices avail-
able on the market, operation via the vehicle
cannot be ensured for every audio device.
Ask your BMW center which audio devices are
suitable.
Connecting
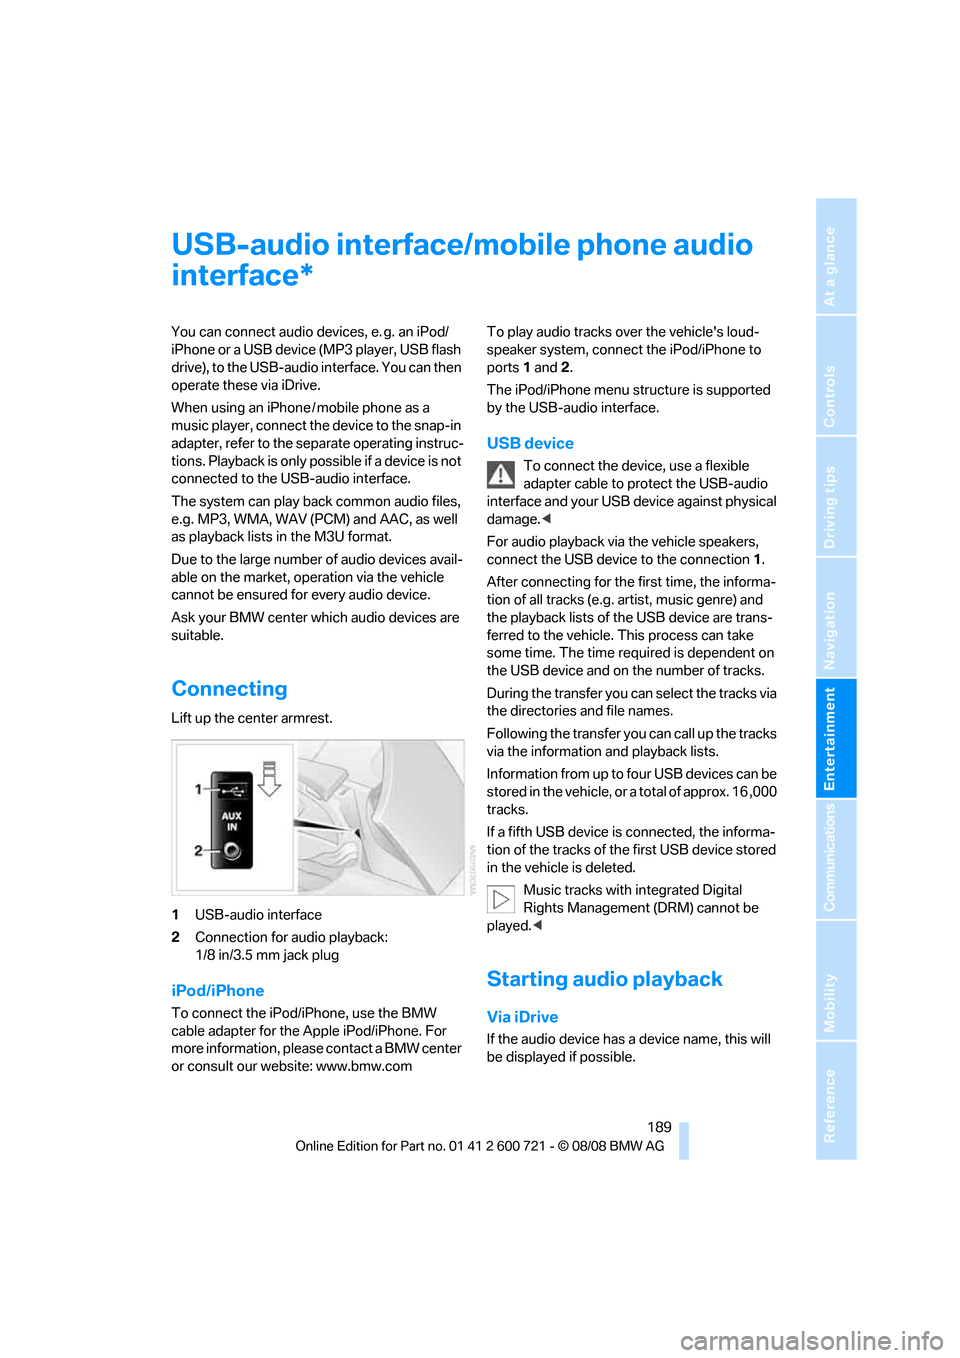
Lift up the center armrest.
1USB-audio interface
2Connection for audio playback:
1/8 in/3.5 mm jack plug
iPod/iPhone
To connect the iPod/iPhone, use the BMW
cable adapter for the Apple iPod/iPhone. For
more information, please contact a BMW center
or consult our website: www.bmw.comTo play audio tracks over the vehicle's loud-
speaker system, connect the iPod/iPhone to
ports 1 and 2.
The iPod/iPhone menu structure is supported
by the USB-audio interface.
USB device
To connect the device, use a flexible
adapter cable to protect the USB-audio
interface and your USB device against physical
damage.<
For audio playback via the vehicle speakers,
connect the USB device to the connection 1.
After connecting for the first time, the informa-
tion of all tracks (e.g. artist, music genre) and
the playback lists of the USB device are trans-
ferred to the vehicle. This process can take
some time. The time required is dependent on
the USB device and on the number of tracks.
During the transfer you can select the tracks via
the directories and file names.
Following the transfer you can call up the tracks
via the information and playback lists.
Information from up to four USB devices can be
stored in the vehicle, or a total of approx. 16 ,000
tracks.
If a fifth USB device is connected, the informa-
tion of the tracks of the first USB device stored
in the vehicle is deleted.
Music tracks with integrated Digital
Rights Management (DRM) cannot be
played.<
Starting audio playback
Via iDrive
If the audio device has a device name, this will
be displayed if possible.
*
Page 192 of 294
USB-audio interface/mobile phone audio interface
190 1.Press the button.
This opens the start menu.
2.Move the controller backwards to call up
"Entertainment".
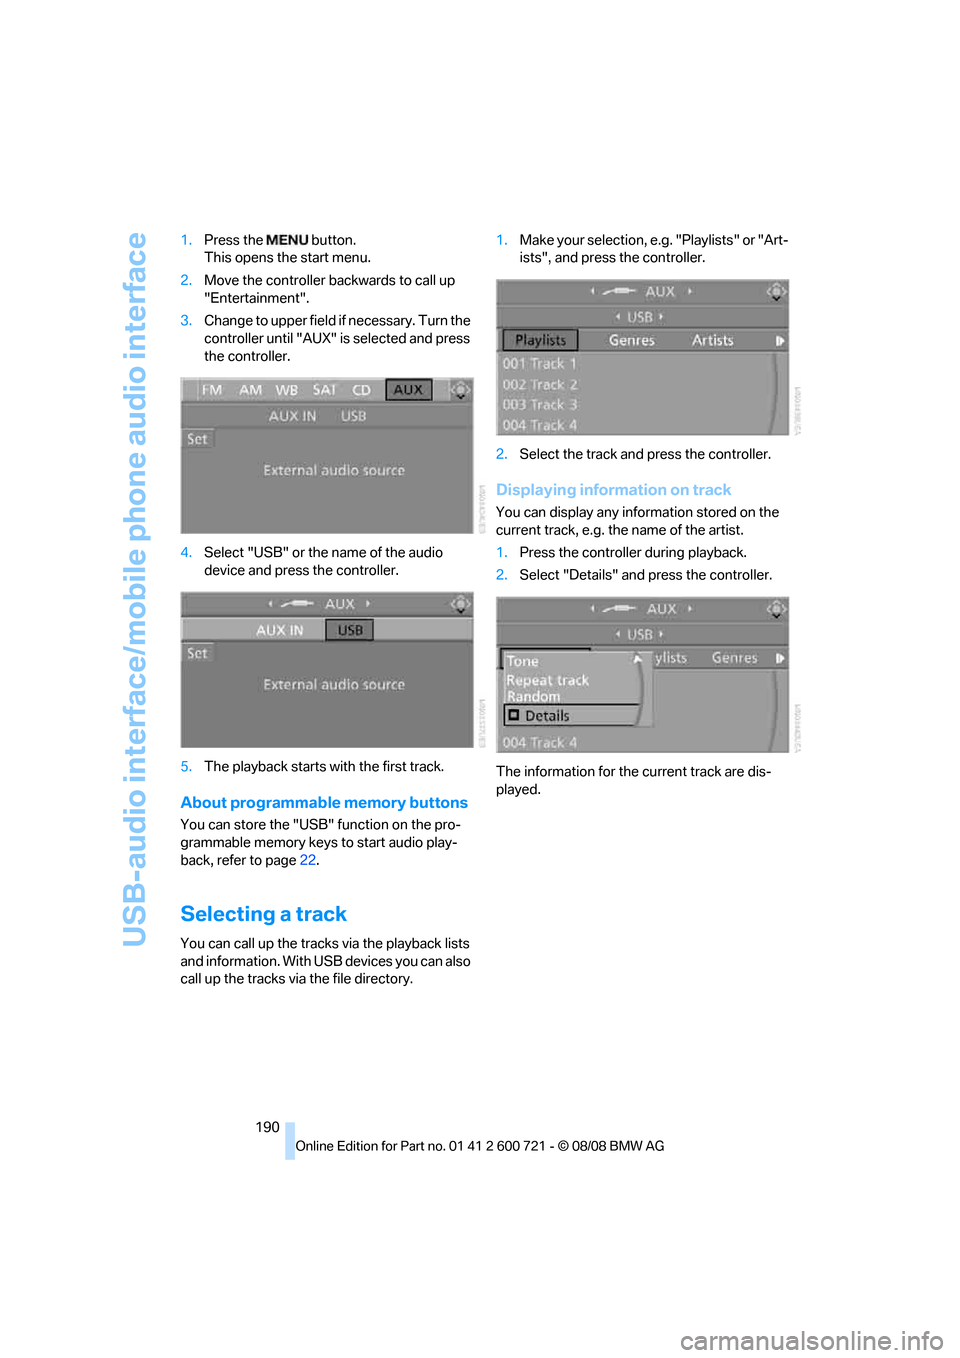
3.Change to upper field if necessary. Turn the
controller until "AUX" is selected and press
the controller.
4.Select "USB" or the name of the audio
device and press the controller.
5.The playback starts with the first track.
About programmable memory buttons
You can store the "USB" function on the pro-
grammable memory keys to start audio play-
back, refer to page22.
Selecting a track
You can call up the tracks via the playback lists
and information. With USB devices you can also
call up the tracks via the file directory.1.Make your selection, e.g. "Playlists" or "Art-
ists", and press the controller.
2.Select the track and press the controller.
Displaying information on track
You can display any information stored on the
current track, e.g. the name of the artist.
1.Press the controller during playback.
2.Select "Details" and press the controller.
The information for the current track are dis-
played.
Page 193 of 294
Navigation
Entertainment
Driving tips
191Reference
At a glance
Controls
Communications
Mobility
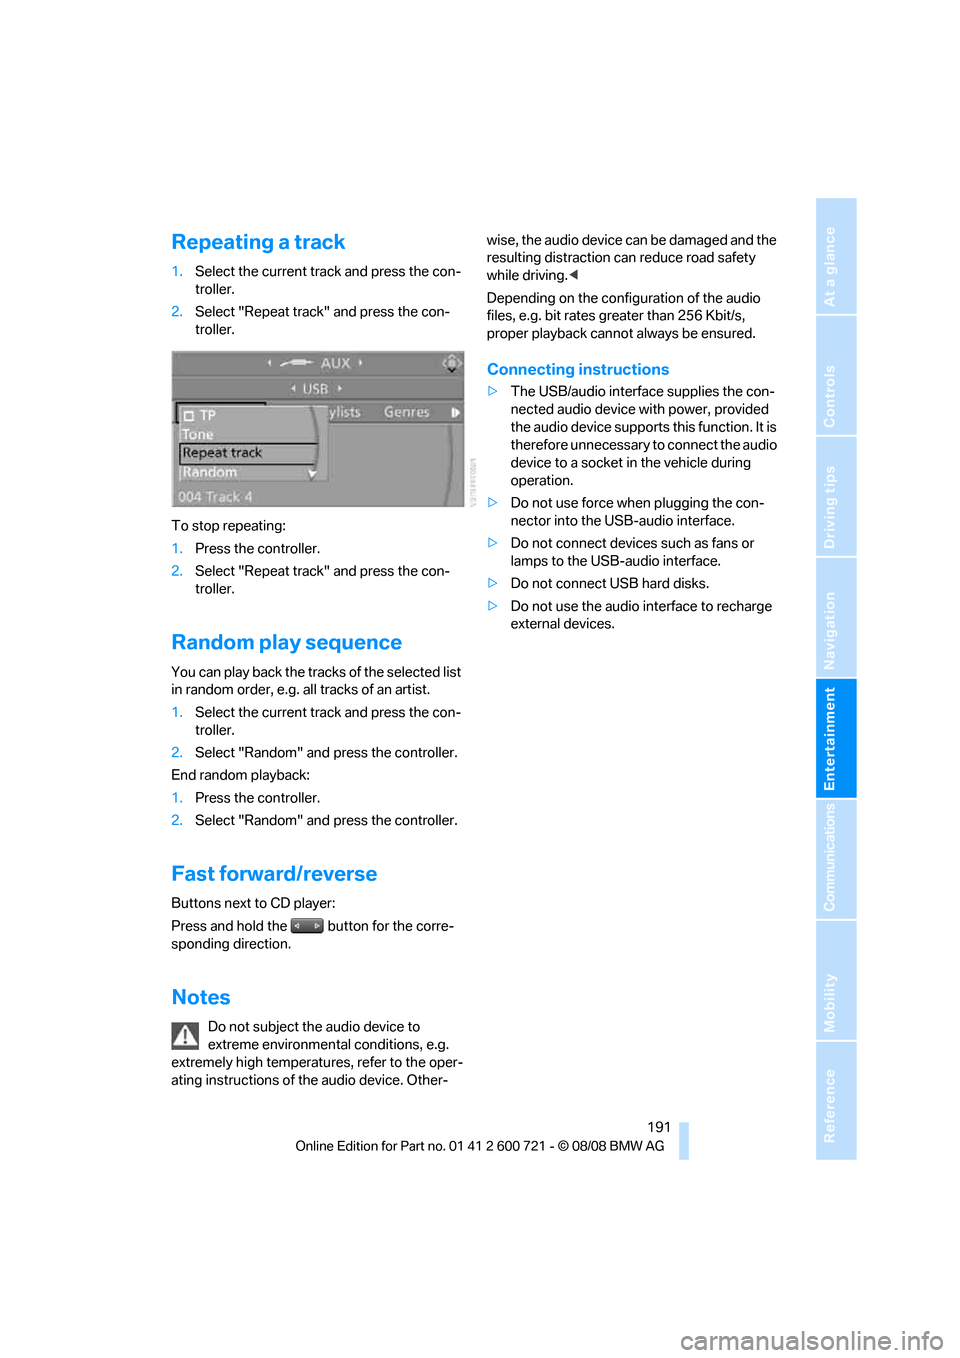
Repeating a track
1.Select the current track and press the con-
troller.
2.Select "Repeat track" and press the con-
troller.
To stop repeating:
1.Press the controller.
2.Select "Repeat track" and press the con-
troller.
Random play sequence
You can play back the tracks of the selected list
in random order, e.g. all tracks of an artist.
1.Select the current track and press the con-
troller.
2.Select "Random" and press the controller.
End random playback:
1.Press the controller.
2.Select "Random" and press the controller.
Fast forward/reverse
Buttons next to CD player:
Press and hold the button for the corre-
sponding direction.
Notes
Do not subject the audio device to
extreme environmental conditions, e.g.
extremely high temperatures, refer to the oper-
ating instructions of the audio device. Other-wise, the audio device can be damaged and the
resulting distraction can reduce road safety
while driving.<
Depending on the configuration of the audio
files, e.g. bit rates greater than 256 Kbit/s,
proper playback cannot always be ensured.
Connecting instructions
>The USB/audio interface supplies the con-
nected audio device with power, provided
the audio device supports this function. It is
therefore unnecessary to connect the audio
device to a socket in the vehicle during
operation.
>Do not use force when plugging the con-
nector into the USB-audio interface.
>Do not connect devices such as fans or
lamps to the USB-audio interface.
>Do not connect USB hard disks.
>Do not use the audio interface to recharge
external devices.
Page 202 of 294
Telephoning
200
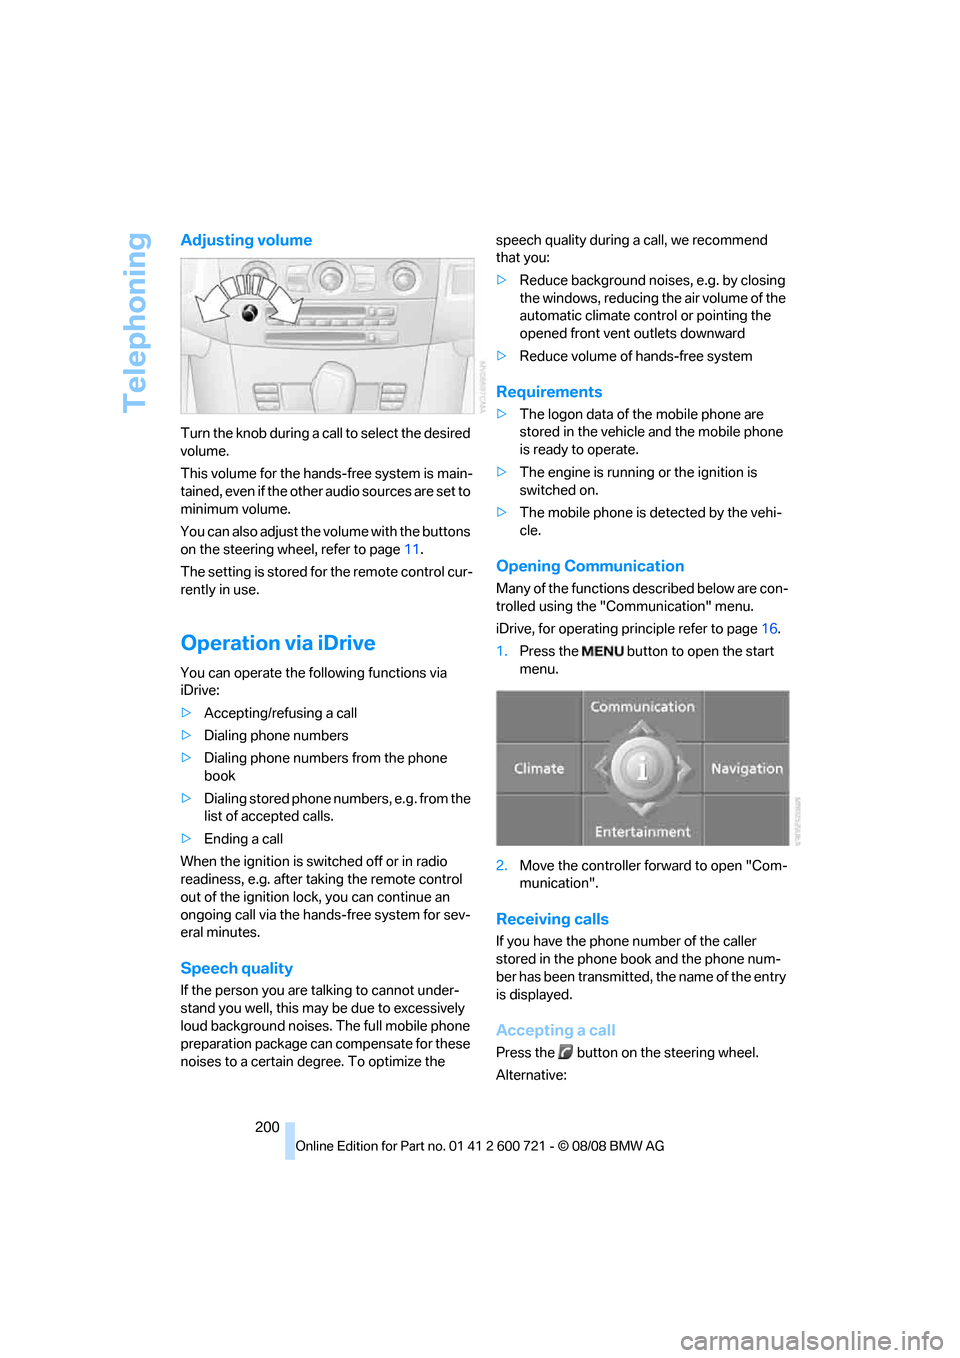
Adjusting volume
Turn the knob during a call to select the desired
volume.
This volume for the hands-free system is main-
tained, even if the other audio sources are set to
minimum volume.
You can also adjust the volume with the buttons
on the steering wheel, refer to page11.
The setting is stored for the remote control cur-
rently in use.
Operation via iDrive
You can operate the following functions via
iDrive:
>Accepting/refusing a call
>Dialing phone numbers
>Dialing phone numbers from the phone
book
>Dialing stored phone numbers, e.g. from the
list of accepted calls.
>Ending a call
When the ignition is switched off or in radio
readiness, e.g. after taking the remote control
out of the ignition lock, you can continue an
ongoing call via the hands-free system for sev-
eral minutes.
Speech quality
If the person you are talking to cannot under-
stand you well, this may be due to excessively
loud background noises. The full mobile phone
preparation package can compensate for these
noises to a certain degree. To optimize the speech quality during a call, we recommend
that you:
>Reduce background noises, e.g. by closing
the windows, reducing the air volume of the
automatic climate control or pointing the
opened front vent outlets downward
>Reduce volume of hands-free system
Requirements
>The logon data of the mobile phone are
stored in the vehicle and the mobile phone
is ready to operate.
>The engine is running or the ignition is
switched on.
>The mobile phone is detected by the vehi-
cle.
Opening Communication
Many of the functions described below are con-
trolled using the "Communication" menu.
iDrive, for operating principle refer to page16.
1.Press the button to open the start
menu.
2.Move the controller forward to open "Com-
munication".
Receiving calls
If you have the phone number of the caller
stored in the phone book and the phone num-
ber has been transmitted, the name of the entry
is displayed.
Accepting a call
Press the button on the steering wheel.
Alternative:
Page 208 of 294
Telephoning
206
Setting volume of instructions
You can adjust the volume for the instructions
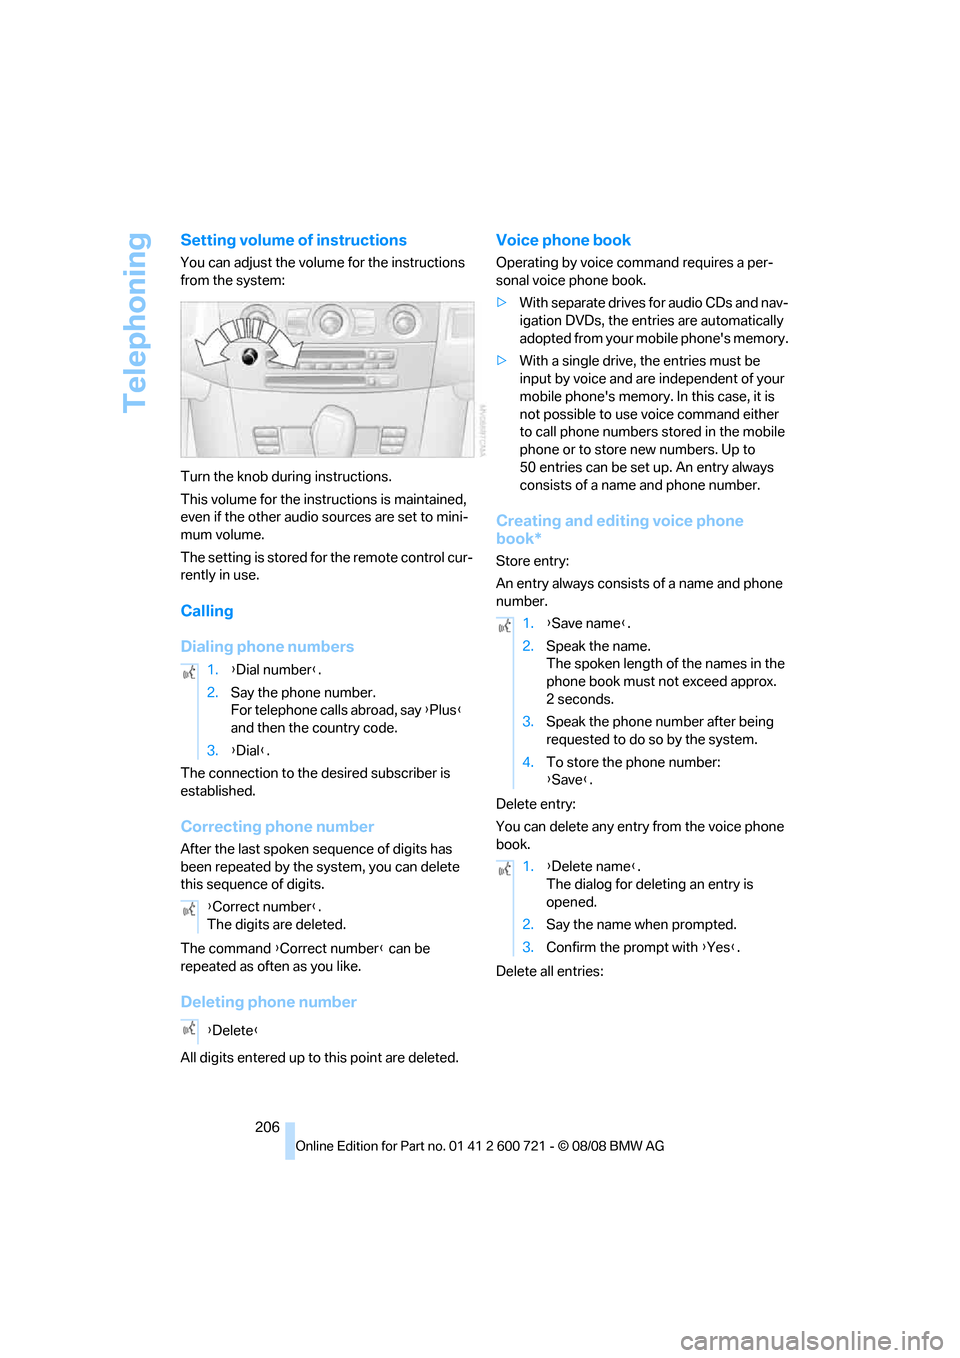
from the system:
Turn the knob during instructions.
This volume for the instructions is maintained,
even if the other audio sources are set to mini-
mum volume.
The setting is stored for the remote control cur-
rently in use.
Calling
Dialing phone numbers
The connection to the desired subscriber is
established.
Correcting phone number
After the last spoken sequence of digits has
been repeated by the system, you can delete
this sequence of digits.
The command {Correct number} can be
repeated as often as you like.
Deleting phone number
All digits entered up to this point are deleted.
Voice phone book
Operating by voice command requires a per-
sonal voice phone book.
>With separate drives for audio CDs and nav-
igation DVDs, the entries are automatically
adopted from your mobile phone's memory.
>With a single drive, the entries must be
input by voice and are independent of your
mobile phone's memory. In this case, it is
not possible to use voice command either
to call phone numbers stored in the mobile
phone or to store new numbers. Up to
50 entries can be set up. An entry always
consists of a name and phone number.
Creating and editing voice phone
book*
Store entry:
An entry always consists of a name and phone
number.
Delete entry:
You can delete any entry from the voice phone
book.
Delete all entries: 1.{Dial number}.
2.Say the phone number.
For telephone calls abroad, say {Plus}
and then the country code.
3.{Dial}.
{Correct number}.
The digits are deleted.
{Delete}
1.{Save name}.
2.Speak the name.
The spoken length of the names in the
phone book must not exceed approx.
2seconds.
3.Speak the phone number after being
requested to do so by the system.
4.To store the phone number:
{Save}.
1.{Delete name}.
The dialog for deleting an entry is
opened.
2.Say the name when prompted.
3.Confirm the prompt with {Yes}.
Page 268 of 294
Short commands of voice command system
266
Onboard info
Entertainment
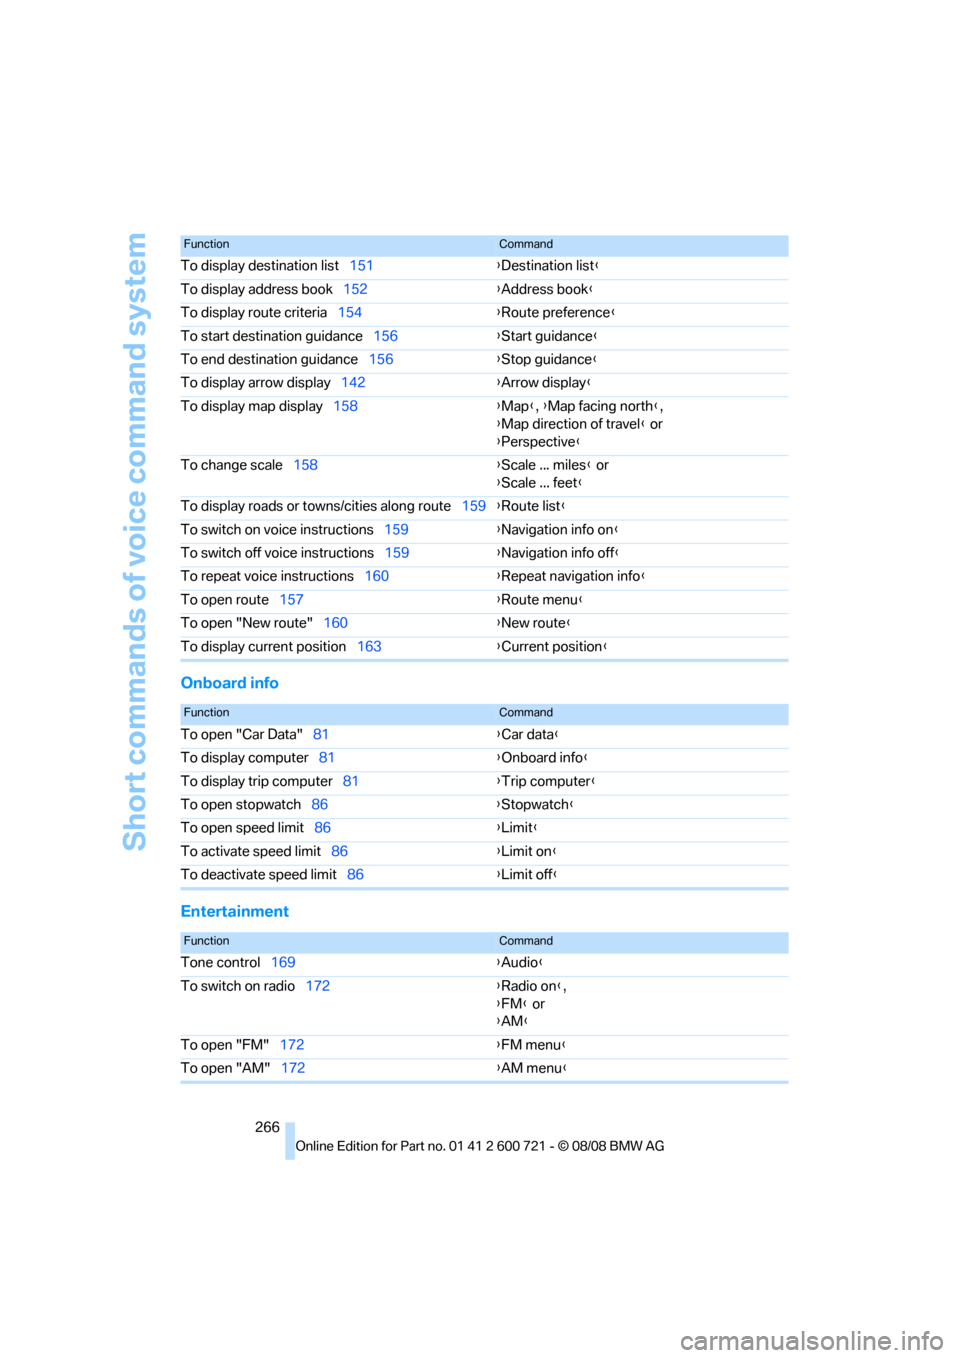
To display destination list151{Destination list}
To display address book152{Address book}
To display route criteria154{Route preference}
To start destination guidance156{Start guidance}
To end destination guidance156{Stop guidance}
To display arrow display142{Arrow display}
To display map display158{Map}, {Map facing north},
{Map direction of travel} or
{Perspective}
To change scale158{Scale ... miles} or
{Scale ... feet}
To display roads or towns/cities along route159{Route list}
To switch on voice instructions159{Navigation info on}
To switch off voice instructions159{Navigation info off}
To repeat voice instructions160{Repeat navigation info}
To open route157{Route menu}
To open "New route"160{New route}
To display current position163{Current position}
FunctionCommand
FunctionCommand
To open "Car Data"81{Car data}
To display computer81{Onboard info}
To display trip computer81{Trip computer}
To open stopwatch86{Stopwatch}
To open speed limit86{Limit}
To activate speed limit86{Limit on}
To deactivate speed limit86{Limit off}
FunctionCommand
Tone control169{Audio}
To switch on radio172{Radio on},
{FM} or
{AM}
To open "FM"172{FM menu}
To open "AM"172{AM menu}
Page 269 of 294
Reference 267
At a glance
Controls
Driving tips
Communications
Navigation
Entertainment
Mobility
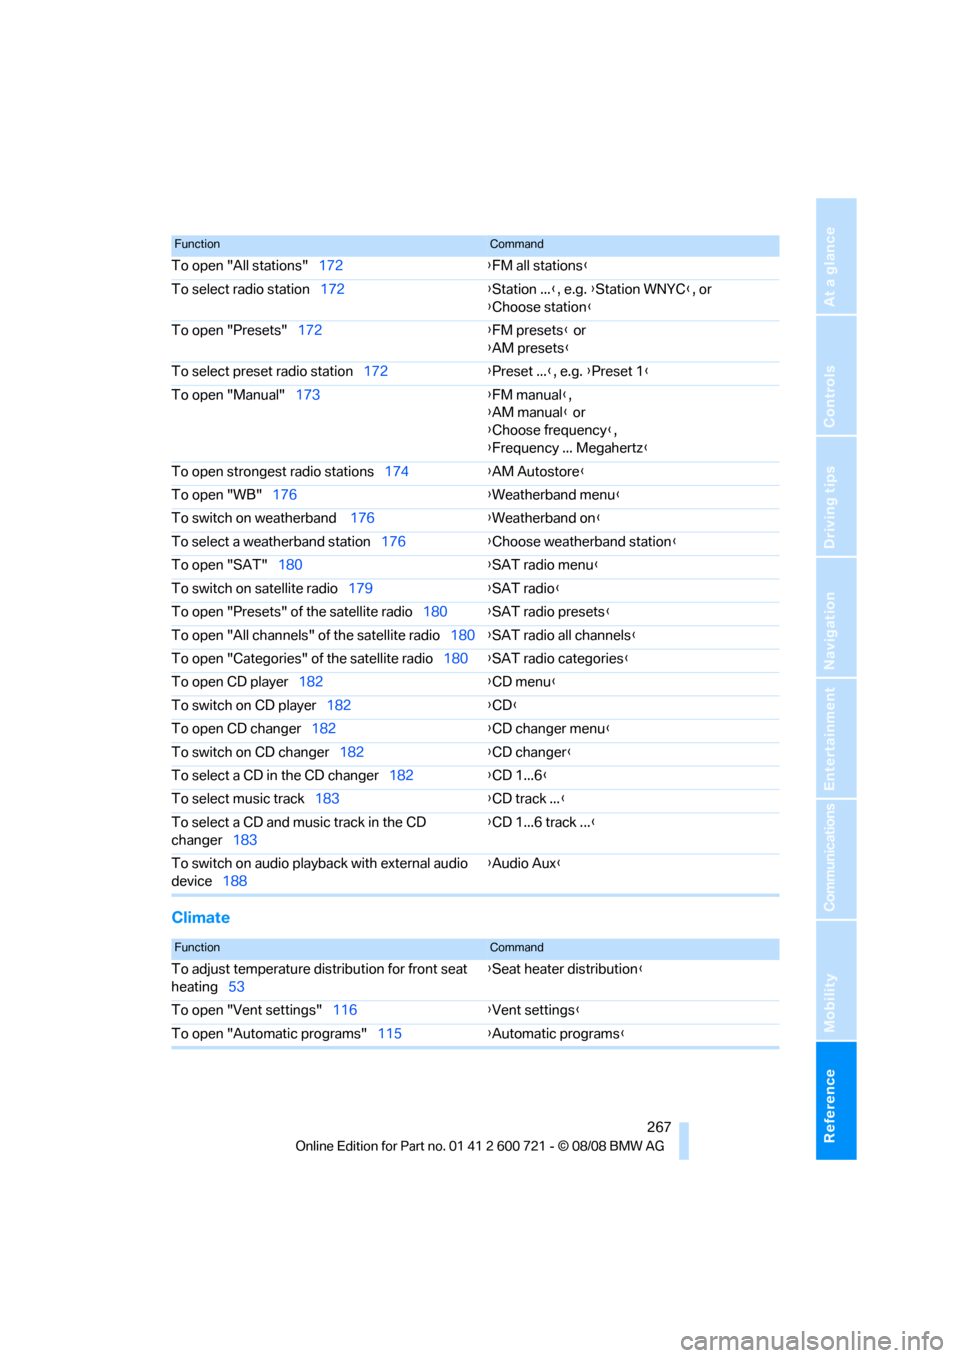
Climate
To open "All stations"172{FM all stations}
To select radio station172{Station ...}, e.g. {Station WNYC}, or
{Choose station}
To open "Presets"172{FM presets} or
{AM presets}
To select preset radio station172{Preset ...}, e.g. {Preset 1}
To open "Manual"173{FM manual},
{AM manual} or
{Choose frequency},
{Frequency ... Megahertz}
To open strongest radio stations174{AM Autostore}
To open "WB"176{Weatherband menu}
To switch on weatherband 176{Weatherband on}
To select a weatherband station176{Choose weatherband station}
To open "SAT"180{SAT radio menu}
To switch on satellite radio179{SAT radio}
To open "Presets" of the satellite radio180{SAT radio presets}
To open "All channels" of the satellite radio180{SAT radio all channels}
To open "Categories" of the satellite radio180{SAT radio categories}
To open CD player
182{CD menu}
To switch on CD player182{CD}
To open CD changer182{CD changer menu}
To switch on CD changer182{CD changer}
To select a CD in the CD changer182{CD 1...6}
To select music track183{CD track ...}
To select a CD and music track in the CD
changer183{CD 1...6 track ...}
To switch on audio playback with external audio
device188{Audio Aux}
FunctionCommand
FunctionCommand
To adjust temperature distribution for front seat
heating53{Seat heater distribution}
To open "Vent settings"116{Vent settings}
To open "Automatic programs"115{Automatic programs}
Page 272 of 294
Everything from A to Z
270
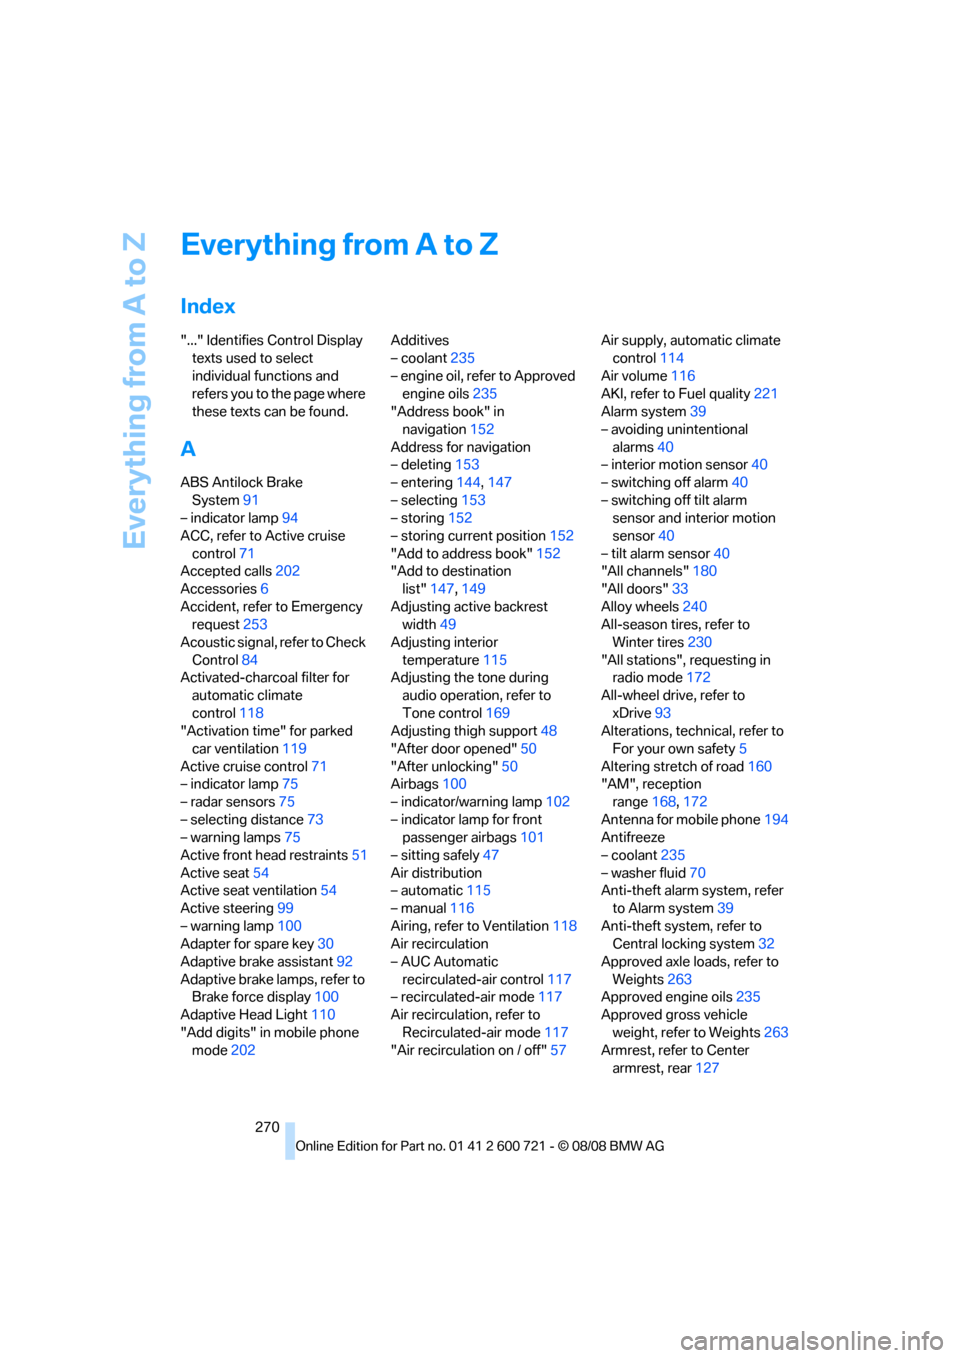
Everything from A to Z
Index
"..." Identifies Control Display
texts used to select
individual functions and
refers you to the page where
these texts can be found.
A
ABS Antilock Brake
System91
– indicator lamp94
ACC, refer to Active cruise
control71
Accepted calls202
Accessories6
Accident, refer to Emergency
request253
Acoustic signal, refer to Check
Control84
Activated-charcoal filter for
automatic climate
control118
"Activation time" for parked
car ventilation119
Active cruise control71
– indicator lamp75
– radar sensors75
– selecting distance73
– warning lamps75
Active front head restraints51
Active seat54
Active seat ventilation54
Active steering99
– warning lamp100
Adapter for spare key30
Adaptive brake assistant92
Adaptive brake lamps, refer to
Brake force display100
Adaptive Head Light110
"Add digits" in mobile phone
mode202Additives
– coolant235
– engine oil, refer to Approved
engine oils235
"Address book" in
navigation152
Address for navigation
– deleting153
– entering144,147
– selecting153
– storing152
– storing current position152
"Add to address book"152
"Add to destination
list"147,149
Adjusting active backrest
width49
Adjusting interior
temperature115
Adjusting the tone during
audio operation, refer to
Tone control169
Adjusting thigh support48
"After door opened"50
"After unlocking"
50
Airbags100
– indicator/warning lamp102
– indicator lamp for front
passenger airbags101
– sitting safely47
Air distribution
– automatic115
– manual116
Airing, refer to Ventilation118
Air recirculation
– AUC Automatic
recirculated-air control117
– recirculated-air mode117
Air recirculation, refer to
Recirculated-air mode117
"Air recirculation on / off"57Air supply, automatic climate
control114
Air volume116
AKI, refer to Fuel quality221
Alarm system39
– avoiding unintentional
alarms40
– interior motion sensor40
– switching off alarm40
– switching off tilt alarm
sensor and interior motion
sensor40
– tilt alarm sensor40
"All channels"180
"All doors"33
Alloy wheels240
All-season tires, refer to
Winter tires230
"All stations", requesting in
radio mode172
All-wheel drive, refer to
xDrive93
Alterations, technical, refer to
For your own safety5
Altering stretch of road160
"AM", reception
range168,172
Antenna for mobile phone194
Antifreeze
– coolant235
– washer fluid70
Anti-theft alarm system, refer
to Alarm system39
Anti-theft system, refer to
Central locking system32
Approved axle loads, refer to
Weights263
Approved engine oils235
Approved gross vehicle
weight, refer to Weights263
Armrest, refer to Center
armrest, rear127