length BMW 528I XDRIVE 2014 Owners Manual
[x] Cancel search | Manufacturer: BMW, Model Year: 2014, Model line: 528I XDRIVE, Model: BMW 528I XDRIVE 2014Pages: 267, PDF Size: 5.88 MB
Page 40 of 267
Opening/closing trunk lid with no-
touch activation
With Comfort Access, the trunk lid can be
opened or closed with no-touch activation us‐
ing the remote control you are carrying.
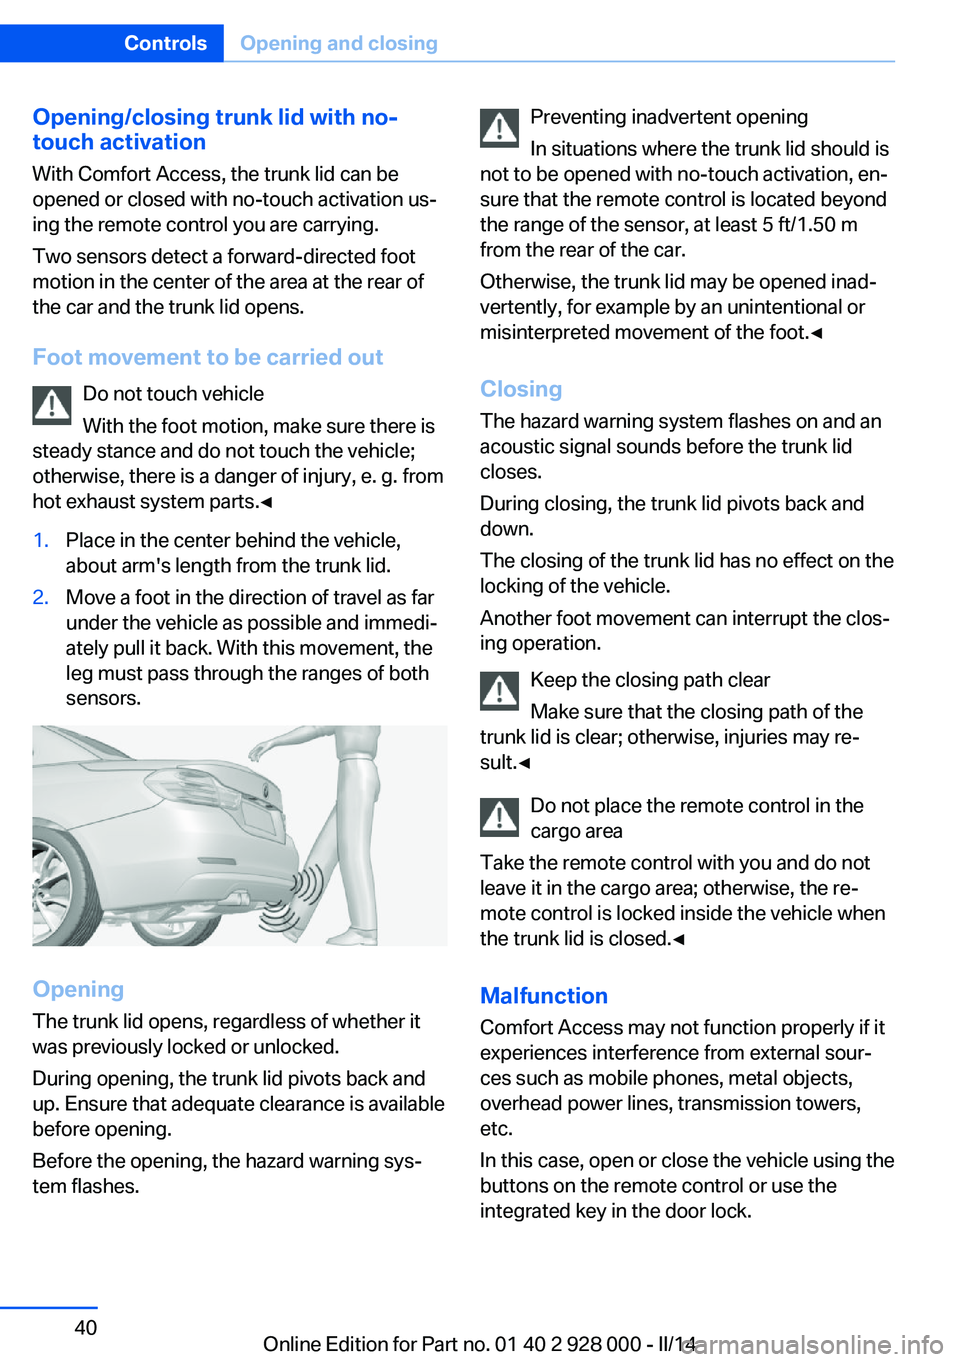
Two sensors detect a forward-directed foot
motion in the center of the area at the rear of
the car and the trunk lid opens.
Foot movement to be carried out Do not touch vehicle
With the foot motion, make sure there is
steady stance and do not touch the vehicle;
otherwise, there is a danger of injury, e. g. from
hot exhaust system parts.◀1.Place in the center behind the vehicle,
about arm's length from the trunk lid.2.Move a foot in the direction of travel as far
under the vehicle as possible and immedi‐
ately pull it back. With this movement, the
leg must pass through the ranges of both
sensors.
Opening
The trunk lid opens, regardless of whether it
was previously locked or unlocked.
During opening, the trunk lid pivots back and
up. Ensure that adequate clearance is available
before opening.
Before the opening, the hazard warning sys‐
tem flashes.
Preventing inadvertent opening
In situations where the trunk lid should is
not to be opened with no-touch activation, en‐
sure that the remote control is located beyond
the range of the sensor, at least 5 ft/1.50 m
from the rear of the car.
Otherwise, the trunk lid may be opened inad‐
vertently, for example by an unintentional or
misinterpreted movement of the foot.◀
Closing The hazard warning system flashes on and an
acoustic signal sounds before the trunk lid closes.
During closing, the trunk lid pivots back and
down.
The closing of the trunk lid has no effect on the
locking of the vehicle.
Another foot movement can interrupt the clos‐
ing operation.
Keep the closing path clear
Make sure that the closing path of the
trunk lid is clear; otherwise, injuries may re‐
sult.◀
Do not place the remote control in the
cargo area
Take the remote control with you and do not
leave it in the cargo area; otherwise, the re‐
mote control is locked inside the vehicle when
the trunk lid is closed.◀
Malfunction
Comfort Access may not function properly if it experiences interference from external sour‐
ces such as mobile phones, metal objects,
overhead power lines, transmission towers,
etc.
In this case, open or close the vehicle using the
buttons on the remote control or use the
integrated key in the door lock.Seite 40ControlsOpening and closing40
Online Edition for Part no. 01 40 2 928 000 - II/14
Page 63 of 267
DrivingVehicle equipment
All standard, country-specific and optional
equipment that is offered in the model series is
described in this chapter. Therefore, equip‐
ment is also described that is not available in a
vehicle, e. g., because of the selected optional
equipment or country variant. This also applies
for safety-related functions and systems.
Start/Stop button The concept Pressing the Start/Stop button
switches the ignition on or off
and starts the engine.
Automatic transmission: The
engine starts if the brake is de‐
pressed while pressing the Start/Stop button.
Manual transmission: the engine starts if the
clutch pedal is depressed when the Start/Stop
button is pressed.
Ignition onAutomatic transmission: Press the Start/Stop
button but do not depress the brake.
Manual-shift transmission: press the Start/
Stop button, and do not press on the clutch
pedal at the same time.
All vehicle systems are ready for operation.
Most of the indicator and warning lamps in the
instrument cluster light up for varying lengths
of time.
To save battery power when the engine is off,
switch off the ignition and any unnecessary
electronic systems/power consumers.Note
If the engine is switched off and the ignition is
switched on, the system automatically
switches to the radio ready state when the
door is opened if the lights are switched off or
the daytime running lights are switched on.
Ignition off
Automatic transmission: Press the Start/Stop
button again, but do not depress the brake.
Manual-shift transmission: press the Start/
Stop button again, and do not press on the
clutch pedal at the same time.
All indicator lamps in the instrument cluster go
out.
To save battery power when the engine is off,
switch off the ignition and any unnecessary
electronic systems/power consumers.
P when the ignition is switched off
P is engaged automatically when the ig‐
nition is switched off. When in an automatic car
wash, for example, ensure that the ignition is
not switched off accidentally.◀
The ignition automatically cuts off while the
vehicle is stationary and the engine is stopped:▷When locking the vehicle, and when the
low beams are activated.▷Shortly before the battery is discharged
completely, so that the engine can still be
started. This function is only available
when the low beams are switched off.▷When opening or closing the driver door, if
the driver's seat belt is unbuckled and the
low beams are switched off.▷While the driver's seat belt is unbuckled, if
the driver's door is open and the low
beams are switched off.▷The low beams switch to parking lamps af‐
ter approx. 15 minutes of no use.Seite 63DrivingControls63
Online Edition for Part no. 01 40 2 928 000 - II/14
Page 66 of 267
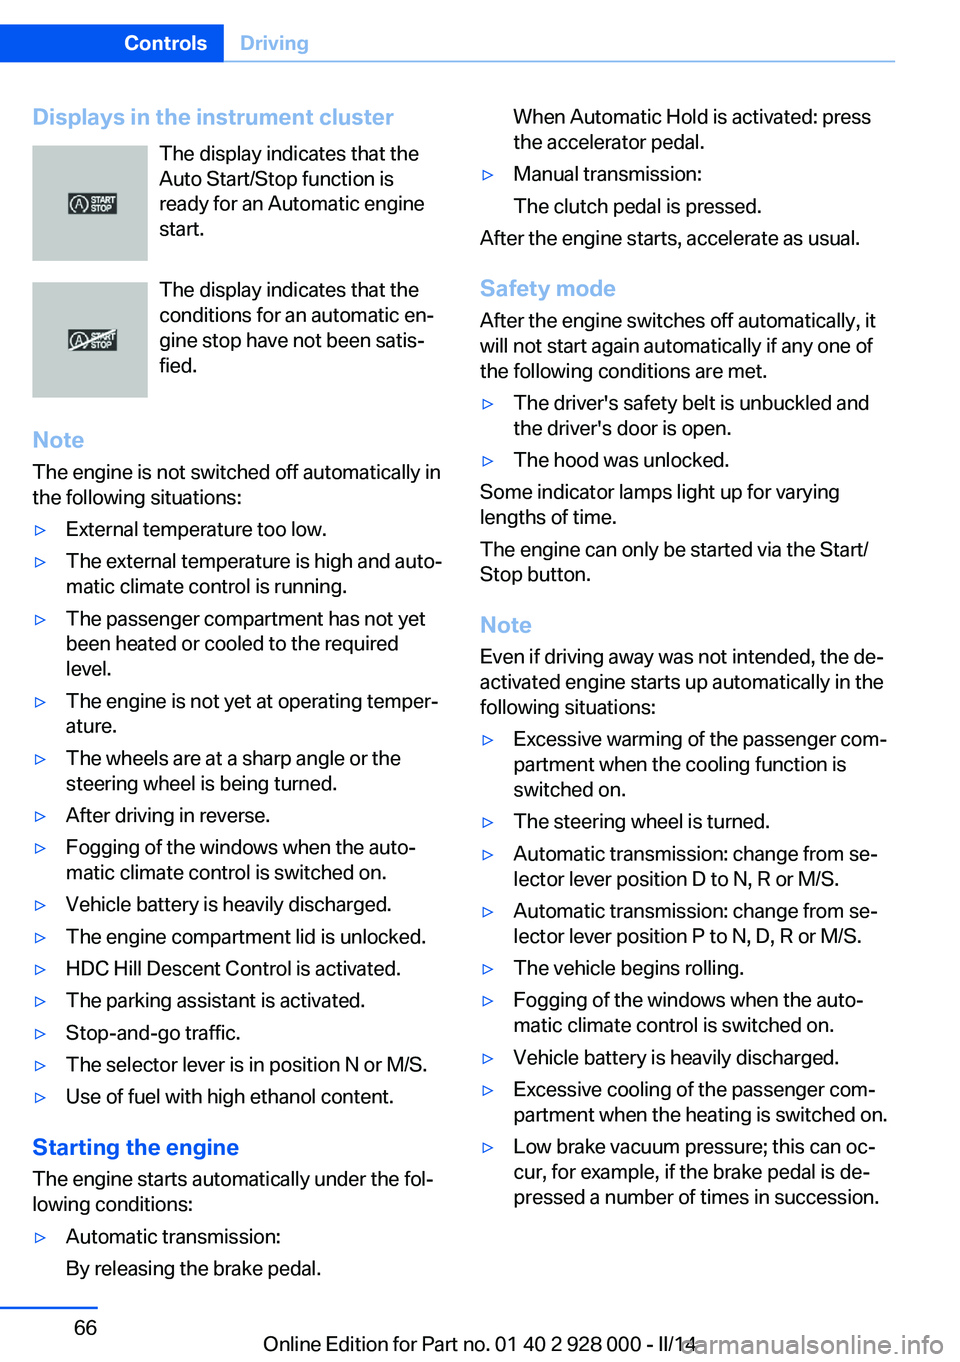
Displays in the instrument clusterThe display indicates that the
Auto Start/Stop function is
ready for an Automatic engine
start.
The display indicates that the
conditions for an automatic en‐
gine stop have not been satis‐
fied.
Note The engine is not switched off automatically in
the following situations:▷External temperature too low.▷The external temperature is high and auto‐
matic climate control is running.▷The passenger compartment has not yet
been heated or cooled to the required
level.▷The engine is not yet at operating temper‐
ature.▷The wheels are at a sharp angle or the
steering wheel is being turned.▷After driving in reverse.▷Fogging of the windows when the auto‐
matic climate control is switched on.▷Vehicle battery is heavily discharged.▷The engine compartment lid is unlocked.▷HDC Hill Descent Control is activated.▷The parking assistant is activated.▷Stop-and-go traffic.▷The selector lever is in position N or M/S.▷Use of fuel with high ethanol content.
Starting the engine
The engine starts automatically under the fol‐
lowing conditions:
▷Automatic transmission:
By releasing the brake pedal.When Automatic Hold is activated: press
the accelerator pedal.▷Manual transmission:
The clutch pedal is pressed.
After the engine starts, accelerate as usual.
Safety mode
After the engine switches off automatically, it
will not start again automatically if any one of
the following conditions are met.
▷The driver's safety belt is unbuckled and
the driver's door is open.▷The hood was unlocked.
Some indicator lamps light up for varying
lengths of time.
The engine can only be started via the Start/
Stop button.
Note Even if driving away was not intended, the de‐
activated engine starts up automatically in the
following situations:
▷Excessive warming of the passenger com‐
partment when the cooling function is
switched on.▷The steering wheel is turned.▷Automatic transmission: change from se‐
lector lever position D to N, R or M/S.▷Automatic transmission: change from se‐
lector lever position P to N, D, R or M/S.▷The vehicle begins rolling.▷Fogging of the windows when the auto‐
matic climate control is switched on.▷Vehicle battery is heavily discharged.▷Excessive cooling of the passenger com‐
partment when the heating is switched on.▷Low brake vacuum pressure; this can oc‐
cur, for example, if the brake pedal is de‐
pressed a number of times in succession.Seite 66ControlsDriving66
Online Edition for Part no. 01 40 2 928 000 - II/14
Page 126 of 267
▷NBG009014A.
Compliance statement:
This device complies with part 15 of the FCC
Rules. Operation is subject to the following
two conditions:
▷This device may not cause harmful inter‐
ference, and▷this device must accept any interference
received, including interference that may
cause undesired operation.
Any unauthorized modifications or changes to
these devices could void the user's authority to
operate this equipment.
Brake force display
The concept
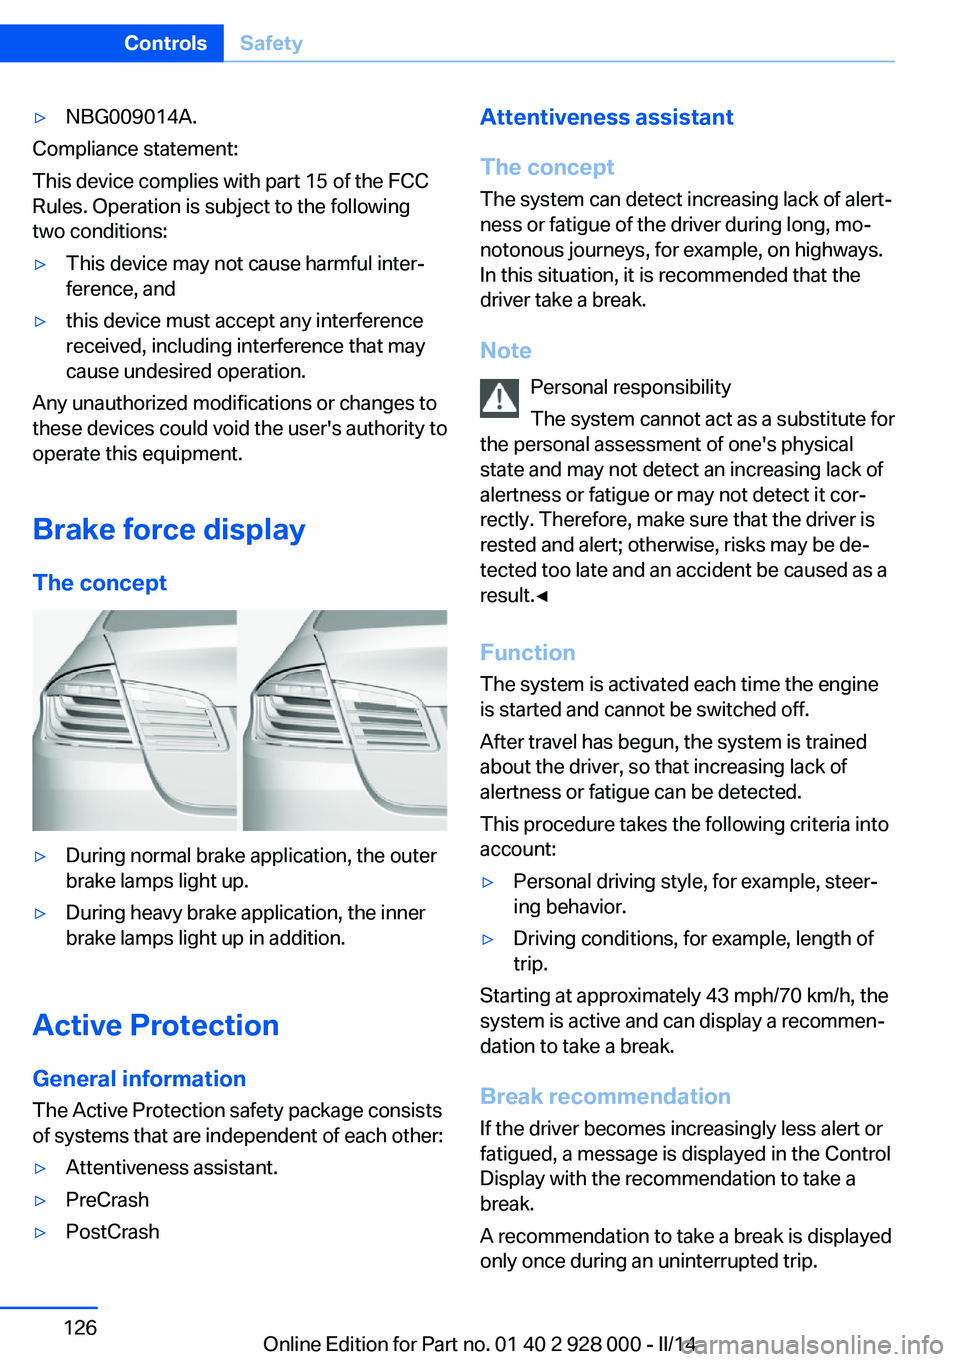
▷During normal brake application, the outer
brake lamps light up.▷During heavy brake application, the inner
brake lamps light up in addition.
Active Protection
General information
The Active Protection safety package consists
of systems that are independent of each other:
▷Attentiveness assistant.▷PreCrash▷PostCrashAttentiveness assistant
The concept The system can detect increasing lack of alert‐
ness or fatigue of the driver during long, mo‐
notonous journeys, for example, on highways.
In this situation, it is recommended that the
driver take a break.
Note Personal responsibility
The system cannot act as a substitute for
the personal assessment of one's physical
state and may not detect an increasing lack of
alertness or fatigue or may not detect it cor‐
rectly. Therefore, make sure that the driver is
rested and alert; otherwise, risks may be de‐
tected too late and an accident be caused as a
result.◀
Function
The system is activated each time the engine
is started and cannot be switched off.
After travel has begun, the system is trained
about the driver, so that increasing lack of
alertness or fatigue can be detected.
This procedure takes the following criteria into
account:▷Personal driving style, for example, steer‐
ing behavior.▷Driving conditions, for example, length of
trip.
Starting at approximately 43 mph/70 km/h, the
system is active and can display a recommen‐
dation to take a break.
Break recommendation
If the driver becomes increasingly less alert or
fatigued, a message is displayed in the Control
Display with the recommendation to take a
break.
A recommendation to take a break is displayed
only once during an uninterrupted trip.
Seite 126ControlsSafety126
Online Edition for Part no. 01 40 2 928 000 - II/14
Page 158 of 267
Suitable parking space▷Gap between two objects with a minimum
length of approx. 5 ft/1.5 m.▷Min. length of gap between two objects:
your vehicle's length plus approx.
4 ft/1.2 m.▷Minimum depth: approx. 5 ft/1.5 m.
For parking procedure
▷Doors and trunk lid closed.▷Parking brake released.▷When parking in parking spaces on the
driver's side, the corresponding turn signal
must be set where applicable.
Automatic transmission:
▷Driver's seat belt fastened.
At a glance
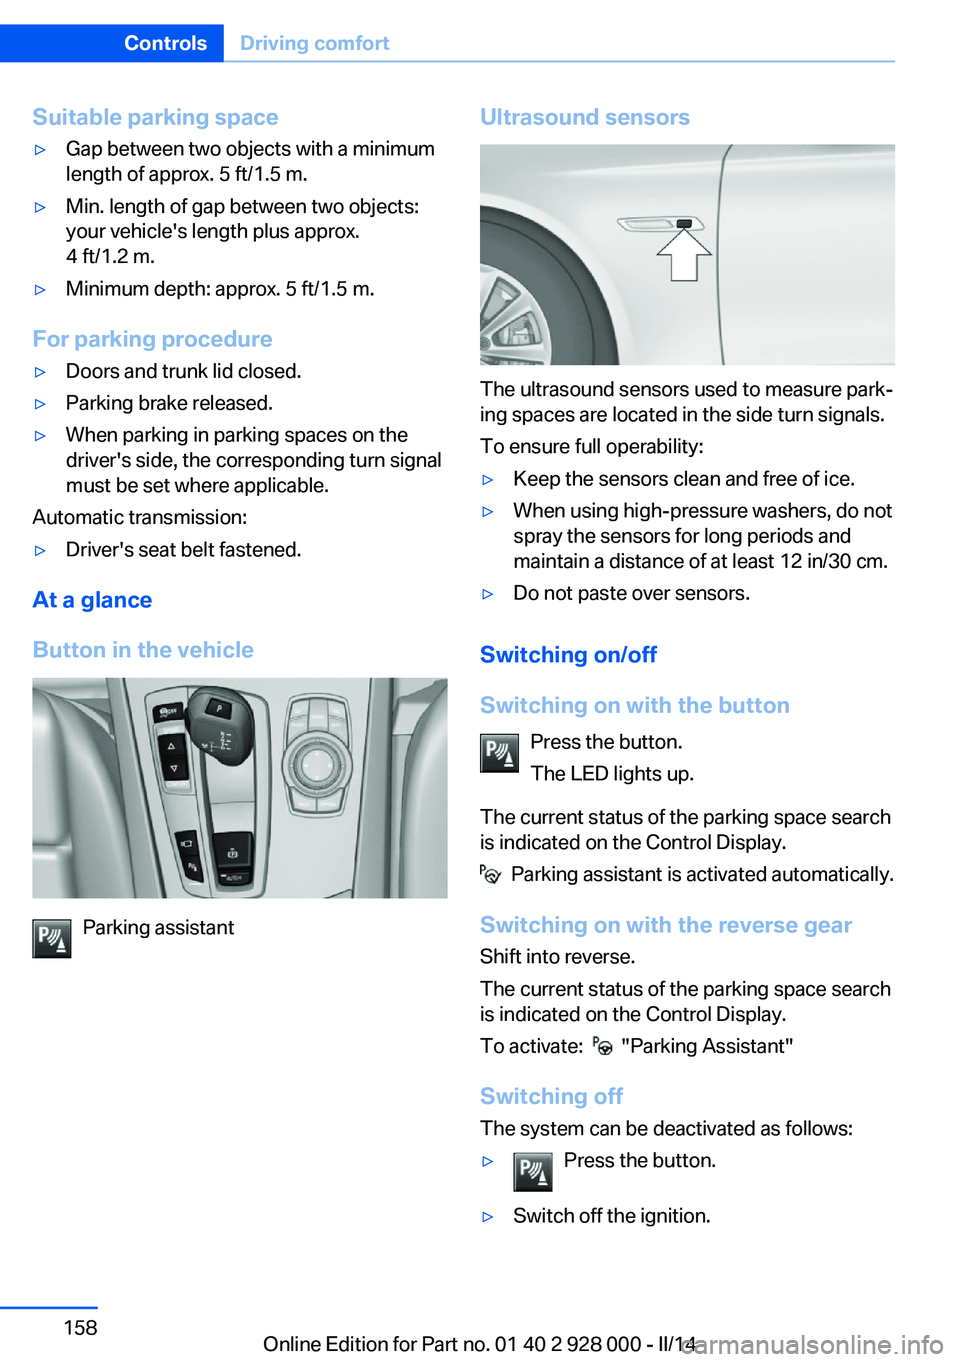
Button in the vehicle
Parking assistant
Ultrasound sensors
The ultrasound sensors used to measure park‐
ing spaces are located in the side turn signals.
To ensure full operability:
▷Keep the sensors clean and free of ice.▷When using high-pressure washers, do not
spray the sensors for long periods and
maintain a distance of at least 12 in/30 cm.▷Do not paste over sensors.
Switching on/off
Switching on with the button Press the button.
The LED lights up.
The current status of the parking space search
is indicated on the Control Display.
Parking assistant is activated automatically.
Switching on with the reverse gear
Shift into reverse.
The current status of the parking space search
is indicated on the Control Display.
To activate:
"Parking Assistant"
Switching off The system can be deactivated as follows:
▷Press the button.▷Switch off the ignition.Seite 158ControlsDriving comfort158
Online Edition for Part no. 01 40 2 928 000 - II/14
Page 177 of 267
Ski bag
Capacity The ski bag can be used to transport up to four
pairs of skis with a length of up to 6 ft/2.10 m
or, depending on the binding, up to two snow‐
boards with a length of up to 5 ft/1.60 m.
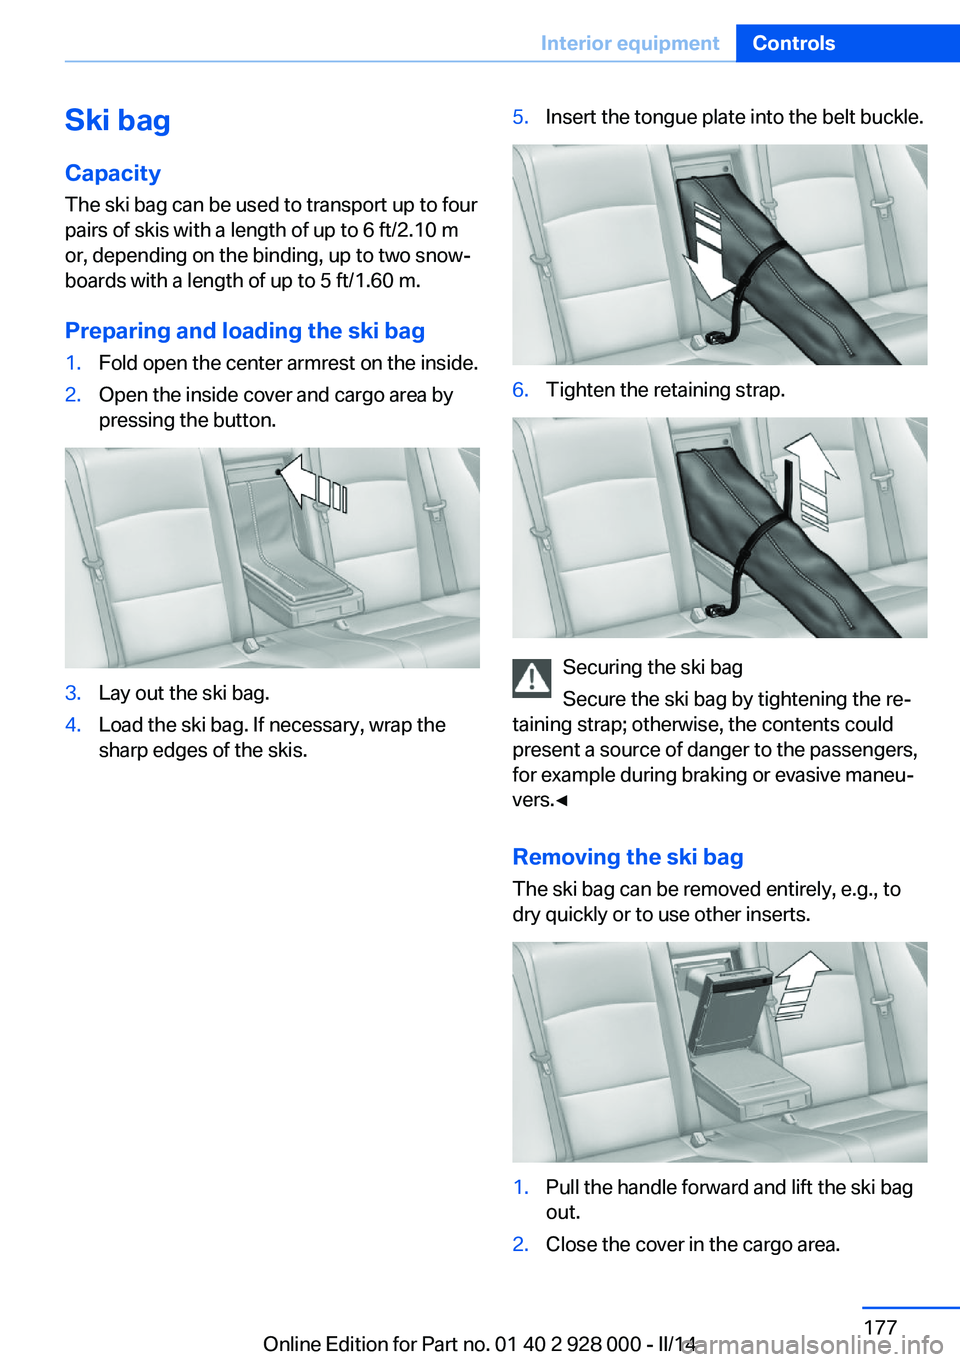
Preparing and loading the ski bag1.Fold open the center armrest on the inside.2.Open the inside cover and cargo area by
pressing the button.3.Lay out the ski bag.4.Load the ski bag. If necessary, wrap the
sharp edges of the skis.5.Insert the tongue plate into the belt buckle.6.Tighten the retaining strap.
Securing the ski bag
Secure the ski bag by tightening the re‐
taining strap; otherwise, the contents could
present a source of danger to the passengers,
for example during braking or evasive maneu‐
vers.◀
Removing the ski bag The ski bag can be removed entirely, e.g., to
dry quickly or to use other inserts.
1.Pull the handle forward and lift the ski bag
out.2.Close the cover in the cargo area.Seite 177Interior equipmentControls177
Online Edition for Part no. 01 40 2 928 000 - II/14
Page 252 of 267
Technical dataVehicle equipment
All standard, country-specific and optional
equipment that is offered in the model series is
described in this chapter. Therefore, equip‐
ment is also described that is not available in a
vehicle, e. g., because of the selected optional
equipment or country variant. This also applies
for safety-related functions and systems.Dimensions
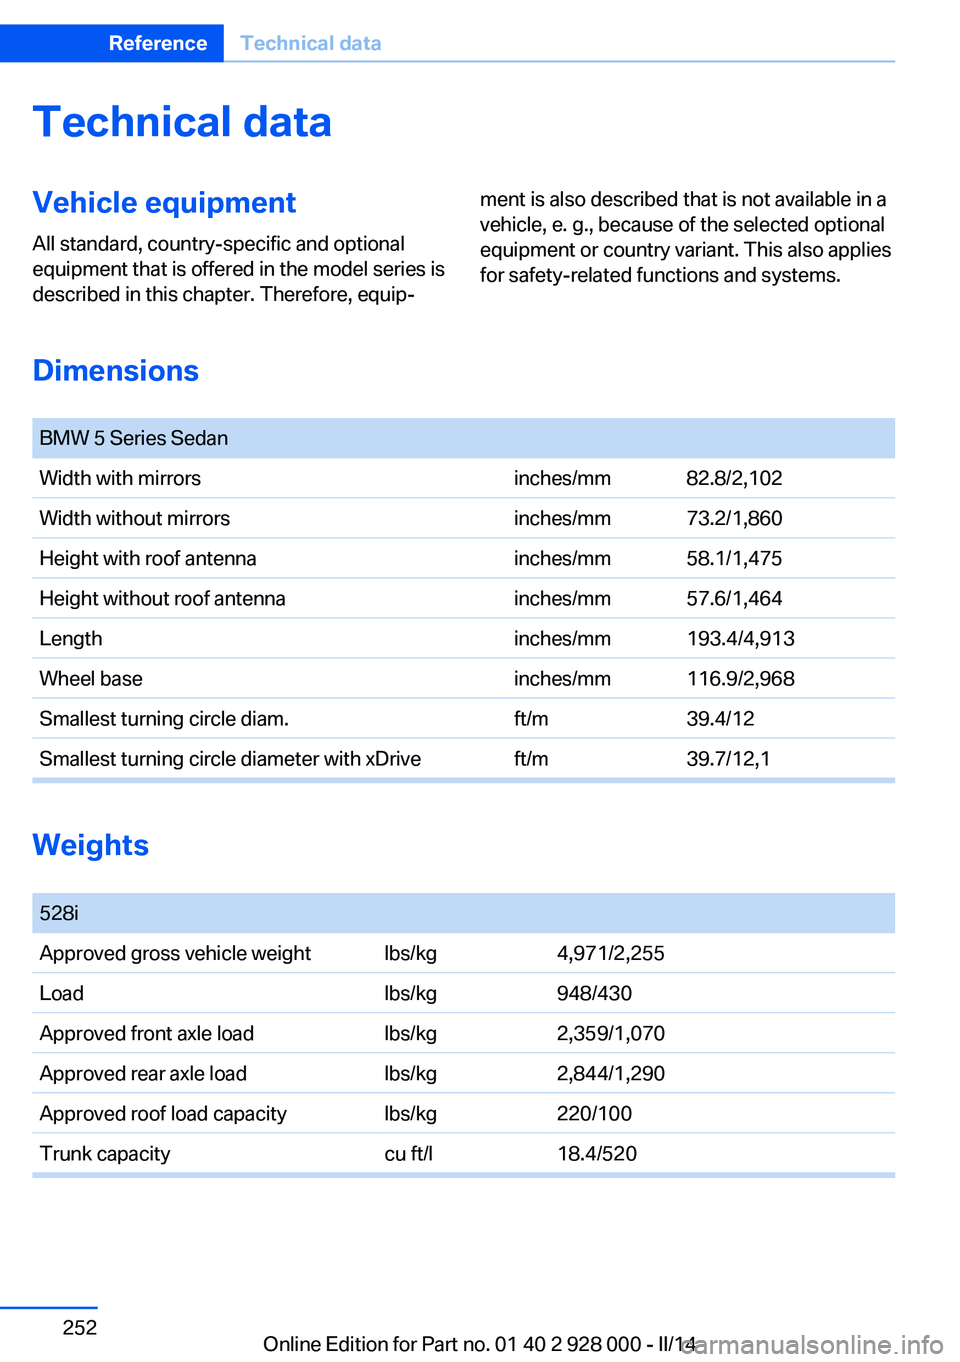
BMW 5 Series SedanWidth with mirrorsinches/mm82.8/2,102Width without mirrorsinches/mm73.2/1,860Height with roof antennainches/mm58.1/1,475Height without roof antennainches/mm57.6/1,464Lengthinches/mm193.4/4,913Wheel baseinches/mm116.9/2,968Smallest turning circle diam.ft/m39.4/12Smallest turning circle diameter with xDriveft/m39.7/12,1
Weights
528iApproved gross vehicle weightlbs/kg4,971/2,255Loadlbs/kg948/430Approved front axle loadlbs/kg2,359/1,070Approved rear axle loadlbs/kg2,844/1,290Approved roof load capacitylbs/kg220/100Trunk capacitycu ft/l18.4/520Seite 252ReferenceTechnical data252
Online Edition for Part no. 01 40 2 928 000 - II/14
Page 260 of 267
Headlamp washer system 71
Headliner 15
Head restraints 47
Head restraints, front 52
Head restraints, rear 53
Head-up Display 96
Head-up Display, care 249
Heavy cargo, stowing 191
Height, vehicle 252
High-beam Assistant 100
High beams 71
High beams/low beams, refer to High-beam Assistant 100
Hill Descent Control HDC 131
Hills 188
Hill start assistant, refer to Drive-off assistant 129
Hints 6
Holder for beverages 181
Homepage 6
Hood 224
Horn 12
Hotel function, trunk lid 38
Hot exhaust system 187
HUD Head-up Display 96
Hydroplaning 187
I Ice warning, see External temperature warning 87
Icy roads, see External tem‐ perature warning 87
Identification marks, tires 218
Identification number, refer to Important features in the en‐
gine compartment 224
iDrive 16
Ignition key, refer to Remote control 30
Ignition off 63
Ignition on 63
Indication of a flat tire 107 , 110 Indicator and warning
lamps 85
Individual air distribution 164
Individual settings, refer to Personal Profile 31
Inflation pressure, tires 209
Inflation pressure warning FTM, tires 109
Info display, refer to Com‐ puter 92
Initialization, Integral Active Steering 133
Initialize, Tire Pressure Moni‐ tor TPM 107
Initializing, Flat Tire Monitor FTM 110
Instrument cluster 78
Instrument cluster, electronic displays 80
Instrument display, multifunc‐ tional 81
Instrument lighting 101
Integral Active Steering 133
Integrated key 30
Integrated Owner's Manual in the vehicle 26
Intelligent Emergency Re‐ quest 240
Intelligent Safety 111
Intensity, AUTO pro‐ gram 164
Interior equipment 170
Interior lamps 102
Interior lamps via remote con‐ trol 34
Interior motion sensor 43
Interior rearview mirror, auto‐ matic dimming feature 57
Interior rearview mirror, man‐ ually dimmable 57
Internet page 6
Interval display, service re‐ quirements 88 J
Jacking points for the vehicle jack 238
Joystick, automatic transmis‐ sion 74
Jump-starting 241
K
Key/remote control 30
Keyless Go, refer to Comfort Access 38
Key Memory, refer to Per‐ sonal Profile 31
Kickdown, automatic trans‐ mission 74
Knee airbag 103
L Lamp replacement 233
Lamp replacement, front 234
Lamp replacement, rear 236
Lamps 98
Lamps and bulbs 233
Lane departure warning 123
Lane margin, warning 123
Language on Control Dis‐ play 95
Lashing eyes, securing cargo 191
LATCH child restraint fixing system 60
Launch Control 76
Leather, care 247
LED front fog lamps, bulb re‐ placement 236
LED headlamps, Bulb re‐ placement 236
LED light 236
LEDs, light-emitting di‐ odes 234
Length, vehicle 252
Letters and numbers, enter‐ ing 22 Seite 260ReferenceEverything from A to Z260
Online Edition for Part no. 01 40 2 928 000 - II/14