rear entertainment BMW 530XI TOURING 2007 E61 Owner's Guide
[x] Cancel search | Manufacturer: BMW, Model Year: 2007, Model line: 530XI TOURING, Model: BMW 530XI TOURING 2007 E61Pages: 286, PDF Size: 9.31 MB
Page 127 of 286
Controls
125Reference
At a glance
Driving tips
Communications
Navigation
Entertainment
Mobility
wise the payload or the roll-up cover may be
damaged.<
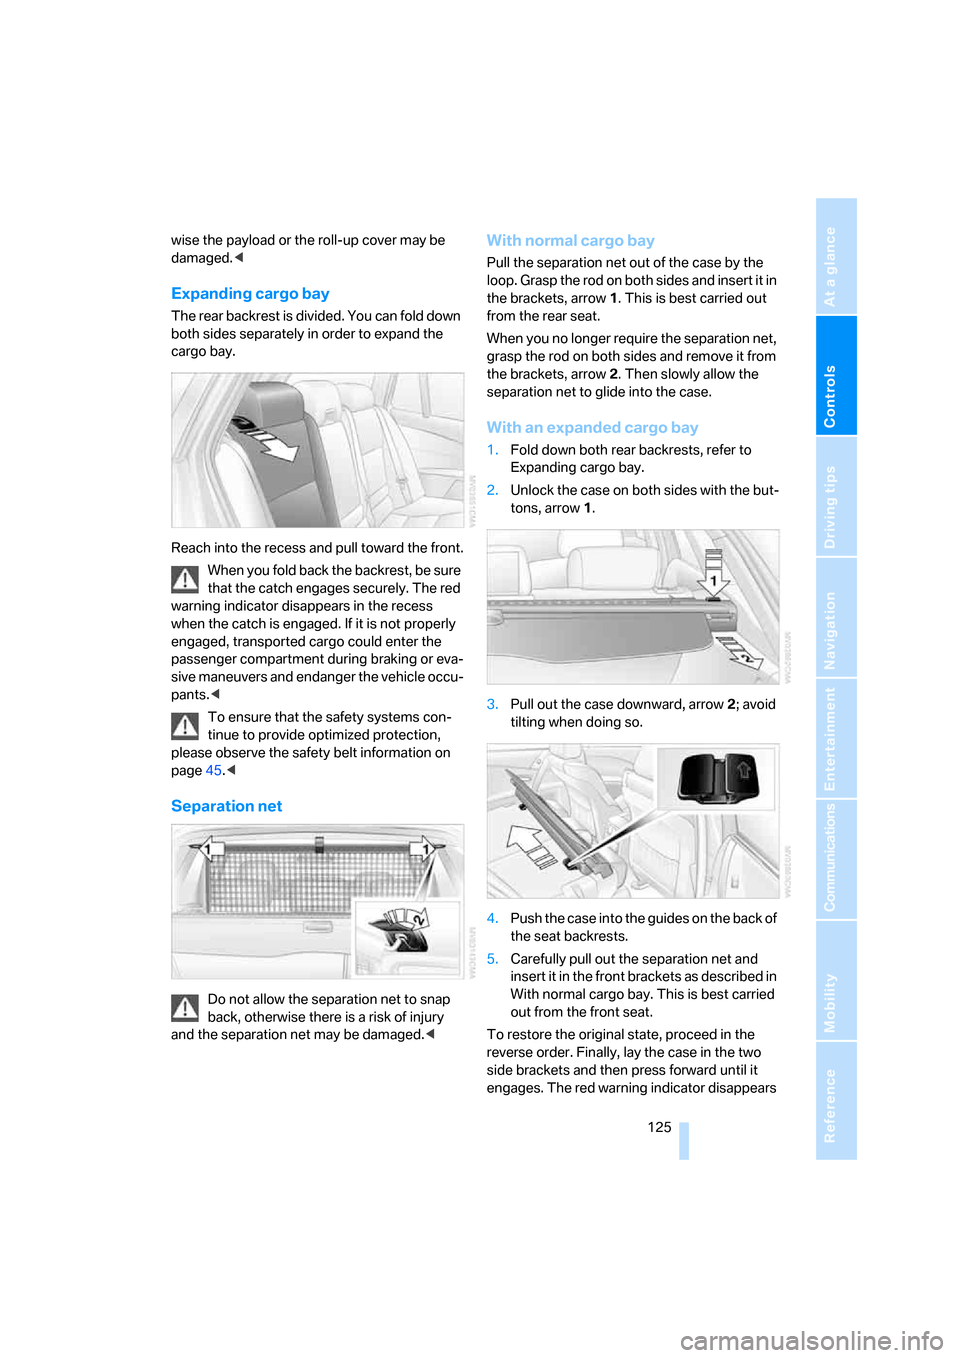
Expanding cargo bay
The rear backrest is divided. You can fold down
both sides separately in order to expand the
cargo bay.
Reach into the recess and pull toward the front.
When you fold back the backrest, be sure
that the catch engages securely. The red
warning indicator disappears in the recess
when the catch is engaged. If it is not properly
engaged, transported cargo could enter the
passenger compartment during braking or eva-
sive maneuvers and endanger the vehicle occu-
pants.<
To ensure that the safety systems con-
tinue to provide optimized protection,
please observe the safety belt information on
page45.<
Separation net
Do not allow the separation net to snap
back, otherwise there is a risk of injury
and the separation net may be damaged.<
With normal cargo bay
Pull the separation net out of the case by the
loop. Grasp the rod on both sides and insert it in
the brackets, arrow1. This is best carried out
from the rear seat.
When you no longer require the separation net,
grasp the rod on both sides and remove it from
the brackets, arrow2. Then slowly allow the
separation net to glide into the case.
With an expanded cargo bay
1.Fold down both rear backrests, refer to
Expanding cargo bay.
2.Unlock the case on both sides with the but-
tons, arrow1.
3.Pull out the case downward, arrow2; avoid
tilting when doing so.
4.Push the case into the guides on the back of
the seat backrests.
5.Carefully pull out the separation net and
insert it in the front brackets as described in
With normal cargo bay. This is best carried
out from the front seat.
To restore the original state, proceed in the
reverse order. Finally, lay the case in the two
side brackets and then press forward until it
engages. The red warning indicator disappears
Page 129 of 286
Controls
127Reference
At a glance
Driving tips
Communications
Navigation
Entertainment
Mobility
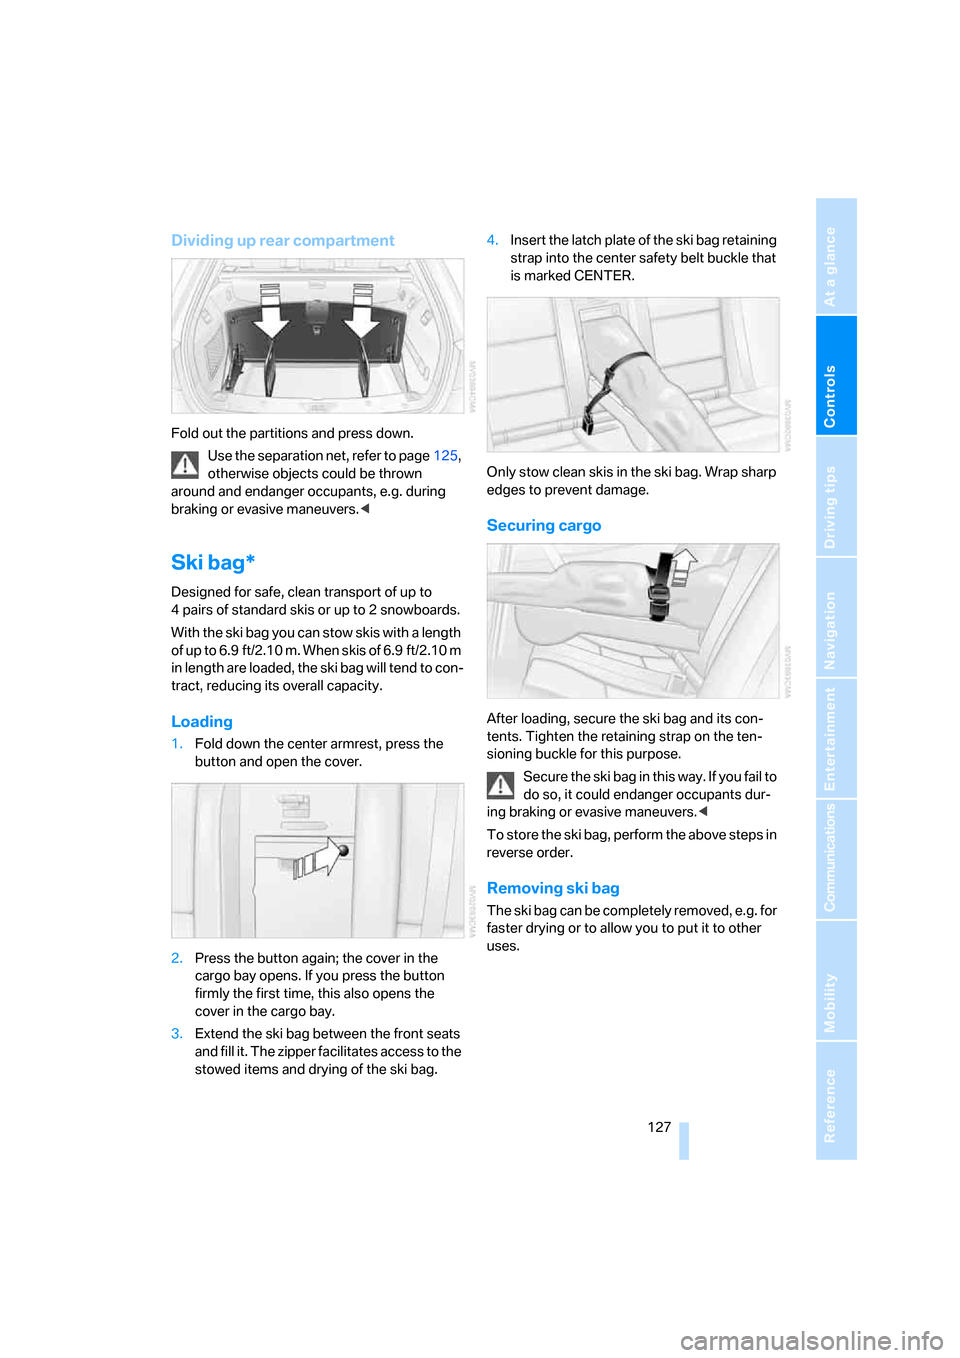
Dividing up rear compartment
Fold out the partitions and press down.
Use the separation net, refer to page125,
otherwise objects could be thrown
around and endanger occupants, e.g. during
braking or evasive maneuvers.<
Ski bag*
Designed for safe, clean transport of up to
4 pairs of standard skis or up to 2 snowboards.
With the ski bag you can stow skis with a length
of up to 6.9 ft/2.10 m. When skis of 6.9 ft/2.10 m
in length are loaded, the ski bag will tend to con-
tract, reducing its overall capacity.
Loading
1.Fold down the center armrest, press the
button and open the cover.
2.Press the button again; the cover in the
cargo bay opens. If you press the button
firmly the first time, this also opens the
cover in the cargo bay.
3.Extend the ski bag between the front seats
and fill it. The zipper facilitates access to the
stowed items and drying of the ski bag.4.Insert the latch plate of the ski bag retaining
strap into the center safety belt buckle that
is marked CENTER.
Only stow clean skis in the ski bag. Wrap sharp
edges to prevent damage.
Securing cargo
After loading, secure the ski bag and its con-
tents. Tighten the retaining strap on the ten-
sioning buckle for this purpose.
Secure the ski bag in this way. If you fail to
do so, it could endanger occupants dur-
ing braking or evasive maneuvers.<
To store the ski bag, perform the above steps in
reverse order.
Removing ski bag
The ski bag can be completely removed, e.g. for
faster drying or to allow you to put it to other
uses.
Page 137 of 286
Driving tips
135Reference
At a glance
Controls
Communications
Navigation
Entertainment
Mobility
Load
The permissible load is the total of the weight of
occupants and cargo/luggage. The greater the
weight of occupants, the less cargo/luggage
can be transported.
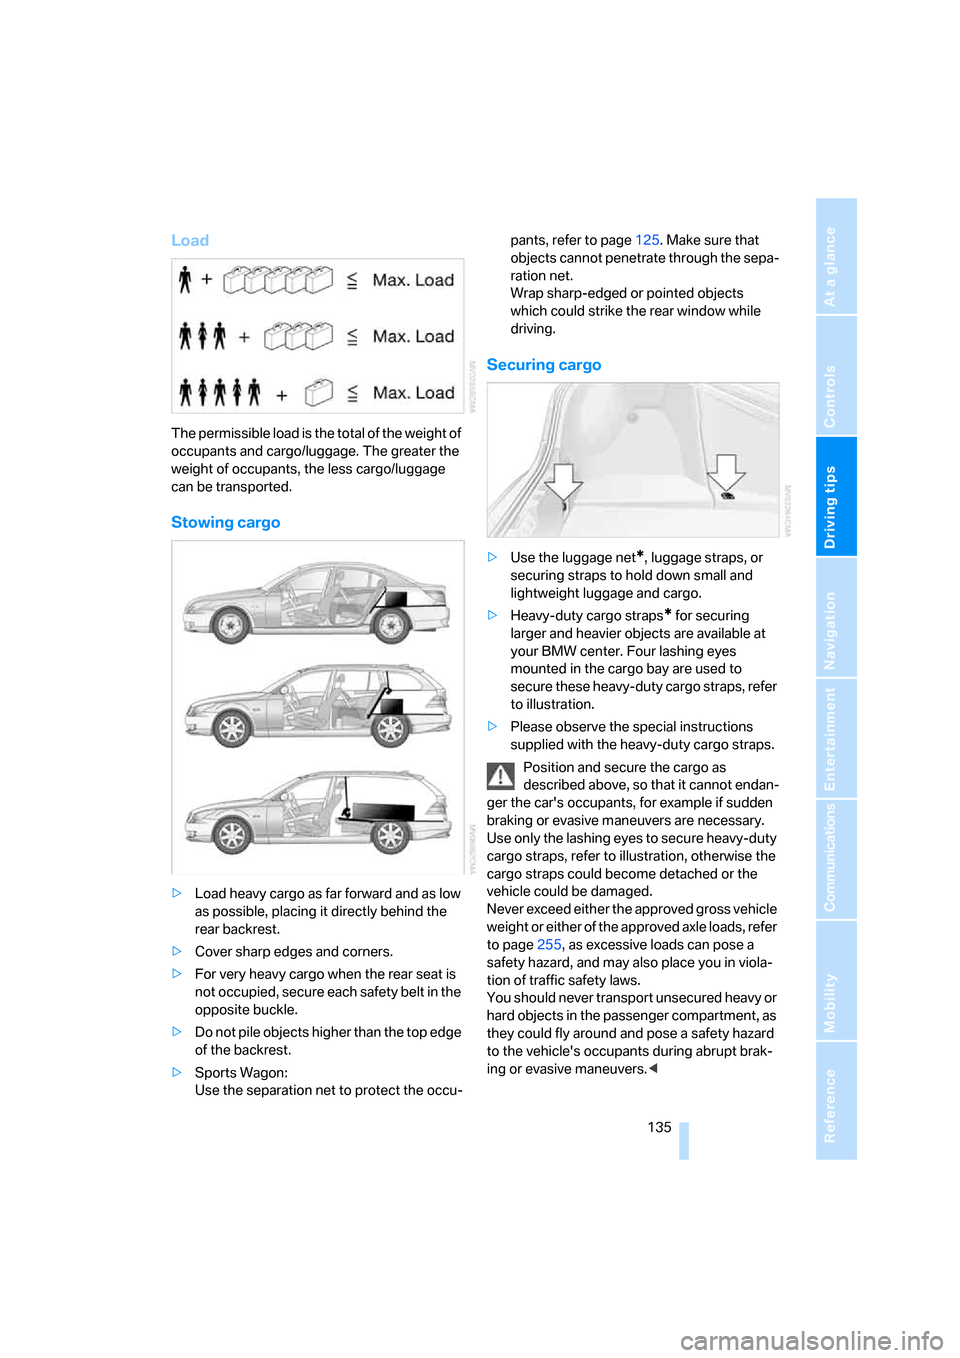
Stowing cargo
>Load heavy cargo as far forward and as low
as possible, placing it directly behind the
rear backrest.
>Cover sharp edges and corners.
>For very heavy cargo when the rear seat is
not occupied, secure each safety belt in the
opposite buckle.
>Do not pile objects higher than the top edge
of the backrest.
>Sports Wagon:
Use the separation net to protect the occu-pants, refer to page125. Make sure that
objects cannot penetrate through the sepa-
ration net.
Wrap sharp-edged or pointed objects
which could strike the rear window while
driving.
Securing cargo
>Use the luggage net*, luggage straps, or
securing straps to hold down small and
lightweight luggage and cargo.
>Heavy-duty cargo straps
* for securing
larger and heavier objects are available at
your BMW center. Four lashing eyes
mounted in the cargo bay are used to
secure these heavy-duty cargo straps, refer
to illustration.
>Please observe the special instructions
supplied with the heavy-duty cargo straps.
Position and secure the cargo as
described above, so that it cannot endan-
ger the car's occupants, for example if sudden
braking or evasive maneuvers are necessary.
Use only the lashing eyes to secure heavy-duty
cargo straps, refer to illustration, otherwise the
cargo straps could become detached or the
vehicle could be damaged.
Never exceed either the approved gross vehicle
weight or either of the approved axle loads, refer
to page255, as excessive loads can pose a
safety hazard, and may also place you in viola-
tion of traffic safety laws.
You should never transport unsecured heavy or
hard objects in the passenger compartment, as
they could fly around and pose a safety hazard
to the vehicle's occupants during abrupt brak-
ing or evasive maneuvers.<
Page 221 of 286
Mobility
219Reference
At a glance
Controls
Driving tips
Communications
Navigation
Entertainment
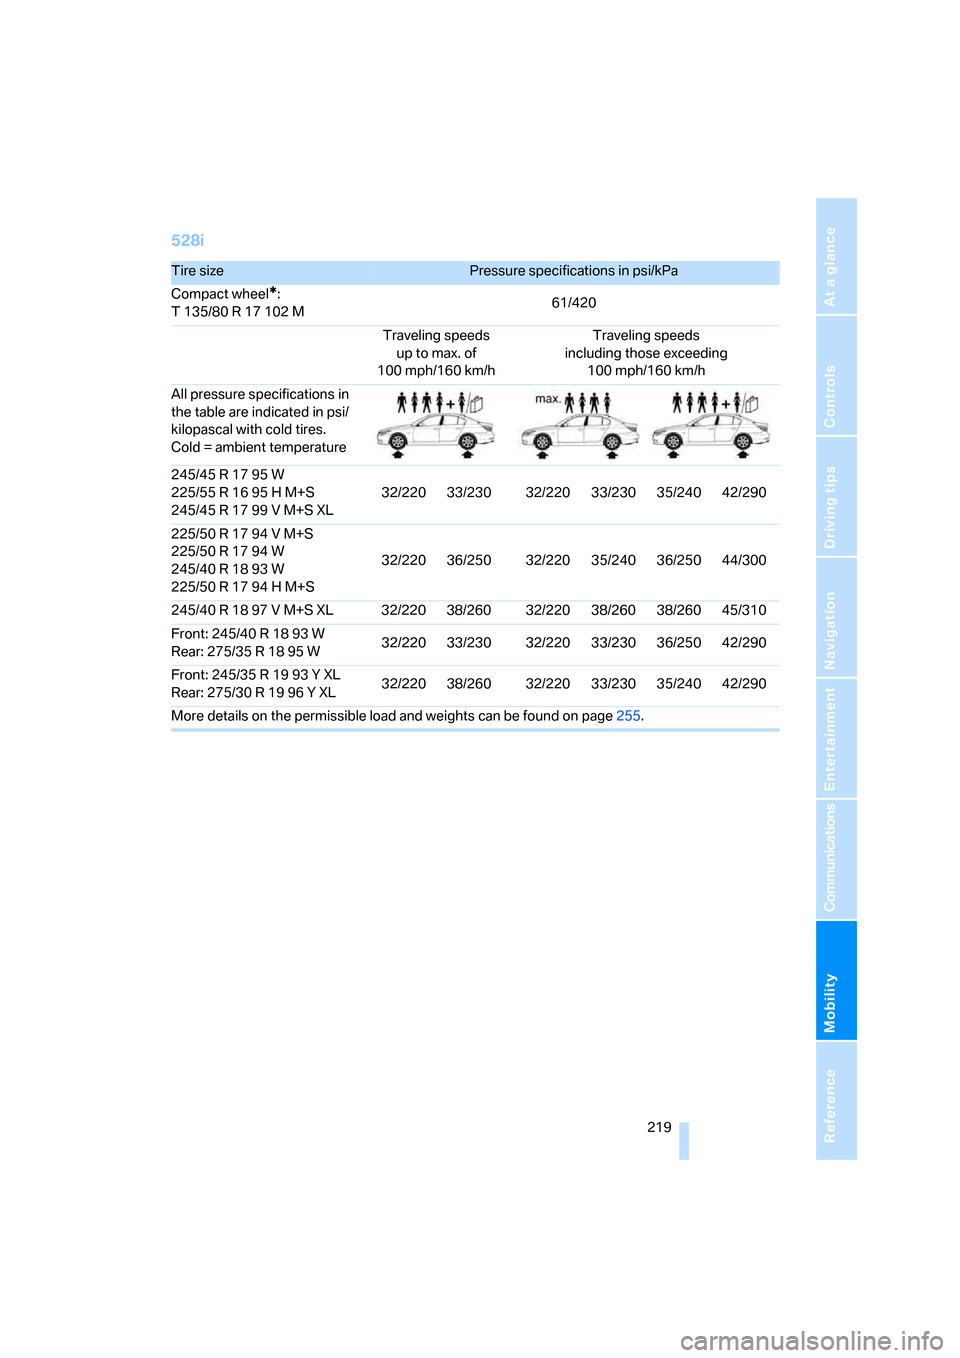
528i
Tire sizePressure specifications in psi/kPa
Compact wheel
*:
T 135/80 R 17 102 M61/420
Traveling speeds
up to max. of
100 mph/160 km/hTraveling speeds
including those exceeding
100 mph/160 km/h
All pressure specifications in
the table are indicated in psi/
kilopascal with cold tires.
Cold = ambient temperature
245/45 R 17 95 W
225/55 R 16 95 H M+S
245/45 R 17 99 V M+S XL32/220 33/230 32/220 33/230 35/240 42/290
225/50 R 17 94 V M+S
225/50 R 17 94 W
245/40 R 18 93 W
225/50 R 17 94 H M+S32/220 36/250 32/220 35/240 36/250 44/300
245/40 R 18 97 V M+S XL 32/220 38/260 32/220 38/260 38/260 45/310
Front: 245/40 R 18 93 W
Rear: 275/35R1895W32/220 33/230 32/220 33/230 36/250 42/290
Front: 245/35 R 19 93 Y XL
Rear: 275/30R1996YXL32/220 38/260 32/220 33/230 35/240 42/290
More details on the permissible load and weights can be found on page255.
Page 223 of 286
Mobility
221Reference
At a glance
Controls
Driving tips
Communications
Navigation
Entertainment
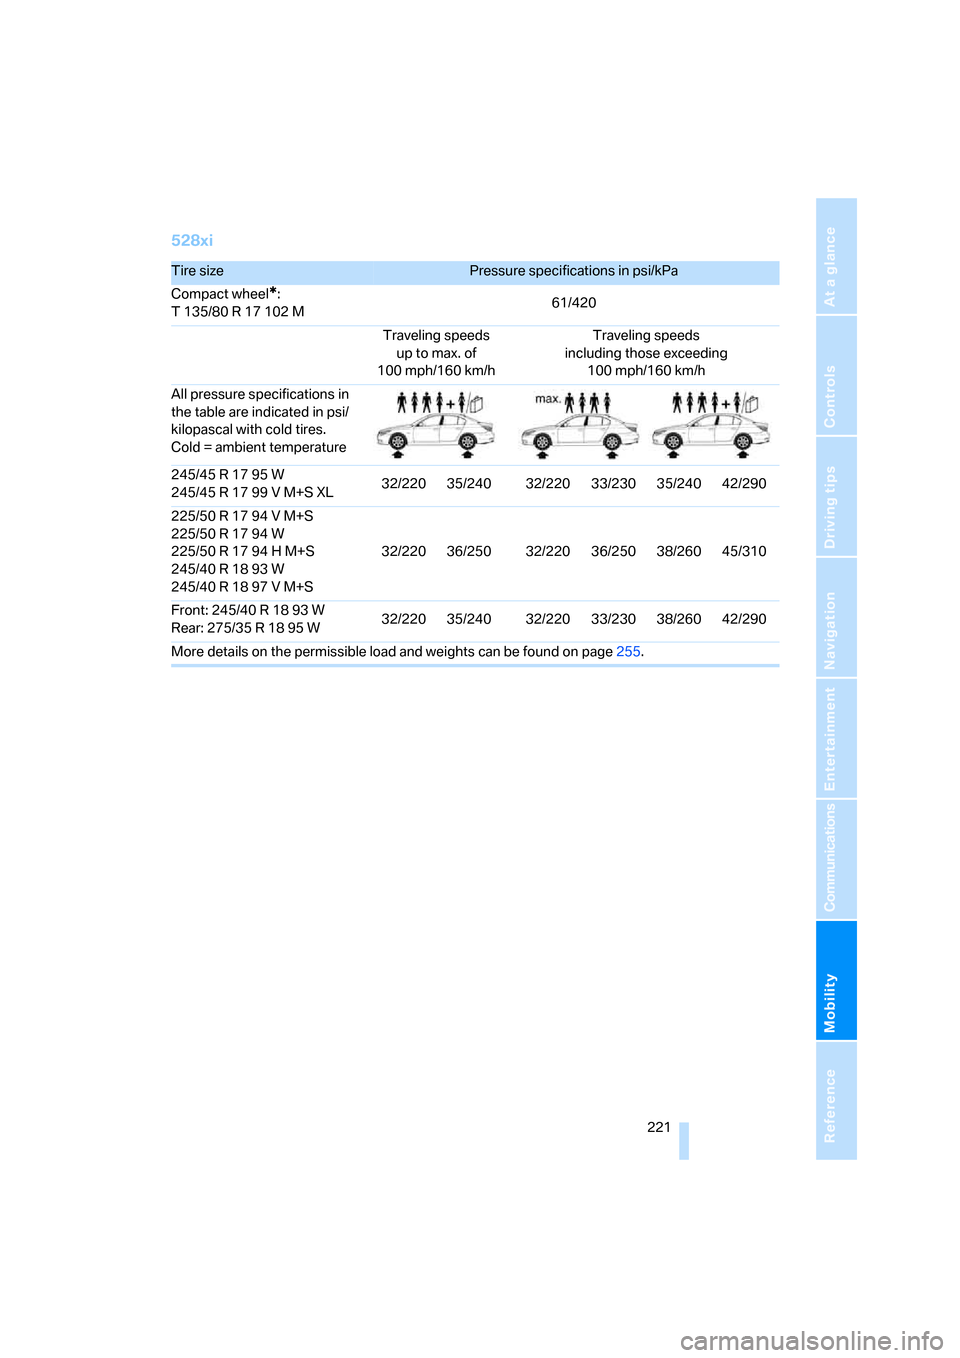
528xi
Tire sizePressure specifications in psi/kPa
Compact wheel
*:
T 135/80 R 17 102 M61/420
Traveling speeds
up to max. of
100 mph/160 km/hTraveling speeds
including those exceeding
100 mph/160 km/h
All pressure specifications in
the table are indicated in psi/
kilopascal with cold tires.
Cold = ambient temperature
245/45 R 17 95 W
245/45 R 17 99 V M+S XL32/220 35/240 32/220 33/230 35/240 42/290
225/50 R 17 94 V M+S
225/50 R 17 94 W
225/50 R 17 94 H M+S
245/40 R 18 93 W
245/40 R 18 97 V M+S32/220 36/250 32/220 36/250 38/260 45/310
Front: 245/40 R 18 93 W
Rear: 275/35R1895W32/220 35/240 32/220 33/230 38/260 42/290
More details on the permissible load and weights can be found on page255.
Page 225 of 286
Mobility
223Reference
At a glance
Controls
Driving tips
Communications
Navigation
Entertainment
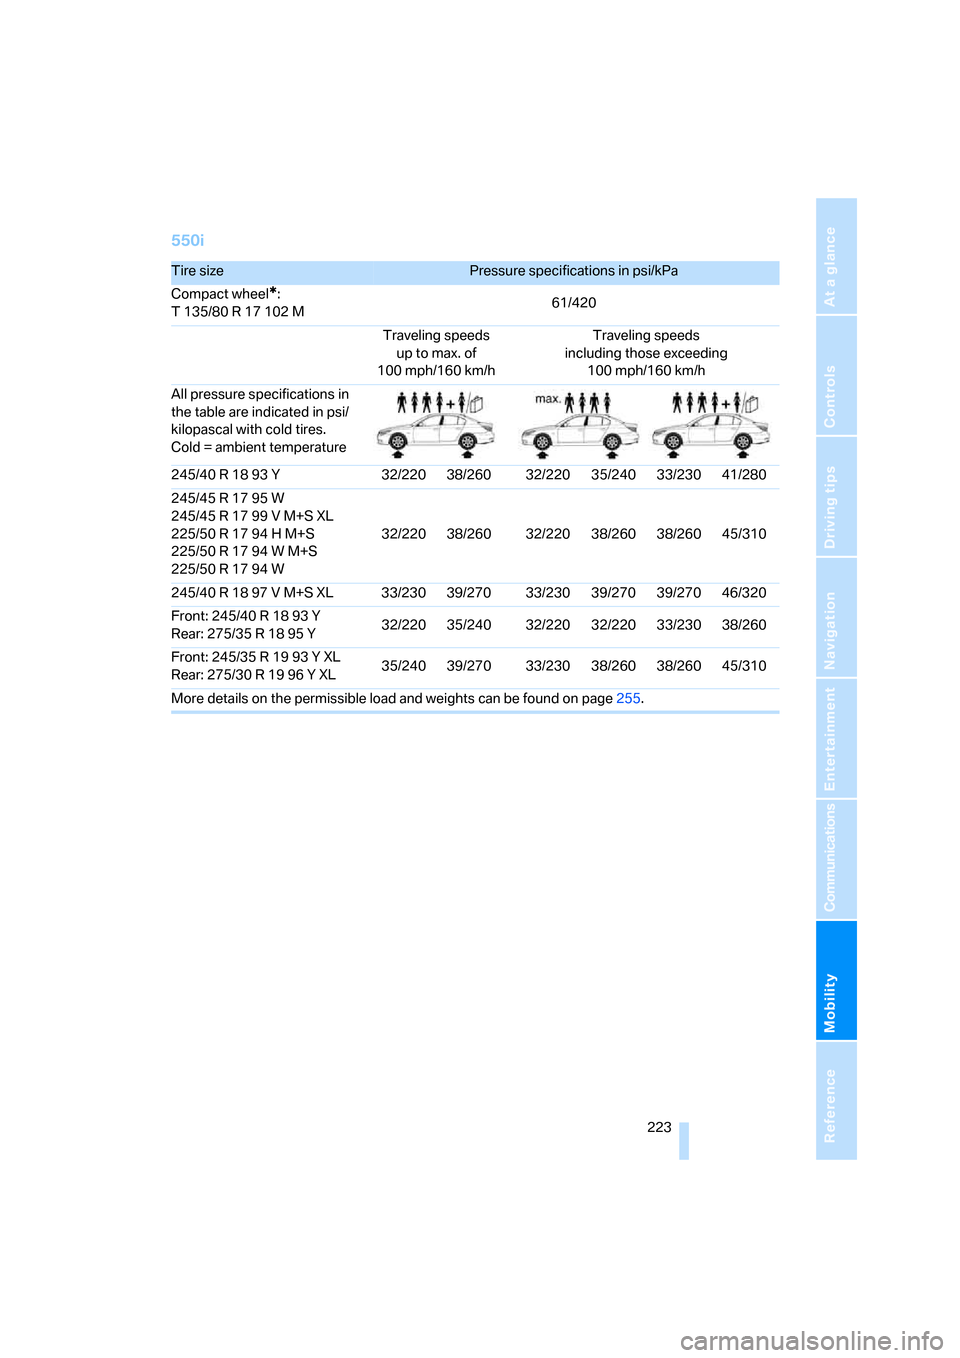
550i
Tire sizePressure specifications in psi/kPa
Compact wheel
*:
T 135/80 R 17 102 M61/420
Traveling speeds
up to max. of
100 mph/160 km/hTraveling speeds
including those exceeding
100 mph/160 km/h
All pressure specifications in
the table are indicated in psi/
kilopascal with cold tires.
Cold = ambient temperature
245/40 R 18 93 Y 32/220 38/260 32/220 35/240 33/230 41/280
245/45 R 17 95 W
245/45 R 17 99 V M+S XL
225/50 R 17 94 H M+S
225/50 R 17 94 W M+S
225/50 R 17 94 W32/220 38/260 32/220 38/260 38/260 45/310
245/40 R 18 97 V M+S XL 33/230 39/270 33/230 39/270 39/270 46/320
Front: 245/40 R 18 93 Y
Rear: 275/35R1895Y32/220 35/240 32/220 32/220 33/230 38/260
Front: 245/35 R 19 93 Y XL
Rear: 275/30R1996YXL35/240 39/270 33/230 38/260 38/260 45/310
More details on the permissible load and weights can be found on page255.
Page 229 of 286
Mobility
227Reference
At a glance
Controls
Driving tips
Communications
Navigation
Entertainment
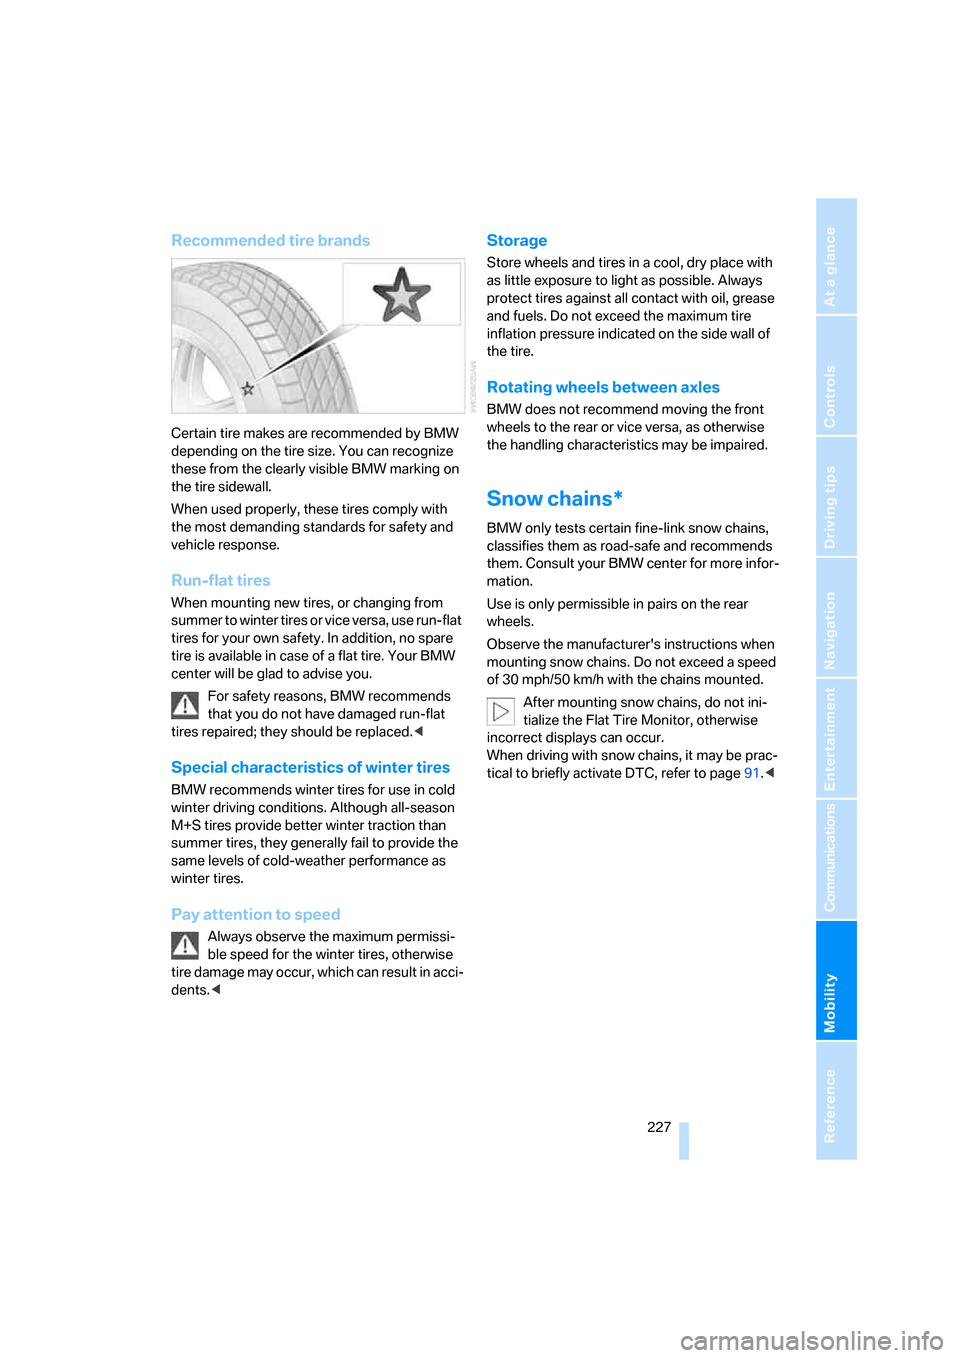
Recommended tire brands
Certain tire makes are recommended by BMW
depending on the tire size. You can recognize
these from the clearly visible BMW marking on
the tire sidewall.
When used properly, these tires comply with
the most demanding standards for safety and
vehicle response.
Run-flat tires
When mounting new tires, or changing from
summer to winter tires or vice versa, use run-flat
tires for your own safety. In addition, no spare
tire is available in case of a flat tire. Your BMW
center will be glad to advise you.
For safety reasons, BMW recommends
that you do not have damaged run-flat
tires repaired; they should be replaced.<
Special characteristics of winter tires
BMW recommends winter tires for use in cold
winter driving conditions. Although all-season
M+S tires provide better winter traction than
summer tires, they generally fail to provide the
same levels of cold-weather performance as
winter tires.
Pay attention to speed
Always observe the maximum permissi-
ble speed for the winter tires, otherwise
tire damage may occur, which can result in acci-
dents.<
Storage
Store wheels and tires in a cool, dry place with
as little exposure to light as possible. Always
protect tires against all contact with oil, grease
and fuels. Do not exceed the maximum tire
inflation pressure indicated on the side wall of
the tire.
Rotating wheels between axles
BMW does not recommend moving the front
wheels to the rear or vice versa, as otherwise
the handling characteristics may be impaired.
Snow chains*
BMW only tests certain fine-link snow chains,
classifies them as road-safe and recommends
them. Consult your BMW center for more infor-
mation.
Use is only permissible in pairs on the rear
wheels.
Observe the manufacturer's instructions when
mounting snow chains. Do not exceed a speed
of 30 mph/50 km/h with the chains mounted.
After mounting snow chains, do not ini-
tialize the Flat Tire Monitor, otherwise
incorrect displays can occur.
When driving with snow chains, it may be prac-
tical to briefly activate DTC, refer to page91.<
Page 239 of 286
Mobility
237Reference
At a glance
Controls
Driving tips
Communications
Navigation
Entertainment
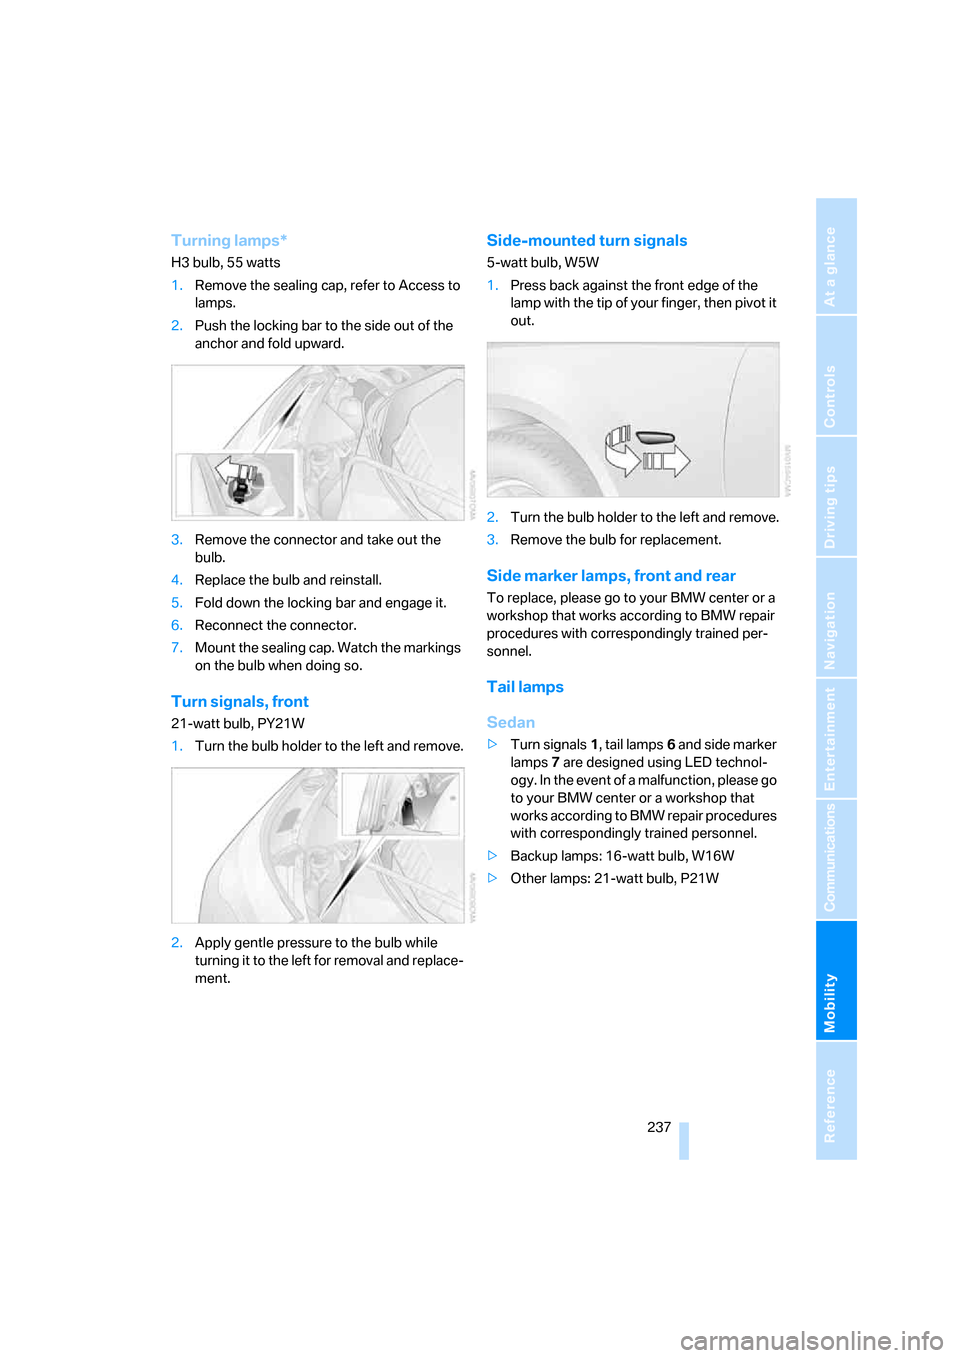
Turning lamps*
H3 bulb, 55 watts
1.Remove the sealing cap, refer to Access to
lamps.
2.Push the locking bar to the side out of the
anchor and fold upward.
3.Remove the connector and take out the
bulb.
4.Replace the bulb and reinstall.
5.Fold down the locking bar and engage it.
6.Reconnect the connector.
7.Mount the sealing cap. Watch the markings
on the bulb when doing so.
Turn signals, front
21-watt bulb, PY21W
1.Turn the bulb holder to the left and remove.
2.Apply gentle pressure to the bulb while
turning it to the left for removal and replace-
ment.
Side-mounted turn signals
5-watt bulb, W5W
1.Press back against the front edge of the
lamp with the tip of your finger, then pivot it
out.
2.Turn the bulb holder to the left and remove.
3.Remove the bulb for replacement.
Side marker lamps, front and rear
To replace, please go to your BMW center or a
workshop that works according to BMW repair
procedures with correspondingly trained per-
sonnel.
Tail lamps
Sedan
>Turn signals1, tail lamps6 and side marker
lamps7 are designed using LED technol-
ogy. In the event of a malfunction, please go
to your BMW center or a workshop that
works according to BMW repair procedures
with correspondingly trained personnel.
>Backup lamps: 16-watt bulb, W16W
>Other lamps: 21-watt bulb, P21W
Page 241 of 286
Mobility
239Reference
At a glance
Controls
Driving tips
Communications
Navigation
Entertainment
Lamps in luggage compartment lid
License plate lamp
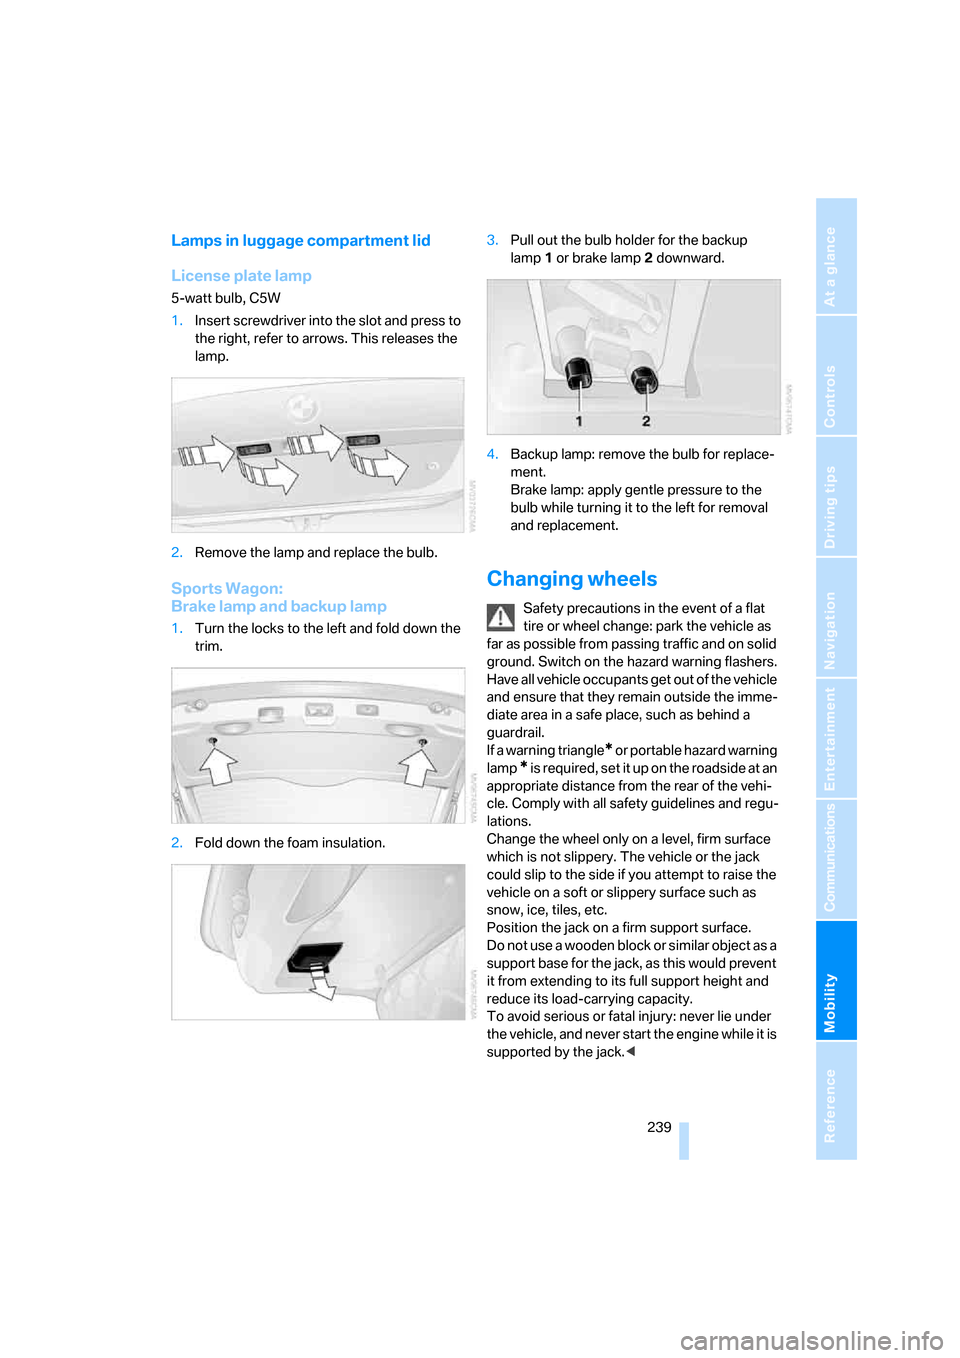
5-watt bulb, C5W
1.Insert screwdriver into the slot and press to
the right, refer to arrows. This releases the
lamp.
2.Remove the lamp and replace the bulb.
Sports Wagon:
Brake lamp and backup lamp
1.Turn the locks to the left and fold down the
trim.
2.Fold down the foam insulation.3.Pull out the bulb holder for the backup
lamp1 or brake lamp2 downward.
4.Backup lamp: remove the bulb for replace-
ment.
Brake lamp: apply gentle pressure to the
bulb while turning it to the left for removal
and replacement.
Changing wheels
Safety precautions in the event of a flat
tire or wheel change: park the vehicle as
far as possible from passing traffic and on solid
ground. Switch on the hazard warning flashers.
Have all vehicle occupants get out of the vehicle
and ensure that they remain outside the imme-
diate area in a safe place, such as behind a
guardrail.
If a warning triangle
* or portable hazard warning
lamp
* is required, set it up on the roadside at an
appropriate distance from the rear of the vehi-
cle. Comply with all safety guidelines and regu-
lations.
Change the wheel only on a level, firm surface
which is not slippery. The vehicle or the jack
could slip to the side if you attempt to raise the
vehicle on a soft or slippery surface such as
snow, ice, tiles, etc.
Position the jack on a firm support surface.
Do not use a wooden block or similar object as a
support base for the jack, as this would prevent
it from extending to its full support height and
reduce its load-carrying capacity.
To avoid serious or fatal injury: never lie under
the vehicle, and never start the engine while it is
supported by the jack.<
Page 247 of 286
Mobility
245Reference
At a glance
Controls
Driving tips
Communications
Navigation
Entertainment
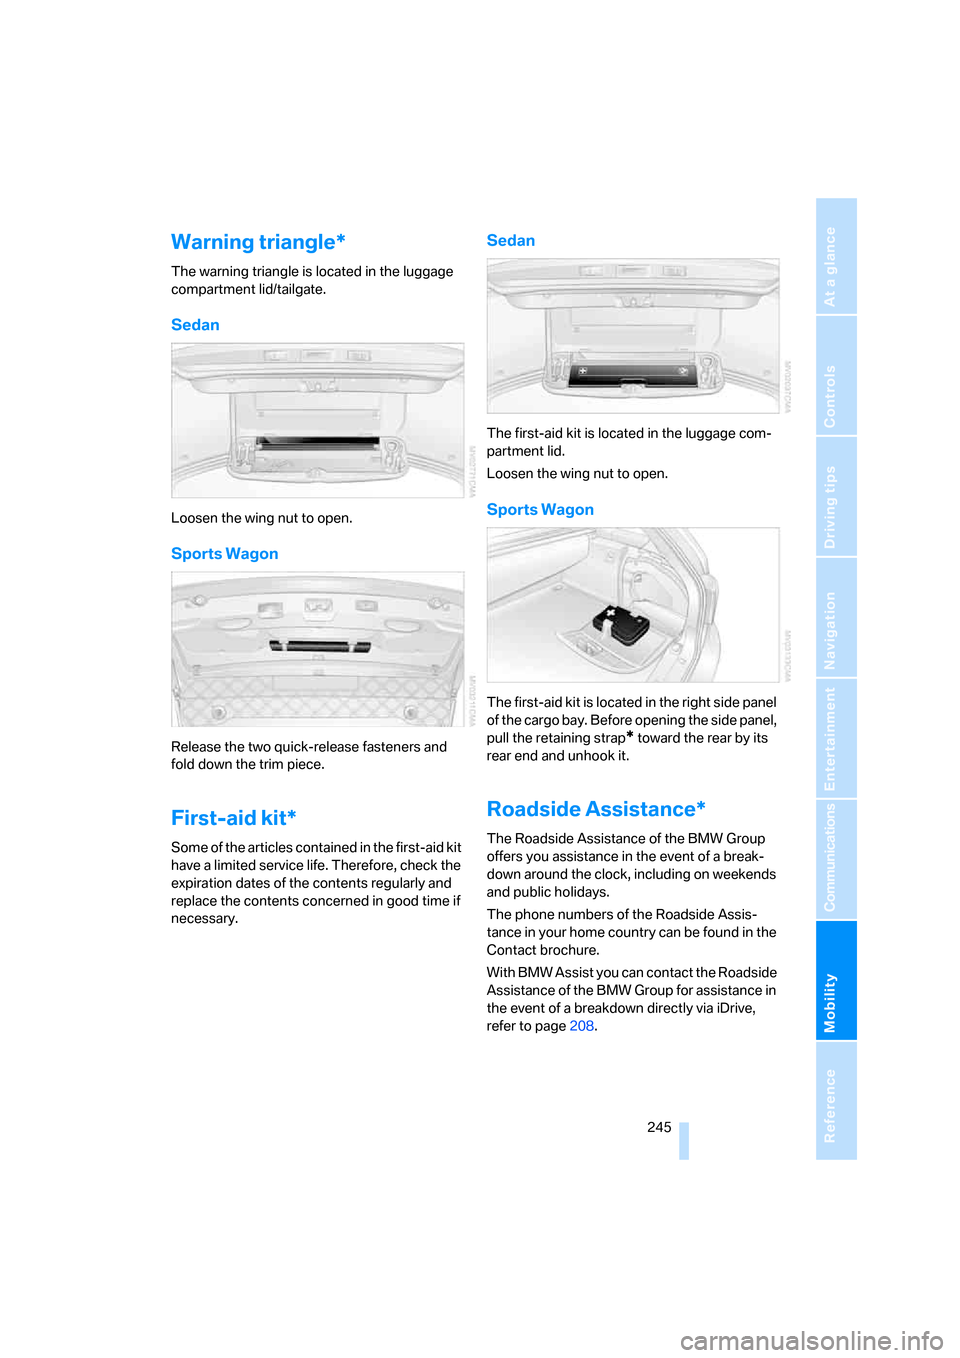
Warning triangle*
The warning triangle is located in the luggage
compartment lid/tailgate.
Sedan
Loosen the wing nut to open.
Sports Wagon
Release the two quick-release fasteners and
fold down the trim piece.
First-aid kit*
Some of the articles contained in the first-aid kit
have a limited service life. Therefore, check the
expiration dates of the contents regularly and
replace the contents concerned in good time if
necessary.
Sedan
The first-aid kit is located in the luggage com-
partment lid.
Loosen the wing nut to open.
Sports Wagon
The first-aid kit is located in the right side panel
of the cargo bay. Before opening the side panel,
pull the retaining strap
* toward the rear by its
rear end and unhook it.
Roadside Assistance*
The Roadside Assistance of the BMW Group
offers you assistance in the event of a break-
down around the clock, including on weekends
and public holidays.
The phone numbers of the Roadside Assis-
tance in your home country can be found in the
Contact brochure.
With BMW Assist you can contact the Roadside
Assistance of the BMW Group for assistance in
the event of a breakdown directly via iDrive,
refer to page208.