parking BMW 535I 2008 User Guide
[x] Cancel search | Manufacturer: BMW, Model Year: 2008, Model line: 535I, Model: BMW 535I 2008Pages: 288, PDF Size: 7.03 MB
Page 110 of 288
Lamps
108
Lamps
Parking lamps/low beams
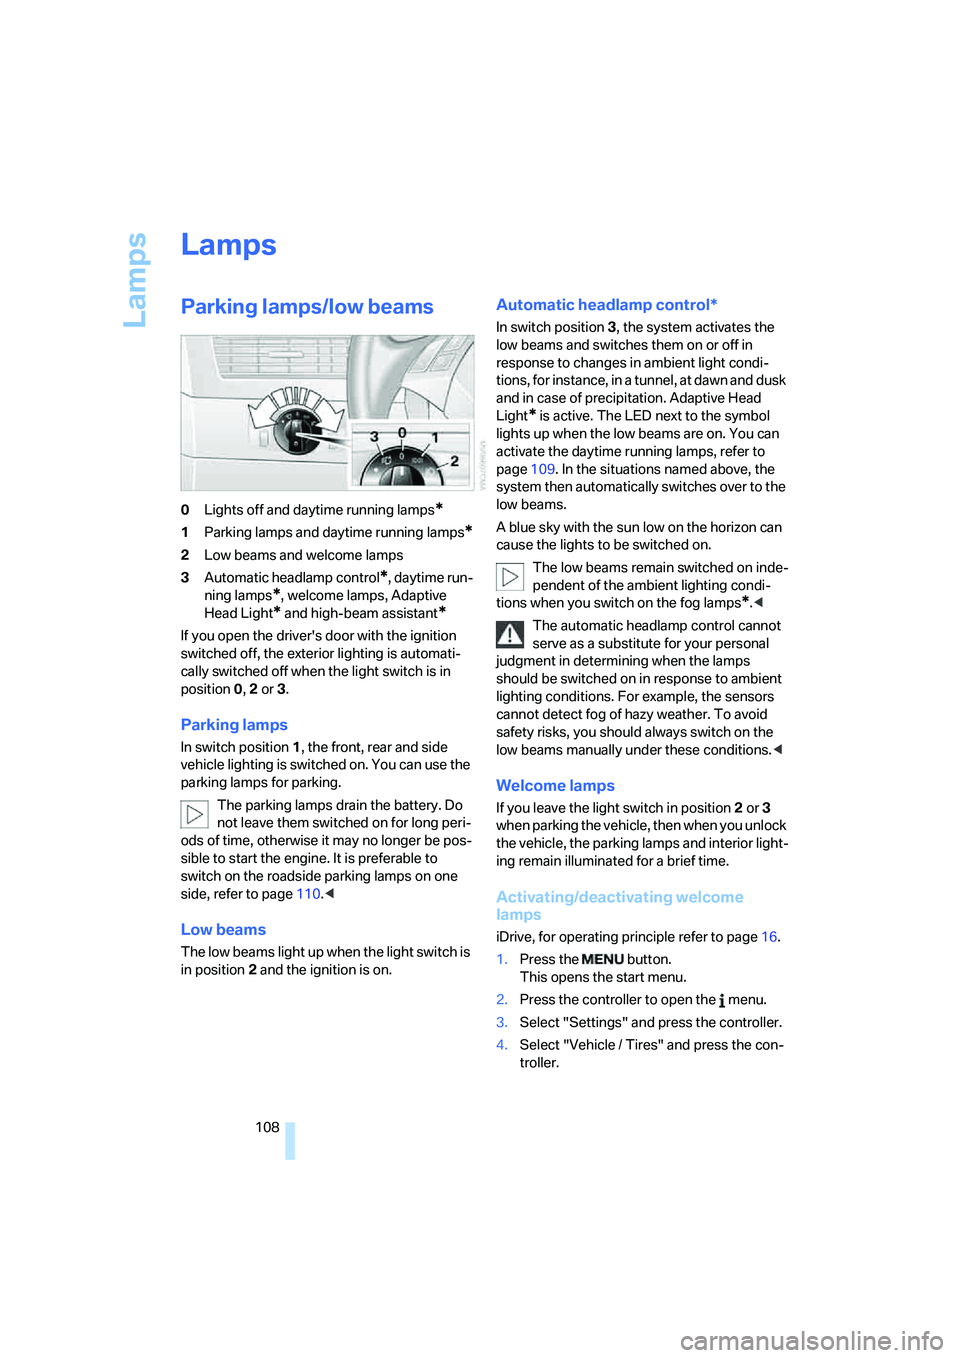
0Lights off and daytime running lamps*
1Parking lamps and daytime running lamps*
2Low beams and welcome lamps
3Automatic headlamp control
*, daytime run-
ning lamps
*, welcome lamps, Adaptive
Head Light
* and high-beam assistant*
If you open the driver's door with the ignition
switched off, the exterior lighting is automati-
cally switched off when the light switch is in
position0, 2 or 3.
Parking lamps
In switch position1, the front, rear and side
vehicle lighting is switched on. You can use the
parking lamps for parking.
The parking lamps drain the battery. Do
not leave them switched on for long peri-
ods of time, otherwise it may no longer be pos-
sible to start the engine. It is preferable to
switch on the roadside parking lamps on one
side, refer to page110.<
Low beams
The low beams light up when the light switch is
in position 2 and the ignition is on.
Automatic headlamp control*
In switch position3, the system activates the
low beams and switches them on or off in
response to changes in ambient light condi-
tions, for instance, in a tunnel, at dawn and dusk
and in case of precipitation. Adaptive Head
Light
* is active. The LED next to the symbol
lights up when the low beams are on. You can
activate the daytime running lamps, refer to
page109. In the situations named above, the
system then automatically switches over to the
low beams.
A blue sky with the sun low on the horizon can
cause the lights to be switched on.
The low beams remain switched on inde-
pendent of the ambient lighting condi-
tions when you switch on the fog lamps
*.<
The automatic headlamp control cannot
serve as a substitute for your personal
judgment in determining when the lamps
should be switched on in response to ambient
lighting conditions. For example, the sensors
cannot detect fog of hazy weather. To avoid
safety risks, you should always switch on the
low beams manually under these conditions.<
Welcome lamps
If you leave the light switch in position2 or 3
when parking the vehicle, then when you unlock
the vehicle, the parking lamps and interior light-
ing remain illuminated for a brief time.
Activating/deactivating welcome
lamps
iDrive, for operating principle refer to page16.
1.Press the button.
This opens the start menu.
2.Press the controller to open the menu.
3.Select "Settings" and press the controller.
4.Select "Vehicle / Tires" and press the con-
troller.
Page 111 of 288
Controls
109Reference
At a glance
Driving tips
Communications
Navigation
Entertainment
Mobility
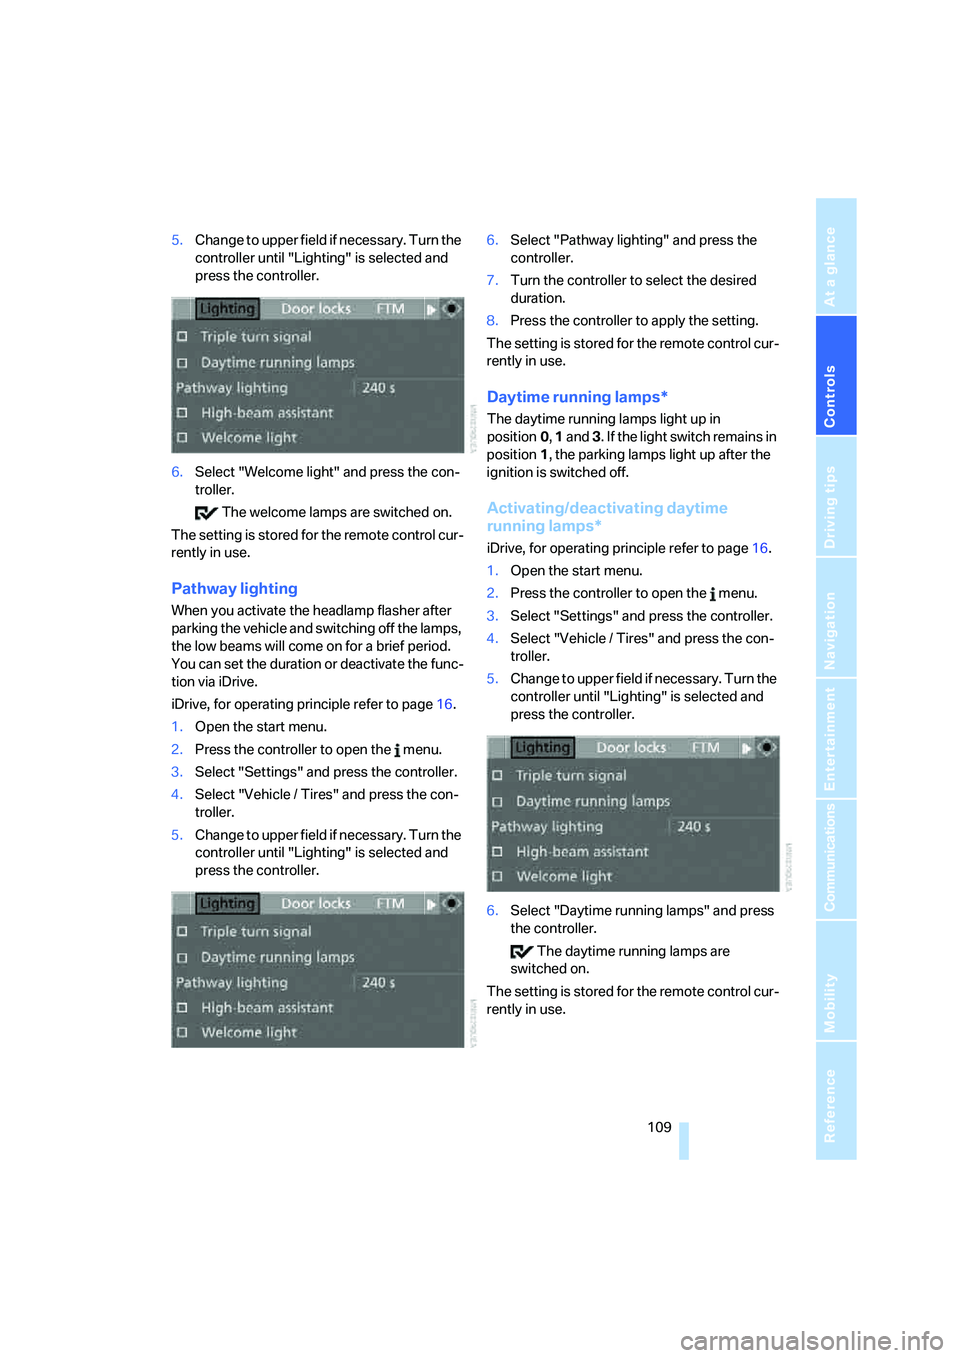
5.Change to upper field if necessary. Turn the
controller until "Lighting" is selected and
press the controller.
6.Select "Welcome light" and press the con-
troller.
The welcome lamps are switched on.
The setting is stored for the remote control cur-
rently in use.
Pathway lighting
When you activate the headlamp flasher after
parking the vehicle and switching off the lamps,
the low beams will come on for a brief period.
You can set the duration or deactivate the func-
tion via iDrive.
iDrive, for operating principle refer to page16.
1.Open the start menu.
2.Press the controller to open the menu.
3.Select "Settings" and press the controller.
4.Select "Vehicle / Tires" and press the con-
troller.
5.Change to upper field if necessary. Turn the
controller until "Lighting" is selected and
press the controller.6.Select "Pathway lighting" and press the
controller.
7.Turn the controller to select the desired
duration.
8.Press the controller to apply the setting.
The setting is stored for the remote control cur-
rently in use.
Daytime running lamps*
The daytime running lamps light up in
position0, 1 and 3. If the light switch remains in
position1, the parking lamps light up after the
ignition is switched off.
Activating/deactivating daytime
running lamps*
iDrive, for operating principle refer to page16.
1.Open the start menu.
2.Press the controller to open the menu.
3.Select "Settings" and press the controller.
4.Select "Vehicle / Tires" and press the con-
troller.
5.Change to upper field if necessary. Turn the
controller until "Lighting" is selected and
press the controller.
6.Select "Daytime running lamps" and press
the controller.
The daytime running lamps are
switched on.
The setting is stored for the remote control cur-
rently in use.
Page 112 of 288
Lamps
110
Adaptive Head Light*
The concept
Adaptive Head Light is a variable headlamp
control system that enables better illumination
of the road surface. Depending on the steering
angle and other parameters, the light from the
headlamp follows the course of the road.
In tight curves at speeds up to approx. 45 mph/
70 km/h, e.g. on mountainous roads or when
negotiating curves, turning lamps are switched
on that light up the inside area of the curve.
Activating Adaptive Head Light
With the ignition switched on, turn the light
switch into position 3, refer to page108.
The turning lamps are automatically switched
on depending on the steering angle or the use
of turn signals.
To avoid blinding oncoming traffic, the Adaptive
Head Light directs light towards the front pas-
senger side when the vehicle is at a standstill.
When driving in reverse, only the turning lamps
are active and illuminate the outer area of
curves.
High beams/
roadside parking lamps
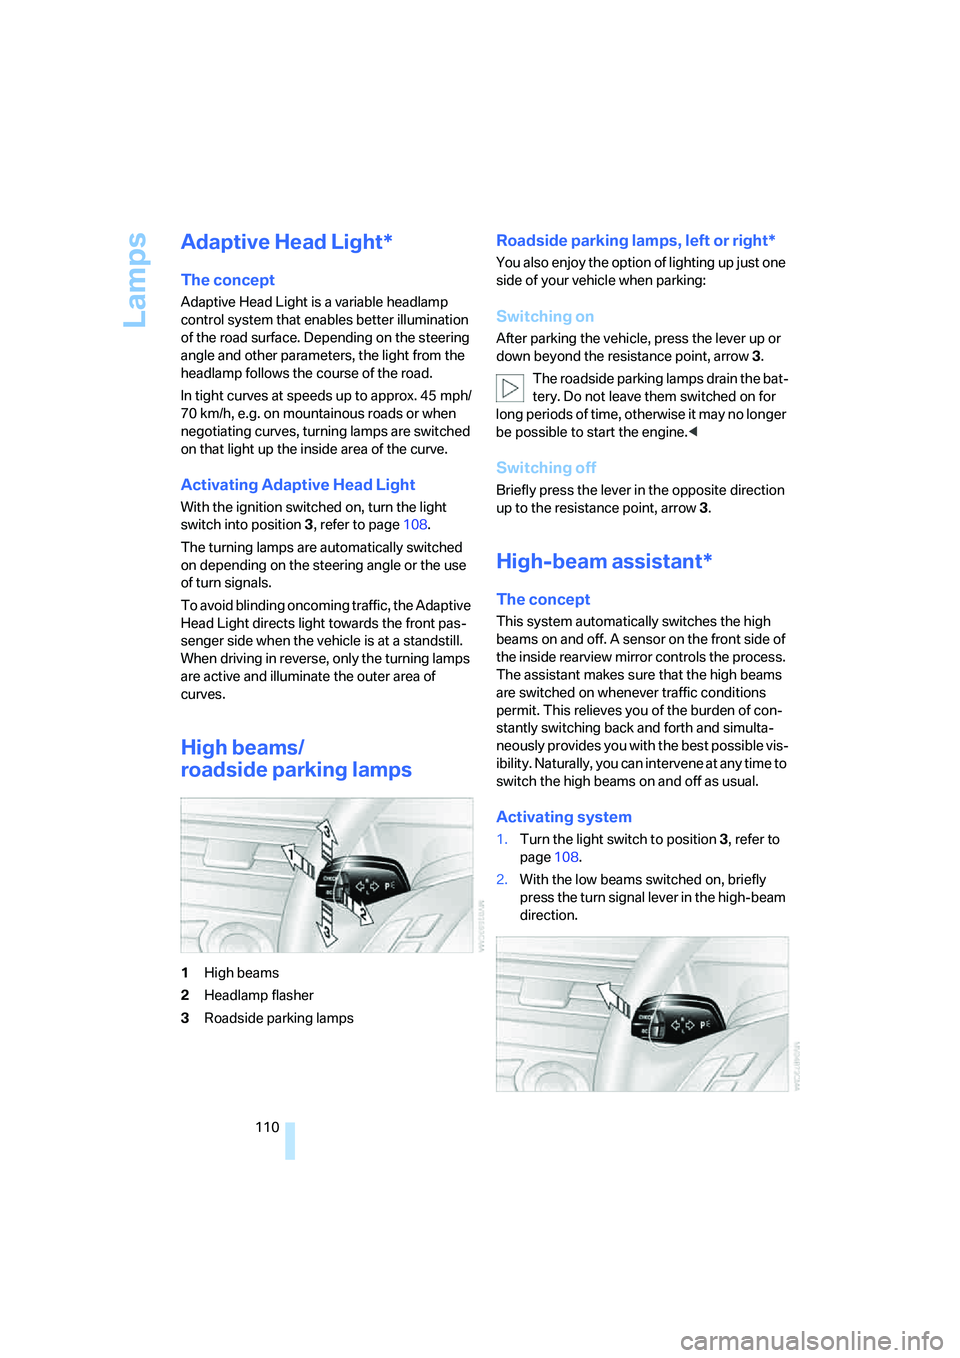
1High beams
2Headlamp flasher
3Roadside parking lamps
Roadside parking lamps, left or right*
You also enjoy the option of lighting up just one
side of your vehicle when parking:
Switching on
After parking the vehicle, press the lever up or
down beyond the resistance point, arrow 3.
The roadside parking lamps drain the bat-
tery. Do not leave them switched on for
long periods of time, otherwise it may no longer
be possible to start the engine.<
Switching off
Briefly press the lever in the opposite direction
up to the resistance point, arrow3.
High-beam assistant*
The concept
This system automatically switches the high
beams on and off. A sensor on the front side of
the inside rearview mirror controls the process.
The assistant makes sure that the high beams
are switched on whenever traffic conditions
permit. This relieves you of the burden of con-
stantly switching back and forth and simulta-
neously provides you with the best possible vis-
ibility. Naturally, you can intervene at any time to
switch the high beams on and off as usual.
Activating system
1.Turn the light switch to position3, refer to
page108.
2.With the low beams switched on, briefly
press the turn signal lever in the high-beam
direction.
Page 114 of 288
Lamps
112
Switching off via iDrive
iDrive, for operating principle refer to page16.
1.Press the button.
This opens the start menu.
2.Press the controller to open the menu.
3.Select "Settings" and press the controller.
4.Select "Vehicle / Tires" and press the con-
troller.
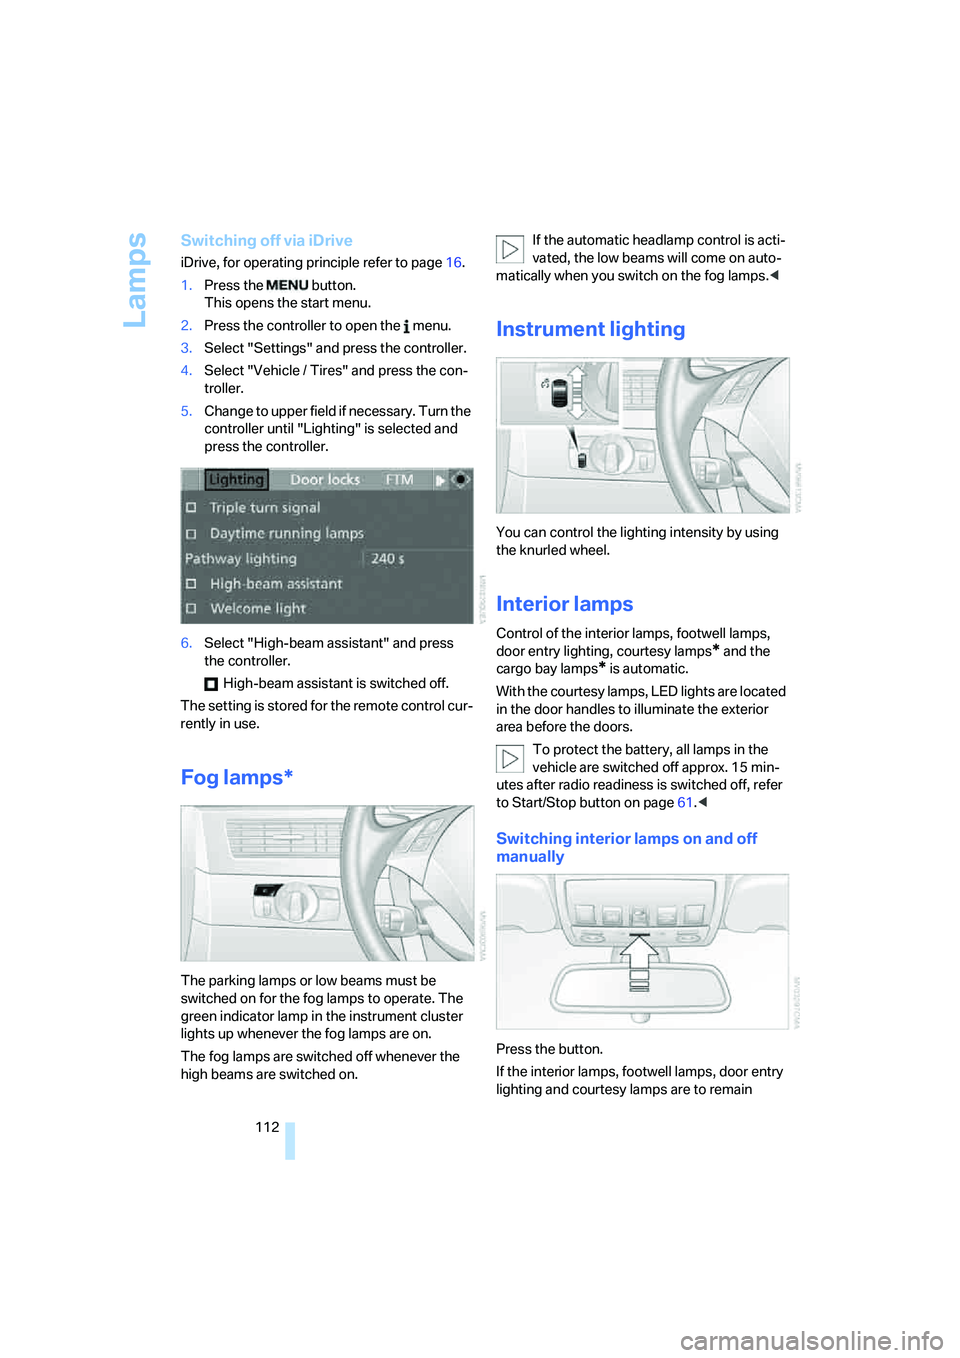
5.Change to upper field if necessary. Turn the
controller until "Lighting" is selected and
press the controller.
6.Select "High-beam assistant" and press
the controller.
High-beam assistant is switched off.
The setting is stored for the remote control cur-
rently in use.
Fog lamps*
The parking lamps or low beams must be
switched on for the fog lamps to operate. The
green indicator lamp in the instrument cluster
lights up whenever the fog lamps are on.
The fog lamps are switched off whenever the
high beams are switched on.If the automatic headlamp control is acti-
vated, the low beams will come on auto-
matically when you switch on the fog lamps.<
Instrument lighting
You can control the lighting intensity by using
the knurled wheel.
Interior lamps
Control of the interior lamps, footwell lamps,
door entry lighting, courtesy lamps
* and the
cargo bay lamps
* is automatic.
With the courtesy lamps, LED lights are located
in the door handles to illuminate the exterior
area before the doors.
To protect the battery, all lamps in the
vehicle are switched off approx. 15 min-
utes after radio readiness is switched off, refer
to Start/Stop button on page61.<
Switching interior lamps on and off
manually
Press the button.
If the interior lamps, footwell lamps, door entry
lighting and courtesy lamps are to remain
Page 125 of 288
Controls
123Reference
At a glance
Driving tips
Communications
Navigation
Entertainment
Mobility
Sun blinds for rear side windows
Pull the loop of the roller sun blind and hook
onto bracket.
Do not open the window with the roller
sun blind deployed. Otherwise, there is a
risk of damage and injury at higher speeds.<
Glove compartment
Opening
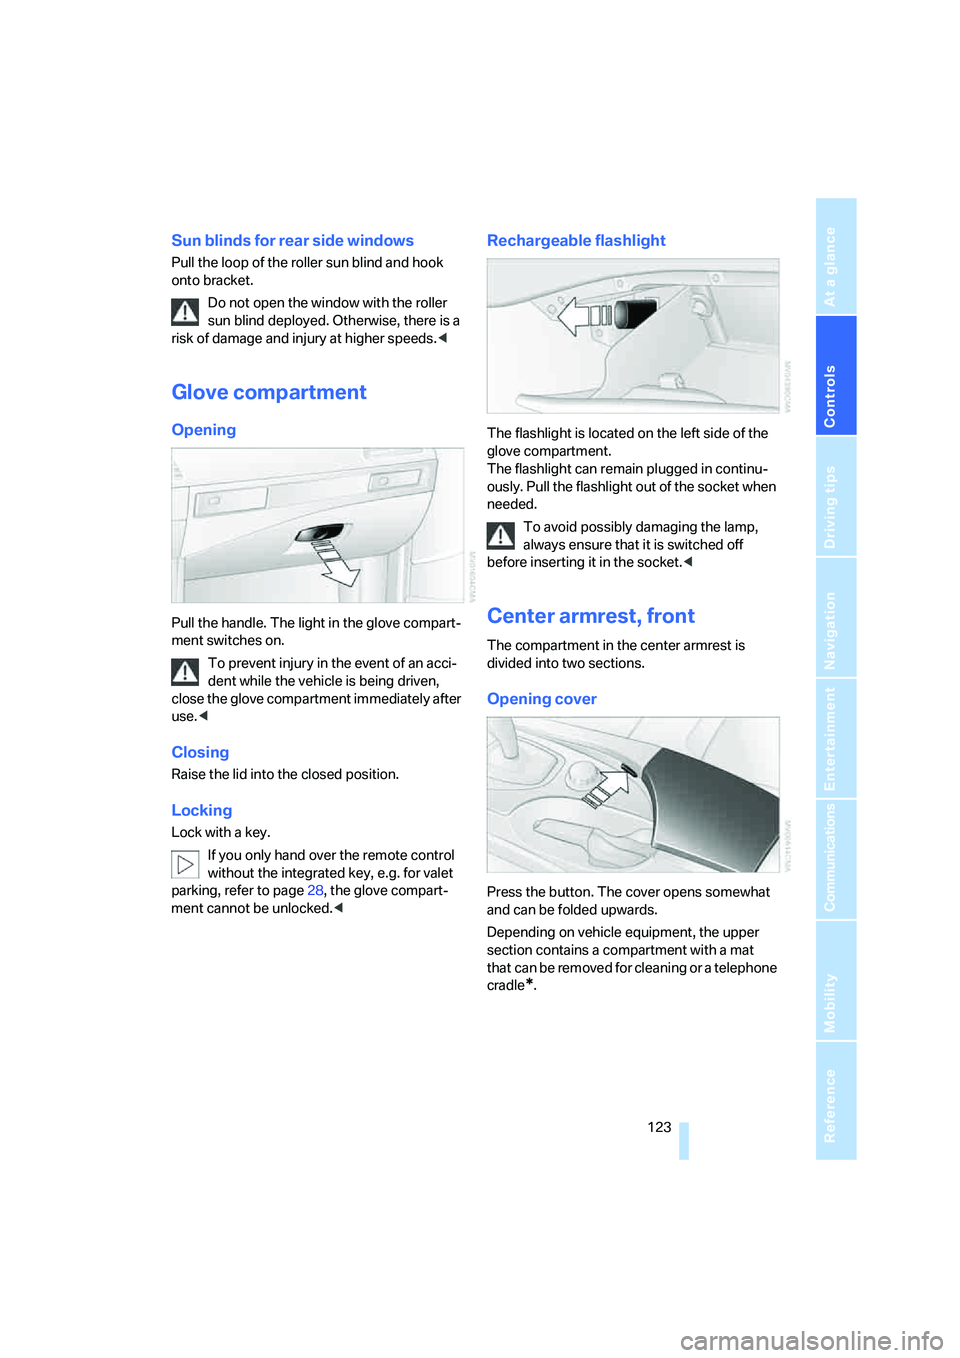
Pull the handle. The light in the glove compart-
ment switches on.
To prevent injury in the event of an acci-
dent while the vehicle is being driven,
close the glove compartment immediately after
use.<
Closing
Raise the lid into the closed position.
Locking
Lock with a key.
If you only hand over the remote control
without the integrated key, e.g. for valet
parking, refer to page28, the glove compart-
ment cannot be unlocked.<
Rechargeable flashlight
The flashlight is located on the left side of the
glove compartment.
The flashlight can remain plugged in continu-
ously. Pull the flashlight out of the socket when
needed.
To avoid possibly damaging the lamp,
always ensure that it is switched off
before inserting it in the socket.<
Center armrest, front
The compartment in the center armrest is
divided into two sections.
Opening cover
Press the button. The cover opens somewhat
and can be folded upwards.
Depending on vehicle equipment, the upper
section contains a compartment with a mat
that can be removed for cleaning or a telephone
cradle
*.
Page 137 of 288
Driving tips
135Reference
At a glance
Controls
Communications
Navigation
Entertainment
Mobility
Thinking ahead when driving
Avoid unnecessary acceleration and braking.
To do so, maintain the appropriate distance
from the vehicle in front of you. An anticipatory
and smooth driving style reduces fuel con-
sumption.
Avoiding high engine speeds
Use 1st gear only for starting off. Accelerate
rapidly in 2nd gear and above. Avoid high
engine speeds in doing so and shift into the
next gear early.
When you have reached the desired speed,
shift into the highest possible gear and drive
with the lowest possible engine speed while
maintaining a constant a vehicle speed.
In general: driving at a low engine speed
reduces fuel consumption and minimizes wear.
Taking advantage of coasting
When approaching a red light, let off the gas
and allow the vehicle to coast to a stop in the
highest possible gear.
On steep roadways, let off the gas and allow the
vehicle to roll in the appropriate gear.
The flow of fuel is interrupted when coasting.
Switching off engine during longer
stops
Switch off the engine at longer stops such as
traffic signals, railroad crossings, or in traffic
jams. Even having the engine switched off for
approx. 4 seconds results in fuel savings.
Switching off functions currently not
required
Functions such as air conditioning, seat heat-
ing, or rear window defrosting consume a lot of
energy and require additional fuel. Their influ-
ence is particularly pronounced in city traffic
and stop & go operation. For this reason, it is a
good idea to switch these functions off when
they are not really needed.
Having maintenance carried out
Have the vehicle serviced regularly in order to
achieve the optimum economy and service life
of your vehicle. BMW recommends having the
maintenance performed by a BMW center. Also
please pay attention to the BMW maintenance
system, refer to page235.
General driving notes
Closing luggage compartment lid/
tailgate
Operate the vehicle only when the lug-
gage compartment lid/tailgate is com-
pletely closed. Otherwise, exhaust fumes could
enter the interior of the vehicle.<
If it is absolutely necessary to drive with the lug-
gage compartment lid open:
1.Close all windows and the glass sunroof or
panorama glass sunroof.
2.Increase the air volume of the automatic cli-
mate control to a high level, refer to
page116.
Hot exhaust system
As in all vehicles, extremely high temper-
atures are generated on the exhaust sys-
tem. Do not remove the heat shields installed
adjacent to it, and never apply undercoating to
them. When driving, standing at idle and while
parking take care to avoid possible contact
between the hot exhaust system and any highly
flammable materials such as hay, leaves, grass,
etc. Such contact could lead to a fire, and with it
the risk of serious property damage as well as
personal injury. Do not touch hot exhaust tail
pipes. Otherwise there is a risk of burns.<
Hydroplaning
When driving on wet or slushy roads,
reduce road speed. If you do not, a wedge
of water can form between tires and road sur-
face. This phenomenon is referred to as hydro-
planing, and is characterized by a partial or
complete loss of contact between the tires and
Page 159 of 288
Navigation
Driving tips
157Reference
At a glance
Controls
Communications
Entertainment
Mobility
2.Select "Zielführung beenden" and press
the controller.
When you park the vehicle before reaching the
entered destination, the following question is
displayed before beginning the next trip:
"Continue guidance to destination?".
The destination guidance starts automatically
after a short time.
To start the destination guidance:
Select "Yes" and press the controller.
Displaying route
You have the option of displaying various views
of the route during destination guidance.
From another menu, you can change
directly to the screen last displayed,
refer to Comfort opening of menu items,
page18.<
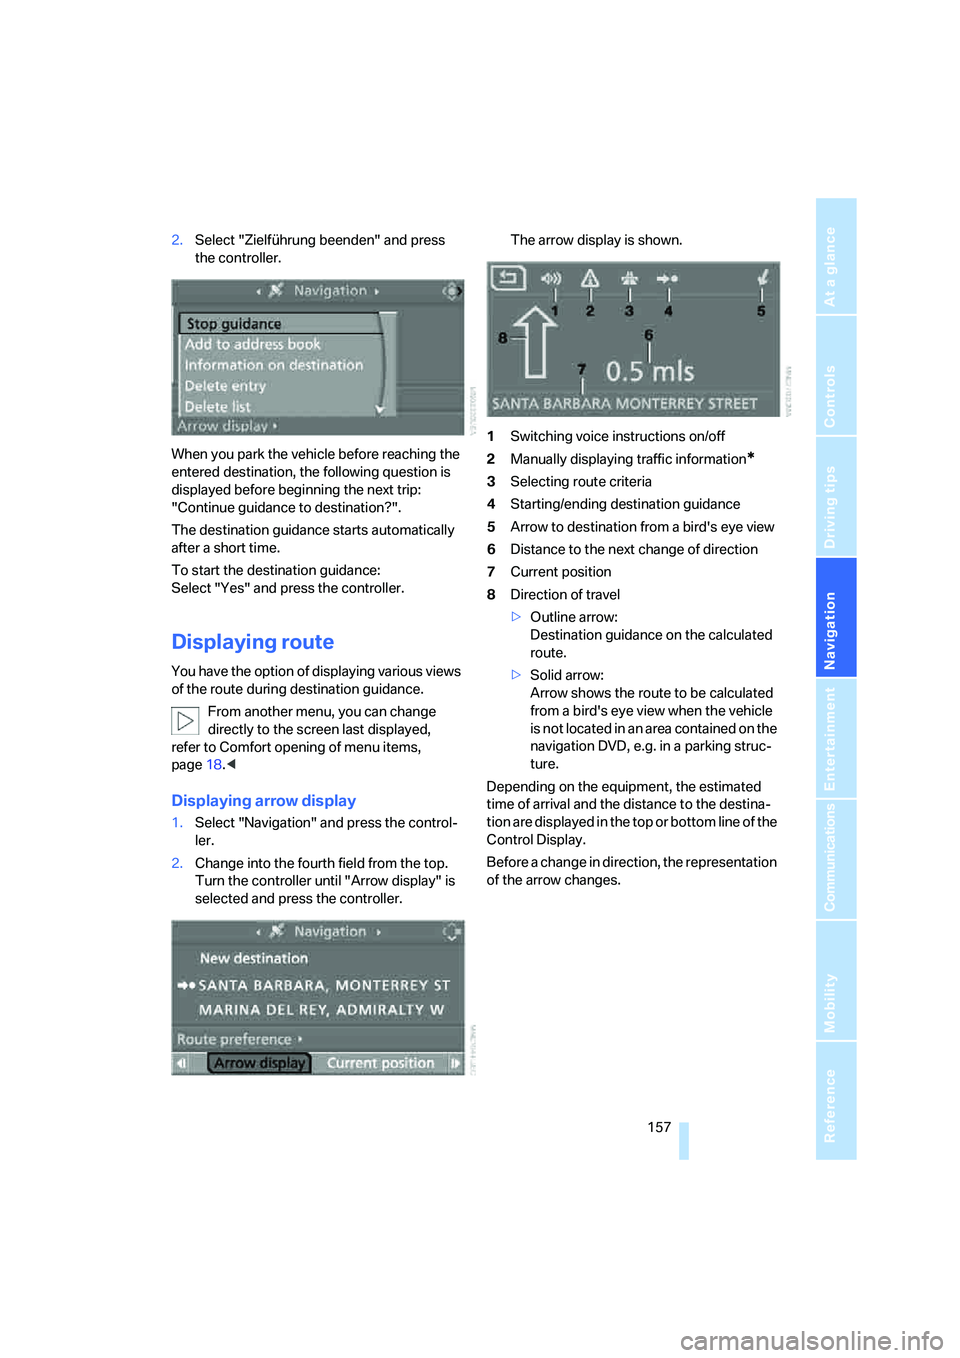
Displaying arrow display
1.Select "Navigation" and press the control-
ler.
2.Change into the fourth field from the top.
Turn the controller until "Arrow display" is
selected and press the controller.The arrow display is shown.
1Switching voice instructions on/off
2Manually displaying traffic information
*
3Selecting route criteria
4Starting/ending destination guidance
5Arrow to destination from a bird's eye view
6Distance to the next change of direction
7Current position
8Direction of travel
>Outline arrow:
Destination guidance on the calculated
route.
>Solid arrow:
Arrow shows the route to be calculated
from a bird's eye view when the vehicle
is not located in an area contained on the
navigation DVD, e.g. in a parking struc-
ture.
Depending on the equipment, the estimated
time of arrival and the distance to the destina-
tion are displayed in the top or bottom line of the
Control Display.
Before a change in direction, the representation
of the arrow changes.
Page 164 of 288
Destination guidance
162
With destination guidance switched off
1.Open the start menu.
2.Move the controller to the right to open
"Navigation".
3.Select "Traffic Info" and press the control-
ler.
First the traffic information along the planned
route is shown sorted according to the distance
to the current vehicle position.
Depiction of traffic information in map
view
The traffic information symbols are shown in
the map view up to a scale of 100 miles/200 km.
The section of the route affected by a traffic
report as well as the number for the type of inci-
dent are displayed and hidden. This occurs as a
function of the scale selected.
Displaying detailed traffic information
Select a traffic information item from the list and
press the controller.
To exit from the menu:
Select the arrow and press the controller.
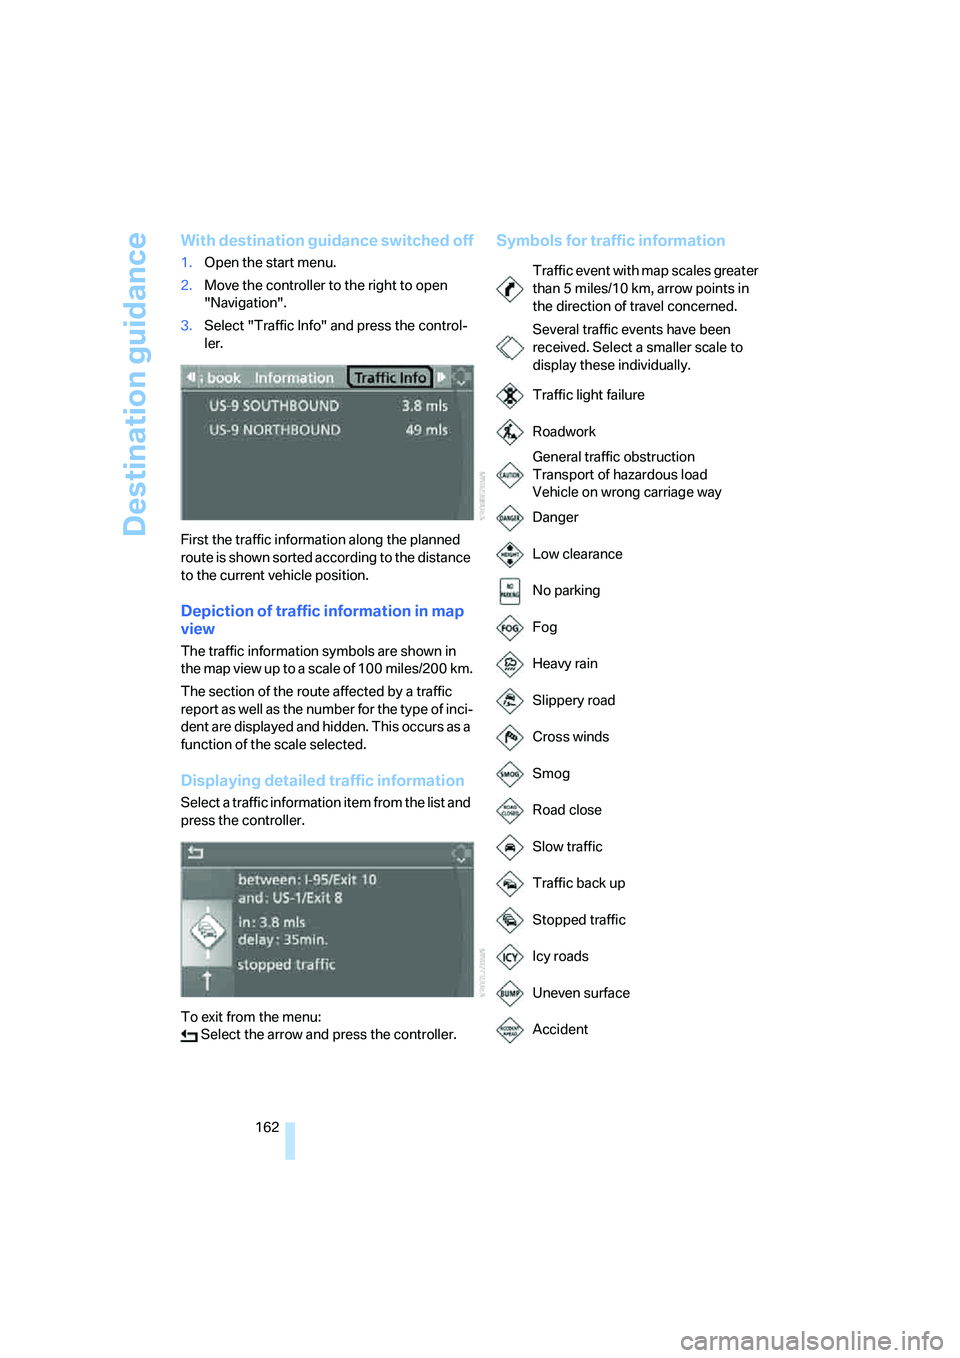
Symbols for traffic information
Traffic event with map scales greater
than 5miles/10km, arrow points in
the direction of travel concerned.
Several traffic events have been
received. Select a smaller scale to
display these individually.
Traffic light failure
Roadwork
General traffic obstruction
Transport of hazardous load
Vehicle on wrong carriage way
Danger
Low clearance
No parking
Fog
Heavy rain
Slippery road
Cross winds
Smog
Road close
Slow traffic
Traffic back up
Stopped traffic
Icy roads
Uneven surface
Accident
Page 241 of 288
Mobility
239Reference
At a glance
Controls
Driving tips
Communications
Navigation
Entertainment
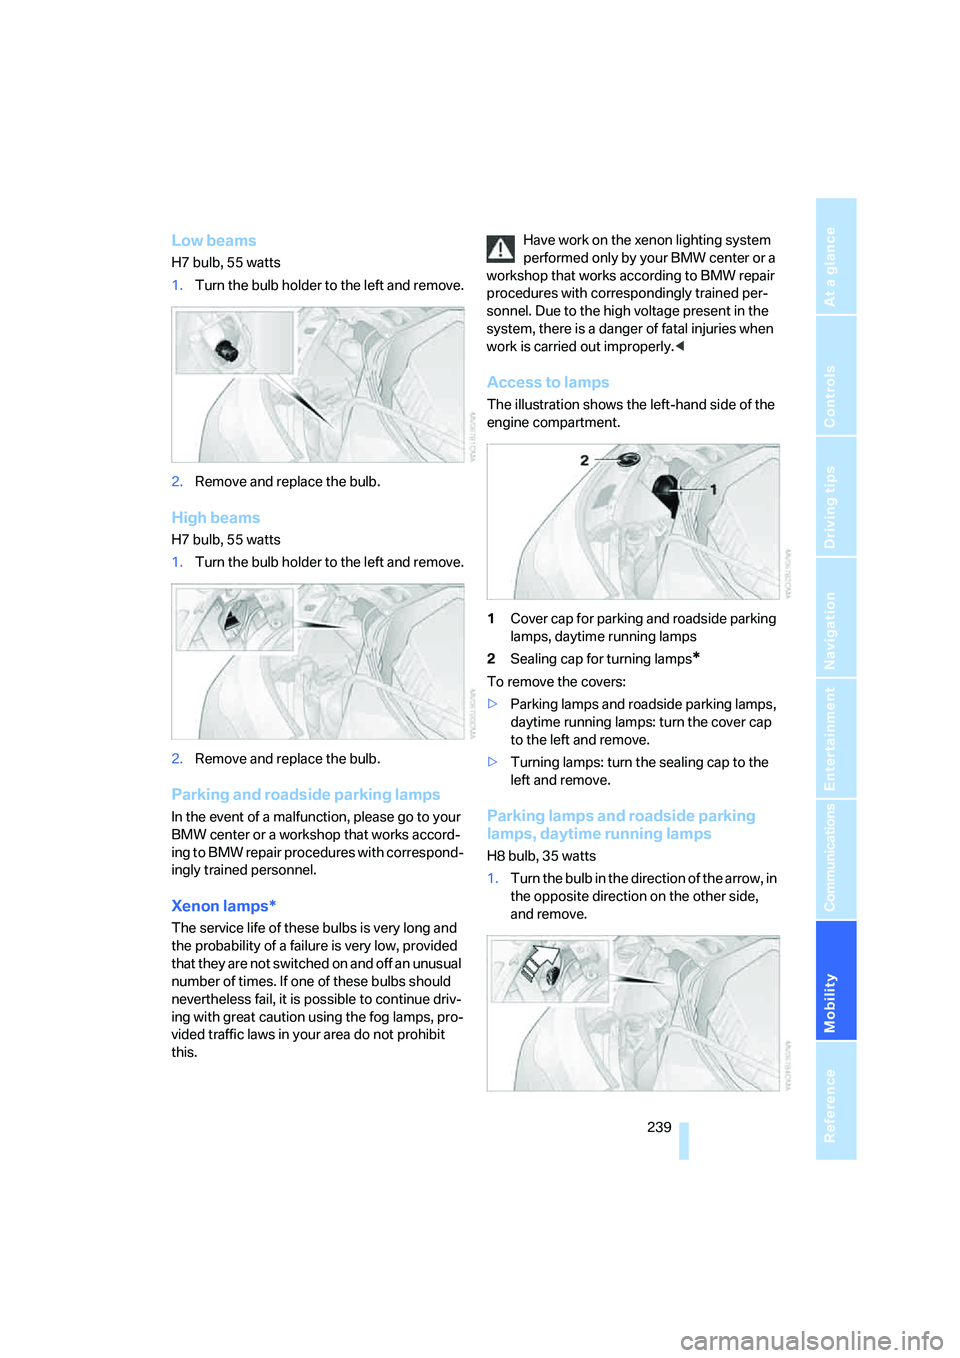
Low beams
H7 bulb, 55 watts
1.Turn the bulb holder to the left and remove.
2.Remove and replace the bulb.
High beams
H7 bulb, 55 watts
1.Turn the bulb holder to the left and remove.
2.Remove and replace the bulb.
Parking and roadside parking lamps
In the event of a malfunction, please go to your
BMW center or a workshop that works accord-
ing to BMW repair procedures with correspond-
ingly trained personnel.
Xenon lamps*
The service life of these bulbs is very long and
the probability of a failure is very low, provided
that they are not switched on and off an unusual
number of times. If one of these bulbs should
nevertheless fail, it is possible to continue driv-
ing with great caution using the fog lamps, pro-
vided traffic laws in your area do not prohibit
this.Have work on the xenon lighting system
performed only by your BMW center or a
workshop that works according to BMW repair
procedures with correspondingly trained per-
sonnel. Due to the high voltage present in the
system, there is a danger of fatal injuries when
work is carried out improperly.<
Access to lamps
The illustration shows the left-hand side of the
engine compartment.
1Cover cap for parking and roadside parking
lamps, daytime running lamps
2Sealing cap for turning lamps
*
To remove the covers:
>Parking lamps and roadside parking lamps,
daytime running lamps: turn the cover cap
to the left and remove.
>Turning lamps: turn the sealing cap to the
left and remove.
Parking lamps and roadside parking
lamps, daytime running lamps
H8 bulb, 35 watts
1.Turn the bulb in the direction of the arrow, in
the opposite direction on the other side,
and remove.
Page 271 of 288
Reference 269
At a glance
Controls
Driving tips
Communications
Navigation
Entertainment
Mobility
Destination for navigation
– destination list150
– entering via voice147
– entry144
– selecting from address
book152
– selecting using
information149
– storing151
Destination guidance156
– bypassing route
sections160
– canceling voice
instructions55
– changing specified
route154
– displaying route157
– distance and arrival156
– interrupting156
– starting156
– terminating/continuing156
– voice instructions159
– volume of voice
instructions160
Destination list for
navigation150
Destinations recently driven
to150
"Details" in audio
mode184,190
"Dial" for mobile phone201
"Dial number"201
"Diamond button"55
Diamond button54
Digital clock78
Digital radio, refer to High
Definition Radio176
Dimensions255
Directional indicators, refer to
Turn signals67
Direction instructions, refer to
Voice instructions159
Directory, refer to Phone
book202
Directory for navigation, refer
to Address book151
Direct selection buttons21
Displacement, refer to Engine
data254"Display"88
Display, refer to iDrive
controls16
Display elements, refer to
Instrument cluster12
Displaying vehicle data215
Display lighting, refer to
Instrument lighting112
"Display off"21
Displays
– on Control Display, refer to
iDrive16
– refer to Instrument
cluster12
"Display settings"88,103
Displays on the windshield,
refer to Head-Up
Display102
Disposal
– battery of remote control
with comfort access40
– coolant233
– vehicle battery245
Distance, refer to
Computer80
Distance control, refer to
Active cruise control70
"Distance to dest."80
Distance to destination, refer
to Computer80
Distance warning, refer to
PDC Park Distance
Control90
Divided rear backrest, refer to
Through-loading
system127
Door entry lighting112
Door key, refer to Keys/
remote control28
Door lock32
Door locking, confirmation
signals31
"Door locks"30
Doors
– manual operation32
– remote control30
DOT Quality Grades226
Draft-free ventilation118Drinks holder, refer to Cup
holders125
"Driver's door only"30
Driving lamps, refer to Parking
lamps/low beams108
Driving route, refer to
Displaying route157
Driving stability control
systems91
Driving through water136
Driving tips, refer to General
driving notes134
Dry air, refer to Cooling
function117
Drying the air, refer to Cooling
function117
DSC Dynamic Stability
Control92
– indicator lamp13,92
– malfunction94
DTC Dynamic Traction
Control92
– activating92
– indicator lamp13,93
DVD for navigation
142
Dynamic Drive94
Dynamic Driving Control66
"Dynamic route" for
navigation154
Dynamic Stability Control
DSC92
Dynamic Traction Control
DTC92
E
Easy entry/exit54
– backrest width47
Eject button, refer to Buttons
in area of CD player168
Electrical malfunction
– door lock32
– driver's door32
– fuel filler door218
– glass sunroof, electric42
– luggage compartment lid34
– panorama glass sunroof44
– tailgate35