parking BMW 535I 2008 Owners Manual
[x] Cancel search | Manufacturer: BMW, Model Year: 2008, Model line: 535I, Model: BMW 535I 2008Pages: 288, PDF Size: 7.03 MB
Page 12 of 288
Cockpit
10
Cockpit
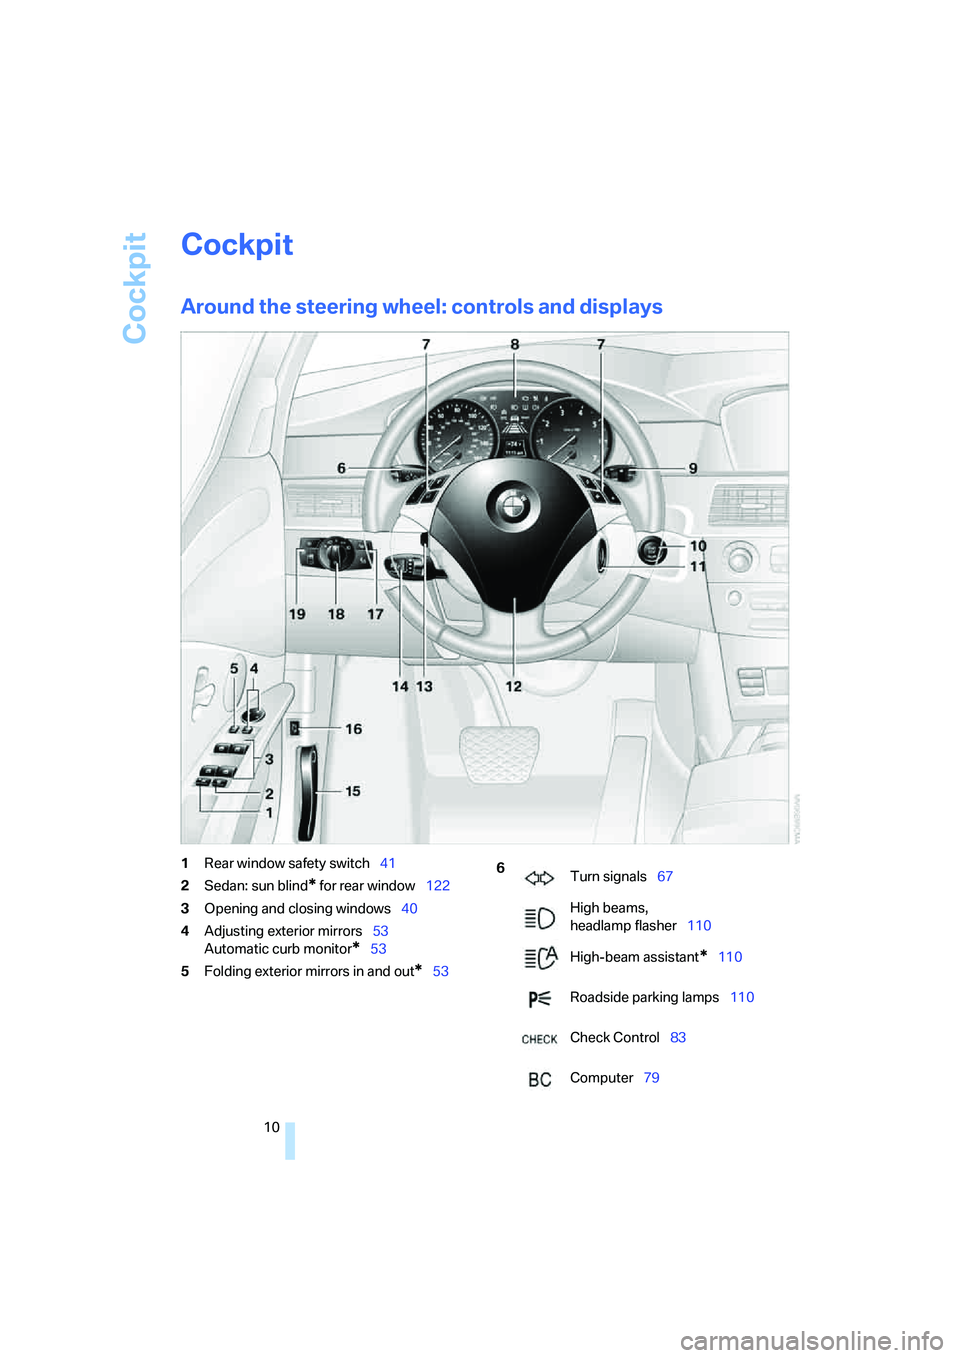
Around the steering wheel: controls and displays
1Rear window safety switch41
2Sedan: sun blind
* for rear window122
3Opening and closing windows40
4Adjusting exterior mirrors53
Automatic curb monitor
*53
5Folding exterior mirrors in and out
*53
6
Turn signals67
High beams,
headlamp flasher110
High-beam assistant
*110
Roadside parking lamps110
Check Control83
Computer79
Page 13 of 288
At a glance
11Reference
Controls
Driving tips
Communications
Navigation
Entertainment
Mobility
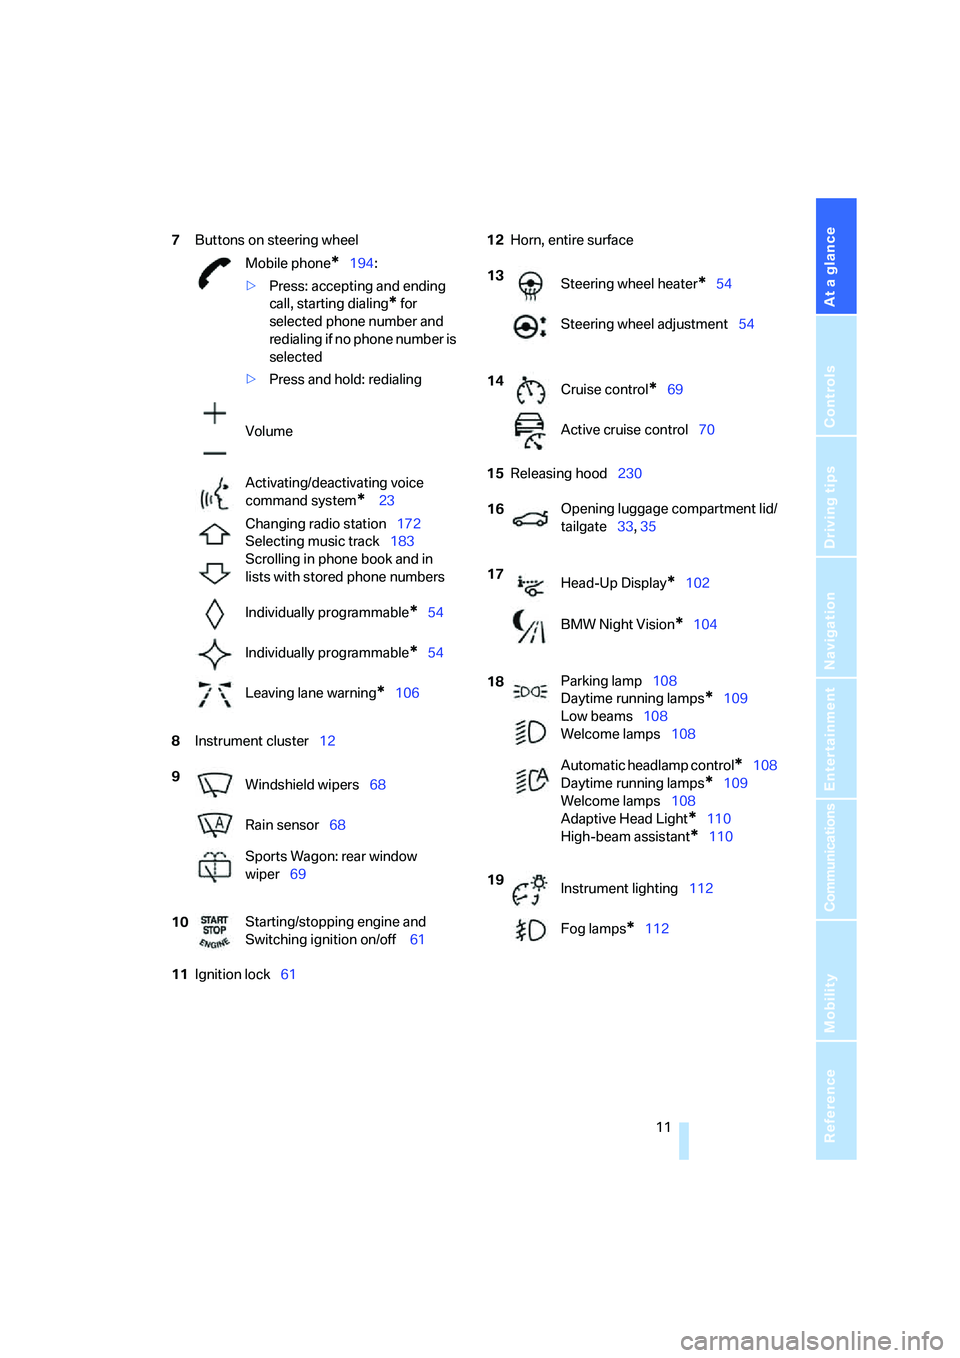
7Buttons on steering wheel
8Instrument cluster12
11Ignition lock6112Horn, entire surface
15Releasing hood230 Mobile phone
*194:
>Press: accepting and ending
call, starting dialing
* for
selected phone number and
redialing if no phone number is
selected
>Press and hold: redialing
Volume
Activating/deactivating voice
command system
* 23
Changing radio station172
Selecting music track183
Scrolling in phone book and in
lists with stored phone numbers
Individually programmable
*54
Individually programmable
*54
Leaving lane warning
*106
9
Windshield wipers68
Rain sensor68
Sports Wagon: rear window
wiper69
10Starting/stopping engine and
Switching ignition on/off 61
13
Steering wheel heater*54
Steering wheel adjustment54
14
Cruise control
*69
Active cruise control70
16Opening luggage compartment lid/
tailgate33, 35
17
Head-Up Display
*102
BMW Night Vision
*104
18Parking lamp108
Daytime running lamps
*109
Low beams108
Welcome lamps108
Automatic headlamp control
*108
Daytime running lamps
*109
Welcome lamps108
Adaptive Head Light
*110
High-beam assistant
*110
19
Instrument lighting112
Fog lamps
*112
Page 33 of 288
Controls
31Reference
At a glance
Driving tips
Communications
Navigation
Entertainment
Mobility
Do not lock the vehicle from the outside if
persons are inside, as unlocking from the
inside is not possible without special knowl-
edge.<
Switching on interior lamps
With vehicle locked:
Press the button.
You can also use this function to locate your
vehicle in parking garages etc.
Panic mode*
You can trigger the alarm system in case of dan-
ger:
Press the button for at least 3 seconds.
Switching off alarm: press any button.
Sedan: opening luggage
compartment lid
Press the button for approx. 1 second.
The luggage compartment lid opens, regard-
less of whether it was previously locked or
unlocked.
During opening, the luggage compart-
ment lid pivots back and up. Make sure
that adequate clearance is available before
opening.
To prevent accidentally locking yourself out,
never lay the remote control in the cargo bay. A
previously locked luggage compartment lid is
also locked again after closing.<
Sports Wagon: unlocking tailgate
Press the button for approx. 1 second.
The tailgate will open slightly, regardless of
whether it was previously locked or unlocked.
During opening, the tailgate pivots back
and up. Make sure that adequate clear-
ance is available before opening.
To prevent accidentally locking yourself out,
never lay the remote control in the cargo bay. A
previously locked tailgate is also locked again
after closing.
When opening the tailgate, the roll-up cover is
raised.
sure to provide protection around all edges.
Failure to do so could result in damage to the
heating conductors of the rear window.<
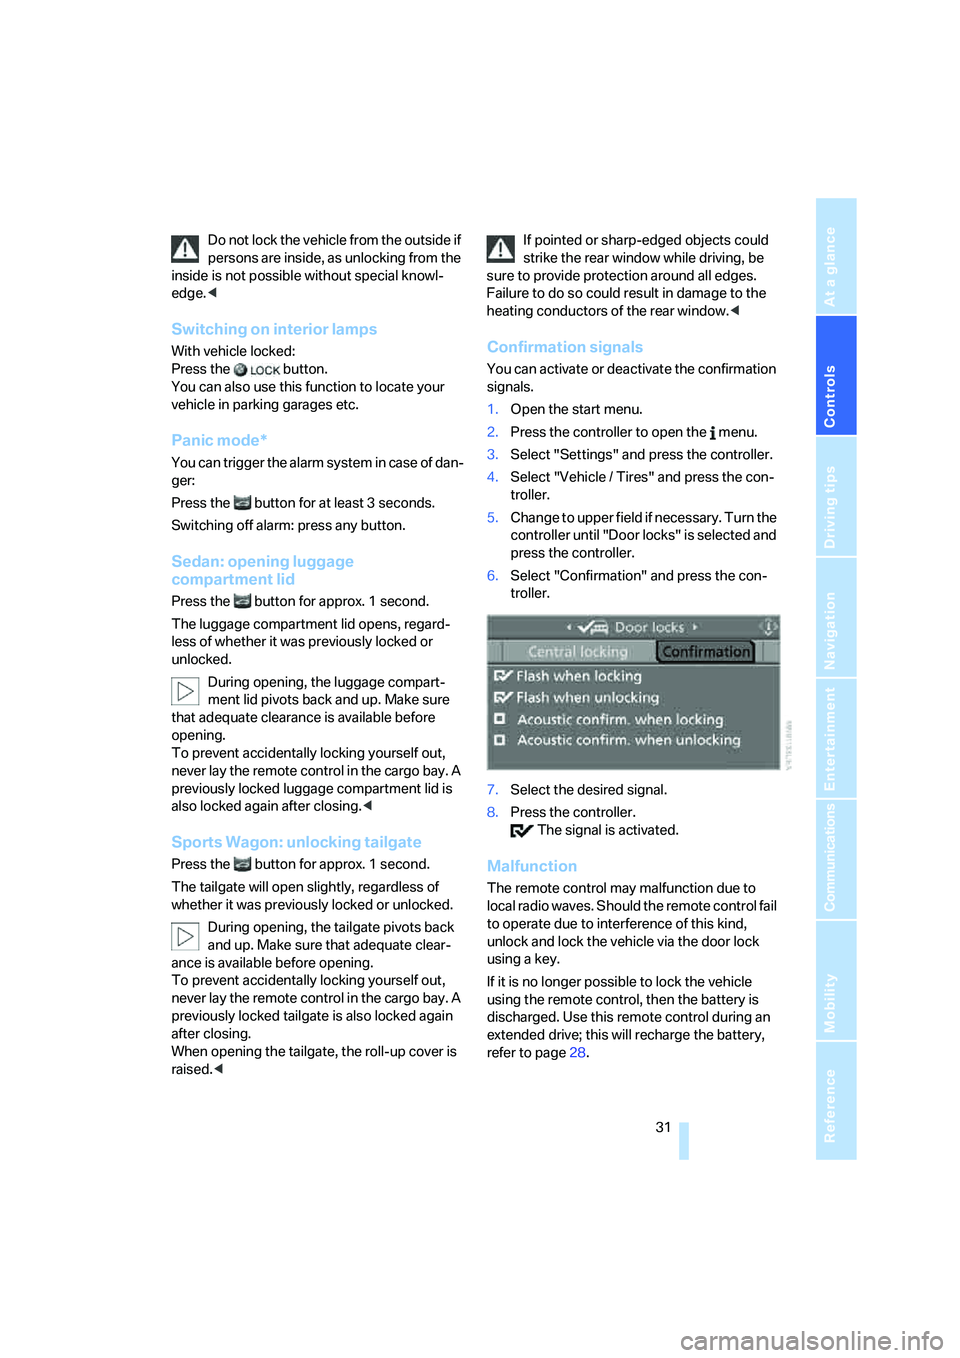
Confirmation signals
You can activate or deactivate the confirmation
signals.
1.Open the start menu.
2.Press the controller to open the menu.
3.Select "Settings" and press the controller.
4.Select "Vehicle / Tires" and press the con-
troller.
5.Change to upper field if necessary. Turn the
controller until "Door locks" is selected and
press the controller.
6.Select "Confirmation" and press the con-
troller.
7.Select the desired signal.
8.Press the controller.
The signal is activated.
Malfunction
The remote control may malfunction due to
local radio waves. Should the remote control fail
to operate due to interference of this kind,
unlock and lock the vehicle via the door lock
using a key.
If it is no longer possible to lock the vehicle
using the remote control, then the battery is
discharged. Use this remote control during an
extended drive; this will recharge the battery,
refer to page28.
Page 36 of 288
Opening and closing
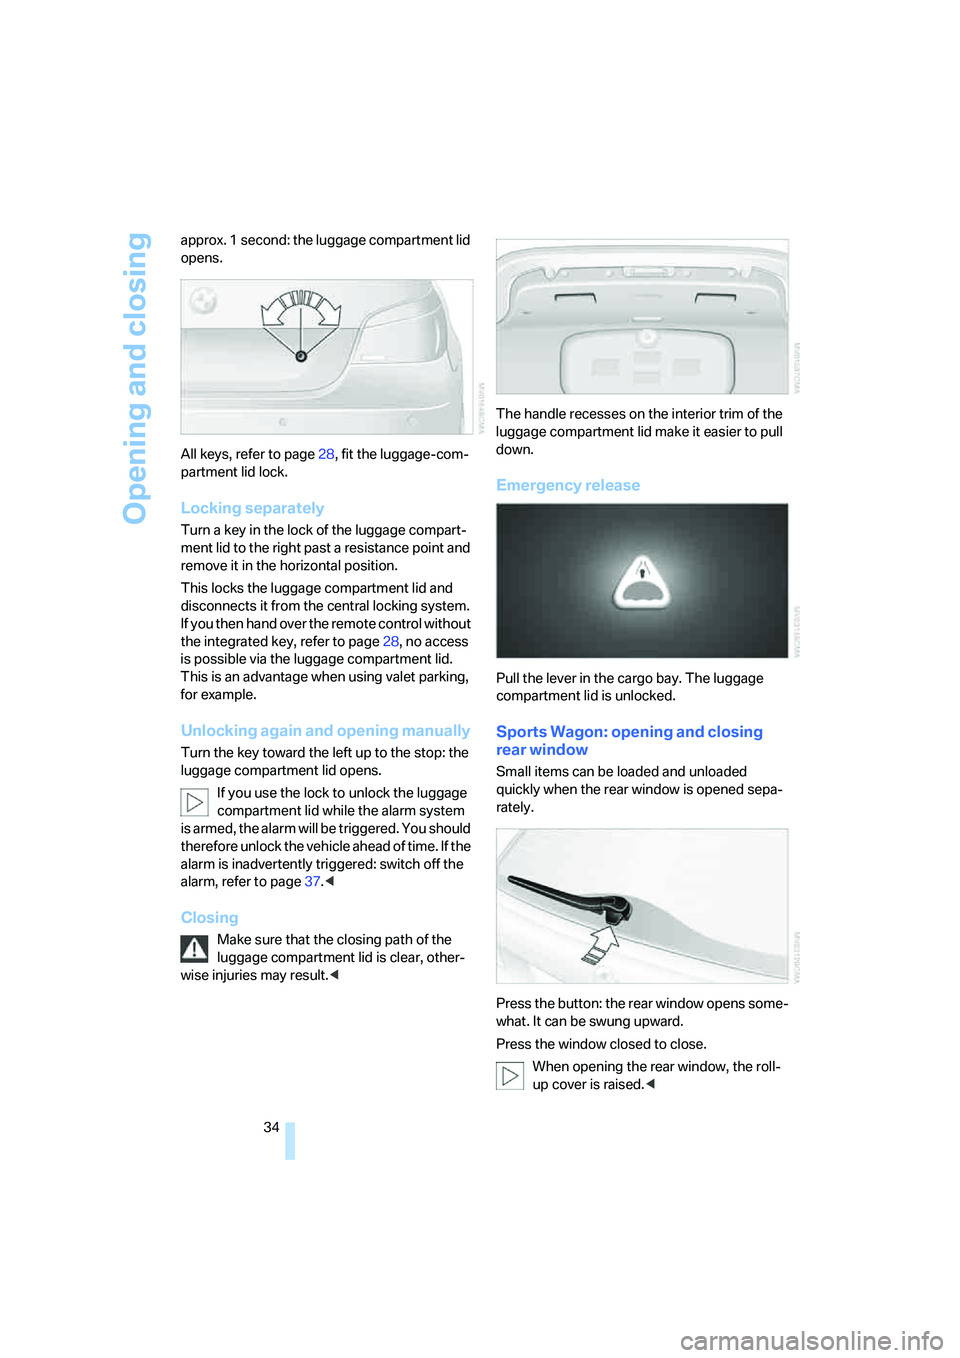
34 approx. 1 second: the luggage compartment lid
opens.
All keys, refer to page28, fit the luggage-com-
partment lid lock.
Locking separately
Turn a key in the lock of the luggage compart-
ment lid to the right past a resistance point and
remove it in the horizontal position.
This locks the luggage compartment lid and
disconnects it from the central locking system.
If you then hand over the remote control without
the integrated key, refer to page28, no access
is possible via the luggage compartment lid.
This is an advantage when using valet parking,
for example.
Unlocking again and opening manually
Turn the key toward the left up to the stop: the
luggage compartment lid opens.
If you use the lock to unlock the luggage
compartment lid while the alarm system
is armed, the alarm will be triggered. You should
therefore unlock the vehicle ahead of time. If the
alarm is inadvertently triggered: switch off the
alarm, refer to page37.<
Closing
Make sure that the closing path of the
luggage compartment lid is clear, other-
wise injuries may result.
down.
Emergency release
Pull the lever in the cargo bay. The luggage
compartment lid is unlocked.
Sports Wagon: opening and closing
rear window
Small items can be loaded and unloaded
quickly when the rear window is opened sepa-
rately.
Press the button: the rear window opens some-
what. It can be swung upward.
Press the window closed to close.
When opening the rear window, the roll-
up cover is raised.<
Page 64 of 288
Driving
62
Radio readiness and ignition
switched off
All indicator and warning lamps in the instru-
ment cluster go out.
Starting engine
Do not run the engine in closed rooms,
otherwise the inhalation of toxic exhaust
gases can cause unconsciousness and death.
The exhaust gases contain carbon monoxide,
an odorless and colorless, but highly toxic gas.
Never leave an unattended vehicle with the
engine running, as such a vehicle represents a
potential safety hazard.
Before leaving the vehicle with the engine run-
ning, select the idling position, or shift the trans-
mission into position P and firmly apply the
handbrake, otherwise the vehicle can begin to
roll.<
Avoid frequent starting in quick succes-
sion or repeated starting attempts in
which the engine does not start. Otherwise, the
fuel is not burned or inadequately burned and
there is a danger of overheating and damaging
the catalytic converter.<
Do not allow the engine to warm up by leaving it
running while the vehicle remains stationary.
Instead, begin to drive at a moderate engine
speed.
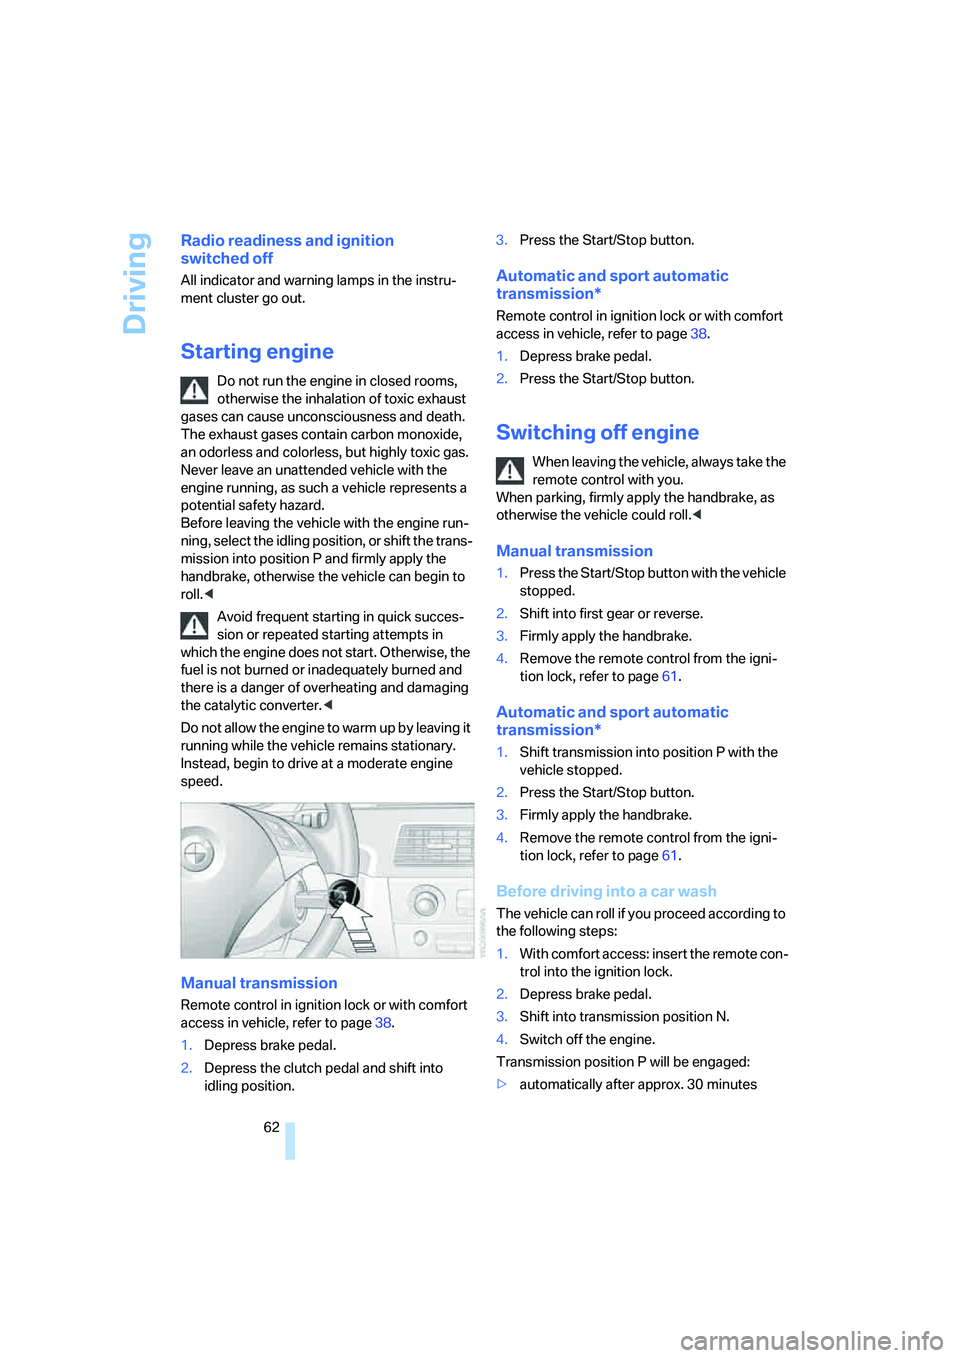
Manual transmission
Remote control in ignition lock or with comfort
access in vehicle, refer to page38.
1.Depress brake pedal.
2.Depress the clutch pedal and shift into
idling position.3.Press the Start/Stop button.
Automatic and sport automatic
transmission*
Remote control in ignition lock or with comfort
access in vehicle, refer to page38.
1.Depress brake pedal.
2.Press the Start/Stop button.
Switching off engine
When leaving the vehicle, always take the
remote control with you.
When parking, firmly apply the handbrake, as
otherwise the vehicle could roll.<
Manual transmission
1.Press the Start/Stop button with the vehicle
stopped.
2.Shift into first gear or reverse.
3.Firmly apply the handbrake.
4.Remove the remote control from the igni-
tion lock, refer to page61.
Automatic and sport automatic
transmission*
1.Shift transmission into position P with the
vehicle stopped.
2.Press the Start/Stop button.
3.Firmly apply the handbrake.
4.Remove the remote control from the igni-
tion lock, refer to page61.
Before driving into a car wash
The vehicle can roll if you proceed according to
the following steps:
1.With comfort access: insert the remote con-
trol into the ignition lock.
2.Depress brake pedal.
3.Shift into transmission position N.
4.Switch off the engine.
Transmission position P will be engaged:
>automatically after approx. 30 minutes
Page 67 of 288
Controls
65Reference
At a glance
Driving tips
Communications
Navigation
Entertainment
Mobility
When the selector lever is pressed forward or
back, the manual mode is activated and the
Steptronic shifts the gear. The instrument clus-
ter shows M1 through M6.
Upshifts and downshifts are only carried out at a
suitable engine and vehicle speed, e.g. a down-
shift is not carried out at excessively high
engine speeds. The selected gear is briefly dis-
played in the instrument cluster, followed by the
current gear.
To resume automatic mode, press the selector
lever to the right.
Manually unlocking and locking
transmission lock
In case of a power failure, e.g. when the battery
is drained or disconnected, or an electrical fault,
manually release the transmission lock, as oth-
erwise the rear wheels are blocked and the
vehicle cannot be towed.
Only manually release the transmission lock for
towing and firmly apply the handbrake before-
hand so that the vehicle cannot roll. Reengage
the transmission lock after parking the vehicle
at its destination.
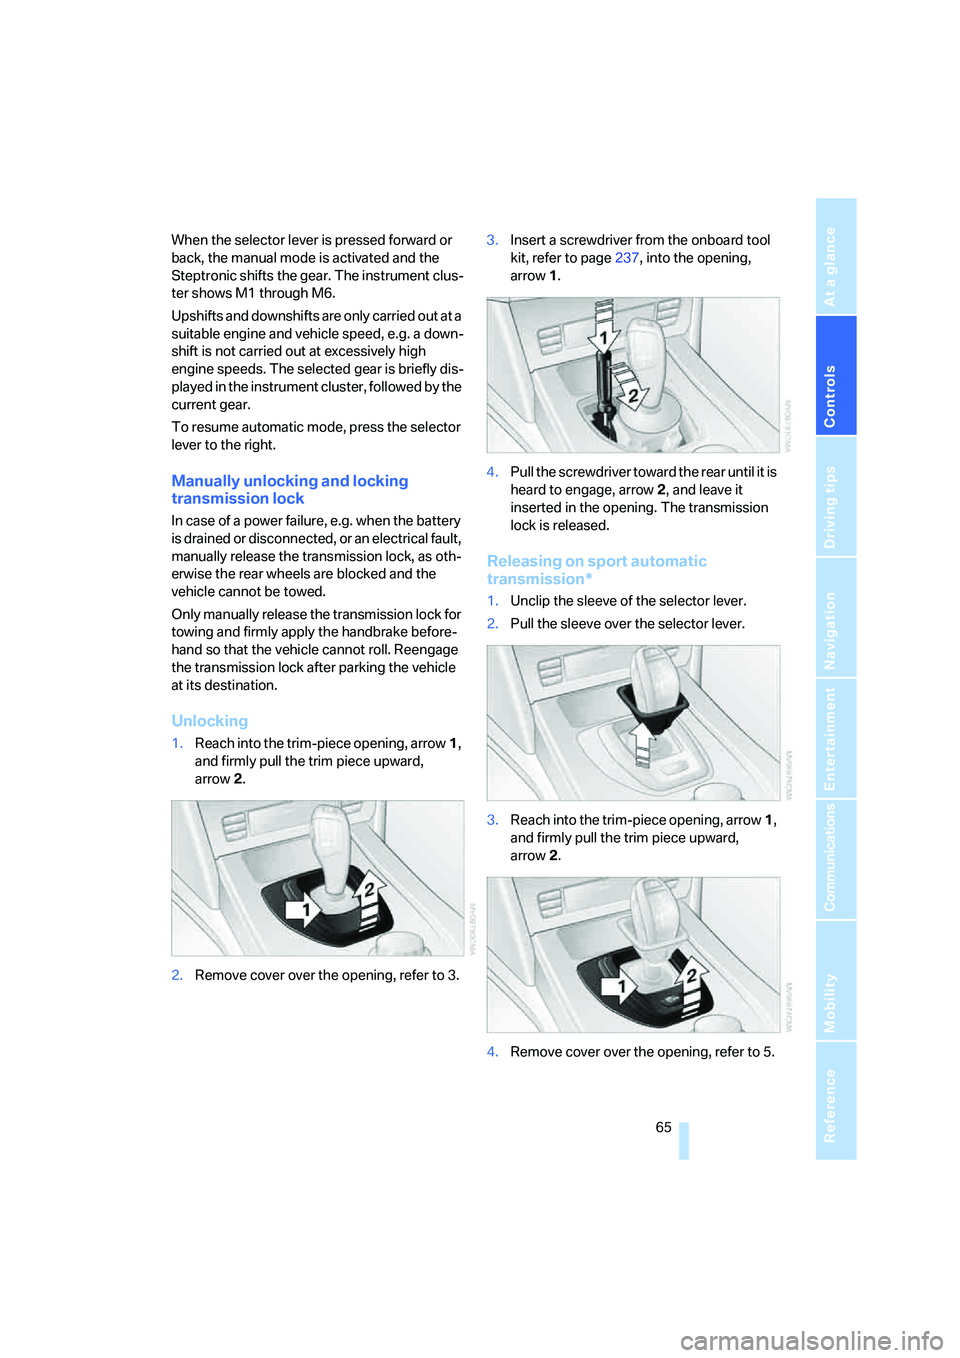
Unlocking
1.Reach into the trim-piece opening, arrow1,
and firmly pull the trim piece upward,
arrow2.
2.Remove cover over the opening, refer to 3.3.Insert a screwdriver from the onboard tool
kit, refer to page237, into the opening,
arrow1.
4.Pull the screwdriver toward the rear until it is
heard to engage, arrow2, and leave it
inserted in the opening. The transmission
lock is released.
Releasing on sport automatic
transmission*
1.Unclip the sleeve of the selector lever.
2.Pull the sleeve over the selector lever.
3.Reach into the trim-piece opening, arrow1,
and firmly pull the trim piece upward,
arrow2.
4.Remove cover over the opening, refer to 5.
Page 73 of 288
Controls
71Reference
At a glance
Driving tips
Communications
Navigation
Entertainment
Mobility
In addition to holding a steady cruising speed, if
you encounter slower vehicles ahead, active
cruise control will, within limits, adjust your
vehicle's speed automatically so that you can
flow with the traffic without having to make con-
stant adjustments. If, for example, while cruis-
ing at the selected speed, you begin to
approach a slower vehicle ahead of you in the
same lane, the system will reduce your vehicle's
speed to the same as that of the vehicle ahead
to maintain your selected distance setting. You
can vary the following distance, which will vary
with speed. Based on your selected distance
setting, the system automatically decreases the
throttle setting and lightly applies the brakes if
necessary. In addition, if the vehicle ahead of
you slows to a complete stop, the system can
follow this action within the given scope and
can also accelerate from a complete stop if the
vehicle ahead of you drives off again shortly
thereafter. During braking, your vehicle brake
lamps will automatically illuminate to alert a fol-
lowing driver to take action. In addition, it may
be necessary for your vehicle to downshift the
automatic transmission to maintain the dis-
tance setting selected. As soon as the road in
front of you has no moving vehicles, the system
will accelerate to your desired speed. This set
speed is also maintained on downhill grades,
however the vehicle speed can drop below the
set speed when driving uphill if the engine out-
put is not sufficient.
Active cruise control cannot detect stop
signs, red lights, or any object that is
stopped or is blocking the road.
Active cruise control is not and must not be
used as a collision avoidance/warning system.
Since this active cruise control system is a new
technology and operates differently from con-
ventional cruise control systems which you may
be accustomed to, it is necessary that you read
all of the pages relating to this system before
use. Carefully read and observe the information
on the system limitations beginning on page75
to obtain a good command of the system and its
range of applications.
the brake pedal, a somewhat different braking
feel results.
Professional* navigation system
If a navigation DVD is in the drive, refer to
page142, within limits the system adjusts the
accelerating and braking behavior of the vehicle
to the road you are driving on.
To ensure that the system is informed of
the current course of the road, always use
the latest navigation DVD if possible.<
When the vehicle position is unknown, e. g.
when you leave the map area, this influence of
the navigation system is not available.
Applications
Please try the system first during sparse traffic
and clear road conditions so that you can get
used to the system. After you have experience
and understand the system, only then use it
during normal traffic.
As with conventional cruise control systems,
active cruise control in no way reduces or sub-
stitutes for the driver's own personal experi-
ence, responsibility, alertness and awareness in
adjusting speed, braking or otherwise control-
ling the vehicle. The driver should decide when
to use the system on the basis of road, traffic,
visibility, and weather conditions. Active cruise
control is intended for use on highway-type
roadways where traffic is moving relatively
smoothly as well as in slow-moving traffic. Do
not use the system in city driving; in complex
driving situations; heavy traffic such as during
rush hour; on curvy, winding roads, slippery
roads or roads with sharp curves such as high-
way off-ramps; during inclement weather such
as snow, strong rain or fog; or when entering
interchanges, service/parking areas or toll
booths. It is also important to regulate your
vehicle's speed and distance setting within
applicable legal limits. Always be ready to take
action or apply the brakes if necessary, espe-
cially when the system is actively following a
vehicle in front of you. Otherwise, driving condi-
Page 77 of 288
Controls
75Reference
At a glance
Driving tips
Communications
Navigation
Entertainment
Mobility
System limitations
As with conventional cruise control sys-
tems, active cruise control in no way
diminishes or substitutes for the driver's own
personal responsibility, alertness and aware-
ness in adjusting speed, braking or otherwise
controlling the vehicle. The driver should
decide when to use the system on the basis of
road, traffic, visibility, and weather conditions.
Active cruise control is intended for use on
highway-type roadways where traffic is moving
relatively smoothly. Do not use this system in
city driving; in complex driving situations; on
curvy, winding roads, slippery roads or roads
with sharp curves such as highway off-ramps;
during inclement weather such as snow, strong
rain or fog; or when entering interchanges, ser-
vice/parking areas or toll booths. It is also
important to regulate your vehicle's speed and
distance setting within applicable legal limits.
Always be ready to take action or apply the
brakes if necessary, especially when the sys-
tem is actively following a vehicle in front of
you.<
Always remember that the range and abil-
ity of the system do have physical limita-
tions. For example, the system may not detect
vehicles driving ahead if they suddenly brake
heavily in stop-and-go traffic during accelera-
tion. The system will not apply the brakes or
slow your vehicle when a very slow-moving
vehicle, stopped vehicle or stationary object is
in the lane ahead of you, for example when
approaching a traffic light or parked vehicle or
when a vehicle is stalled in your lane. Also, the
system does not react to oncoming traffic,
pedestrians or other types of potential traffic
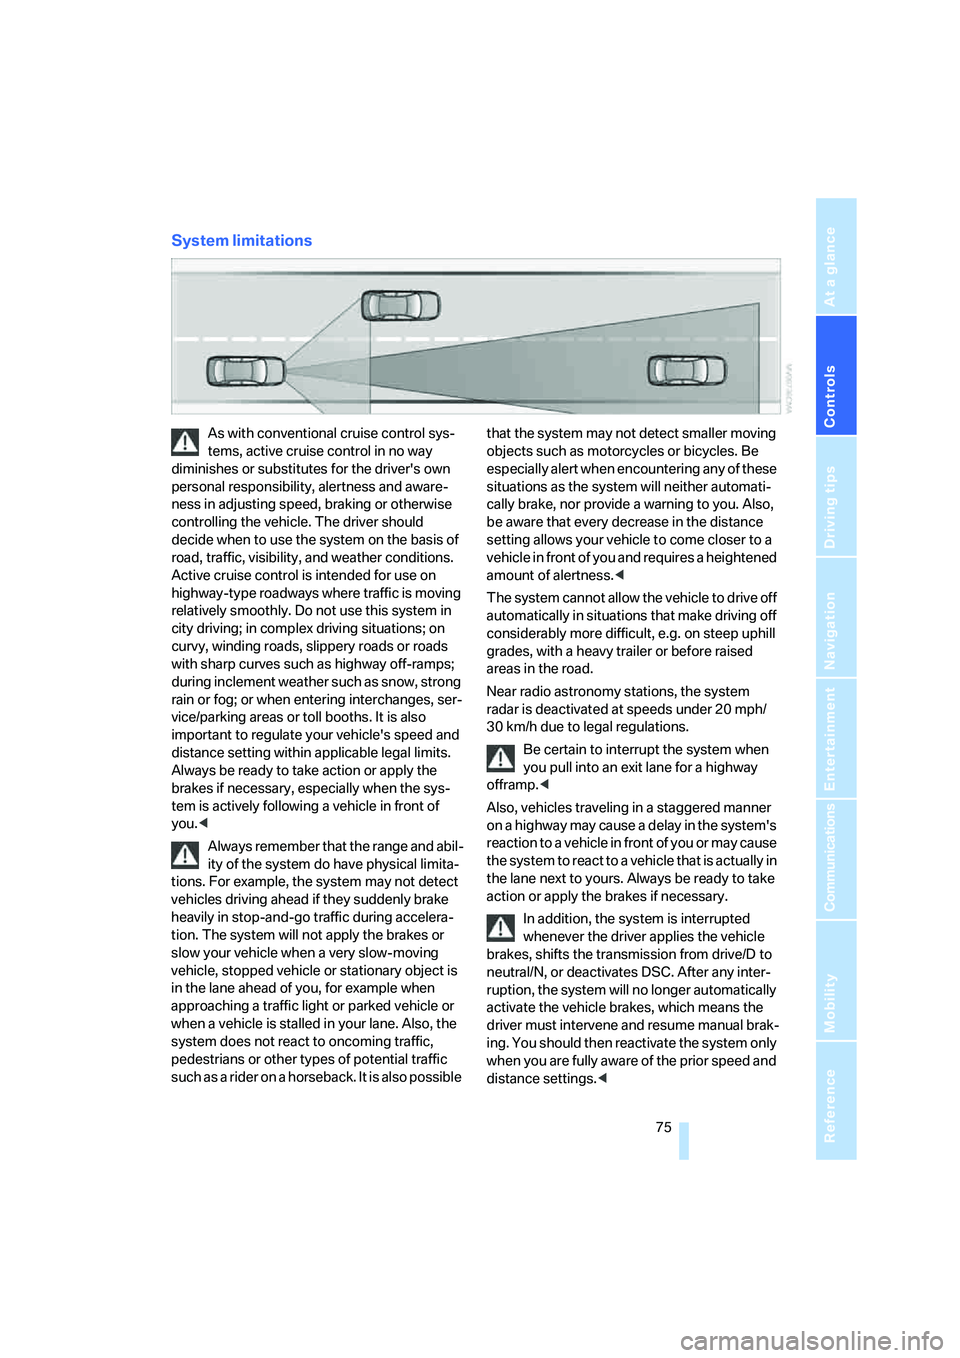
such as a rider on a horseback. It is also possible that the system may not detect smaller moving
objects such as motorcycles or bicycles. Be
especially alert when encountering any of these
situations as the system will neither automati-
cally brake, nor provide a warning to you. Also,
be aware that every decrease in the distance
setting allows your vehicle to come closer to a
vehicle in front of you and requires a heightened
amount of alertness.<
The system cannot allow the vehicle to drive off
automatically in situations that make driving off
considerably more difficult, e.g. on steep uphill
grades, with a heavy trailer or before raised
areas in the road.
Near radio astronomy stations, the system
radar is deactivated at speeds under 20 mph/
30 km/h due to legal regulations.
Be certain to interrupt the system when
you pull into an exit lane for a highway
offramp.<
Also, vehicles traveling in a staggered manner
on a highway may cause a delay in the system's
reaction to a vehicle in front of you or may cause
the system to react to a vehicle that is actually in
the lane next to yours. Always be ready to take
action or apply the brakes if necessary.
In addition, the system is interrupted
whenever the driver applies the vehicle
brakes, shifts the transmission from drive/D to
neutral/N, or deactivates DSC. After any inter-
ruption, the system will no longer automatically
activate the vehicle brakes, which means the
driver must intervene and resume manual brak-
ing. You should then reactivate the system only
when you are fully aware of the prior speed and
distance settings.<
Page 92 of 288
Technology for comfort, convenience and safety
90
Technology for comfort, convenience and
safety
PDC Park Distance Control*
The concept
The PDC assists you when you are parking.
Acoustic signals and an optical display
* alert
you to the approach of an object from behind
your vehicle. To measure the distance, there
are four ultrasonic sensors in each bumper.
The range of these sensors is approx. 7 ft/2 m.
However, an acoustic warning first sounds for
the sensors at the front and at the two rear cor-
ners at approx. 24 in/60 cm, and for the center
rear sensors at approx. 5 ft/1.50 m.
PDC is a parking aid that can indicate
objects when they are approached
slowly, as is usually the case when parking.
Avoid approaching an object at high speed, oth-
erwise the physical circumstances would mean
that the system warning was too late.<
Automatic activation
The system starts to operate approx. one sec-
ond after you shift into reverse or move the
selector lever into position R with the engine
running or the ignition switched on.
Wait this short time before driving off.
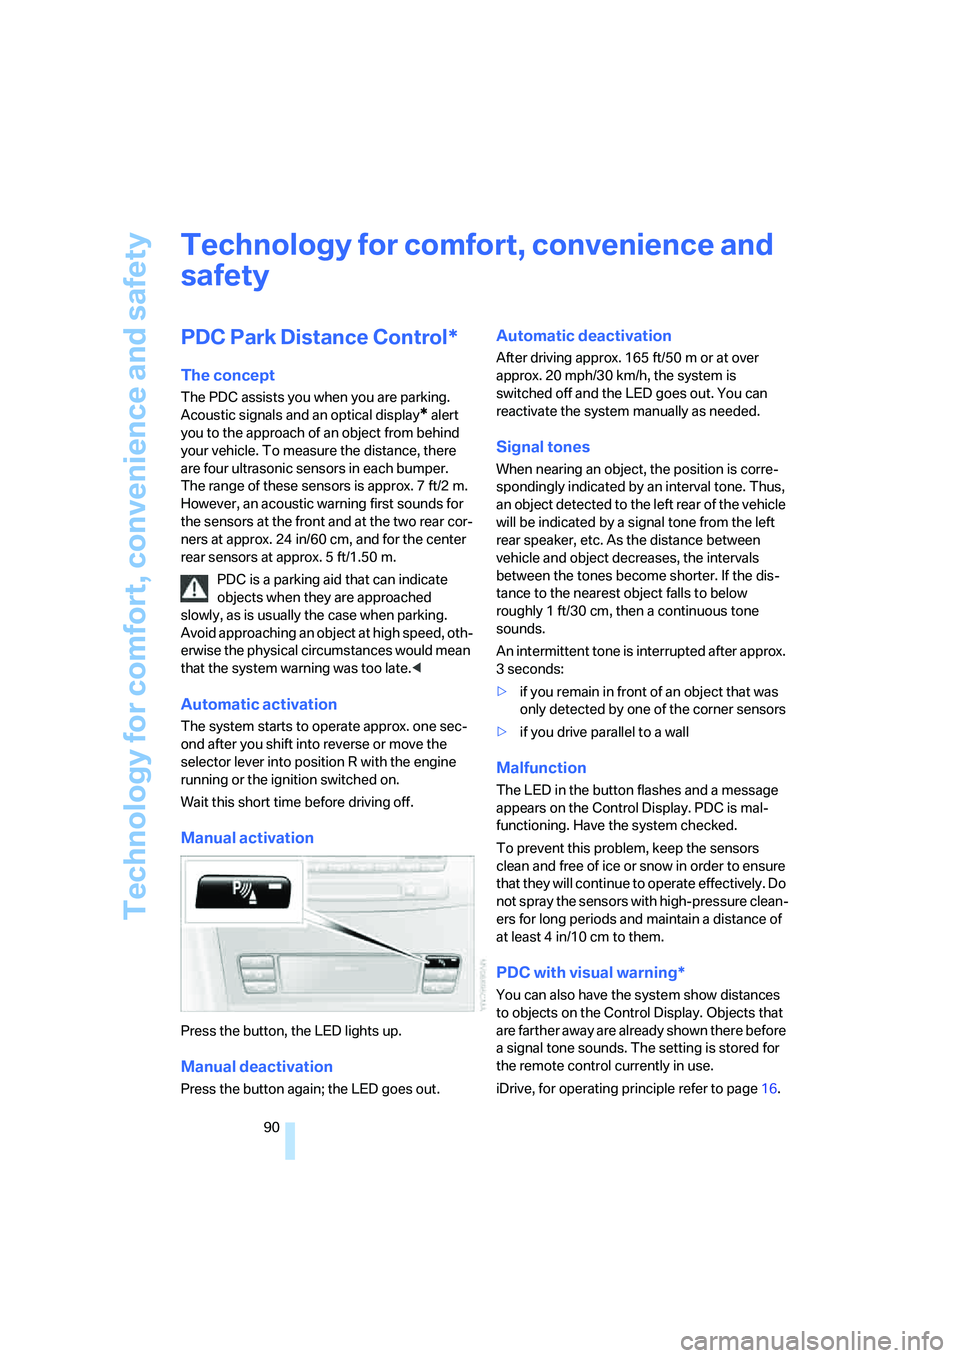
Manual activation
Press the button, the LED lights up.
Manual deactivation
Press the button again; the LED goes out.
Automatic deactivation
After driving approx. 165 ft/50 m or at over
approx. 20 mph/30 km/h, the system is
switched off and the LED goes out. You can
reactivate the system manually as needed.
Signal tones
When nearing an object, the position is corre-
spondingly indicated by an interval tone. Thus,
an object detected to the left rear of the vehicle
will be indicated by a signal tone from the left
rear speaker, etc. As the distance between
vehicle and object decreases, the intervals
between the tones become shorter. If the dis-
tance to the nearest object falls to below
roughly 1 ft/30 cm, then a continuous tone
sounds.
An intermittent tone is interrupted after approx.
3seconds:
>if you remain in front of an object that was
only detected by one of the corner sensors
>if you drive parallel to a wall
Malfunction
The LED in the button flashes and a message
appears on the Control Display. PDC is mal-
functioning. Have the system checked.
To prevent this problem, keep the sensors
clean and free of ice or snow in order to ensure
that they will continue to operate effectively. Do
not spray the sensors with high-pressure clean-
ers for long periods and maintain a distance of
at least 4 in/10 cm to them.
PDC with visual warning*
You can also have the system show distances
to objects on the Control Display. Objects that
are farther away are already shown there before
a signal tone sounds. The setting is stored for
the remote control currently in use.
iDrive, for operating principle refer to page16.
Page 101 of 288
Controls
99Reference
At a glance
Driving tips
Communications
Navigation
Entertainment
Mobility
Drive reservedly and do not exceed a
speed of 50 mph/80 km/h. In the event of
pressure loss, vehicle handling changes. This
includes reduced tracking stability in braking,
extended braking distance and altered natural
steering characteristics.
If unusual vibrations or loud noises occur while
the vehicle is being driven, this can indicate final
failure of the damaged tire. Reduce speed and
stop at a suitable location as soon as possible,
otherwise pieces of the tire could become
detached and cause an accident. Do not con-
tinue driving, but instead contact your BMW
center.<
Malfunction
The yellow warning lamp flashes and
then lights up continuously. The tires
are shown in gray on the Control Dis-
play and a message is displayed. No flat tire can
be detected.
A message like this is displayed in the following
situations:
>In case of a malfunction;
have the system checked.
>If a wheel is mounted without TPM elec-
tronics
>If TPM is temporarily interfered with by
other systems or devices which use the
same radio frequency.
Declaration according to NHTSA/
FMVSS 138 Tire Pressure Monitoring
Systems
Each tire, including the spare, should be
checked monthly when cold and inflated to the
inflation pressure recommended by the vehicle
manufacturer on the vehicle placard or tire infla-
tion pressure label. If your vehicle has tires of a
different size than the size indicated on the
vehicle placard or tire inflation pressure label,
you should determine the proper tire inflation
pressure for those tires. As an added safety fea-
ture, your vehicle has been equipped with a tire
pressure monitoring system, TPMS, that illumi-
nates a low tire pressure telltale when one or
more of your tires are significantly under-inflated. Accordingly, when the low tire pres-
sure telltale illuminates, you should stop and
check your tires as soon as possible, and inflate
them to the proper pressure. Driving on a signif-
icantly under-inflated tire causes the tire to
overheat and can lead to tire failure. Underinfla-
tion also reduces fuel efficiency and tire tread
life, and may affect the vehicle's handling and
stopping ability. Please note that the TPMS is
not a substitute for proper tire maintenance,
and it is the driver's responsibility to maintain
correct tire pressure, even if underinflation has
not reached the level to trigger illumination of
the TPMS low tire pressure telltale.
The TPMS malfunction indicator is combined
with the low tire pressure telltale. When the sys-
tem detects a malfunction, the telltale will flash
for approximately one minute and then remain
continuously illuminated. This sequence will
continue upon subsequent vehicle startups as
long as the malfunction exists. When the mal-
function indicator lights up, the system may not
be able to detect or signal low tire pressure as
intended. TPMS malfunctions may occur for a
variety of reasons, including the installation of
replacement or alternate tires or wheels on the
vehicle that prevent the TPMS from functioning
properly. Always check the TPMS malfunction
telltale after replacing one or more tires or
wheels on your vehicle to ensure that the
replacement or alternate tires and wheels allow
the TPMS to continue to function properly.
Active steering*
The concept
The active steering is a system that actively var-
ies the steering angle of the front wheels in rela-
tion to the steering wheel movements.
When you are driving in the low road speed
range, e. g. in a town or when parking, the steer-
ing angle increases, i.e. the steering becomes
very direct. In the higher speed range, on the
other hand, the steering angle is reduced more
and more. This improves the handling capability
of your BMW over the entire speed range.