Page 237 BMW 535I SEDAN 2008 E60 Owner's Manual
[x] Cancel search | Manufacturer: BMW, Model Year: 2008, Model line: 535I SEDAN, Model: BMW 535I SEDAN 2008 E60Pages: 288, PDF Size: 7.03 MB
Page 5 of 288
Reference
At a glance
Controls
Driving tips
Communications
Navigation
Entertainment
Mobility
Contents
The fastest way to find specific topics is to use
the index, refer to page264.
Using this Owner's Manual
4Notes
7Reporting safety defects
At a glance
10Cockpit
16iDrive
23Voice command system
Controls
28Opening and closing
45Adjusting
56Transporting children safely
61Driving
78Everything under control
90Technology for comfort, convenience
and safety
108Lamps
114Climate
121Practical interior accessories
Driving tips
134Things to remember when driving
Navigation
142Starting navigation system
144Destination entry
156Destination guidance
165What to do if …
Entertainment
168On/off and tone
172Radio
179Satellite radio
182CD player and CD changer
188AUX-In connection
189USB/audio interface
Communications
194Telephoning
209BMW Assist
Mobility
218Refueling
220Wheels and tires
230Under the hood
235Maintenance
237Replacing components
247Giving and receiving assistance
Reference
254Technical data
259Short commands of voice command
system
264Everything from A to Z
Page 44 of 288
Opening and closing
42 In a similar manner, the glass sunroof closes
when you slide the switch forward. The sliding
visor remains open and can be closed by hand.
For information on using the convenient opera-
tion at the door lock or with the remote control,
refer to page30 or32.
For information on comfort closing with comfort
access, refer to page39.
Opening and closing automatically
Briefly press the switch beyond the resistance
point.
The following movements are also automatic:
>Press the switch with the sunroof open: the
sunroof is raised all the way.
>When the sunroof is raised, briefly press the
switch in the opening direction: the sunroof
is opened all the way.
Briefly pressing the switch stops the motion.
Pinch protection system
If the glass sunroof encounters resistance when
closing from roughly the center of the roof
opening or when closing from the raised posi-
tion, the closing action is interrupted and the
glass sunroof reopens a short way.
Despite the pinch protection system,
inspect the sunroof's travel path prior to
closing it, as the safety system might fail to
detect certain kinds of obstructions, such as
very thin objects, and the sunroof would con-
tinue closing.<
Closing without pinch protection
system
In case of danger from outside, slide the switch
forward beyond the resistance point and hold.
The roof closes without the pinch protection
system.
Following interruptions in electrical
power supply
After a power loss, the sunroof may only
respond to the raise command. Then have the
system initialized. BMW recommends having
this work done by your BMW center.
Moving manually*
In the event of an electrical malfunction, you can
move the glass sunroof manually.
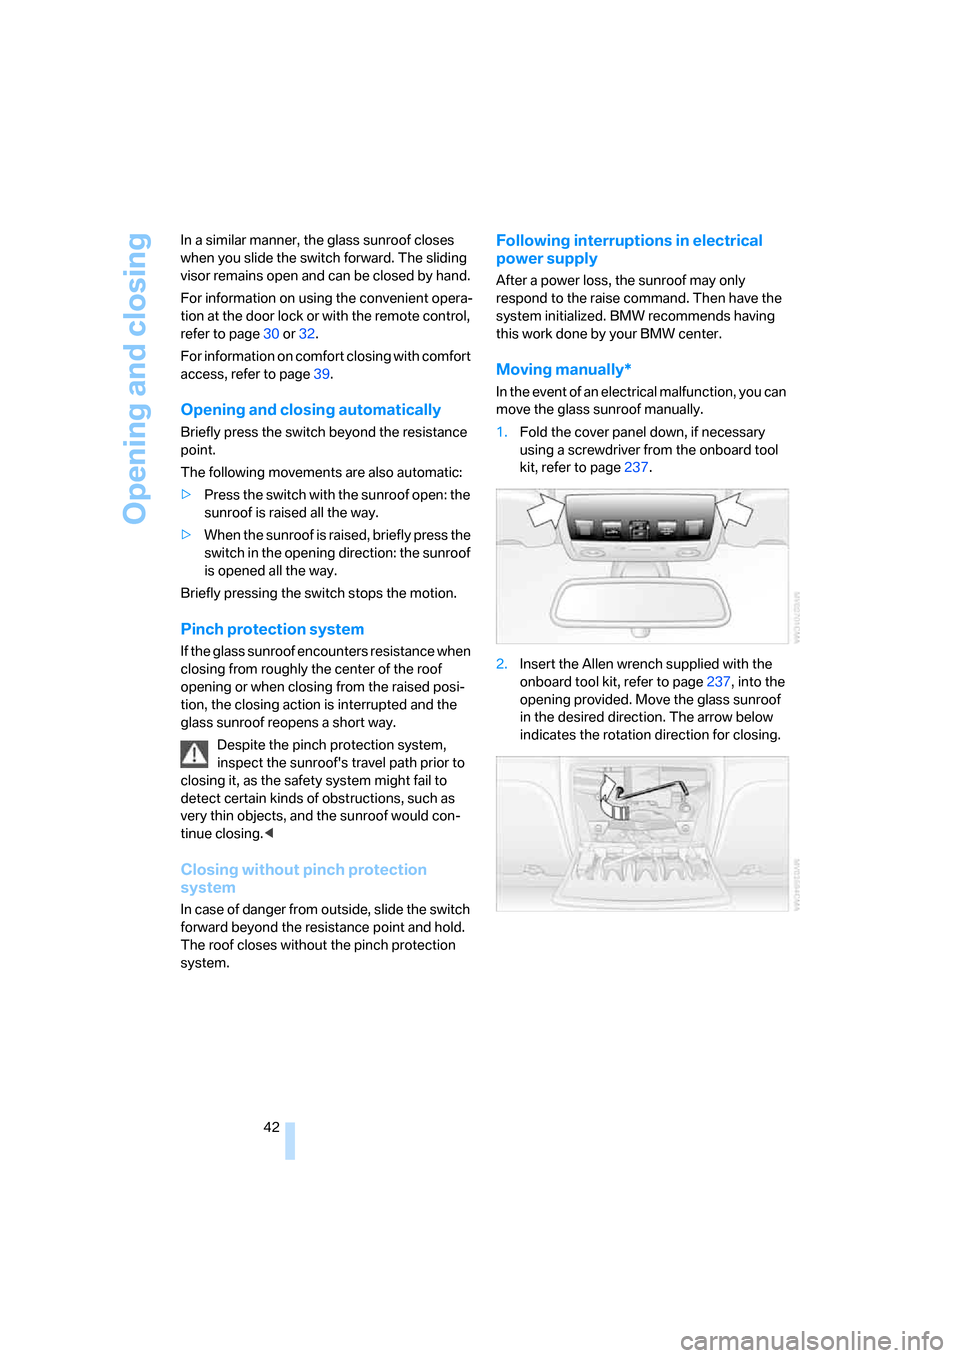
1.Fold the cover panel down, if necessary
using a screwdriver from the onboard tool
kit, refer to page237.
2.Insert the Allen wrench supplied with the
onboard tool kit, refer to page237, into the
opening provided. Move the glass sunroof
in the desired direction. The arrow below
indicates the rotation direction for closing.
Page 46 of 288
Opening and closing
44 very thin objects, and the sunroof would con-
tinue closing.<
Closing without pinch protection
system
In case of danger from outside, slide the switch
forward beyond the resistance point and hold.
The roof closes without the pinch protection
system.
Following interruptions in electrical
power supply
After a power loss, the sunroof may only
respond to the raise command. Then have the
system initialized. BMW recommends having
this work done by your BMW center.
Moving manually*
In the event of an electrical malfunction, you can
move the sunroof manually.
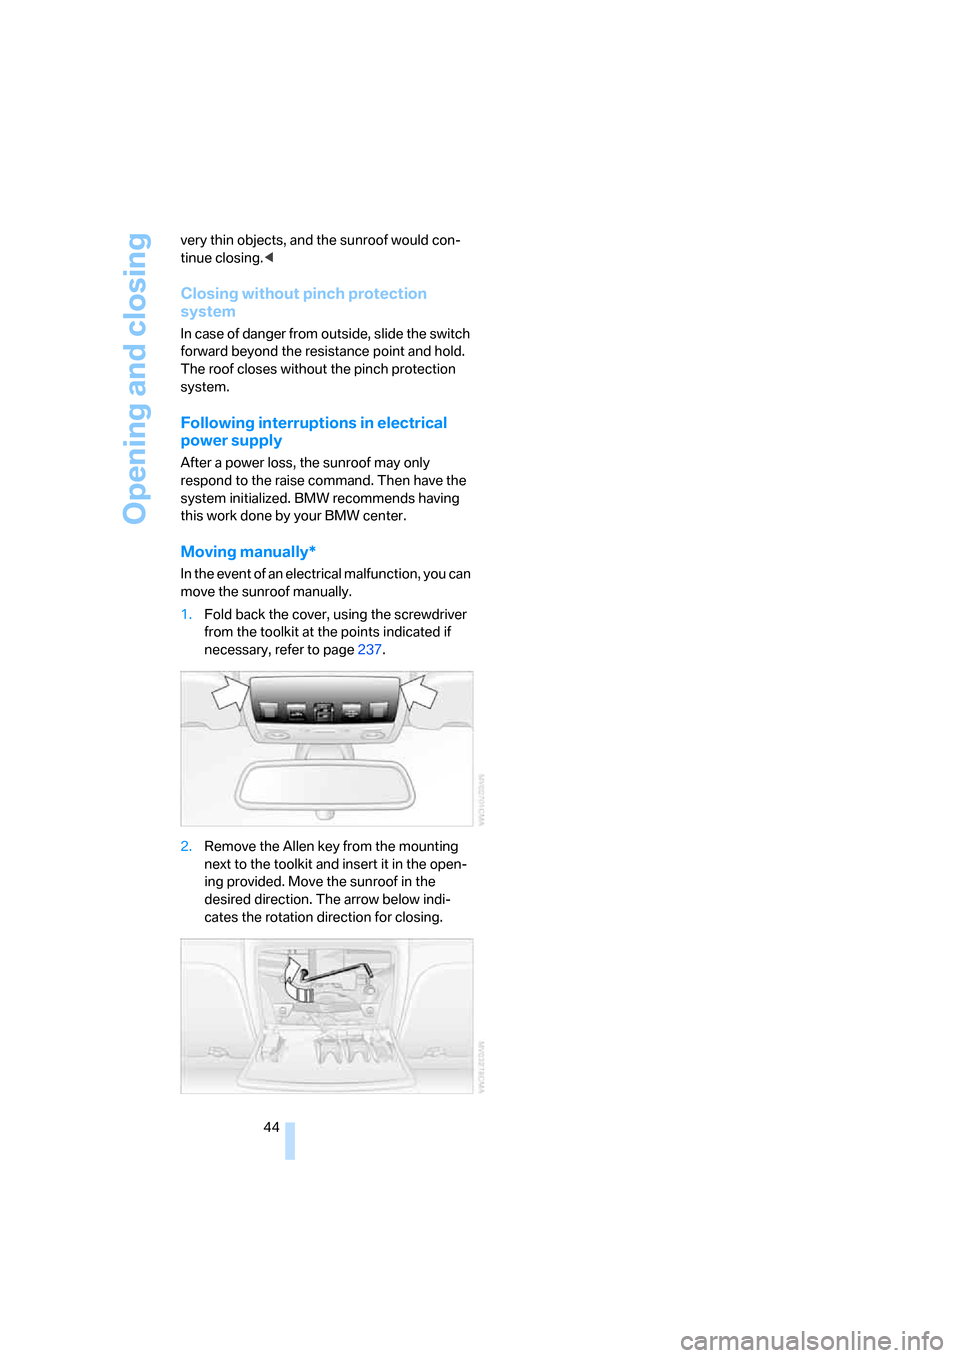
1.Fold back the cover, using the screwdriver
from the toolkit at the points indicated if
necessary, refer to page237.
2.Remove the Allen key from the mounting
next to the toolkit and insert it in the open-
ing provided. Move the sunroof in the
desired direction. The arrow below indi-
cates the rotation direction for closing.
Page 67 of 288
Controls
65Reference
At a glance
Driving tips
Communications
Navigation
Entertainment
Mobility
When the selector lever is pressed forward or
back, the manual mode is activated and the
Steptronic shifts the gear. The instrument clus-
ter shows M1 through M6.
Upshifts and downshifts are only carried out at a
suitable engine and vehicle speed, e.g. a down-
shift is not carried out at excessively high
engine speeds. The selected gear is briefly dis-
played in the instrument cluster, followed by the
current gear.
To resume automatic mode, press the selector
lever to the right.
Manually unlocking and locking
transmission lock
In case of a power failure, e.g. when the battery
is drained or disconnected, or an electrical fault,
manually release the transmission lock, as oth-
erwise the rear wheels are blocked and the
vehicle cannot be towed.
Only manually release the transmission lock for
towing and firmly apply the handbrake before-
hand so that the vehicle cannot roll. Reengage
the transmission lock after parking the vehicle
at its destination.
Unlocking
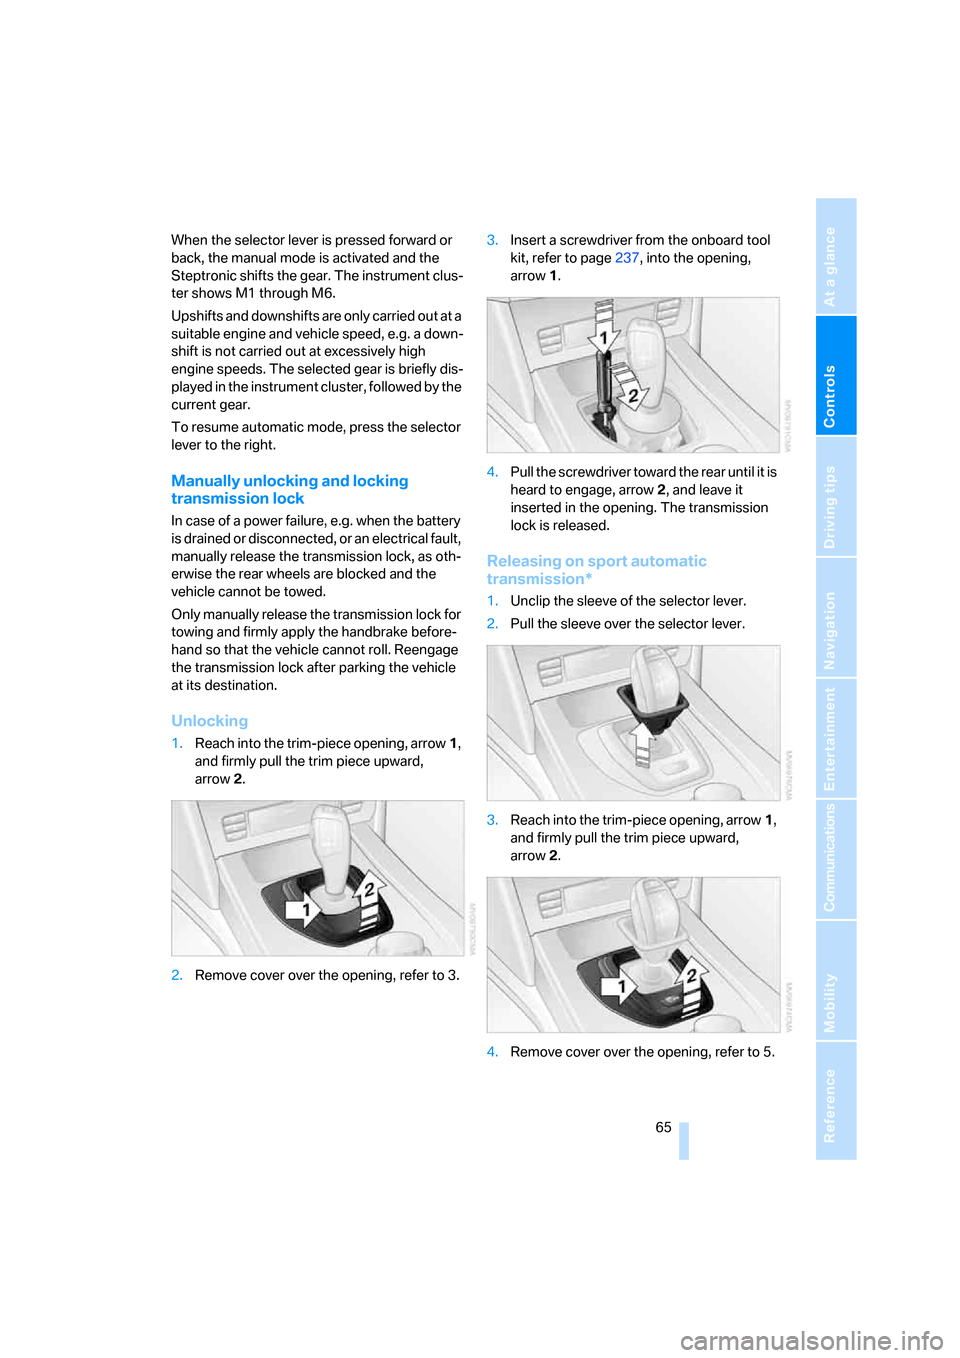
1.Reach into the trim-piece opening, arrow1,
and firmly pull the trim piece upward,
arrow2.
2.Remove cover over the opening, refer to 3.3.Insert a screwdriver from the onboard tool
kit, refer to page237, into the opening,
arrow1.
4.Pull the screwdriver toward the rear until it is
heard to engage, arrow2, and leave it
inserted in the opening. The transmission
lock is released.
Releasing on sport automatic
transmission*
1.Unclip the sleeve of the selector lever.
2.Pull the sleeve over the selector lever.
3.Reach into the trim-piece opening, arrow1,
and firmly pull the trim piece upward,
arrow2.
4.Remove cover over the opening, refer to 5.
Page 68 of 288
Driving
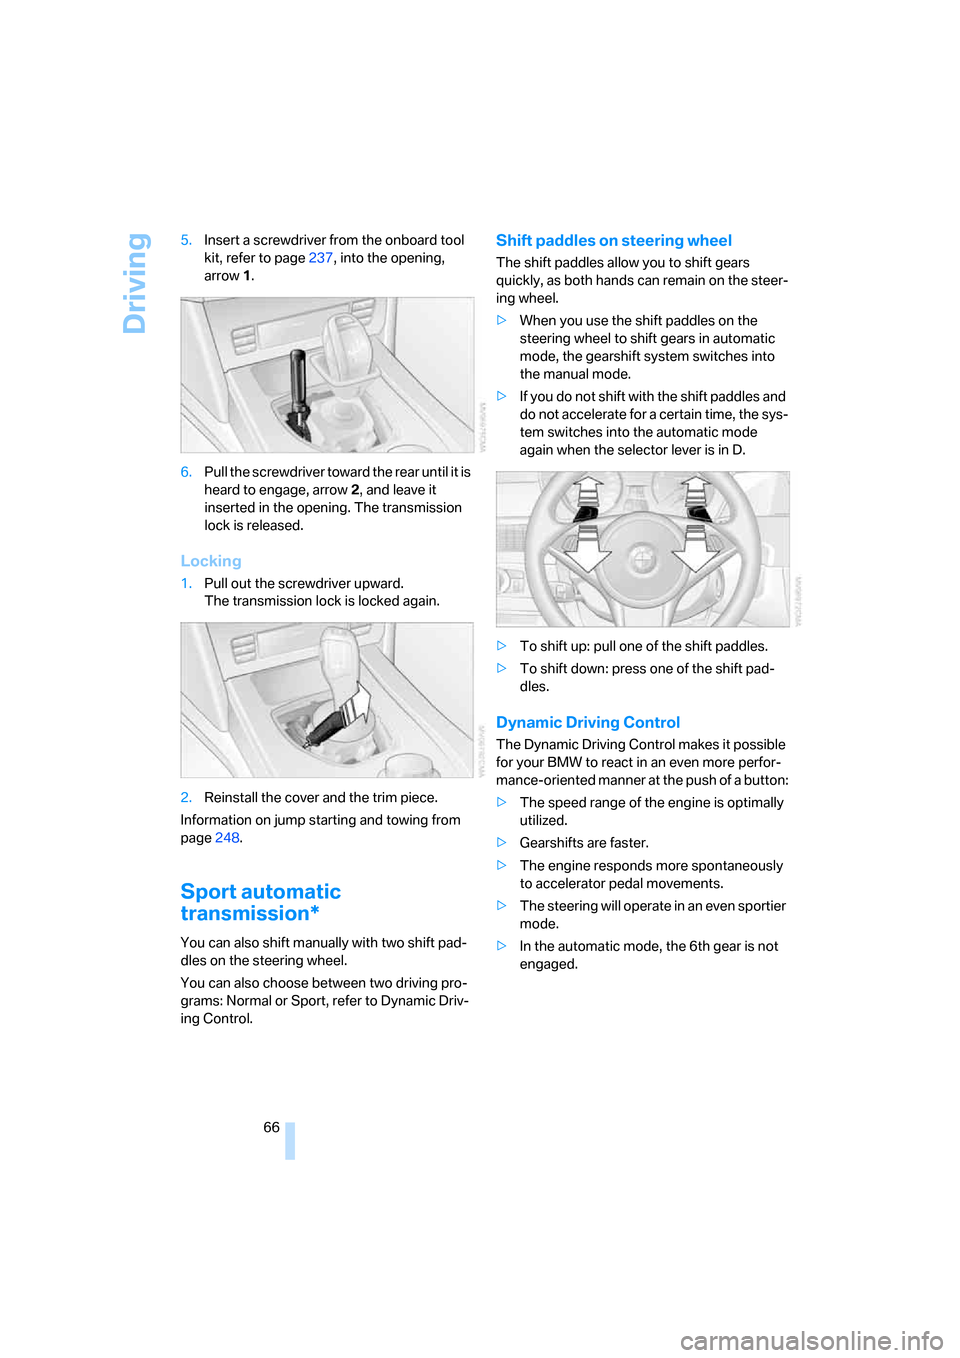
66 5.Insert a screwdriver from the onboard tool
kit, refer to page237, into the opening,
arrow1.
6.Pull the screwdriver toward the rear until it is
heard to engage, arrow2, and leave it
inserted in the opening. The transmission
lock is released.
Locking
1.Pull out the screwdriver upward.
The transmission lock is locked again.
2.Reinstall the cover and the trim piece.
Information on jump starting and towing from
page248.
Sport automatic
transmission*
You can also shift manually with two shift pad-
dles on the steering wheel.
You can also choose between two driving pro-
grams: Normal or Sport, refer to Dynamic Driv-
ing Control.
Shift paddles on steering wheel
The shift paddles allow you to shift gears
quickly, as both hands can remain on the steer-
ing wheel.
>When you use the shift paddles on the
steering wheel to shift gears in automatic
mode, the gearshift system switches into
the manual mode.
>If you do not shift with the shift paddles and
do not accelerate for a certain time, the sys-
tem switches into the automatic mode
again when the selector lever is in D.
>To shift up: pull one of the shift paddles.
>To shift down: press one of the shift pad-
dles.
Dynamic Driving Control
The Dynamic Driving Control makes it possible
for your BMW to react in an even more perfor-
mance-oriented manner at the push of a button:
>The speed range of the engine is optimally
utilized.
>Gearshifts are faster.
>The engine responds more spontaneously
to accelerator pedal movements.
>The steering will operate in an even sportier
mode.
>In the automatic mode, the 6th gear is not
engaged.
Page 247 of 288
Mobility
245Reference
At a glance
Controls
Driving tips
Communications
Navigation
Entertainment
Protect valve stems with valve stem
seal caps against dirt and contamina-
tion. Dirt in valve stems is a frequent source
of gradual air loss.<
4.Initialize the Flat Tire Monitor, refer to
page95, or reset the Tire Pressure Monitor,
refer to page97.
5.Replace the damaged tire as soon as possi-
ble and have the new wheel/tire balanced.
Driving with compact wheel
Drive reservedly and do not exceed a speed of
50 mph/80 km/h.
The driving characteristics change, for example
reduced track stability on braking, extended
braking distance, and altered self-steering
characteristics in the limit range. In conjunction
with winter tires, these characteristics are more
pronounced.
Only one compact wheel may be
mounted. Restore the wheels and tires to
their original size as quickly as possible. Failure
to do so is a safety risk.<
Vehicle battery
Battery care
The battery is 100 % maintenance-free, i.e., the
electrolyte will last for the life of the battery
when the vehicle is operated in a temperate cli-
mate. Your BMW center will be glad to advise in
all matters concerning the battery.
Charging battery
Only charge the battery in the vehicle via the
terminals in the engine compartment with the
engine switched off. Connections, refer to
Jump starting on page248.
Disposal
Have old batteries disposed of by your
BMW center or hand them in to a recy-
cling center. Maintain the battery in an upright
position for transport and storage. Always
restrain the battery to prevent it from tipping
over during transport.<
Power failure
After a temporary power supply interruption,
some settings are lost. Take the following
steps:
>Seat, mirror and steering wheel memory
Store the positions again, refer to page48.
>Time and date
Reset, refer to text starting on page86.
>Radio
Store stations again, refer to page174.
>Navigation system
Wait until the system starts, refer to
page142.
Fuses
Never attempt to repair a blown fuse and
do not replace a defective fuse with a sub-
stitute of another color or amperage rating, as
this could lead to a circuit overload, ultimately
resulting in a fire in the vehicle.<
Sedan
Spare fuses, plastic tweezers and fuse alloca-
tion diagram are located in the compartment for
the onboard tool kit, refer to page237.
Sports Wagon
Spare fuses and a pair of plastic tweezers are
contained in the onboard tool kit, refer to
page237. A fuse allocation diagram is located
in the cargo bay behind the right-hand side
panel.
Page 252 of 288
Giving and receiving assistance
250 Sedan:
It is located in the toolkit in the luggage com-
partment lid, refer to page237.
Sports Wagon:
It is located in the toolkit behind the left side
panel in the cargo bay, refer to page237.
Use only the tow fitting provided with the
vehicle and screw it all the way in. Use the
tow fitting for towing only on roads. Avoid lateral
loading of the tow fitting, e.g. do not lift the vehi-
cle by the tow fitting. Otherwise damage to the
tow fitting and the vehicle can occur.<
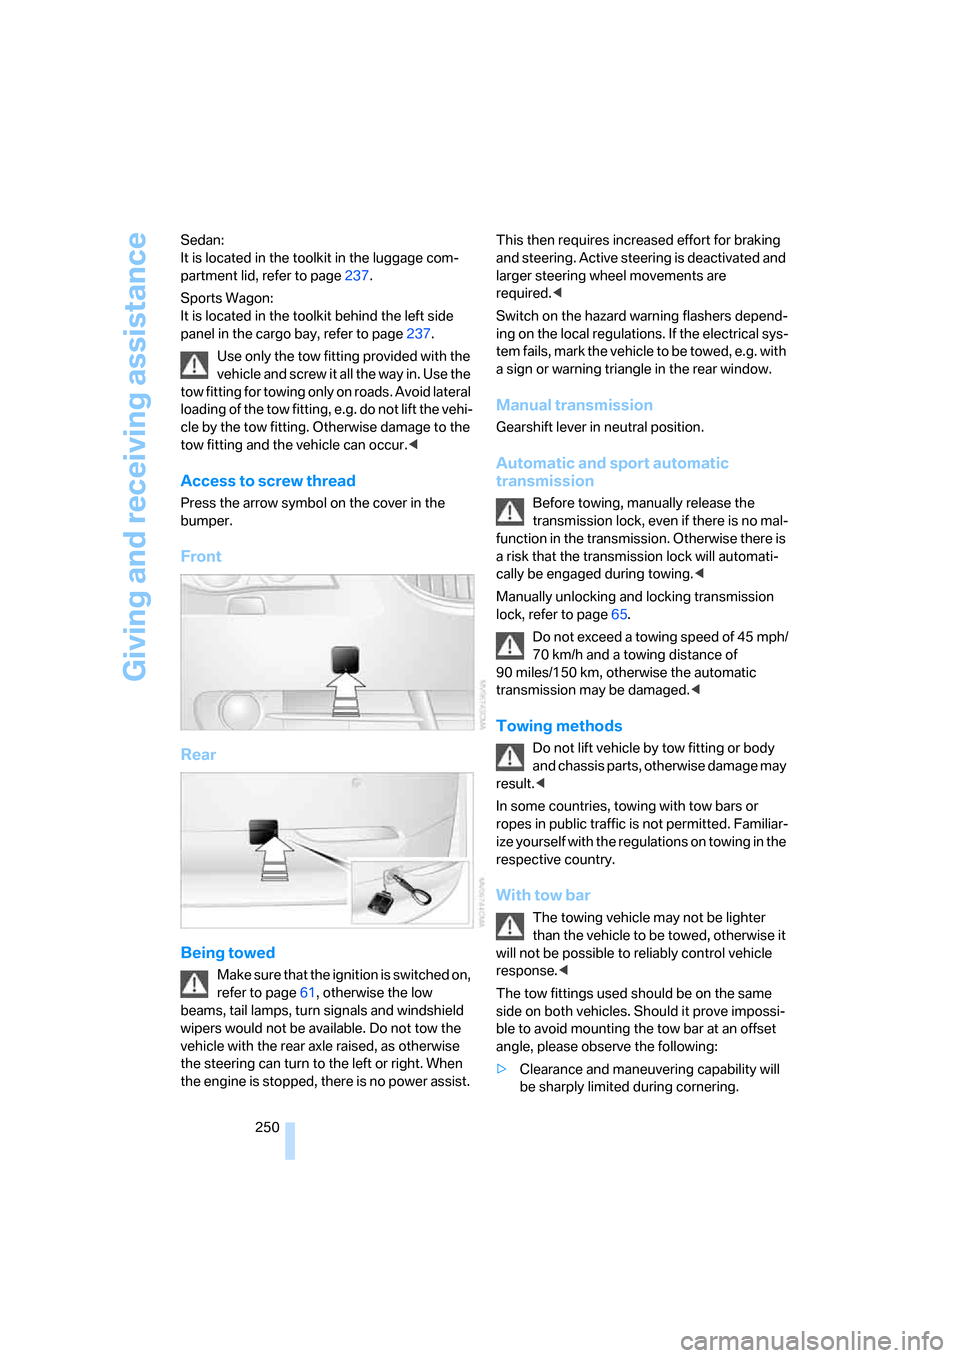
Access to screw thread
Press the arrow symbol on the cover in the
bumper.
Front
Rear
Being towed
Make sure that the ignition is switched on,
refer to page61, otherwise the low
beams, tail lamps, turn signals and windshield
wipers would not be available. Do not tow the
vehicle with the rear axle raised, as otherwise
the steering can turn to the left or right. When
the engine is stopped, there is no power assist. This then requires increased effort for braking
and steering. Active steering is deactivated and
larger steering wheel movements are
required.<
Switch on the hazard warning flashers depend-
ing on the local regulations. If the electrical sys-
tem fails, mark the vehicle to be towed, e.g. with
a sign or warning triangle in the rear window.
Manual transmission
Gearshift lever in neutral position.
Automatic and sport automatic
transmission
Before towing, manually release the
transmission lock, even if there is no mal-
function in the transmission. Otherwise there is
a risk that the transmission lock will automati-
cally be engaged during towing.<
Manually unlocking and locking transmission
lock, refer to page65.
Do not exceed a towing speed of 45 mph/
70 km/h and a towing distance of
90 miles/150 km, otherwise the automatic
transmission may be damaged.<
Towing methods
Do not lift vehicle by tow fitting or body
and chassis parts, otherwise damage may
result.<
In some countries, towing with tow bars or
ropes in public traffic is not permitted. Familiar-
ize yourself with the regulations on towing in the
respective country.
With tow bar
The towing vehicle may not be lighter
than the vehicle to be towed, otherwise it
will not be possible to reliably control vehicle
response.<
The tow fittings used should be on the same
side on both vehicles. Should it prove impossi-
ble to avoid mounting the tow bar at an offset
angle, please observe the following:
>Clearance and maneuvering capability will
be sharply limited during cornering.