ECU BMW 535XI SPORTS WAGON 2008 User Guide
[x] Cancel search | Manufacturer: BMW, Model Year: 2008, Model line: 535XI SPORTS WAGON, Model: BMW 535XI SPORTS WAGON 2008Pages: 292, PDF Size: 9.33 MB
Page 131 of 292
Controls
129Reference
At a glance
Driving tips
Communications
Navigation
Entertainment
Mobility
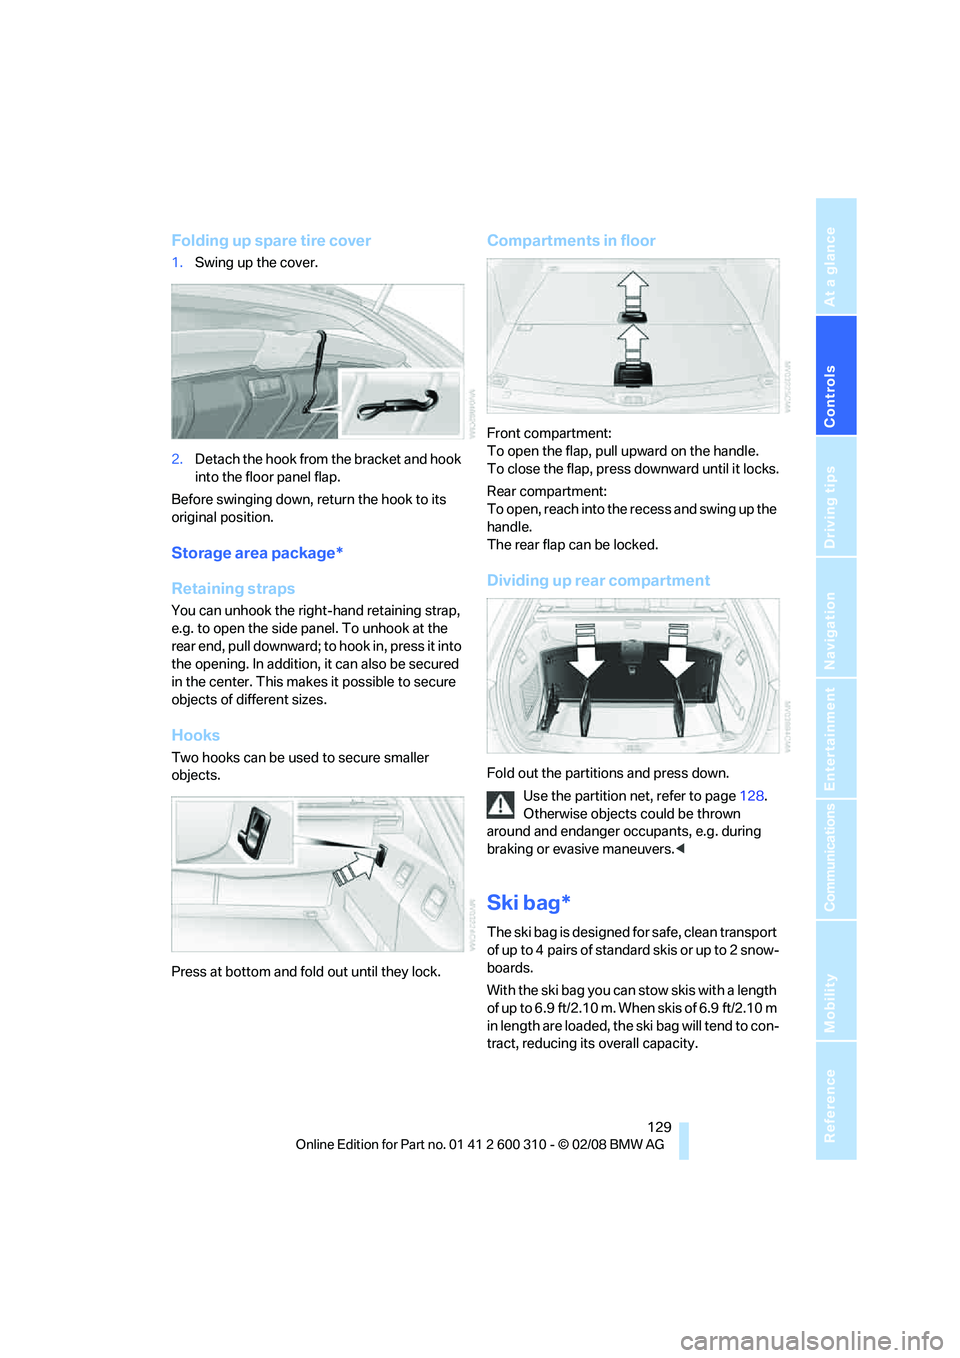
Folding up spare tire cover
1.Swing up the cover.
2.Detach the hook from the bracket and hook
into the floor panel flap.
Before swinging down, return the hook to its
original position.
Storage area package*
Retaining straps
You can unhook the right-hand retaining strap,
e.g. to open the side panel. To unhook at the
rear end, pull downward; to hook in, press it into
the opening. In addition, it can also be secured
in the center. This makes it possible to secure
objects of different sizes.
Hooks
Two hooks can be used to secure smaller
objects.
Press at bottom and fold out until they lock.
Compartments in floor
Front compartment:
To open the flap, pull upward on the handle.
To close the flap, press downward until it locks.
Rear compartment:
To open, reach into the recess and swing up the
handle.
The rear flap can be locked.
Dividing up rear compartment
Fold out the partitions and press down.
Use the partition net, refer to page128.
Otherwise objects could be thrown
around and endanger occupants, e.g. during
braking or evasive maneuvers.<
Ski bag*
The ski bag is designed for safe, clean transport
of up to 4 pa irs of s tandard s kis or up to 2 snow-
boards.
With the ski bag you can stow skis with a length
o f u p t o 6 . 9 f t / 2 . 1 0 m . W h e n s k i s o f 6 . 9 f t / 2 . 1 0 m
in length are loaded, the ski bag will tend to con-
tract, reducing its overall capacity.
Page 132 of 292
Practical interior accessories
130
Loading
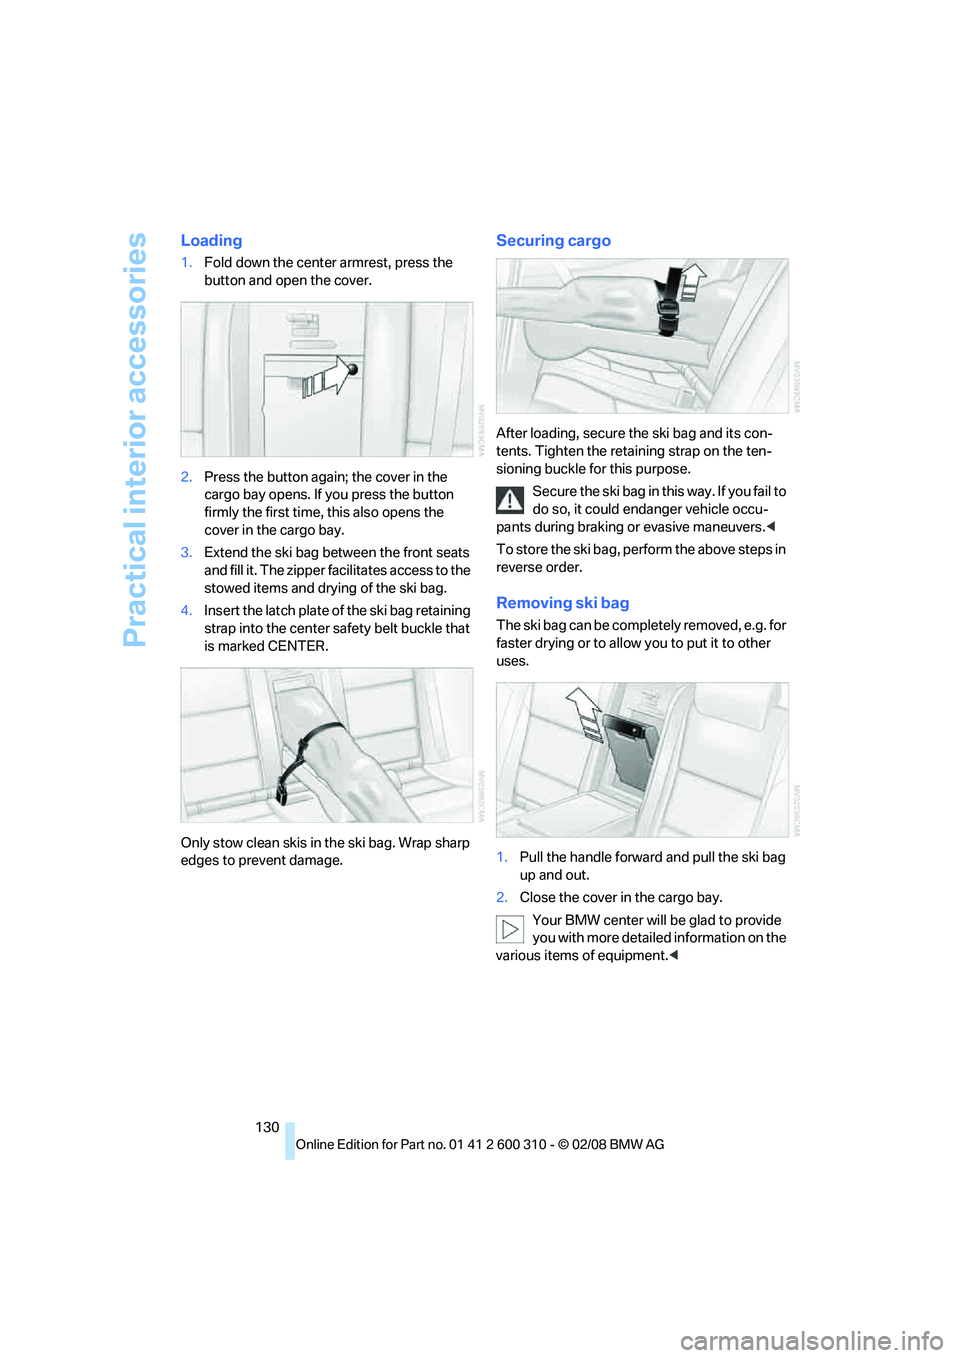
1.Fold down the center armrest, press the
button and open the cover.
2.Press the button again; the cover in the
cargo bay opens. If you press the button
firmly the first time, this also opens the
cover in the cargo bay.
3.Extend the ski bag between the front seats
and fill it. The zipper facilitates access to the
stowed items and drying of the ski bag.
4.Insert the latch plate of the ski bag retaining
strap into the center safety belt buckle that
is marked CENTER.
Only stow clean skis in the ski bag. Wrap sharp
edges to prevent damage.
Securing cargo
After loading, secure the ski bag and its con-
tents. Tighten the retaining strap on the ten-
sioning buckle for this purpose.
Secure the ski bag in this way. If you fail to
do so, it could endanger vehicle occu-
pants during braking or evasive maneuvers.<
To store the ski bag, perform the above steps in
reverse order.
Removing ski bag
The ski bag can be completely removed, e.g. for
faster drying or to allow you to put it to other
uses.
1.Pull the handle forward and pull the ski bag
up and out.
2.Close the cover in the cargo bay.
Your BMW center will be glad to provide
you with more detailed information on the
various items of equipment.<
Page 140 of 292
Things to remember when driving
138
Stowing cargo
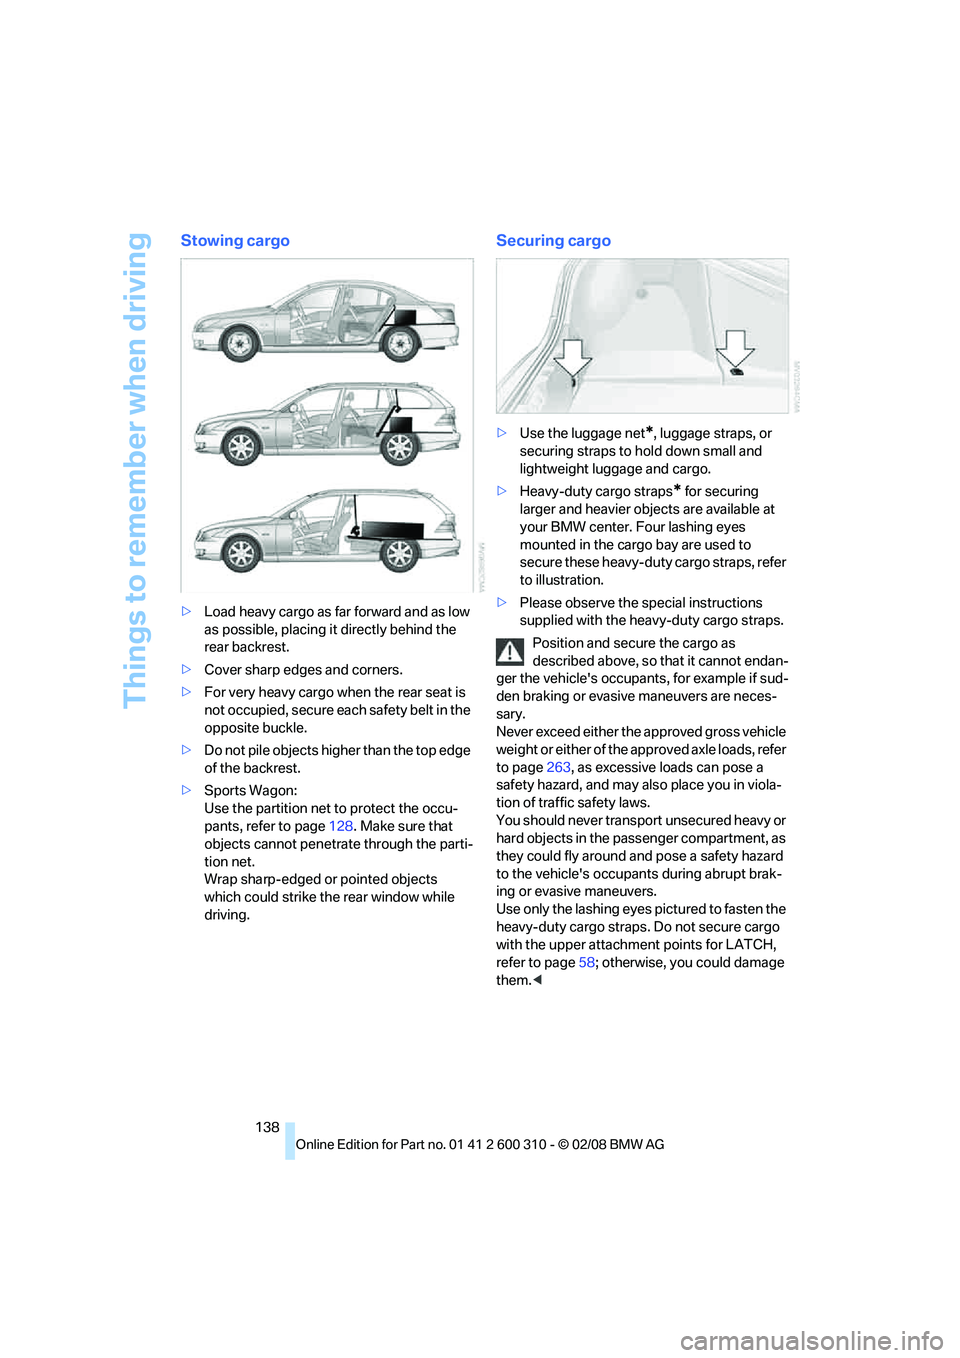
>Load heavy cargo as far forward and as low
as possible, placing it directly behind the
rear backrest.
>Cover sharp edges and corners.
>For very heavy cargo when the rear seat is
not occupied, secure each safety belt in the
opposite buckle.
>Do not pile objects higher than the top edge
of the backrest.
>Sports Wagon:
Use the partition net to protect the occu-
pants, refer to page128. Make sure that
objects cannot penetrate through the parti-
tion net.
Wrap sharp-edged or pointed objects
which could strike the rear window while
driving.
Securing cargo
>Use the luggage net*, luggage straps, or
securing straps to hold down small and
lightweight luggage and cargo.
>Heavy-duty cargo straps
* for securing
larger and heavier objects are available at
your BMW center. Four lashing eyes
mounted in the cargo bay are used to
secure these heavy-duty cargo straps, refer
to illustration.
>Please observe the special instructions
supplied with the heavy-duty cargo straps.
Position and secure the cargo as
described above, so that it cannot endan-
ger the vehicle's occupants, for example if sud-
den braking or evasive maneuvers are neces-
sary.
Never exceed either the approved gross vehicle
weight or either of the approved axle loads, refer
to page263, as excessive loads can pose a
safety hazard, and may also place you in viola-
tion of traffic safety laws.
You should never transport unsecured heavy or
hard objects in the passenger compartment, as
they could fly around and pose a safety hazard
to the vehicle's occupants during abrupt brak-
ing or evasive maneuvers.
Use only the lashing eyes pictured to fasten the
heavy-duty cargo straps. Do not secure cargo
with the upper attachment points for LATCH,
refer to page58; otherwise, you could damage
them.<
Page 141 of 292
Driving tips
139Reference
At a glance
Controls
Communications
Navigation
Entertainment
Mobility
Roof-mounted luggage rack*
A special rack system is available as an option
for your BMW. Please comply with the precau-
tions included with the installation instructions.
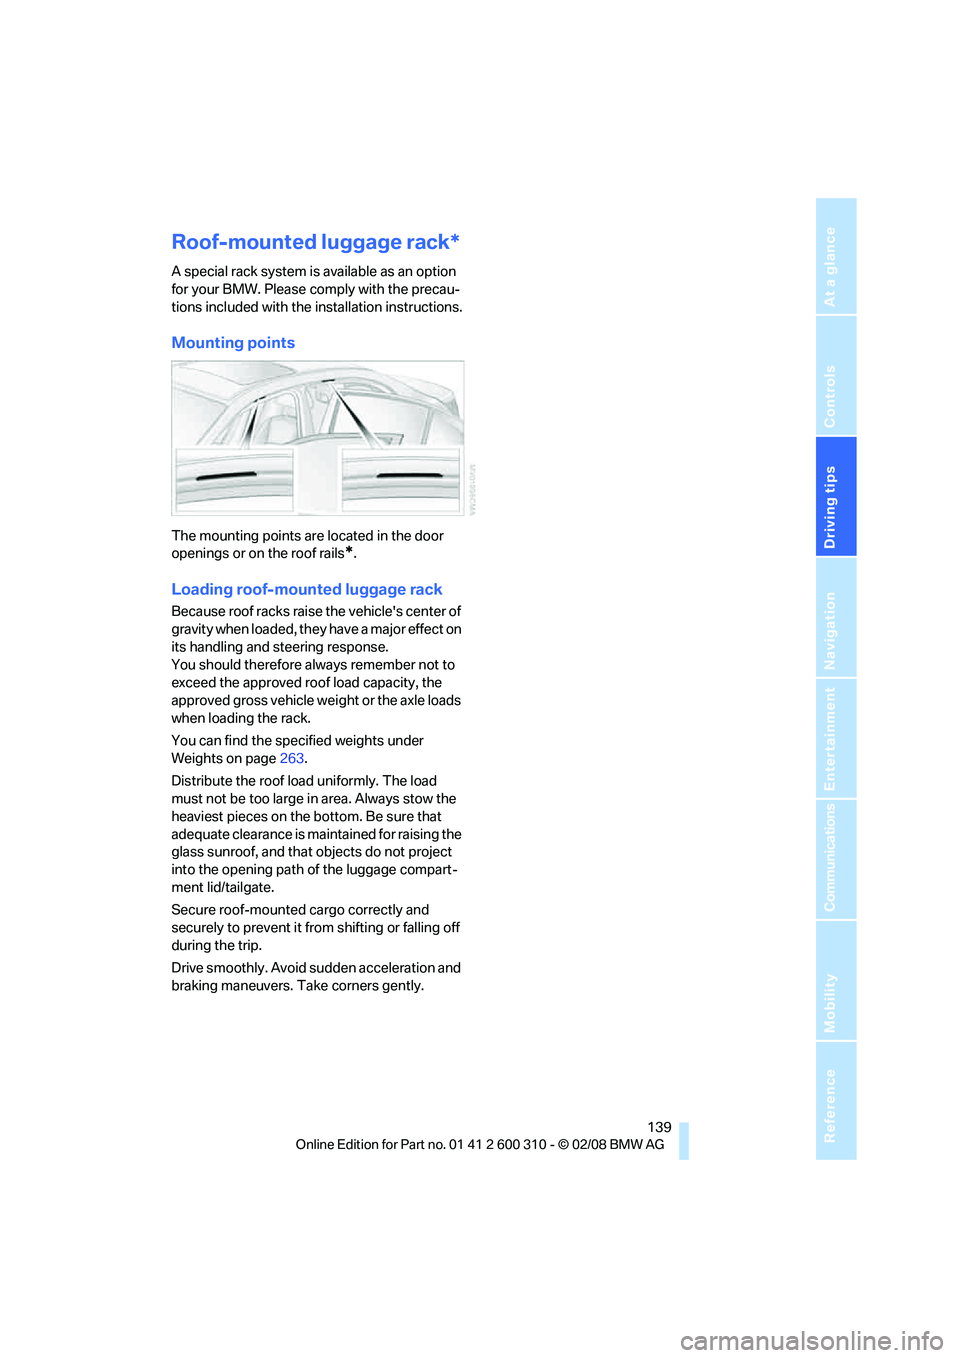
Mounting points
The mounting points are located in the door
openings or on the roof rails
*.
Loading roof-mounted luggage rack
Because roof racks raise the vehicle's center of
gravity when loaded, they have a major effect on
its handling and steering response.
You should therefore always remember not to
exceed the approved roof load capacity, the
approved gross vehicle weight or the axle loads
when loading the rack.
You can find the specified weights under
Weights on page263.
Distribute the roof load uniformly. The load
must not be too large in area. Always stow the
heaviest pieces on the bottom. Be sure that
adequate clearance is maintained for raising the
glass sunroof, and that objects do not project
into the opening path of the luggage compart-
ment lid/tailgate.
Secure roof-mounted cargo correctly and
securely to prevent it from shifting or falling off
during the trip.
Drive smoothly. Avoid sudden acceleration and
braking maneuvers. Take corners gently.
Page 198 of 292
Telephoning
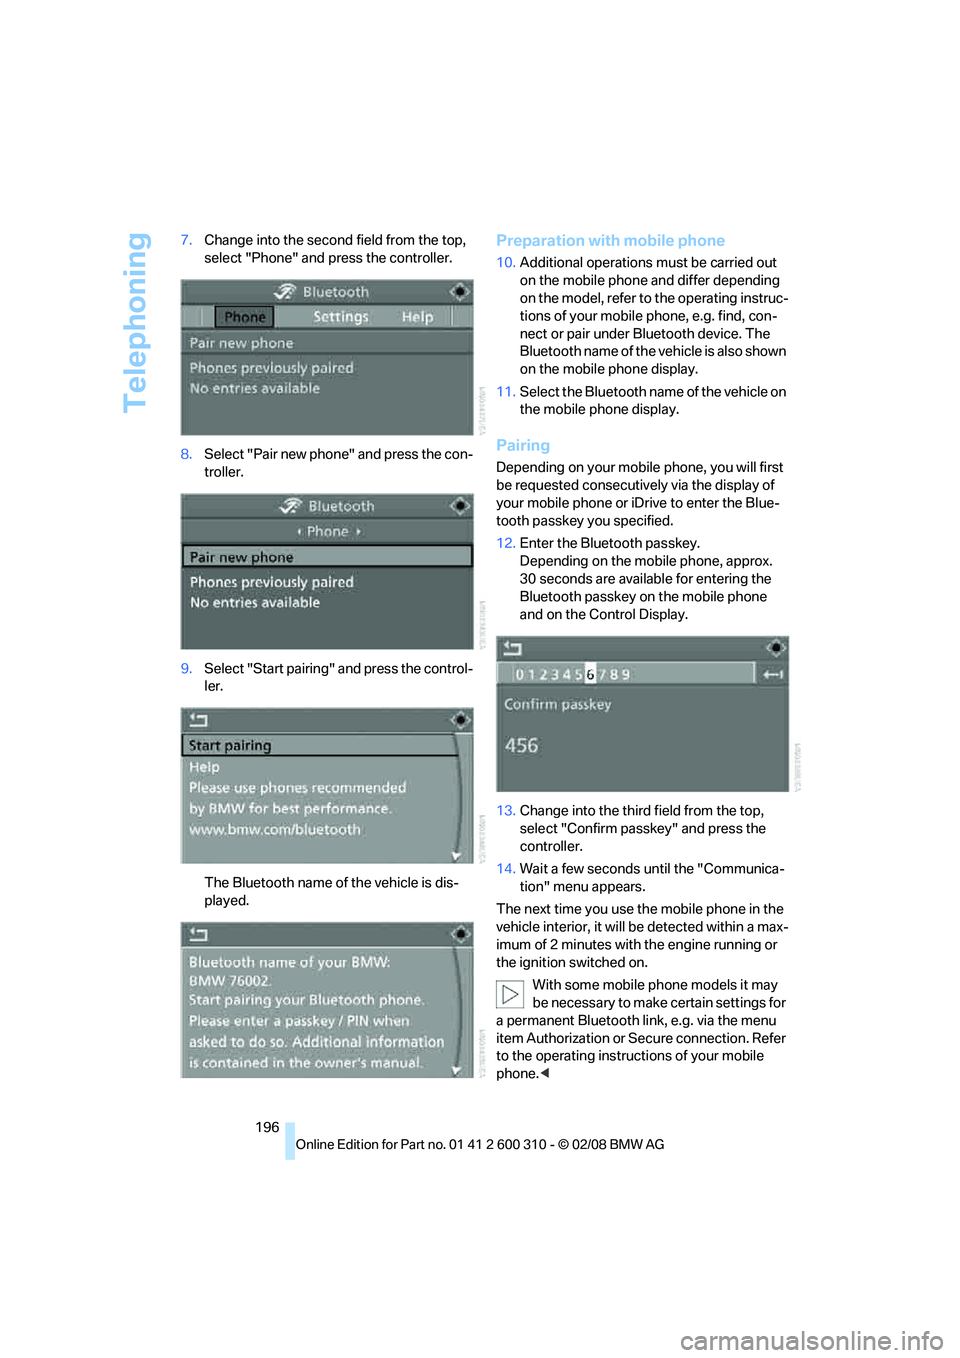
196 7.Change into the second field from the top,
select "Phone" and press the controller.
8.Select "Pair new phone" and press the con-
troller.
9.Select "Start pairing" and press the control-
ler.
The Bluetooth name of the vehicle is dis-
played.
Preparation with mobile phone
10.Additional operations must be carried out
on the mobile phone and differ depending
on the model, refer to the operating instruc-
tions of your mobile phone, e.g. find, con-
nect or pair under Bluetooth device. The
Bluetooth name of the vehicle is also shown
on the mobile phone display.
11.Select the Bluetooth name of the vehicle on
the mobile phone display.
Pairing
Depending on your mobile phone, you will first
be requested consecutively via the display of
your mobile phone or iDrive to enter the Blue-
tooth passkey you specified.
12.Enter the Bluetooth passkey.
Depending on the mobile phone, approx.
30 seconds are available for entering the
Bluetooth passkey on the mobile phone
and on the Control Display.
13.Change into the third field from the top,
select "Confirm passkey" and press the
controller.
14.Wait a few seconds until the "Communica-
tion" menu appears.
The next time you use the mobile phone in the
vehicle interior, it will be detected within a max-
imum of 2 minutes with the engine running or
the ignition switched on.
With some mobile phone models it may
be necessary to make certain settings for
a permanent Bluetooth link, e.g. via the menu
item Authorization or Secure connection. Refer
to the operating instructions of your mobile
phone.<
Page 234 of 292
Under the hood
232
Under the hood
Never attempt to perform any service or
repair operations on your vehicle without
the required professional technical training.
If you do not know what repair procedures to
follow, have work on your vehicle done only by
your BMW center or a workshop that works
according to BMW repair procedures with cor-
respondingly trained personnel. If this work is
not carried out properly, there is a danger of
subsequent damage and related safety haz-
ards.<
Hood
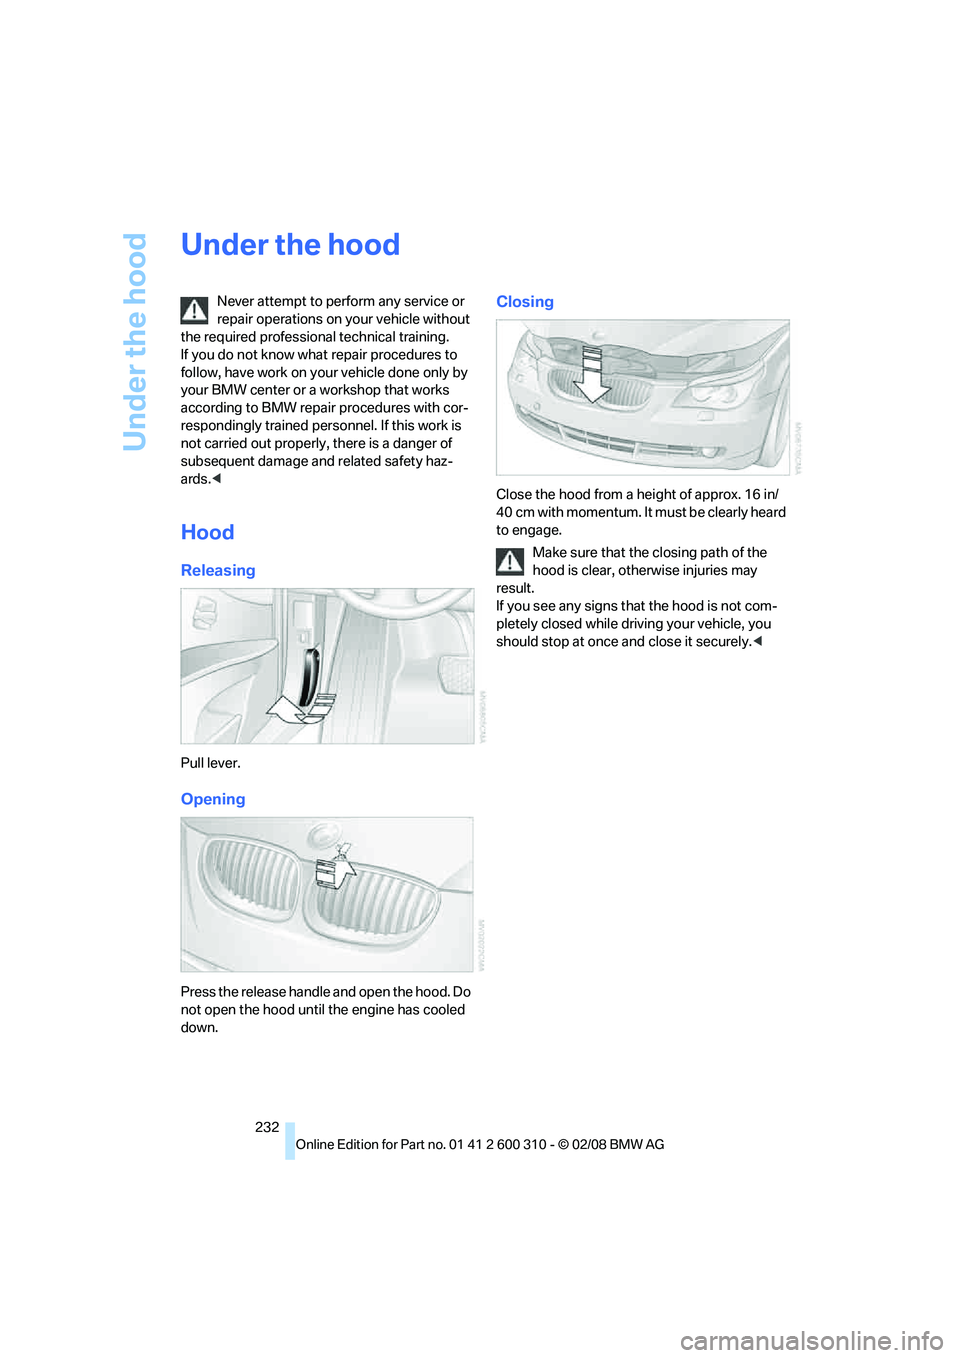
Releasing
Pull lever.
Opening
Press the release handle and open the hood. Do
not open the hood until the engine has cooled
down.
Closing
Close the hood from a height of approx. 16 in/
40 cm with momentum. It must be clearly heard
to engage.
Make sure that the closing path of the
hood is clear, otherwise injuries may
result.
If you see any signs that the hood is not com-
pletely closed while driving your vehicle, you
should stop at once and close it securely.<
Page 252 of 292
Replacing components
250
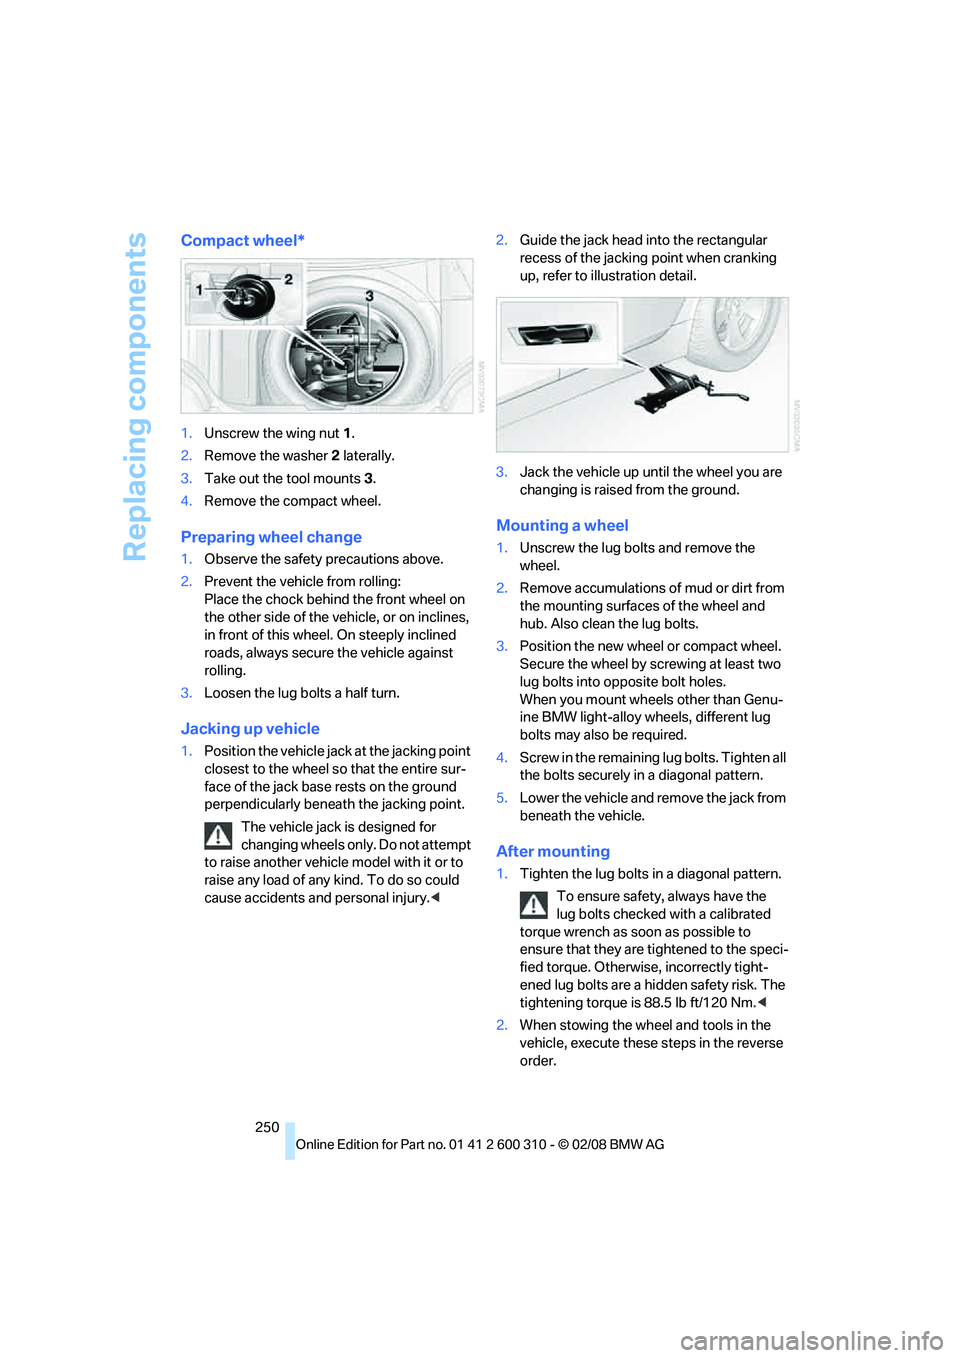
Compact wheel*
1.Unscrew the wing nut 1.
2.Remove the washer 2 laterally.
3.Take out the tool mounts 3.
4.Remove the compact wheel.
Preparing wheel change
1.Observe the safety precautions above.
2.Prevent the vehicle from rolling:
Place the chock behind the front wheel on
the other side of the vehicle, or on inclines,
in front of this wheel. On steeply inclined
roads, always secure the vehicle against
rolling.
3.Loosen the lug bolts a half turn.
Jacking up vehicle
1.Position the vehicle jack at the jacking point
closest to the wheel so that the entire sur-
face of the jack base rests on the ground
perpendicularly beneath the jacking point.
The vehicle jack is designed for
changing wheels only. Do not attempt
to raise another vehicle model with it or to
raise any load of any kind. To do so could
cause accidents and personal injury.<2.Guide the jack head into the rectangular
recess of the jacking point when cranking
up, refer to illustration detail.
3.Jack the vehicle up until the wheel you are
changing is raised from the ground.
Mounting a wheel
1.Unscrew the lug bolts and remove the
wheel.
2.Remove accumulations of mud or dirt from
the mounting surfaces of the wheel and
hub. Also clean the lug bolts.
3.Position the new wheel or compact wheel.
Secure the wheel by screwing at least two
lug bolts into opposite bolt holes.
When you mount wheels other than Genu-
ine BMW light-alloy wheels, different lug
bolts may also be required.
4.Screw in the remaining lug bolts. Tighten all
the bolts securely in a diagonal pattern.
5.Lower the vehicle and remove the jack from
beneath the vehicle.
After mounting
1.Tighten the lug bolts in a diagonal pattern.
To ensure safety, always have the
lug bolts checked with a calibrated
torque wrench as soon as possible to
ensure that they are tightened to the speci-
fied torque. Otherwise, incorrectly tight-
ened lug bolts are a hidden safety risk. The
tightening torque is 88.5 lb ft/120 Nm.<
2.When stowing the wheel and tools in the
vehicle, execute these steps in the reverse
order.
Page 274 of 292
Everything from A to Z
272 BMW Assist209
– activating215
– BMW TeleServices211
– concierge service212
– contacting BMW Customer
Relations212
– displaying vehicle data216
– offered services209
– roadside assistance210
– updating214
BMW Assist My Info213
BMW Car Shampoo241
"BMW Contact"204
"BMW Contact
Numbers"204
BMW homepage4
BMW maintenance
system237
BMW Night Vision103
– activating104
– cleaning camera105
– cleaning camera, refer to
Wiper system68
– deactivating104
– making settings104
"BMW Service settings"214
BMW TeleServices211
BMW TeleServices services
– displaying212
– updating212
BMW website4
Bottle holder, refer to Cup
holders124
Bracket for telephone or
mobile phone, refer to Snap-
in adapter207
Brake assistant90
– adaptive91
Brake force display99
Brake lamps
– replacing bulbs246
– two-stage99
Brake rotors
– breaking-in134
– refer to Braking safely136Brakes
– ABS Antilock Brake
System90
– brake assistant90
– brake force display99
– breaking-in134
– CBC Cornering Brake
Control90
– electronic brake-force
distribution90
– handbrake63
– refer to Braking safely136
– warning lamps
13
Brake system134
– brake pads134
– breaking-in134
– disk brakes136
– warning lamp93
Braking safely136
Breakdown services, refer to
Roadside Assistance254
Breaking-in brake pads134
Breaking-in the clutch134
Breaking-in the differential,
refer to Engine and
differential134
Break-in period134
"Brightness"88,102
– with BMW Night Vision105
Brightness of Control
Display87
Button for starting engine,
refer to Start/Stop button61
Buttons on steering wheel11
C
California Proposition 65
Warning6
"Call"202,213
Call
– accepting200
– displaying accepted203
– ending201
– in absence203
– rejecting201
– starting201Calling
– by entering phone
number201
– from phone book202
– from Top 8 list203
– redialing203
– refer to telephone operating
instructions
Can holder, refer to Cup
holders124
Capacities264
Car battery, refer to Vehicle
battery251
"Car Data"80
Care239
– car-care products239
– carpets241
– car washes239
– CD/DVD-player242
– chrome components240
– displays241
– exterior239
– fine wooden
components241
– hand washing240
– headlamps240
– high-pressure cleaning
jets239
– interior241
– leather241
– light-alloy wheels240
– paint240
– plastic components241
– rubber gaskets240
– safety belts241
– sensors and cameras241
– upholstery and cloth-
covered paneling241
– windows240
– wiper blades240
Cargo
– refer to Cargo loading137
– securing138
– securing with ski bag130
Page 280 of 292
Everything from A to Z
278 Head restraints49
– active front head
restraints49
– removing50
– sitting safely45
"Head-Up Display"102
Head-Up Display101
Heated
– mirrors53
– rear window115
– seats51
– steering wheel54
Heating113
– exterior mirrors53
– interior113
– rear window115
– residual heat116
– seats51
– steering wheel54
Heating with engine switched
off, refer to Residual
heat116
Heavy cargo, refer to Securing
cargo138
Height, refer to
Dimensions261
Height adjustment
– seats46
– steering wheel54
"High-beam assistant"111
High-beam assistant109
High beams109
– headlamp flasher109
– indicator lamp13
– replacing bulbs245
High Definition Radio176
High-pressure cleaning
jets239,240
High water, refer to Driving
through water136
Hill Descent Control HDC92
Hills136
Holder for cups124
"Home address" in
navigation153
Homepage of BMW4
Hood232Hooks for shopping bags,
Sports Wagon129
Horn10
Hotel function, refer to
Locking separately34
Hot exhaust system135
"Hour memo"87
"House number" in
destination entry146
Hydraulic brake assistant,
refer to Brake assistant90
Hydroplaning135
I
IBOC, refer to High Definition
Radio176
Ice, refer to Outside
temperature warning78
ID3 tag, refer to Information on
track183
Identification mark
– recommended tire
brands230
– run-flat tires229
– tire coding227
iDrive16
– assistance window20
– automatic climate control
with expanded scope114
– changing date and time86
– changing language88
– changing menu page19
– changing settings86
– changing units of measure
and display type88
– confirming selection or
entry19
– controller16
– controls16
– displays, menus17
– operating principle17
– selecting menu item19
– setting brightness87
– start menu17
– status information20
– symbols18Ignition61
– switched off62
– switched on61
Ignition key, refer to Keys/
remote control28
Ignition key position 1, refer to
Radio readiness61
Ignition key position 2, refer to
Ignition on61
Ignition lock61
– starting engine with comfort
access39
i menu17
Imprint2
Indicator/warning lamps
– ABS Antilock Brake
System93
– active steering99
– airbags101
– brake system93
– DSC13,91
– DTC13,92
– Flat Tire Monitor95
– fog lamps
13
– safety belt warning50
– TPM Tire Pressure
Monitor97
Indicator and warning
lamps13
Inflation pressure, refer to Tire
inflation pressure222
Inflation pressure monitoring
– refer to Flat Tire Monitor94
– refer to TPM Tire Pressure
Monitor96
Info menu17
Information
– on another location149
– on current position149
– on destination location149
"Information" in
navigation149
Information menu, refer to
imenu17
"Information on
destination"151
"Info sources"81
Page 281 of 292
Reference 279
At a glance
Controls
Driving tips
Communications
Navigation
Entertainment
Mobility
Initializing
– Flat Tire Monitor94
– radio, refer to Storing
stations174
– refer to Power failure251
– refer to Setting time and
date86
– seat, mirror and steering
wheel memory47
"Input map"149
Installation location
– CD changer185
– drive for navigation DVD142
– mobile phone122
Instructions for navigation
system, refer to Voice
instructions159
Instrument cluster12
Instrument illumination, refer
to Instrument lighting111
Instrument lighting111
Instrument panel, refer to
Cockpit10
Instrument panel, refer to
Instrument cluster12
Integrated key28
Integrated universal remote
control120
Interesting destination for
navigation149
"Interim time"86
Interior lamps111
– switching on with remote
control31
Interior motion sensor38
– switching off38
Interior rearview mirror53
– automatic dimming
feature54
Intermittent mode of the
wipers68
J
Jacking points250
Joystick, refer to iDrive16
Jumpering, refer to Jump
starting254
Jump starting254
K
Keyless-Go, refer to Comfort
access38
Keyless opening and closing,
refer to Comfort access38
Key Memory, refer to Personal
Profile28
"Keypad"204
Keys28
– key-related settings, refer to
Personal Profile28
– spare key28
Kick-down, Automatic
transmission with
Steptronic64
Knock control221
L
Lamps
– refer to High-beam
assistant109
– refer to Parking lamps/low
beams107
Lamps and bulbs244
Lane limit lines, refer to
Leaving lane warning105
"Language / Units"88
– in navigation143,159
"Languages"88
– in navigation143,159
Lashing eyes, refer to
Securing cargo138
Last destinations, refer to
Destination list150
"Last seat pos."48
LATCH child restraint fixing
system57
Leather care241
Leaving lane warning105
LEDs light-emitting
diodes244
Length, refer to
Dimensions261
License plate lamp, replacing
bulbs248
Light-emitting diodes
LEDs244Lighter124
"Lighting"67
Lighting
– instruments111
– lamps and bulbs244
– of the vehicle, refer to
Lamps107
Light switch107
"Limit"85
Loading
– securing cargo138
– stowing cargo138
– vehicle137
Load securing equipment,
refer to Securing cargo138
"Lock after driving"33
Lock buttons in the doors,
refer to Locking33
Locking31
– confirmation signals31
– from inside33
– from outside31
– without key, refer to Comfort
access38
Locking and unlocking doors
– confirmation signals31
– from inside32
– from outside30
Low beams
107
– automatic107
– replacing bulbs245
Lower back support, refer to
Lumbar support47
Lug bolts250
– tightening torque, refer to
After mounting250
– wrench249
Luggage compartment, refer
to Cargo bay
Luggage compartment lid33
– emergency operation, refer
to Manual operation34
– emergency release34
– locking separately34
– opening from inside33
– opening from outside34
– unlocking and locking from
inside32
– unlocking manually34