relay BMW 540i 1998 E39 Owner's Manual
[x] Cancel search | Manufacturer: BMW, Model Year: 1998, Model line: 540i, Model: BMW 540i 1998 E39Pages: 1002
Page 418 of 1002
Downloaded from www.Manualslib.com manuals search engine
130-28
Fuel Injection
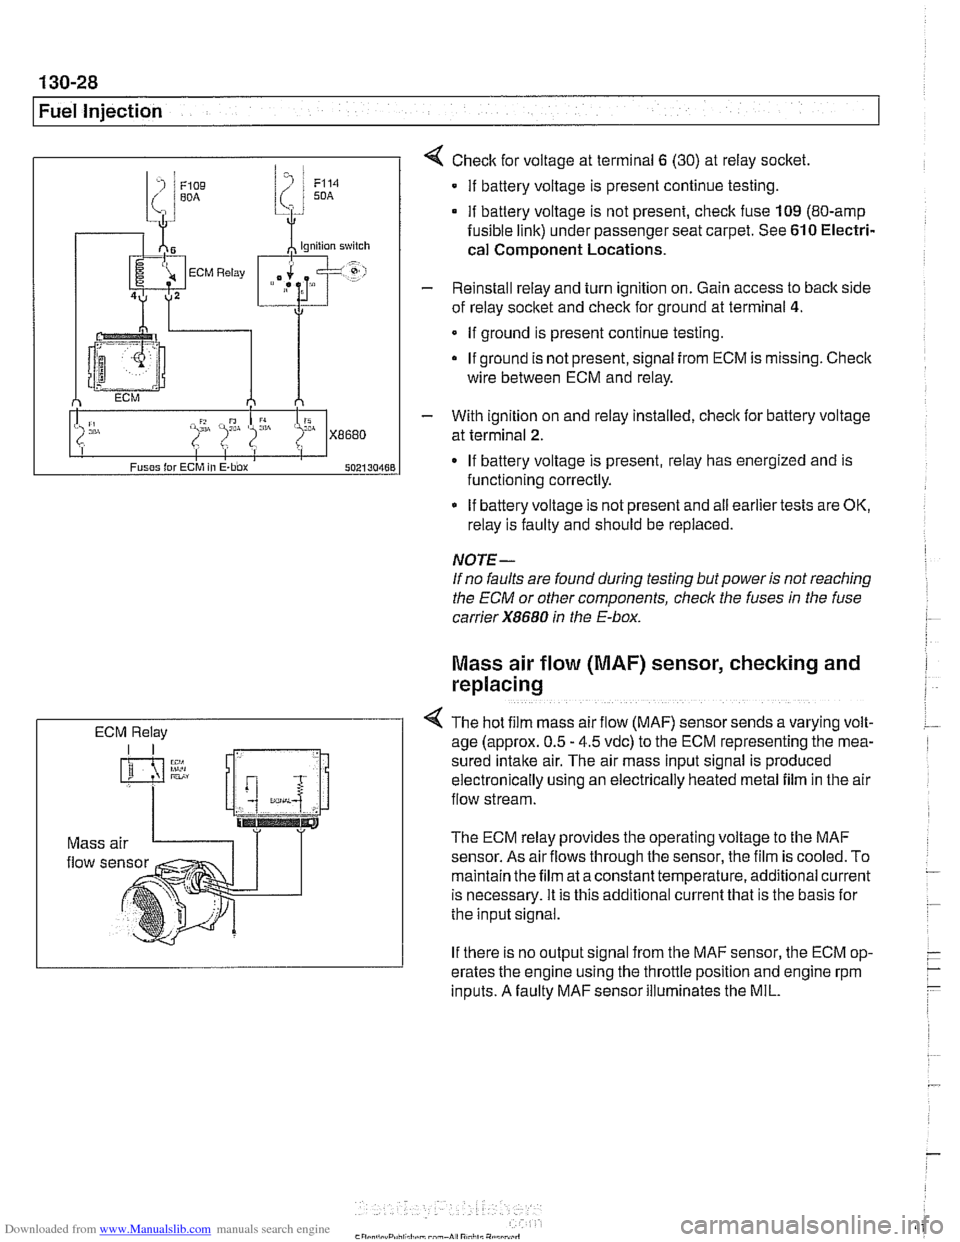
ECM Relay
4 Check for voltage at terminal 6 (30) at reiay socket
If battery voltage is present continue testing.
if battery voltage is not present, check fuse 109 (80-amp
fusible link) under passenger seat carpet. See 610 Electri-
cal
Component Locations.
- Reinstall relay and turn ignition on. Gain access to back side
of reiay socket and check for ground at terminal
4.
If ground is present continue testing.
If ground is not present, signal
from ECM is missing. Check
wire between ECM and relay.
- With ignition on and reiay installed, check lor battery voltage
at terminal
2.
If battery voltage is present, relay has energized and is
functioning correctly.
If battery voltage is not present and
ail earlier tests are OK,
relay is faulty and should be replaced.
NOTE-
If no faults are found during testing but power is not reaching
the ECM or other components, check the fuses
in the fuse
carrier
X8680 in the E-box.
Mass air flow (MAF) sensor, checking and
replacing
4 The hot f~lm mass air flow (MAF) sensor sends a varying volt-
age (approx. 0.5 - 4.5 vdc) to the ECM representing the mea-
sured
Intake air. The alr mass input signal is produced
electron~caily uslng an electrically heated metal fllm in the air
flow stream.
The ECM relay provides the operating voltage to the MAF
sensor. As air
flows through the sensor, the film is cooled. To
maintain the film at a constant temperature, additional current
is necessary. It is this additional current that is the basis lor
the input signal.
If there is no output signal from the MAF sensor, the ECM op-
erates the engine using the throttle position and engine rpm
inputs. A faulty MAF sensor illuminates the MIL.
Page 419 of 1002
Downloaded from www.Manualslib.com manuals search engine
Fuel Injection
A faulty MAF sensor can produce the following problems:
Difficult to restart when engine is hot
Engine starts then stalls
* Engine starts and runs only with accelerator pedal de-
pressed
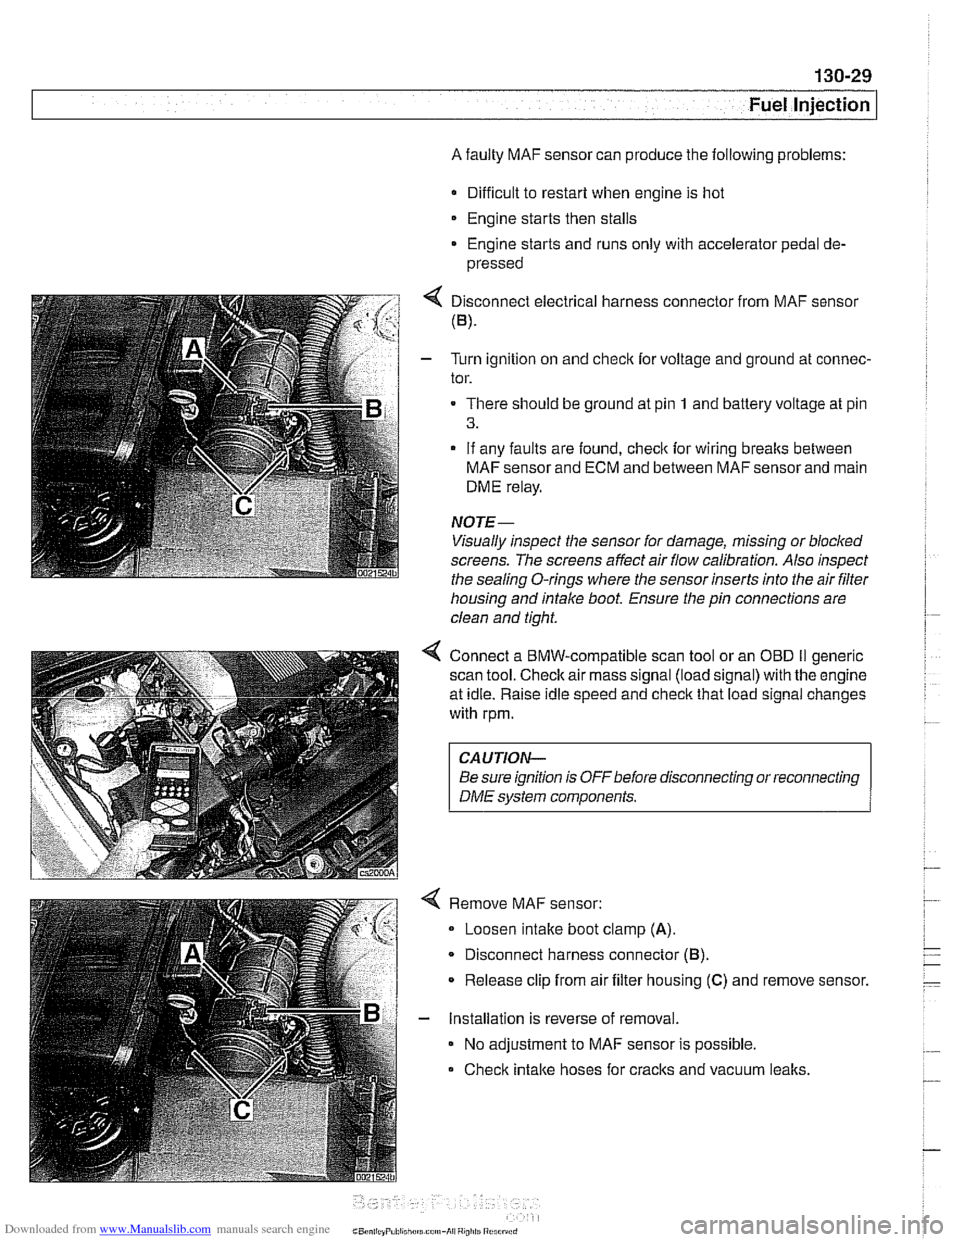
4 Disconnect electrical harness connector from MAF sensor
(B).
- Turn ignition on and checlc for voltage and ground at connec-
tor.
There should be ground at pin
1 and battery voltage at pin
3.
- If any faults are found, checlc for wiring breaks between
MAF sensor and ECM and between MAF sensor and main
DME relay.
NOTE-
Visually inspect the sensor for damage, missing or blocked
screens. The screens affect air flow calibration. Also inspect
the sealina
0-rinas where the sensor inserts into the air filter - - housing and intake boot. Ensure the pin connections are
clean and tight.
4 Connect a BMW-compatible scan tool or an OED II generic
scan tool.
Checlc air mass signal (load signal) with the engine
at idle. Raise idle speed and
checlc that load signal changes
with rpm.
CAUTION-
Be sure ignition is OFFbefore disconnecting or reconnecting
DME system components.
Remove MAF sensor:
Loosen intake boot clamp
(A).
Disconnect harness connector (6).
* Release clip from air filter housing (C) and remove sensor.
- Installation is reverse of removal.
No adjustment to MAF sensor is possible.
Check intake hoses for cracks and vacuum
lealts.
Page 428 of 1002
Downloaded from www.Manualslib.com manuals search engine
130-38
Fuel Injection
Throttle cable, adjusting
(MS 42.0)
The throttle assembly on MS 42.0 cars uses a throttle cable.
The cable should be adjusted any time it is disconnected or
replaced. This procedure requires the factory scan tool or an
equivalent to read and adjust throttle angle. It is recommend-
ed the procedure be done by an authorized
BMW dealer ser-
vice department
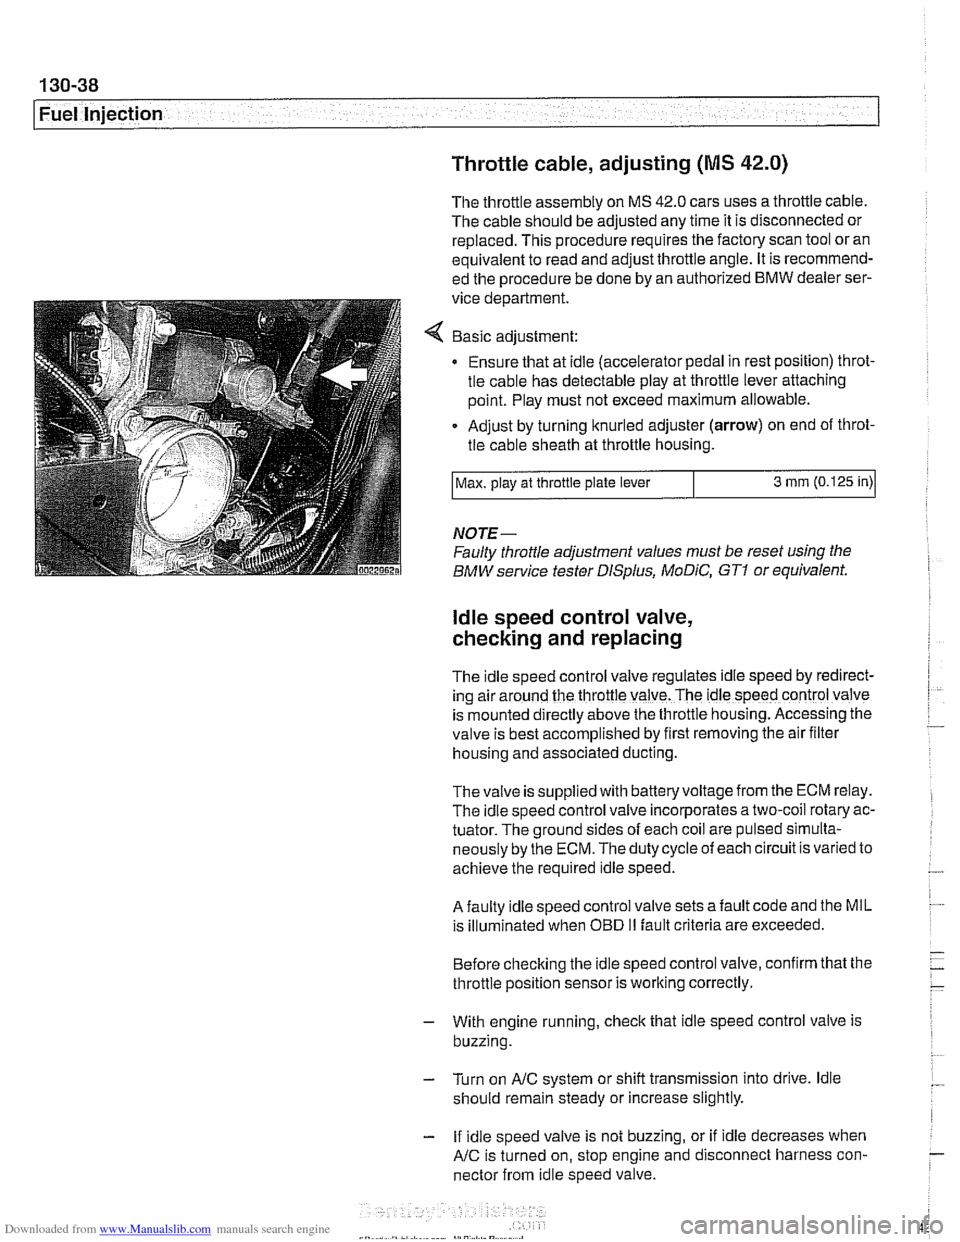
Basic adjustment:
Ensure that at idle (accelerator pedal in rest position) throt-
tle cable has detectable play at throttle lever attaching
point. Play must not exceed maximum allowable.
Adjust by turning knurled adjuster
(arrow) on end of throt-
tle cable sheath at throttle housing.
NOTE-
Faulty throttle adjustment values must be reset using the
BMW service tester
DISplus, MoDiC, GTI or equivalent.
Max.
play at throttle plate lever
ldle speed control valve,
checking and replacing
3 mm (0.125 in)
The Idle speed control valve regulates Idle speed by red~rect-
ing air around the throttle valve. The ldle speed control valve
is mounted
d~rectly above the throttle housing. Accessing the
valve is best accomplished by
flrst removing the air fllter
housing and associated ducting.
Thevalve is supplied with batteryvoltage from the ECM relay.
The idle speed control valve incorporates a two-coil rotary ac-
tuator. The ground sides of each coil are pulsed simulta-
neously by the ECM. The duty cycle of each circuit is varied to
achieve the required idle speed.
A faulty idle speed control valve sets a fault code and the MIL
is illuminated when
OED II fault criteria are exceeded.
Before checking the idle speed control valve, confirm that the
throttle position sensor is working correctly.
- With engine running, check that idle speed control valve is
buzzing.
- Turn on AIC system or shift transmission into drive. ldle
should remain steady or increase slightly.
- If idle speed valve is not buzzing, or if idle decreases when
AIC is turned on, stop engine and disconnect harness con-
nector from idle speed valve.
Page 431 of 1002
Downloaded from www.Manualslib.com manuals search engine
. -
Fuel Injection I
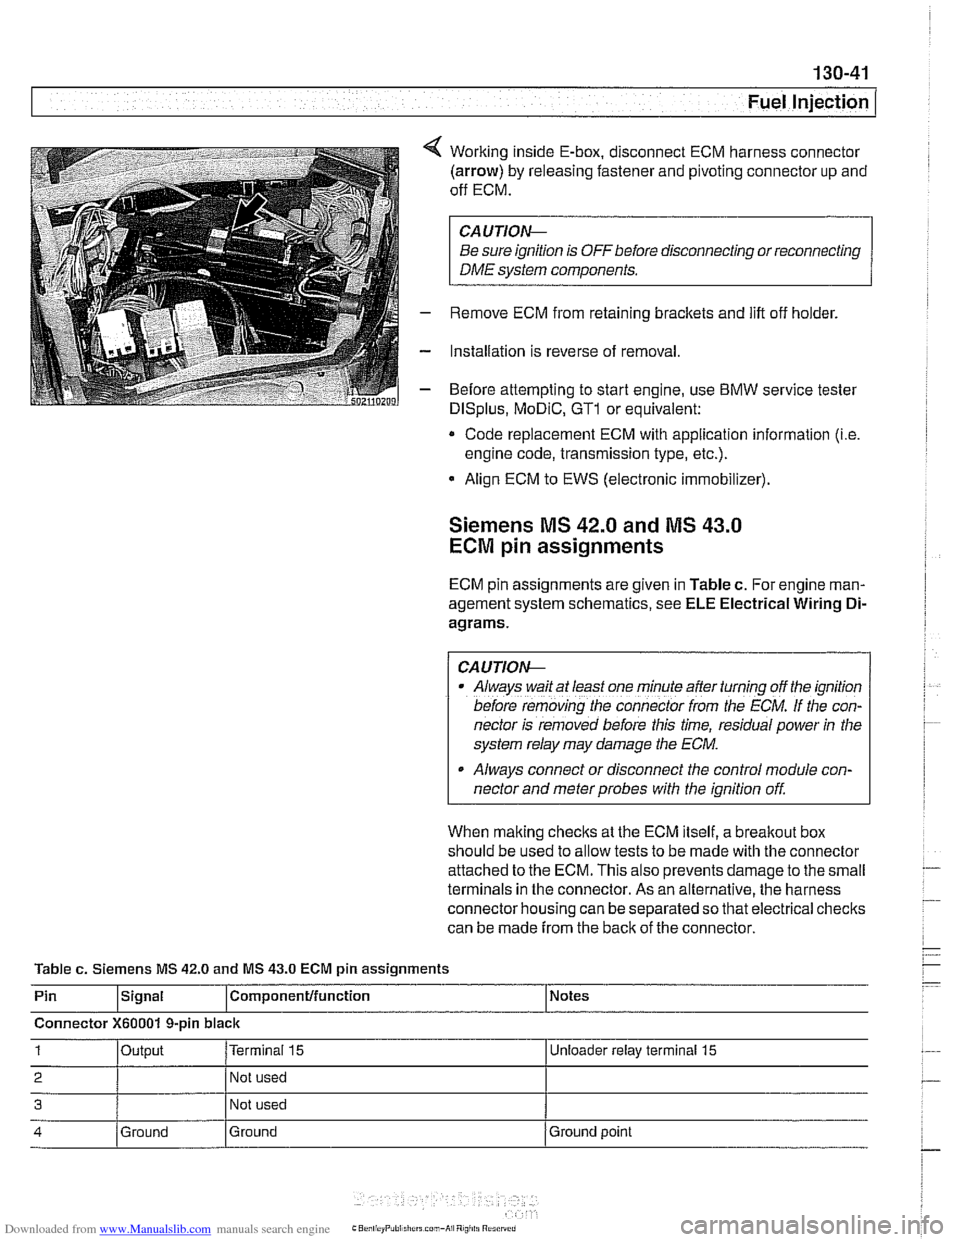
Working inside E-box, disconnect ECM harness connector
(arrow) by releasing fastener and pivoting connector up and
off ECM.
CA UTIOW
Be sure ignition is OFF before disconnecting or reconnecting
DME system components.
Remove ECM from retaining brackets and lift off holder.
Installation is reverse of removal
Before attempting to start engine, use
BMW service tester
DISplus, MoDiC, GTl or equivalent:
* Code replacement ECM with application information (i.e
engine code, transmission type, etc.).
Align ECM to EWS (electronic immobilizer).
Siemens MS 42.0 and MS 43.0
ECM pin assignments
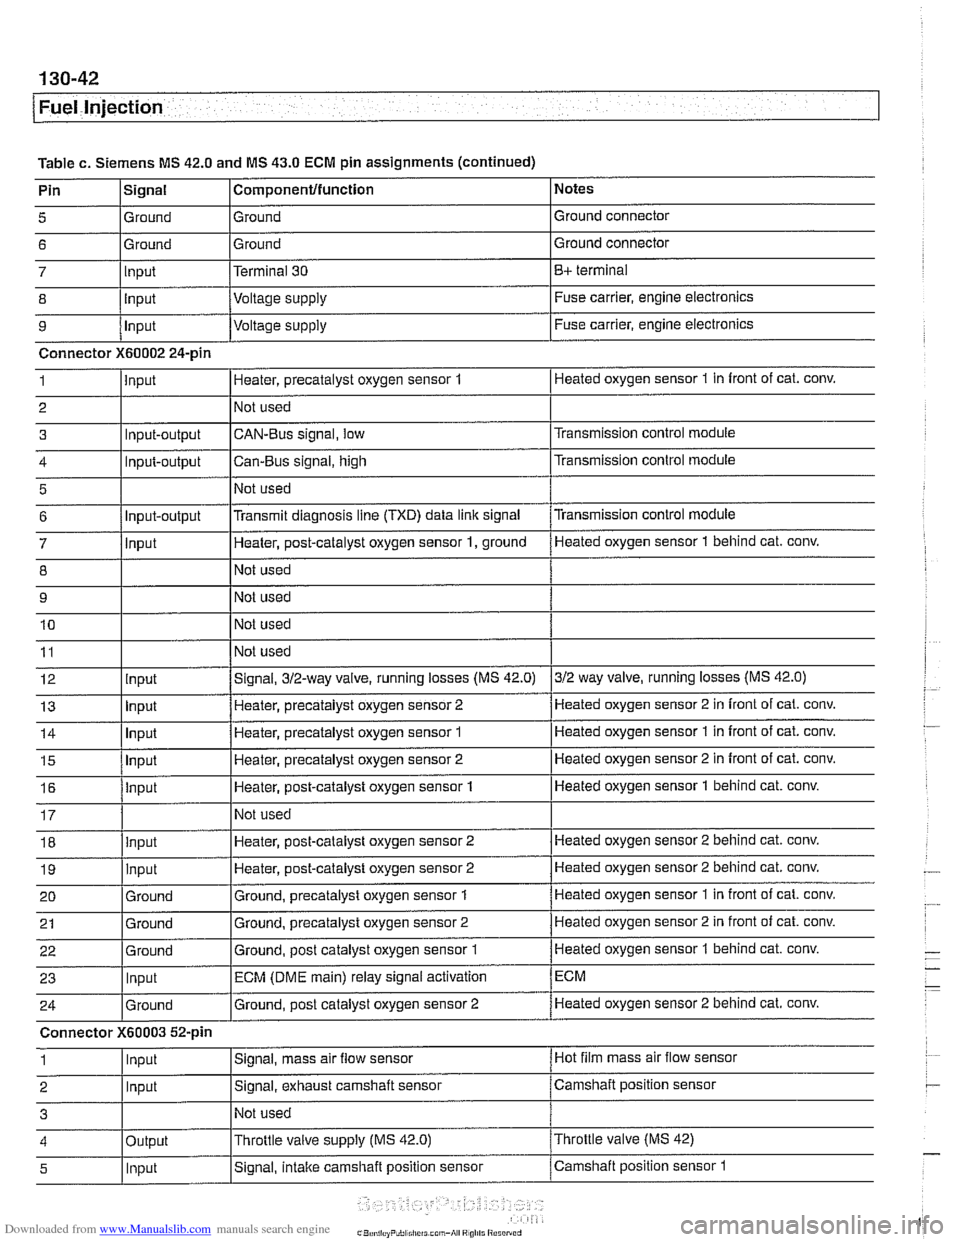
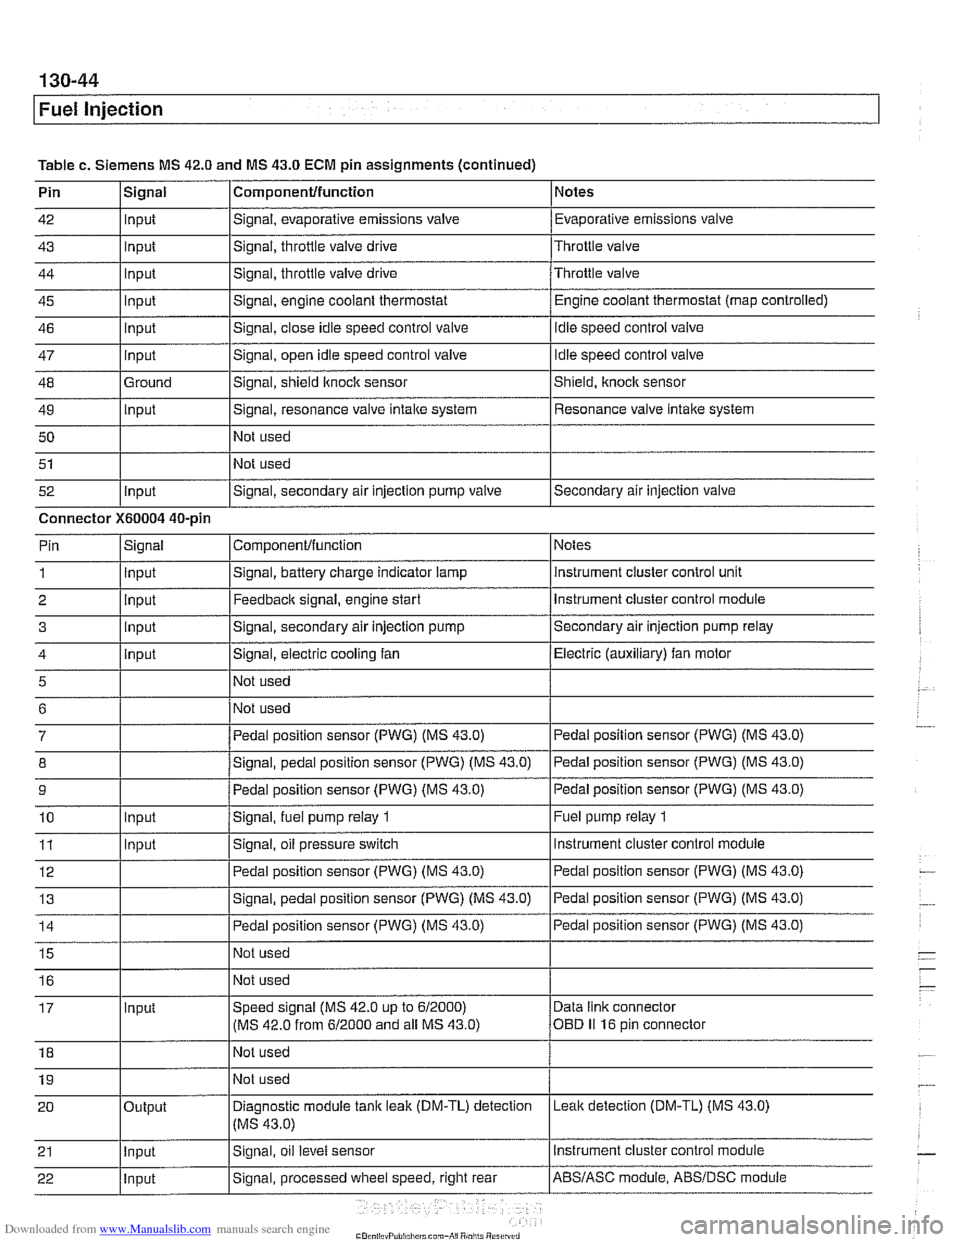
ECM pin assignments are given in Table c. For engine man-
agement system schematics, see
ELE Electrical Wiring Di-
agrams.
/ CAUTIOW I
Al~ays wait at least one mfnule after turning off the ignition
before
remov;ng [he connecror irom rhe ECM. If the con-
nector is removed before this time, residual power
in the
system relay may damage the
ECM.
Always connect or disconnect the control module con-
nector and meter probes with the ignition off.
When making checks at the ECM itself, a
breakout box
should be used to allow tests to be made with the connector
attached to the ECM. This also prevents damage to the small
terminals in the connector. As an alternative, the harness
connector housing can be separated so that electrical checks
can be made from the back of the connector.
Table
c. Siemens MS 42.0 and MS 43.0 ECM pin assignments
Pin
lslgnal l~om~onentlfunction 1 Notes
Connector
X60001 9-pin black
1 loutput I~erminai 15 I Unloeder relay terminal 15
2 I 1 Not used I
3 Not used
4 Ground
Ground Ground
point
Page 432 of 1002
Downloaded from www.Manualslib.com manuals search engine
.-
/Fuel Injection
I ' I - I
9 /ln~ut l~oltaqe supply I Fuse carrier, engine electronics
Table
c. Siemens MS 42.0 and MS 43.0 ECM pin assignments (continued) I ' I . I
Connector X60002 24-pin
1 linput IHeater, precatalyst oxygen sensor 1 I Heated oxygen sensor 1 in front of cat. conv.
I I I
18 llnout IHeater, post-catalyst oxygen sensor 2 ]Heated oxygen sensor 2 behind cat. conv.
Notes
Ground connector
Ground connector
B+ terminal
Fuse carrier, engine electronics
Pin
5
6
7
8
I I I
4 loutput l~hrottle valve supply (MS
42.0) I~hrottle valve (MS 42)
Signal
Ground
Ground Input
lnout
19
20 21
22
23
24
Connector
1
2
3
I I I
5 1 lnput ISignal, intake camshaft position sensor /camshaft position sensor 1
Componentlfunction
Ground
Ground
Terminal 30
Voltaae
SUDP~V
input
Ground
Ground
Ground
Input
Ground
X60003 52-pin
Input
Input
~ -
Heater, post-catalyst oxygen sensor 2
Ground, precatalyst oxygen sensor
1
Ground, precatalyst oxygen sensor 2
Ground, post catalyst oxygen sensor
1
ECM (DME main) relay signal activation
Ground, post catalyst oxygen sensor 2
Signal, mass air
flow sensor
Signal, exhaust camshaft sensor
Not used Heated
oxygen sensor 2 behind cat.
conv.
Heated oxygen sensor 1 in front of cat. conv.
Heated oxygen sensor 2 in front of cat. conv.
Heated oxygen sensor
1 behind cat. conv.
ECM
Heated oxygen sensor 2 behind cat. conv.
Hot film mass air flow sensor
Camshaft position sensor
Page 434 of 1002
Downloaded from www.Manualslib.com manuals search engine
Fuel Injection
Table c. Siemens MS 42.0 and MS 43.0 ECM pin assignments (continued)
Pin
42
43
44
45
46
47
48
49 50
51
52 Componentlfunction
Signal, evaporative emissions valve
Signal, throttle
valve drive
Signal, throttle valve drive
Signal, engine coolant thermostat
Signal, close idle speed control valve
Signal, open idle speed control valve
Signal, shield
ltnock sensor
Signal, resonance valve
intake system
Not used
Not used
Signal, secondary air injection pump valve
Signal
Input
Input
Input
Input
input
Input
Ground
Input
Input
Notes
Evaporative emissions valve
Throttle valve
Throttle valve Engine coolant thermostat (map controlled)
idle speed control valve
Idle speed control valve
Shield,
knock sensor
Resonance valve intake system
Secondary air injection valve
Connector
X60004 40-pin Notes
instrument cluster control unit
Instrument cluster control module
Secondary air injection pump relay
Electric (auxiliary) fan motor
Pedal position sensor (PWG) (MS 43.0)
Pedal position sensor (PWG) (MS 43.0)
Pedal position sensor (PWG) (MS 43.0)
Fuel pump relay
1
Instrument cluster control module
ComponenVfunction
Signal, battery charge indicator lamp
Feedback signal, engine start
Signal, secondary air injection pump
Signal, electric cooling fan
Not used
Not used
Pedal position sensor (PWG) (MS 43.0)
Signal, pedal position sensor (PWG) (MS 43.0)
Pedal position sensor (PWG) (MS 43.0)
Signal,
fuel pump relay 1
Signal, oil pressure switch
Pin
1
2 3
4
5
6
7
8
9
10
11 Signal
Input
Input
input
input
Input
Input
Page 436 of 1002
Downloaded from www.Manualslib.com manuals search engine
130-46
Fuel Injection
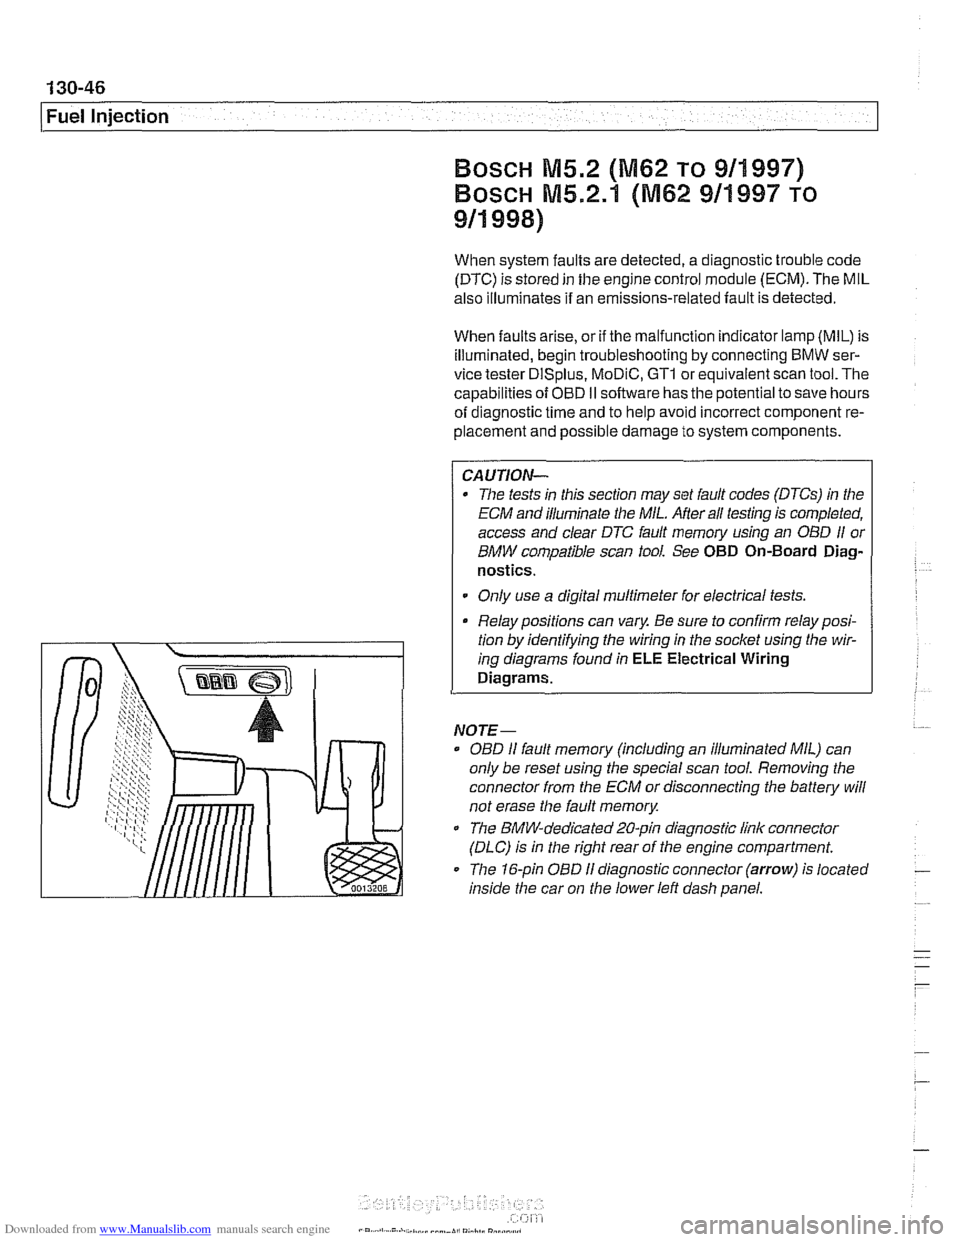
When system faults are detected, a diagnostic trouble code
(DTC) is stored in the engine control module (ECM). The MIL
also illuminates if an emissions-related fault is detected.
When faults arise, or
if the malfunction indicator lamp (MIL) is
illuminated, begin troubleshooting by connecting BMW ser-
vice tester
DISplus. MoDiC, GTI or equivalent scan tool. The
capabilities of
OED II software has the potential to save hours
of diagnostic time and to help avoid incorrect component re-
placement and possible damage to system components.
CA UTIOiU-
The tests in this section may set fault codes (DTCs) in the
ECM and illuminate the MIL. After ail testing is completed,
access and clear DTC fault
memory using an OED I/ or
BMW compatible scan tool. See OBD On-Board Diag-
nostics.
Only use a digital
multimeter for electrical tests.
Relay positions can vary. Be sure to confirm relay
posi-
. tion by identifying the wiring in the socket using the wir-
ing diagrams-found in ~~~~lectrical Wiring
Diagrams.
NOTE-
OED I1 fault memory (including an illuminated MIL) can
only be reset
using~the special scan tool. Removing the
connector from the ECM or disconnecting the battery will
not erase the fault
memory.
The BMW-dedicated 20-pin diagnostic link connector
(DLC) is in the right rear of the engine compartment.
The 16-pin OBD
I1 diagnostic connector (arrow) is located
inside the car on
the lower left dash panel.
Page 437 of 1002
Downloaded from www.Manualslib.com manuals search engine
Fuel Injection
M5.2 system features
The Bosch M5.2 system used on 1997 540i models uses an
88-pin control unit. The
M5.2 system has the following func-
tions and capabilities:
Fully sequential cylinder-individual fuel injection.
Integrated adaptive knock control.
Oxygen sensor fuel mixture control.
0 Self-diagnosis and emergency operation characteristics.
CAN-Bus link.
0 OED II functions (misfire detection, catalytic converter
monitoring, oxygen sensor monitor, and fuel tank ventila-
tion system).
Electronic vehicle immobilization via EWS.
One-touch starter function.
Control of characteristic map thermostat.
M5.2.1 system features
The Bosch M5.2.1 system is used on 1998 540i models. The
M5.2.1 control module utilizes the SKE (standard shell con-
struction housing) with 5 connectors and a combined total of
134 pins.
The M5.2.1 systefn has
tile following functions or capabilities:
Separate power supply relay for ignition coils. Leak diagnosis pump (LDP) control and feedback
rnonitor-
ing for evaporative system leak testing.
Fuel evaporative system providing ORVR (on-board refuel-
ing vapor recovery) compliancy.
Batterylalternator charge logic (idle speed varied with the
battery state of charge).
CAN-Bus communications with the instrument cluster
EWS
Ill "rolling code" ISN interface.
More sensitive ignition
knock sensors.
Pulse width modulated (P-W-M) Heating and
AIC (IHKA)
status signal.
Running loss (312-way) solenoid valve.
Page 439 of 1002
Downloaded from www.Manualslib.com manuals search engine
- Fuel Injection
ECM relay, testing
The engine control module (ECM) relay is energized via the
ECM and supplies battery positive
(B+) power to many of the
engine
management components and subsystems. If this re-
lay is faulty, the engine will not start.
CAUTIOI\C
Relay positions can vary. Be sure to confirm relay position by
identifying the wiring
in the socket using the wiring diagrams
in ELE Electrical Wiring Diagrams.
NOTE-
The ECM relay is also referred to as the DME main relay.
ECM relay powers:
* ECM
Ignition coils
Fuel injection
Evaporative leak detection pump
(5.2.1 only)
Idle air actuator
Camshaft sensors Evaporative emissions valve
Hot film mass air flow sensor
Fuel pump relay
Oxygen sensor heaters
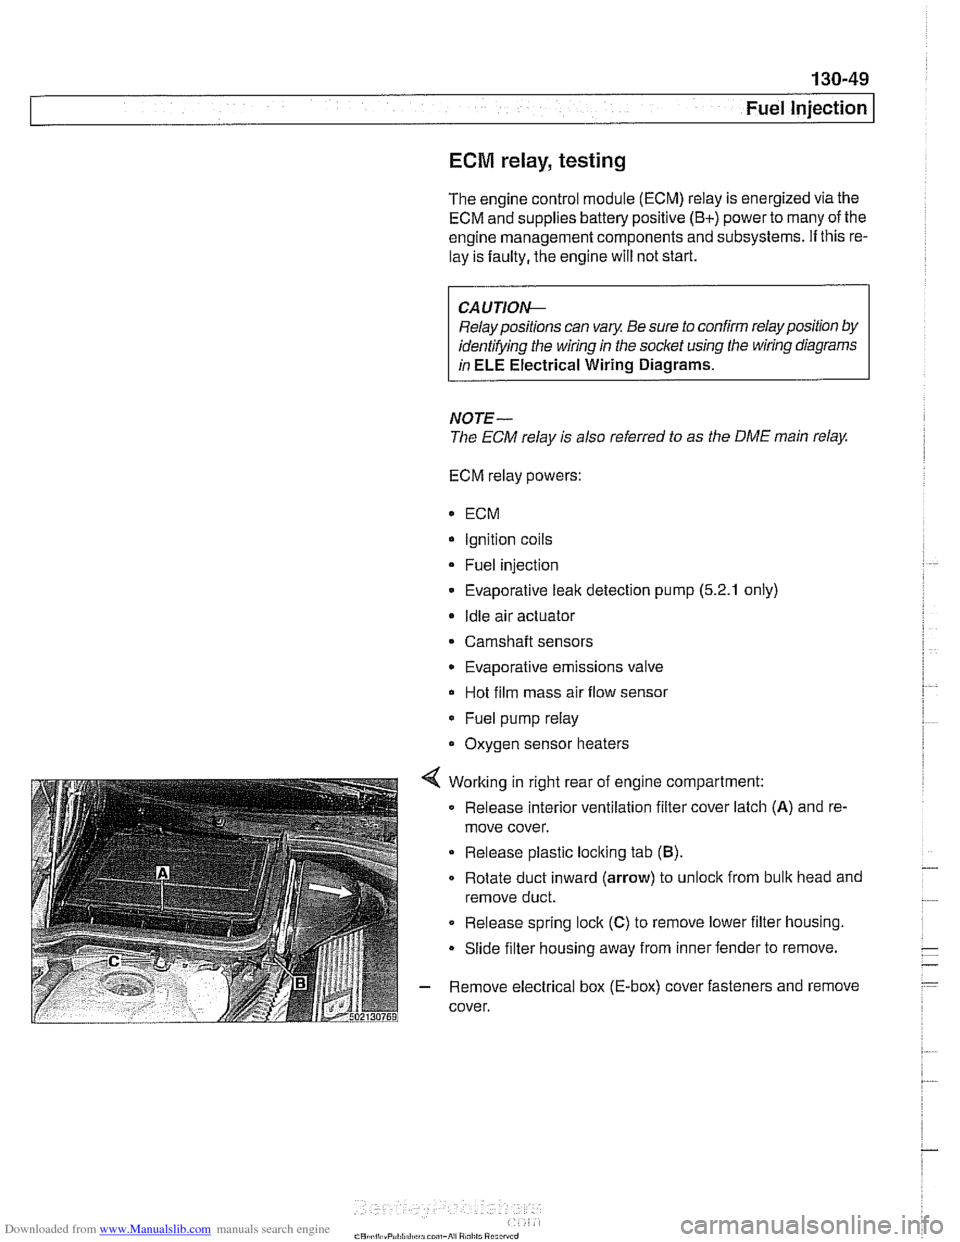
4 Working in right rear of engine compartment:
Release interior ventilation filter cover latch
(A) and re-
move cover.
Release plastic locking tab
(B).
Rotate duct inward (arrow) to unloclc from bulk head and
remove duct.
0 Release spring lock (C) to remove lower filter housing.
Slide filter housing away from inner fender to remove.
- Remove electrical box (E-box) cover fasteners and remove
cover.
Page 440 of 1002
Downloaded from www.Manualslib.com manuals search engine
130-50
Fuel Injection
Bosch M5.2
ECM relay
1 HoL al ail iirnel XOL a1 ail limes
i--[-----i F109 (BOA) electronics I L.$.....: .I:
ECM relay . . . . . . . . . ,
8,s
:,
6 1 .. ... ~~.~~. . ...... .-, Engine control ii~~-~.~~..~ ........ ~~~~~~.~~~~:. module relay -;I
Of?
,c,;,,,
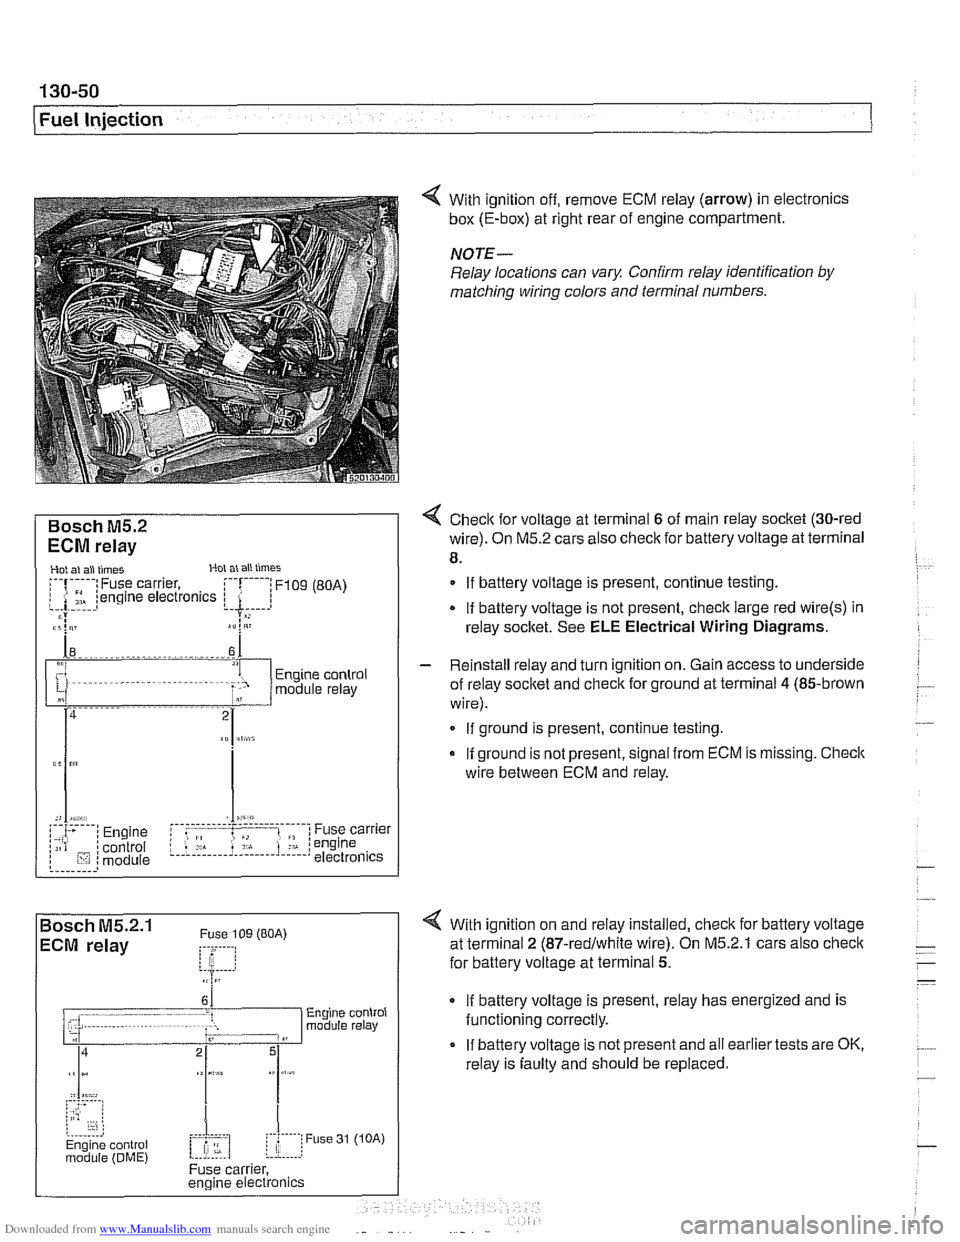
< With ignition off, remove ECM relay (arrow) in electronics
box (E-box) at right rear of engine compartment.
NOTE-
Relay locations can vary. Conh relay identification by
matcliing wiring colors and terminal numbers.
4 Check for voltage at terminal 6 of main relay socket (30-red
wire). On M5.2 cars also check for battery voltage at terminal
8.
. . . . . . . . . ,
If battery voltage is present, continue testing
.
If battery voltage is not present, check large red wire(s) in
relay socltet. See
ELE Electrical Wiring Diagrams.
%P,,tt
- Reinstall relay and turn ignition on. Gain access to underside
of relay socket and
checlc for ground at terminal 4 (85-brown
wire).
. . . . . . . . . . . . - - - - - - - - - . - - - . . l ,,-. ; Engine i f .: , ; Fuse carrier .,A . :engine /;is? /control L.!.!! .... 1.: ...... !.::..! I lij :module electronics If
ground is present, continue testing
If ground is not present, signal from ECM is missing. Checic
wire between ECM and relay.
4 With ignition on and relay installed, check for battery voltage
at terminal
2 (87-redlwhite wire). On M5.2.1 cars also checlc
for battery voltage at terminal 5.
If battery voltage is present, relay has energized and is
functioning correctly.
If battery voltage is not present and all earlier tests are OK,
relay is faulty and should be replaced.