Cylinder BMW 540i 1999 E39 Workshop Manual
[x] Cancel search | Manufacturer: BMW, Model Year: 1999, Model line: 540i, Model: BMW 540i 1999 E39Pages: 1002
Page 242 of 1002
Downloaded from www.Manualslib.com manuals search engine
Camshaft Timing Chain
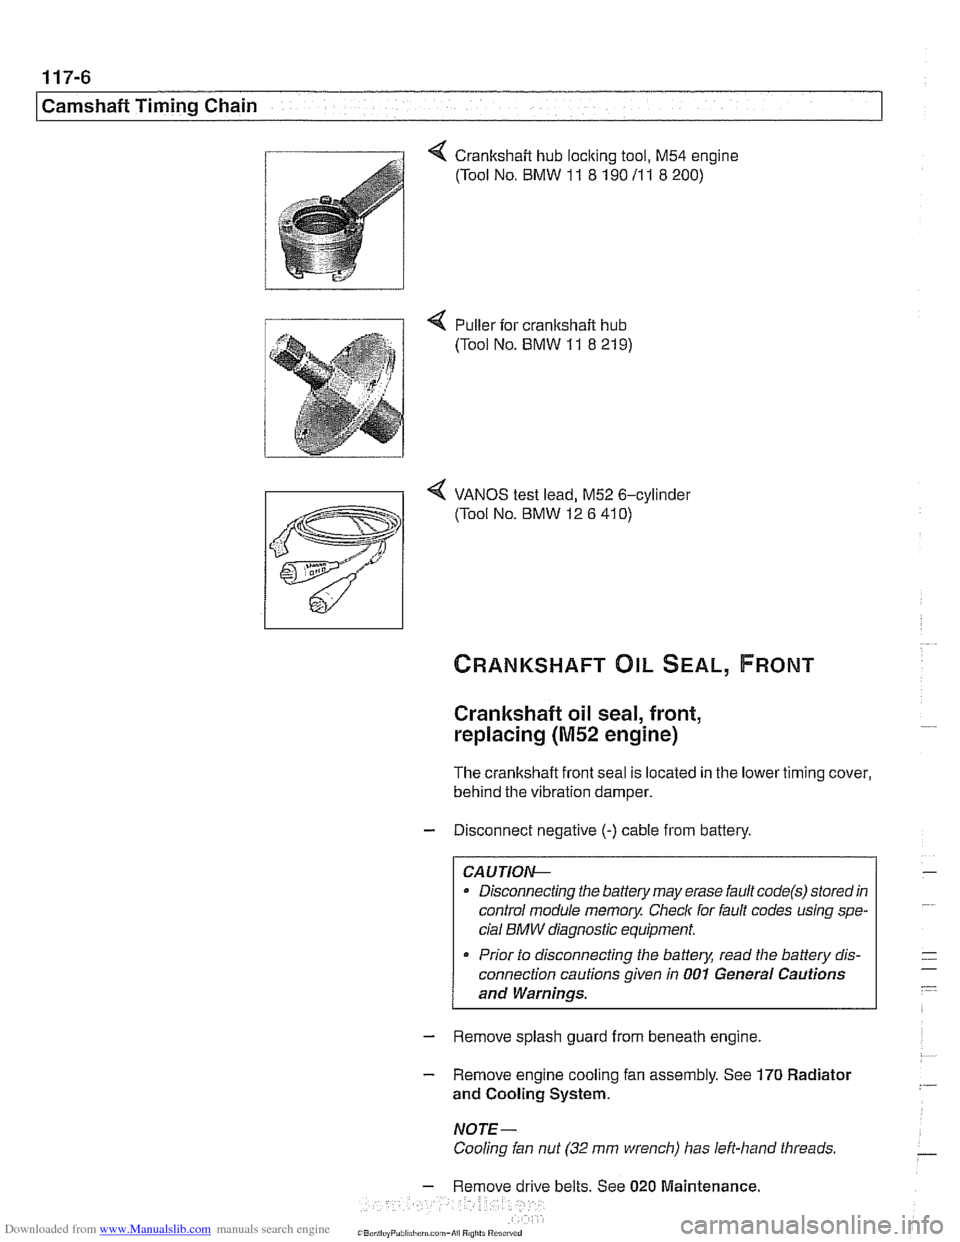
4 Crankshaft hub loclting tool. M54 engine
(Tool No.
BMW 11 8 190 11 1 8 200)
4 VANOS test lead, M52 6-cylinder
(Tool No.
BMW 12 6 410)
Crankshaft oil seal, front,
replacing
(M52 engine)
The crankshaft front seal is located in the lower timing cover,
behind the vibration damper.
- Disconnect negative (-) cable from battery.
CAUTIOIG
a Disconnecting the battery may erase fault code(s) stored in
control module memory Check
for fault codes using spe-
cial
BMW diagnostic equipment.
Prior to disconnecting the battery, read
the battery dis-
connection cautions given in
001 General Cautions
and
Warninqs.
- Remove splash guard from beneath engine.
- Remove engine cooling fan assembly. See 170 Radiator
and Cooling System.
NOTE-
Cooling ian nut (32 mm wrench) has left-hand threads.
- Remove drive belts. See 020 Maintenance.
,~R,~",,,~"P,,,,!,.,,,.,"?,,m-A,, P,",,,s
Page 243 of 1002
Downloaded from www.Manualslib.com manuals search engine
Camshaff Timing Chain
NOTE-
Mark direction of belt rotation if reusing belt.
- Remove vibration damper mounting bolts and remove vibra-
tion damper and pulley from hub.
NOTE- The M52
6-cylinder engine uses a 2-piece vibration damper
and hub assembly.
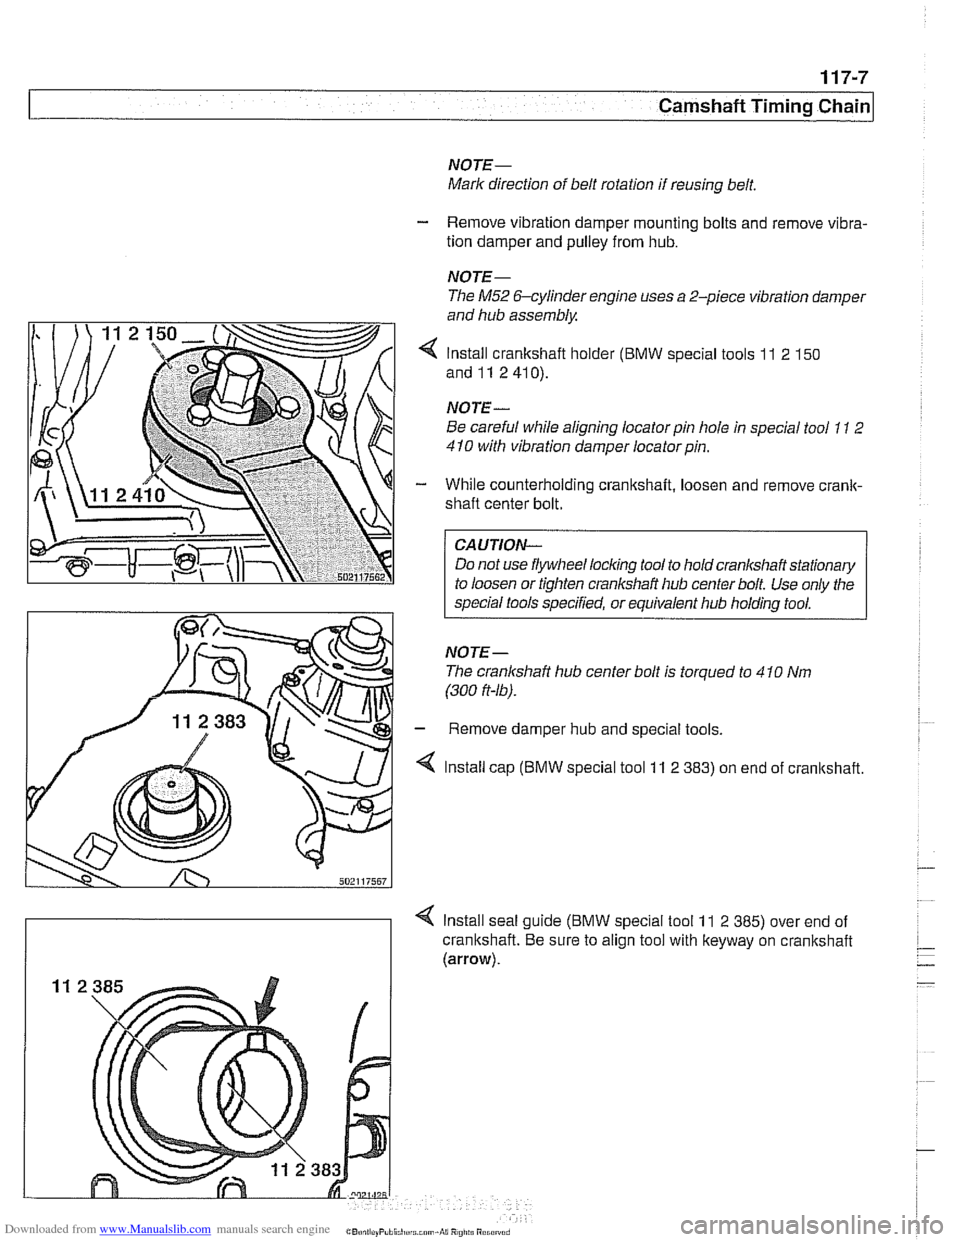
4 Install crankshaft holder (BMW special tools 11 2 150
and11 2410).
NOTE
-
Be careful while aligning locator pin hole in special tool 11 2
410 with vibration damper locatorpin.
- While counterholding crankshaft, loosen and remove crank-
shaft center bolt.
CAUTION-
Do not use flywheel locking tool to hold crankshaft stationary
to loosen or tighten crankshaft hub center bolt Use only the
special tools specified, or equivalent hub holding tool.
NOTE- The cranlshaft hub center bolt is torqued to 4
10 Nm
(300
ft-16).
- Remove damper hub and special tools.
4 Install cap (BMW special tool 11 2 383) on end of cranltshaft.
4 Install seal guide (BMW special tool 11 2 385) over end of
crankshaft. Be sure to align tool with keyway on crankshaft
(arrow).
Page 251 of 1002
Downloaded from www.Manualslib.com manuals search engine
Camshaft Timina chain1
- Remove viscous clutch cooling fan. See 170 Radiator and
Cooling
System.
CA UTlOEIC
The radiator cooling fan nut (32mm wrench) has left- hand
threads.
.
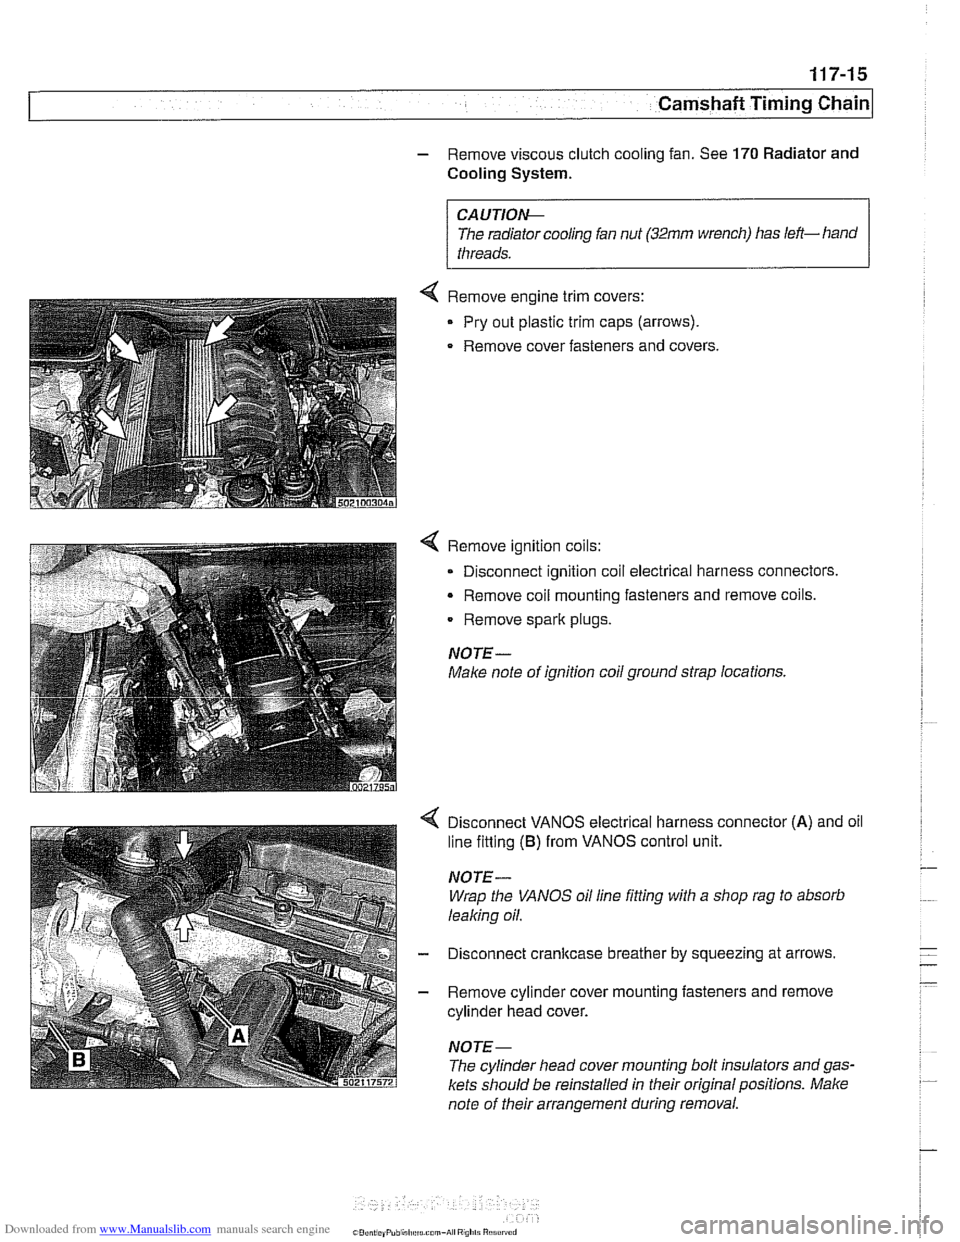
< Remove engine trim covers:
Pry out plastic trim caps (arrows).
. Remove cover fasteners and covers.
4 Remove ignition coils:
0 Disconnect ignition coil electrical harness connectors
Remove
coil mounting fasteners and remove coils.
Remove spark plugs.
NOTE-
Make note of ignition coil ground strap locations.
Disconnect VANOS electrical harness connector
(A) and oil
line fitting
(B) from VANOS control unit.
NOTE-
Wrap the VANOS oil line fitting with a shop rag to absorb
leaking oil.
- Disconnect cranltcase breather by squeezing at arrows,
- Remove cylinder cover mounting fasteners and remove
cylinder head cover.
NOTE-
The cylinder head cover mounting bolt insulators and gas.
kets should be reinstalled in their original positions. Make
note of their arrangement during removal.
Page 252 of 1002
Downloaded from www.Manualslib.com manuals search engine
Camshaft Timing Chain -- - -1
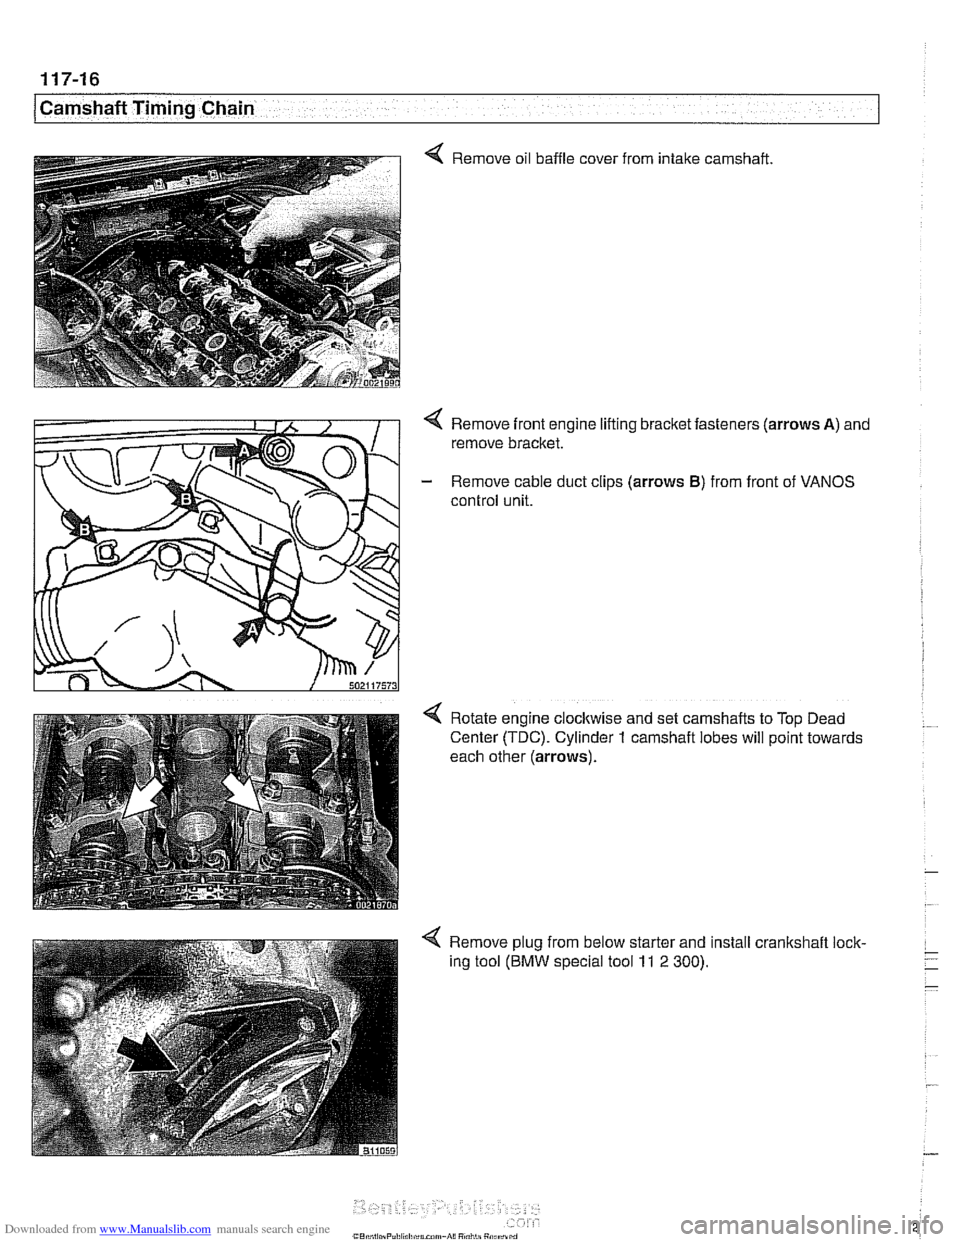
Q Remove oil baffle cover
from intake
camshaft
Remove front engine lifting bracket fasteners (arrows
A) and
remove bracket.
- Remove cable duct clips (arrows B) from front of VANOS
control unit.
Rotate engine
clocltwise and set camshafts to Top Dead
Center (TDC). Cylinder
1 camshaft lobes will point towards
each other (arrows).
4 Remove plug from below starter and install crankshaft lock-
ing tool
(BMW special tool 11 2 300).
Page 253 of 1002
Downloaded from www.Manualslib.com manuals search engine
Camshaft Timing Chain
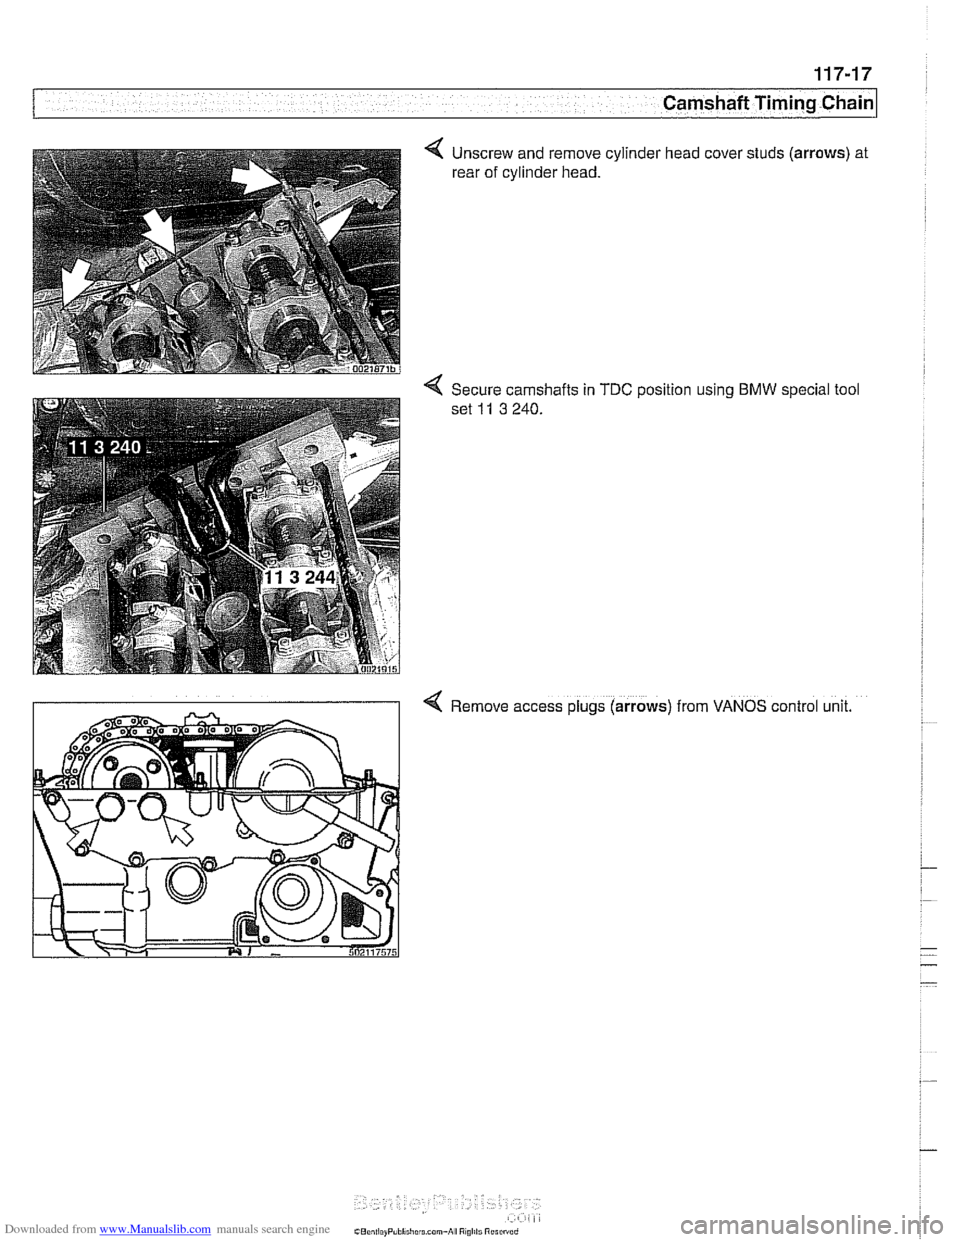
4 Unscrew and remove cylinder head cover studs (arrows) at
rear of cylinder head.
% Secure camshafts in TDC position using BMW special tool
set
11 3 240.
4 Remove access plugs (arrows) from VANOS control unit.
Page 254 of 1002
Downloaded from www.Manualslib.com manuals search engine
117-18
Camshaft Timing Chain
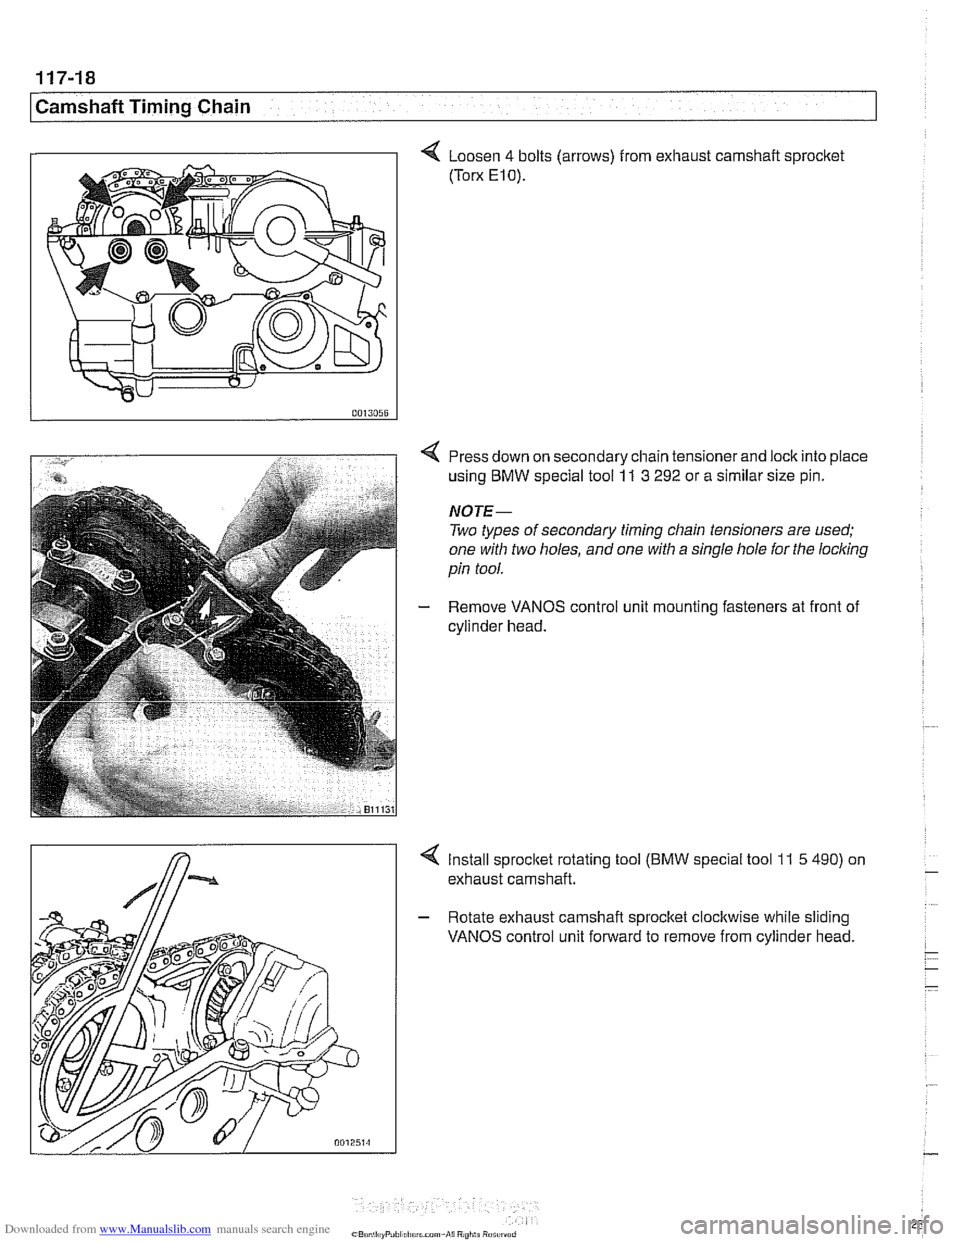
4 Loosen 4 bolts (arrows) from exhaust camshait sprocket
(Torx E10).
Press down on secondary chain tensioner and lock into place
using BMW special tool
11 3 292 or a similar size pin.
NOTE-
Two types of secondary timing chain tensioners are used;
one with two holes, and one with a single hole for the
locl
Remove VANOS control unit mounting fasteners at front of
cylinder head.
4 Install sprocltet rotating tool (BMW special tool 11 5 490) on
exhaust camshaft.
- Rotate exhaust camshaft sprocket clockwise while sliding
VANOS control unit forward to remove from cylinder head.
Page 255 of 1002
Downloaded from www.Manualslib.com manuals search engine
Camshaft Timing chain1
VANOS control unit, installing (M52 engine)
CAUTION-
Incorrect installation of the VANOS control unit may result in
damage to the engine.
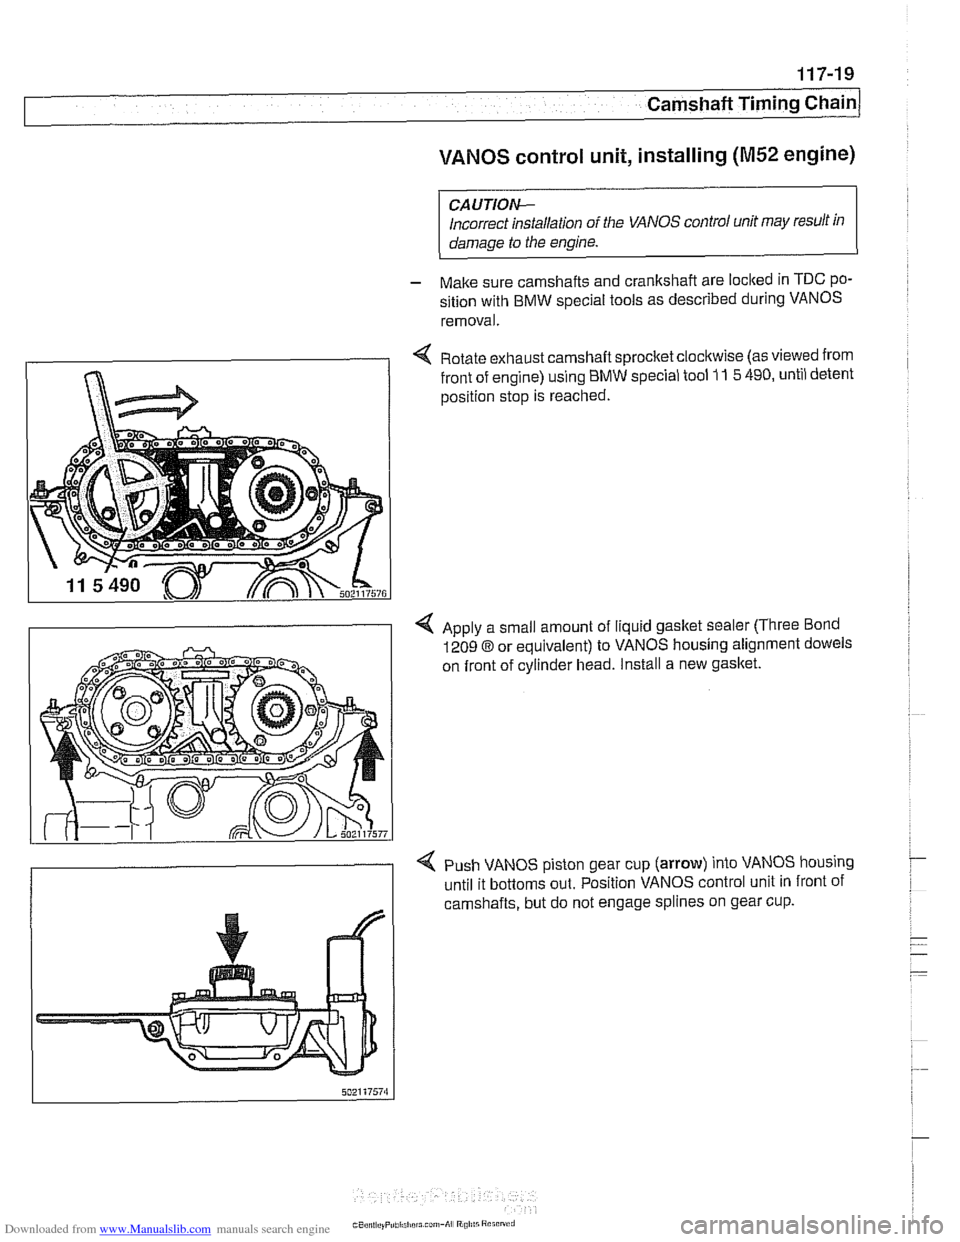
- Make sure camshafts and crankshaft are loclted in TDC po-
sition with BMW special tools as described during VANOS
removal.
< Rotate exhaust camshaft sprocket clocltwise (as viewed from
front of engine) using BMW special tool
11 5 490, until detent
position stop is reached.
4 Apply a small amount of liquid gasket sealer (Three Bond
1209
8 or equivalent) to VANOS housing alignment dowels
on front of cylinder head. Install a new
gasket.
< Push VANOS piston gear cup (arrow) into VANOS housing
until it bottoms out. Position VANOS control unit in front of
camshafts, but do not engage splines on gear cup.
Page 256 of 1002
Downloaded from www.Manualslib.com manuals search engine
11 7-20
Camshaft Timing Chain
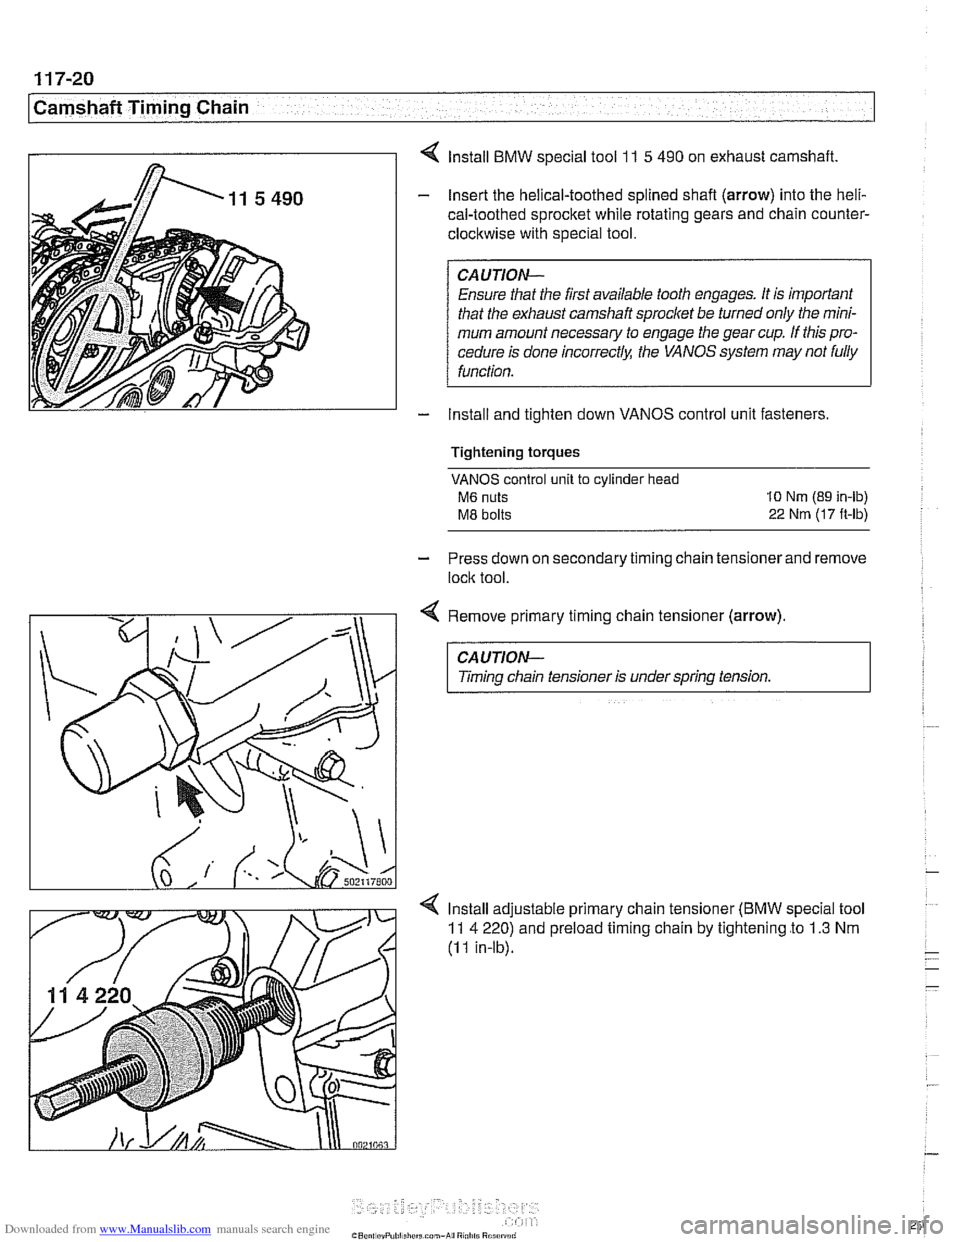
4 lnstall BMW special tool 1 I 5 490 on exhaust camshaft.
- Insert the helical-toothed splined shafl (arrow) into the heli-
cal-toothed sprocket while rotating gears and chain counter-
clockwise with special tool.
CAUTION- Ensure
that the first available tooth engages. It is important
that the exhaust camshaft sprocket be turned only the mini-
mum amount necessary to engage the gear cup. If this pro-
cedure is done
incorrectlq: the VANOS system may not fully
function.
- Install and tighten down VANOS control unit fasteners
Tightening torques
VANOS control unit to cylinder head
M6 nuts 10 Nm (89 in-lb)
M8 bolts 22 Nrn (17 ft-lbj
- Press down on secondary timing chain tensioner and remove
lock tool.
Remove primary timing chain tensioner
(arrow)
CAUTION-
Timing chain tensioner is under spring tension.
lnstall adjustable primary chain tensioner
(BMW special tool
11 4 220) and preload timing chain by tightening to 1.3 Nm
(I I in-lb).
Page 257 of 1002
Downloaded from www.Manualslib.com manuals search engine
Camshaft Timing Chain/ - - - - - - . - - . - .
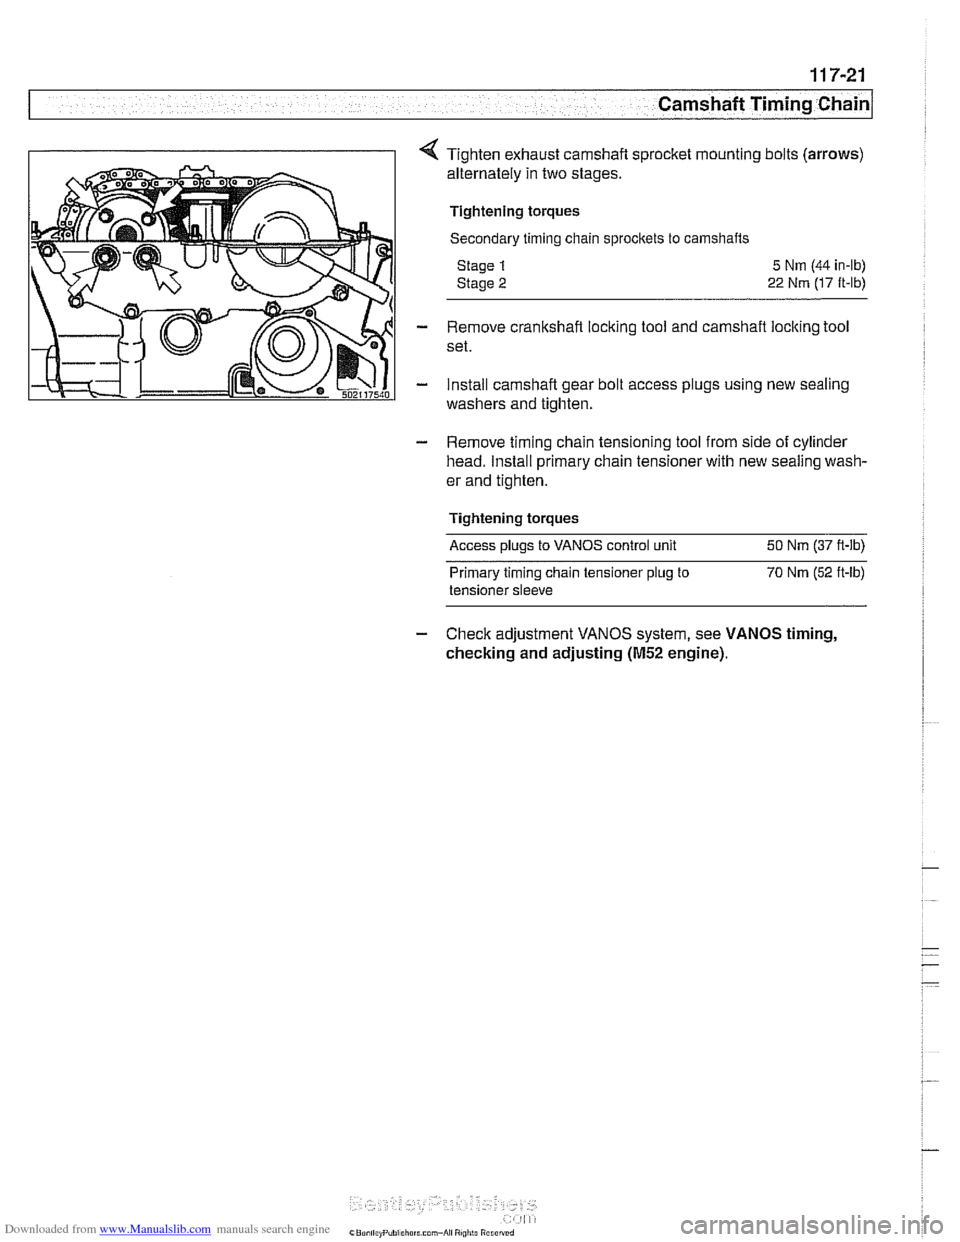
Tighten exhaust camshaft sprocket mounting bolts (arrows)
alternately in two stages.
Tightening torques
Secondary timing chain sprocltets to camshafts
Stage
1
Stage 2
5 Nm (44 in-lb)
22 Nm (17 ft-lb)
- Remove crankshaft locking tool and camshaft locking tool
set.
- install camshaft gear bolt access plugs using new sealing
washers and tighten.
- Remove timing chain tensioning tool from side of cylinder
head. Install primary chain tensioner with new sealing wash-
er and tighten.
Tightening torques
Access plugs to VANOS control unit 50 Nm (37 ft-lb)
Primary timing chain tensioner
plug to 70 Nm (52 ft-lb)
tensioner sleeve
- Check adjustment VANOS system, see VANOS timing,
checking and adjusting
(M52 engine).
Page 259 of 1002
Downloaded from www.Manualslib.com manuals search engine
Camshaft Timing Chain
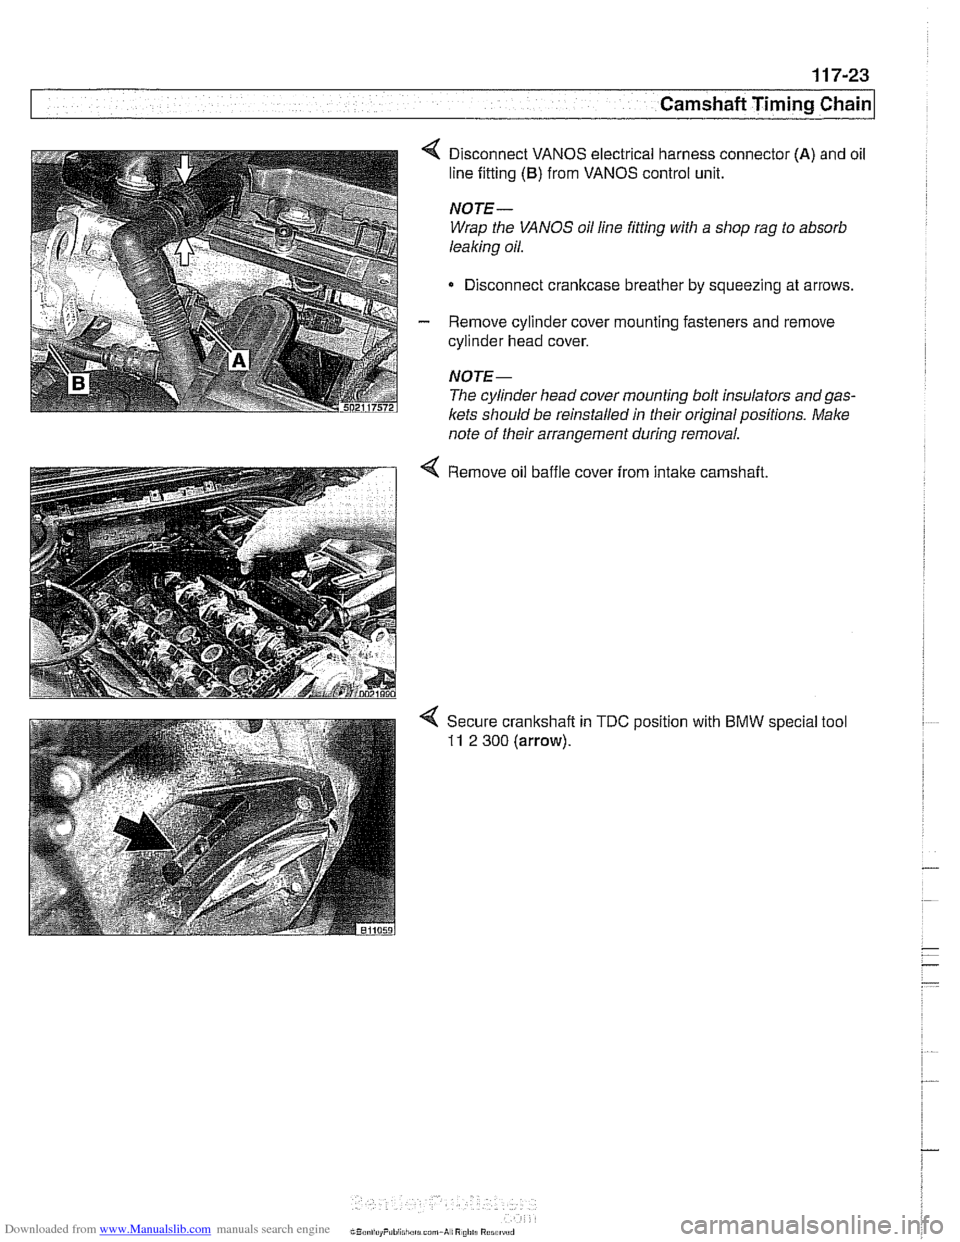
4 Disconnect VANOS electrical harness connector (A) and oil
line fitting
(B) from VANOS control unit.
NOTE-
Wrap the VANOS oil line fitting with a shop rag to absorb
leaking oil.
Disconnect cranltcase breather by squeezing at arrows.
- Remove cylinder cover mounting fasteners and remove
cylinder head cover.
NOTE-
The cylinder head cover mounting bolt insulators andgas-
lets should be reinstalled in their original positions. Make
note of their arrangement during removal.
4 Remove oil baffle cover from intake camshaft