boot BMW 540i 1999 E39 Service Manual
[x] Cancel search | Manufacturer: BMW, Model Year: 1999, Model line: 540i, Model: BMW 540i 1999 E39Pages: 1002
Page 775 of 1002
Downloaded from www.Manualslib.com manuals search engine
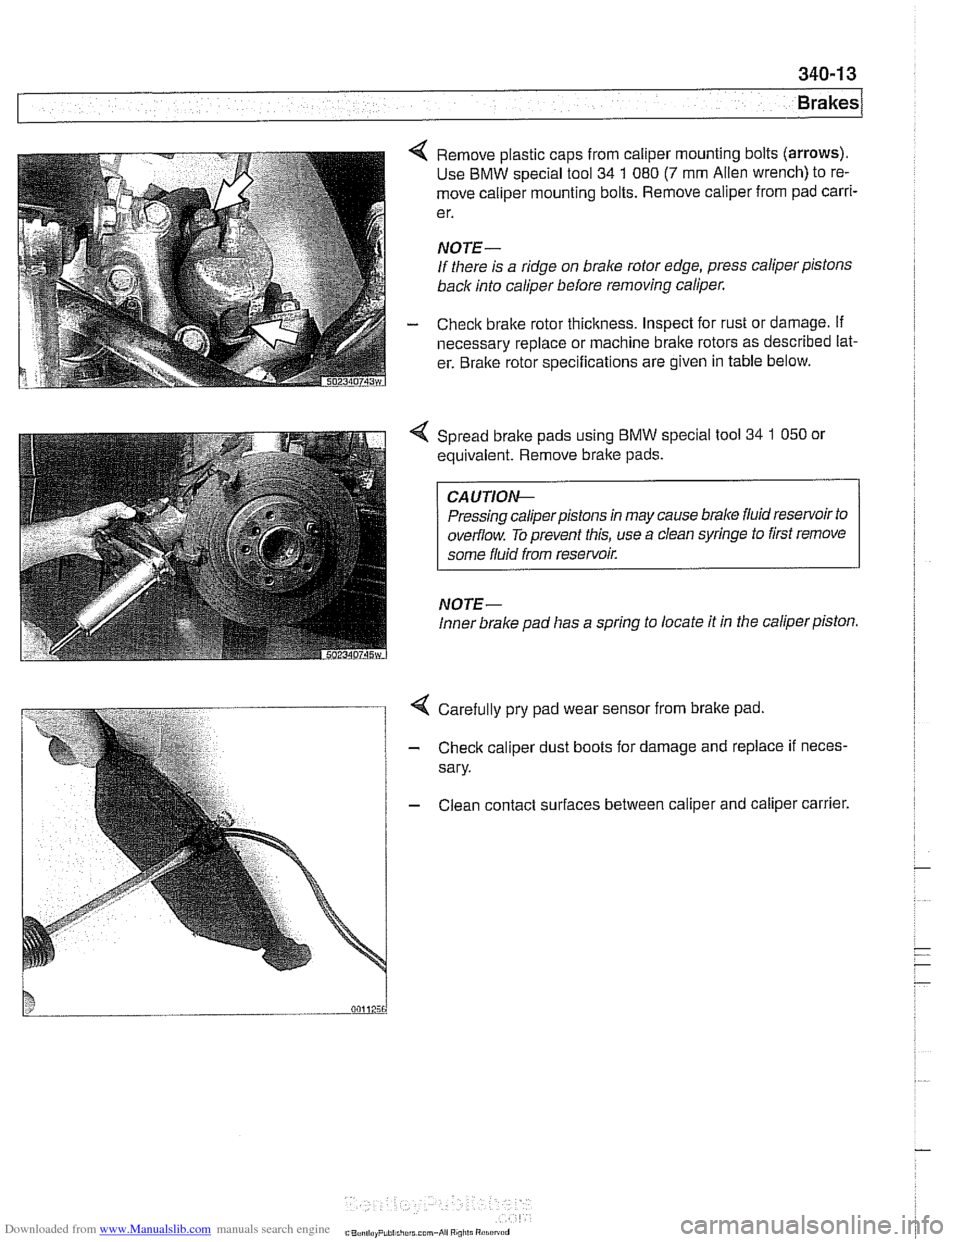
4 Remove plastic caps from caliper mounting bolts (arrows).
Use BMW special tool 34 1 080 (7 mm Alien wrench) to re-
move caliper mounting bolts. Remove caliper from pad
carri-
e r.
NOTE-
If there is a ridge on brake rotor edge, press caliper pistons
back into caliper before removing caliper.
- Check brake rotor thickness. Inspect for rust or damage. if
necessary replace or machine brake rotors as described lat-
er. Bralte rotor specifications are given in table below.
Spread bralte pads using BMW special tool
34 1 050 or
equivalent. Remove brake pads.
CA UTIOG
Pressing caliperpistons in may cause brake fluid reservoir to
overflow. To prevent this, use a clean syringe to first remove
some fluid from reservoir.
NOTE-
Inner brake pad lias a spring to locate it in the caliper piston.
4 Carefully pry pad wear sensor from brake pad
- Check caliper dust boots for damage and replace if neces-
sary.
- Clean contact surfaces between caliper and caliper carrier.
C"..., I,.. P,hi..,,,.r.. mm-*ii Ai"i,li "1.i"~"d
Page 784 of 1002
Downloaded from www.Manualslib.com manuals search engine
Brakes
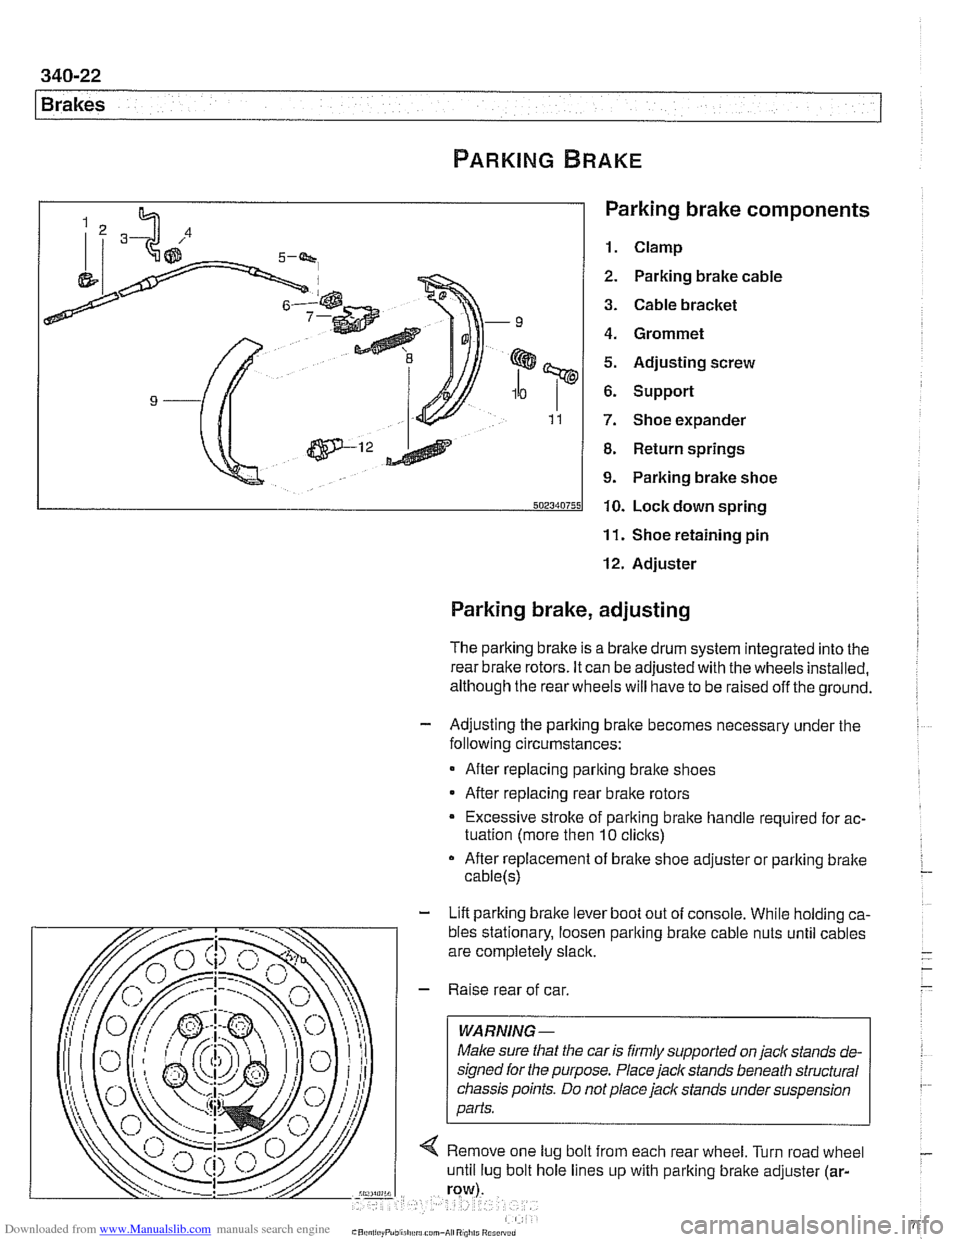
Parking brake components
1. Clamp
2. Parking brake cable
3. Cable bracket
4. Grommet
5. Adjusting screw
6. Support
7. Shoe expander
8. Return springs
9. Parking brake shoe
10. Lock down spring
11. Shoe retaining pin
12. Adjuster
Parking brake, adjusting
The parking brake is a brake drum system integrated into the I
rear brake rotors. It can be adjusted with the wheels installed,
although the rear wheels will have to be raised off the ground.
- Adjusting the parking bralte becomes necessary under the
following circumstances:
After replacing parking bralte shoes
After replacing rear brake rotors
Excessive stroke of parking brake handle required for ac-
tuation (more then
10 clicks)
After replacement of brake shoe adjuster or parking bralte
cable(s)
- Lift parking brake lever boot out of console. While holding ca-
Page 785 of 1002
Downloaded from www.Manualslib.com manuals search engine
340-23
Brakes
- Using flat-bladed screwdriver, reach into brake drum through
lug bolt hole. Turn brake adjuster until wheel no longer turns.
Back adjuster off
12 notches.
Parking brake adjusting (initial)
Back
off adjuster through wheel
lug bolt hole 12 notches
- Working inside car, set parking brake several times to seat
cable. Then pull parking brake
lever up two notches. Tighten
cable adjusting nuts until it is just possible to turn rear wheels
with slight resistance.
- Release lever and make sure rear wheels turn freely
- Turn on ignition. Pull up parlting brake lever 1 notch and
make sure that parking bralte warning light comes on. if not,
adjust parking bralte warning light contact switch.
- Install parking brake lever boot. Install road wheel lug bolts.
Tightening torque Road
wheel to hub 120 i. 10 Nrn (89 i- 7 ft-lb)
Parking brake shoes, removing and
installing
- Raise rear of car and remove road wheels.
WARNING-
Make sure that the car is firmly supported on jack stands de-
signed for
the purpose. Place jack stands beneath structural
chassis points. Do not place
jaclc stands under suspension
parts.
- Without disconnecting brake fluid hose, remove rear bralte
calipers from trailing arms. Remove rear brake rotors as de-
scribed earlier.
CAUTION-
Do not let the brake caliper assembly hang from the brake
hose. Support caliper from chassis with strong wire.
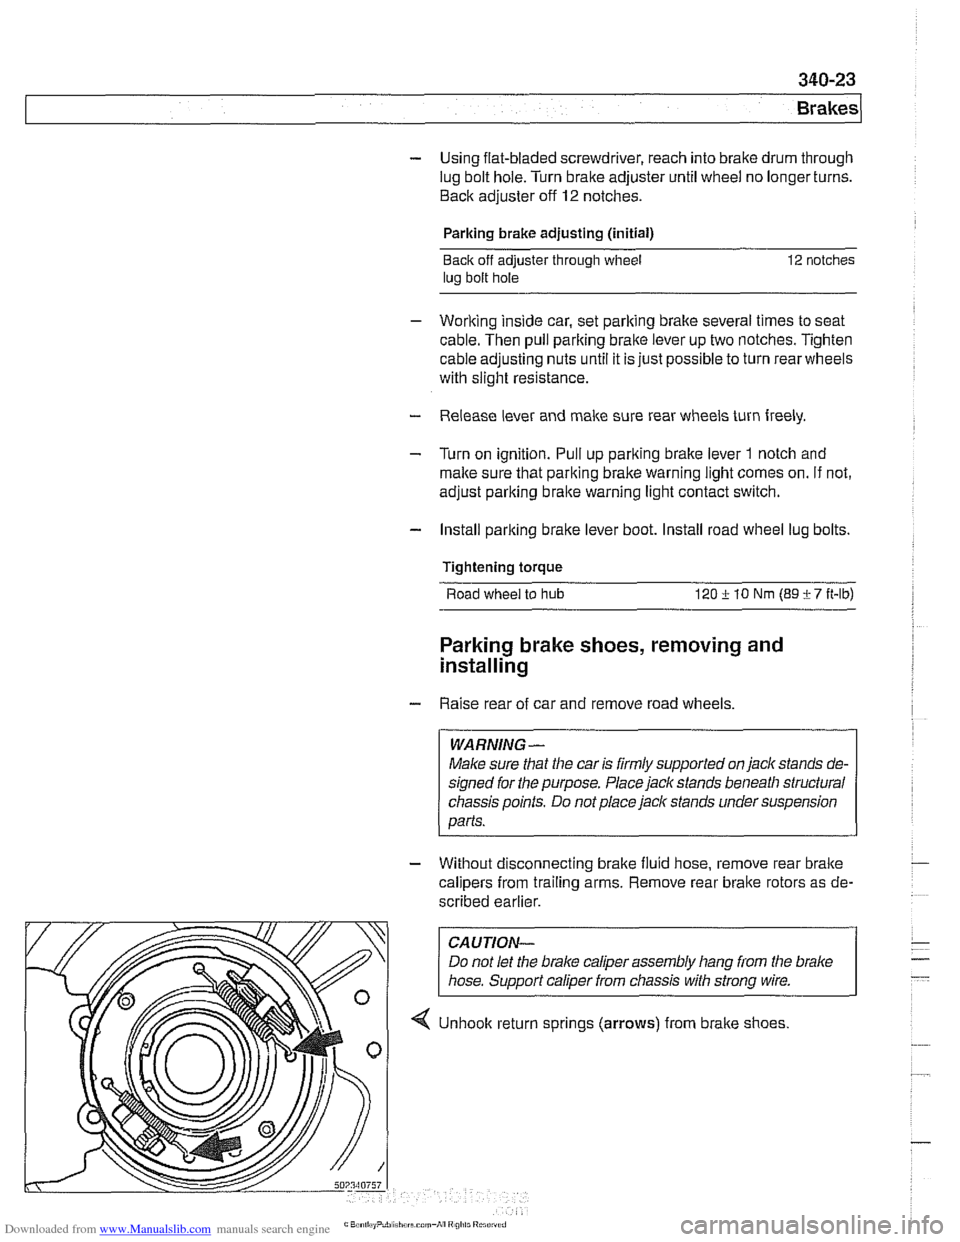
4 Unhook return sprlngs (arrows) from brake shoes
Page 863 of 1002
Downloaded from www.Manualslib.com manuals search engine
51 0-1 3
Exterior Trim, Bumpers
Exterior trim is attached to the body with plastic clips and fas-
teners that may be damaged during removal. Be sure to have
necessary fasteners on hand when reinstalling exterior trim
pieces.
BMW emblem, removing and installing
The procedure given below applies to both front and rear
emblems.
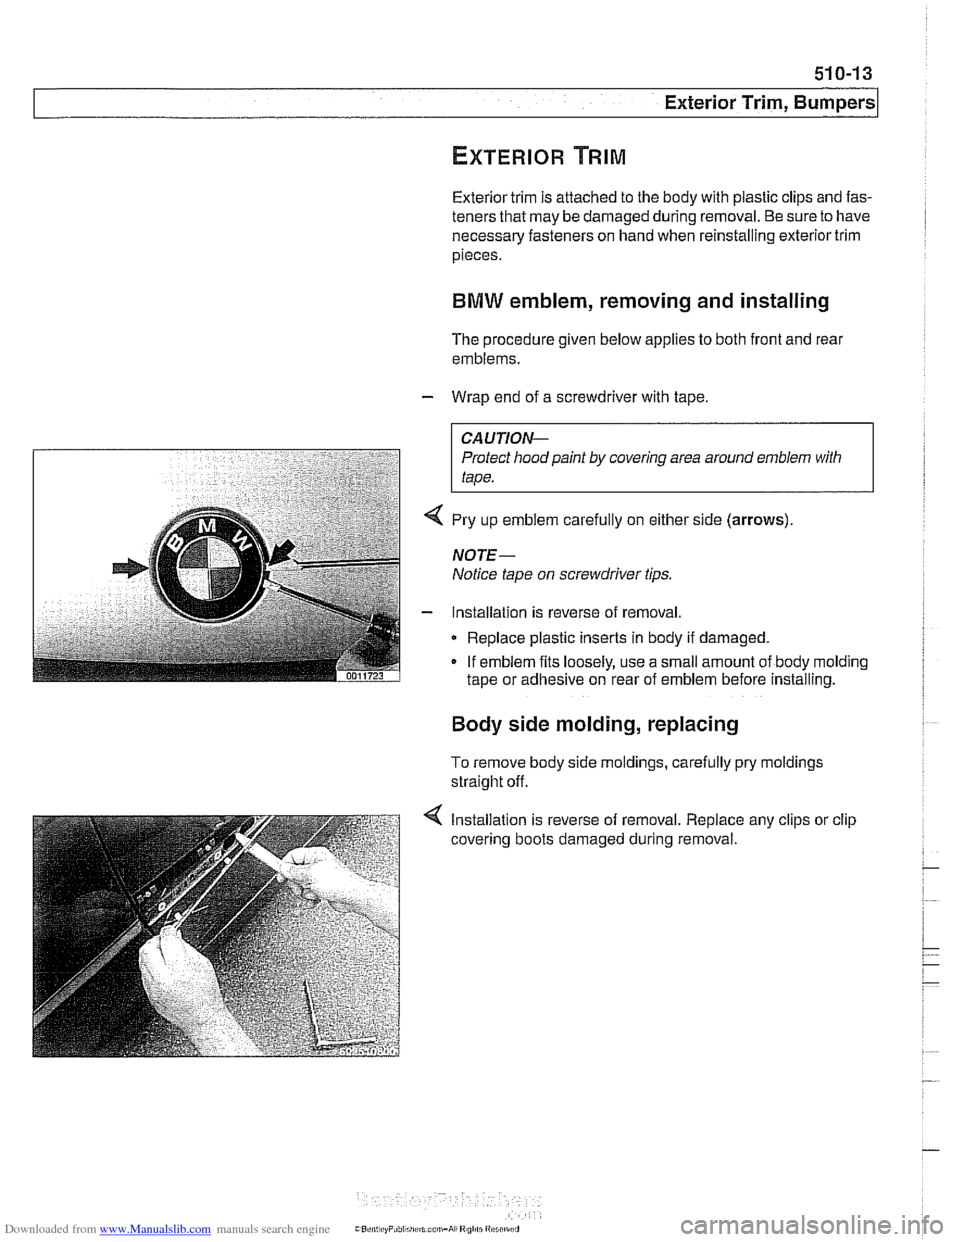
- Wrap end of a screwdriver with tape.
CAUTION-
Protect hood paint by covering area around emblem with
tape.
4 Pry up emblem carefully on either side (arrows)
NOTE-
Notice tape on screwdriver tips.
- Installation is reverse of removal
Replace plastic inserts in body if damaged.
If emblem fits loosely, use a small amount of body molding
tape or adhesive on rear of emblem before installing.
Body side molding, replacing
To remove body side moldings, carefully pry moldings
straight off.
4 Installation is reverse of removal. Replace any clips or clip
covering boots damaged during removal.
Page 884 of 1002
Downloaded from www.Manualslib.com manuals search engine
51 3-6
Interior Trim
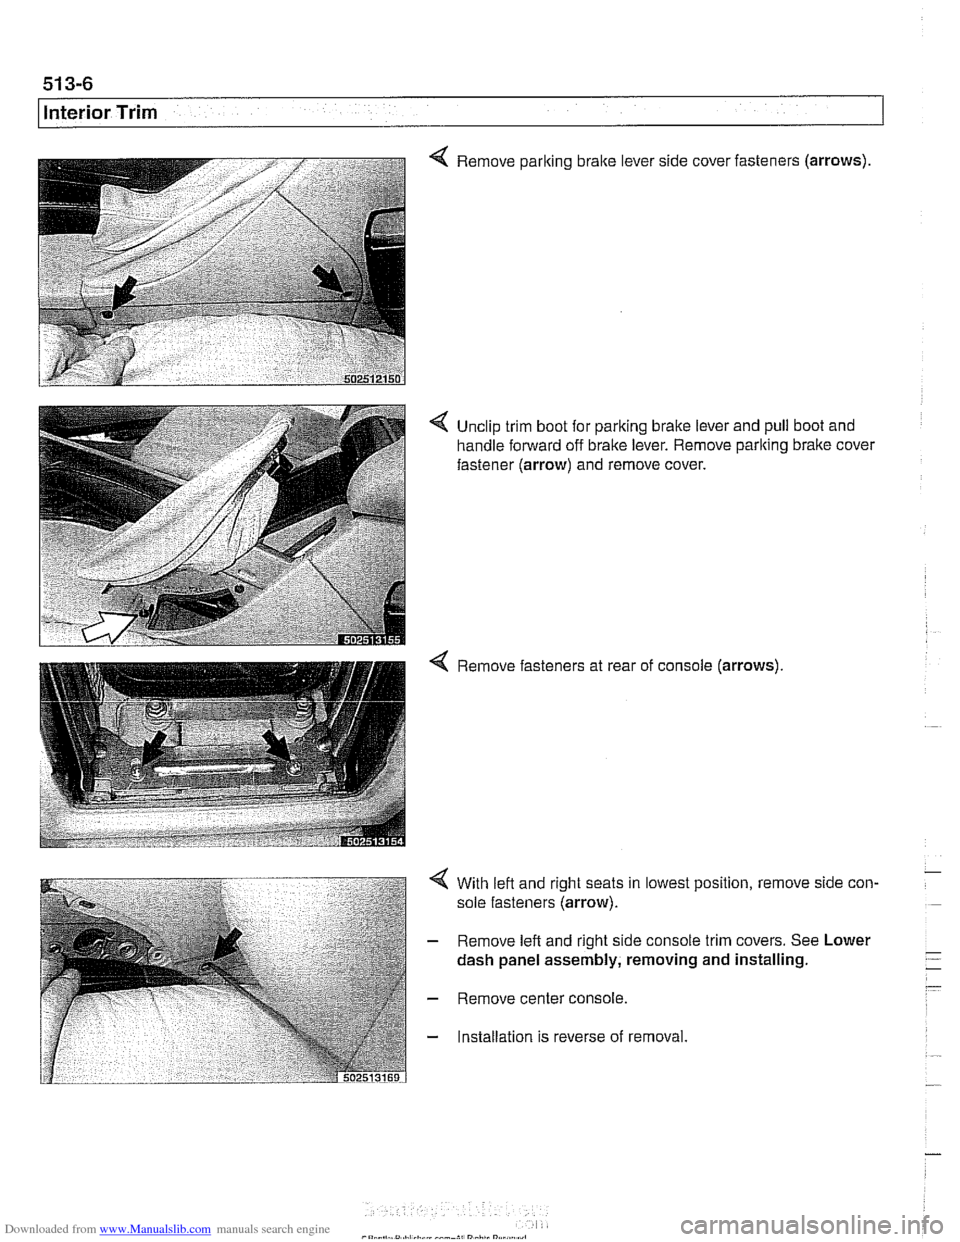
Remove parking bralte lever side cover fasteners (arrows)
4 Unclip trim boot for parking brake lever and pull boot and
handle forward off brake lever. Remove parking
bralte cover
fastener
(arrow) and remove cover.
4 Remove fasteners at rear of console (arrows).
4 With left and right seats in lowest position, remove side con-
sole fasteners
(arrow).
- Remove left and right side console trim covers. See Lower
- Remove center console.
- Installation is reverse of removal.
Page 885 of 1002
Downloaded from www.Manualslib.com manuals search engine
Interior Trim
The E39 dashboard assembly includes the instrument clus-
ter, passenger side
airbag, glove compartment, fuse and re-
lay panel, radio. IHKA control panel oron-board monitor (if
equipped with GPS). The dash is made up of an upper and
lower sections. The lower section must be remove before the
upper section can be removed.
Dashboard removal is a complex operation. Read the proce-
dures through before starting work.
Lower dash panel assembly, removing and
installing
- Disconnect negative (-) cable from battery and cover termi-
nal with
insulating material.
--7
CAUTION-
Prior to disconnecting the battery, read the battery discon-
nectioncautionsgiven atthe irontin001 General Warnings
and Cautions.
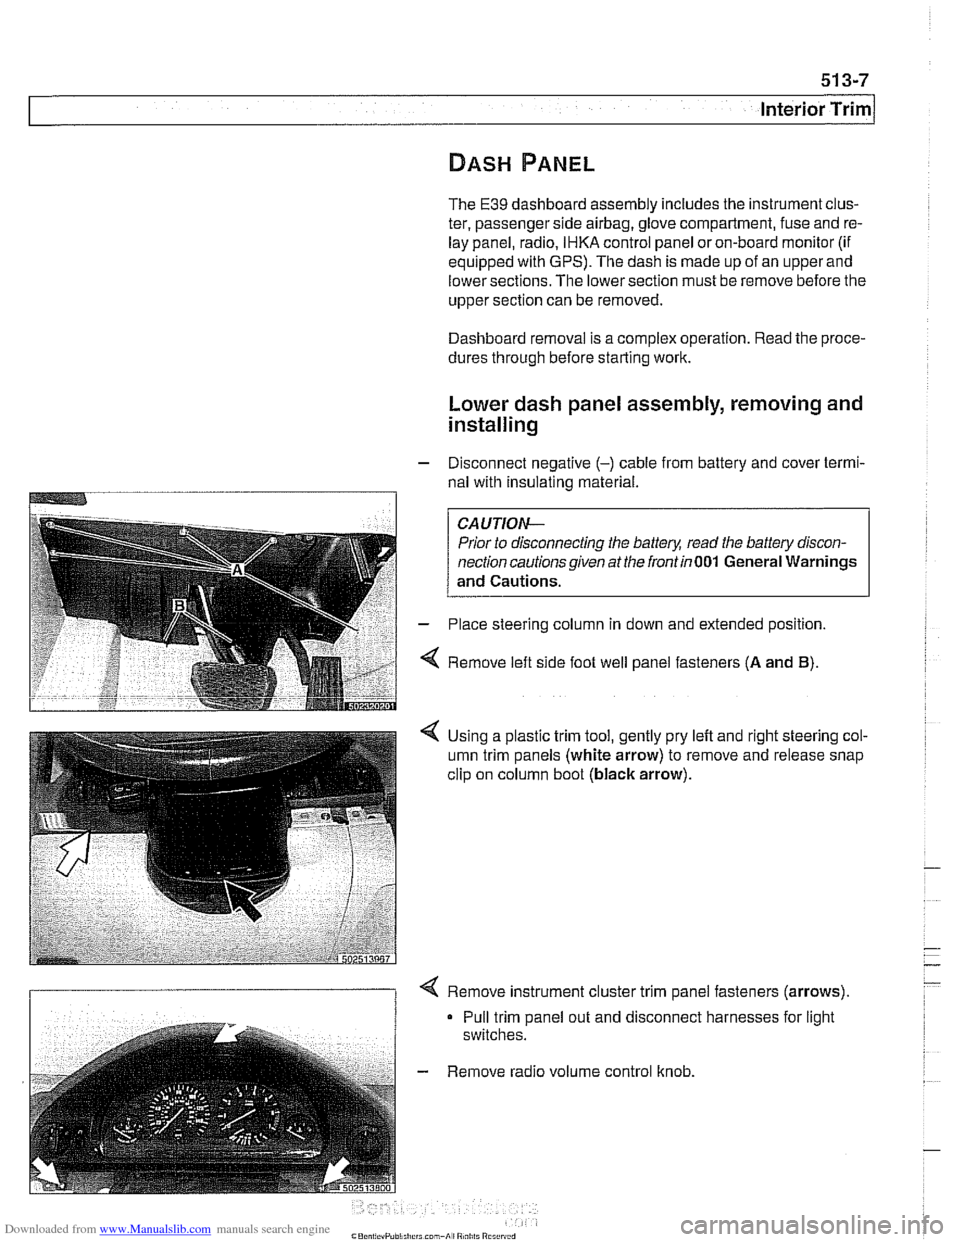
- Place steering column in down and extended position.
4 Remove left side foot well panel fasteners (A and B).
< Using a plastic trim tool, gently pry left and right steering col-
umn trim panels (white arrow) to remove and release snap
clip on column boot
(black arrow).
I 1 < Remove instrument cluster trim panel fasteners (arrows).
Pull trim panel out and disconnect harnesses for light
switches.
- Remove radio volume control knob.
Page 936 of 1002
Downloaded from www.Manualslib.com manuals search engine
1 Sunroof
Sunroof assembly removal and installation involves headliner
removal, and is not covered in this manual. After sunroof re-
pairs, be sure to follow initialization and adjustment proce-
dures given earlier.
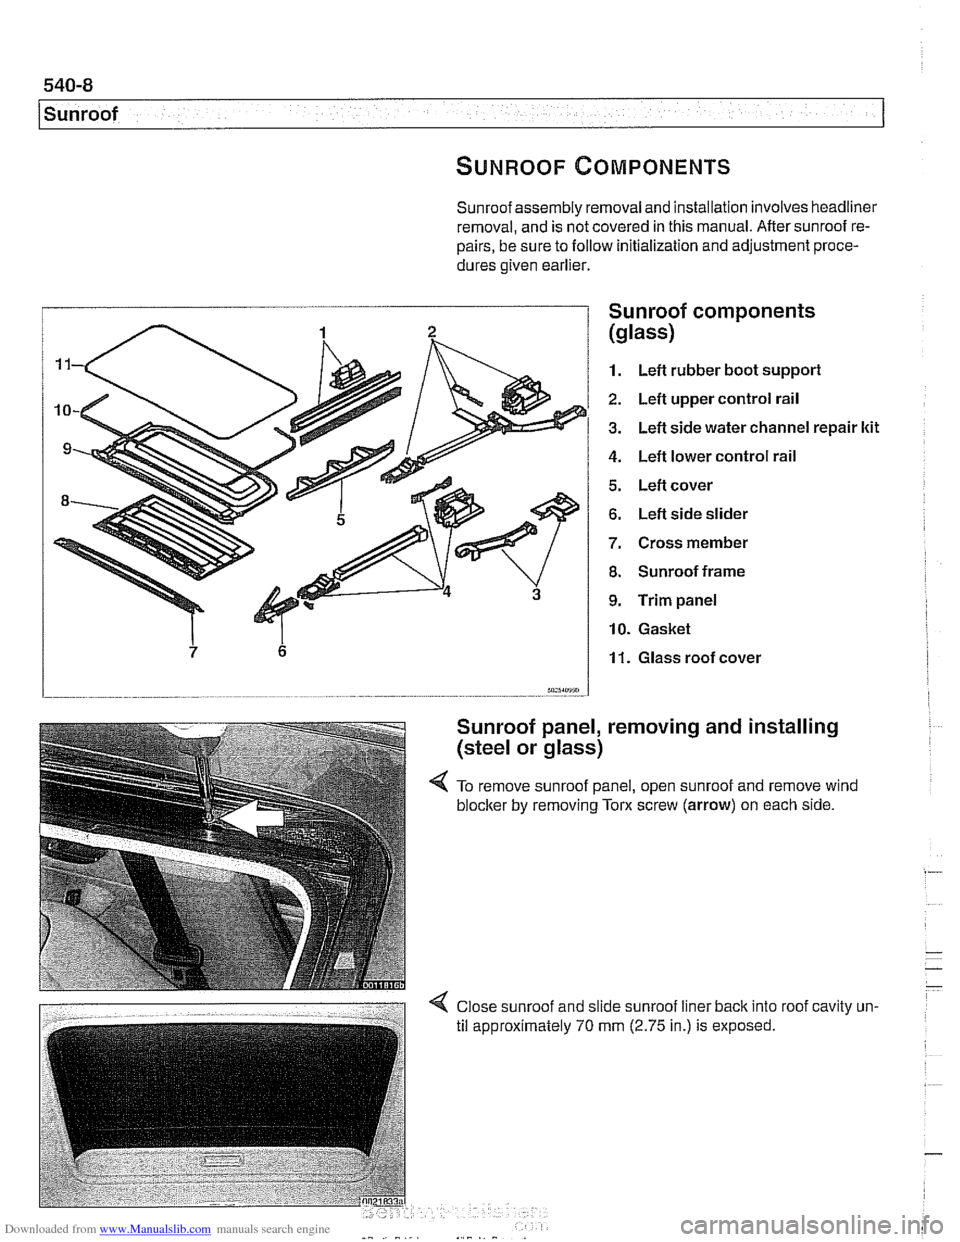
I Sunroof comDonents
1. Left rubber boot suppori
2. Left upper control rail
3. Left side water channel repair ltit
4. Left lower control rail
5. Left cover
6. Left side slider
7. Cross member
8. Sunroof frame
9. Trim panel
10. Gasket
11. Glass roof cover
m5sm.7 - -.
Sunroof panel, removing and installing
(steel or glass)
4 To remove sunroof panel, open sunroof and remove wind
blocker
by removing Tom screw (arrow) on each side.
Page 981 of 1002
Downloaded from www.Manualslib.com manuals search engine
OBD-21
On-Board
~ia~nosticsl
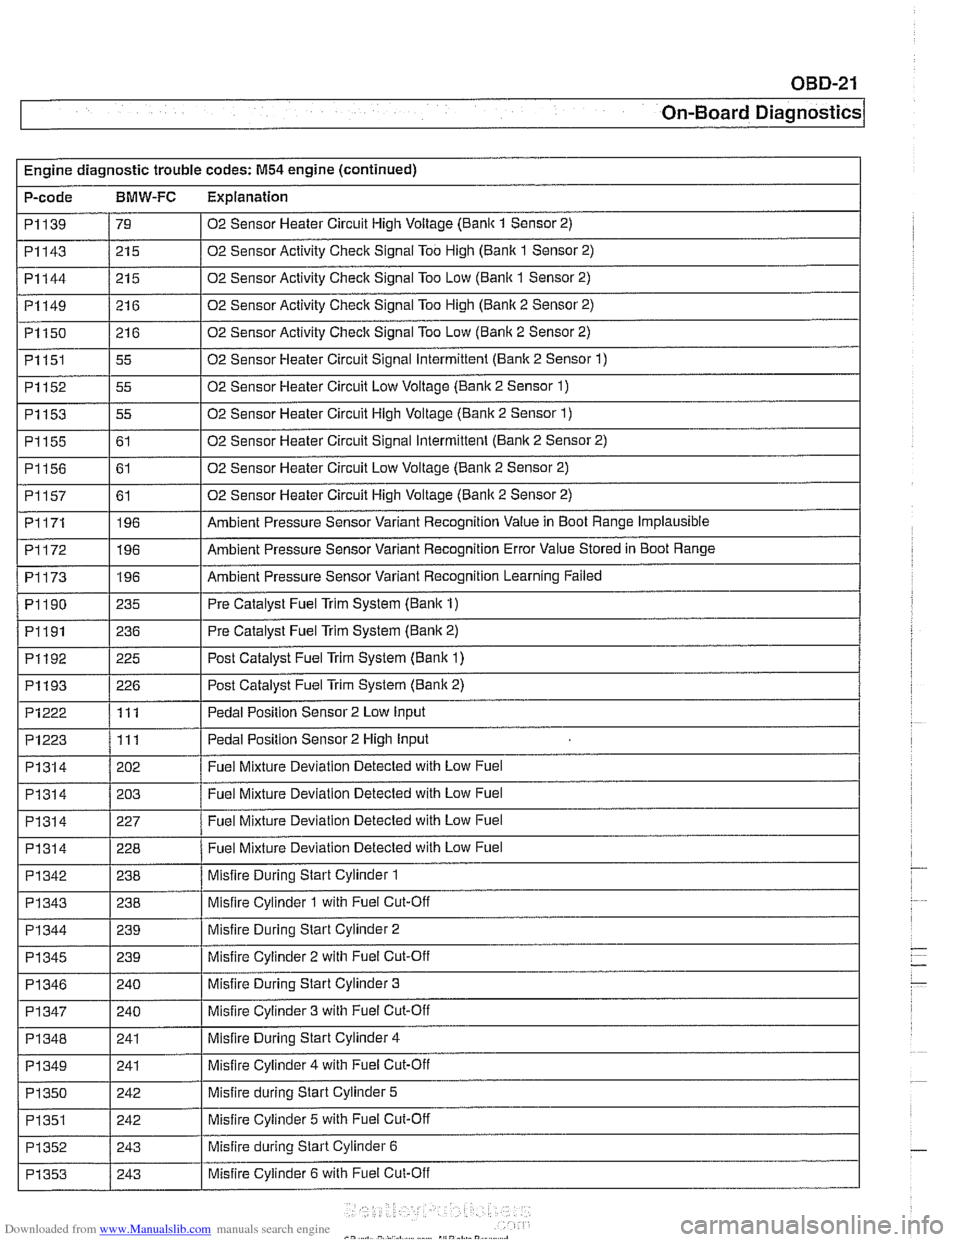
Engine diagnostic trouble codes: M54 engine (continued)
P-code
BMW-FC Explanation
I I
PI314 / 202 / Fuel Mixture Deviation Detected with Low Fuel
I I
02 Sensor Heater Circuit High Voltage (Bank 1 Sensor 2)
02 Sensor Activity Check Signal Too High (Banlc 1 Sensor 2)
02 Sensor Activity Check Signal Too Low (Bank 1 Sensor 2)
02 Sensor Activity Check Signal Too High (Banlc 2 Sensor 2)
02 Sensor Activity Check Signal Too Low (Bank 2 Sensor 2)
02 Sensor Heater Circuit Signal Intermittent (Bank 2 Sensor
1)
02 Sensor Heater Circuit Low Voltage (Bank 2 Sensor 1)
02 Sensor Heater Circuit High Voltage (Bank 2 Sensor 1)
02 Sensor Heater Circuit Signal Intermittent (Banlc 2 Sensor 2)
02 Sensor Heater Circuit Low Voltage (Bank 2 Sensor 2)
02 Sensor Heater Circuit High Voltage (Bank 2 Sensor 2)
Ambient Pressure Sensor Variant Recognition Value in Boot Range Implausible
Ambient Pressure Sensor Variant Recognition Error Value Stored in Boot Range
Ambient Pressure Sensor Variant Recognition Learning Failed
Pre Catalyst Fuel Trim System (Bank 1)
Pre Catalyst Fuel Trim System (Bank 2)
PI139
PI143
PI144
PI149
PI150
PI151
PI152
PI153
PI155
P1156
PI157
PI171
PI172
PI173
PI 190
PI191
79
21 5
21 5
21 6
21 6
55
55
55
61
61
61 196
196
196
235
236
Pedal Position Sensor 2 Low
Input PI222
-~~~~~~~~~ PI314
PI314
PI314
PI342 - PI343
PI 344
PI192
PI193
PI223 /I11 I Pedal Position Sensor 2 High Input
111
PI 345
PI 346
PI 347
PI348
PI 349
PI350
PI351
PI352
PI353
225 Post Catalyst Fuel Trim System (Bank 1)
226 Post Catalyst Fuel Trim Svstem (Bank 2)
203
227
228
238
238
239 Fuel Mixture Deviation Detected with Low Fuel
Fuel Mixture Deviation Detected with Low Fuel
Fuel Mixture Deviation Detected with Low Fuel
Misfire During Start Cylinder 1
Misfire Cylinder 1 with Fuel Cut-Off
Misfire Durina Start Cylinder 2
239
240
240
241
241
242
242
243
243
-
Misfire Cylinder 2 with Fuel Cut-Off
Misfire During Start Cylinder 3
Misfire Cylinder 3 with Fuel Cut-Off
Misfire During Start Cylinder 4
Misfire Cylinder 4 with Fuel Cut-Off
Misfire during Start Cylinder 5
Misfire Cylinder 5 with Fuel Cut-Off
Misfire during Start Cylinder 6
Misfire Cylinder 6 with Fuel Cut-Off
Page 992 of 1002
Downloaded from www.Manualslib.com manuals search engine
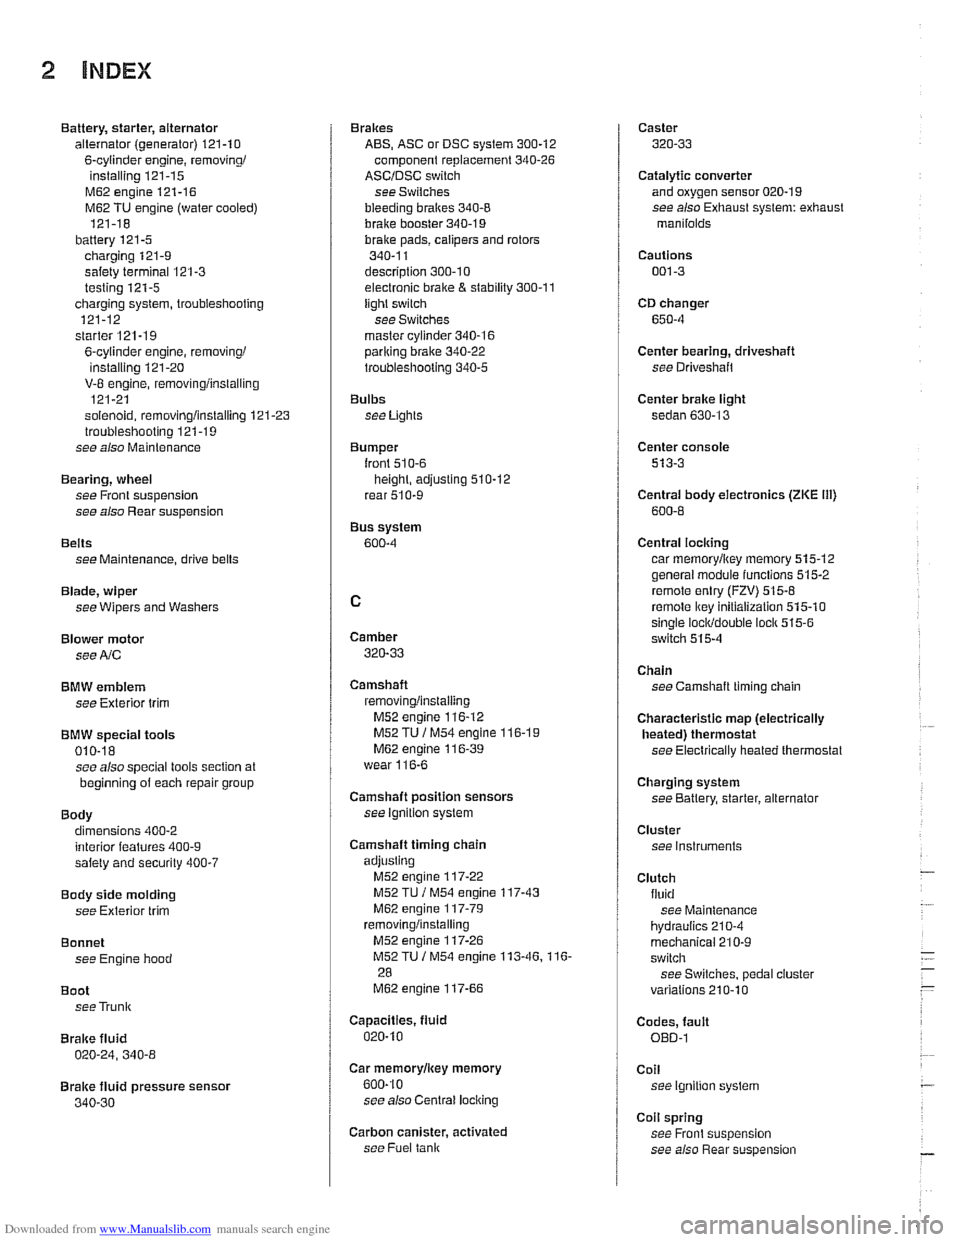
2 INDEX
Battery, starter, alternator
alternator (generator)
121-10
6-cylinder engine, removingi
installing 121-15
M62 engine 121-16
M62 TU engine (water cooled)
121-18
battery
121-5 charging 121-9
safety terminal 121-3
testing 121-5 charging system, troubleshooting
121-12
starter
121-1 9
6-cylinder engine, removingi instaliinq 121-20 . V-8 engine, rernovinglinsialiing
121-21
solenoid, removinglinstalling
121-23 troubleshooting 121-19
see also Maintenance
Bearing, wheel
see Front suspension
see also Rear suspension
Belts see Maintenance, drive belts
Blade, wiper
see Wipers and Washers
Blower motor see
A/C
BMW emblem
see Exterior trim
BMW special tools 010-18 see also special tools section at
beginning
of each repair group
Body dimensions 400-2
interior features
400-9 salety and security 400-7
Body side molding
see Exterior trim
Bonnet see Engine hood
Boot see Trunk
Brake fluid
020-24, 340-8
Brake fluid pressure sensor
340-30
Brakes
ABS, ASC or DSC system
300-12
component replacement 340-26
ASCIDSC switch
see Switches
bleeding
bralces 340-8
brake booster 340-1 9 bralce Dads. caiioers and rotors ,., 340-1 1
descriotion 300-10
e~ectrdnic brake & stability 300-11
light switch
see Switches
master cylinder
340-16 pariking brake 340-22
troubleshooting 340-5
Bulbs see Lights
Bumper
lront 510-6 height, adjusting 510-12
rear 510-9
Bus system
600-4
Camber
320-33
Camshaft
removingiinslaiiing
M52 engine 116-12
M52 TU
/ M54 engine 116-1 9 M62 engine 11 6-39
wear
116-6
Camshaft position sensors
see ignition system
Camshaft timing chain
adjusting M52 engine
117-22
M52 TU I M54 engine 117-43
M62 engine 117-79 removinglinstalling
M52 engine 117-26
M52TU 1 M54 engine 113-46.116-
28
M62 engine 117-66
Capacities, fluid
020.10
Car rnemorvlicev memorv . . 600-10
see also Centrai
lociking
Carbon canister, activated
see Fuel
tank
Caster
320-33
Catalytic converter and oxygen sensor 020-19
see also Exhaust system: exhaust
manilolds
Cautions
001-3
CD changer
650-4
Center bearing, driveshaft
see Driveshait
Center brake light
sedan
630-13
Center console
513-3
Centrai body electronics (ZKE 111)
600-6
Central locking
car memoryiey memory 515.12 general module iunctions 515-2
remote entry (FZV) 515-8
remote lkey initialization 515-10 single lociddouble ioclk 515-6
switch 515-4
Chain
see Camshaft liming chain
Characteristic map (electrically heated) thermostat
see Electrically heated thermostat
Charging system
see Battery, starter, alternator
Cluster see instruments
Clutch fluid see Maintenance
hydraulics
210-4
mechanical 210-9
switch
see Switches, pedal ciuster
variations
210.10
Codes, fault OED-1
Coil
see Ignition system
Coil spring
see Front suspension
see also Rear
suspe nsion
Page 993 of 1002
Downloaded from www.Manualslib.com manuals search engine
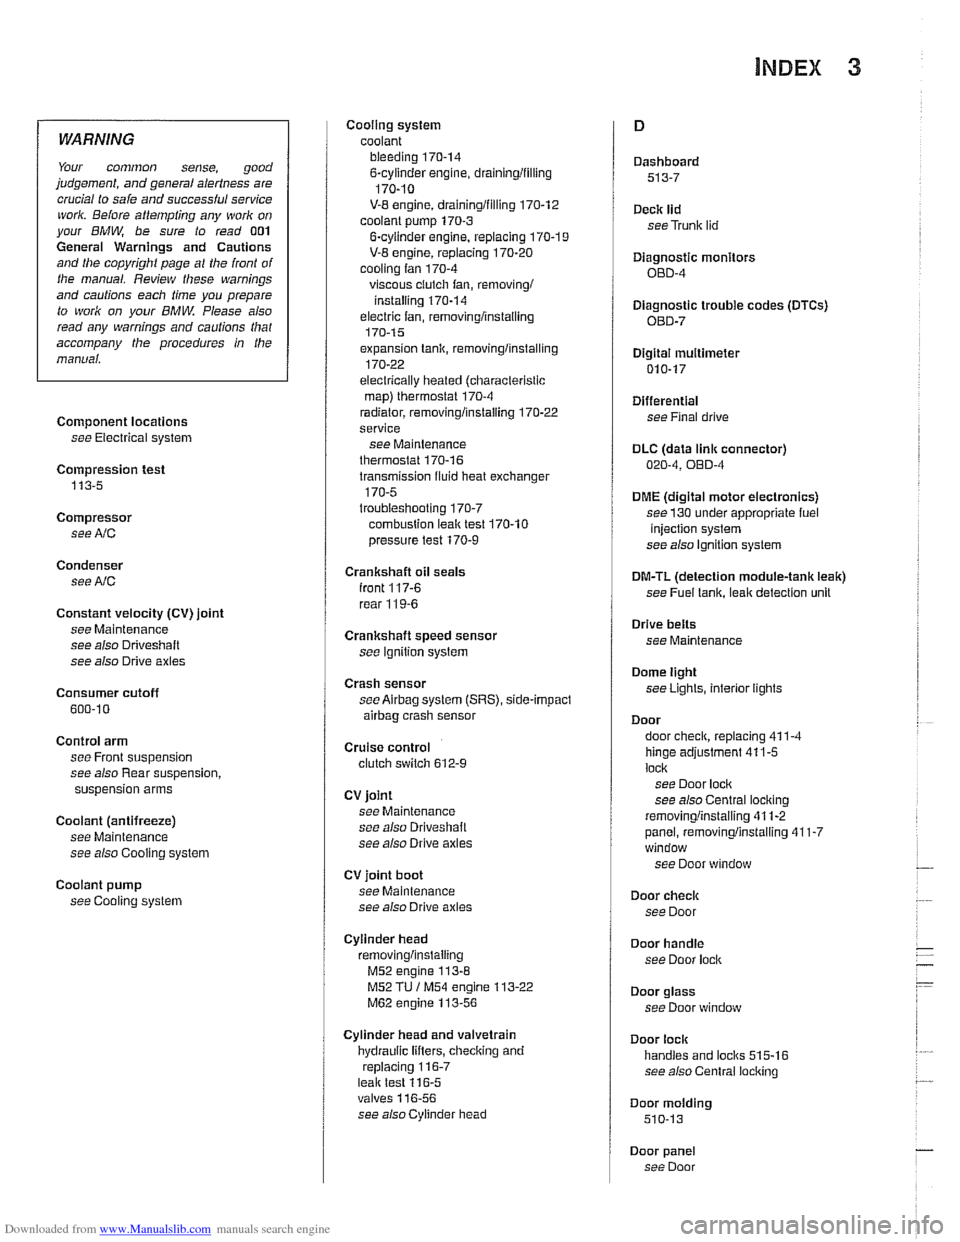
WARNING
Your common sense, good
judgement, and general alertness are
crucial lo sale and
successlul service
work. Belore attempling any work on
your BMW, be sure to read 001
General Warnings and Cautions
and lhe copyright page
a1 llle Iron1 01
the manual. Review lliese warnings
and cautions each time you prepare
lo work on your
BMW Please also
read any warnings and
caulions lhal
accompany the procedures In !he
manual.
Component locations
see Electrical system
Compression test
113-5
Compressor see
AlC
Condenser see
AlC
Constant velocity (CV) joint
see Maintenance
see also
Driveshall
see also Drive axles
Consumer cutoff
600-10
Control arm see Front suspension
see also Rear suspension,
suspension arms
Coolant (antifreeze) see Maintenance
see also Cooling system
Coolant pump
see Cooling system Cooling system
coolant bleeding
170-14 6-cylinder engine, draininglfilling
170-10
V-8 engine, draininglfilling 170-12
coolant pump 170-3
6-cyiinder engine, replacing 170-1 9
V-8 engine, replacing 170-20 cooling fan 170-4
viscous ciutch fan, removingi
installing 170-14
electric fan, removlngiinstailing 170-1 5
expansion tank, removinglinstalling
170-22
electrically heated (ciiaracterislic
map) therrnostat 170-4
radiator, removinglinstaliing 170-22
service
see Maintenance
therrnostat 170-16
transmission fluid heat exchanger
170-5 troubleshooting 170-7
combuslion leal( test 170-10
pressure test
170-9
Crankshaft oil seals
iront
117-6
rear 11 9-6
Crankshaft speed sensor
see Ignition syslem
Crash sensor
see
Airbag system (SRS), side-impact
airbag crasii sensor
Cruise control clutch switch 612-9
CV joint
see Maintenance
see also Driveshalt
see also Drive axles
CV joint boot
see Maintenance
see also Drive axles
Cylinder head removinglinslaliing
M52 engine 113-8
M52 TU / M54 engine 113-22
M62 engine 113-56
Cylinder head and valvetrain
hydraulic lifters, checking and
replacing
116-7 leak test 116-5 valves 11 6-56
see
alsocylinder head Dashboard
513-7
Deck
lid
seeTrunk lid
Diagnostic monitors
OED-4
Diagnostic trouble codes
(DTCs)
080-7
Digital multimetel
010-17
Differential see Final drive
DLC (data
link connector) 020-4, OED-4
DME (digital motor electronics)
see
130 under appropriate fuel
injection system
see also ignition system
DM-TL (detection module-tank leak)
see
Fuel lank, leak deteclion unit
Drive
belts
see Maintenance
Dome light
seeLighls, interior lights
Door
door
check, replacing 411-4
hinge adjustment 41 1-5
loci(
see Door lock see also Central locking
removinglinslaliing 41
1-2
panel, removinglinstaliing 41 1-7 window
see Door window
Door
check
see Door
Door
handle
see Door lock
Door glass
see Door window
Door
lock
handles and loci(s 515-16
see also Central locking
Door
molding
510-13
Door panel see Door