tailgate BMW 540i 2000 E39 User Guide
[x] Cancel search | Manufacturer: BMW, Model Year: 2000, Model line: 540i, Model: BMW 540i 2000 E39Pages: 1002
Page 837 of 1002
Downloaded from www.Manualslib.com manuals search engine
. .- -
Trunk Lid, Tailgate
Rear window gas strut, removing and
installing
- Tailgate and window struts are located in left and right sides
of roof.
- Open rear window.
WARNING-
The tailgate is very heavy and will close without both pressu-
rized lifting struts installed. Properly support tailgate prior to
removal of the lifting struts.
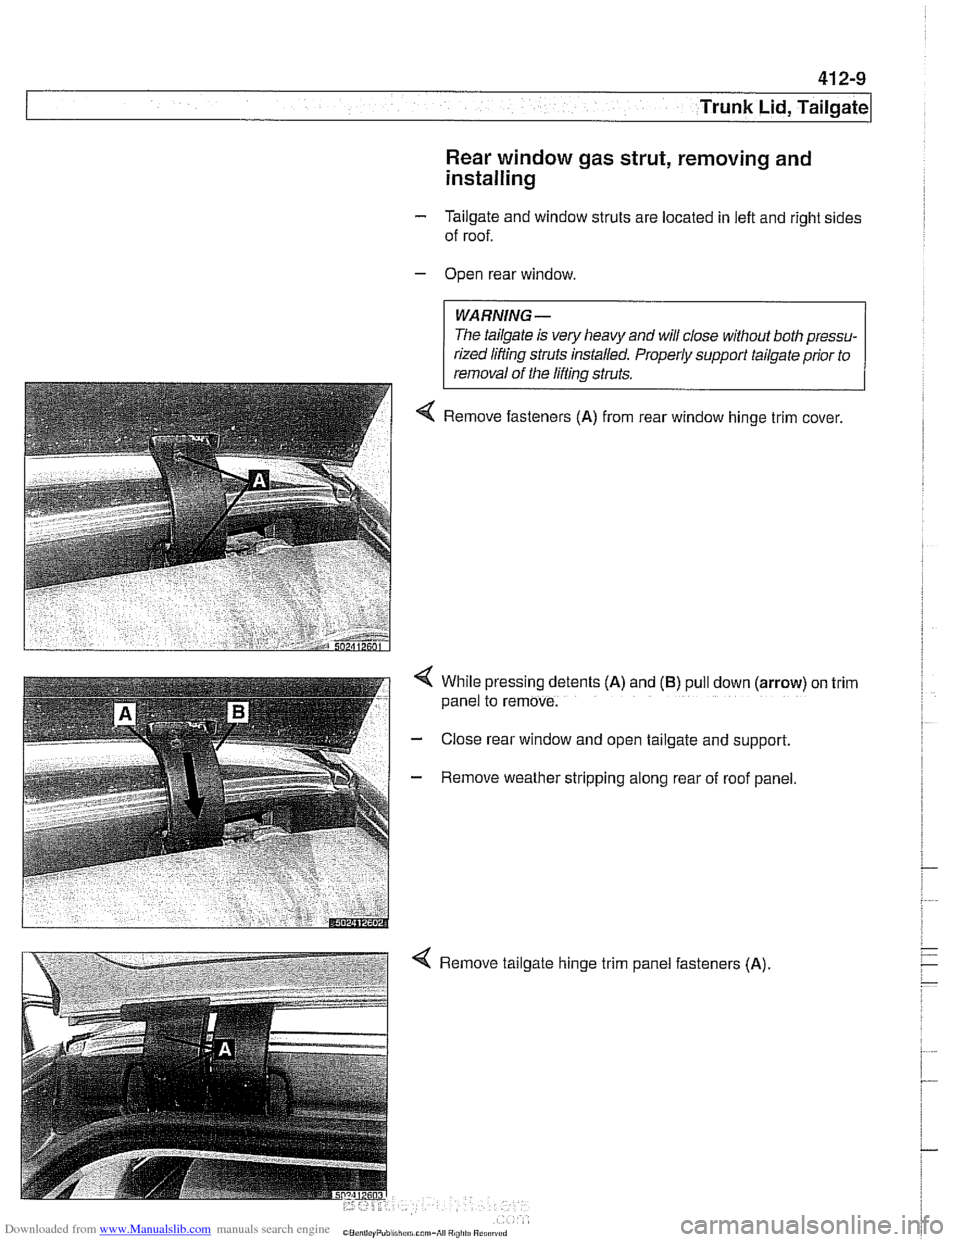
< Remove fasteners (A) from rear window hinge trim cover,
< While pressing detents (A) and (6) pull down (arrow) on trim
panel to remove.
- Close rear window and open tailgate and support.
- Remove weather stripping along rear of roof panel.
< Remove tailgate hinge trim panel fasteners (A).
Page 838 of 1002
Downloaded from www.Manualslib.com manuals search engine
.-
l~runk Lid, Tailgate
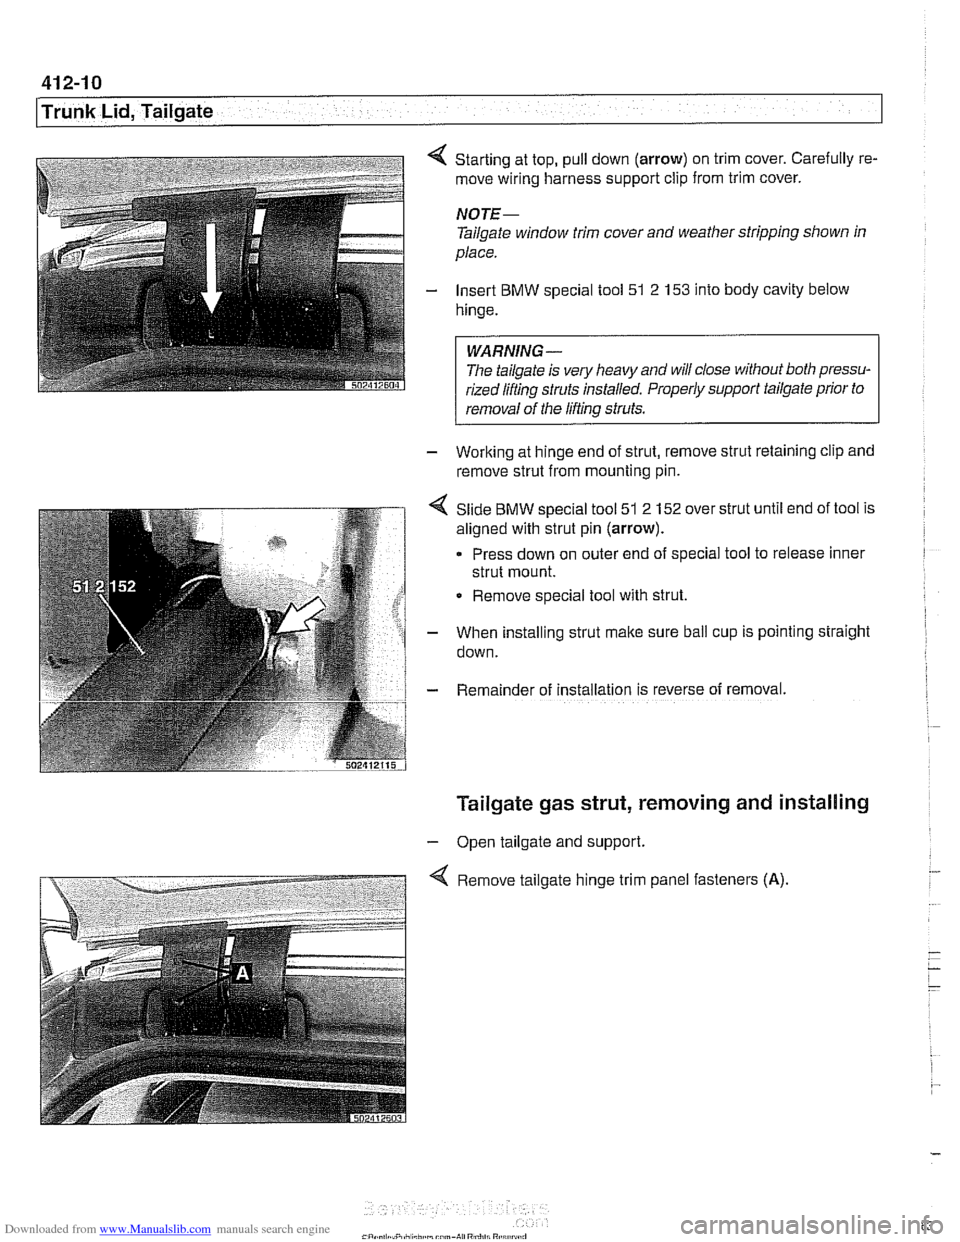
Starting at top, pull down (arrow) on trim cover. Carefully re-
move wiring harness support clip from trim cover.
NOTE-
Tailgate window trim cover and weather stripping shown in
place.
Insert BMW special tool 51 2
153 into body cavity below
hinge.
WARNING-
Tlie tailgate is ve!y heavy and will close without both pressu-
rized liftinq struts installed. Properly support
tailgafe prior to r
1 removal of the lifting struts.
- Working at hinge end of strut, remove strut retaining clip and
remove strut from mounting pin.
Slide BMW special tool 51 2 152 over strut until end of tool is
aligned with strut pin
(arrow).
Press down on outer end of special tool to release inner
strut mount.
Remove special tool with strut.
When installing strut make sure ball cup is pointing straight
down.
Rema~nder of installation 1s reverse of removal.
Tailgate gas strut, removing and installing
- Open tailgate and support.
Remove tailgate hinge trim panel fasteners
(A).
Page 839 of 1002
Downloaded from www.Manualslib.com manuals search engine
Trunk Lid, Tailgate
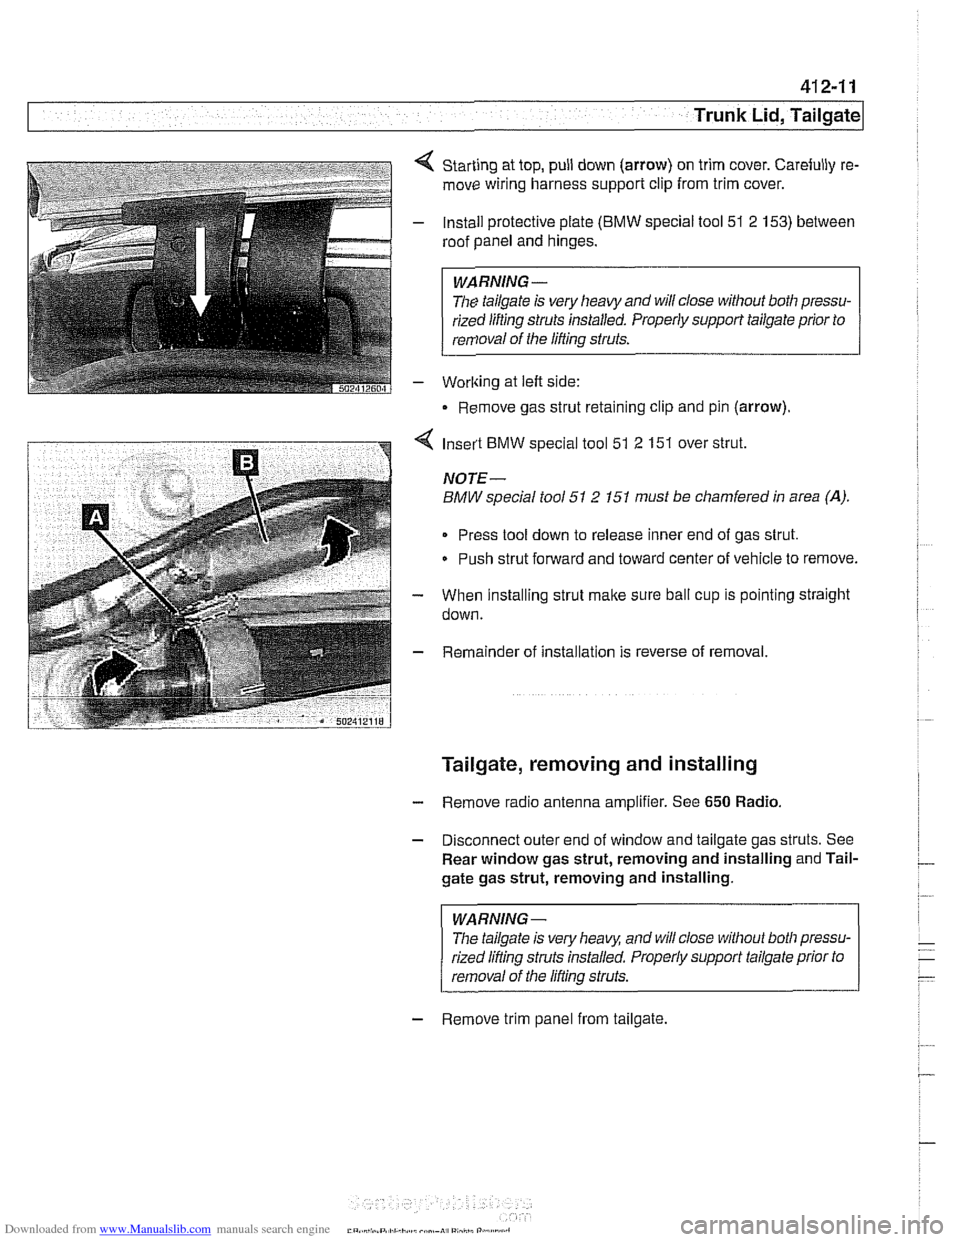
Starting at top, pull down (arrow) on trim cover. Carefully re-
move wiring harness support clip from trim cover.
Install protective plate
(BMW special tool 51 2 153) between
roof panel and hinges.
WARNING -
The tailgate is very heavy and will close without both pressu-
rized lifting
struts installed. Properly support tailgate prior to
removal of the lifting struts.
Worlting at left side:
Remove gas strut retaining clip and pin (arrow).
4 Insert BMW special tool 51 2 151 over strut.
NOTE-
BMW special tool 51 2 151 must be chamfered in area (A).
Press tool down to release inner end of gas strut.
Push strut forward and toward center of vehicle to remove.
- When installing strut make sure ball cup is pointing straight
down.
- Remainder of installation is reverse of removal.
Tailgate, removing and installing
- Remove radio antenna amplifier. See 650 Radio.
- Disconnect outer end of window and tailgate gas struts. See
Rear window gas strut, removing and installing and Tail-
gate gas strut, removing and installing.
WARNING-
The tailgate is very heaq and will close without both pressu-
rized lifling struts installed. Properly support tailgate prior to
removal of the lifling struts.
- Remove trim panel from tailgate.
Page 840 of 1002
Downloaded from www.Manualslib.com manuals search engine
Trunk Lid, Tailgate I
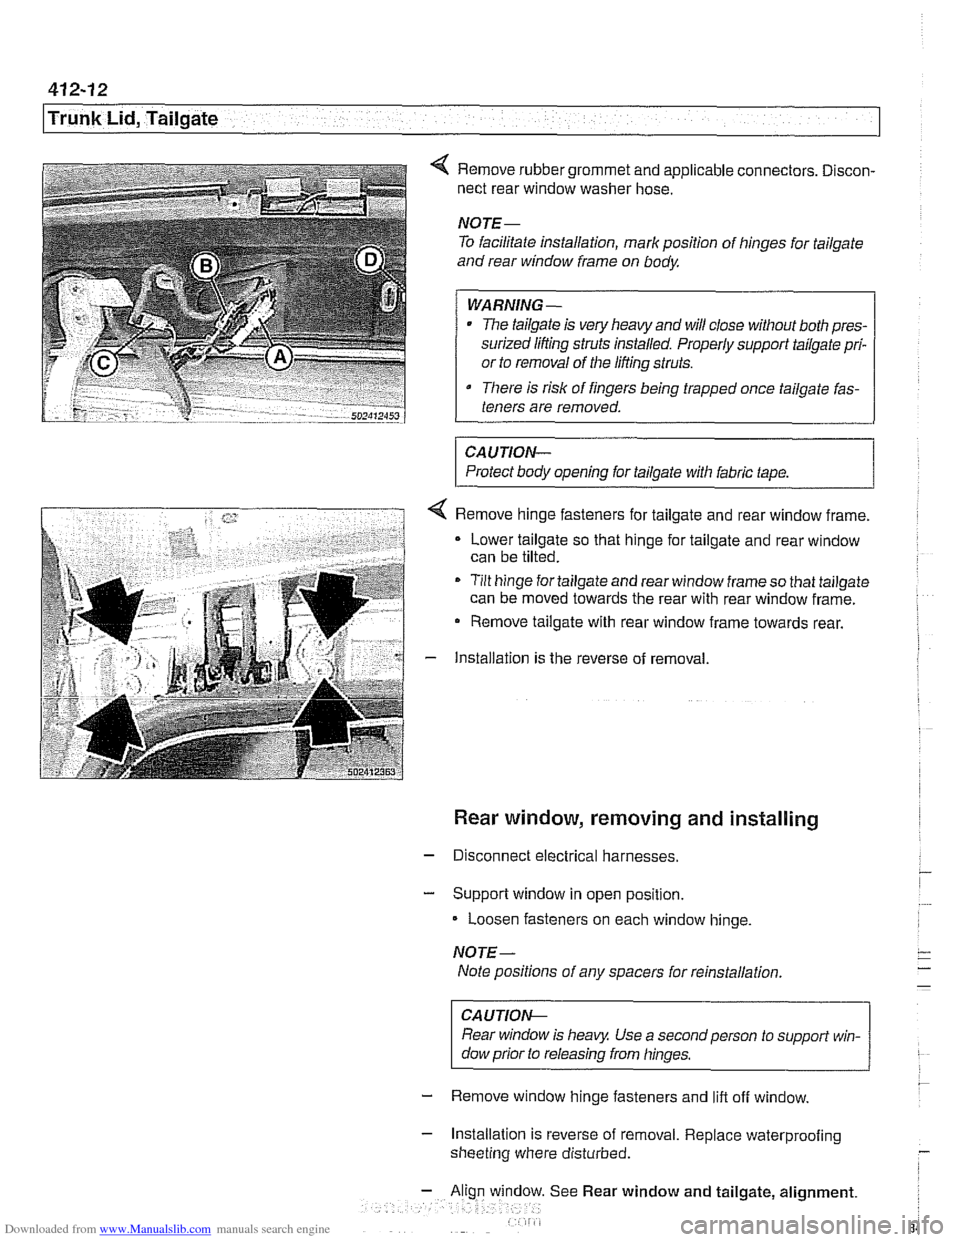
4 Remove rubber grommet and applicable connectors. Discon-
nect rear window washer hose.
NOTE-
To facilitate installation, mark position of hinges for tailgate
and rear window frame on body
WARNING-
The tailgate is very heavy and will close without both pres-
surized lifting struts installed. Properly support tailgate pri-
or to removal of the lifting struts.
There is risk of fingers being trapped once tailgate fas-
teners are removed.
CAUTION-
Protect body opening for tailgate with fabric tape.
4 Remove hinge fasteners for tailgate and rear window frame.
Lower tailgate so that hinge for tailgate and rear window
can be tilted.
- Tilt hinge for tailgate and rear window frame so that tailgate
can be moved towards the rear with rear window frame.
- Remove tailgate with rear window frame towards rear.
- Installation is the reverse of removal
Rear window, removing and installing
- Disconnect electrical harnesses.
- Support window in open position.
Loosen fasteners on each window hinge.
NOTE-
Note positions of any spacers for reinstallation
CAUTION-
Rear window is heavy Use a second person to support win-
dow prior to releasing from hinges.
- Remove window hinge fasteners and lift off window.
- Installation is reverse of removal. Replace waterprooiing
sheeting where disturbed.
See Rear window and tailgate, alignment.
Page 841 of 1002
Downloaded from www.Manualslib.com manuals search engine
Trunk Lid, Tailgate
Rear window and tailgate, alignment
- Alignment procedures involve adjusting tailgate, window, and
spoiler to have equal space between
iefl and right sides and
to be flush with body. Measurement locations and specific di-
mensions are shown.
- If alignment has been disturbed during repair, adjust fit of tail-
gate to body. Then adjust fit of rear window to tailgate.
Clearance of the rear window is adjusted by adding or re-
moving shims between hinge bracket and rear window
(maximum of three shims).
Adjust spoiler gap to body last.
Height of spoiler is set by alignment of the rear tailgate.
Gap of spoiler to body is set by adjusting spoiler attach-
ment fasteners.
- Lateral and vertical alignment of the window and tailgate is
done using hinge bolts. Fine adjustment of the tailgate to the
body is made using rubber stop buffers and latch assembly.
Spoiler gap specification Rear spoiler to roof 4.25
- 5 mm
(0.167 - 0.197 in)
Max. deviation from parallel 0.5
mm (0.019 in)
Tailgate alignment, preliminary work
- Open rear window and tailgate.
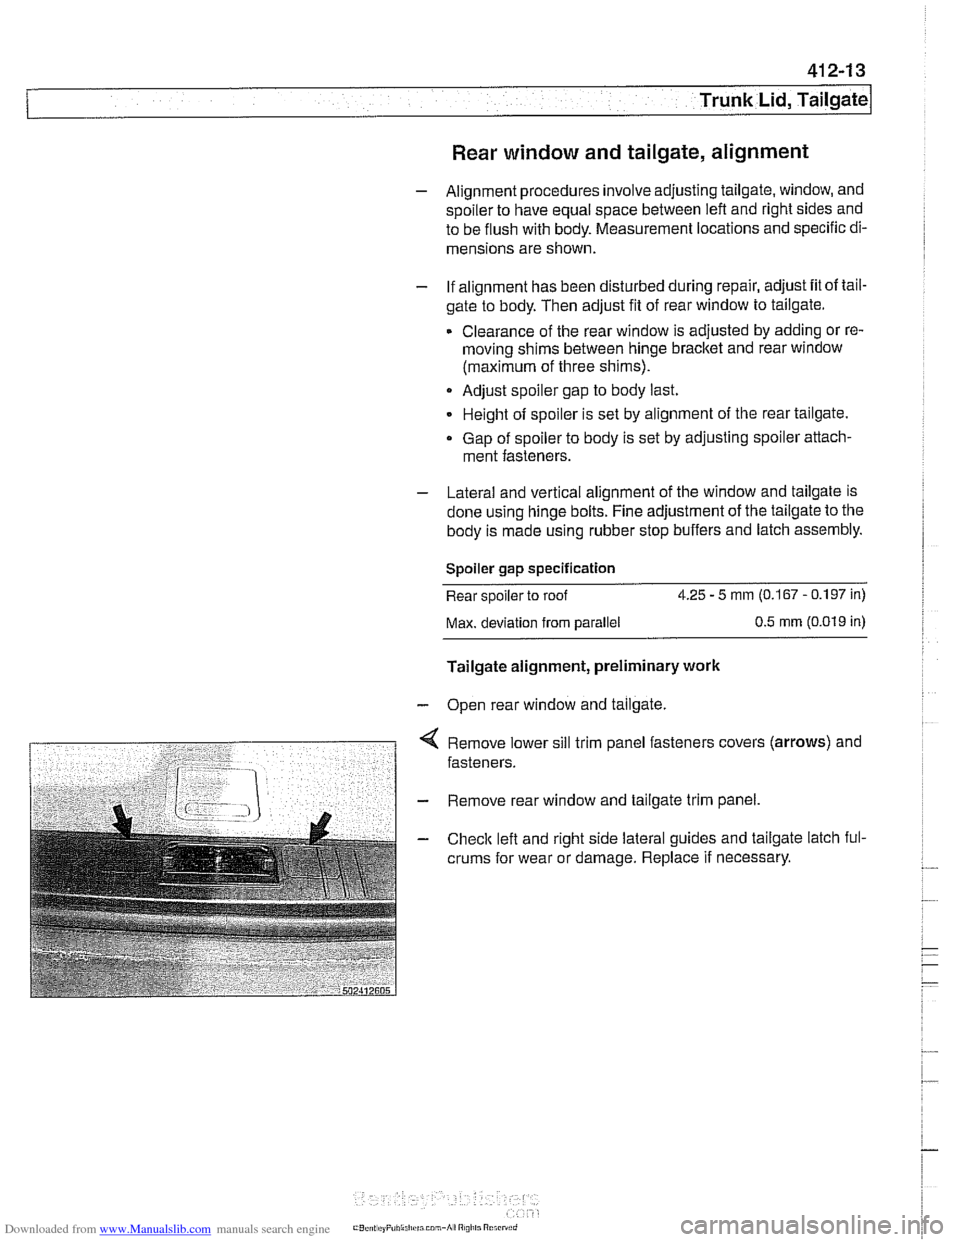
< Remove lower sill trim panel fasteners covers (arrows) and
fasteners.
- Remove rear window and tailgate trim panel.
- Checlc left and right side lateral guides and tailgate latch ful-
crums for wear or damage. Replace
if necessary.
Page 842 of 1002
Downloaded from www.Manualslib.com manuals search engine
41 2-1 4
l~runk Lid, Tailgate
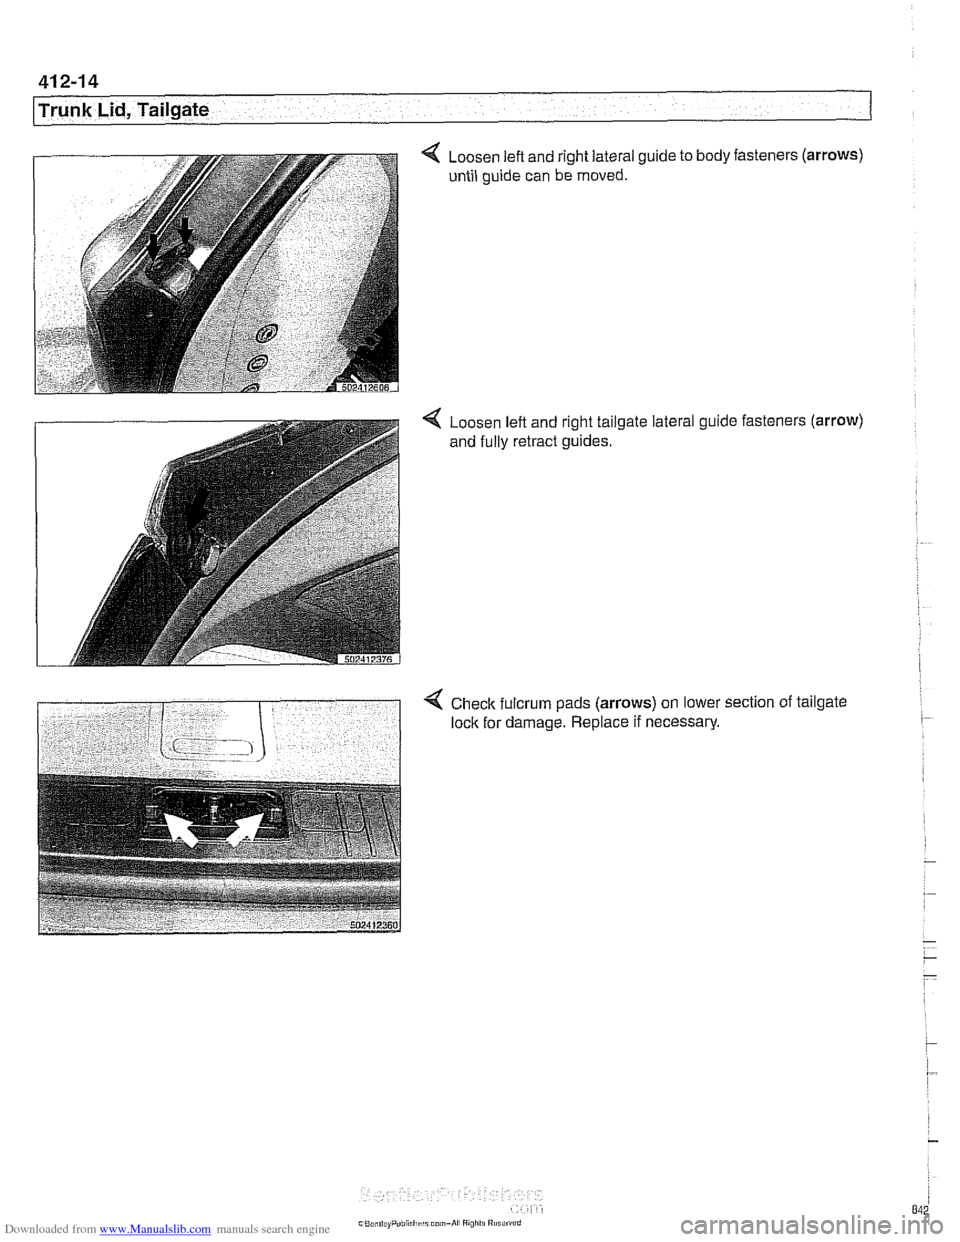
< Loosen left and right lateral guide to body fasteners (arrows)
until guide can be moved.
4 Loosen left and right tailgate lateral guide fasteners (arrow)
and fully retract guides.
Check fulcrum pads (arrows) on lower section of tailgate
lock for damage. Replace if necessary.
Page 843 of 1002
Downloaded from www.Manualslib.com manuals search engine
Trunk Lid, ~ail~atel
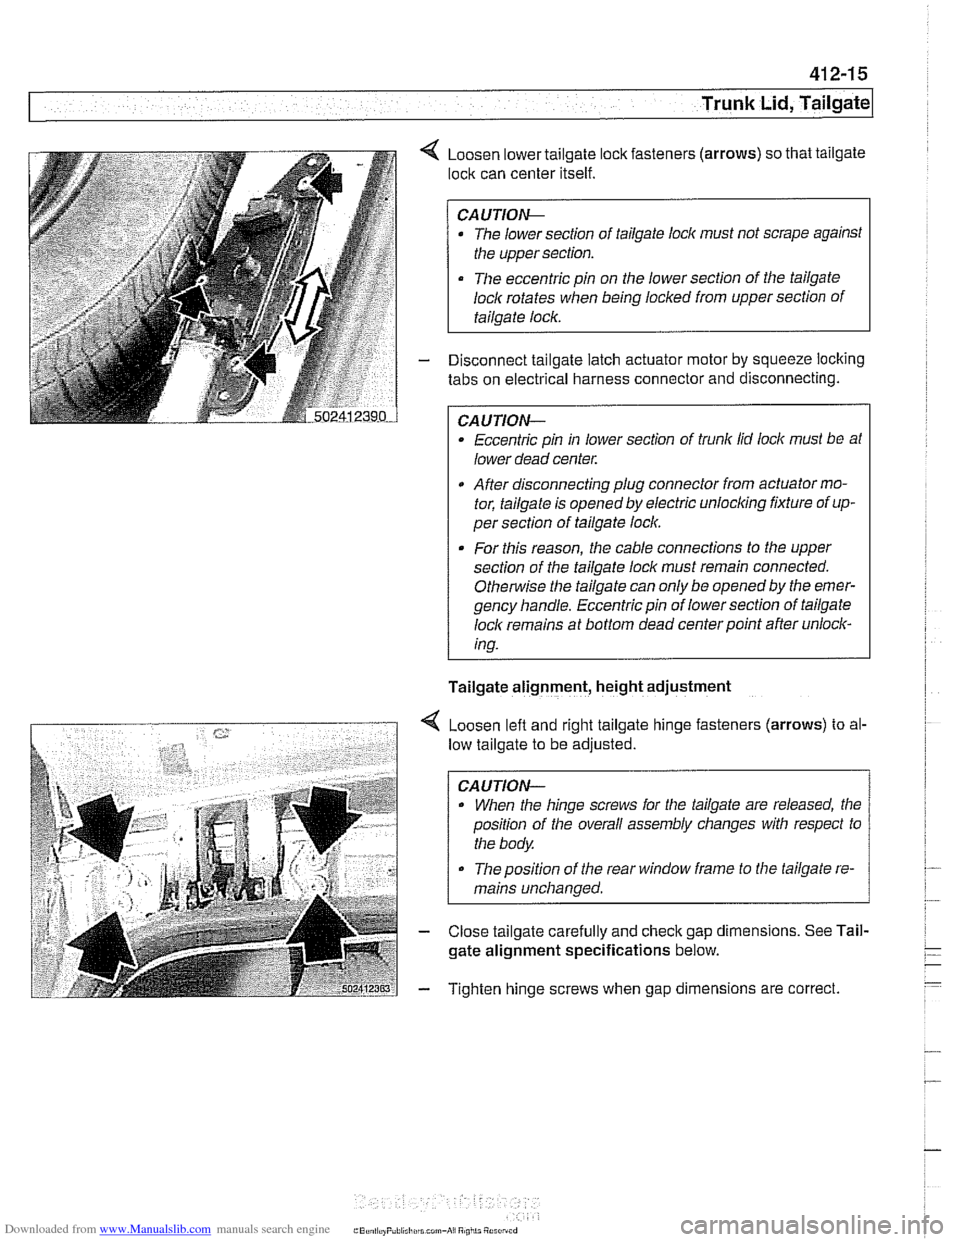
4 Loosen lower tailgate lock fasteners (arrows) so that tailgate
lock can center itself.
CAUTION-
The lower section of tailgate lock must not scrape against
the upper section.
The eccentric pin on the lower section of the tailgate
loclc rotates
when being locked from upper section of
tailgate lock.
- Disconnect tailgate latch actuator motor by squeeze locking
tabs on electrical harness connector and disconnecting.
CAUTION-
Eccentric pin in lower section of trunk lid lock must be at
lower dead center.
After disconnecting plug connector from actuator mo-
tor, tailgate is opened by electric
unloclcing fixture of up-
per section of tailgate loclc.
. For this reason, the cable connections to the upper
section of the tailgate loclc must remain connected.
Othe~tise the tailgate can only be opened by the emer-
gency handle. Eccentric pin of lower section of tailgate
loclc remains at bottom dead center point after unlock-
ing.
Tailgate alignment, height adjustment
4 Loosen left and right tailgate hinge fasteners (arrows) to al-
low tailgate to be adjusted.
CAUTION-
. When the hinge screws for the tailgate are released, the
position of the overall assembly changes with respect to
the body.
The position of the rear window frame to the tailgate re-
mains unchanged.
- Close tailgate carefully and check gap dimensions. See Tail-
gate alignment specifications below.
- Tighten hinge screws when gap dimensions are correct.
Page 844 of 1002
Downloaded from www.Manualslib.com manuals search engine
Trunk Lid, Tailgate
Tailgate alignment specifications
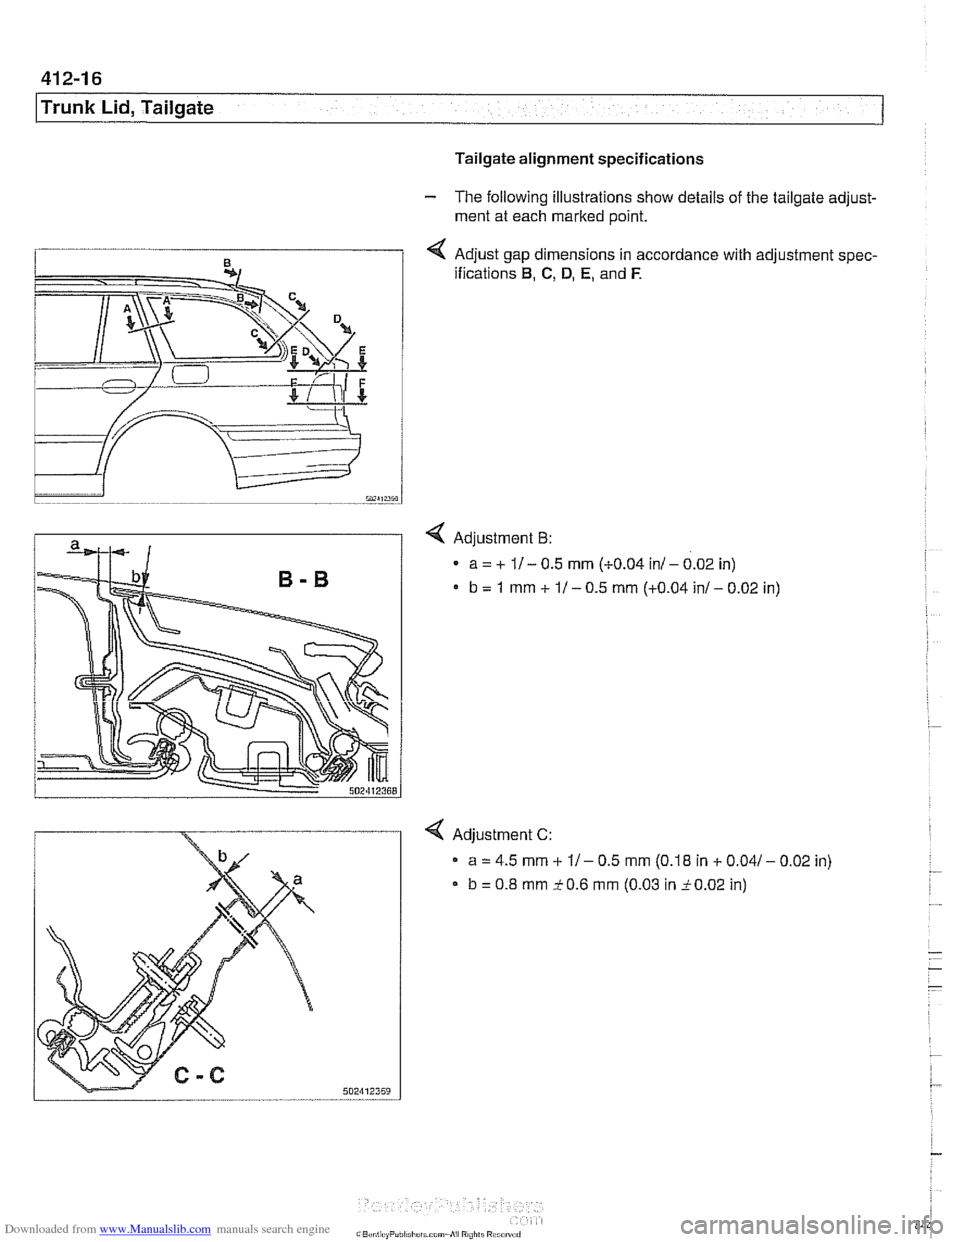
- The following illustrations show details of the tailgate adjust-
ment at each marked point.
< Adjust gap dimensions in accordance with adjustment spec-
ifications
B, C, D, E, and F.
4 Adjustment B:
a = + 11 - 0.5 mm (+0.04 in/ - 0.02 in)
b = 1 mm + 11 - 0.5 mm (+0.04 in1 - 0.02 in)
4 Adjustment C:
a = 4.5 mm + 11 - 0.5 mm (0.18 in + 0.041 - 0.02 in)
b = 0.8 mm 20.6 mm (0.03 in 20.02 in)
Page 845 of 1002
![BMW 540i 2000 E39 User Guide Downloaded from www.Manualslib.com manuals search engine
. -
Trunk Lid, ~ail~ate]
< Adjustment D:
a = 4.5 rnrn + ll- 0.5 rnrn (0.18 in + 0.041- 0.02 in)
b = 3.7 rnrn +2 l- 1 rnrn (0.1 5 in + 0 BMW 540i 2000 E39 User Guide Downloaded from www.Manualslib.com manuals search engine
. -
Trunk Lid, ~ail~ate]
< Adjustment D:
a = 4.5 rnrn + ll- 0.5 rnrn (0.18 in + 0.041- 0.02 in)
b = 3.7 rnrn +2 l- 1 rnrn (0.1 5 in + 0](/img/1/2822/w960_2822-844.png)
Downloaded from www.Manualslib.com manuals search engine
. -
Trunk Lid, ~ail~ate]
< Adjustment D:
a = 4.5 rnrn + ll- 0.5 rnrn (0.18 in + 0.041- 0.02 in)
b = 3.7 rnrn +2 l- 1 rnrn (0.1 5 in + 0.081 - 0.04 in)
4 Adjustment E:
1 tailgate lid
a=1.3rnrnil rnrn(0.05ini0.04in)
2 rear side panel
b = 4.5 rnrn + 11 - 0.5 rnrn (0.1 8 in + 0.041 - 0.02 in)
4 Adjustment F:
a = 1.3 rnrn 21 rnrn (0.05 in 20.04 in)
b = 1 rnrn 20.5 rnrn (0.04 i0.02 in)
* c=1.3rnrn+lrnrn/-1.3rnrn(0.05in+0.04in-0.05in)
d = 4.5 rnrn + 1 rnrn I - 0.5 rnrn (0.18 in + 0.041 - 0.02 in)
CAUTION-
Rear window frame must not extend above height of roof.
Olherwise, wind noise will be created.
Page 846 of 1002
Downloaded from www.Manualslib.com manuals search engine
41 2-1 8
Trunk Lid, Tailgate
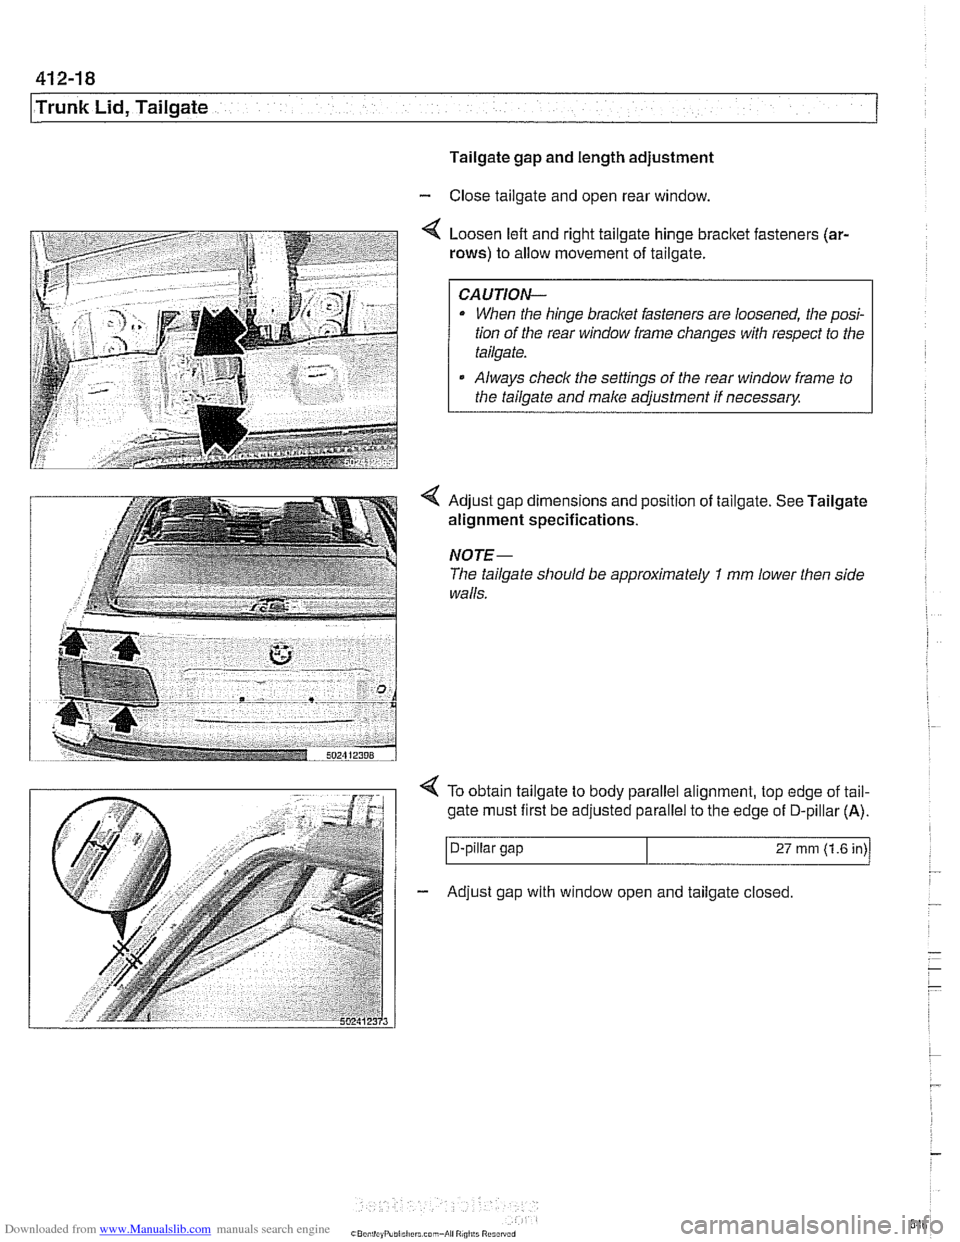
Tailgate gap and length adjustment
- Close tailgate and open rear window.
Loosen left and right tailgate hinge
bracket fasteners (ar-
rows)
to allow movement of tailgate.
CAUTION-
When the hinge bracket fasteners are loosened, the posi-
tion of the rear window frame changes with respect to the
tailgate.
Always
check the settings of the rear window frame to
the tailgate and
make adjustment if necessary
NOTE-
The tailgate should be approximately I mm lower then side
walls.
4 To obtain tailgate to body parallel alignment, top edge of tail-
gate must first be adjusted parallel to the edge
of D-pillar (A).
I D-pillar gap 27 rnrn (1.6 in)/
- Adjust gap with window open and tailgate closed.