check BMW 550I 2007 Owner's Manual
[x] Cancel search | Manufacturer: BMW, Model Year: 2007, Model line: 550I, Model: BMW 550I 2007Pages: 273, PDF Size: 8.96 MB
Page 115 of 273
Controls
113Reference
At a glance
Driving tips
Communications
Navigation
Entertainment
Mobility
Practical interior accessories
Integrated universal remote
control*
The concept
The integrated universal remote control can
replace as many as three hand-held transmit-
ters for various remote-controlled accessories,
such as door openers and house alarm sys-
tems. The integrated universal remote control
registers and stores signals from the original
hand-held transmitters.
The signal of an original hand-held transmitter
can be programmed on one of the three mem-
ory buttons1. After this, the programmed
memory button1 will operate the system in
question. The LED2 flashes to confirm trans-
mission of the signal.
Should you sell your vehicle one day, be sure to
delete the stored programs beforehand for your
safety, refer to page114.
To prevent possible damage or injury,
before programming or using the inte-
grated universal remote control, always inspect
the immediate area to make certain that no peo-
ple, animals or objects are within the travel
range of the device. Also, comply with the
safety precautions of the original hand-held
transmitter.<
Checking compatibility
If you see this symbol on the packaging
or in the manual supplied with the orig-
inal hand-held transmitter, it is safe to
assume that it is compatible with the integrated
universal remote control.
If you have additional questions, please
contact your BMW center or call:
1-800-355-3515.
Information is also provided on the Internet at:
www.bmwusa.com or
www.homelink.com.
HomeLink is a registered trademark of Johnson
Controls, Inc.<
Programming
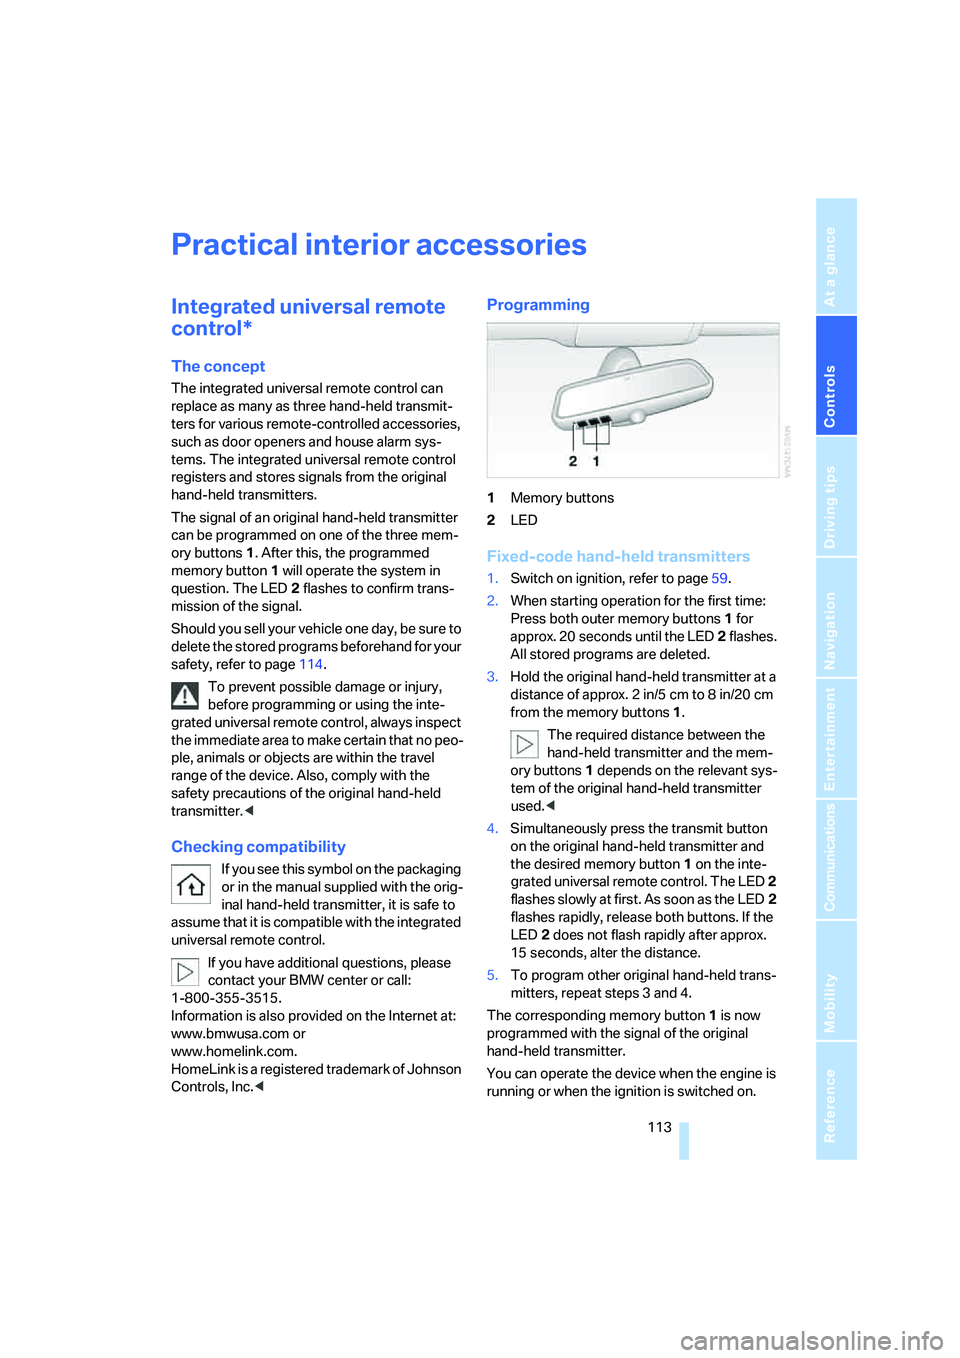
1Memory buttons
2LED
Fixed-code hand-held transmitters
1.Switch on ignition, refer to page59.
2.When starting operation for the first time:
Press both outer memory buttons1 for
approx. 20 seconds until the LED2 flashes.
All stored programs are deleted.
3.Hold the original hand-held transmitter at a
distance of approx. 2in/5cm to 8in/20cm
from the memory buttons1.
The required distance between the
hand-held transmitter and the mem-
ory buttons1 depends on the relevant sys-
tem of the original hand-held transmitter
used.<
4.Simultaneously press the transmit button
on the original hand-held transmitter and
the desired memory button 1 on the inte-
grated universal remote control. The LED 2
flashes slowly at first. As soon as the LED2
flashes rapidly, release both buttons. If the
LED2 does not flash rapidly after approx.
15 seconds, alter the distance.
5.To program other original hand-held trans-
mitters, repeat steps 3 and 4.
The corresponding memory button 1 is now
programmed with the signal of the original
hand-held transmitter.
You can operate the device when the engine is
running or when the ignition is switched on.
Page 116 of 273
Practical interior accessories
114 If the device fails to function even after
repeated programming, check whether
the original hand-held transmitter uses an alter-
nating-code system. To do so, either read the
instructions for the original hand-held transmit-
ter or hold down the programmed memory
button1 of the integrated universal remote
control. If the LED2 on the integrated universal
remote control flashes rapidly for a short time
and then remains lit for approx. 2 seconds, this
indicates that the original hand-held transmitter
uses an alternating-code system. In the case of
an alternating-code system, program the mem-
ory buttons1 as described at Alternating-code
hand-held transmitters.<
Alternating-code hand-held
transmitters
To program the integrated universal remote
control, consult the operating instructions for
the equipment to be set. You will find informa-
tion there on the possibilities for synchroniza-
tion.
When programming hand-held transmitters
that employ an alternating code, please observe
the following supplementary instructions:
Programming will be easier with the aid of
a second person.<
1.Park your vehicle within the range of the
remote-controlled device.
2.Program the integrated universal remote
control as described above in the section
Fixed-code hand-held transmitters.
3.Locate the button on the receiver of the
device to be set, e. g. on the drive unit.
4.Press the button on the receiver of the
device to be set. After step 4, you have
approx. 30 seconds for step 5.
5.Press the programmed memory button1
of the integrated universal remote control
three times.
The corresponding memory button 1 is now
programmed with the signal of the original
hand-held transmitter.
If you have any additional questions,
please contact your BMW center.<
Deleting stored programs
Press both outer memory buttons1 for approx.
20 seconds until the LED2 flashes:
All stored programs are deleted.
Individual programs cannot be deleted.
Sun blinds*
Sun blind for rear window
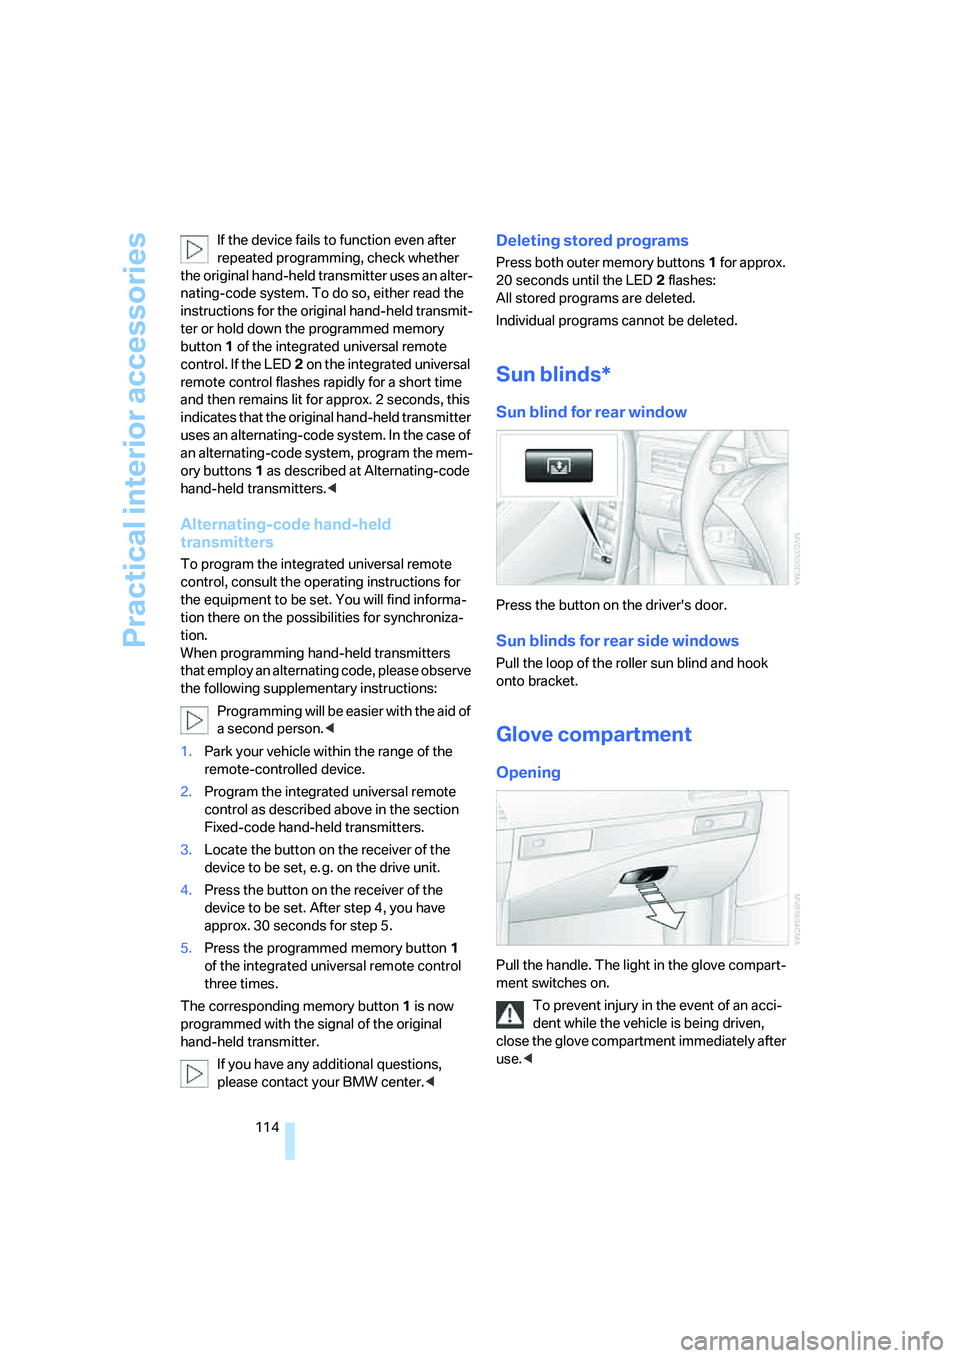
Press the button on the driver's door.
Sun blinds for rear side windows
Pull the loop of the roller sun blind and hook
onto bracket.
Glove compartment
Opening
Pull the handle. The light in the glove compart-
ment switches on.
To prevent injury in the event of an acci-
dent while the vehicle is being driven,
close the glove compartment immediately after
use.<
Page 123 of 273
Controls
121Reference
At a glance
Driving tips
Communications
Navigation
Entertainment
Mobility
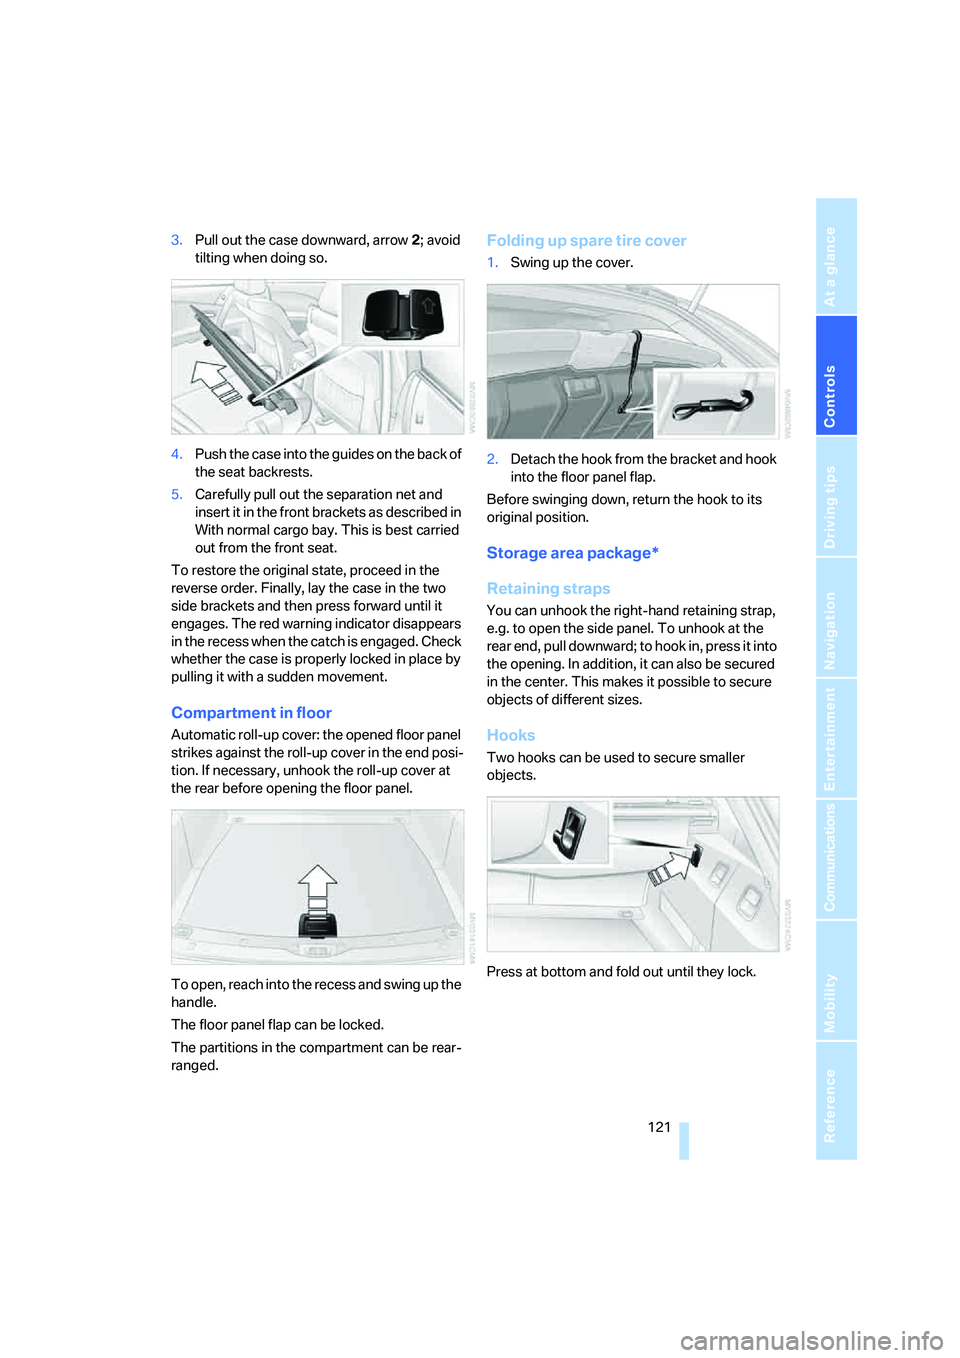
3.Pull out the case downward, arrow2; avoid
tilting when doing so.
4.Push the case into the guides on the back of
the seat backrests.
5.Carefully pull out the separation net and
insert it in the front brackets as described in
With normal cargo bay. This is best carried
out from the front seat.
To restore the original state, proceed in the
reverse order. Finally, lay the case in the two
side brackets and then press forward until it
engages. The red warning indicator disappears
in the recess when the catch is engaged. Check
whether the case is properly locked in place by
pulling it with a sudden movement.
Compartment in floor
Automatic roll-up cover: the opened floor panel
strikes against the roll-up cover in the end posi-
tion. If necessary, unhook the roll-up cover at
the rear before opening the floor panel.
To open, reach into the recess and swing up the
handle.
The floor panel flap can be locked.
The partitions in the compartment can be rear-
ranged.
Folding up spare tire cover
1.Swing up the cover.
2.Detach the hook from the bracket and hook
into the floor panel flap.
Before swinging down, return the hook to its
original position.
Storage area package*
Retaining straps
You can unhook the right-hand retaining strap,
e.g. to open the side panel. To unhook at the
rear end, pull downward; to hook in, press it into
the opening. In addition, it can also be secured
in the center. This makes it possible to secure
objects of different sizes.
Hooks
Two hooks can be used to secure smaller
objects.
Press at bottom and fold out until they lock.
Page 147 of 273
Navigation
Driving tips
145Reference
At a glance
Controls
Communications
Entertainment
Mobility
Selecting route
You can influence the calculated route by
choosing certain route criteria. You can change
the route criteria as often as you like while
entering the destination and whenever the des-
tination guidance is active.
The route is planned according to fixed rules.
The type of road is taken into account, e.g.
whether it is a highway or a winding road. The
road types are stored on the navigation DVD.
As a result, the routes recommended by the
navigation system may not always be the same
ones that you would choose based on personal
experience.
Changing route criteria
1.Select "Navigation" and press the control-
ler.
2.Change into the third field from the top.
Turn the controller until "Route preference"
is selected and press the controller.
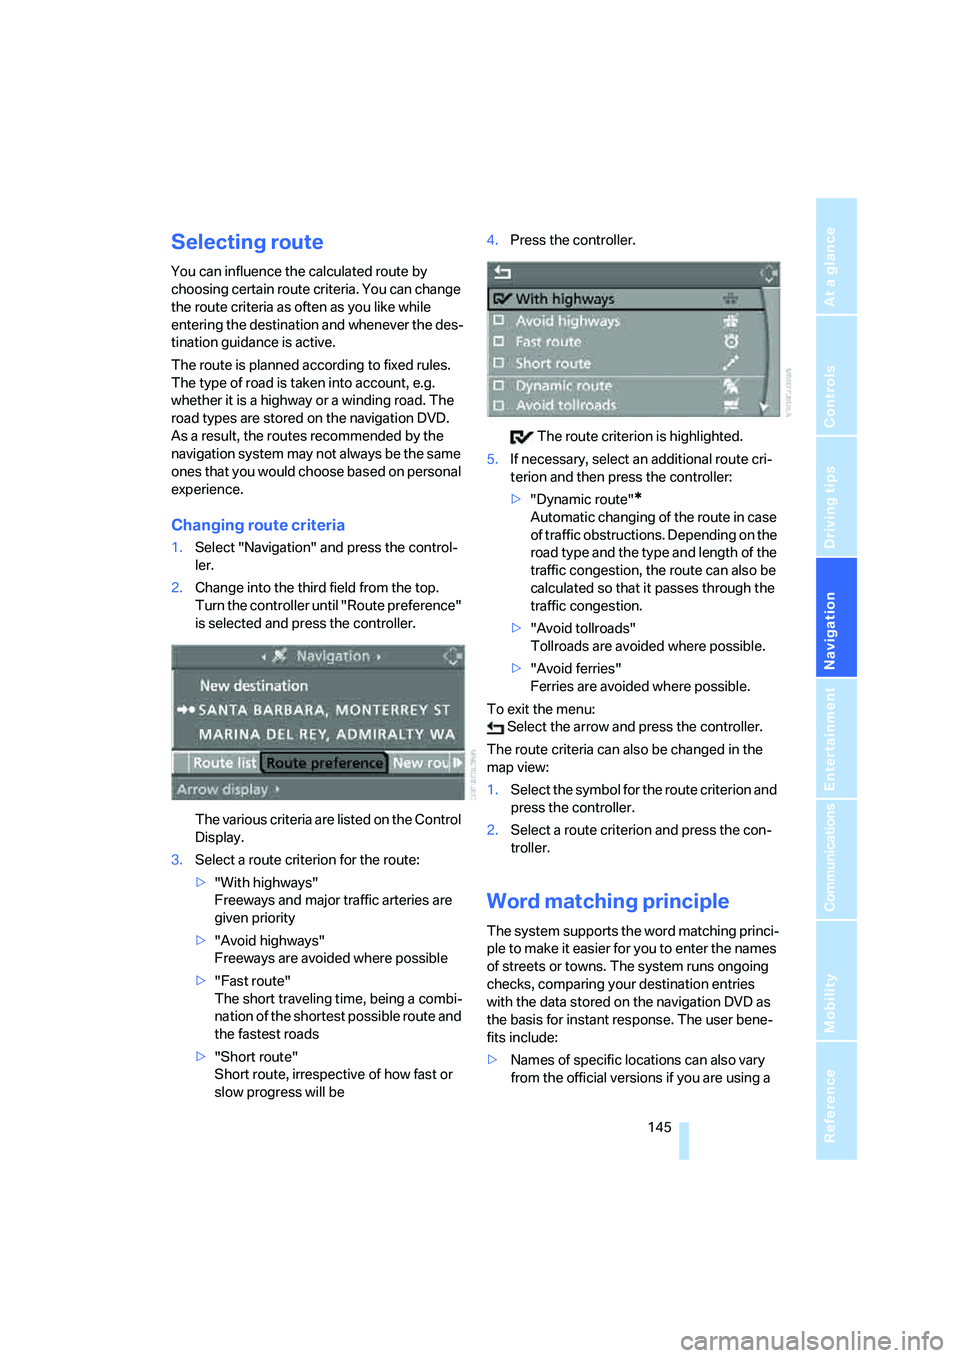
The various criteria are listed on the Control
Display.
3.Select a route criterion for the route:
>"With highways"
Freeways and major traffic arteries are
given priority
>"Avoid highways"
Freeways are avoided where possible
>"Fast route"
The short traveling time, being a combi-
nation of the shortest possible route and
the fastest roads
>"Short route"
Short route, irrespective of how fast or
slow progress will be4.Press the controller.
The route criterion is highlighted.
5.If necessary, select an additional route cri-
terion and then press the controller:
>"Dynamic route"
*
Automatic changing of the route in case
of traffic obstructions. Depending on the
road type and the type and length of the
traffic congestion, the route can also be
calculated so that it passes through the
traffic congestion.
>"Avoid tollroads"
Tollroads are avoided where possible.
>"Avoid ferries"
Ferries are avoided where possible.
To exit the menu:
Select the arrow and press the controller.
The route criteria can also be changed in the
map view:
1.Select the symbol for the route criterion and
press the controller.
2.Select a route criterion and press the con-
troller.
Word matching principle
The system supports the word matching princi-
ple to make it easier for you to enter the names
of streets or towns. The system runs ongoing
checks, comparing your destination entries
with the data stored on the navigation DVD as
the basis for instant response. The user bene-
fits include:
>Names of specific locations can also vary
from the official versions if you are using a
Page 155 of 273
Navigation
Driving tips
153Reference
At a glance
Controls
Communications
Entertainment
Mobility
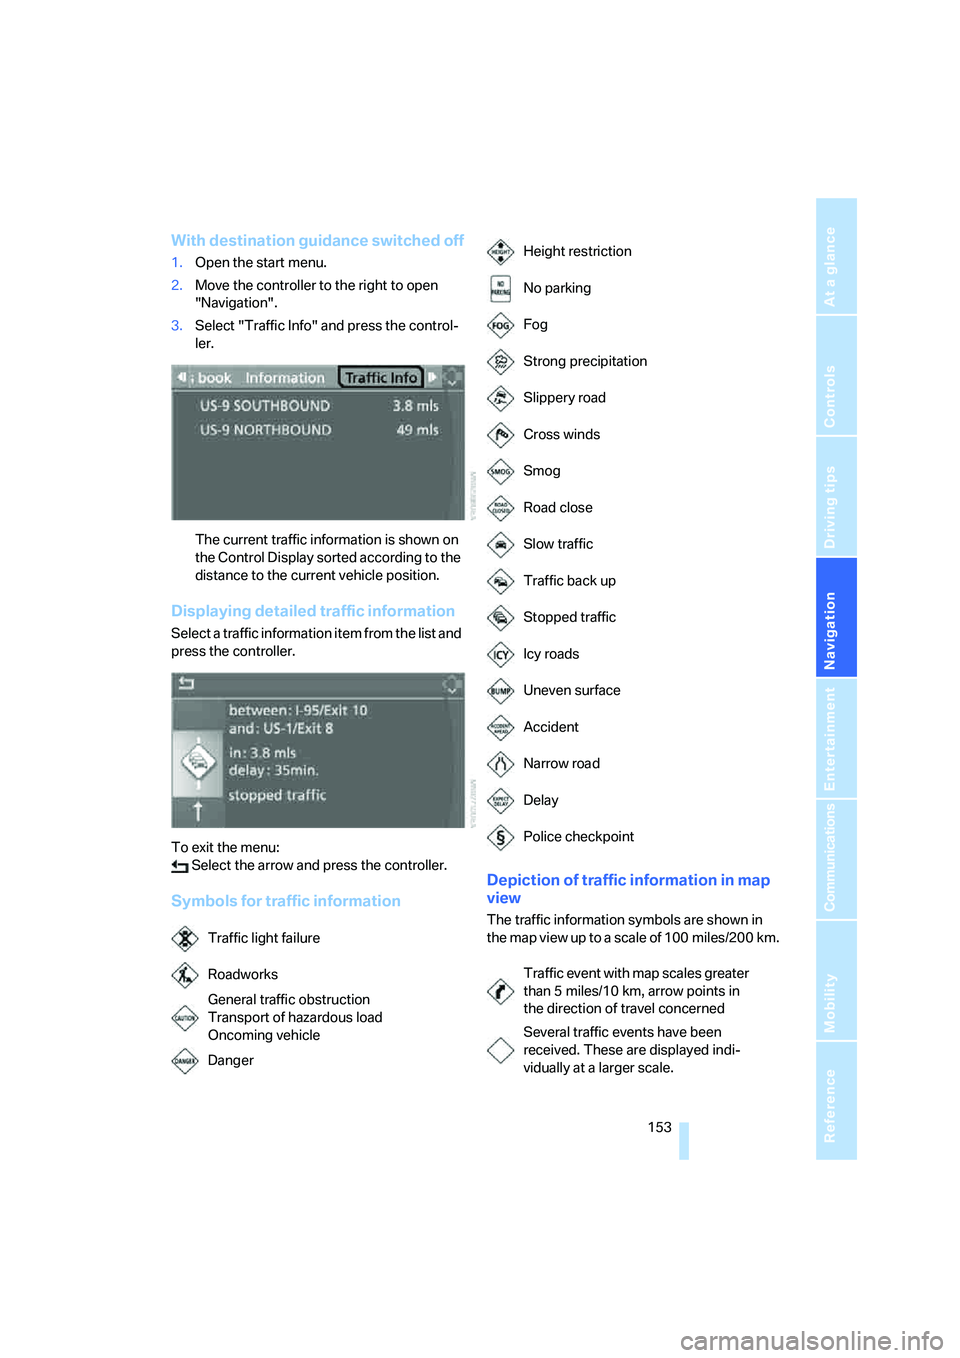
With destination guidance switched off
1.Open the start menu.
2.Move the controller to the right to open
"Navigation".
3.Select "Traffic Info" and press the control-
ler.
The current traffic information is shown on
the Control Display sorted according to the
distance to the current vehicle position.
Displaying detailed traffic information
Select a traffic information item from the list and
press the controller.
To exit the menu:
Select the arrow and press the controller.
Symbols for traffic informationDepiction of traffic information in map
view
The traffic information symbols are shown in
the map view up to a scale of 100 miles/200 km.
Traffic light failure
Roadworks
General traffic obstruction
Transport of hazardous load
Oncoming vehicle
Danger
Height restriction
No parking
Fog
Strong precipitation
Slippery road
Cross winds
Smog
Road close
Slow traffic
Traffic back up
Stopped traffic
Icy roads
Uneven surface
Accident
Narrow road
Delay
Police checkpoint
Traffic event with map scales greater
than 5 miles/10 km, arrow points in
the direction of travel concerned
Several traffic events have been
received. These are displayed indi-
vidually at a larger scale.
Page 180 of 273
CD player and CD changer
178
Notes
BMW CD/DVD players and changers are
officially designated Class 1 laser prod-
ucts. Do not operate if the cover is damaged,
otherwise severe eye damage can result.
Do not use self-recorded CDs/DVDs with labels
applied as these can become detached during
playback due to heat build-up and can cause
irreparable damage to the device.
Only use round CDs/DVDs with a standard
diameter of 4.7 in/12 cm and do not play CDs/
DVDs with an adapter, e.g. CD singles, as other-
wise the CD/DVD or the adapter can jam and
may no longer eject properly.
Do not use a combined CD/DVD, e. g. DVD
Plus,
otherwise the CD/DVD can jam and will no
longer eject.<
General malfunctions
BMW CD/DVD changers and players have been
optimized for performance in vehicles. In some
instances they may be more sensitive to faulty
CDs/DVDs than stationary devices would be.
If a CD/DVD cannot be played, first check
whether it has been inserted correctly.
Humidity
High levels of humidity can lead to condensa-
tion on the CD/DVD or the laser's scan lens and
temporarily prevent playback.
Malfunctions with individual CDs/DVDs
If malfunctions occur only with particular CDs/
DVDs, this can be due to one of the following
causes.
Self-recorded CDs/DVDs
Possible reasons for malfunctions with self-
recorded CDs/DVDs are, e.g., inconsistent
data-creation or recording processes, or poor
quality or high age of the CD/DVD blank.
Only label CDs/DVDs on the upper side with a
pen intended for this purpose.
Damaged CDs/DVDs
Avoid fingerprints, dust, scratches and mois-
ture.
Store CDs/DVDs in a sleeve.
Do not subject CDs/DVDs to temperatures over
1227/506, high levels of humidity or direct
sunlight.
CDs/DVDs with copy protection
CDs/DVDs are often provided with a copy pro-
tection feature by the manufacturer. This can
m e a n t h a t s o m e C D s / D V D s c a n n o t b e p l a y e d o r
can only be played to a limited extent.
Care
If necessary, clean the reflective scanning side
of the CDs/DVDs with a commercially available
cleaning cloth by wiping in straight lines from
the center outward.
Page 192 of 273
Telephoning
190
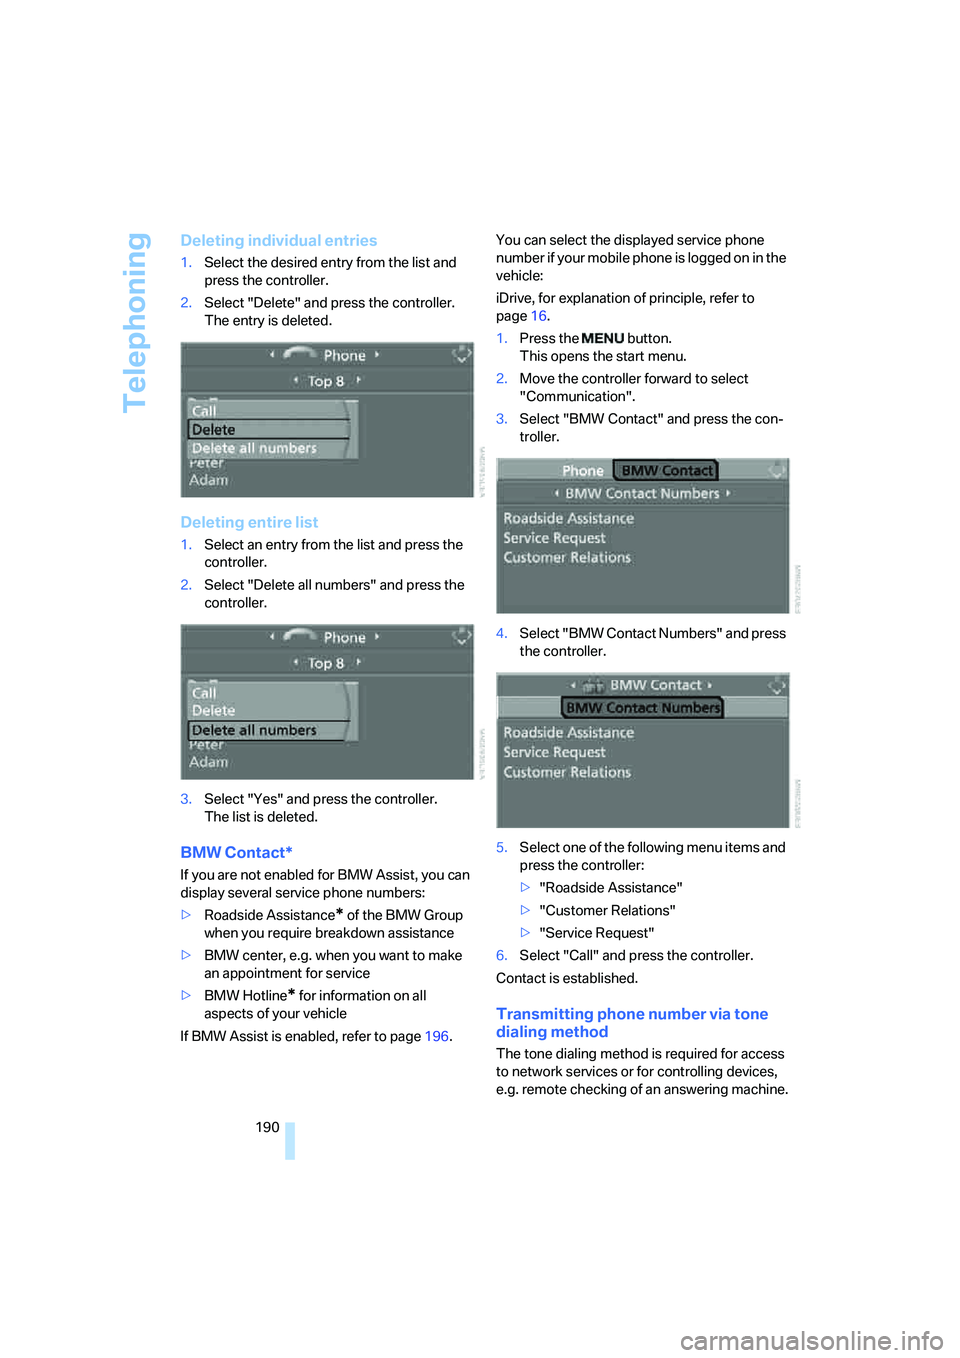
Deleting individual entries
1.Select the desired entry from the list and
press the controller.
2.Select "Delete" and press the controller.
The entry is deleted.
Deleting entire list
1.Select an entry from the list and press the
controller.
2.Select "Delete all numbers" and press the
controller.
3.Select "Yes" and press the controller.
The list is deleted.
BMW Contact*
If you are not enabled for BMW Assist, you can
display several service phone numbers:
>Roadside Assistance
* of the BMW Group
when you require breakdown assistance
>BMW center, e.g. when you want to make
an appointment for service
>BMW Hotline
* for information on all
aspects of your vehicle
If BMW Assist is enabled, refer to page196.You can select the displayed service phone
number if your mobile phone is logged on in the
vehicle:
iDrive, for explanation of principle, refer to
page16.
1.Press the button.
This opens the start menu.
2.Move the controller forward to select
"Communication".
3.Select "BMW Contact" and press the con-
troller.
4.Select "BMW Contact Numbers" and press
the controller.
5.Select one of the following menu items and
press the controller:
>"Roadside Assistance"
>"Customer Relations"
>"Service Request"
6.Select "Call" and press the controller.
Contact is established.
Transmitting phone number via tone
dialing method
The tone dialing method is required for access
to network services or for controlling devices,
e.g. remote checking of an answering machine.
Page 200 of 273
BMW Assist
198 Contact to Roadside Assistance will be estab-
lished.
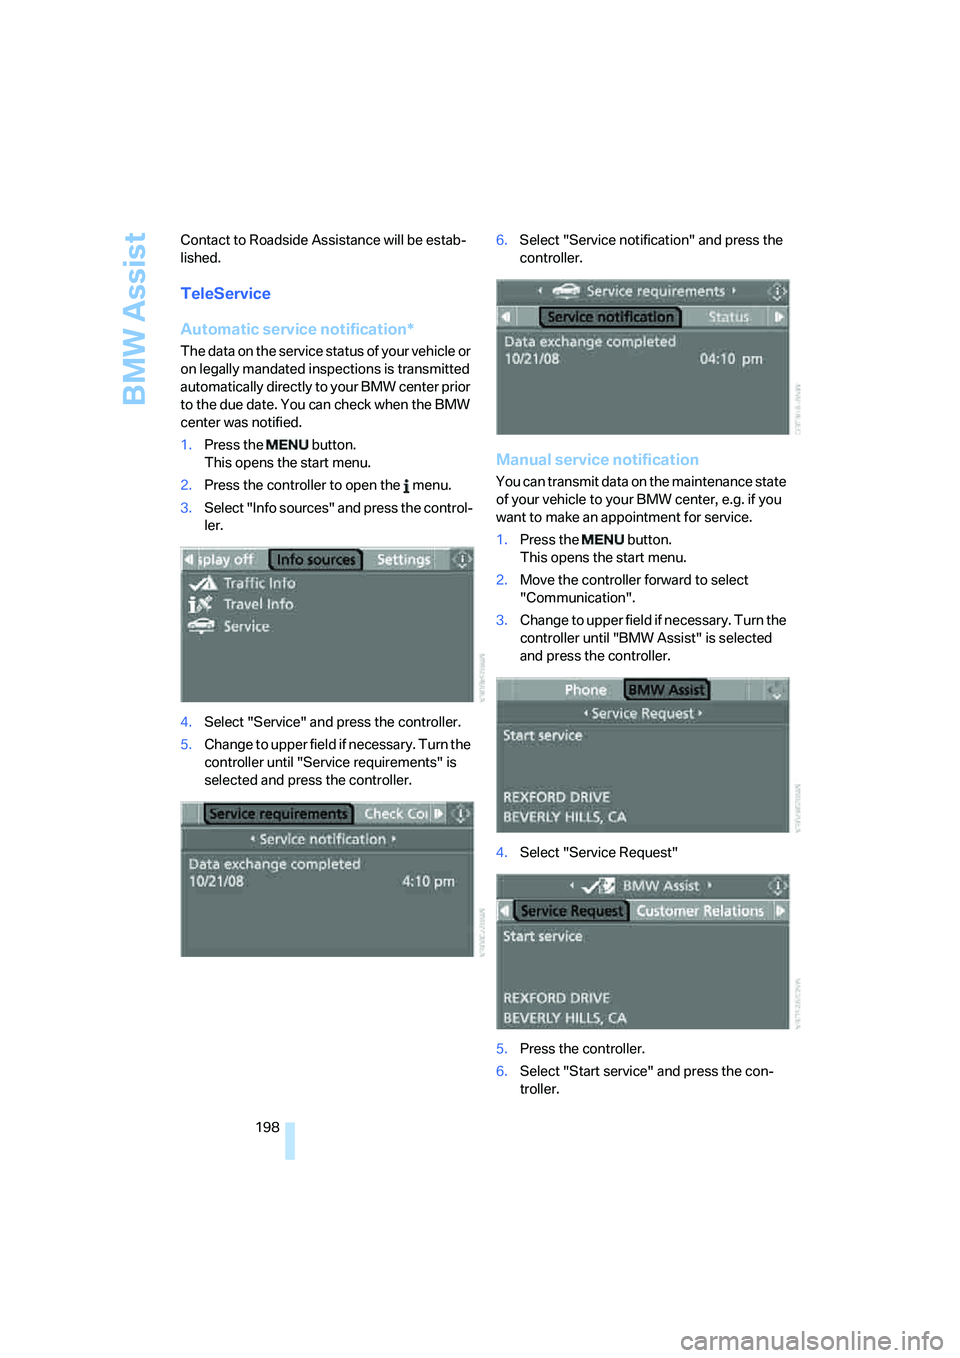
TeleService
Automatic service notification*
The data on the service status of your vehicle or
on legally mandated inspections is transmitted
automatically directly to your BMW center prior
to the due date. You can check when the BMW
center was notified.
1.Press the button.
This opens the start menu.
2.Press the controller to open the menu.
3.Select "Info sources" and press the control-
ler.
4.Select "Service" and press the controller.
5.Change to upper field if necessary. Turn the
controller until "Service requirements" is
selected and press the controller.6.Select "Service notification" and press the
controller.
Manual service notification
You can transmit data on the maintenance state
of your vehicle to your BMW center, e.g. if you
want to make an appointment for service.
1.Press the button.
This opens the start menu.
2.Move the controller forward to select
"Communication".
3.Change to upper field if necessary. Turn the
controller until "BMW Assist" is selected
and press the controller.
4.Select "Service Request"
5.Press the controller.
6.Select "Start service" and press the con-
troller.
Page 210 of 273
Wheels and tires
208
Wheels and tires
Tire inflation pressure
Information for your safety
The condition of the tires and the maintenance
of the specified tire pressure are crucial not only
to the tire's service life, but also to driving com-
fort and most importantly, driving safety.
Checking pressure
Only check tire inflation pressure when the tires
are cold. This means after a maximum of
1.25 miles/2 km driving or when the vehicle has
been parked for at least 2 hours. When tires are
warm, the tire inflation pressure increases.
Check the tire inflation pressure regularly
and correct it as needed, even on the
compact tire
*: at least twice a month and before
starting long trips. Otherwise driving instability
or tire damage, and therefore accidents, can
result from incorrect tire inflation pressures.
Do not drive with depressurized, i.e. flat tires,
except run-flat tires. A flat tire will seriously
impair your vehicle's handling and braking
response. Attempts to drive on a flat tire can
lead to a loss of control over the vehicle.<
After correcting the tire inflation pressure,
reinitialize the Flat Tire Monitor, refer to
page91, or reset the Tire Pressure Monitor,
refer to page93.<
Pressure specifications
The tables below provide all the correct inflation
pressures for the specified tire sizes at ambient
temperature.
The inflation pressures apply to the tire
sizes and tire brands respectively
approved and recommended by BMW; a list of
these is available from your BMW center.<
For correct identification of the right tire infla-
tion pressure for your tires, observe the follow-
ing:
>Tire sizes of your vehicle>Load conditions
>Maximum allowable driving speed
Tire inflation pressures for speeds
up to 100 mph/160 km/h
For normal driving up to 100 mph/160 km/h,
adjust pressures to the respective tire inflation
pressures listed on the following pages in the
column Traveling speeds up to max. 100 mph/
160 km/h to achieve optimum driving comfort.
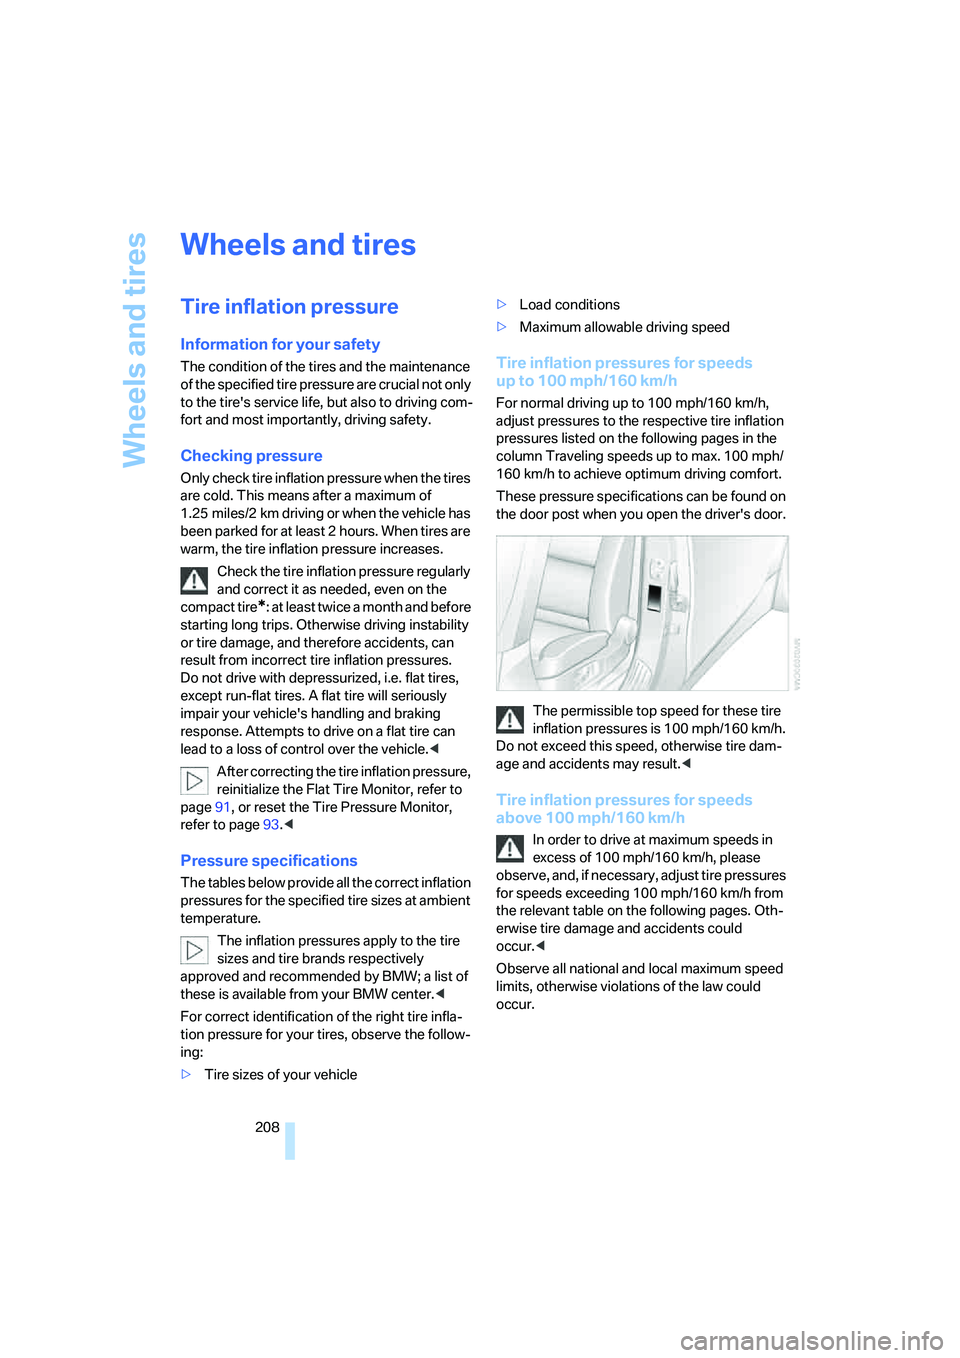
These pressure specifications can be found on
the door post when you open the driver's door.
The permissible top speed for these tire
inflation pressures is 100 mph/160 km/h.
Do not exceed this speed, otherwise tire dam-
age and accidents may result.<
Tire inflation pressures for speeds
above 100 mph/160 km/h
In order to drive at maximum speeds in
excess of 100 mph/160 km/h, please
observe, and, if necessary, adjust tire pressures
for speeds exceeding 100 mph/160 km/h from
the relevant table on the following pages. Oth-
erwise tire damage and accidents could
occur.<
Observe all national and local maximum speed
limits, otherwise violations of the law could
occur.
Page 215 of 273
Mobility
213Reference
At a glance
Controls
Driving tips
Communications
Navigation
Entertainment
M+S
Winter and all-season tires.
These have better winter properties than sum-
mer tires.
XL
Indicates specially reinforced tires.
Tire condition
Inspect your tires frequently for tread wear,
signs of damage and for foreign objects lodged
in the tread. Check the tread depth.
Minimum tread depth
The tread depth should not drop below 0.12 in/
3 mm, although, for example, European legisla-
tion only specifies a minimum tread depth of
0.063 in/1.6 mm. At tread depths below 0.12 in/
3 mm there is an increased risk of high-speed
hydroplaning, even when only small amounts of
water are present on the road surface.
When winter tires wear down past a tread depth
of 0.16 in/4 mm, they become perceptibly less
suitable for winter conditions. For the sake of
safety, new tires should be installed.
Wear indicators at the tread-groove base, refer
to arrow, are distributed over the tire's circum-
ference and are marked on the side of the tire
with TWI – Tread Wear Indicator. If the tire tread
has been driven down to the wear indicators, a
tread depth of 0.063 in/1.6 mm has been
reached.
Wheel/tire damage
Please note that low-profile tires cause wheels,
tires and suspension parts to be more suscep-tible to road hazards and consequential dam-
ages.
Unusual vibrations encountered during normal
vehicle operation can indicate tire failure or
some other vehicle defect. This can, for exam-
ple, be caused by driving over curbs. These
kinds of problems may also be signaled by other
changes in vehicle response, such as a strong
tendency to pull to the left or right.
In these cases, reduce speed immedi-
ately and have wheels and tires thor-
oughly checked. To do so, drive carefully to the
nearest BMW center or tire shop that works
according to BMW repair procedures with cor-
respondingly trained personnel. If necessary,
have the vehicle towed there. Tire damage can
be extremely dangerous for vehicle occupants
and other road users.<
Run-flat tires*
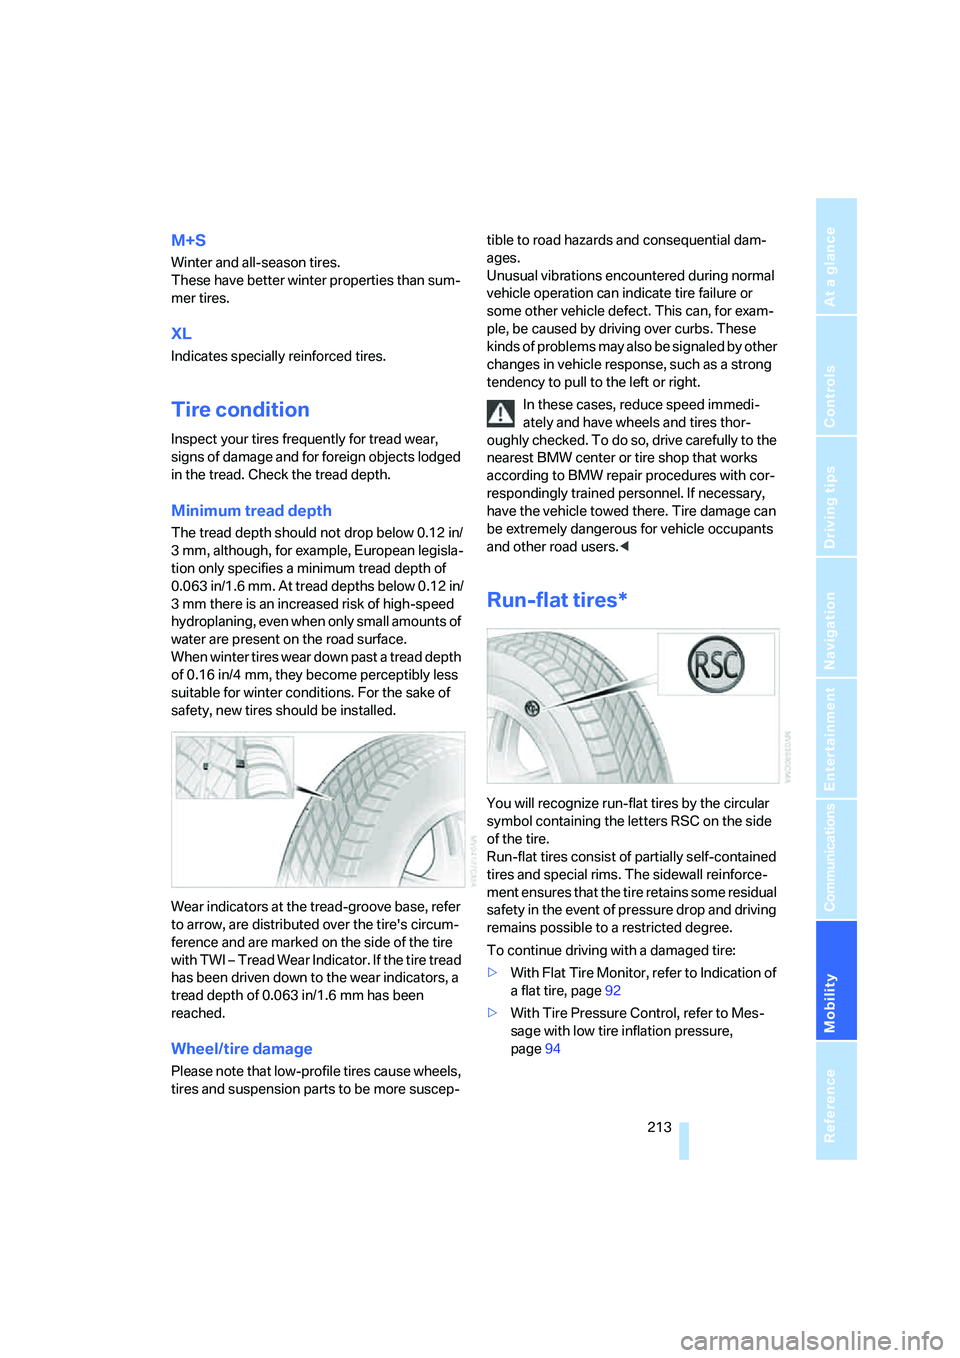
You will recognize run-flat tires by the circular
symbol containing the letters RSC on the side
of the tire.
Run-flat tires consist of partially self-contained
tires and special rims. The sidewall reinforce-
ment ensures that the tire retains some residual
safety in the event of pressure drop and driving
remains possible to a restricted degree.
To continue driving with a damaged tire:
>With Flat Tire Monitor, refer to Indication of
a flat tire, page92
>With Tire Pressure Control, refer to Mes-
sage with low tire inflation pressure,
page94