tow BMW 550I GRAN TURISMO 2011 Owner's Manual
[x] Cancel search | Manufacturer: BMW, Model Year: 2011, Model line: 550I GRAN TURISMO, Model: BMW 550I GRAN TURISMO 2011Pages: 297, PDF Size: 8.59 MB
Page 158 of 297
"Start search": if a search term is not entered,
the
search is repeated with the previous search
term.
Category search
1. "Category search"
2. "Town/City"
Select or enter the town/city.
3. "Category"
4. Select the category.
5. "Category details"
For
some special destinations, multiple cat‐
egory details can be selected. Move the
controller to the left to leave the category
details.
6. "Start search"
A
list of the special destinations is displayed.
7. Select a special destination.
Details are displayed.
If multiple details are stored, you can leaf
through the pages.
If
a phone number is available, a connection
can be established if necessary.
8. Select the symbol.
"Start guidance" or "Add as another
destination"
Add a destination as a further destination,
refer to page 160.
Display of special destinations
List
of special destinations: special destinations
are organized by distance and are displayed with
a directional arrow to the special destination.
on the split screen, special destinations of the
selected category are displayed in the map view
as symbols. The display depends on the scale
of the map and the category.
Destination entry via BMW Assist*
A connection is established to the Concierge
service, refer to page 233. 1.
"Navigation"
2. "Enter address"
3. Open "Options".
4. "BMW Assist dest. entry"
Displaying special destinations in the
map
To display symbols of the special destinations
in the map view:
1. "Navigation"
2. "Map"
3. Open "Options".
4. "Display Points of Interest"
5. Select the setting.
Destination entry by map
Selecting the destination
1. "Navigation"
2. "Map"
The current position of the vehicle is indi‐
cated on the map.
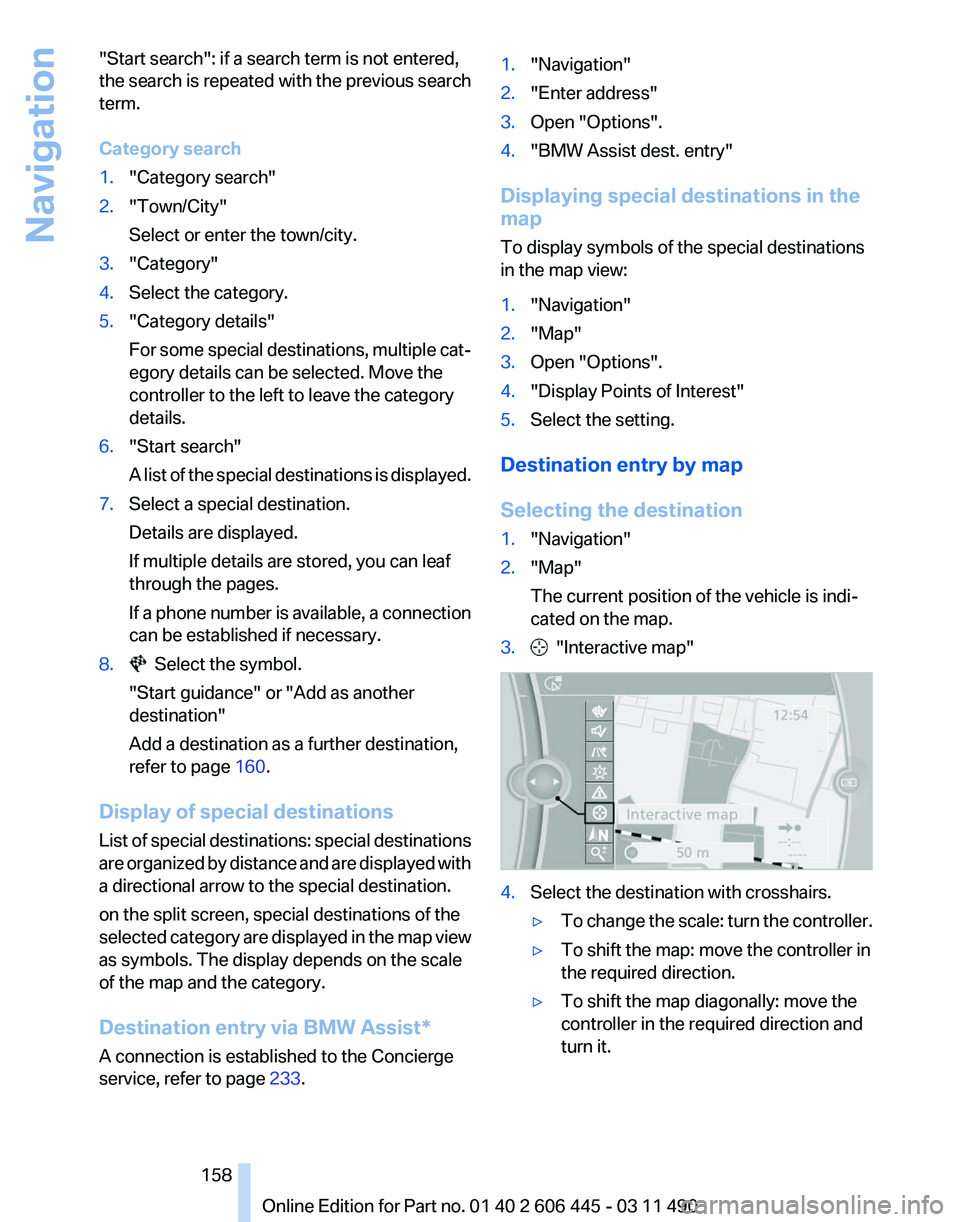
3. "Interactive map"
4.
Select the destination with crosshairs.
▷To change the scale: turn the controller.
▷ To shift the map: move the controller in
the required direction.
▷ To shift the map diagonally: move the
controller in the required direction and
turn it.
Seite 158
158 Online Edition for Part no. 01 40 2 606 445 - 03 11 490
Navigation
Page 159 of 297
Specifying the street
If
the system does not recognize a street, one of
the following is displayed:
▷ The name of a street in the vicinity.
▷ The county.
▷ The coordinates of the destination.
Additional functions
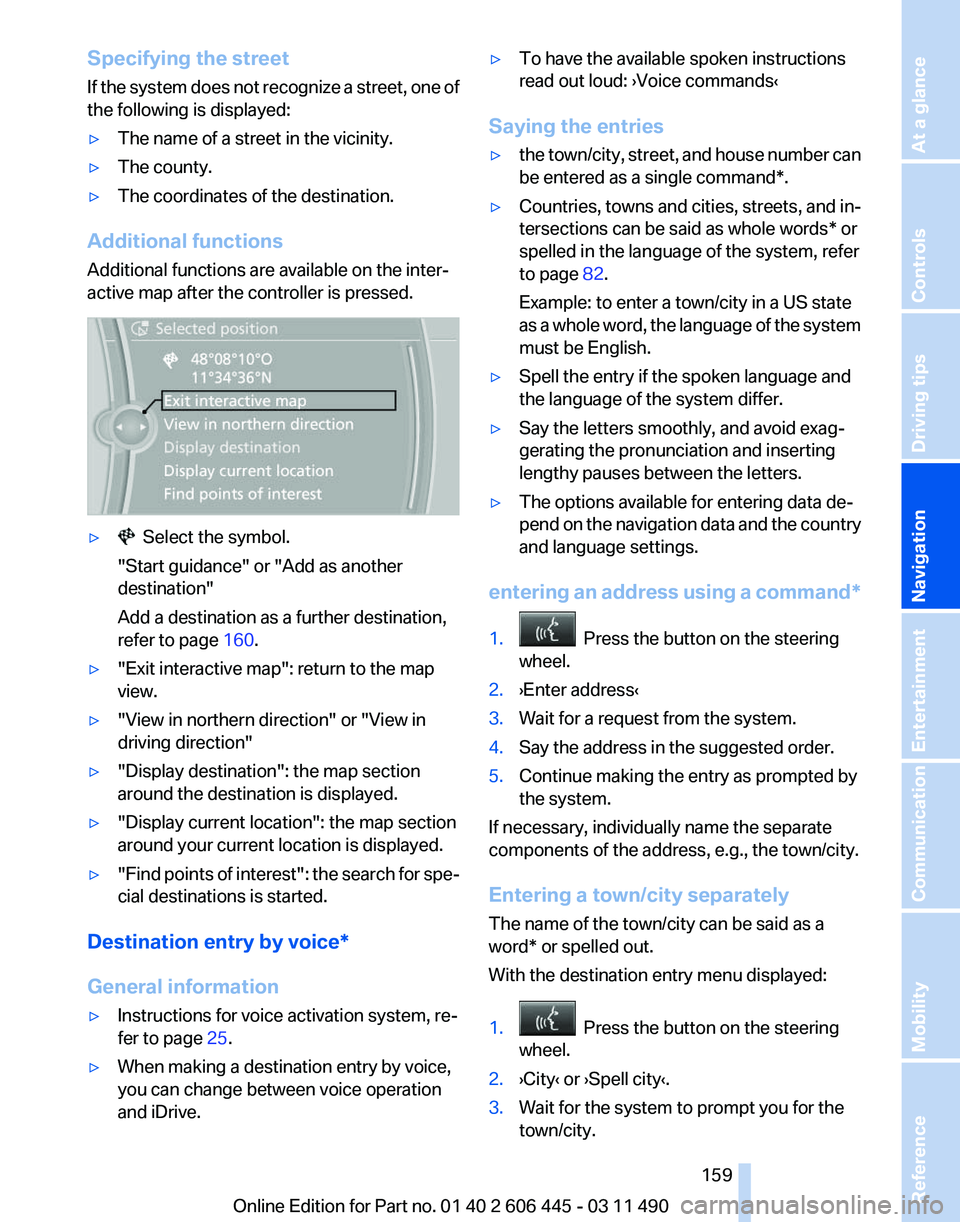
Additional functions are available on the inter‐
active map after the controller is pressed. ▷ Select the symbol.
"Start guidance" or "Add as another
destination"
Add a destination as a further destination,
refer to page 160.
▷ "Exit interactive map": return to the map
view.
▷ "View in northern direction" or "View in
driving direction"
▷ "Display destination": the map section
around the destination is displayed.
▷ "Display current location": the map section
around your current location is displayed.
▷ "Find
points of interest": the search for spe‐
cial destinations is started.
Destination entry by voice*
General information
▷ Instructions for voice activation system, re‐
fer to page 25.
▷ When making a destination entry by voice,
you can change between voice operation
and iDrive. ▷
To have the available spoken instructions
read out loud: ›Voice commands
‹
Saying the entries
▷ the town/city, street, and house number can
be entered as a single
command*.
▷ Countries, towns and cities, streets, and in‐
tersections can be said as whole words* or
spelled in the language of the system, refer
to page 82.
Example: to enter a town/city in a US state
as
a whole word, the language of the system
must be English.
▷ Spell the entry if the spoken language and
the language of the system differ.
▷ Say the letters smoothly, and avoid exag‐
gerating the pronunciation and inserting
lengthy pauses between the letters.
▷ The options available for entering data de‐
pend
on the navigation data and the country
and language settings.
entering an address using a command*
1. Press the button on the steering
wheel.
2. ›Enter address‹
3. Wait for a request from the system.
4. Say the address in the suggested order.
5. Continue making the entry as prompted by
the system.
If necessary, individually name the separate
components of the address, e.g., the town/city.
Entering a town/city separately
The name of the town/city can be said as a
word* or spelled out.
With the destination entry menu displayed:
1. Press the button on the steering
wheel.
2. ›City‹ or ›Spell city‹.
3. Wait for the system to prompt you for the
town/city.
Seite 159
159Online Edition for Part no. 01 40 2 606 445 - 03 11 490
Reference Mobility Communication Entertainment
Navigation Driving tips Controls At a glance
Page 160 of 297
4.
Say the name of the town/city, or say at least
the first three letters.
Depending
on the entry, up to 20 towns/cit‐
ies may be suggested.
5. Select the town/city.
▷To select a recommended town/
city: ›Yes‹
▷ To select a different town/city: ›New
entry‹
▷ Select an entry: ›Entry ...‹ e.g., entry 2
▷ To spell an entry: ›Spell city‹
6. Continue making the entry as prompted by
the system.
If there are several towns/cities with the same
name:
Towns/cities
of the same name are grouped in a
list and displayed as one location followed by an
ellipsis.
1. Select an entry: ›Yes‹ or ›Entry ...‹ e.g., En‐
try 2.
2. Select the desired town/city.
Entering a street or intersection
separately
Enter a street and intersection in the same way
as you would enter a town/city.
Entering a house number separately
Depending
on the data in the navigation system,
house numbers up to number 2000 can be en‐
tered.
1. ›House number‹
2. Say the house number.
Say each digit separately.
3. Continue making the entry as prompted by
the system.
Planning a trip with intermediate
destinations
New trip
A trip can be planned with several intermediate
destinations. 1.
"Navigation"
2. "Map"
3. Move the controller to the left if necessary.
4. "Guidance"
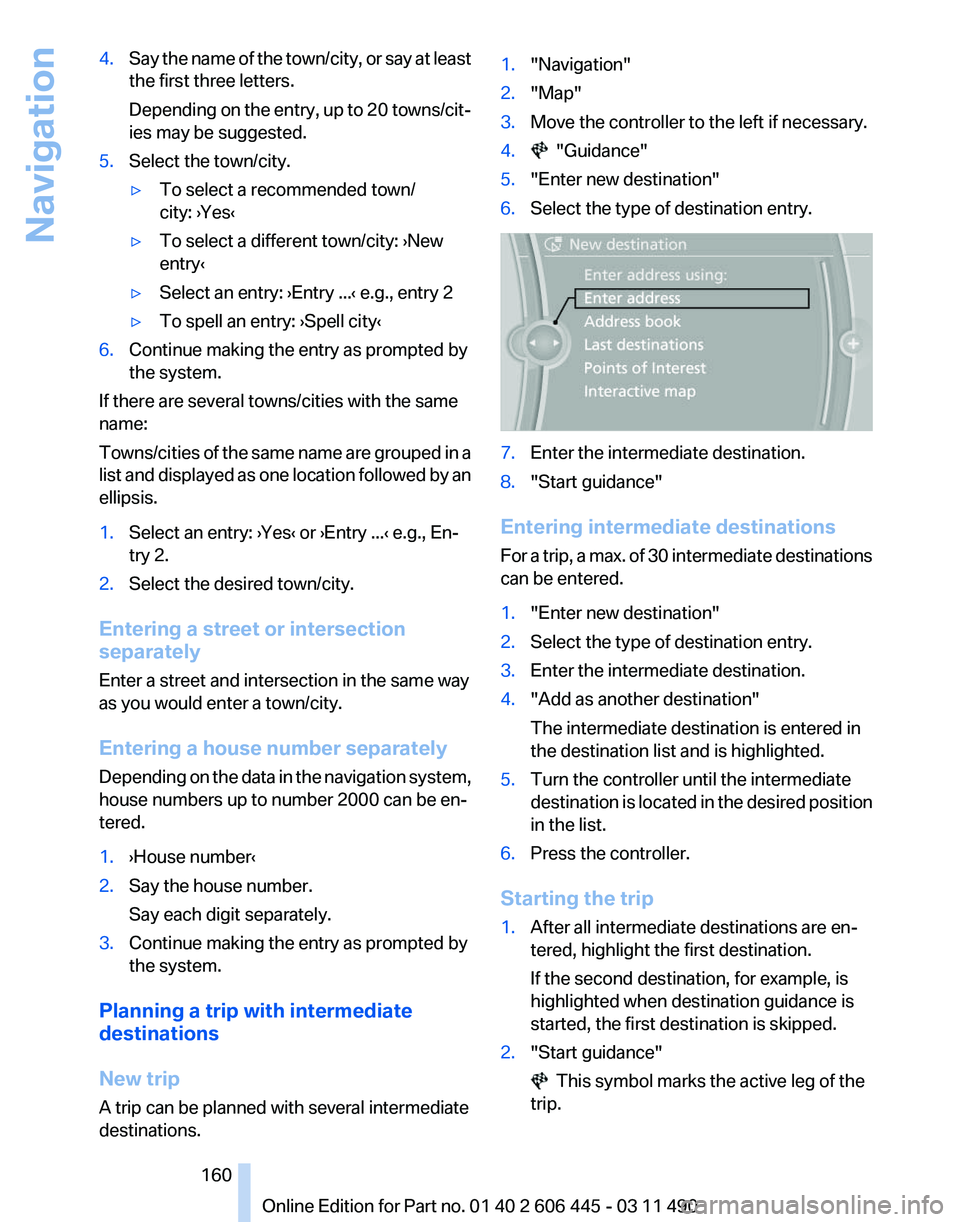
5. "Enter new destination"
6. Select the type of destination entry. 7.
Enter the intermediate destination.
8. "Start guidance"
Entering intermediate destinations
For
a trip, a max. of 30 intermediate destinations
can be entered.
1. "Enter new destination"
2. Select the type of destination entry.
3. Enter the intermediate destination.
4. "Add as another destination"
The intermediate destination is entered in
the destination list and is highlighted.
5. Turn the controller until the intermediate
destination
is located in the desired position
in the list.
6. Press the controller.
Starting the trip
1. After all intermediate destinations are en‐
tered, highlight the first destination.
If the second destination, for example, is
highlighted when destination guidance is
started, the first destination is skipped.
2. "Start guidance" This symbol marks the active leg of the
trip.
Seite 160
160 Online Edition for Part no. 01 40 2 606 445 - 03 11 490
Navigation
Page 168 of 297
Navigation data
Information on the navigation data
1.
"Navigation"
2. Open "Options".
3. "Navigation system version": information on
the data version is displayed.
Updating the navigation data
General information
Navigation data and authorization codes are
available from your service center. Navigation
data are stored in the vehicle and can be up‐
dated.
▷ Depending on the data volume, a data up‐
date may take several hours.
▷ Update during the trip to preserve battery.
▷ During the update, only the basic functions
of the navigation system are available.
▷ The status of the update can be viewed.
▷ The system restarts after the update.
▷ The data carrier with the navigation data can
be removed after the update is complete.
Perform an update
1. Insert the navigation DVD into the DVD
player with the labeled side facing up.
2. Follow the instructions on the Control Dis‐
play.
3. Enter the authorization code of the naviga‐
tion DVD and change the DVD if needed.
After interrupting your trip, follow the instruc‐
tions on the Control Display.
Viewing the status
1. Press the button.
2. "Navigation update" What to do if...
▷
The current transmission position cannot be
displayed?
The vehicle is located in an unrecognized
region, is in a poor reception area, or the
system is currently determining the posi‐
tion. Reception is usually best when you
have an unobstructed view of the sky.
▷ The destination without street information is
not used for route guidance?
When
city has been input, no downtown can
be determined.
Input any street in the selected city and start
destination guidance.
▷ The destination is not used for route guid‐
ance?
The destination data is not contained in the
navigation data. Select a destination that is
as close as possible to the original.
▷ Letters for destination input cannot be se‐
lected?
The stored data do not contain the data of
the destination.
Select a goal that is as close as possible to
the original.
▷ Is the map displayed in shades of gray?
"Traffic conditions/gray map" Active: indi‐
cation on the control display is switched to
shades
of gray. This enables a better view of
the traffic bulletins.
▷ Spoken instructions are no longer output
during route guidance in front of intersec‐
tions?
The
area has not yet been fully recorded, or
you have left the recommended route and
the system requires a few seconds to cal‐
culate a new route suggestion.
Seite 168
168 Online Edition for Part no. 01 40 2 606 445 - 03 11 490
Navigation
Page 247 of 297
Those grades represent the tire's ability to stop
on
wet pavement as measured under controlled
conditions on specified government test surfa‐
ces of asphalt and concrete. A tire marked C may
have poor traction performance.
The traction grade assigned to this tire is based
on straight-ahead braking traction tests, and
does not include acceleration, cornering, hydro‐
planing, or peak traction characteristics.
Temperature
The temperature grades are A, the highest, B,
and C, representing the tire's resistance to the
generation of heat and its ability to dissipate
heat when tested under controlled conditions
on a specified indoor laboratory test wheel. Sus‐
tained high temperature can cause the material
of the tire to degenerate and reduce tire life, and
excessive temperature can lead to sudden tire
failure. The grade C corresponds to a level of
performance which all passenger car tires must
meet under the Federal Motor Vehicle Safety
Standard No. 109. Grades Band A represent
higher levels of performance on the laboratory
test wheel than the minimum required by law.
Temperature grade for this tire
The temperature grade for this tire is es‐
tablished for a tire that is properly inflated and
not overloaded. Excessive speed, underinfla‐
tion, or excessive loading, either separately or in
combination, can cause heat buildup and pos‐
sible tire failure.
If necessary, have the vehicle towed.◀
RSC – Run-flat tires
Run-flat tires, refer to page 249, are labeled with
a circular symbol containing the letters RSC
marked on the sidewall.
M+S
Winter and all-season tires with better cold
weather performance than summer tires. Tire tread
Summer tires
Do not drive with a tire tread depth of less than
0.12 in/3 mm.
There is an increased danger of hydroplaning if
the tread depth is less than 0.12 in/3 mm.
Winter tires
Do not drive with a tire tread depth of less than
0.16 in/4 mm.
Below a tread depth of 0.16 in/4 mm, tires are
less suitable for winter operation.
Minimum tread depth
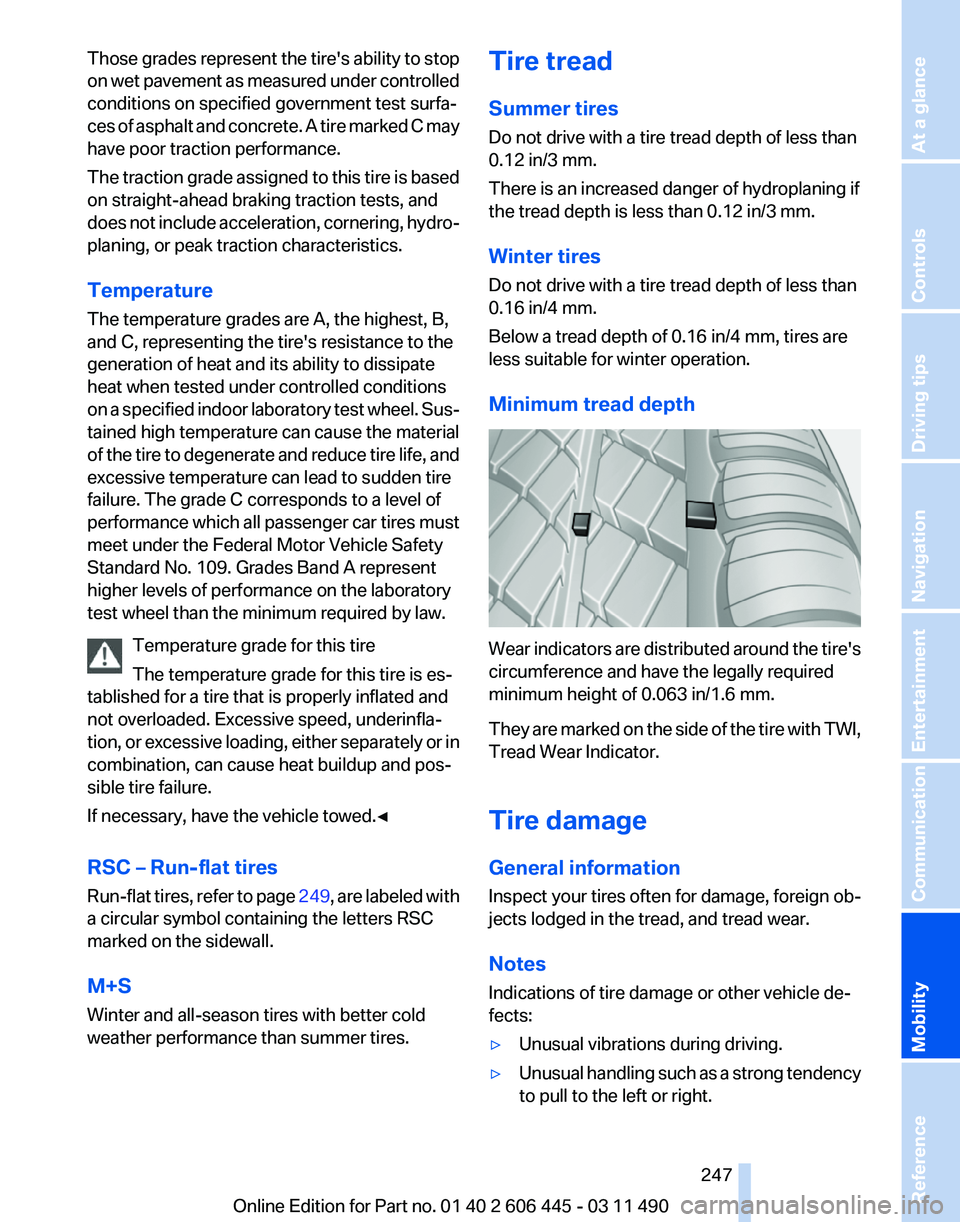
Wear indicators are distributed around the tire's
circumference and have the legally required
minimum height of 0.063 in/1.6 mm.
They
are marked on the side of the tire with TWI,
Tread Wear Indicator.
Tire damage
General information
Inspect your tires often for damage, foreign ob‐
jects lodged in the tread, and tread wear.
Notes
Indications of tire damage or other vehicle de‐
fects:
▷ Unusual vibrations during driving.
▷ Unusual handling such as a strong tendency
to pull to the left or right.
Seite 247
247Online Edition for Part no. 01 40 2 606 445 - 03 11 490
Reference
Mobility Communication Entertainment Navigation Driving tips Controls At a glance
Page 248 of 297
In case of tire damage
If there are indications of tire damage, re‐
duce your speed immediately and have the
wheels
and tires checked right away; otherwise,
there is the increased risk of an accident.
Drive carefully to the next service center or tire
shop.
If necessary, have the vehicle towed.◀
Repair of tire damage
For safety reasons, the manufacturer of
your vehicle recommends that you do not have
damaged tires repaired; they should be re‐
placed. Otherwise, damage can occur as a re‐
sult.◀
Changing wheels and tires
Mounting
Information on mounting tires
Have mounting and balancing performed
only by a service center or tire specialist.
If this work is not carried out properly, there is
the danger of subsequent damage and related
safety hazards.◀
Wheel and tire combination
Information on the correct wheel-tire combina‐
tion and rim versions for your vehicle can be ob‐
tained from your service center.
Incorrect wheel and tire combinations impair the
function of a variety of systems such as ABS or
DSC.
To maintain good handling and vehicle re‐
sponse, use only tires with a single tread con‐
figuration from a single manufacturer.
Following tire damage, have the original wheel
and tire combination remounted on the vehicle
as soon as possible. Approved wheels and tires
The manufacturer of your vehicle recom‐
mends that you use only wheels and tires that
have been approved for your particular vehicle
model.
For example, despite having the same official
size
ratings, variations can lead to body contact
and with it, the risk of severe accidents.
The manufacturer of your vehicle cannot evalu‐
ate non-approved wheels and tires to determine
if they are suited for use, and therefore cannot
ensure the operating safety of the vehicle if they
are mounted.◀
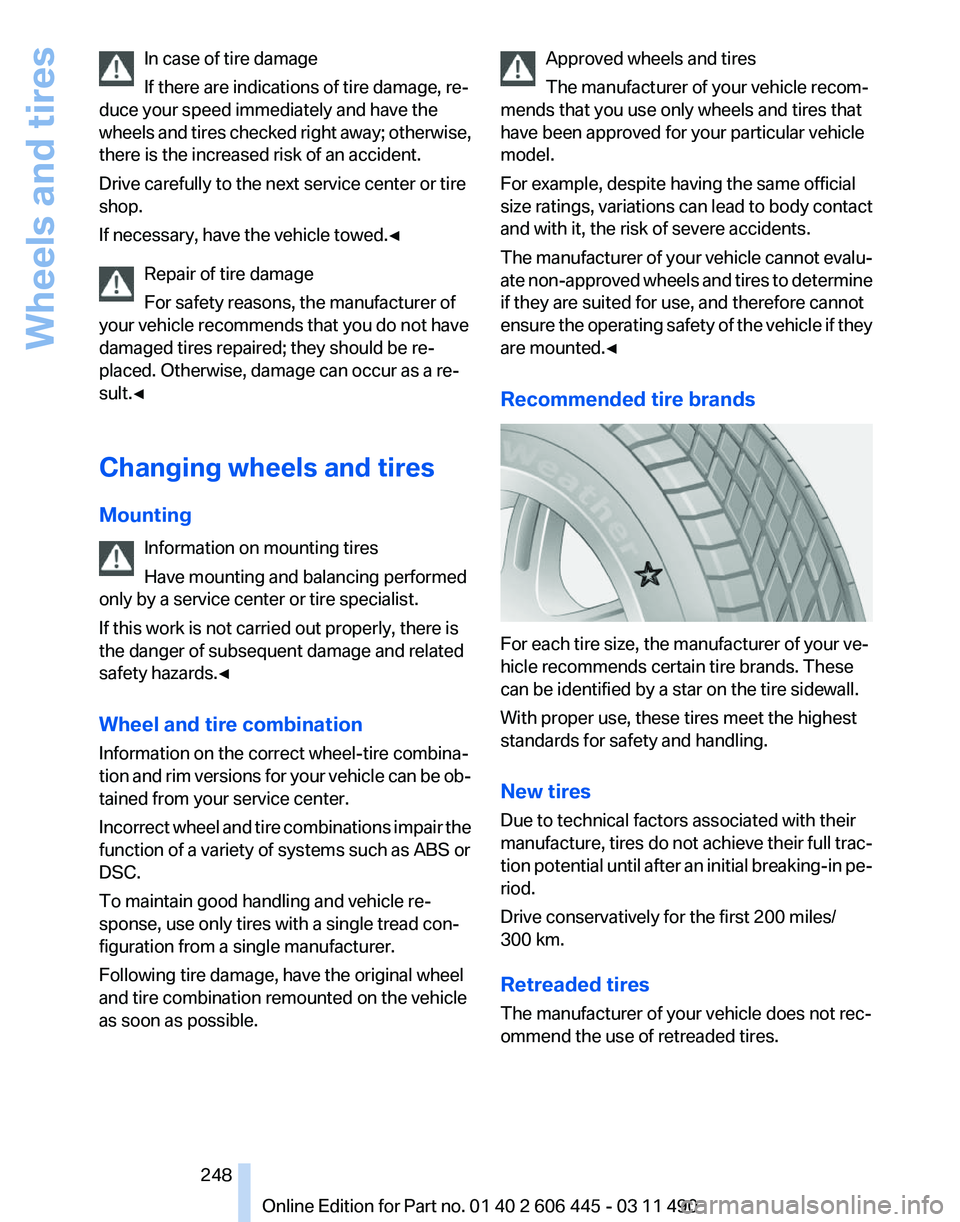
Recommended tire brands For each tire size, the manufacturer of your ve‐
hicle recommends certain tire brands. These
can be identified by a star on the tire sidewall.
With proper use, these tires meet the highest
standards for safety and handling.
New tires
Due to technical factors associated with their
manufacture,
tires do not achieve their full trac‐
tion potential until after an initial breaking-in pe‐
riod.
Drive conservatively for the first 200 miles/
300 km.
Retreaded tires
The manufacturer of your vehicle does not rec‐
ommend the use of retreaded tires. Seite 248
248 Online Edition for Part no. 01 40 2 606 445 - 03 11 490
Wheels and tires
Page 258 of 297
Replacing components
Tool kit
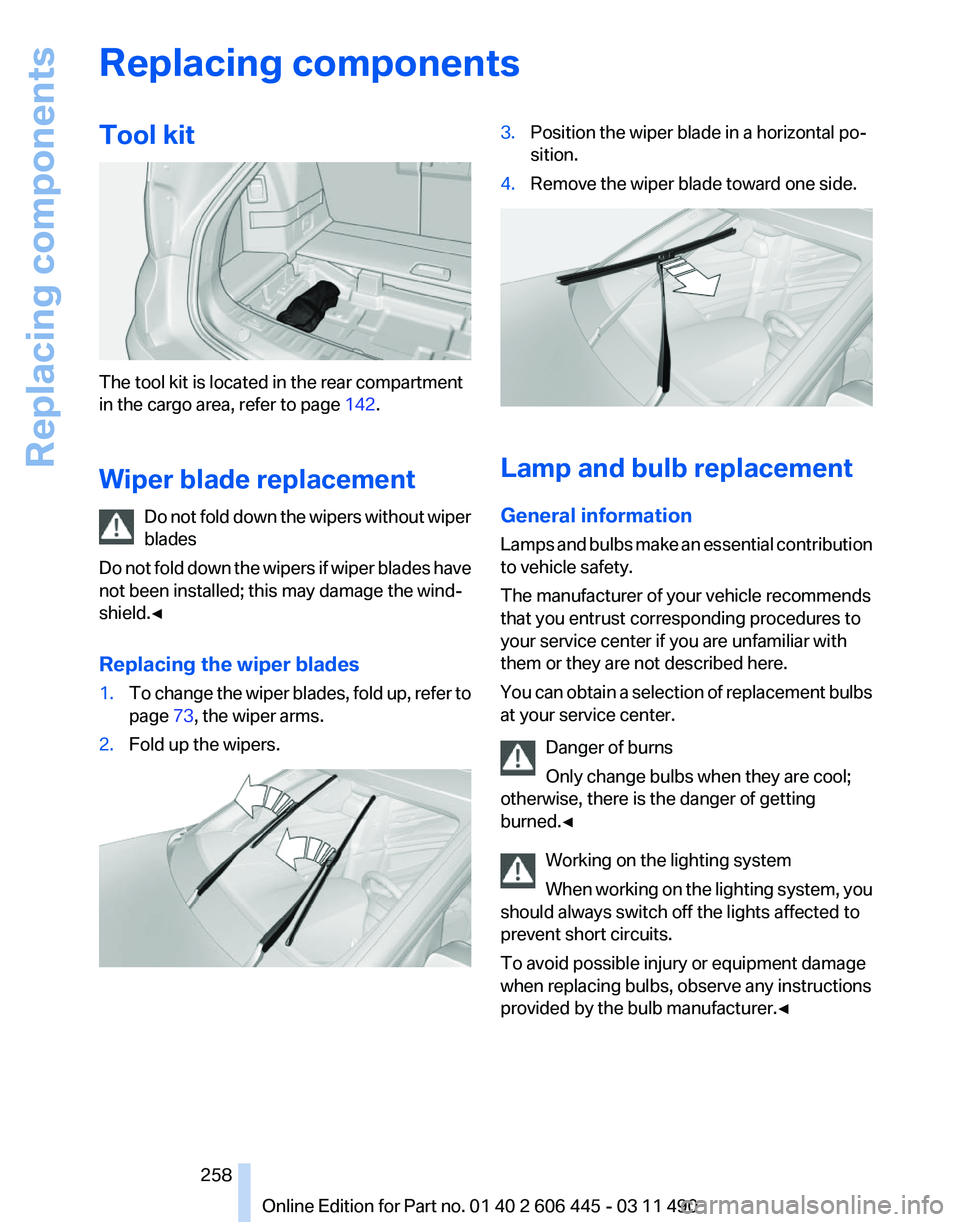
The tool kit is located in the rear compartment
in the cargo area, refer to page
142.
Wiper blade replacement Do
not fold down the wipers without wiper
blades
Do not fold down the wipers if wiper blades have
not been installed; this may damage the wind‐
shield.◀
Replacing the wiper blades
1. To change the wiper blades, fold up, refer to
page 73, the wiper arms.
2. Fold up the wipers. 3.
Position the wiper blade in a horizontal po‐
sition.
4. Remove the wiper blade toward one side. Lamp and bulb replacement
General information
Lamps
and bulbs make an essential contribution
to vehicle safety.
The manufacturer of your vehicle recommends
that you entrust corresponding procedures to
your service center if you are unfamiliar with
them or they are not described here.
You can obtain a selection of replacement bulbs
at your service center.
Danger of burns
Only change bulbs when they are cool;
otherwise, there is the danger of getting
burned.◀
Working on the lighting system
When working on the lighting system, you
should always switch off the lights affected to
prevent short circuits.
To avoid possible injury or equipment damage
when replacing bulbs, observe any instructions
provided by the bulb manufacturer.◀ Seite 258
258 Online Edition for Part no. 01 40 2 606 445 - 03 11 490Replacing components
Page 260 of 297
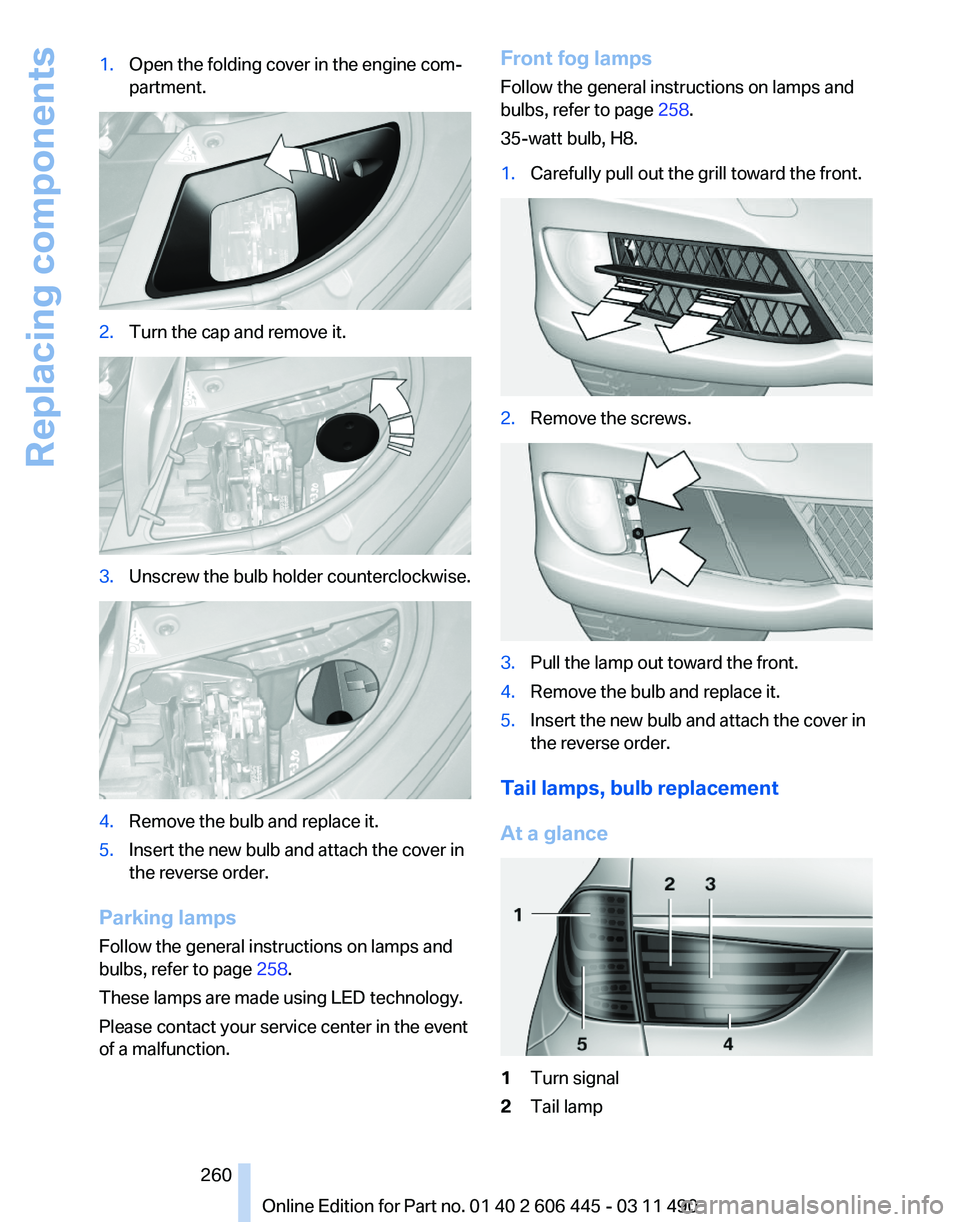
1.
Open the folding cover in the engine com‐
partment. 2.
Turn the cap and remove it. 3.
Unscrew the bulb holder counterclockwise. 4.
Remove the bulb and replace it.
5. Insert the new bulb and attach the cover in
the reverse order.
Parking lamps
Follow the general instructions on lamps and
bulbs, refer to page 258.
These lamps are made using LED technology.
Please contact your service center in the event
of a malfunction. Front fog lamps
Follow the general instructions on lamps and
bulbs, refer to page
258.
35-watt bulb, H8.
1. Carefully pull out the grill toward the front. 2.
Remove the screws. 3.
Pull the lamp out toward the front.
4. Remove the bulb and replace it.
5. Insert the new bulb and attach the cover in
the reverse order.
Tail lamps, bulb replacement
At a glance 1
Turn signal
2 Tail lamp
Seite 260
260 Online Edition for Part no. 01 40 2 606 445 - 03 11 490Replacing components
Page 261 of 297
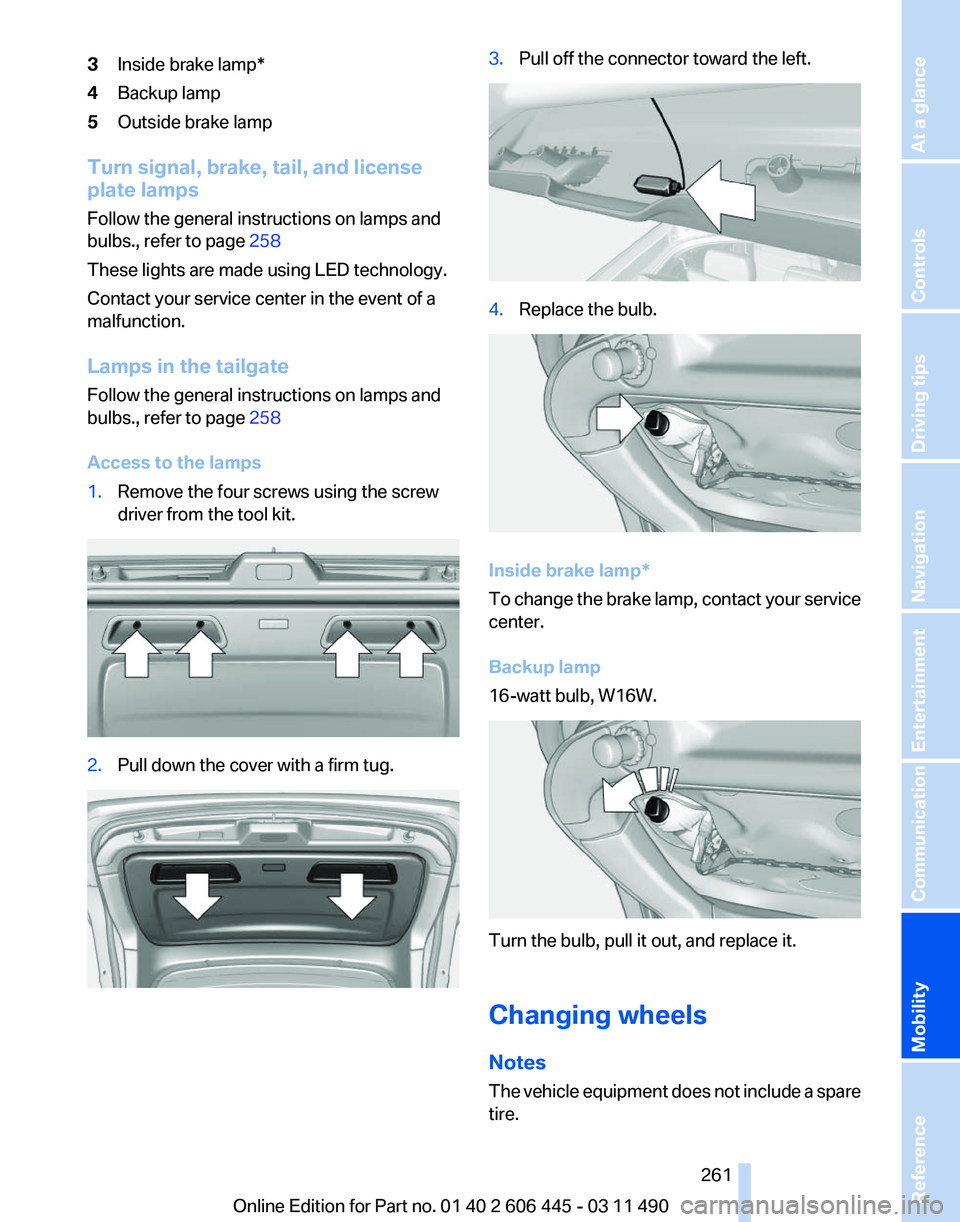
3
Inside brake lamp*
4 Backup lamp
5 Outside brake lamp
Turn signal, brake, tail, and license
plate lamps
Follow the general instructions on lamps and
bulbs., refer to page 258
These lights are made using LED technology.
Contact your service center in the event of a
malfunction.
Lamps in the tailgate
Follow the general instructions on lamps and
bulbs., refer to page 258
Access to the lamps
1. Remove the four screws using the screw
driver from the tool kit. 2.
Pull down the cover with a firm tug. 3.
Pull off the connector toward the left. 4.
Replace the bulb. Inside brake lamp*
To
change the brake lamp, contact your service
center.
Backup lamp
16-watt bulb, W16W. Turn the bulb, pull it out, and replace it.
Changing wheels
Notes
The
vehicle equipment does not include a spare
tire.
Seite 261
261Online Edition for Part no. 01 40 2 606 445 - 03 11 490
Reference
Mobility Communication Entertainment Navigation Driving tips Controls At a glance
Page 266 of 297
Starting aid terminals
Connecting order
Connect the jumper cables in the correct
order; otherwise, there is the danger of injury
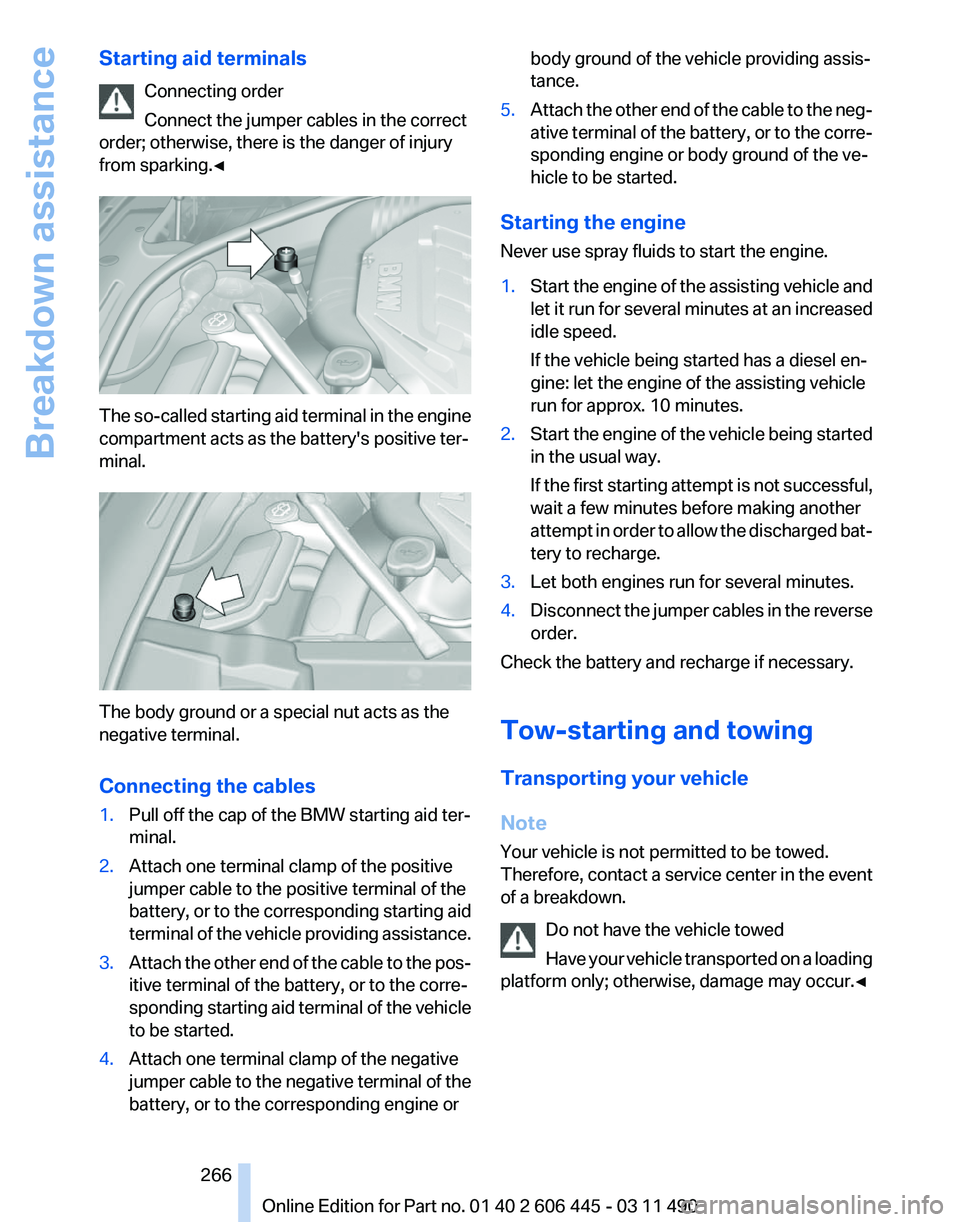
from sparking.◀ The so-called starting aid terminal in the engine
compartment acts as the battery's positive ter‐
minal.
The body ground or a special nut acts as the
negative terminal.
Connecting the cables
1.
Pull off the cap of the BMW starting aid ter‐
minal.
2. Attach one terminal clamp of the positive
jumper cable to the positive terminal of the
battery,
or to the corresponding starting aid
terminal of the vehicle providing assistance.
3. Attach the other end of the cable to the pos‐
itive terminal of the battery, or to the corre‐
sponding
starting aid terminal of the vehicle
to be started.
4. Attach one terminal clamp of the negative
jumper
cable to the negative terminal of the
battery, or to the corresponding engine or body ground of the vehicle providing assis‐
tance.
5. Attach the other end of the cable to the neg‐
ative
terminal of the battery, or to the corre‐
sponding engine or body ground of the ve‐
hicle to be started.
Starting the engine
Never use spray fluids to start the engine.
1. Start the engine of the assisting vehicle and
let
it run for several minutes at an increased
idle speed.
If the vehicle being started has a diesel en‐
gine: let the engine of the assisting vehicle
run for approx. 10 minutes.
2. Start the engine of the vehicle being started
in the usual way.
If
the first starting attempt is not successful,
wait a few minutes before making another
attempt in order to allow the discharged bat‐
tery to recharge.
3. Let both engines run for several minutes.
4. Disconnect the jumper cables in the reverse
order.
Check the battery and recharge if necessary.
Tow-starting and towing
Transporting your vehicle
Note
Your vehicle is not permitted to be towed.
Therefore,
contact a service center in the event
of a breakdown.
Do not have the vehicle towed
Have your vehicle transported on a loading
platform only; otherwise, damage may occur.◀ Seite 266
266 Online Edition for Part no. 01 40 2 606 445 - 03 11 490
Breakdown assistance