air BMW 550I TOURING 2006 E61 Owner's Guide
[x] Cancel search | Manufacturer: BMW, Model Year: 2006, Model line: 550I TOURING, Model: BMW 550I TOURING 2006 E61Pages: 259, PDF Size: 8.9 MB
Page 205 of 259
Mobility
203Reference
At a glance
Controls
Driving tips
Communications
Navigation
Entertainment
grease and fuels. Do not exceed the maximum
tire inflation pressure indicated on the side wall
of the tire.
Snow chains*
BMW only tests certain fine-link snow chains,
classifies them as road-safe and recommends
them. Consult your BMW center for more infor-
mation.
Use is only permissible in pairs on the rear
wheels.
Observe the manufacturer's instructions when
mounting snow chains. Do not exceed a speed
of 30 mph/50 km/h with the chains mounted.
After mounting snow chains, do not ini-
tialize the Flat Tire Monitor, otherwise
incorrect displays can occur.
When driving with snow chains, it may be prac-
tical to briefly activate DTC, refer to page87.<
Page 206 of 259
Under the hood
204
Under the hood
Never attempt to perform any service or
repair operations on your vehicle without
the required professional technical training.
If you do not know what repair procedures to
follow, have work on your vehicle done only by
your BMW center or a workshop that works
according to BMW repair procedures with cor-
respondingly trained personnel. If this work is
not carried out properly, there is a danger of
subsequent damage and related safety haz-
ards.<
Hood
Releasing
Pull lever.
Opening
Press the release handle and open the hood.
Closing
Close the hood from a height of approx. 16 in/
40 cm with momentum. It must be clearly heard
to engage.
Make sure that the closing path of the
hood is clear, otherwise injuries may
result.
If you see any signs that the hood is not com-
pletely closed while driving your vehicle, you
should stop at once and close it securely.<
Page 208 of 259
Under the hood
206 4.Change to upper field if necessary. Turn the
controller until "Service requirements" is
selected and press the controller.
5.Change to the second field from the top if
necessary. Turn the controller until "Engine
oil level" is selected and press the control-
ler. The oil level is displayed.
Possible messages
>"Engine oil level O.K."
>"No measured value available: Updating
engine oil level measurement...":
Engine oil level is being measured. This
process can take approx. 3 minutes when
stopped on a level surface and approx.
5 minutes while driving.
>"Oil level at the minimum! Refill with 1 quart
of engine oil.":
Add 1 US quart/liter of engine oil at the next
opportunity.
>"Engine oil level too high":
Have the vehicle checked immedi-
ately, otherwise engine damage may
result if too much oil has been added.<
>"Please observe recalculated service inter-
val for engine oil":
Do not add engine oil. Continued driving is
possible. To do this, observe the recalcu-
lated remaining mileage until the next oil
change service, refer to page209. Have the
system checked as soon as possible.
Adding engine oil
Do not add 1 US quart/1 liter of oil until a corre-
sponding message is shown on the Control Dis-
play.
Add oil within the next 125 miles/200 km,
otherwise the engine could be dam-
aged.<
Continuous exposure to used oil has
caused cancer in laboratory testing.
For this reason, any skin areas that come into
contact with oil should be thoroughly washed
with soap and water.
Keep oil, grease etc. out of reach of children and
observe the warnings on the containers to pre-
vent health risks.<
Oil change
Have oil changed only at your BMW center or
at a workshop that works according to BMW
repair procedures with correspondingly trained
personnel.
Approved engine oils
The quality of the engine oil selected has critical
significance for the operation and service life of
an engine. BMW continuously approves spe-
cific oils after confirming their suitability for use
in its vehicles with extensive testing.
Do not use oil additives, as these may
result in engine damage.<
Only use approved BMW High Performance
Synthetic Oil.
If BMW High Performance Synthetic Oil is
unavailable, you can add small quantities of
other synthetic oils between oil changes. Only
use oils of the specification API SH or higher.
Page 211 of 259
Mobility
209Reference
At a glance
Controls
Driving tips
Communications
Navigation
Entertainment
Maintenance
BMW maintenance system
The BMW maintenance system supports the
preservation of the traffic and operating safety
of your BMW. The service schedule also
includes operations related to the vehicle's
comfort and convenience features, such as
replacement of the filters for the inside air.
The ultimate objective is to ensure economical
maintenance by providing the ideal service for
your vehicle.
Should the day come when you decide to sell
your BMW, a complete dealer service history
will prove to be an asset of inestimable value.
CBS Condition Based Service
Sensors and special algorithms take the differ-
ent driving conditions of your BMW into
account. Condition Based Service uses this to
determine the current and future service
requirements. By letting you define a service
and maintenance regimen that reflects your
own individual requirements, the system builds
the basis for trouble-free driving.
You can set the Control Display to show
remaining distances and times of selected
maintenance intervals and legally mandated
deadlines, refer to page77:
>Engine oil
>Brake pads, front and rear separately
>Microfilter/activated-charcoal filter
>Brake fluid
>Spark plugs>Vehicle check
>Legally mandated inspections depending
on local regulations
Service data in remote control
Your vehicle stores the information required
maintenance continuously in the remote con-
trol during driving. After accessing the data
stored in the remote control, your BMW Service
Advisor can suggest precisely the right array of
service procedures for your own individual vehi-
cle. You should therefore hand over the remote
control you last used to drive to the BMW Ser-
vice Advisor when you take your vehicle in for
service.
Make sure the date is always set cor-
rectly, refer to page83, as otherwise the
effectiveness of CBS Condition Based Service
is not ensured.<
Service and Warranty Information
Booklet for US models and Warranty
and Service Guide Booklet for
Canadian models
Please consult your Service and Warranty Infor-
mation Booklet for US models and Warranty
and Service Guide Booklet for Canadian models
for additional information on service require-
ments.
BMW recommends that you have service
and repair operations performed at your
BMW center.
Take the time to ensure that these service pro-
cedures are confirmed by entries in your vehi-
cle's Service and Warranty Information Booklet
for US models and Warranty and Service Guide
Booklet for Canadian models. These entries
verify that your vehicle has received the speci-
fied regular maintenance.<
Page 215 of 259
Mobility
213Reference
At a glance
Controls
Driving tips
Communications
Navigation
Entertainment
2.Remove and replace the bulb.
Parking and roadside parking lamps
Bulb 5 watts, W 5 W
One bulb each is located above the low beams
and high beams.
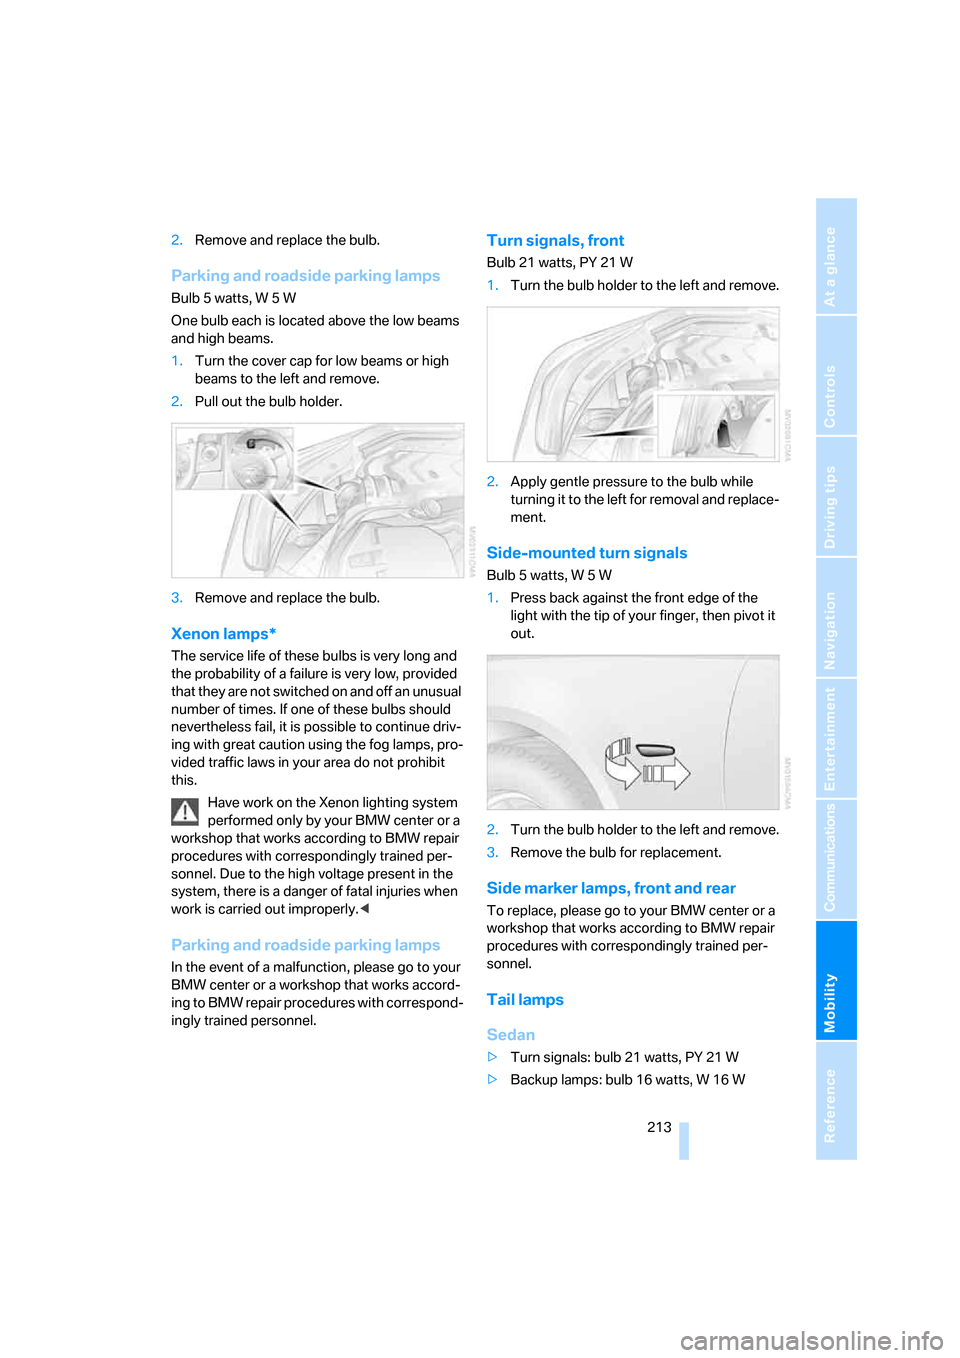
1.Turn the cover cap for low beams or high
beams to the left and remove.
2.Pull out the bulb holder.
3.Remove and replace the bulb.
Xenon lamps*
The service life of these bulbs is very long and
the probability of a failure is very low, provided
that they are not switched on and off an unusual
number of times. If one of these bulbs should
nevertheless fail, it is possible to continue driv-
ing with great caution using the fog lamps, pro-
vided traffic laws in your area do not prohibit
this.
Have work on the Xenon lighting system
performed only by your BMW center or a
workshop that works according to BMW repair
procedures with correspondingly trained per-
sonnel. Due to the high voltage present in the
system, there is a danger of fatal injuries when
work is carried out improperly.<
Parking and roadside parking lamps
In the event of a malfunction, please go to your
BMW center or a workshop that works accord-
ing to BMW repair procedures with correspond-
ingly trained personnel.
Turn signals, front
Bulb 21 watts, PY 21 W
1.Turn the bulb holder to the left and remove.
2.Apply gentle pressure to the bulb while
turning it to the left for removal and replace-
ment.
Side-mounted turn signals
Bulb 5 watts, W 5 W
1.Press back against the front edge of the
light with the tip of your finger, then pivot it
out.
2.Turn the bulb holder to the left and remove.
3.Remove the bulb for replacement.
Side marker lamps, front and rear
To replace, please go to your BMW center or a
workshop that works according to BMW repair
procedures with correspondingly trained per-
sonnel.
Tail lamps
Sedan
>Turn signals: bulb 21 watts, PY 21 W
>Backup lamps: bulb 16 watts, W 16 W
Page 216 of 259
Replacing components
214 >Other lamps: bulb 21 watts, P 21 W
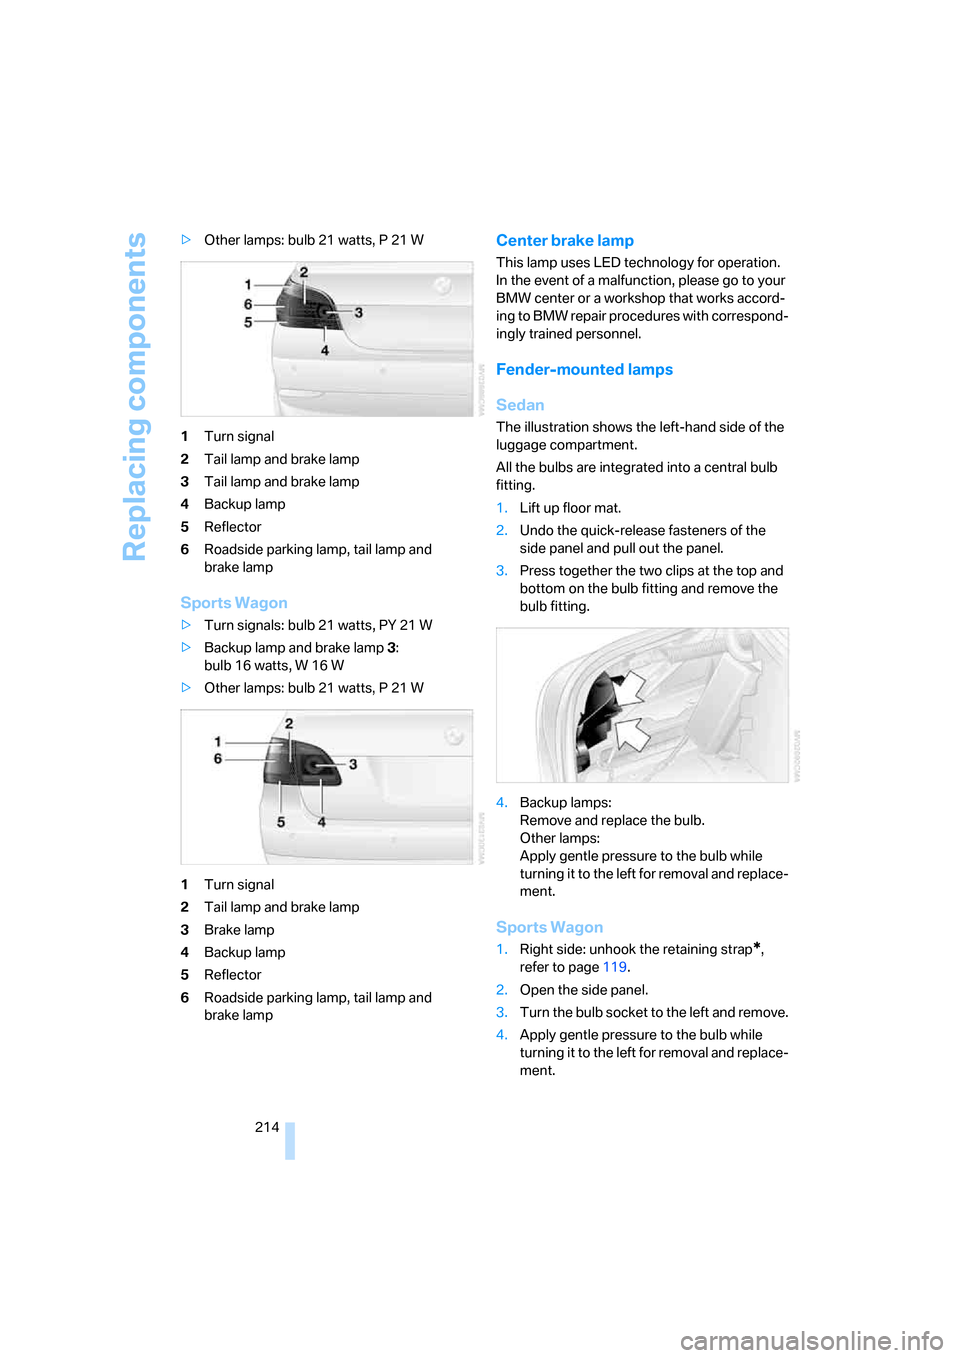
1Turn signal
2Tail lamp and brake lamp
3Tail lamp and brake lamp
4Backup lamp
5Reflector
6Roadside parking lamp, tail lamp and
brake lamp
Sports Wagon
>Turn signals: bulb 21 watts, PY 21 W
>Backup lamp and brake lamp 3:
bulb 16 watts, W 16 W
>Other lamps: bulb 21 watts, P 21 W
1Turn signal
2Tail lamp and brake lamp
3Brake lamp
4Backup lamp
5Reflector
6Roadside parking lamp, tail lamp and
brake lamp
Center brake lamp
This lamp uses LED technology for operation.
In the event of a malfunction, please go to your
BMW center or a workshop that works accord-
ing to BMW repair procedures with correspond-
ingly trained personnel.
Fender-mounted lamps
Sedan
The illustration shows the left-hand side of the
luggage compartment.
All the bulbs are integrated into a central bulb
fitting.
1.Lift up floor mat.
2.Undo the quick-release fasteners of the
side panel and pull out the panel.
3.Press together the two clips at the top and
bottom on the bulb fitting and remove the
bulb fitting.
4.Backup lamps:
Remove and replace the bulb.
Other lamps:
Apply gentle pressure to the bulb while
turning it to the left for removal and replace-
ment.
Sports Wagon
1.Right side: unhook the retaining strap*,
refer to page119.
2.Open the side panel.
3.Turn the bulb socket to the left and remove.
4.Apply gentle pressure to the bulb while
turning it to the left for removal and replace-
ment.
Page 217 of 259
Mobility
215Reference
At a glance
Controls
Driving tips
Communications
Navigation
Entertainment
Lamps in luggage compartment lid
License plate lamp
Bulb 5 watts, C 5 W
1.Insert screwdriver into the slot and press to
the right, refer to arrows. This releases the
lamp.
2.Remove the lamp and replace the bulb.
Sports Wagon:
Backup lamp
In the event of a malfunction, please go to your
BMW center or a workshop that works accord-
ing to BMW repair procedures with correspond-
ingly trained personnel.
Changing wheels
Safety precautions in the event of a flat
tire or wheel change: park the vehicle as
far as possible from passing traffic and on solid
ground. Switch on the hazard warning flashers.
Lock the steering wheel in straight-ahead set-
ting of the wheels. Apply the handbrake and
engage first gear, reverse gear or selector lever
position P.
Have all vehicle occupants get out of the vehicle
and ensure that they remain outside the imme-
diate area in a safe place, such as behind a
guardrail.
If a warning triangle
* or portable hazard warning
lamp is required, set it up on the roadside at an
appropriate distance from the rear of the vehi-
cle. Comply with all safety guidelines and regu-
lations. Change the wheel only on a level, firm surface
which is not slippery. The vehicle or the jack
could slip to the side if you attempt to raise the
vehicle on a soft or slippery surface such as
snow, ice, tiles, etc.
Position the jack on a firm support surface.
Do not use a wooden block or similar object as a
support base for the jack, as this would prevent
it from extending to its full support height and
reduce its load-carrying capacity.
To avoid serious or fatal injury: never lie under
the vehicle, and never start the engine while it is
supported by the jack.<
What you will need
To avoid rattling noises later on, note the posi-
tions of the tools before removing them, then
return them to their initial positions after com-
pleting work.
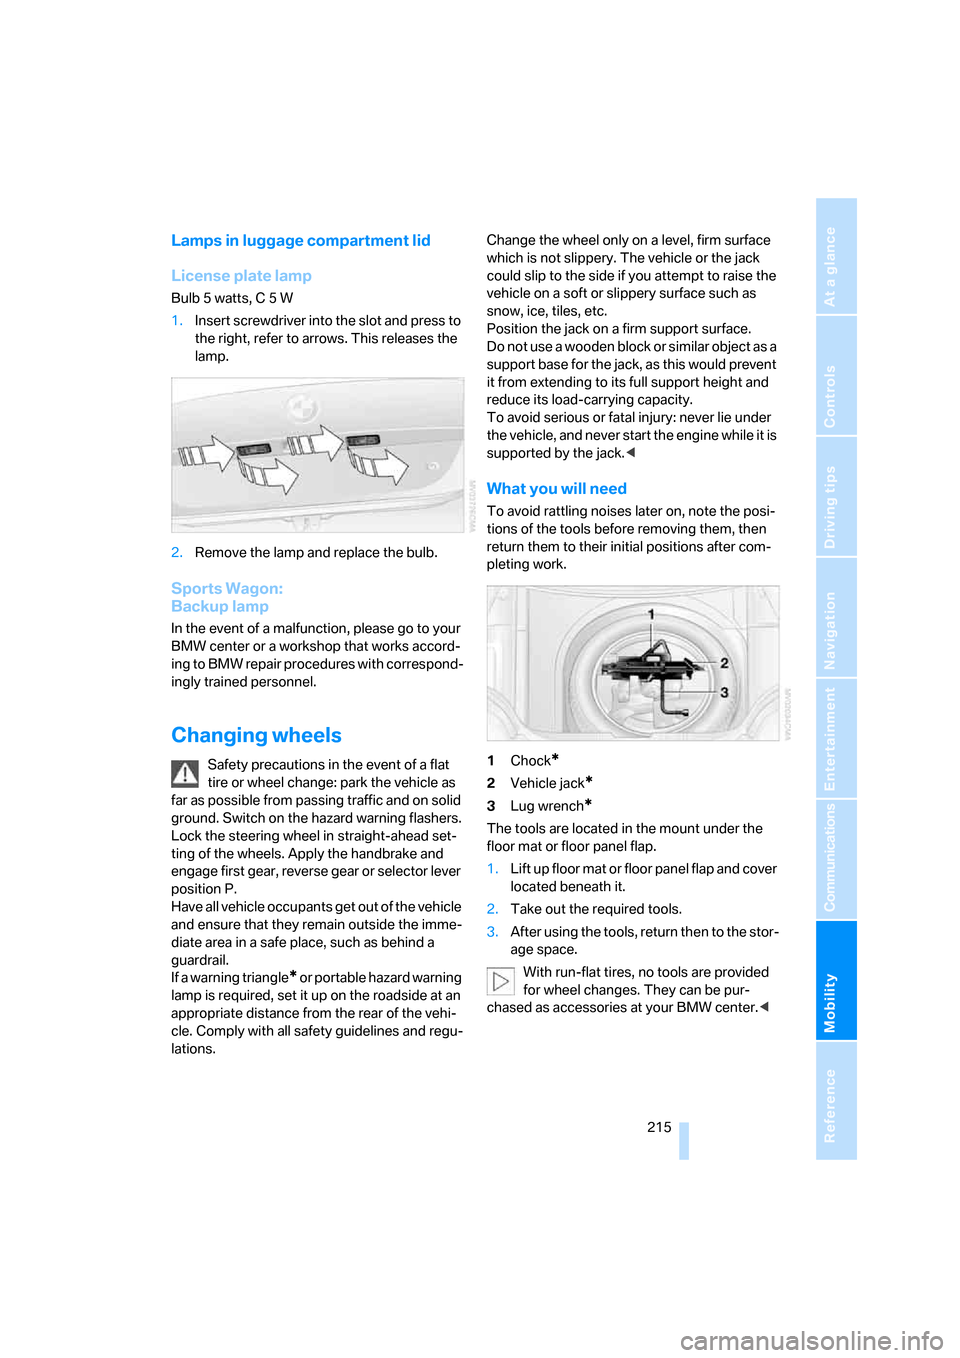
1Chock
*
2Vehicle jack*
3Lug wrench*
The tools are located in the mount under the
floor mat or floor panel flap.
1.Lift up floor mat or floor panel flap and cover
located beneath it.
2.Take out the required tools.
3.After using the tools, return then to the stor-
age space.
With run-flat tires, no tools are provided
for wheel changes. They can be pur-
chased as accessories at your BMW center.<
Page 219 of 259
Mobility
217Reference
At a glance
Controls
Driving tips
Communications
Navigation
Entertainment
face of the jack base rests on the ground
perpendicularly beneath the jacking point.
The vehicle jack is designed for
changing wheels only. Do not attempt
to raise another vehicle model with it or to
raise any load of any kind. To do so could
cause accidents and personal injury.<
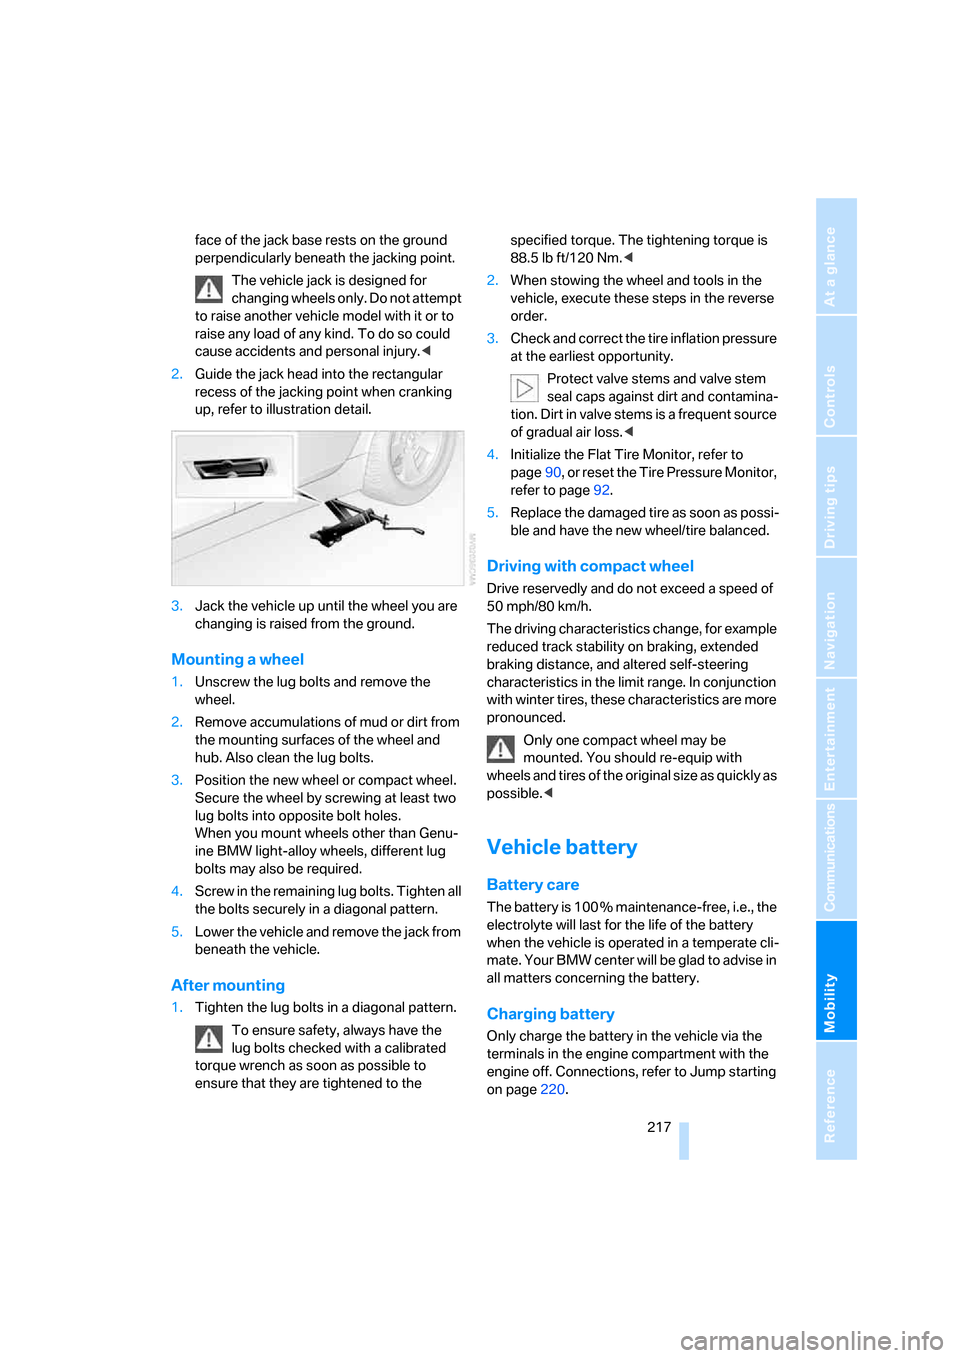
2.Guide the jack head into the rectangular
recess of the jacking point when cranking
up, refer to illustration detail.
3.Jack the vehicle up until the wheel you are
changing is raised from the ground.
Mounting a wheel
1.Unscrew the lug bolts and remove the
wheel.
2.Remove accumulations of mud or dirt from
the mounting surfaces of the wheel and
hub. Also clean the lug bolts.
3.Position the new wheel or compact wheel.
Secure the wheel by screwing at least two
lug bolts into opposite bolt holes.
When you mount wheels other than Genu-
ine BMW light-alloy wheels, different lug
bolts may also be required.
4.Screw in the remaining lug bolts. Tighten all
the bolts securely in a diagonal pattern.
5.Lower the vehicle and remove the jack from
beneath the vehicle.
After mounting
1.Tighten the lug bolts in a diagonal pattern.
To ensure safety, always have the
lug bolts checked with a calibrated
torque wrench as soon as possible to
ensure that they are tightened to the specified torque. The tightening torque is
88.5 lb ft/120 Nm.<
2.When stowing the wheel and tools in the
vehicle, execute these steps in the reverse
order.
3.Check and correct the tire inflation pressure
at the earliest opportunity.
Protect valve stems and valve stem
seal caps against dirt and contamina-
tion. Dirt in valve stems is a frequent source
of gradual air loss.<
4.Initialize the Flat Tire Monitor, refer to
page90, or reset the Tire Pressure Monitor,
refer to page92.
5.Replace the damaged tire as soon as possi-
ble and have the new wheel/tire balanced.
Driving with compact wheel
Drive reservedly and do not exceed a speed of
50 mph/80 km/h.
The driving characteristics change, for example
reduced track stability on braking, extended
braking distance, and altered self-steering
characteristics in the limit range. In conjunction
with winter tires, these characteristics are more
pronounced.
Only one compact wheel may be
mounted. You should re-equip with
wheels and tires of the original size as quickly as
possible.<
Vehicle battery
Battery care
The battery is 100 % maintenance-free, i.e., the
electrolyte will last for the life of the battery
when the vehicle is operated in a temperate cli-
mate. Your BMW center will be glad to advise in
all matters concerning the battery.
Charging battery
Only charge the battery in the vehicle via the
terminals in the engine compartment with the
engine off. Connections, refer to Jump starting
on page220.
Page 220 of 259
Replacing components
218
Disposal
Have old batteries disposed of by your
BMW center or hand them in to a recy-
cling center. Maintain the battery in an upright
position for transport and storage. Always
restrain the battery to prevent it from tipping
over during transport.<
Power failure
After a temporary power loss, the functioning of
some equipment may be limited and require
reinitialization. Individual settings are also lost
and must be updated:
>Seat, mirror and steering wheel memory
The positions must be stored again, refer to
page47.
>Time and Date
The values must be updated, refer to
page82.
>Radio
Stations must be stored again if necessary,
refer to page158.
>Navigation system
Wait until the system starts, refer to
page149.
Fuses
Never attempt to repair a blown fuse and
do not replace a defective fuse with a sub-
stitute of another color or amperage rating, as
this could lead to a circuit overload, ultimately
resulting in a fire in the vehicle.<
Sedan
Spare fuses, plastic tweezers and fuse alloca-
tion diagram are located in the compartment for
the onboard tool kit, refer to page211.
Sports Wagon
Reserve fuses and a pair of plastic tweezers are
contained in the onboard tool kit, refer to
page211. A fuse allocation diagram is located
in the cargo area behind the right-hand side
panel.
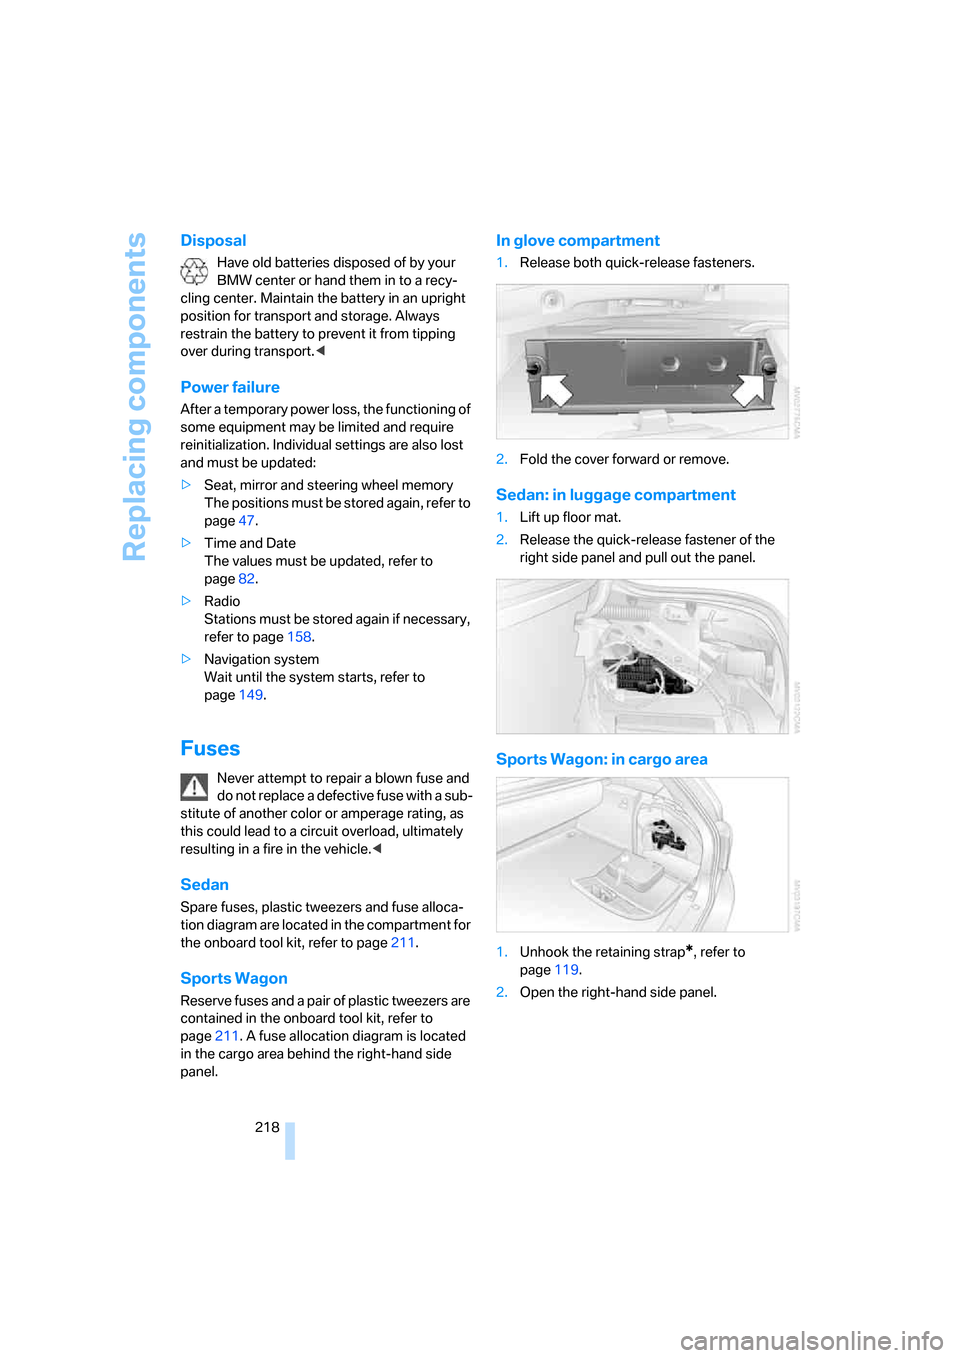
In glove compartment
1.Release both quick-release fasteners.
2.Fold the cover forward or remove.
Sedan: in luggage compartment
1.Lift up floor mat.
2.Release the quick-release fastener of the
right side panel and pull out the panel.
Sports Wagon: in cargo area
1.Unhook the retaining strap*, refer to
page119.
2.Open the right-hand side panel.
Page 238 of 259
Everything from A to Z
236
Everything from A to Z
Index
"..." Identifies Control Display
texts used to select
individual functions, and
indicates where to find them
in the text.
A
ABS Antilock Brake
System86
ACC, refer to Active cruise
control67
Acceleration assistant for
SMG Sequential Manual
Transmission63
Accessories6
Acoustic signal, refer to Check
Control79
Activated-charcoal filter109
"Activation time" for parked-
car ventilation109
Active cruise control67
– indicator lamp70
– radar sensor71
– selecting distance69
– warning lamps71
Active head restraints,
front49
Active seat51
Active seat ventilation51
Active steering93
– warning lamp94
Adapter for spare key28
Adaptive brake lamps, refer to
Brake force display94
Adaptive Head Light102
"Add digits" for mobile
phone180
"Address book" for navigation
system140Address for navigation
– deleting141
– entering133,136
– selecting141
– storing140
– storing current position140
"Add to address book"140
"Add to destination list"136
Adjusting active backrest
width47
Adjusting confirmation signals
for locking and unlocking31
Adjusting the tone during
audio operation, refer to
Tone control153
Adjusting thigh support46
Adjustment in audio mode
– front-to-rear154
– right/left balance154
"After door opened"48
"After unlocking"48
Airbags94
– sitting safely45
– warning lamp96
Air circulation, refer to Air
recirculation108
Air distribution
– automatic106
– manual107
Airing, refer to Ventilation108
Air recirculation
– AUC Automatic recircu-
lated-air control108
– recirculated-air mode108
"Air recirculation on / off"53
Air vent outlets of automatic
climate control105
Air vents105
– refer to Ventilation108
Air volume107
AKI, refer to Fuel quality195Alarm system37
– avoiding unintentional
alarms38
– interior motion sensor38
– switching off alarm38
– switching off tilt alarm
sensor and interior motion
sensor38
– tilt alarm sensor38
"All channels"163
"All doors"30
All-season tires, refer to
Winter tires202
"All stations", calling up with
radio156,159
All-wheel drive, refer to
xDrive87
Alterations, technical, refer to
For your own safety5
Altering stretch of road148
"AM", reception
range152,156
Antenna for mobile phone174
Antifreeze
– coolant207
– washer fluid66
Antilock Brake System
ABS86
Anti-theft alarm system, refer
to Alarm system37
Anti-theft system, refer to
Central locking system29
Approved axle loads, refer to
Weights229
Approved engine oils206
Approved gross vehicle
weight, refer to Weights229
Armrest, refer to Center
armrest, rear116
Around the center console14
Around the steering wheel10