air BMW 550I TOURING 2006 E61 Owner's Guide
[x] Cancel search | Manufacturer: BMW, Model Year: 2006, Model line: 550I TOURING, Model: BMW 550I TOURING 2006 E61Pages: 259, PDF Size: 8.9 MB
Page 108 of 259
Climate
106 The current setting for air distribution is dis-
played on the Control Display.
A congenial climate
The AUTO program offers the optimum air dis-
tribution and air volume for virtually all condi-
tions, refer to AUTO program below. Now you
only need to select an interior temperature
pleasant to you.
The following sections contain more detailed
information on the available setting options.
Most settings are stored for the remote control
currently in use, also refer to Personal Profile
settings on page29.
AUTO program
The AUTO program handles the
adjustment of air distribution to the
windshield and side windows, in
the direction of the upper body, and in the foot-
well, as well as the air volume. It also adapts
your instructions for the temperature to outside
influences throughout the year.
The cooling is switched on automatically with
the AUTO program. At the same time, a con-
densation sensor controls the program in such
a way that window condensation is prevented
as much as possible.
Intensity of AUTO program
To meet your individual needs, you can weaken
or strengthen the intensity of the automatic cli-
mate control.
iDrive, for explanation of principle, refer to
page16.
1.Press the button.
This opens the start menu.
2.Move the controller to the left to open "Cli-
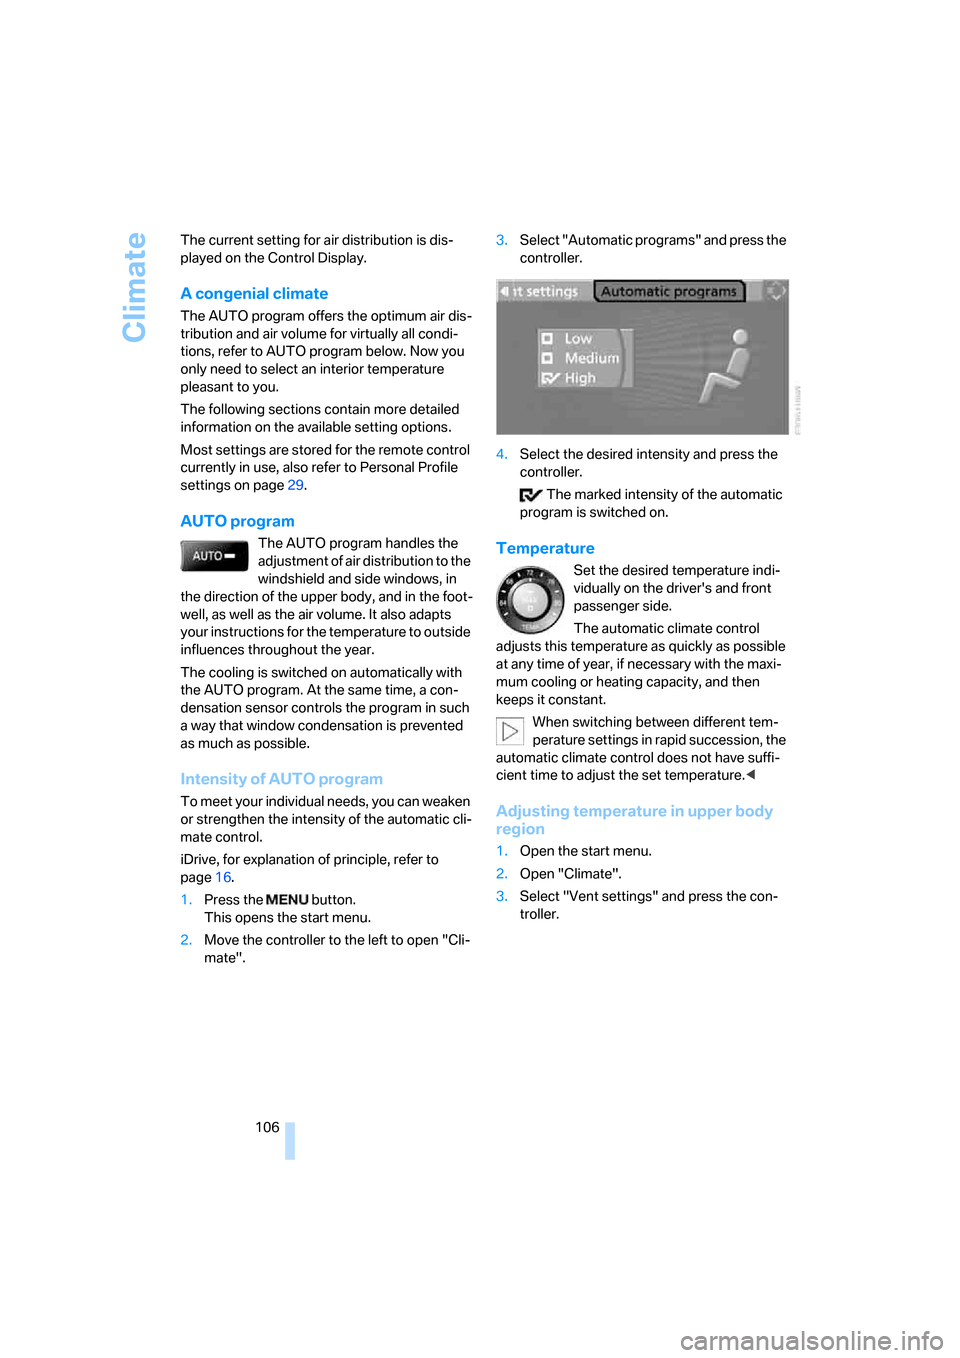
mate".3.Select "Automatic programs" and press the
controller.
4.Select the desired intensity and press the
controller.
The marked intensity of the automatic
program is switched on.
Temperature
Set the desired temperature indi-
vidually on the driver's and front
passenger side.
The automatic climate control
adjusts this temperature as quickly as possible
at any time of year, if necessary with the maxi-
mum cooling or heating capacity, and then
keeps it constant.
When switching between different tem-
perature settings in rapid succession, the
automatic climate control does not have suffi-
cient time to adjust the set temperature.<
Adjusting temperature in upper body
region
1.Open the start menu.
2.Open "Climate".
3.Select "Vent settings" and press the con-
troller.
Page 109 of 259
Controls
107Reference
At a glance
Driving tips
Communications
Navigation
Entertainment
Mobility
4.Select the field by moving the controller and
turning the controller to adjust the temper-
ature.
Defrosting windows and removing
condensation
Quickly remove ice and condensa-
tion from the windshield and front
side windows.
Rear window defroster
The rear window defroster
switches off automatically after a
while.
Air volume, manual
You can adjust the air volume by
turning. You can reactivate the
automatic mode for the air volume
with the AUTO button.
Manual air distribution
You can specify the air distribution.
1.Open the start menu.
2.Open "Climate".
3.Select "Vent settings" and press the con-
troller.
The driver's and front passenger side can
be adjusted separately with the fields on the
right or left side.
4.Select the driver's or front passenger side
if necessary.
Move the controller to the right or left
repeatedly until the driver's or front passen-
ger side is selected.
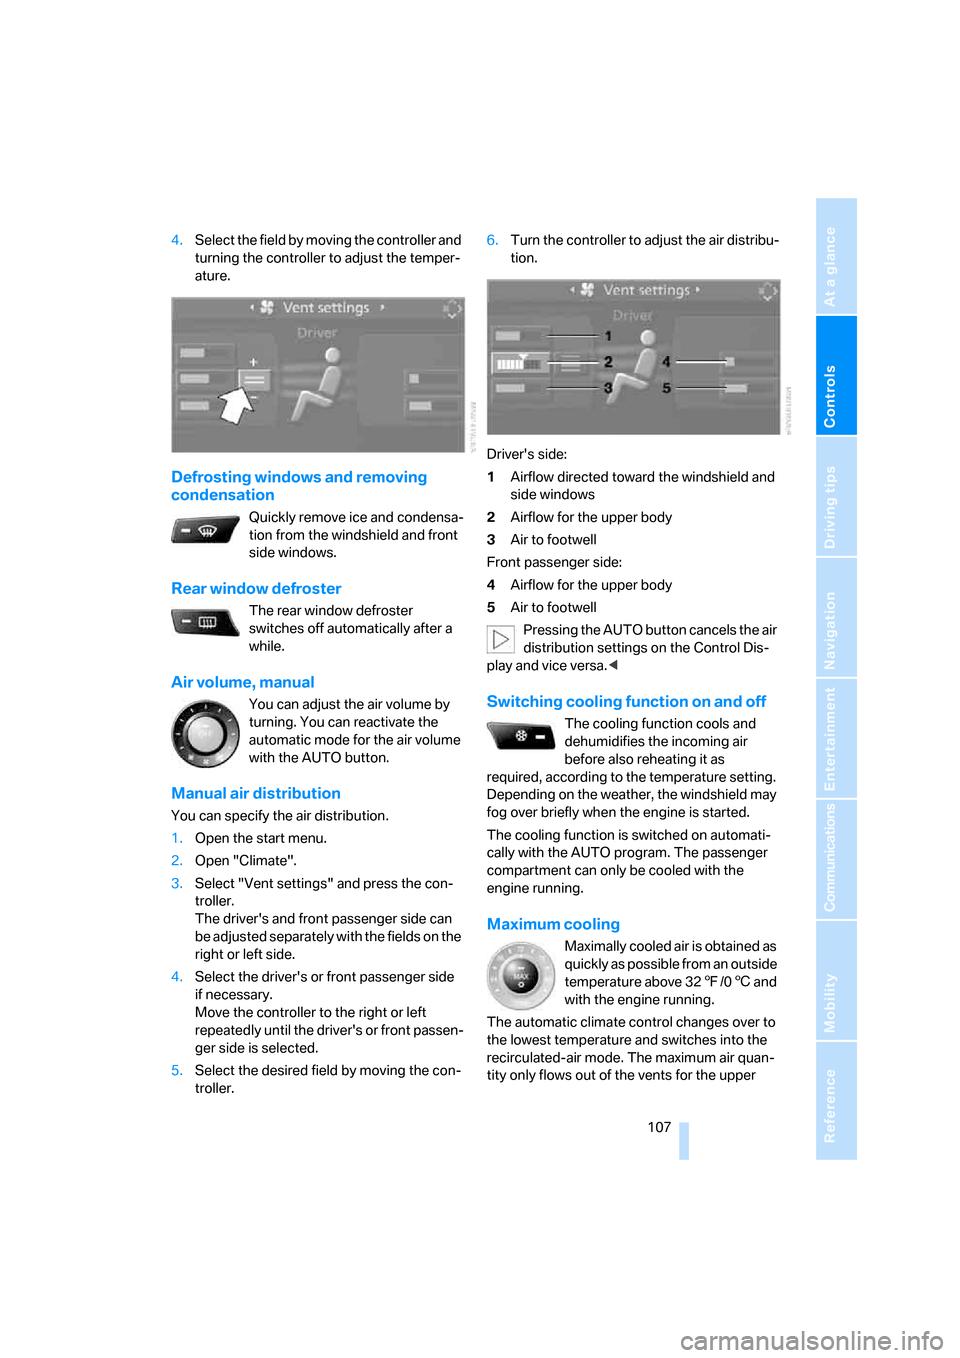
5.Select the desired field by moving the con-
troller.6.Turn the controller to adjust the air distribu-
tion.
Driver's side:
1Airflow directed toward the windshield and
side windows
2Airflow for the upper body
3Air to footwell
Front passenger side:
4Airflow for the upper body
5Air to footwell
Pressing the AUTO button cancels the air
distribution settings on the Control Dis-
play and vice versa.<
Switching cooling function on and off
The cooling function cools and
dehumidifies the incoming air
before also reheating it as
required, according to the temperature setting.
Depending on the weather, the windshield may
fog over briefly when the engine is started.
The cooling function is switched on automati-
cally with the AUTO program. The passenger
compartment can only be cooled with the
engine running.
Maximum cooling
Maximally cooled air is obtained as
quickly as possible from an outside
temperature above 327/06 and
with the engine running.
The automatic climate control changes over to
the lowest temperature and switches into the
recirculated-air mode. The maximum air quan-
tity only flows out of the vents for the upper
Page 110 of 259
Climate
108 body. Therefore, open these vents for maxi-
mum cooling.
AUC Automatic recirculated-air
control/recirculated-air mode
You can respond to pollutants or
unpleasant odors in the immediate
environment by suspending the
supply of outside air. The system then recircu-
lates the air currently within the vehicle. During
AUC operation, a sensor detects pollutants in
the outside air and controls the shut-off auto-
matically.
By pressing the button repeatedly, you can
request three operating modes:
>LED off: outside air flows in continuously.
>Right LED on, AUC mode: the system
detects pollutants in the outside air and
shuts off the supply as needed.
>Left LED on, recirculated-air mode: the
supply of outside air is permanently shut off.
If condensation starts to form on the
inside window surfaces during operation
in the recirculated-air mode, you should switch
it off while also increasing the air volume as
required.
The recirculated-air mode should not be used
over an extended period of time, as the air qual-
ity inside the vehicle deteriorates continu-
ously.<
Residual heat
The heat stored in the engine is
used to heat the passenger com-
partment, e.g. while stopped at a
school to pick up a child.
The function can be switched on when the fol-
lowing conditions are met:
>up to 15 minutes after switching off the
engine
>with engine at operating temperature
>with sufficient battery voltage
>at an outside temperature below 777/
256The LED lights up when the function is
switched on.
From radio readiness the interior temperature,
the air volume and the air distribution can be
set.
Switching off automatic climate control
The air volume, the heater and the
cooling function are all switched
off.
You can restart the automatic cli-
mate control by pressing any of its buttons
except the REST button.
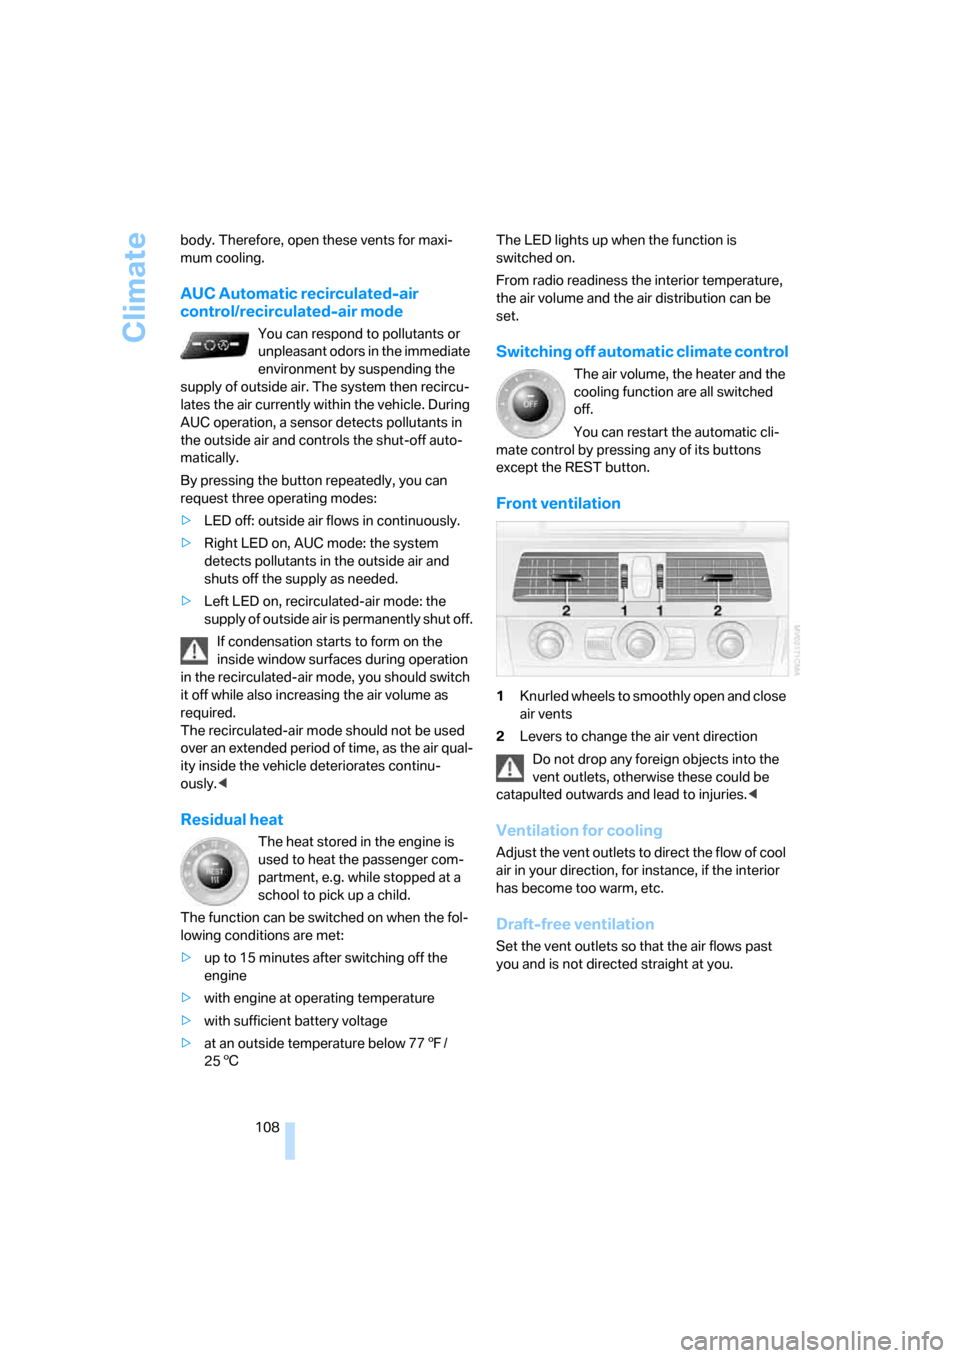
Front ventilation
1Knurled wheels to smoothly open and close
air vents
2Levers to change the air vent direction
Do not drop any foreign objects into the
vent outlets, otherwise these could be
catapulted outwards and lead to injuries.<
Ventilation for cooling
Adjust the vent outlets to direct the flow of cool
air in your direction, for instance, if the interior
has become too warm, etc.
Draft-free ventilation
Set the vent outlets so that the air flows past
you and is not directed straight at you.
Page 111 of 259
Controls
109Reference
At a glance
Driving tips
Communications
Navigation
Entertainment
Mobility
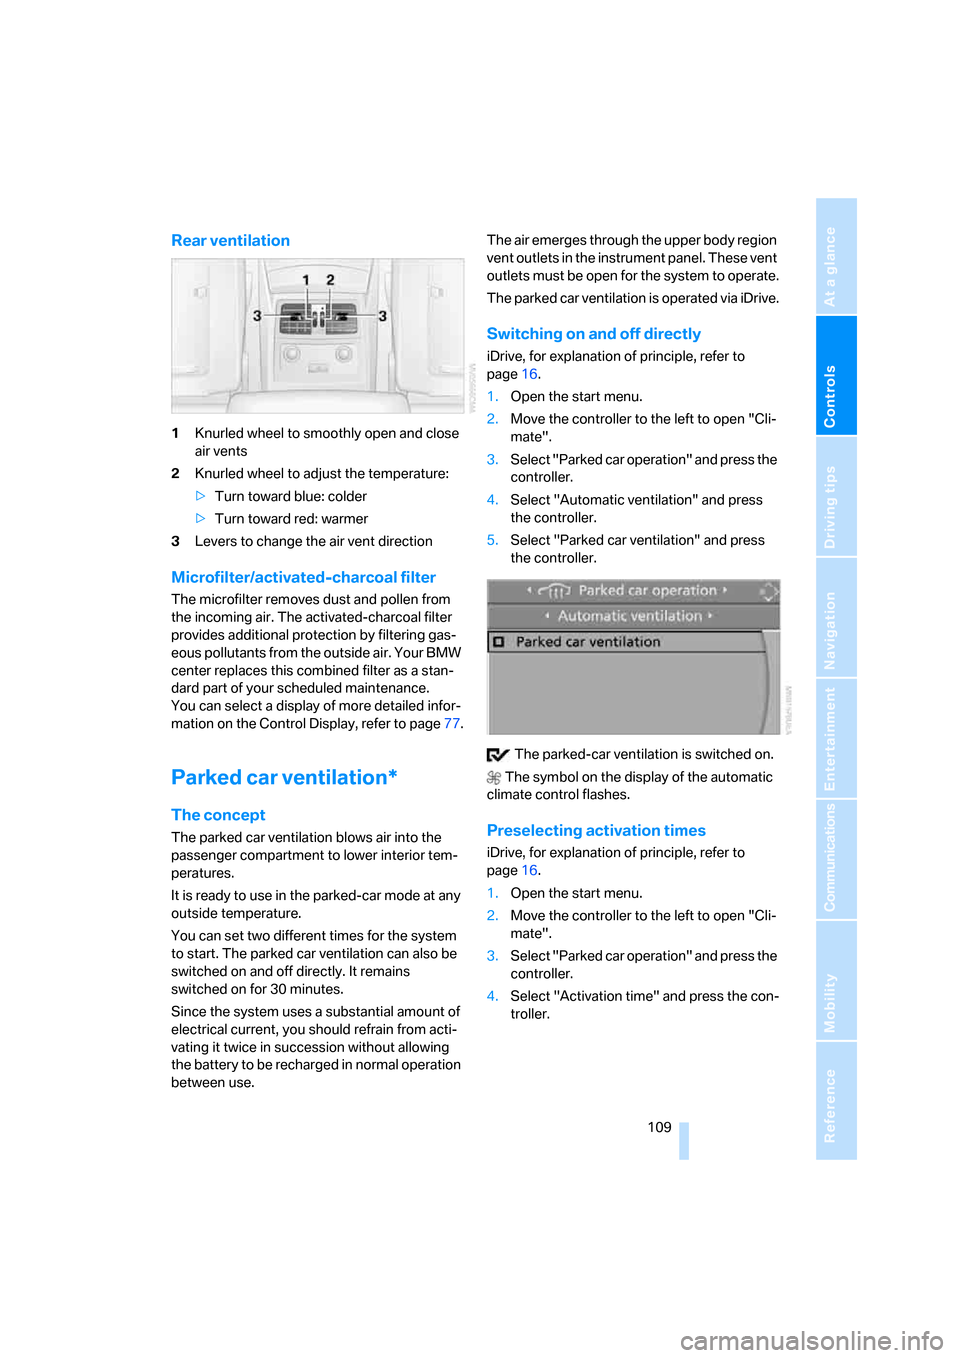
Rear ventilation
1Knurled wheel to smoothly open and close
air vents
2Knurled wheel to adjust the temperature:
>Turn toward blue: colder
>Turn toward red: warmer
3Levers to change the air vent direction
Microfilter/activated-charcoal filter
The microfilter removes dust and pollen from
the incoming air. The activated-charcoal filter
provides additional protection by filtering gas-
eous pollutants from the outside air. Your BMW
center replaces this combined filter as a stan-
dard part of your scheduled maintenance.
You can select a display of more detailed infor-
mation on the Control Display, refer to page77.
Parked car ventilation*
The concept
The parked car ventilation blows air into the
passenger compartment to lower interior tem-
peratures.
It is ready to use in the parked-car mode at any
outside temperature.
You can set two different times for the system
to start. The parked car ventilation can also be
switched on and off directly. It remains
switched on for 30 minutes.
Since the system uses a substantial amount of
electrical current, you should refrain from acti-
vating it twice in succession without allowing
the battery to be recharged in normal operation
between use.The air emerges through the upper body region
vent outlets in the instrument panel. These vent
outlets must be open for the system to operate.
The parked car ventilation is operated via iDrive.
Switching on and off directly
iDrive, for explanation of principle, refer to
page16.
1.Open the start menu.
2.Move the controller to the left to open "Cli-
mate".
3.Select "Parked car operation" and press the
controller.
4.Select "Automatic ventilation" and press
the controller.
5.Select "Parked car ventilation" and press
the controller.
The parked-car ventilation is switched on.
The symbol on the display of the automatic
climate control flashes.
Preselecting activation times
iDrive, for explanation of principle, refer to
page16.
1.Open the start menu.
2.Move the controller to the left to open "Cli-
mate".
3.Select "Parked car operation" and press the
controller.
4.Select "Activation time" and press the con-
troller.
Page 122 of 259
Practical interior accessories
120 around and endanger occupants, e.g. during
braking or evasive maneuvers.<
Ski bag*
Designed for safe, clean transport of up to
4 pairs of standard skis or up to 2 snowboards.
With the ski bag you can stow skis with a length
o f u p t o 6 . 9 f t / 2 . 1 0 m . W h e n s k i s o f 6 . 9 f t / 2 . 1 0 m
in length are loaded, the ski bag will tend to con-
tract, reducing its overall capacity.
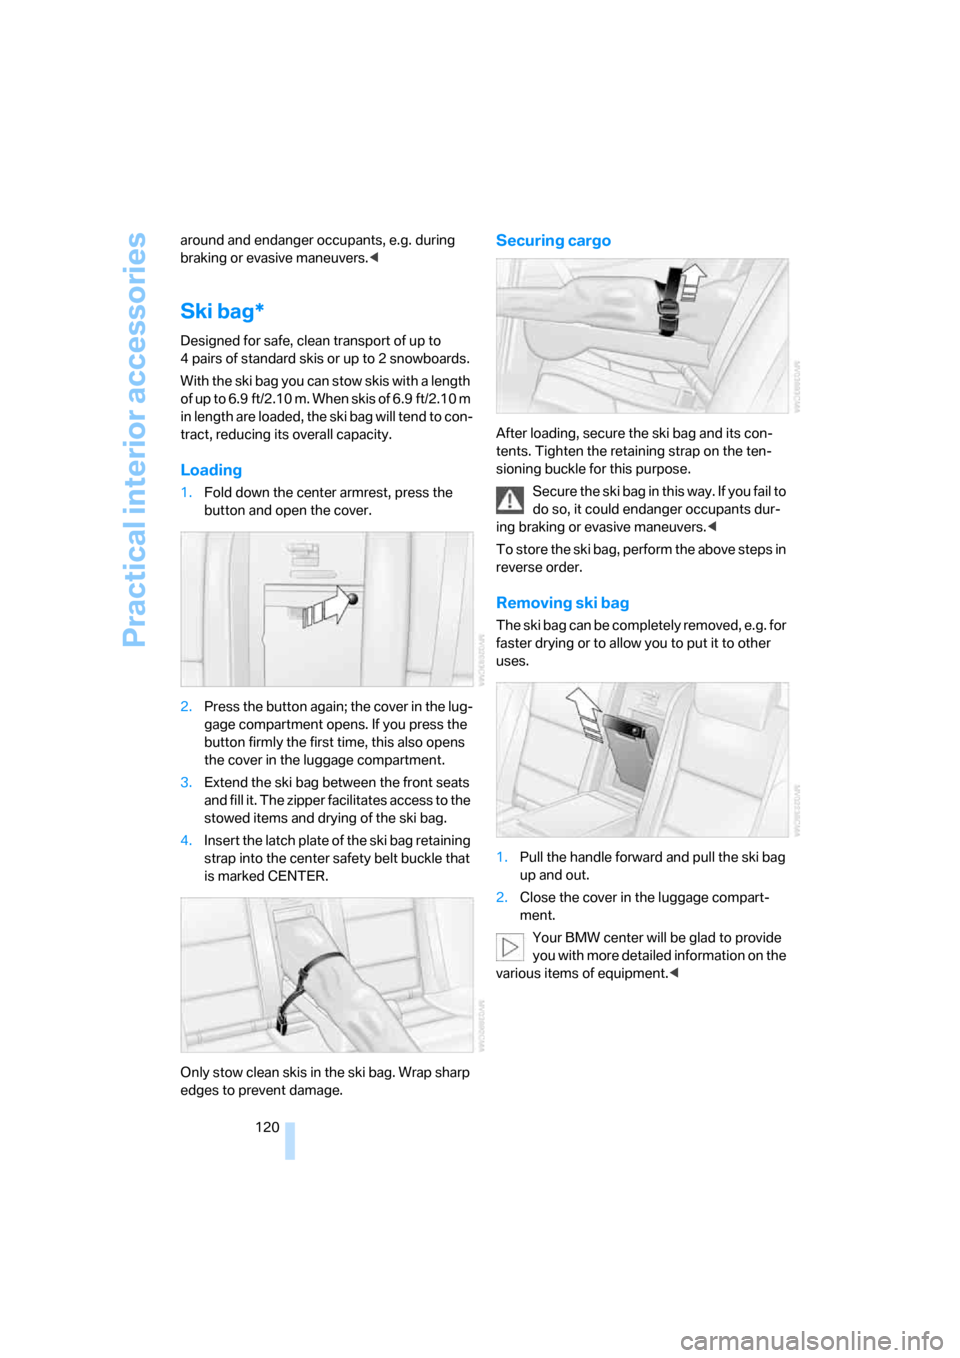
Loading
1.Fold down the center armrest, press the
button and open the cover.
2.Press the button again; the cover in the lug-
gage compartment opens. If you press the
button firmly the first time, this also opens
the cover in the luggage compartment.
3.Extend the ski bag between the front seats
and fill it. The zipper facilitates access to the
stowed items and drying of the ski bag.
4.Insert the latch plate of the ski bag retaining
strap into the center safety belt buckle that
is marked CENTER.
Only stow clean skis in the ski bag. Wrap sharp
edges to prevent damage.
Securing cargo
After loading, secure the ski bag and its con-
tents. Tighten the retaining strap on the ten-
sioning buckle for this purpose.
Secure the ski bag in this way. If you fail to
do so, it could endanger occupants dur-
ing braking or evasive maneuvers.<
To store the ski bag, perform the above steps in
reverse order.
Removing ski bag
The ski bag can be completely removed, e.g. for
faster drying or to allow you to put it to other
uses.
1.Pull the handle forward and pull the ski bag
up and out.
2.Close the cover in the luggage compart-
ment.
Your BMW center will be glad to provide
you with more detailed information on the
various items of equipment.<
Page 126 of 259
Things to remember when driving
124
Things to remember when driving
Break-in period
Moving parts need breaking-in time to adjust to
each other. To ensure that your vehicle contin-
ues to provide optimized economy of operation
throughout an extended service life, we request
that you devote careful attention to the follow-
ing section.
Engine and differential
Always obey all official speed limits.
Up to 1,200 miles/2,000 km
Drive at changing engine and driving speeds,
however do not exceed 4,500 rpm or 100 mph/
160 km/h.
Avoid full-throttle operation and use of the
transmission's kick-down mode during these
initial miles.
From 1,200 miles/2,000 km
The engine and vehicle speed can gradually be
increased.
SMG Sequential Manual Transmission
Do not use the acceleration assistant during the
break-in period, refer to page63.
Tires
Due to technical factors associated with their
manufacture, tires do not achieve their full trac-
tion potential until after an initial break-in
period. Therefore, drive reservedly during the
first 200 miles/300 km.
Brake system
Brakes require an initial break-in period of
approx. 300 miles/500 km to achieve optimized
contact and wear patterns between brake pads
and rotors. Drive in a reserved manner during
this break-in period.
Clutch
The function of the clutch is only at its opti-
mized level after a distance driven of approx.
300 miles/500 km. During this break-in period,
engage the clutch gently.
Following part replacement
Observe the break-in instructions again if com-
ponents mentioned above must be replaced
after subsequent driving operation.
General driving notes
Closing luggage compartment lid/
tailgate
Operate the vehicle only when the lug-
gage compartment lid/tailgate is com-
pletely closed. Otherwise, exhaust fumes could
enter the interior of the vehicle.<
If special circumstances should make it abso-
lutely necessary to operate the vehicle with the
luggage compartment lid/tailgate open:
1.Close all windows and the glass sunroof or
panorama glass sunroof.
2.Increase the air volume of the automatic cli-
mate control to a high level, refer to
page107.
Hot exhaust system
As in all vehicles, extremely high temper-
atures are generated on the exhaust sys-
tem. Do not remove the heat shields installed
adjacent to it, and never apply undercoating to
them. When driving, standing at idle and while
parking take care to avoid possible contact
between the hot exhaust system and any highly
flammable materials such as hay, leaves, grass,
etc. Such contact could lead to a fire, and with it
the risk of serious property damage as well as
personal injury.<
Page 128 of 259
Things to remember when driving
126 Do not drive with your foot resting on the
brake pedal. Even light but consistent
pedal pressure can lead to high temperatures,
brake wear and possibly even brake failure.<
Driving in wet conditions
When roads are wet or there is heavy rain,
briefly exert gentle pressure on the brake pedal
every few miles. Monitor traffic conditions to
ensure that this maneuver does not endanger
other road users. The heat generated in this
process helps dry the pads and rotors to ensure
that full braking efficiency will then be available
when you need it.
Hills
To prevent overheating and the resulting
reduced efficiency of the brake system,
drive long or steep downhill gradients in the
gear in which the least braking is required. Even
light but consistent pressure on the brake pedal
can lead to high temperatures, brake wear and
possibly even brake failure.<
The braking effect of the engine can be further
increased by downshifting, if necessary all the
way down into first gear. This strategy helps
you avoid placing excessive loads on the brake
system. For information on downshifting in the
manual mode of the automatic transmission,
refer to page64.
Do not drive with the clutch depressed, in
idle or with the engine switched off, other-
wise there will be no engine braking action or
support of the braking force and steering.
Never allow floor mats, carpets or any other
objects to protrude into the area of movement
of the pedals and impair their operation.<
Corrosion on brake rotors
When the vehicle is driven only occasionally,
during extended periods when the vehicle is not
used at all, and in operating conditions where
brake applications are less frequent, there is an
increased tendency for corrosion to form on
rotors, while contaminants accumulate on the
brake pads. This occurs because the minimum
pressure which must be exerted by the pads during brake applications to clean the rotors is
not reached.
Should corrosion form on the brake rotors, the
brakes will tend to respond with a pulsating
effect that even extended application will fail to
cure.
When vehicle is parked
Condensation forms in the air conditioner sys-
tem during operation, and then exits under the
vehicle. Traces of condensed water under the
vehicle are therefore normal.
Before driving into a car wash
To prevent the exterior mirrors on this vehicle
from being damaged, always fold them in by
hand before entering an automatic car wash.
General information on the care and mainte-
nance of your BMW is contained in the Caring
for your vehicle brochure.
Rear window wiper*
The rear window wiper can be damaged in car
washes. Take appropriate protective measures;
ask the car wash operator if necessary.
With comfort access and automatic
transmission
Insert the remote control into the ignition lock.
The engine can be switched off in the selector
lever position N. Also refer to page40.
Cargo loading
To avoid loading the tires beyond their
approved carrying capacity, never over-
load the vehicle. Overloading can lead to over-
heating and increases the rate at which damage
develops inside the tires. The ultimate result
can assume the form of a sudden blow-out.<
Page 198 of 259
Wheels and tires
196
Wheels and tires
Tire inflation pressure
Information for your safety
The condition of the tires and the maintenance
of the specified tire pressure are crucial not only
to the tire's service life, but also to driving com-
fort and most importantly, driving safety.
Checking pressure
Only check tire inflation pressure when the tires
are cold. This means after a maximum of
1.25 miles/2 km driving or when the vehicle has
been parked for at least 2 hours. When tires are
warm, the tire inflation pressure increases.
Check the tire inflation pressure regularly
and correct it as needed, even on the
compact tire
*: at least twice a month and before
starting long trips. Otherwise driving instability
or tire damage, and therefore accidents, can
result from incorrect tire inflation pressures.
Do not drive with depressurized, i.e. flat tires,
except run-flat tires. A flat tire will seriously
impair your vehicle's handling and braking
response. Attempts to drive on a flat tire can
lead to a loss of control over the vehicle.<
After correcting the tire inflation pressure,
reinitialize the Flat Tire Monitor, refer to
page90, or reset the Tire Pressure Monitor,
refer to page92.<
Pressure specifications
The tables below provide all the correct inflation
pressures for the specified tire sizes at ambient
temperature.
The inflation pressures apply to the tire
sizes and tire brands respectively
approved and recommended by BMW; a list of
these is available from your BMW center.
ing:
>Tire sizes of your vehicle
>Load conditions
>Maximum allowable driving speed
Tire inflation pressures for speeds
up to 100 mph/160 km/h
For normal driving up to 100 mph/160 km/h,
adjust pressures to the respective tire inflation
pressures listed on the following pages in the
column Traveling speeds up to max. 100 mph/
160 km/h to achieve optimum driving comfort.
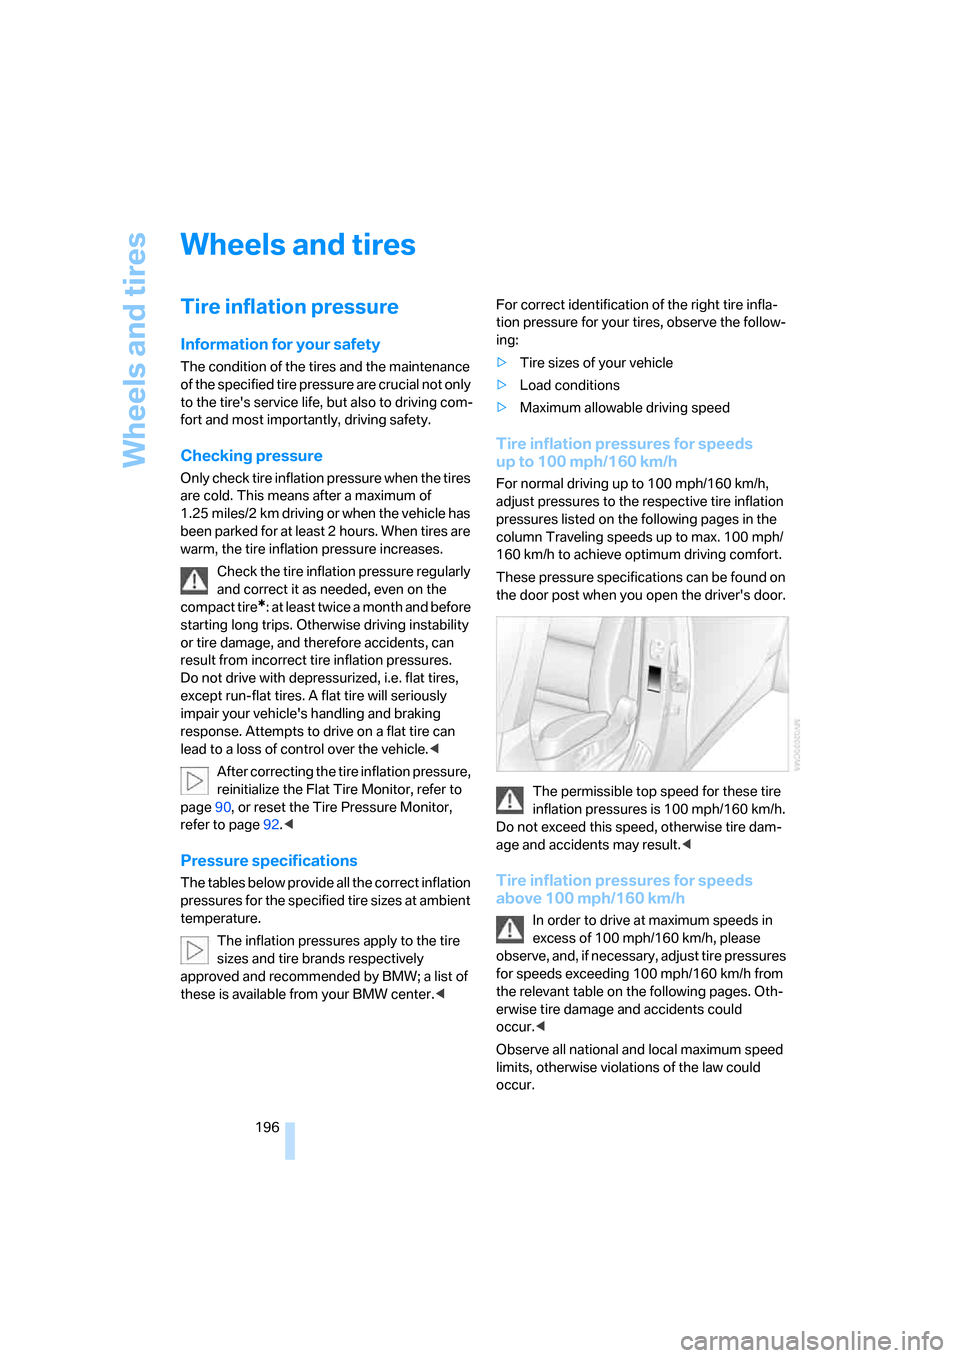
These pressure specifications can be found on
the door post when you open the driver's door.
The permissible top speed for these tire
inflation pressures is 100 mph/160 km/h.
Do not exceed this speed, otherwise tire dam-
age and accidents may result.<
Tire inflation pressures for speeds
above 100 mph/160 km/h
In order to drive at maximum speeds in
excess of 100 mph/160 km/h, please
observe, and, if necessary, adjust tire pressures
for speeds exceeding 100 mph/160 km/h from
the relevant table on the following pages. Oth-
erwise tire damage and accidents could
occur.<
Observe all national and local maximum speed
limits, otherwise violations of the law could
occur.
Page 203 of 259
Mobility
201Reference
At a glance
Controls
Driving tips
Communications
Navigation
Entertainment
Tire condition
Inspect your tires frequently for tread wear,
signs of damage and for foreign objects lodged
in the tread. Check the tread depth.
Minimum tread depth
The tread depth should not drop below 0.12 in/
3 mm, although, for example, European legisla-
tion only specifies a minimum tread depth of
0.063 in/1.6 mm. At tread depths below 0.12 in/
3 mm there is an increased risk of high-speed
hydroplaning, even when only small amounts of
water are present on the road surface.
When winter tires wear down past a tread depth
of 0.16 in/4 mm, they become perceptibly less
suitable for winter conditions. For the sake of
safety, new tires should be installed.
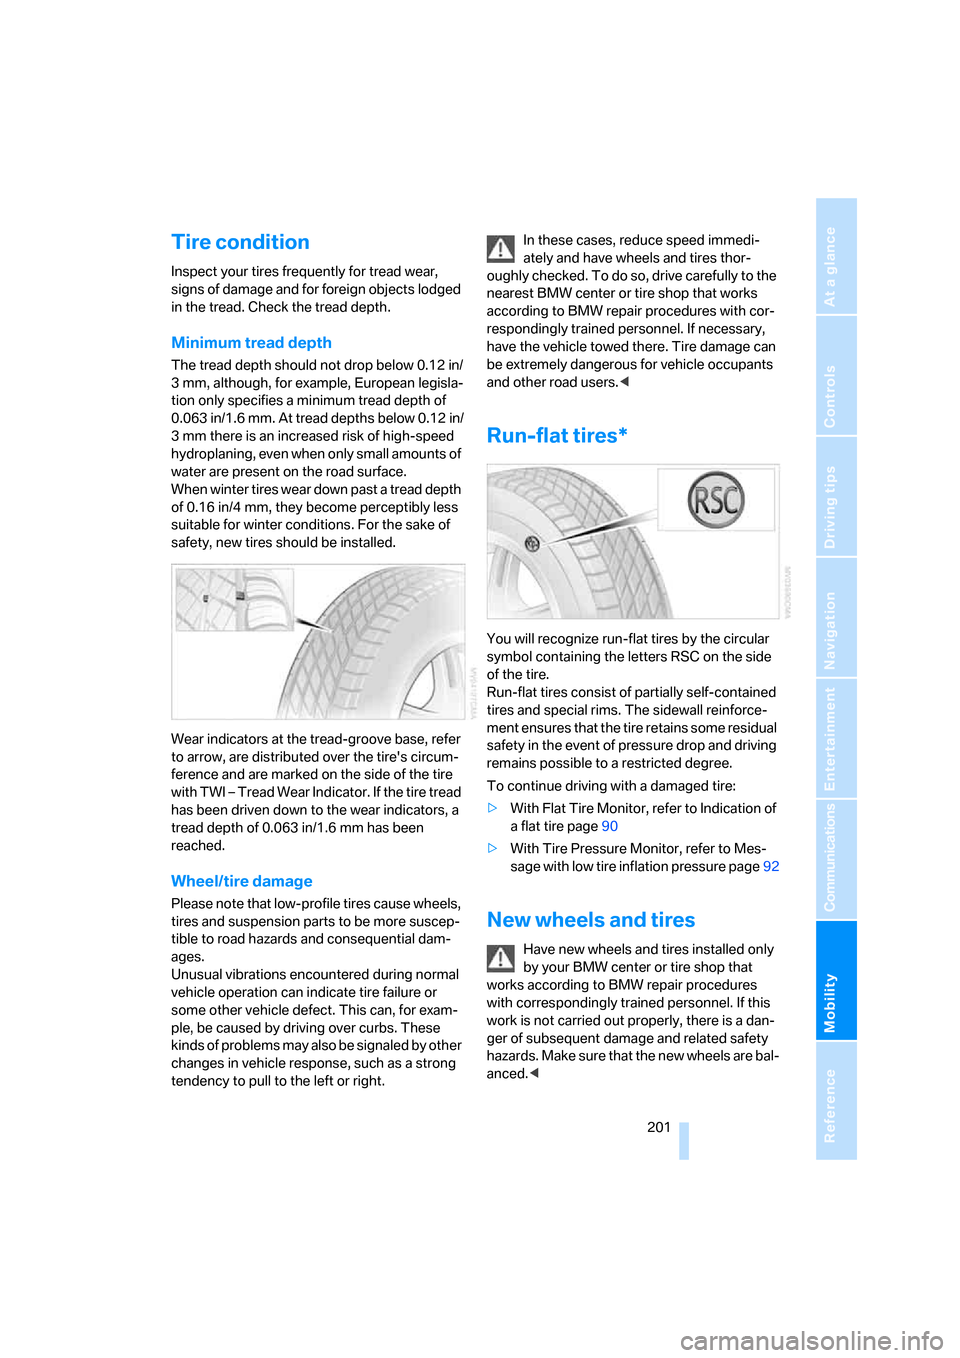
Wear indicators at the tread-groove base, refer
to arrow, are distributed over the tire's circum-
ference and are marked on the side of the tire
with TWI – Tread Wear Indicator. If the tire tread
has been driven down to the wear indicators, a
tread depth of 0.063 in/1.6 mm has been
reached.
Wheel/tire damage
Please note that low-profile tires cause wheels,
tires and suspension parts to be more suscep-
tible to road hazards and consequential dam-
ages.
Unusual vibrations encountered during normal
vehicle operation can indicate tire failure or
some other vehicle defect. This can, for exam-
ple, be caused by driving over curbs. These
kinds of problems may also be signaled by other
changes in vehicle response, such as a strong
tendency to pull to the left or right.In these cases, reduce speed immedi-
ately and have wheels and tires thor-
oughly checked. To do so, drive carefully to the
nearest BMW center or tire shop that works
according to BMW repair procedures with cor-
respondingly trained personnel. If necessary,
have the vehicle towed there. Tire damage can
be extremely dangerous for vehicle occupants
and other road users.<
Run-flat tires*
You will recognize run-flat tires by the circular
symbol containing the letters RSC on the side
of the tire.
Run-flat tires consist of partially self-contained
tires and special rims. The sidewall reinforce-
ment ensures that the tire retains some residual
safety in the event of pressure drop and driving
remains possible to a restricted degree.
To continue driving with a damaged tire:
>With Flat Tire Monitor, refer to Indication of
a flat tire page90
>With Tire Pressure Monitor, refer to Mes-
sage with low tire inflation pressure page92
New wheels and tires
Have new wheels and tires installed only
by your BMW center or tire shop that
works according to BMW repair procedures
with correspondingly trained personnel. If this
work is not carried out properly, there is a dan-
ger of subsequent damage and related safety
hazards. Make sure that the new wheels are bal-
anced.<
Page 204 of 259
Wheels and tires
202
Retreaded tires
BMW does not recommend that you use
retreaded tires, as driving safety may be
impaired. The causes for this include the possi-
bly different tire casing structures and the often
wide variations in their age, which can result in a
limited service life.<
The right wheels and tires
BMW recommends that you use only
wheel and tire combinations that BMW
has tested and approved for your particular
vehicle. Variations in factors such as manufac-
turing tolerances mean that even wheels and
tires with identical official size ratings could
actually have different dimensions than the
approved units – these differences could lead to
body contact, and with it the risk of severe acci-
dents. If non-approved wheels and tires are
used, BMW cannot evaluate their suitability,
and therefore cannot be held liable for driving
safety.<
You can inquire about the right wheel/tire com-
bination at your BMW center.
The correct wheel/tire combination also affects
various systems whose function would other-
wise be impaired, e.g. ABS, DSC or xDrive.
To maintain good handling and vehicle
response, use only tires of a single tread config-
uration from a single manufacturer. Following
tire damage, have the original wheel and tire
combination remounted on the vehicle as soon
as possible.
Wheels with electronics for
TPM Tire Pressure Monitor
When mounting new tires or converting from
summer to winter tires or vice versa, only use
wheels with TPM electronics, as otherwise the
Tire Pressure Monitor cannot detect a flat tire,
refer to page91. Your BMW center will be
happy to advise you on this subject.
Recommended tire brands
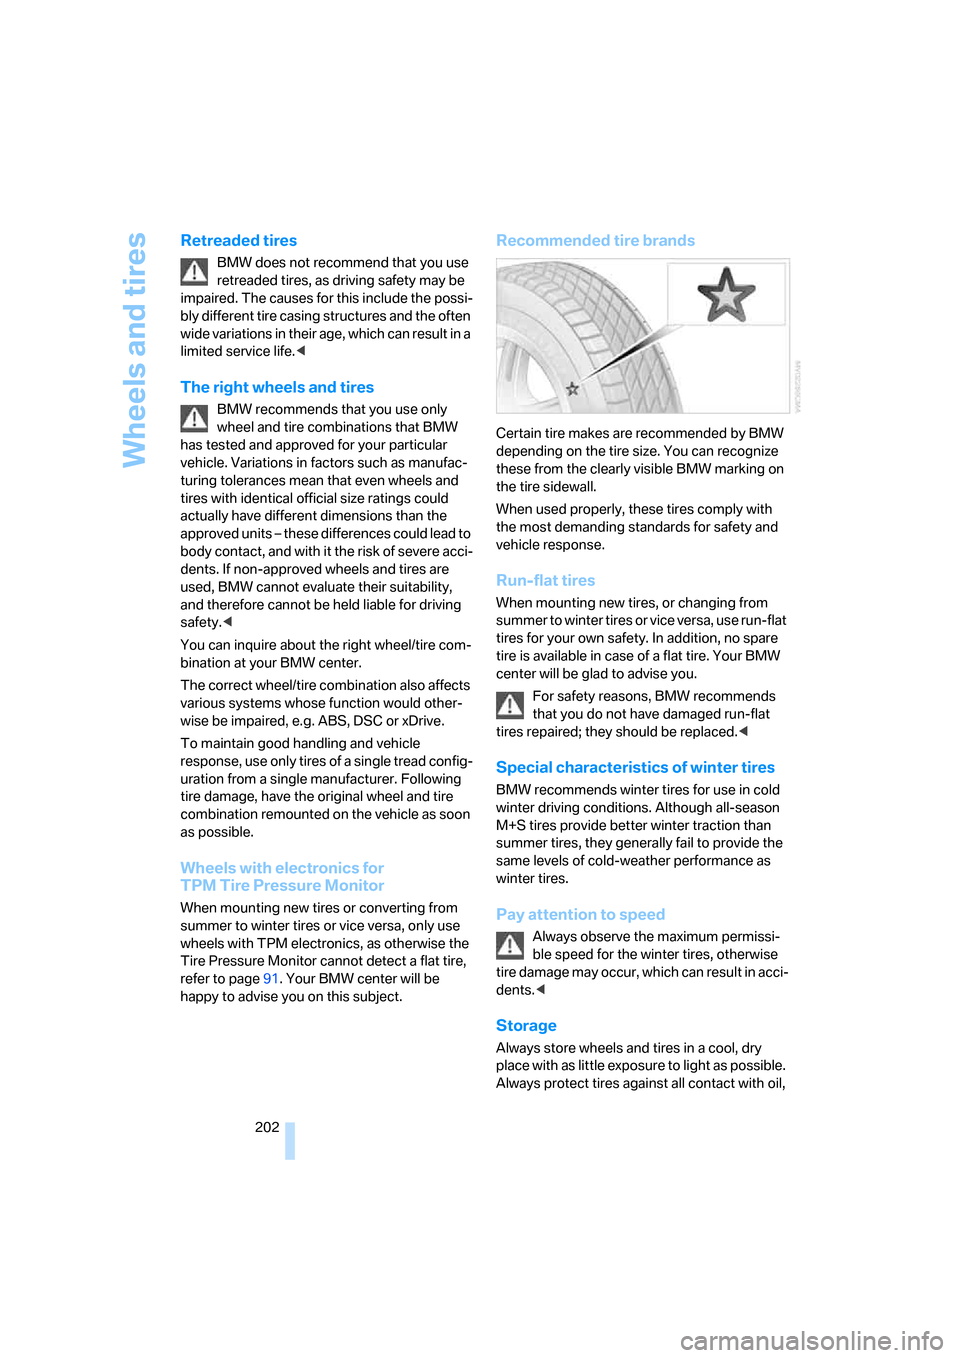
Certain tire makes are recommended by BMW
depending on the tire size. You can recognize
these from the clearly visible BMW marking on
the tire sidewall.
When used properly, these tires comply with
the most demanding standards for safety and
vehicle response.
Run-flat tires
When mounting new tires, or changing from
summer to winter tires or vice versa, use run-flat
tires for your own safety. In addition, no spare
tire is available in case of a flat tire. Your BMW
center will be glad to advise you.
For safety reasons, BMW recommends
that you do not have damaged run-flat
tires repaired; they should be replaced.<
Special characteristics of winter tires
BMW recommends winter tires for use in cold
winter driving conditions. Although all-season
M+S tires provide better winter traction than
summer tires, they generally fail to provide the
same levels of cold-weather performance as
winter tires.
Pay attention to speed
Always observe the maximum permissi-
ble speed for the winter tires, otherwise
t i re d a m a g e m a y o c cu r , w h ic h c a n re s u l t i n a c c i-
dents.<
Storage
Always store wheels and tires in a cool, dry
place with as little exposure to light as possible.
Always protect tires against all contact with oil,