belt BMW 645CI COUPE&CONVERTIBLE 2005 Owners Manual
[x] Cancel search | Manufacturer: BMW, Model Year: 2005, Model line: 645CI COUPE&CONVERTIBLE, Model: BMW 645CI COUPE&CONVERTIBLE 2005Pages: 217, PDF Size: 7.92 MB
Page 45 of 217
Adjustments
44
Adjustments
Sitting safely
The ideal sitting position can make a vital con-
tribution to relaxed, fatigue-free driving. The sit-
ting position also plays an important role
together with the safety belts and airbags in
providing occupants with maximum levels of
passive safety in an accident. To ensure that
the safety systems operate with optimal effi-
ciency, we strongly urge you to observe the
instructions contained in the following section.
For additional information on transporting chil-
dren safely, refer to page52.
Airbags
Always maintain an adequate distance
between yourself and the airbags. Always
hold the steering wheel by its rim with hands at
the 9 o'clock and 3 o'clock positions, to mini-
mize the risk of injuries to your hands and arms
in the event of airbag deployment.
No one and nothing is to come between the air-
bags and the seat occupant.
Do not use the cover of the front airbag on the
front passenger side as a storage area. Make
sure that the front passenger is sitting correctly
and does not rest feet or legs on the instrument
panel, otherwise leg injuries can occur if the
knee and front airbags are triggered.
Never let an occupant's head rest near or on a
side airbag because the inflating airbag could
cause a serious or fatal injury.<
Even if you adhere to all the instructions, inju-
ries resulting from contact with airbags cannot
be fully excluded, depending on the circum-
stances. The ignition and inflation noise may
provoke a mild hearing loss in extremely sensi-
tive individuals. This effect is usually only tem-
porary.
For airbag locations and additional information
on airbags, refer to page86.
Safety belt
Fasten your safety belt before starting any trip.
Airbags complement the safety belt as an addi-
tional safety device, but they do not represent a
substitute.
Your vehicle has four seats that are all equipped
with a safety belt.
At all times, occupants should sit upright
and be properly restrained: infants and
small children in appropriate child-restraint sys-
tems; larger children and adults using the safety
belts.
Never allow more than one person to wear a sin-
gle safety belt. Never allow infants or small chil-
dren to ride in a passenger's lap.
Expectant mothers should always wear their
safety belts, taking care to position the lap belt
against the lower hips, where it will not exert
pressure against the abdominal area.
Do not route the belt across your neck, or run it
across sharp edges. Be sure that the belt does
not become caught or jammed. Avoid twisting
the belt while routing it firmly across the hips
and shoulder. Do not allow the belt to rest
against hard or fragile objects. Otherwise, in the
event of a frontal impact, a loose lap belt could
slide over your hips, leading to abdominal injury.
Avoid wearing clothing that prevents the belt
from fitting properly and pull the shoulder belt
periodically to readjust the tension across your
lap in order to avoid a reduction in the retention
effect of the safety belt.<
For instructions on operating safety belts, refer
to page48.
Seats
Note before adjusting
Never attempt to adjust your seat while
operating the vehicle. The seat could
respond with unexpected movement, and the
ensuing loss of vehicle control could lead to an
accident.
Page 46 of 217
Controls
45Reference
At a glance
Driving tips
Communications
Navigation
Entertainment
Mobility
On the front passenger side as well, do not tilt
the backrest too far toward the rear. Failure to
observe this precaution can prevent the belt
from providing effective protection against
injury, as the passenger could slide under the
belt in an accident.
Make sure that the footwell behind the driver's
and front passenger's seat is empty and unob-
structed. If you fail to do so, any persons or
objects behind the seat could be injured or
damaged by a rearward movement of the
seat.<
Also observe the instructions regarding dam-
age to the safety belt on page49.
Convertible: with the wind deflector fitted,
do not incline the front seat backrests too
far backward if the seat is to be moved back to
the end position, as otherwise the wind deflec-
tor will be damaged.<
Seat adjustment
To ensure that the safety systems con-
tinue to provide optimized protection,
please observe the adjustment instructions
above.<
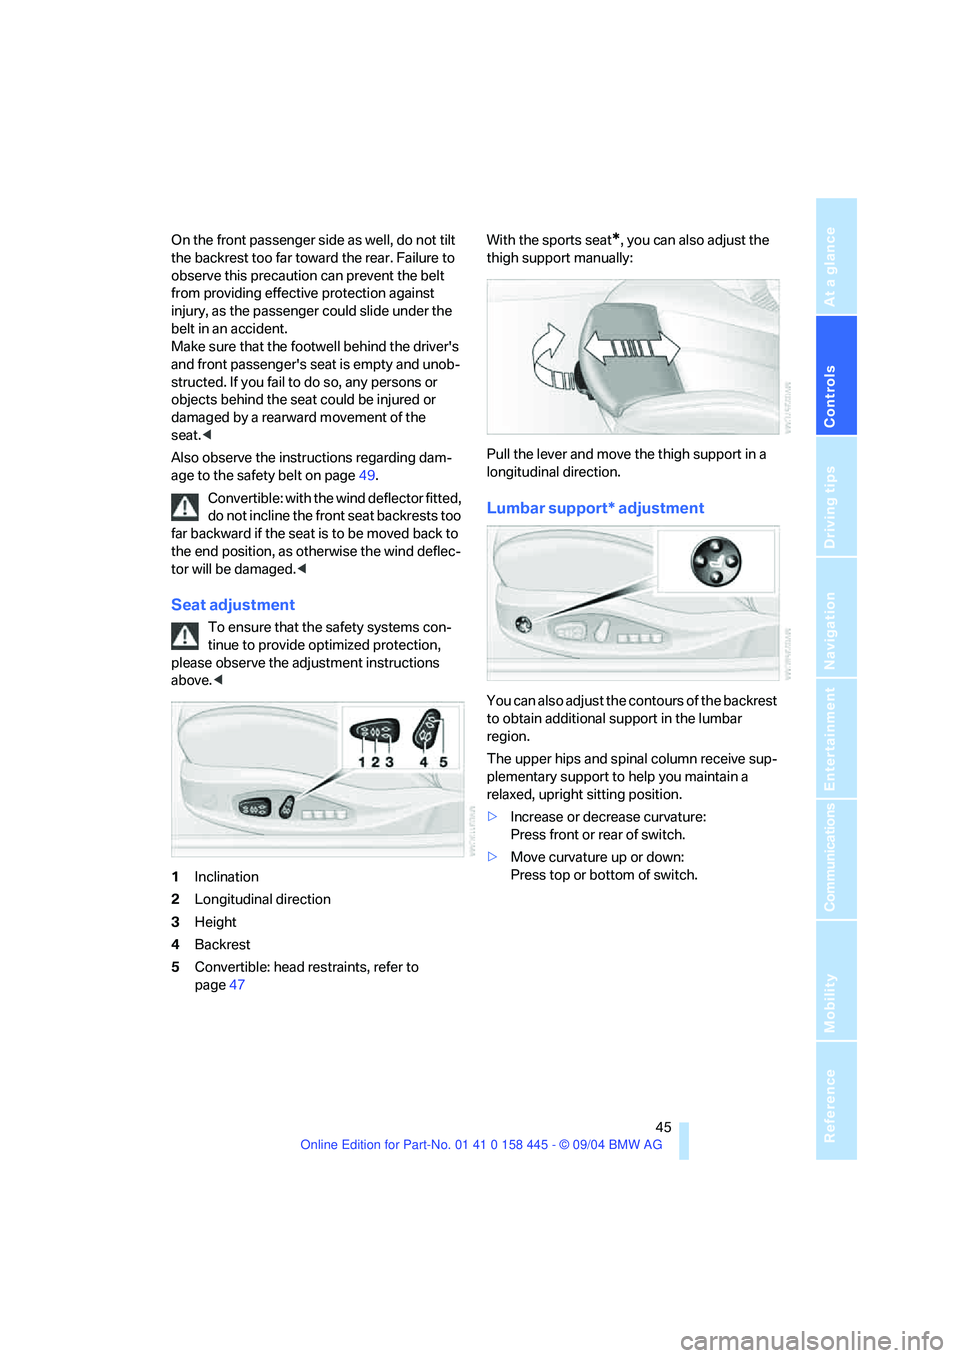
1Inclination
2Longitudinal direction
3Height
4Backrest
5Convertible: head restraints, refer to
page47With the sports seat
*, you can also adjust the
thigh support manually:
Pull the lever and move the thigh support in a
longitudinal direction.
Lumbar support* adjustment
You can also adjust the contours of the backrest
to obtain additional support in the lumbar
region.
The upper hips and spinal column receive sup-
plementary support to help you maintain a
relaxed, upright sitting position.
>Increase or decrease curvature:
Press front or rear of switch.
>Move curvature up or down:
Press top or bottom of switch.
Page 49 of 217
Adjustments
48
Adjusting tilt angle
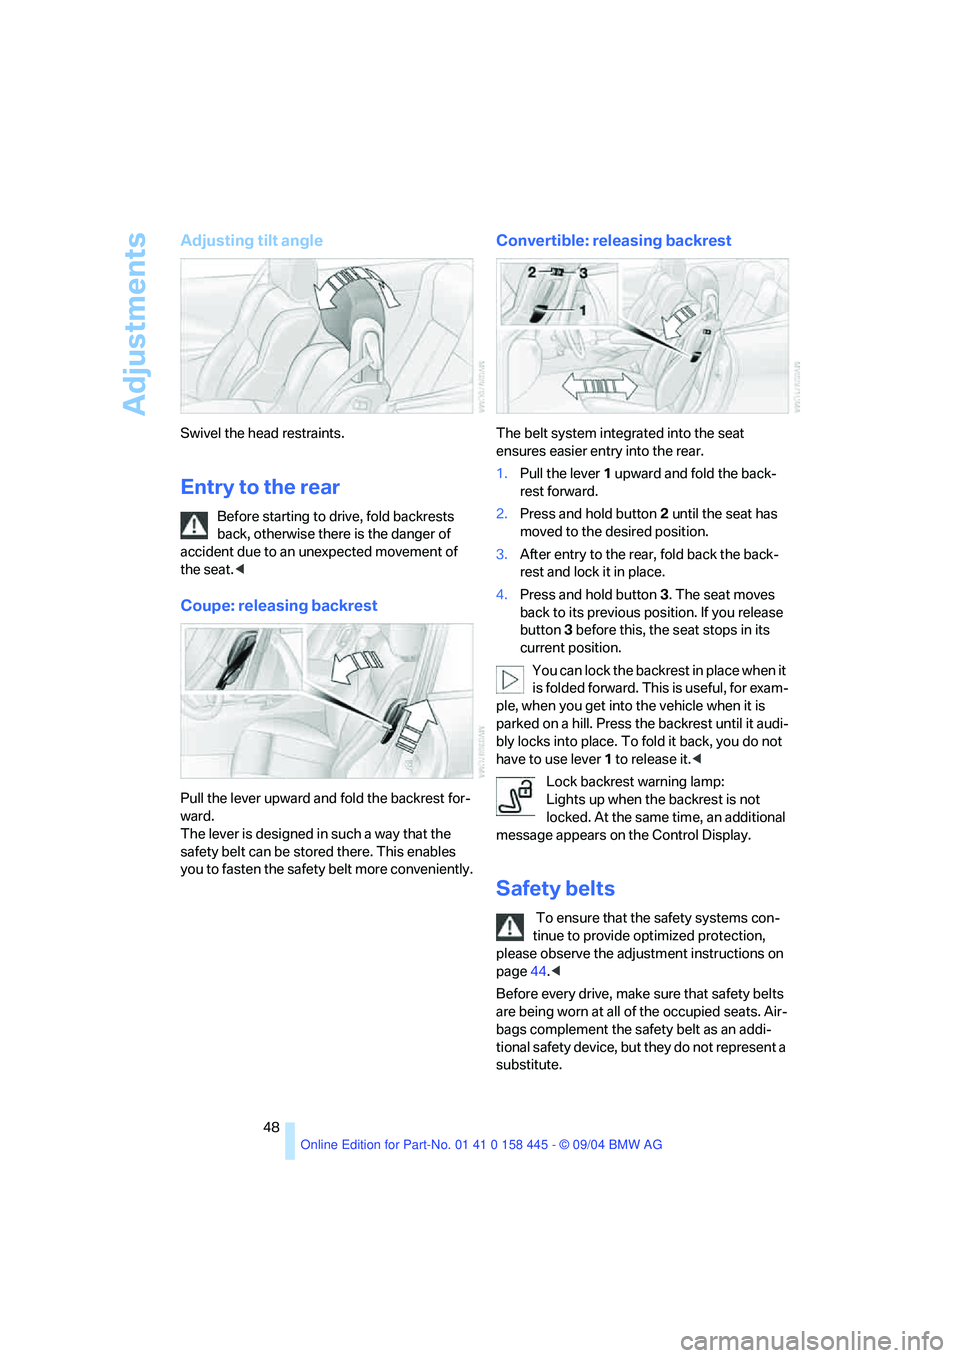
Swivel the head restraints.
Entry to the rear
Before starting to drive, fold backrests
back, otherwise there is the danger of
accident due to an unexpected movement of
the seat.<
Coupe: releasing backrest
Pull the lever upward and fold the backrest for-
ward.
The lever is designed in such a way that the
safety belt can be stored there. This enables
you to fasten the safety belt more conveniently.
Convertible: releasing backrest
The belt system integrated into the seat
ensures easier entry into the rear.
1.Pull the lever 1 upward and fold the back-
rest forward.
2.Press and hold button 2 until the seat has
moved to the desired position.
3.After entry to the rear, fold back the back-
rest and lock it in place.
4.Press and hold button 3. The seat moves
back to its previous position. If you release
button 3 before this, the seat stops in its
current position.
You can lock the backrest in place when it
is folded forward. This is useful, for exam-
ple, when you get into the vehicle when it is
parked on a hill. Press the backrest until it audi-
bly locks into place. To fold it back, you do not
have to use lever 1 to release it.<
Lock backrest warning lamp:
Lights up when the backrest is not
locked. At the same time, an additional
message appears on the Control Display.
Safety belts
To ensure that the safety systems con-
tinue to provide optimized protection,
please observe the adjustment instructions on
page44.<
Before every drive, make sure that safety belts
are being worn at all of the occupied seats. Air-
bags complement the safety belt as an addi-
tional safety device, but they do not represent a
substitute.
Page 50 of 217
Controls
49Reference
At a glance
Driving tips
Communications
Navigation
Entertainment
Mobility
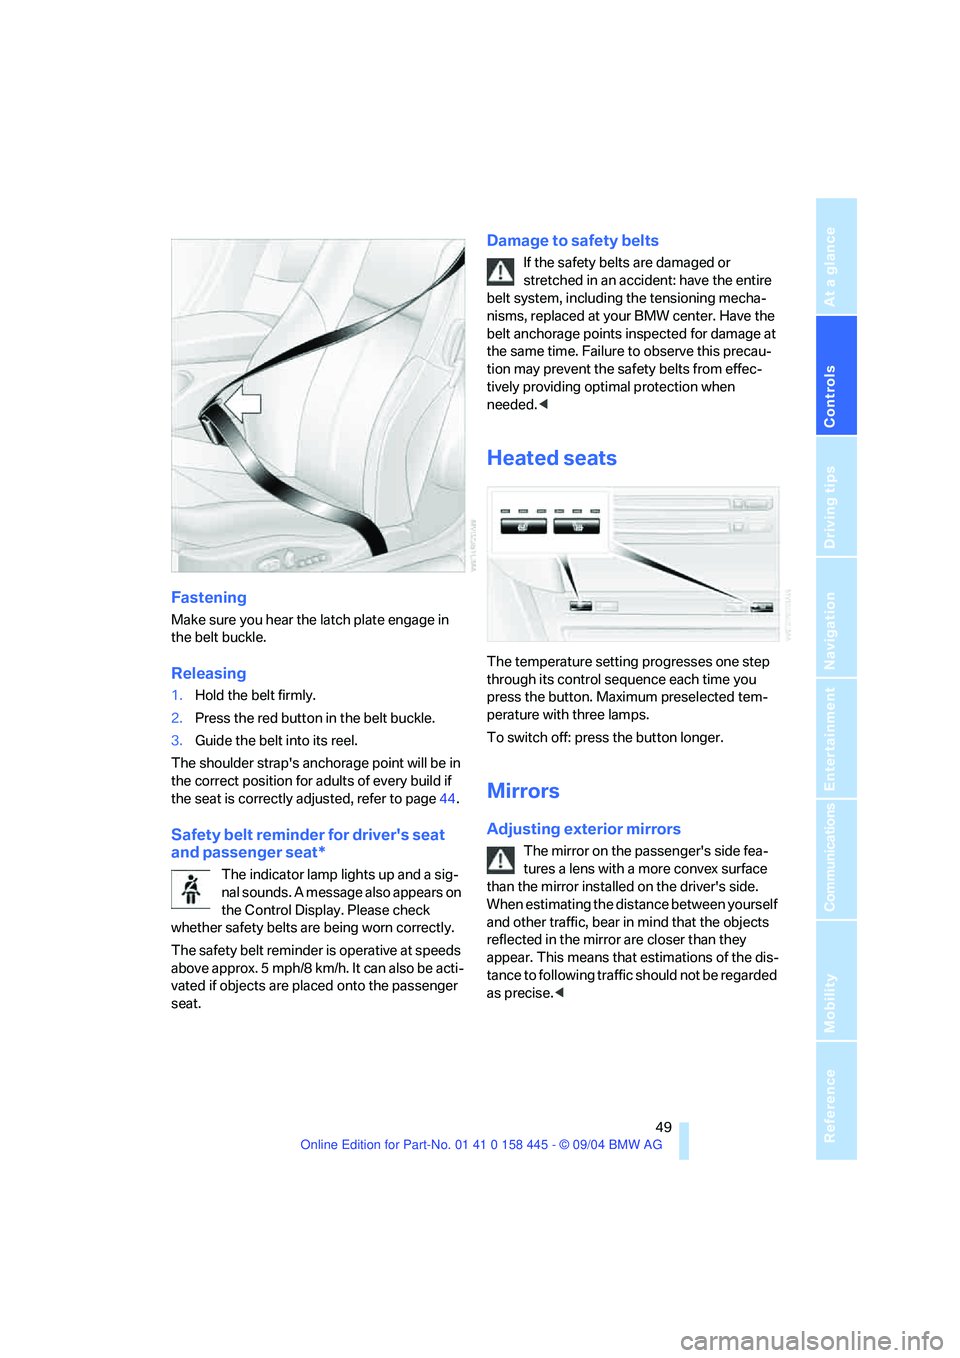
Fastening
Make sure you hear the latch plate engage in
the belt buckle.
Releasing
1.Hold the belt firmly.
2.Press the red button in the belt buckle.
3.Guide the belt into its reel.
The shoulder strap's anchorage point will be in
the correct position for adults of every build if
the seat is correctly adjusted, refer to page44.
Safety belt reminder for driver's seat
and passenger seat*
The indicator lamp lights up and a sig-
nal sounds. A message also appears on
the Control Display. Please check
whether safety belts are being worn correctly.
The safety belt reminder is operative at speeds
above approx. 5 mph/8 km/h. It can also be acti-
vated if objects are placed onto the passenger
seat.
Damage to safety belts
If the safety belts are damaged or
stretched in an accident: have the entire
belt system, including the tensioning mecha-
nisms, replaced at your BMW center. Have the
belt anchorage points inspected for damage at
the same time. Failure to observe this precau-
tion may prevent the safety belts from effec-
tively providing optimal protection when
needed.<
Heated seats
The temperature setting progresses one step
through its control sequence each time you
press the button. Maximum preselected tem-
perature with three lamps.
To switch off: press the button longer.
Mirrors
Adjusting exterior mirrors
The mirror on the passenger's side fea-
tures a lens with a more convex surface
than the mirror installed on the driver's side.
When estimating the distance between yourself
and other traffic, bear in mind that the objects
reflected in the mirror are closer than they
appear. This means that estimations of the dis-
tance to following traffic should not be regarded
as precise.<
Page 53 of 217
Transporting children safely
52
Transporting children safely
The right place for children
Children always in the rear
Accident research shows that the safest place
for children in a vehicle is in the rear seat.
Older children should be tightly secured with a
safety belt, after they have outgrown a booster
seat that is appropriate for their age, height and
weight.
Child-restraint system in the rear
Children under 13 years of age and chil-
dren less than 5 ft/150 cm tall should
always ride in the rear and the restraint systems
should be secured with the vehicle's safety
belts.<
Younger children should be secured in an
appropriate forward-facing child-restraint sys-
tem that has first been properly secured. We
strongly urge you to carefully read and comply
with the instructions for installation and use
provided by the child-restraint's manufacturer
whenever you use such a device.
All rear sitting positions in your vehicle meet the
recommendations of SAE J1819, an industry-
recommended practice for securing child-
restraint systems in motor vehicles.
Exception for front passenger seat
Should it become necessary to use
a child-restraint system on the front pas-
senger seat, the airbags on the passenger's
side must be deactivated. Deactivating the front
passenger airbag is only possible on the Coupe.
Your BMW center will be glad to advise you.<
Never install a rearward-facing child-
restraint system in the front passenger
seat of this vehicle if the passenger airbag is not
deactivated. If you do so, the child could be
severely injured when the airbag is triggered.
Your vehicle is equipped with an airbag supple-
mental restraint system for the front passenger.
Because the backrest on any rearward-facing child-restraint system – of the kind designed for
infants under 1 year and 20 Ibs./9 kg – would be
within the airbag's deployment range, you
should never mount such a system in the front
passenger seat, since the impact of the airbag
against the child restraint's backrest could lead
to serious or fatal injuries.<
Installing child-restraint
systems
Before installing any child-restraint system or
child seat, read the following:
Observe the child-restraint system man-
ufacturer's instructions for installation
and use. Otherwise the degree of protection
can be reduced.
After an accident, have all parts of the child-
restraint system and of the relevant vehicle
safety belt system checked by a BMW center
and replaced if necessary.<
Commercially-available child-restraint systems
are designed to be secured with a lap belt or
with the lap belt portion of a combination lap/
shoulder belt. Improperly or inadequately
installed restraint systems can increase the risk
of injury to children. Always read and follow the
instructions that come with the system.
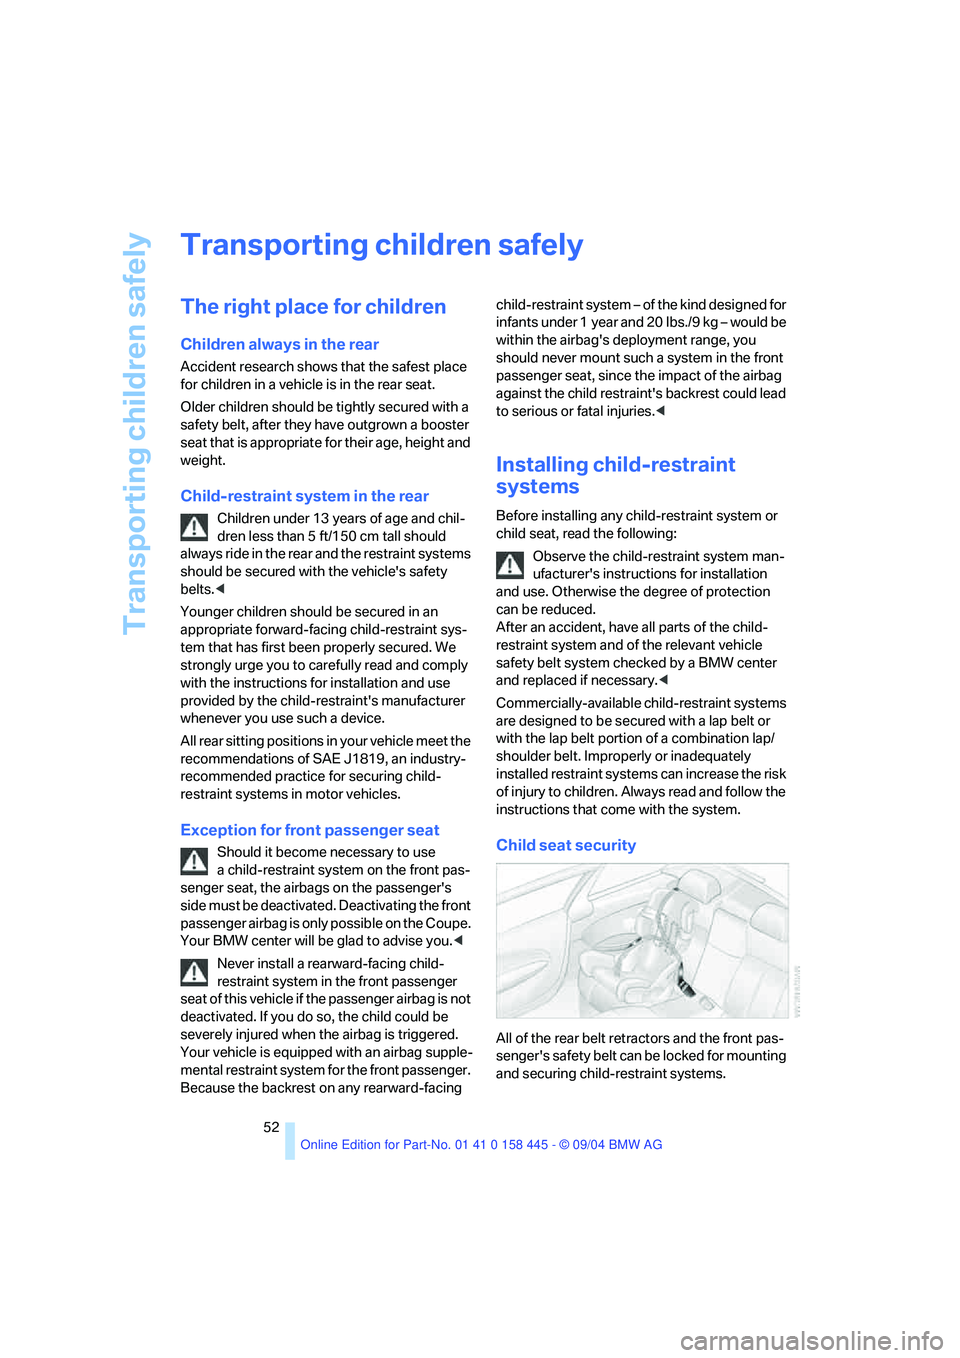
Child seat security
All of the rear belt retractors and the front pas-
senger's safety belt can be locked for mounting
and securing child-restraint systems.
Page 54 of 217
Controls
53Reference
At a glance
Driving tips
Communications
Navigation
Entertainment
Mobility
Information regarding this is located near the
buckle latch of each safety belt.
To lock safety belt
Pull the entire length of the belt from the belt
retractor. Allow the reel to retract the belt
somewhat and engage the buckle, then tighten
the belt against the child-restraint system. The
retraction mechanism is now locked.
To unlock safety belt
Release the buckle, remove the child-restraint
system and allow the belt retractor to reel the
belt completely in.
Coupe: child-restraint system with
tether strap
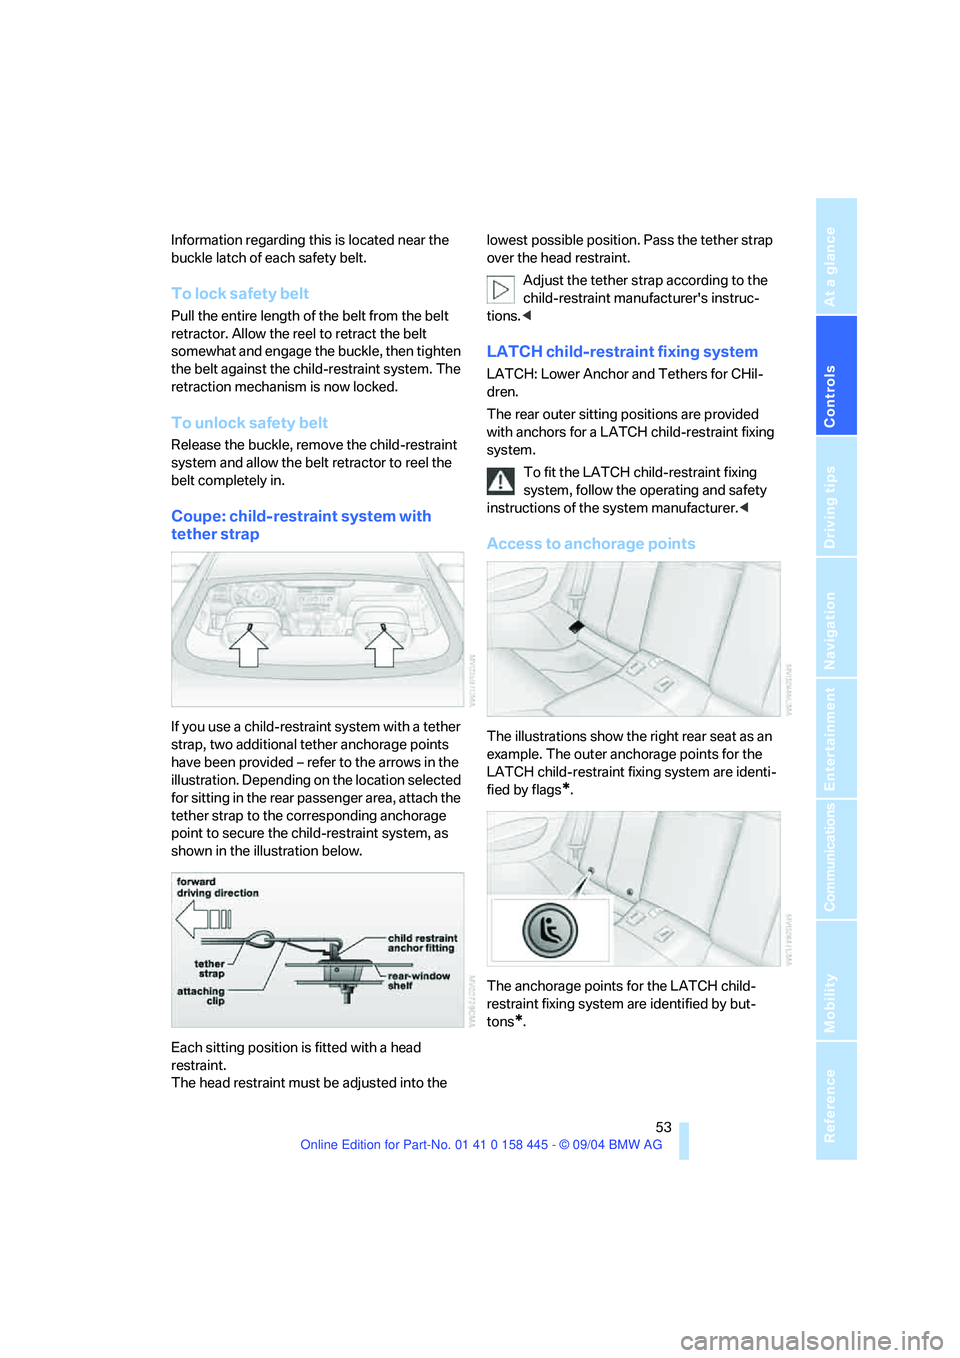
If you use a child-restraint system with a tether
strap, two additional tether anchorage points
have been provided – refer to the arrows in the
illustration. Depending on the location selected
for sitting in the rear passenger area, attach the
tether strap to the corresponding anchorage
point to secure the child-restraint system, as
shown in the illustration below.
Each sitting position is fitted with a head
restraint.
The head restraint must be adjusted into the lowest possible position. Pass the tether strap
over the head restraint.
Adjust the tether strap according to the
child-restraint manufacturer's instruc-
tions.<
LATCH child-restraint fixing system
LATCH: Lower Anchor and Tethers for CHil-
dren.
The rear outer sitting positions are provided
with anchors for a LATCH child-restraint fixing
system.
To fit the LATCH child-restraint fixing
system, follow the operating and safety
instructions of the system manufacturer.<
Access to anchorage points
The illustrations show the right rear seat as an
example. The outer anchorage points for the
LATCH child-restraint fixing system are identi-
fied by flags
*.
The anchorage points for the LATCH child-
restraint fixing system are identified by but-
tons
*.
Page 87 of 217
Technology for comfort, convenience and safety
86
Initializing system
1.Start the engine.
2.With the vehicle stationary, turn the steer-
ing wheel from the straight-ahead position
to the left as far as it will go and then back to
the straight-ahead position.
3.Switch off the engine.
When you start the engine again, all the func-
tions of the active steering will be available once
again.
Brake Force Display
The Brake Force Display lights up in two stages
depending on how strongly you brake.
>Normal braking:
The brake lamps and the third brake lamp
go on.
>Heavy braking and braking with ABS:
In addition, the illuminated area of the rear
brake lamps is enlarged, refer to illustration.
Airbags
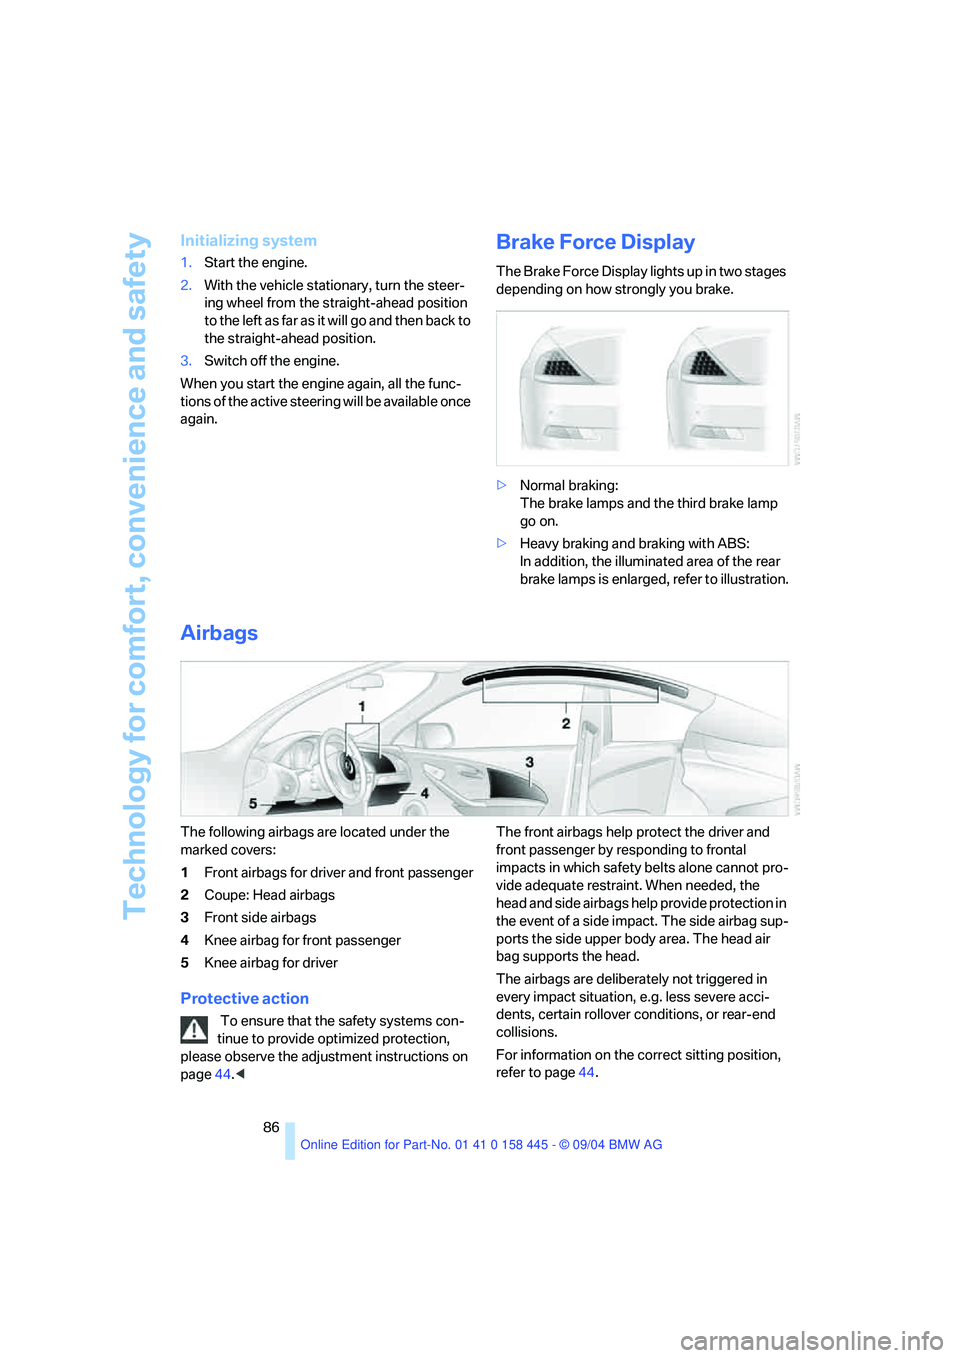
The following airbags are located under the
marked covers:
1Front airbags for driver and front passenger
2Coupe: Head airbags
3Front side airbags
4Knee airbag for front passenger
5Knee airbag for driver
Protective action
To ensure that the safety systems con-
tinue to provide optimized protection,
please observe the adjustment instructions on
page44.
impacts in which safety belts alone cannot pro-
vide adequate restraint. When needed, the
head and side airbags help provide protection in
the event of a side impact. The side airbag sup-
ports the side upper body area. The head air
bag supports the head.
The airbags are deliberately not triggered in
every impact situation, e.g. less severe acci-
dents, certain rollover conditions, or rear-end
collisions.
For information on the correct sitting position,
refer to page44.
Page 88 of 217
Controls
87Reference
At a glance
Driving tips
Communications
Navigation
Entertainment
Mobility
Do not apply adhesive materials to the
cover panels of the airbags, cover them or
modify them in any other way.
Do not attempt to remove the airbag retention
system from the vehicle. Never modify or
tamper with either the wiring or the individual
components in the airbag system. This cate-
gory includes the upholstery in the center of the
steering wheel, on the instrument panel, the
side trim panels on the doors and on the Coupe,
the roof pillars along with the sides of the head-
liner. Do not attempt to remove or dismantle the
steering wheel.
Do not touch the individual components
directly after the system has been triggered,
because there is a danger of burns.
If you note any indication of system malfunc-
tion, if you wish to have an airbag deactivated,
or if the airbag retention system is triggered in
response to an accident, you should always
entrust all inspection, repair and dismantling
operations to your BMW center. Unprofessional
attempts to service the system could lead to
failure in an emergency or undesired airbag
activation, either of which could result in per-
sonal injury.<
Airbag warning information is also provided on
the sun visors.
Operational readiness of airbag system
From ignition key position 1 the warning lamp
lights up briefly, indicating the operational
readiness of the entire airbag system and the
belt tensioners.
Airbag system malfunction
>The warning lamp does not light up as of
ignition key position 1.>The warning lamp lights up continuously.
Have the airbag system checked immedi-
ately if a malfunction occurs, as otherwise
there is a danger of the system not responding
in the expected manner to an impact occurring
within its normal response range.<
Convertible:
Rollover protection system
The rollover protection system is automatically
activated in the event of an accident or a critical
driving situation, extreme inclination on the lon-
gitudinal or transverse axis, or loss of ground
contact. The rollover bars located behind the
rear head restraints are deployed within frac-
tions of a second.
As a supplement to the rollover bar integrated
into the windshield frame, the rollover protec-
tion system ensures that all vehicle occupants
have the necessary headroom.
Always keep the path of movement of the
rollover protection system clear.
In less severe accidents, you are protected by
the fastened safety belt and, depending on the
severity of the accident, the belt tensioner and
the multistage airbag restraint system.<
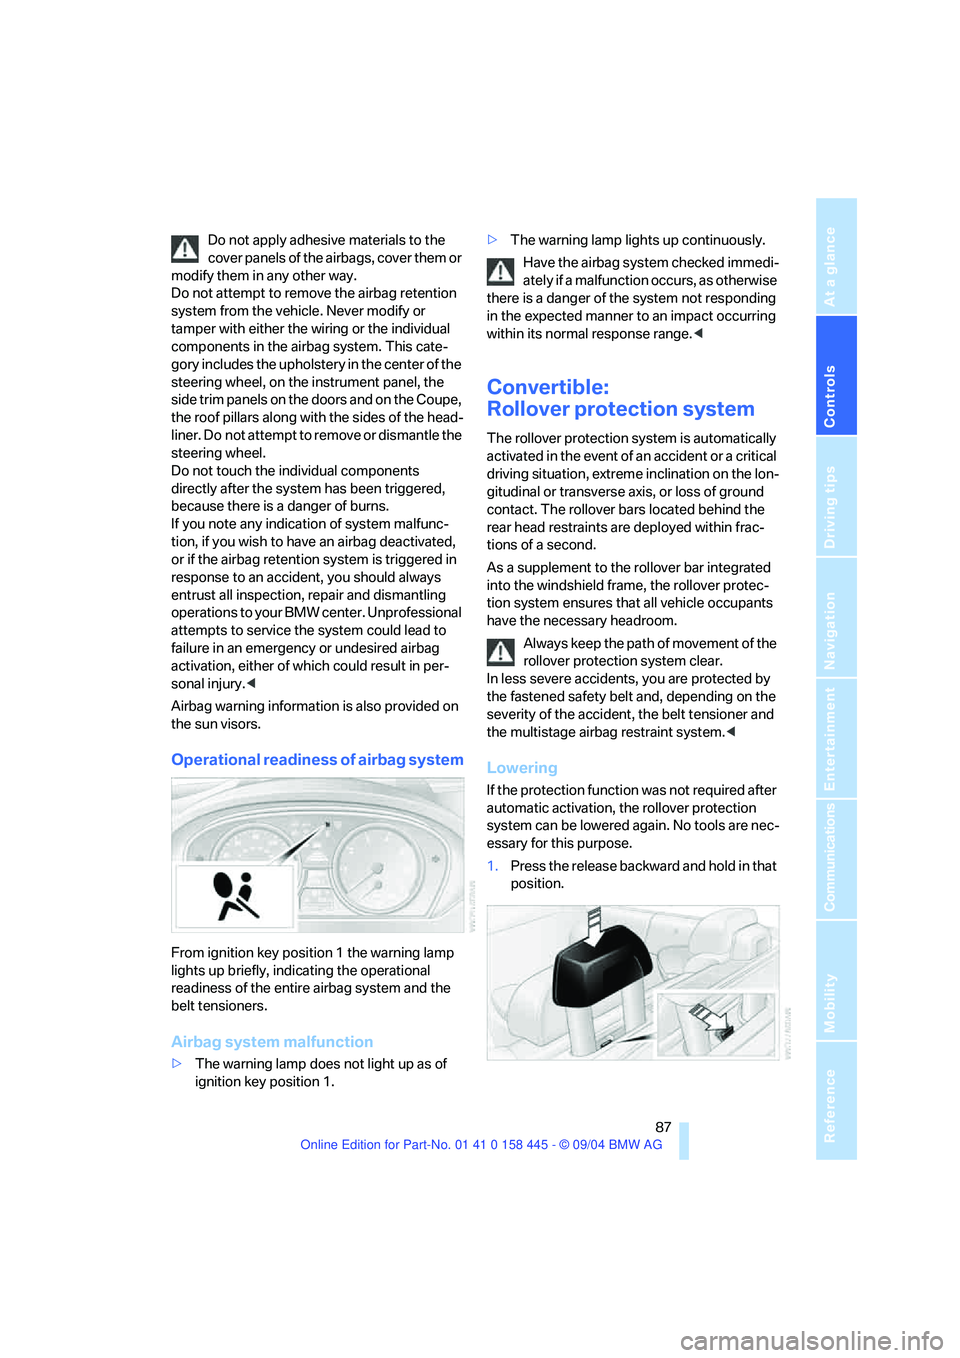
Lowering
If the protection function was not required after
automatic activation, the rollover protection
system can be lowered again. No tools are nec-
essary for this purpose.
1.Press the release backward and hold in that
position.
Page 105 of 217
Practical interior accessories
104
Socket
In front passenger footwell
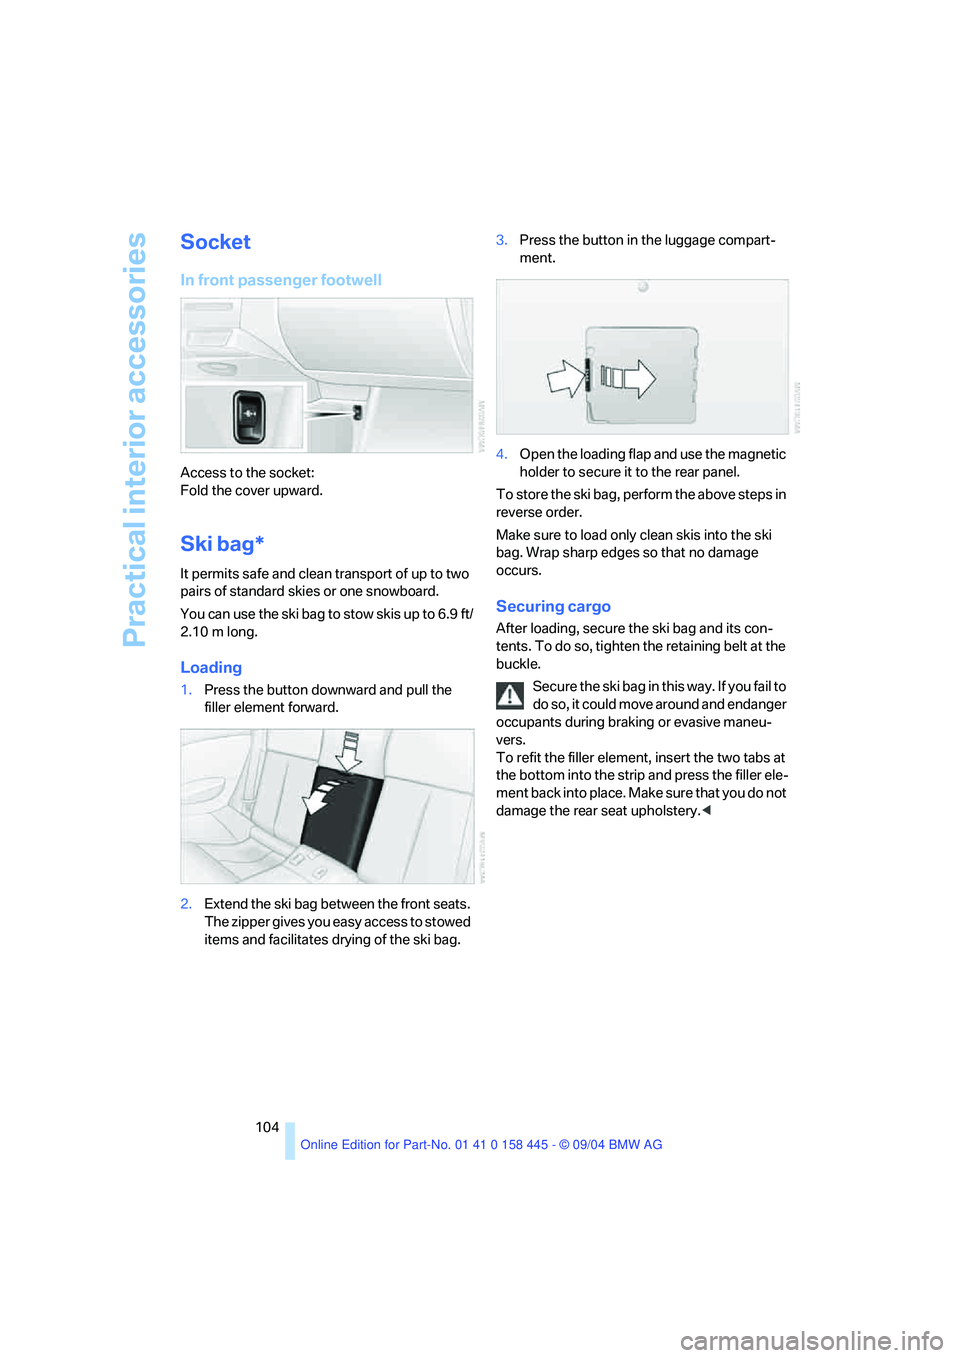
Access to the socket:
Fold the cover upward.
Ski bag*
It permits safe and clean transport of up to two
pairs of standard skies or one snowboard.
You can use the ski bag to stow skis up to 6.9 ft/
2.10 m long.
Loading
1.Press the button downward and pull the
filler element forward.
2.Extend the ski bag between the front seats.
The zipper gives you easy access to stowed
items and facilitates drying of the ski bag.3.Press the button in the luggage compart-
ment.
4.Open the loading flap and use the magnetic
holder to secure it to the rear panel.
To store the ski bag, perform the above steps in
reverse order.
Make sure to load only clean skis into the ski
bag. Wrap sharp edges so that no damage
occurs.
Securing cargo
After loading, secure the ski bag and its con-
tents. To do so, tighten the retaining belt at the
buckle.
Secure the ski bag in this way. If you fail to
do so, it could move around and endanger
occupants during braking or evasive maneu-
vers.
To refit the filler element, insert the two tabs at
the bottom into the strip and press the filler ele-
m e n t b a c k i n t o p l a c e . M a k e s u r e t h a t y o u d o n o t
damage the rear seat upholstery.<
Page 201 of 217
Everything from A to Z
200 Audio132
– controls132
– switching on/off132
– tone control133
– volume133
Automatic
– air distribution95
– air volume95
– cruise control61,62
– headlamp control91
– service notification160
– steering wheel adjustment,
refer to Easy entry/exit50
– storing stations138
Automatic car washes110
– also refer to the Caring for
your vehicle brochure
Automatic climate control94
– automatic air distribution95
– convertible program97
– settings using Control
Center96
– switching off96
Automatic curb monitor47
"Automatic programs"97
Automatic recirculated-air
control AUC95
Automatic station search137
Automatic transmission with
Steptronic58
– convenience start55
– Dynamic Driving Control59
– interlock54
– kick-down58
– selector lever interlock58
– shiftlock58
– starting engine55
– towing188
– tow-starting189
"Automatic ventilation"98
AUTO program with
automatic climate control95
"Autostore" on the
radio136,138
Average fuel consumption74
– setting units77
Average speed74"Avoid ferries" for
navigation123
Avoid freeways for
navigation122
"Avoid highways" for
navigation122
Avoiding unintentional
alarms35
"Avoid tollroads" for
navigation123
Axle loads, refer to
Weights192
"A - Z"153
B
Backrests, refer to Seats44
Backup lamps, refer to
Reverse gear56
Balance, refer to Tone
control134
Balance adjustment in audio
mode, right/left134
Bandages, refer to First-aid
kit186
"Bass", refer to Tone
control134
Bass, refer to Tone
control133
Battery
– jump starting186
– refer to Vehicle battery183
Being towed188
Belts, refer to Safety belts48
Beverage holder, refer to Cup
holders103
Black ice, refer to Ice
warning69
Blower, refer to Air volume95
BMW Assist159
– enabling159
– services offered160
BMW maintenance
system178
"BMW Service"161
"BMW Service settings"159
Bottle holder, refer to Cup
holders103Brake Assistant, refer to DBC
Dynamic Brake Control81
Brake fluid177
– warning lamp177
Brake Force Display86
Brake hydraulic system177
Brake lamps
– Brake Force Display86
– replacing bulbs182
Brake pads177
– breaking-in108
Brake rotors110
Brakes109
– ABS Antilock Brake
System81
– brake fluid177
– Brake Force Display86
– brake pads108,177
– breaking-in108
– CBC Cornering Brake
Control81
– handbrake55
Brake system108
– brake fluid level177
– brake pads108,177
– brake rotors110
– breaking-in108
– warning lamp13,83,177
Brake wear warning
– brake pads177
Braking
– electronic brake-force
distribution81
– refer to Braking safely109
Breakdown assistance161
Breakdown services, refer to
Roadside Assistance186
Breaking-in108
– clutch108
– differential108
Break wear warning
– warning lamp177
"Brightness"77
Buttons on steering wheel11
Bypassing route sections128