BMW 7 SERIES 2013 F01 Manual Online
Manufacturer: BMW, Model Year: 2013, Model line: 7 SERIES, Model: BMW 7 SERIES 2013 F01Pages: 255, PDF Size: 5.22 MB
Page 81 of 255
When the ignition is switched off, refer to
page 66, position P is engaged automatically.
P Park Select only when the vehicle is stationary. The
drive wheels are blocked.
P is engaged automatically:âˇAfter the engine is switched off when the
vehicle is in radio ready state, refer to
page 67, or when the ignition is switched
off, refer to page 66, and when position R
or D is engaged.âˇWith the ignition is off, if position N is enâ
gaged.âˇIf the safety belt is unbuckled, the driver's
door is opened, and the brake pedal is not
pressed while the vehicle is stationary and
transmission position R or D is engaged.
Before exiting the vehicle, make sure that posiâ
tion P of the automatic transmission is enâ
gaged. Otherwise, the vehicle may begin to
roll.
Kickdown
Kickdown is used to achieve maximum driving
performance. Press on the gas pedal beyond
the resistance point at the full throttle position.
Engaging the transmission position
âˇTransmission position P can only be disenâ
gaged if the engine is running and the
brake pedal is pressed.âˇWith the vehicle stationary, press on the
brake pedal before shifting out of P or N;
otherwise, the shift command will not be
executed: shift lock.
Depress the brake until you start
driving
To prevent the vehicle from creeping after
you select a driving position, maintain
pressure on the brake pedal until you are
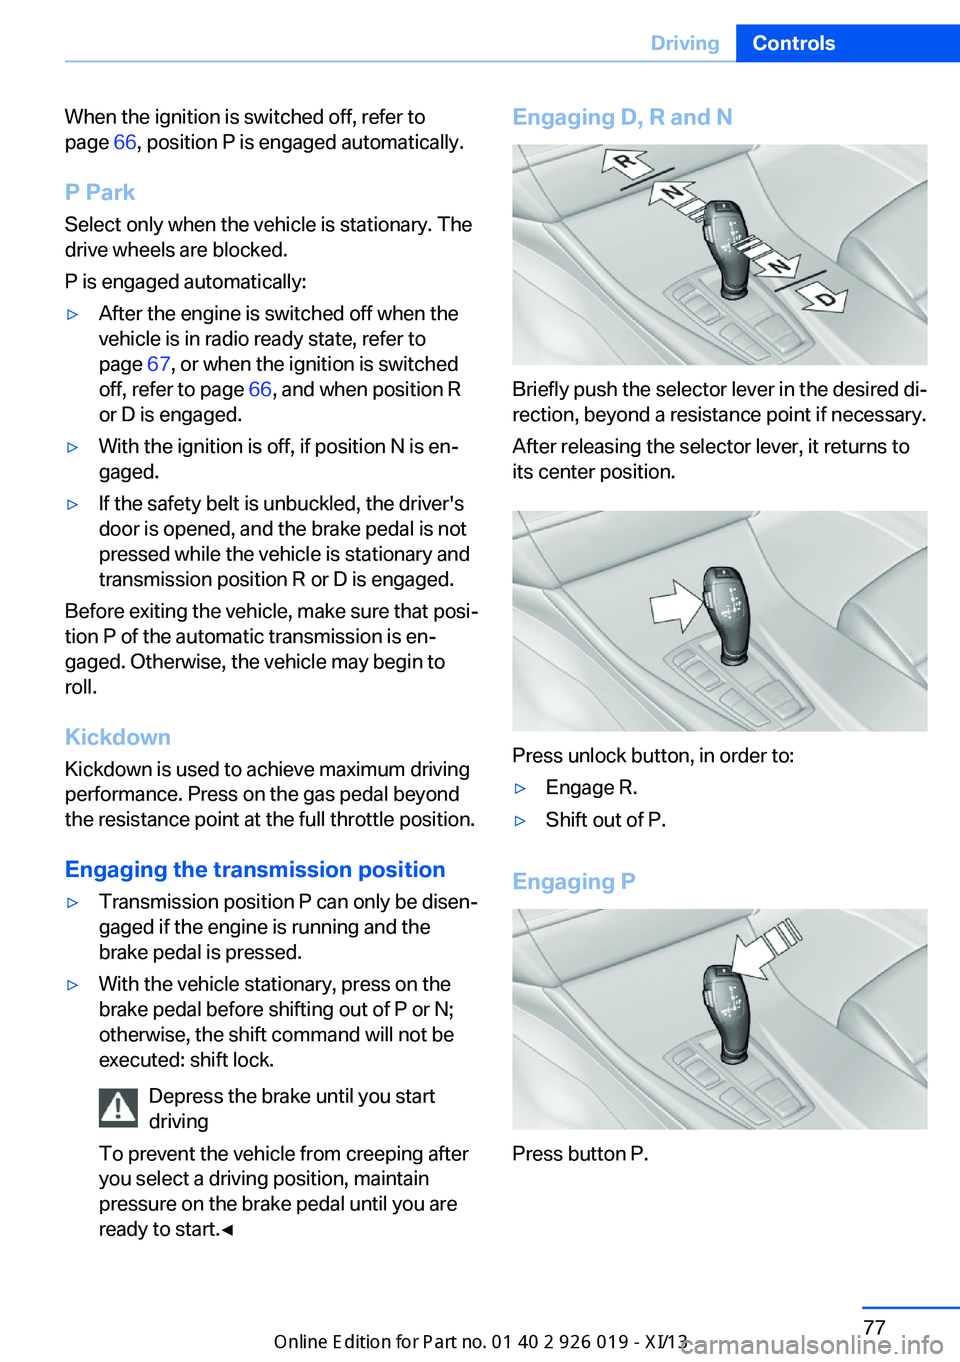
ready to start.âEngaging D, R and N
Briefly push the selector lever in the desired diâ
rection, beyond a resistance point if necessary.
After releasing the selector lever, it returns to
its center position.
Press unlock button, in order to:
âˇEngage R.âˇShift out of P.
Engaging P
Press button P.
Seite 77DrivingControls77
Online Edition for Part no. 01 40 2 909 749 - VI/13
Page 82 of 255
Sport program and manual mode
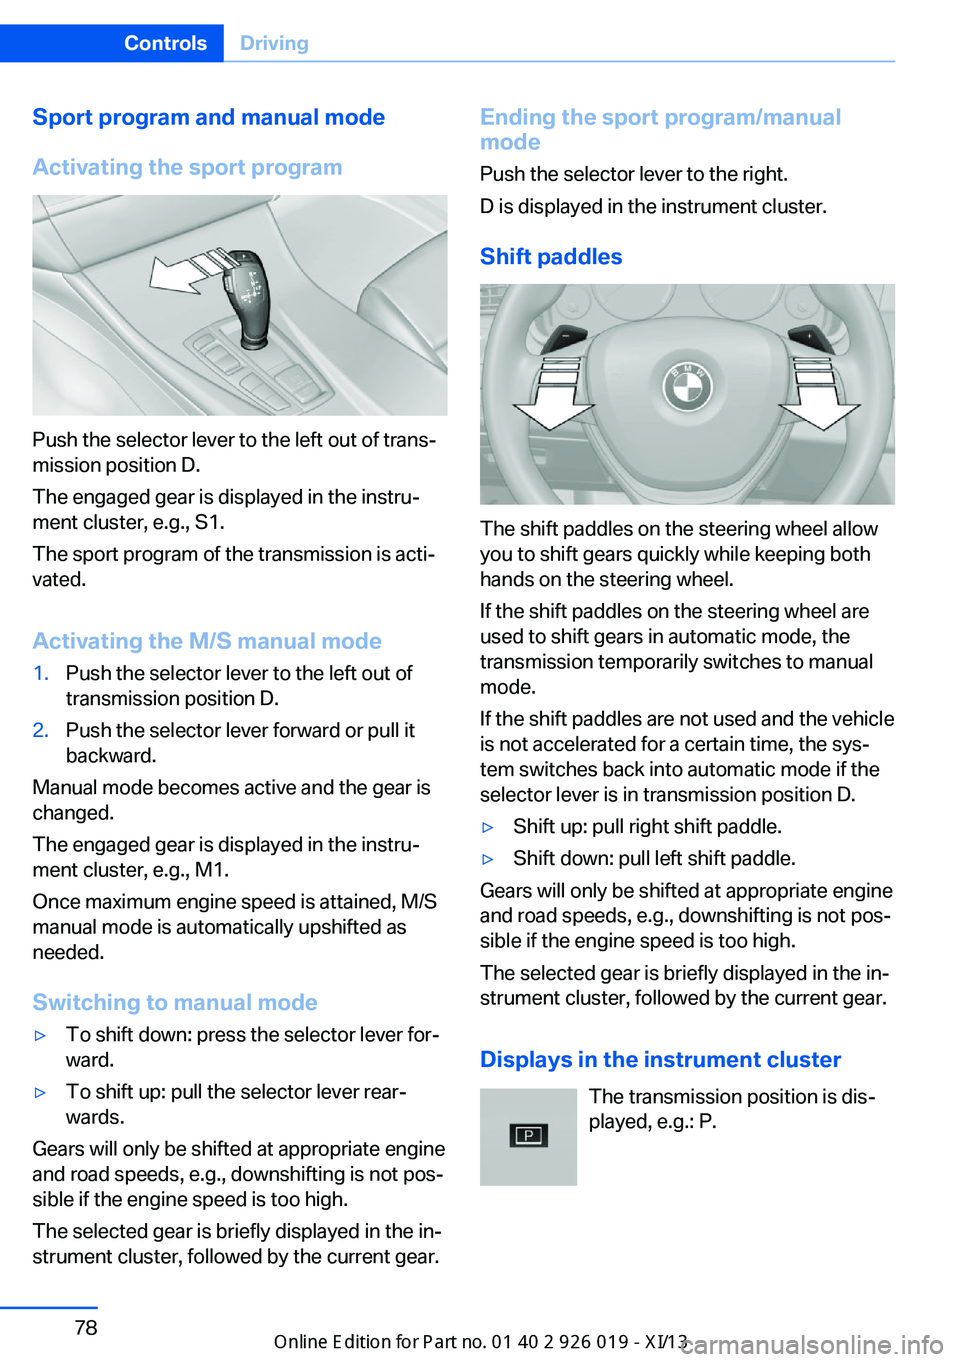
Activating the sport program
Push the selector lever to the left out of transâ
mission position D.
The engaged gear is displayed in the instruâ
ment cluster, e.g., S1.
The sport program of the transmission is actiâ
vated.
Activating the M/S manual mode
1.Push the selector lever to the left out of
transmission position D.2.Push the selector lever forward or pull it
backward.
Manual mode becomes active and the gear is
changed.
The engaged gear is displayed in the instruâ
ment cluster, e.g., M1.
Once maximum engine speed is attained, M/S
manual mode is automatically upshifted as
needed.
Switching to manual mode
âˇTo shift down: press the selector lever forâ
ward.âˇTo shift up: pull the selector lever rearâ
wards.
Gears will only be shifted at appropriate engine
and road speeds, e.g., downshifting is not posâ
sible if the engine speed is too high.
The selected gear is briefly displayed in the inâ
strument cluster, followed by the current gear.
Ending the sport program/manual
mode
Push the selector lever to the right.
D is displayed in the instrument cluster.
Shift paddles
The shift paddles on the steering wheel allow
you to shift gears quickly while keeping both
hands on the steering wheel.
If the shift paddles on the steering wheel are
used to shift gears in automatic mode, the
transmission temporarily switches to manual
mode.
If the shift paddles are not used and the vehicle
is not accelerated for a certain time, the sysâ
tem switches back into automatic mode if the
selector lever is in transmission position D.
âˇShift up: pull right shift paddle.âˇShift down: pull left shift paddle.
Gears will only be shifted at appropriate engine
and road speeds, e.g., downshifting is not posâ
sible if the engine speed is too high.
The selected gear is briefly displayed in the inâ
strument cluster, followed by the current gear.
Displays in the instrument cluster The transmission position is disâ
played, e.g.: P.
Seite 78ControlsDriving78
Online Edition for Part no. 01 40 2 909 749 - VI/13
Page 83 of 255
DisplaysVehicle equipmentAll standard, country-specific and optional
equipment that is offered in the model series is
described in this chapter. Therefore, equipâment is also described that is not available in a
vehicle, e. g., because of the selected optional
equipment or country variant. This also applies
for safety-related functions and systems.
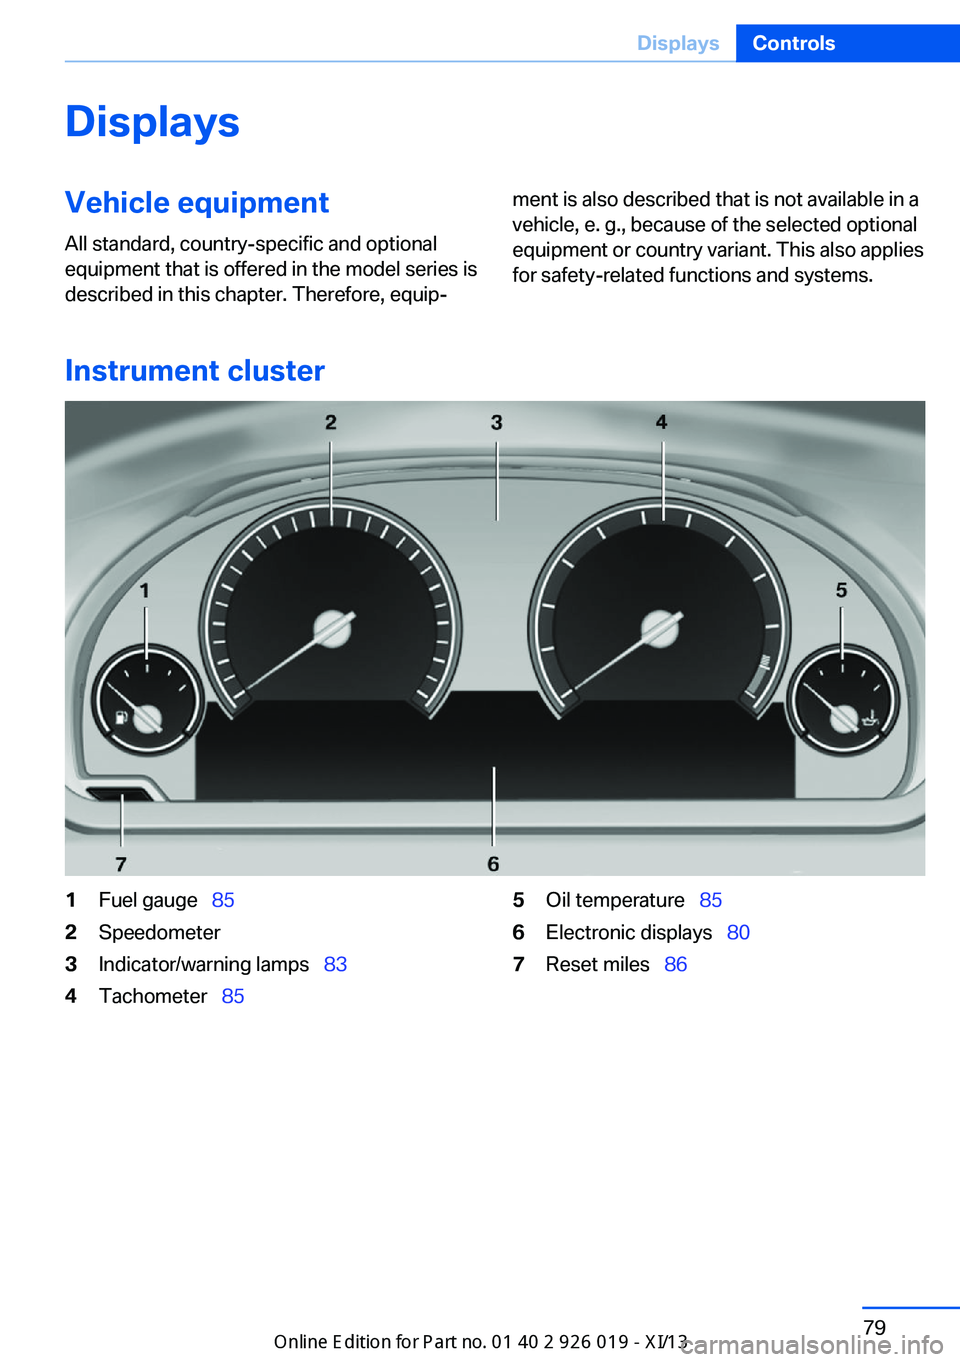
Instrument cluster
1Fuel gaugeââ
852Speedometer3Indicator/warning lampsââ
834Tachometerââ
855Oil temperatureââ
856Electronic displaysââ
807Reset milesââ
86Seite 79DisplaysControls79
Online Edition for Part no. 01 40 2 909 749 - VI/13
Page 84 of 255
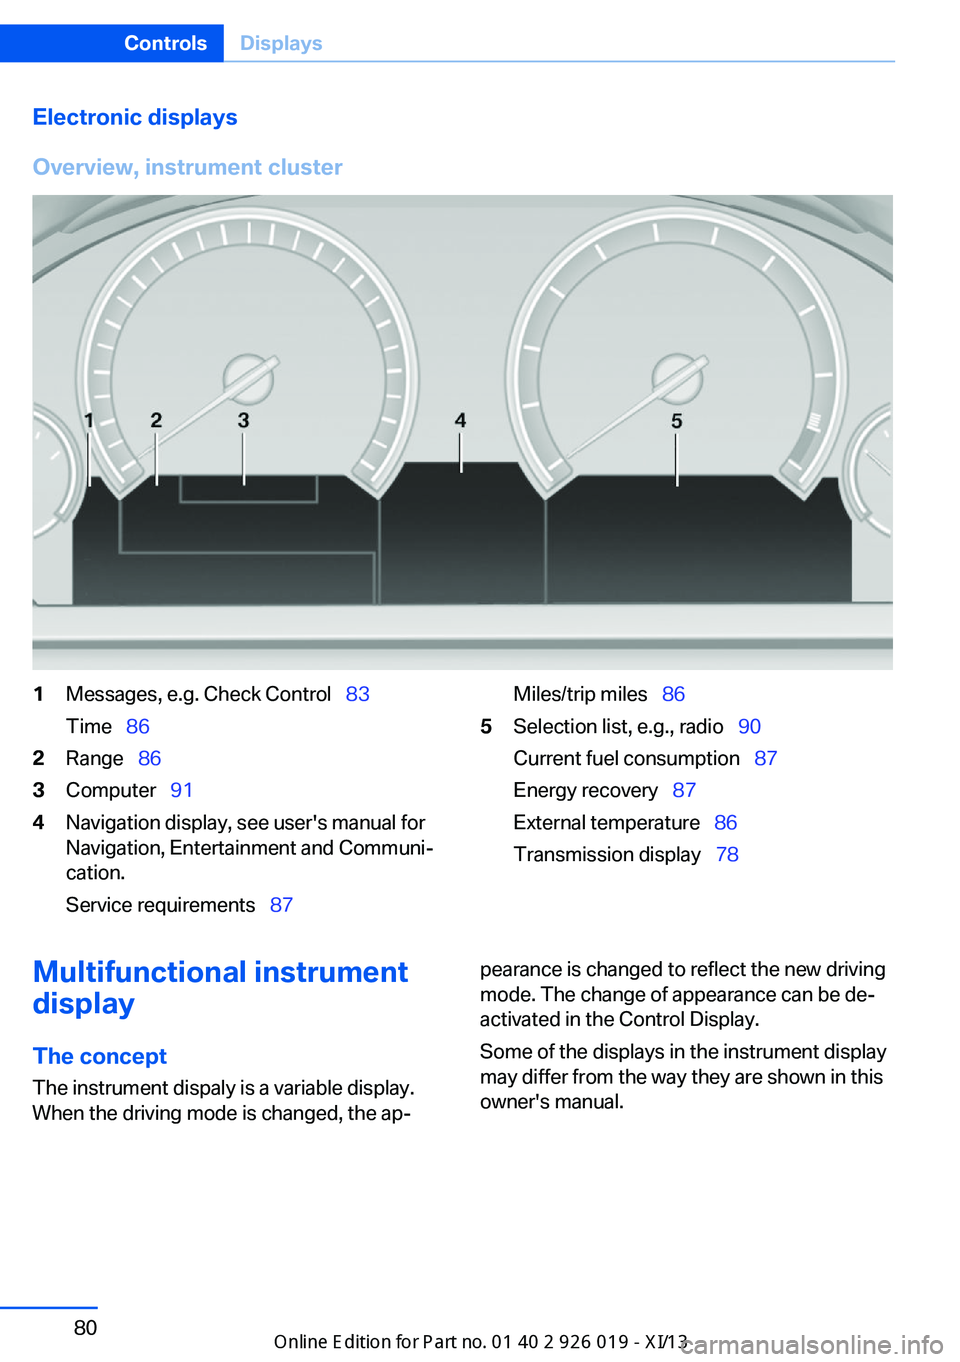
Electronic displays
Overview, instrument cluster1Messages, e.g. Check Controlââ
83
Timeââ
862Rangeââ
863Computerââ
914Navigation display, see user's manual for
Navigation, Entertainment and Communiâ
cation.
Service requirementsââ
87Miles/trip milesââ
865Selection list, e.g., radioââ
90
Current fuel consumptionââ
87
Energy recoveryââ
87
External temperatureââ
86
Transmission displayââ
78Multifunctional instrument
display
The concept The instrument dispaly is a variable display.
When the driving mode is changed, the apâpearance is changed to reflect the new driving
mode. The change of appearance can be deâ
activated in the Control Display.
Some of the displays in the instrument display
may differ from the way they are shown in this
owner's manual.Seite 80ControlsDisplays80
Online Edition for Part no. 01 40 2 909 749 - VI/13
Page 85 of 255
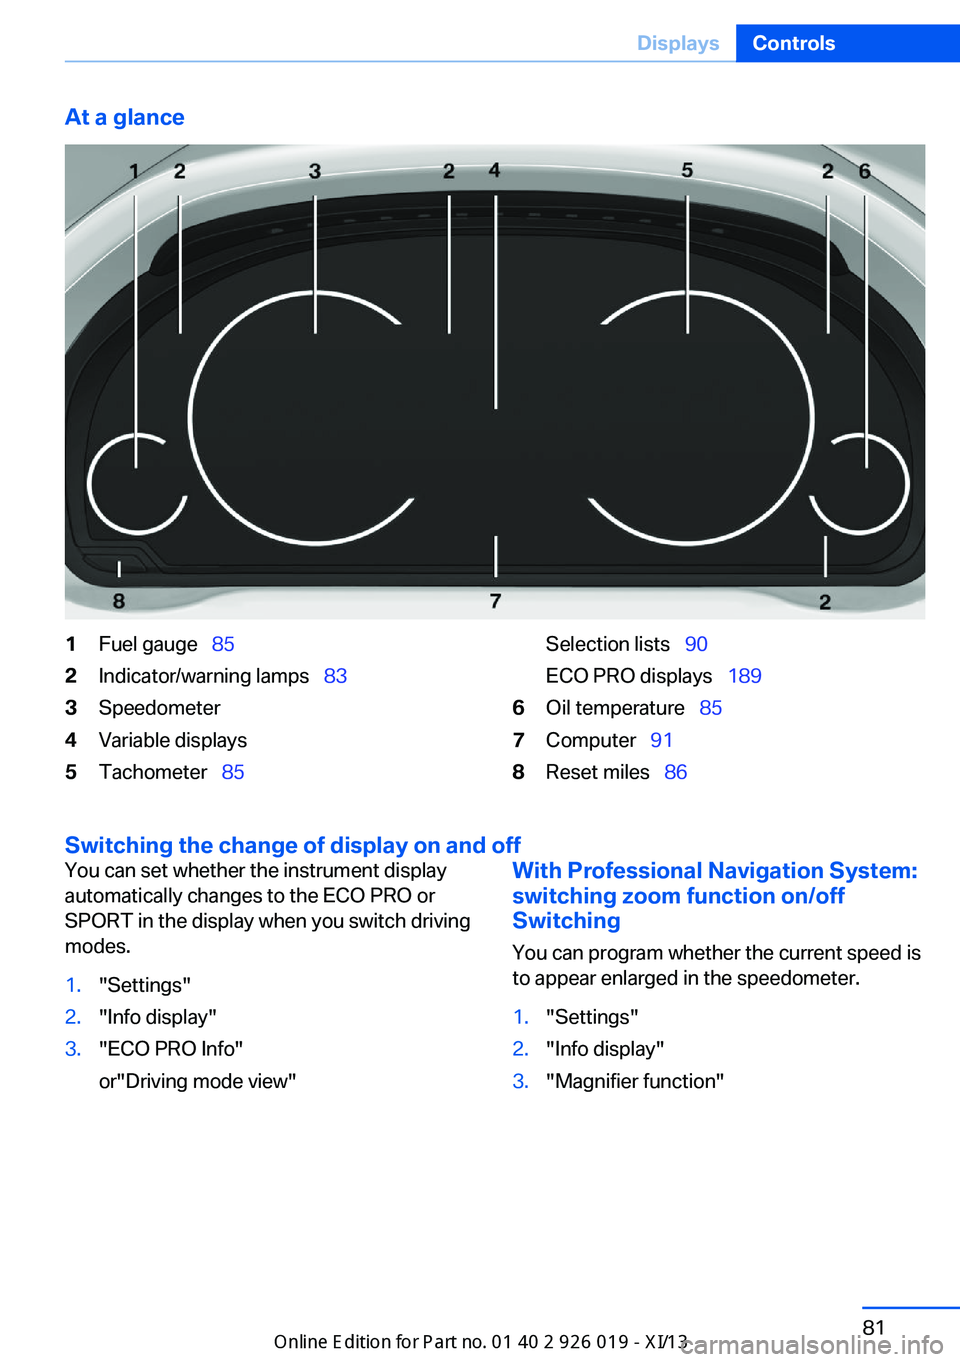
At a glance1Fuel gaugeââ
852Indicator/warning lampsââ
833Speedometer4Variable displays5Tachometerââ
85Selection listsââ
90
ECO PRO displaysââ
1896Oil temperatureââ
857Computerââ
918Reset milesââ
86
Switching the change of display on and off
You can set whether the instrument display
automatically changes to the ECO PRO or
SPORT in the display when you switch driving
modes.1."Settings"2."Info display"3."ECO PRO Info"
or"Driving mode view"With Professional Navigation System:
switching zoom function on/off
Switching
You can program whether the current speed is
to appear enlarged in the speedometer.1."Settings"2."Info display"3."Magnifier function"Seite 81DisplaysControls81
Online Edition for Part no. 01 40 2 909 749 - VI/13
Page 86 of 255
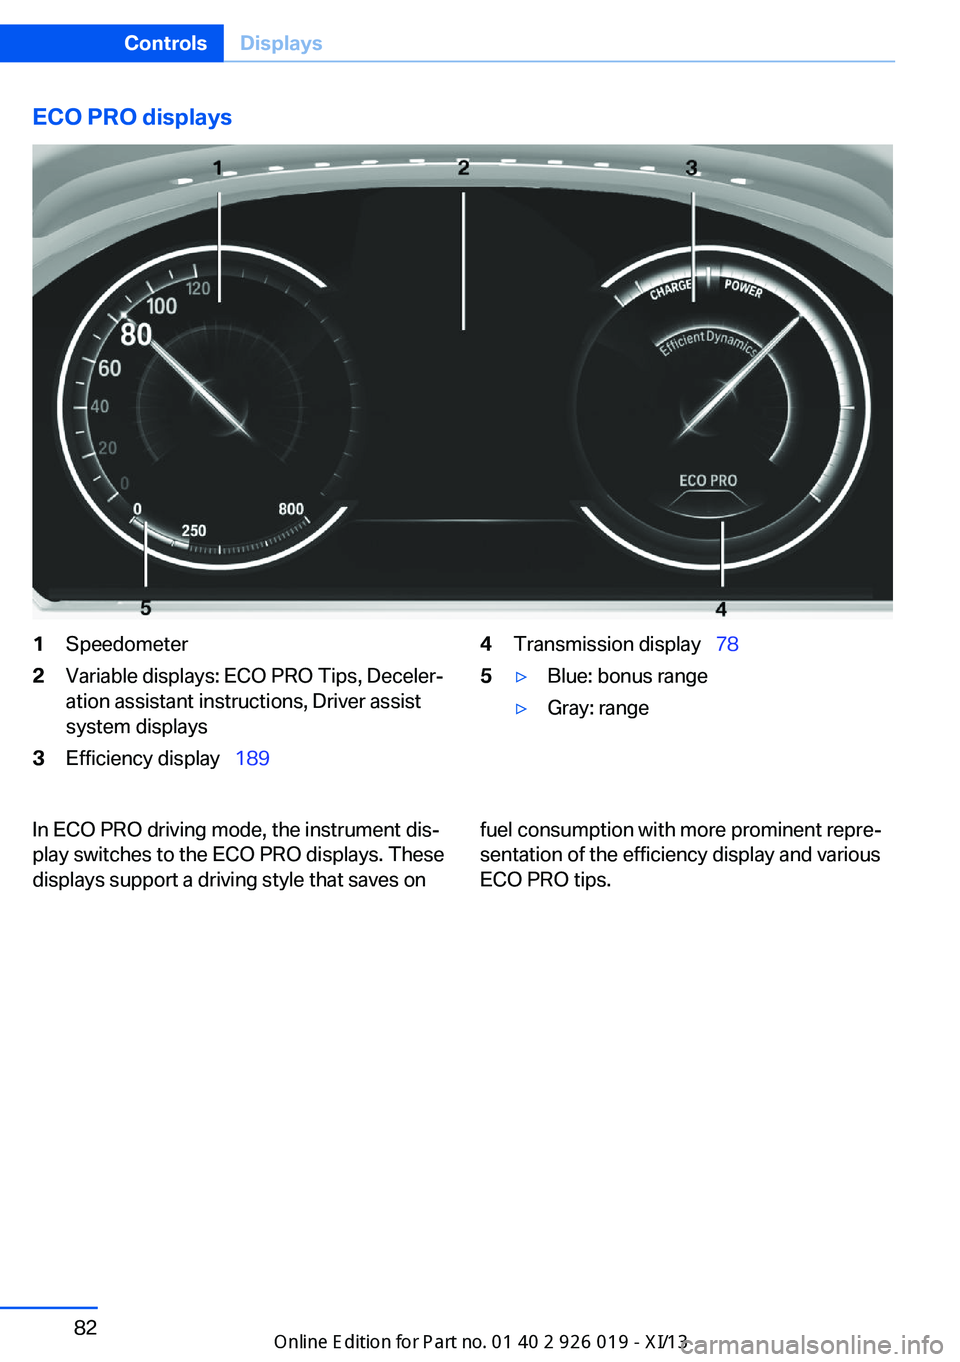
ECO PRO displays1Speedometer2Variable displays: ECO PRO Tips, Decelerâ
ation assistant instructions, Driver assist
system displays3Efficiency displayââ
1894Transmission displayââ
785âˇBlue: bonus rangeâˇGray: rangeIn ECO PRO driving mode, the instrument disâ
play switches to the ECO PRO displays. These
displays support a driving style that saves onfuel consumption with more prominent repreâ
sentation of the efficiency display and various
ECO PRO tips.Seite 82ControlsDisplays82
Online Edition for Part no. 01 40 2 909 749 - VI/13
Page 87 of 255
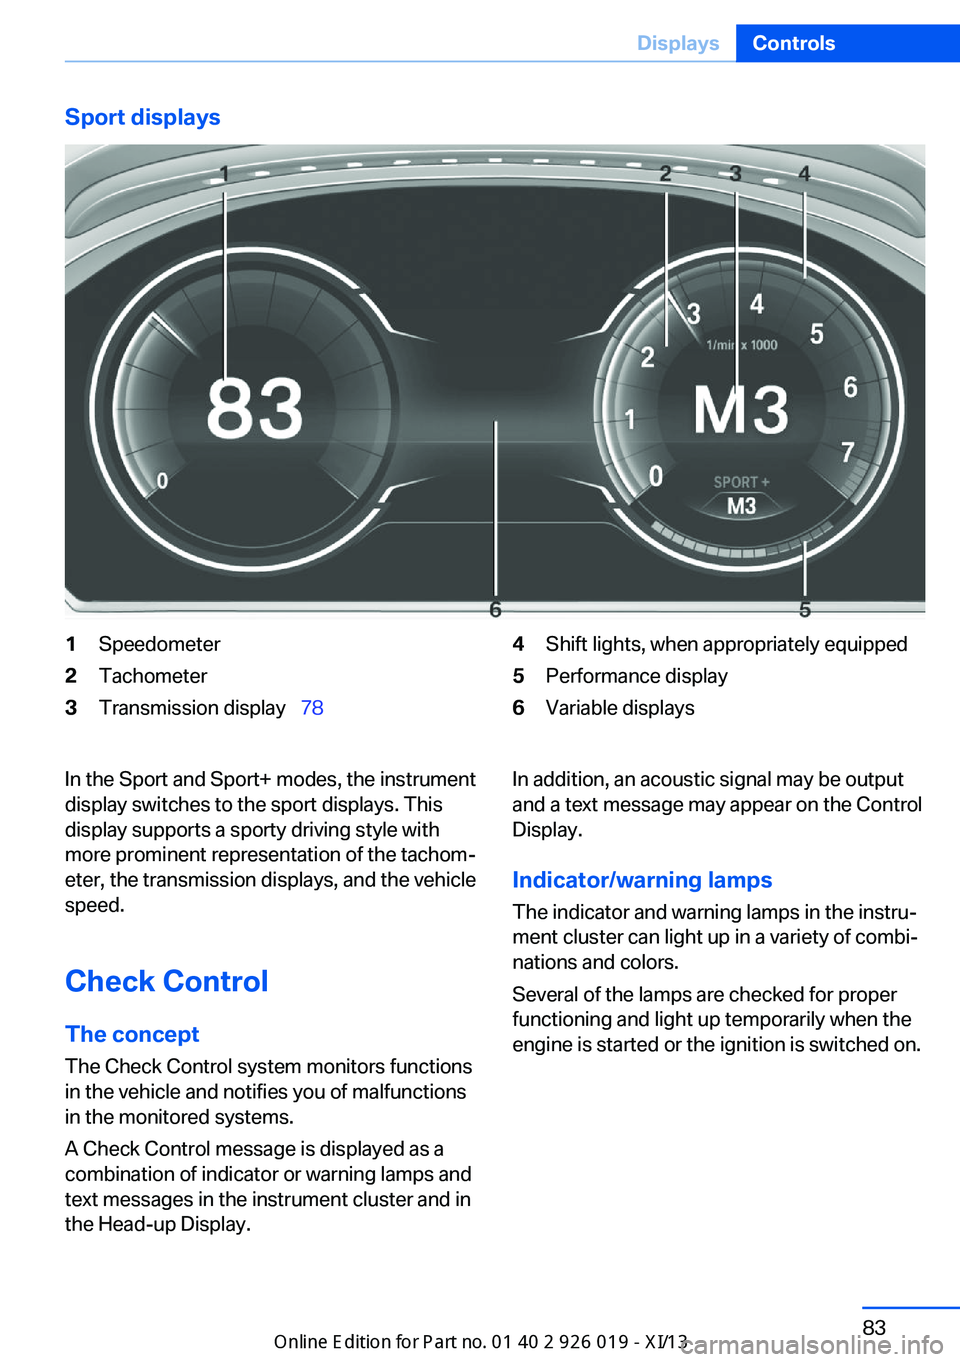
Sport displays1Speedometer2Tachometer3Transmission displayââ
784Shift lights, when appropriately equipped5Performance display6Variable displaysIn the Sport and Sport+ modes, the instrument
display switches to the sport displays. This
display supports a sporty driving style with
more prominent representation of the tachomâ
eter, the transmission displays, and the vehicle
speed.
Check Control
The concept The Check Control system monitors functions
in the vehicle and notifies you of malfunctions
in the monitored systems.
A Check Control message is displayed as a
combination of indicator or warning lamps and
text messages in the instrument cluster and in
the Head-up Display.In addition, an acoustic signal may be output and a text message may appear on the Control
Display.
Indicator/warning lamps
The indicator and warning lamps in the instruâ
ment cluster can light up in a variety of combiâ
nations and colors.
Several of the lamps are checked for proper
functioning and light up temporarily when the
engine is started or the ignition is switched on.Seite 83DisplaysControls83
Online Edition for Part no. 01 40 2 909 749 - VI/13
Page 88 of 255
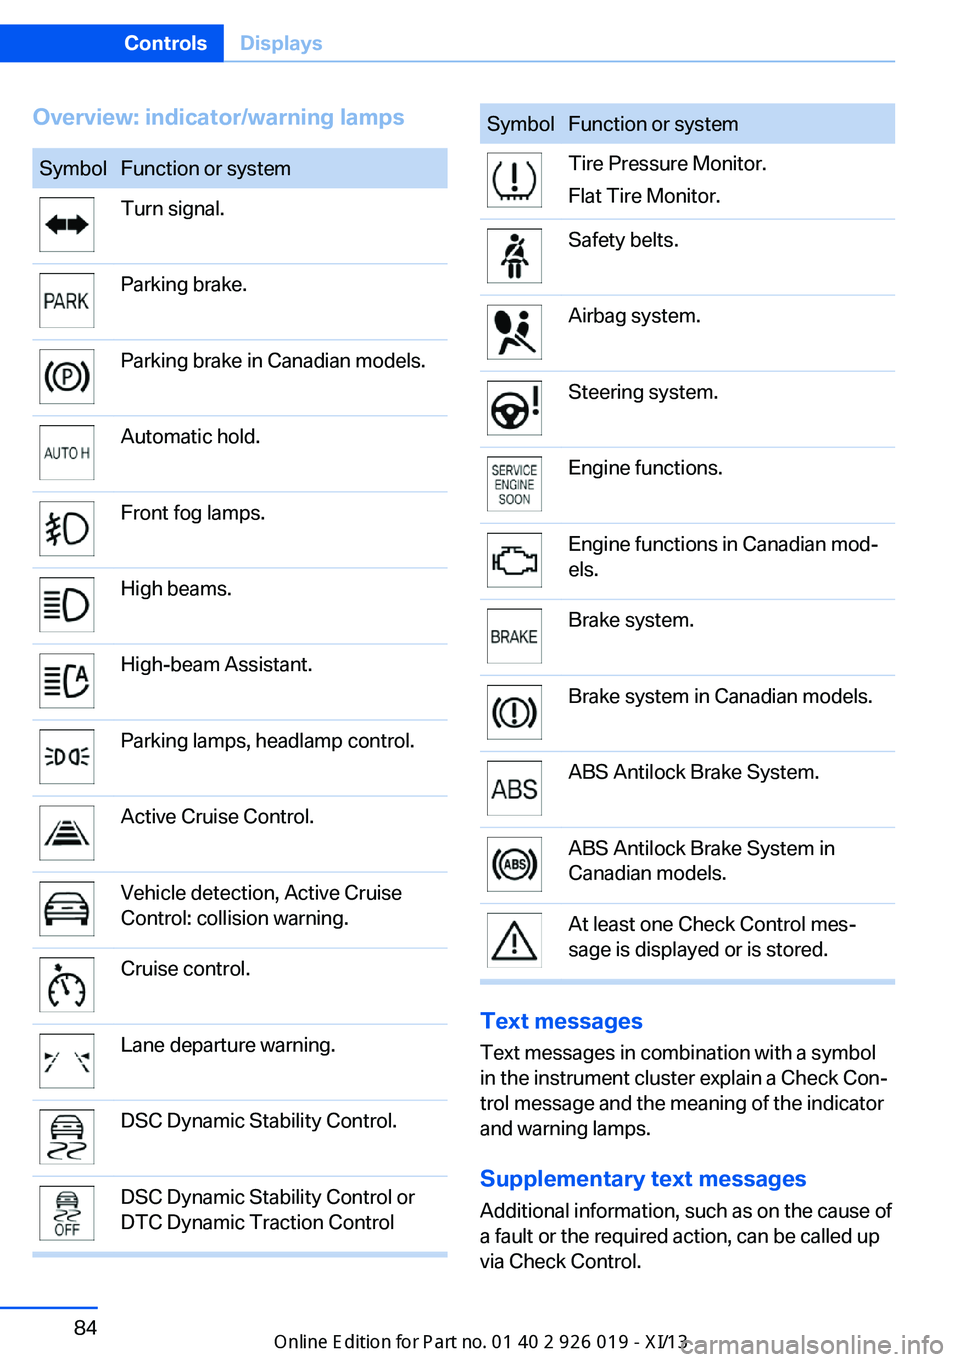
Overview: indicator/warning lampsSymbolFunction or systemTurn signal.Parking brake.Parking brake in Canadian models.Automatic hold.Front fog lamps.High beams.High-beam Assistant.Parking lamps, headlamp control.Active Cruise Control.Vehicle detection, Active Cruise
Control: collision warning.Cruise control.Lane departure warning.DSC Dynamic Stability Control.DSC Dynamic Stability Control or
DTC Dynamic Traction ControlSymbolFunction or systemTire Pressure Monitor.
Flat Tire Monitor.Safety belts.Airbag system.Steering system.Engine functions.Engine functions in Canadian modâ
els.Brake system.Brake system in Canadian models.ABS Antilock Brake System.ABS Antilock Brake System in
Canadian models.At least one Check Control mesâ
sage is displayed or is stored.
Text messages
Text messages in combination with a symbol
in the instrument cluster explain a Check Conâ trol message and the meaning of the indicator
and warning lamps.
Supplementary text messages
Additional information, such as on the cause of
a fault or the required action, can be called up
via Check Control.
Seite 84ControlsDisplays84
Online Edition for Part no. 01 40 2 909 749 - VI/13
Page 89 of 255
The supplementary text of urgent messages is
automatically displayed on the Control Display.
Symbols
Depending on the Check Control message, the
following functions can be selected.⡠"Owner's Manual"
Display additional information about the
Check Control message in the Integrated
Owner's Manual.⡠"Service request"
Contact the service partner.⡠"Roadside Assistance"
Contact Roadside Assistance.
Hiding Check Control messages
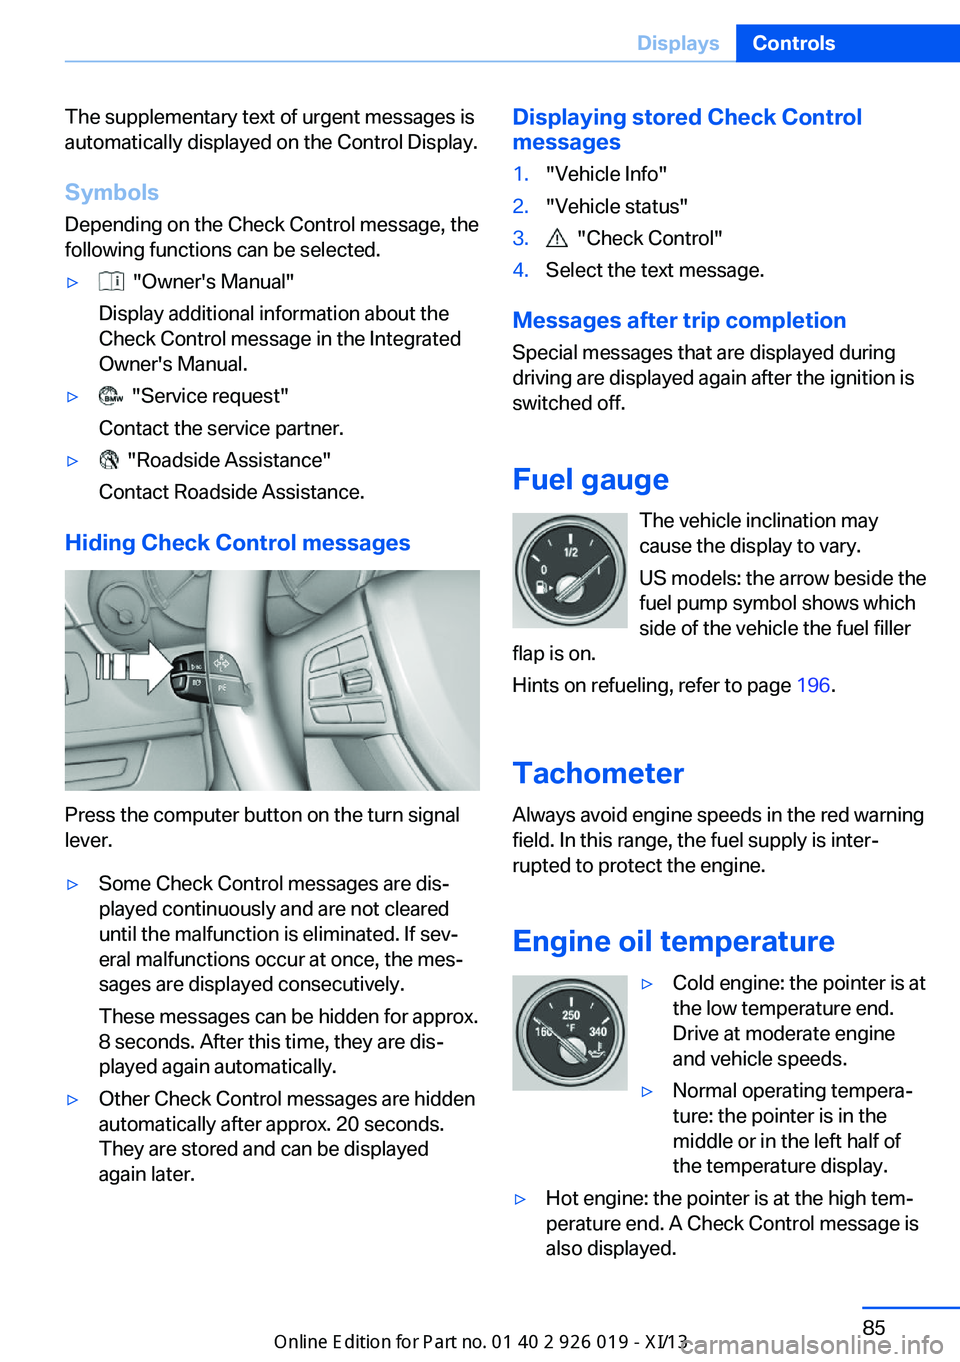
Press the computer button on the turn signal
lever.
âˇSome Check Control messages are disâ
played continuously and are not cleared
until the malfunction is eliminated. If sevâ
eral malfunctions occur at once, the mesâ
sages are displayed consecutively.
These messages can be hidden for approx.
8 seconds. After this time, they are disâ
played again automatically.âˇOther Check Control messages are hidden
automatically after approx. 20 seconds.
They are stored and can be displayed
again later.Displaying stored Check Control
messages1."Vehicle Info"2."Vehicle status"3. "Check Control"4.Select the text message.
Messages after trip completion
Special messages that are displayed during
driving are displayed again after the ignition is
switched off.
Fuel gauge The vehicle inclination may
cause the display to vary.
US models: the arrow beside the
fuel pump symbol shows which
side of the vehicle the fuel filler
flap is on.
Hints on refueling, refer to page 196.
Tachometer
Always avoid engine speeds in the red warning
field. In this range, the fuel supply is interâ
rupted to protect the engine.
Engine oil temperature
âˇCold engine: the pointer is at
the low temperature end.
Drive at moderate engine
and vehicle speeds.âˇNormal operating temperaâ
ture: the pointer is in the
middle or in the left half of
the temperature display.âˇHot engine: the pointer is at the high temâ
perature end. A Check Control message is
also displayed.Seite 85DisplaysControls85
Online Edition for Part no. 01 40 2 909 749 - VI/13
Page 90 of 255
Coolant temperatureIf the coolant along with the engine becomes
too hot, a Check Control message is displayed.
Check the coolant level, refer to page 215.
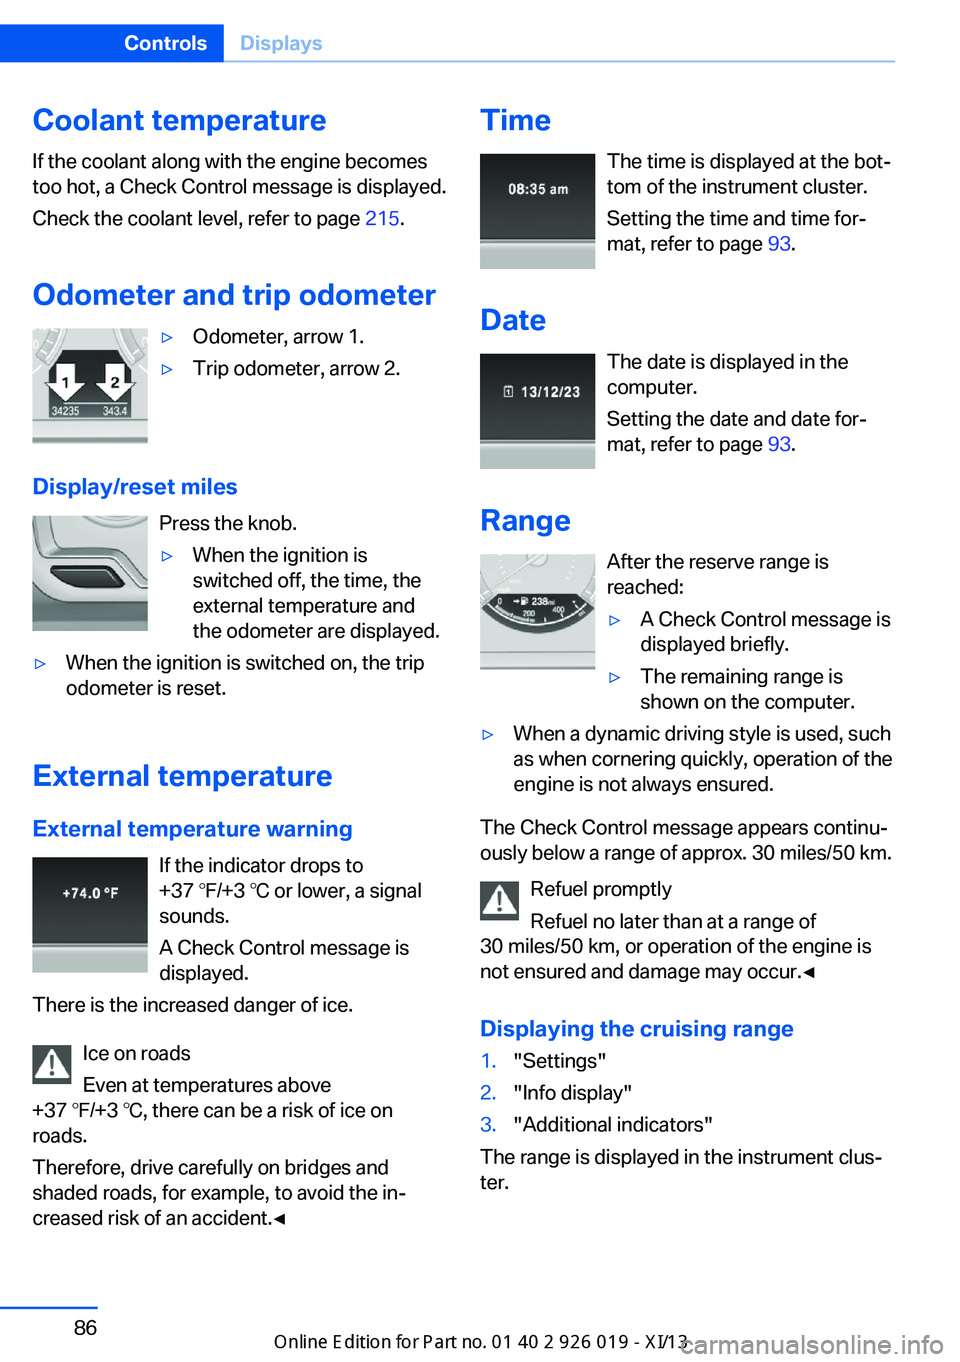
Odometer and trip odometerâˇOdometer, arrow 1.âˇTrip odometer, arrow 2.
Display/reset miles Press the knob.
âˇWhen the ignition is
switched off, the time, the
external temperature and
the odometer are displayed.âˇWhen the ignition is switched on, the trip
odometer is reset.
External temperature
External temperature warning If the indicator drops to
+37 â/+3 â or lower, a signal
sounds.
A Check Control message is displayed.
There is the increased danger of ice.
Ice on roads
Even at temperatures above
+37 â/+3 â, there can be a risk of ice on
roads.
Therefore, drive carefully on bridges and
shaded roads, for example, to avoid the inâ
creased risk of an accident.â
Time
The time is displayed at the botâ
tom of the instrument cluster.
Setting the time and time forâ
mat, refer to page 93.
Date The date is displayed in the
computer.
Setting the date and date forâ
mat, refer to page 93.
Range After the reserve range isreached:âˇA Check Control message is
displayed briefly.âˇThe remaining range is
shown on the computer.âˇWhen a dynamic driving style is used, such
as when cornering quickly, operation of the
engine is not always ensured.
The Check Control message appears continuâ
ously below a range of approx. 30 miles/50 km.
Refuel promptly
Refuel no later than at a range of
30 miles/50 km, or operation of the engine is
not ensured and damage may occur.â
Displaying the cruising range
1."Settings"2."Info display"3."Additional indicators"
The range is displayed in the instrument clusâ
ter.
Seite 86ControlsDisplays86
Online Edition for Part no. 01 40 2 909 749 - VI/13