low beam BMW 7 SERIES 2016 G12 Owner's Manual
[x] Cancel search | Manufacturer: BMW, Model Year: 2016, Model line: 7 SERIES, Model: BMW 7 SERIES 2016 G12Pages: 314, PDF Size: 7.9 MB
Page 15 of 314
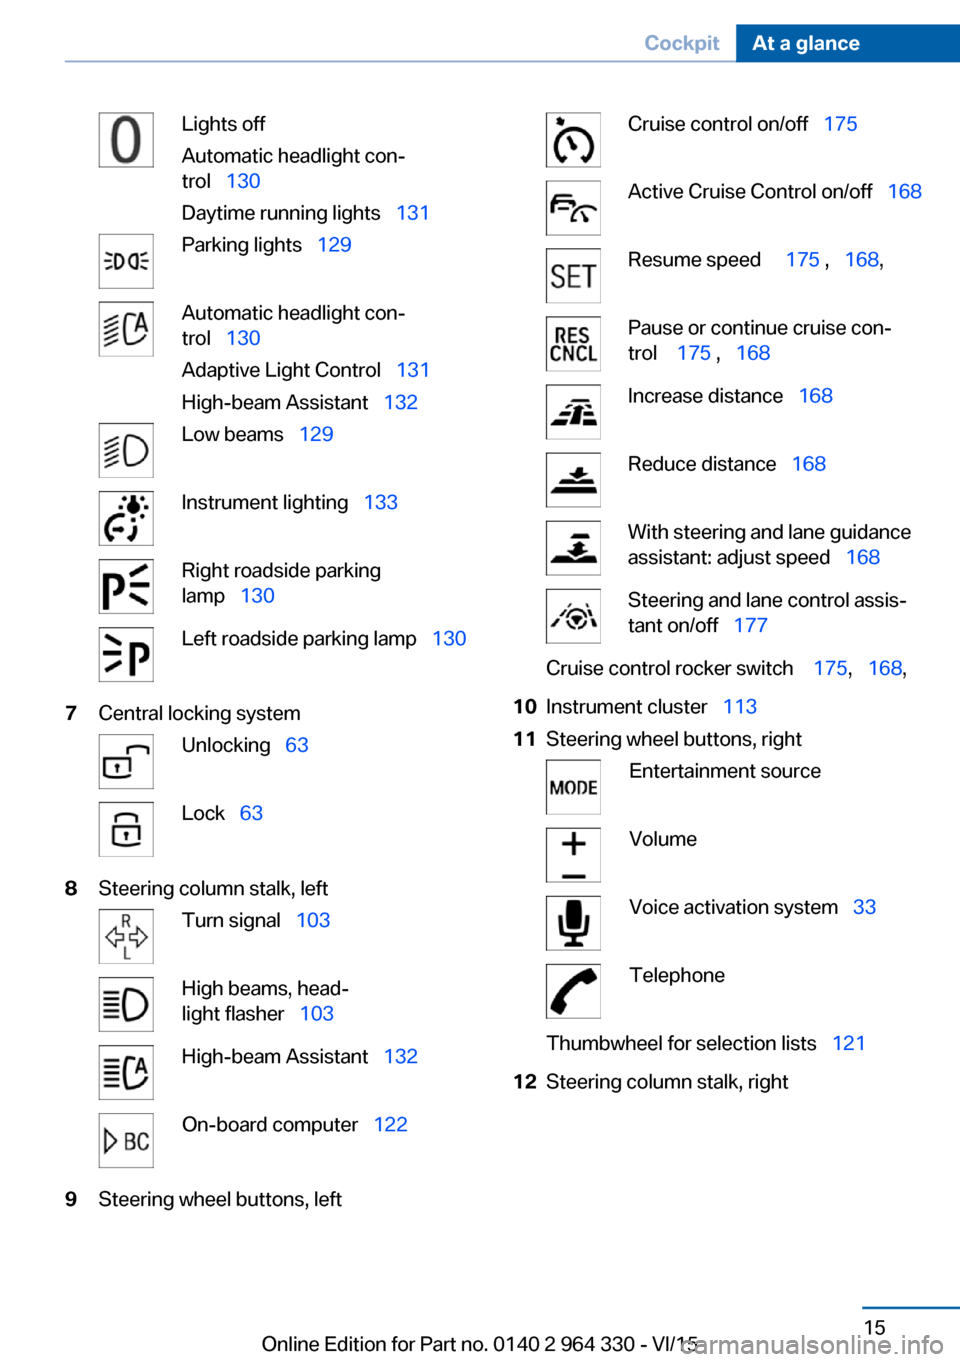
Lights off
Automatic headlight con‐
trol 130
Daytime running lights 131Parking lights 129Automatic headlight con‐
trol 130
Adaptive Light Control 131
High-beam Assistant 132Low beams 129Instrument lighting 133Right roadside parking
lamp 130Left roadside parking lamp 1307Central locking systemUnlocking 63Lock 638Steering column stalk, leftTurn signal 103High beams, head‐
light flasher 103High-beam Assistant 132On-board computer 1229Steering wheel buttons, leftCruise control on/off 175Active Cruise Control on/off 168Resume speed 175 , 168 ,Pause or continue cruise con‐
trol 175 , 168Increase distance 168Reduce distance 168With steering and lane guidance
assistant: adjust speed 168Steering and lane control assis‐
tant on/off 177Cruise control rocker switch 175, 168 ,10Instrument cluster 11311Steering wheel buttons, rightEntertainment sourceVolumeVoice activation system 33TelephoneThumbwheel for selection lists 12112Steering column stalk, rightSeite 15CockpitAt a glance15
Online Edition for Part no. 0140 2 964 330 - VI/15
Page 116 of 314
▷Interference through systems or devices
with the same radio frequency: After leav‐
ing the area of the interference, the system
automatically becomes active again.▷TPM could not conclude the reset: perform
the reset of the system again.▷A wheel without TPM electronics is
mounted: Have it checked by a dealer’s
service center or another qualified service
center or repair shop as needed.▷Malfunction: Have system checked imme‐
diately by a dealer’s service center or an‐
other qualified service center or repair
shop.
For more information, see Tire Pressure Moni‐
tor, refer to page 264.
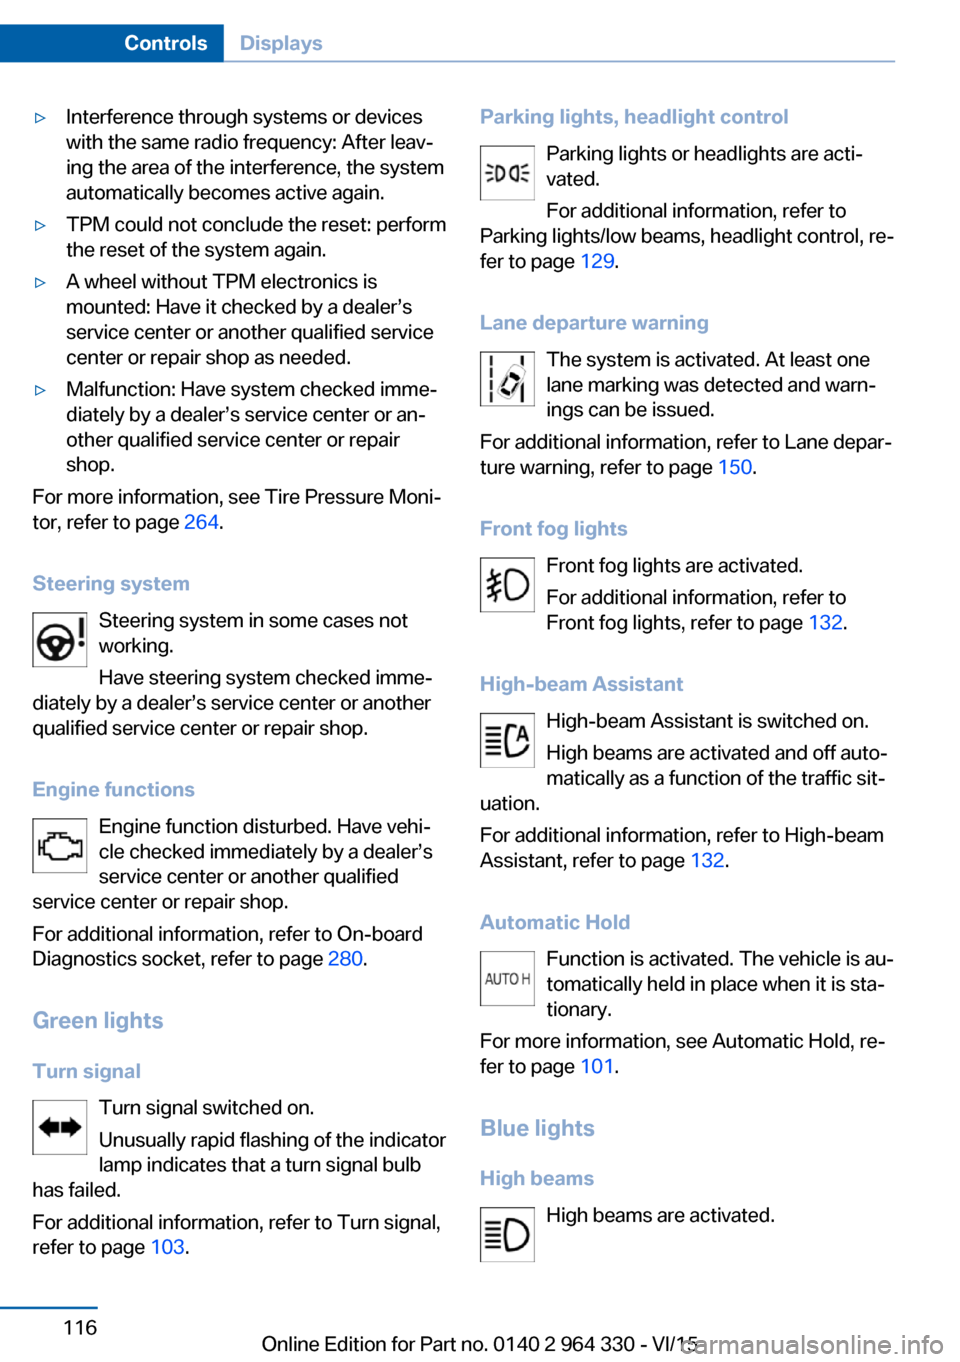
Steering system Steering system in some cases not
working.
Have steering system checked imme‐
diately by a dealer’s service center or another
qualified service center or repair shop.
Engine functions Engine function disturbed. Have vehi‐
cle checked immediately by a dealer’s
service center or another qualified
service center or repair shop.
For additional information, refer to On-board
Diagnostics socket, refer to page 280.
Green lights Turn signal Turn signal switched on.
Unusually rapid flashing of the indicator
lamp indicates that a turn signal bulb
has failed.
For additional information, refer to Turn signal,
refer to page 103.
Parking lights, headlight control
Parking lights or headlights are acti‐
vated.
For additional information, refer to
Parking lights/low beams, headlight control, re‐
fer to page 129.
Lane departure warning The system is activated. At least one
lane marking was detected and warn‐
ings can be issued.
For additional information, refer to Lane depar‐
ture warning, refer to page 150.
Front fog lights Front fog lights are activated.
For additional information, refer to
Front fog lights, refer to page 132.
High-beam Assistant High-beam Assistant is switched on.
High beams are activated and off auto‐
matically as a function of the traffic sit‐
uation.
For additional information, refer to High-beam
Assistant, refer to page 132.
Automatic Hold Function is activated. The vehicle is au‐
tomatically held in place when it is sta‐
tionary.
For more information, see Automatic Hold, re‐
fer to page 101.
Blue lights
High beams High beams are activated.Seite 116ControlsDisplays116
Online Edition for Part no. 0140 2 964 330 - VI/15
Page 117 of 314
For additional information, refer to High
beams, refer to page 103.
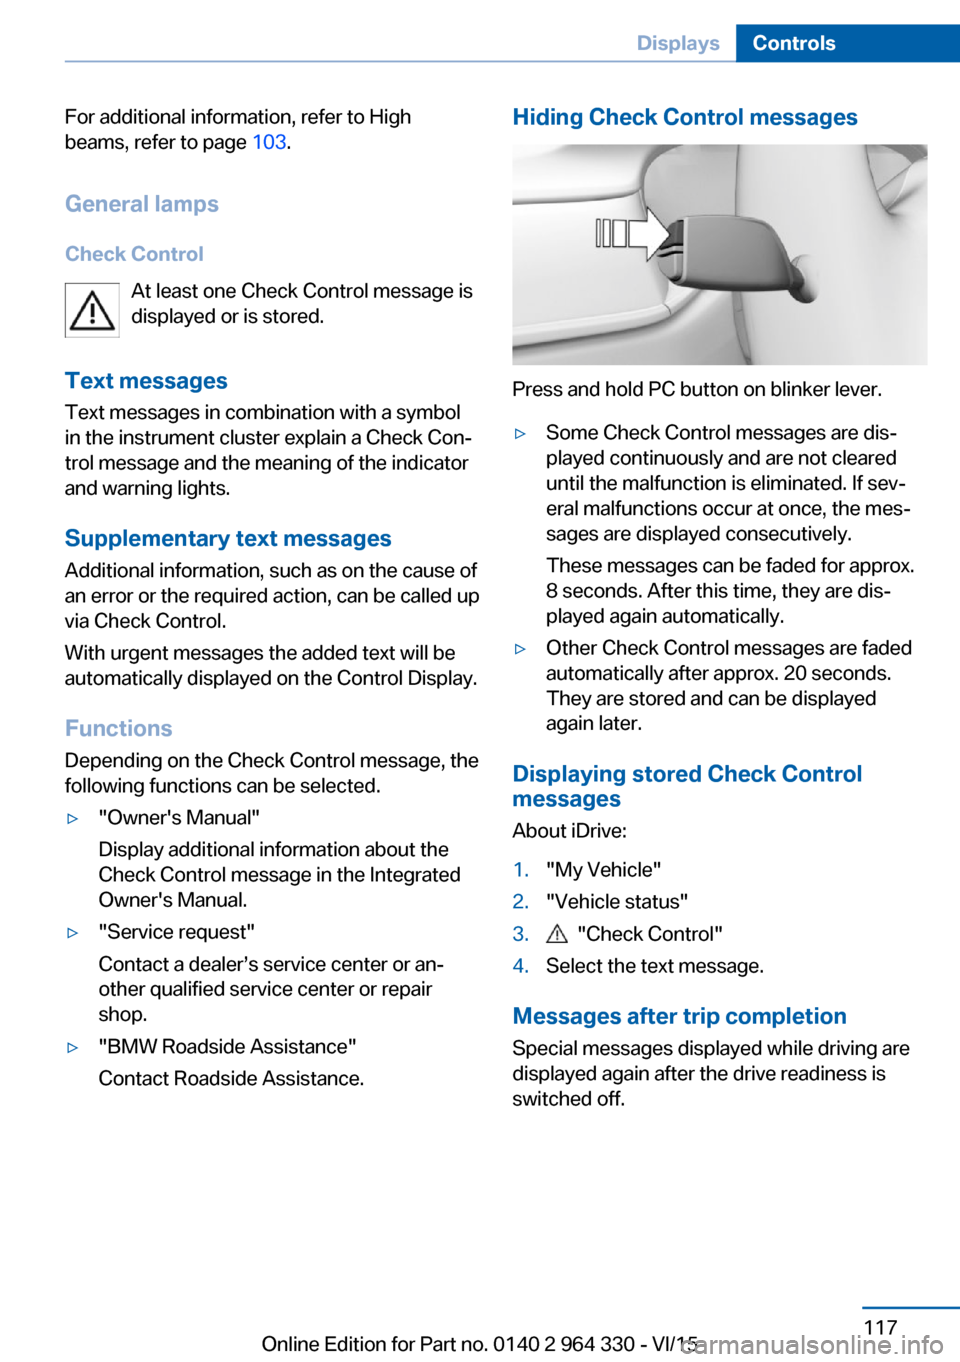
General lamps Check Control At least one Check Control message is
displayed or is stored.
Text messages
Text messages in combination with a symbol
in the instrument cluster explain a Check Con‐
trol message and the meaning of the indicator
and warning lights.
Supplementary text messages
Additional information, such as on the cause of
an error or the required action, can be called up
via Check Control.
With urgent messages the added text will be
automatically displayed on the Control Display.
Functions Depending on the Check Control message, the
following functions can be selected.▷"Owner's Manual"
Display additional information about the
Check Control message in the Integrated
Owner's Manual.▷"Service request"
Contact a dealer’s service center or an‐
other qualified service center or repair
shop.▷"BMW Roadside Assistance"
Contact Roadside Assistance.Hiding Check Control messages
Press and hold PC button on blinker lever.
▷Some Check Control messages are dis‐
played continuously and are not cleared
until the malfunction is eliminated. If sev‐
eral malfunctions occur at once, the mes‐
sages are displayed consecutively.
These messages can be faded for approx.
8 seconds. After this time, they are dis‐
played again automatically.▷Other Check Control messages are faded
automatically after approx. 20 seconds.
They are stored and can be displayed
again later.
Displaying stored Check Control
messages
About iDrive:
1."My Vehicle"2."Vehicle status"3. "Check Control"4.Select the text message.
Messages after trip completion Special messages displayed while driving are
displayed again after the drive readiness is
switched off.
Seite 117DisplaysControls117
Online Edition for Part no. 0140 2 964 330 - VI/15
Page 127 of 314
If the image is distorted, have the basic set‐
tings checked by a dealer’s service center or
another qualified service center or repair shop.
Switching on/off
About iDrive:1."My Vehicle"2."System settings"3."Displays"4."Head-Up Display"5."Head-Up Display"
Display
Overview
The following information is displayed on the
Head-up Display:
▷Speed.▷Navigation system.▷Check Control messages.▷Selection list in the instrument cluster.▷Driver assistance systems.
Some of this information is only displayed
briefly as needed.
Selecting displays in the Head-up
Display
About iDrive:
1."My Vehicle"2."System settings"3."Displays"4."Head-Up Display"5.Select desired setting.
The setting is stored for the drive profile cur‐
rently used.
View Three different views are available for the
Head-up Display:
About iDrive:1."My Vehicle"2."System settings"3."Displays"4."Head-Up Display"5.Select desired setting.▷"STANDARD": all displays in the Head-
up Display are active.▷"REDUCED": the displays in the Head- up Display are reduced to the absolute
necessary.▷"INDIVIDUAL": all displays in the Head-
up Display are active. Individual dis‐
plays, e.g. Check Control messages,
can be individually configured.
The setting is stored for the drive profile cur‐
rently used.
Setting the brightness The brightness is automatically adjusted to the
ambient brightness.
The basic setting can be adjusted manually.
About iDrive:
1."My Vehicle"2."System settings"3."Displays"4."Head-Up Display"5."Brightness"6.Turn the controller until the desired bright‐
ness is set.7.Press the controller.
When the low beams are activated, the bright‐
ness of the Head-up Display can be addition‐
ally influenced using the instrument lighting.
The setting is stored for the drive profile cur‐
rently used.
Seite 127DisplaysControls127
Online Edition for Part no. 0140 2 964 330 - VI/15
Page 129 of 314
LightsVehicle features and optionsThis chapter describes all standard, country-
specific and optional features offered with the
series. It also describes features that are not
necessarily available in your car, e. g., due to
the selected options or country versions. This
also applies to safety-related functions and
systems. The respectively applicable country
provisions must be observed when using the
respective features and systems.
Overview Switches in the vehicle
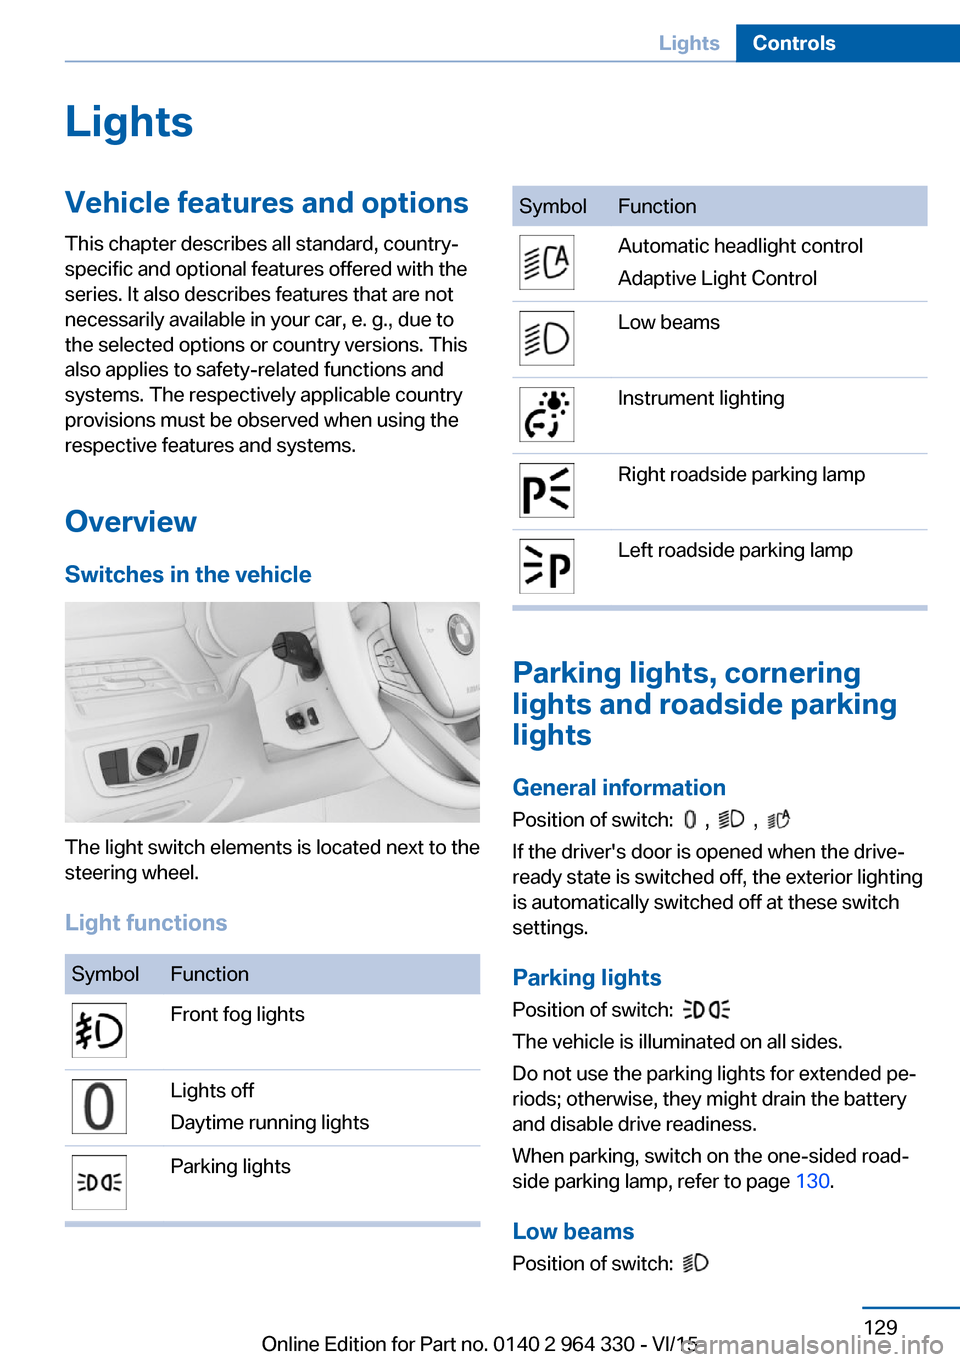
The light switch elements is located next to the
steering wheel.
Light functions
SymbolFunctionFront fog lightsLights off
Daytime running lightsParking lightsSymbolFunctionAutomatic headlight control
Adaptive Light ControlLow beamsInstrument lightingRight roadside parking lampLeft roadside parking lamp
Parking lights, cornering
lights and roadside parking
lights
General information Position of switch:
, ,
If the driver's door is opened when the drive-
ready state is switched off, the exterior lighting
is automatically switched off at these switch
settings.
Parking lights
Position of switch:
The vehicle is illuminated on all sides.
Do not use the parking lights for extended pe‐
riods; otherwise, they might drain the battery
and disable drive readiness.
When parking, switch on the one-sided road‐
side parking lamp, refer to page 130.
Low beams Position of switch:
Seite 129LightsControls129
Online Edition for Part no. 0140 2 964 330 - VI/15
Page 130 of 314
The low beams light up when the drive-ready
state is switched on.
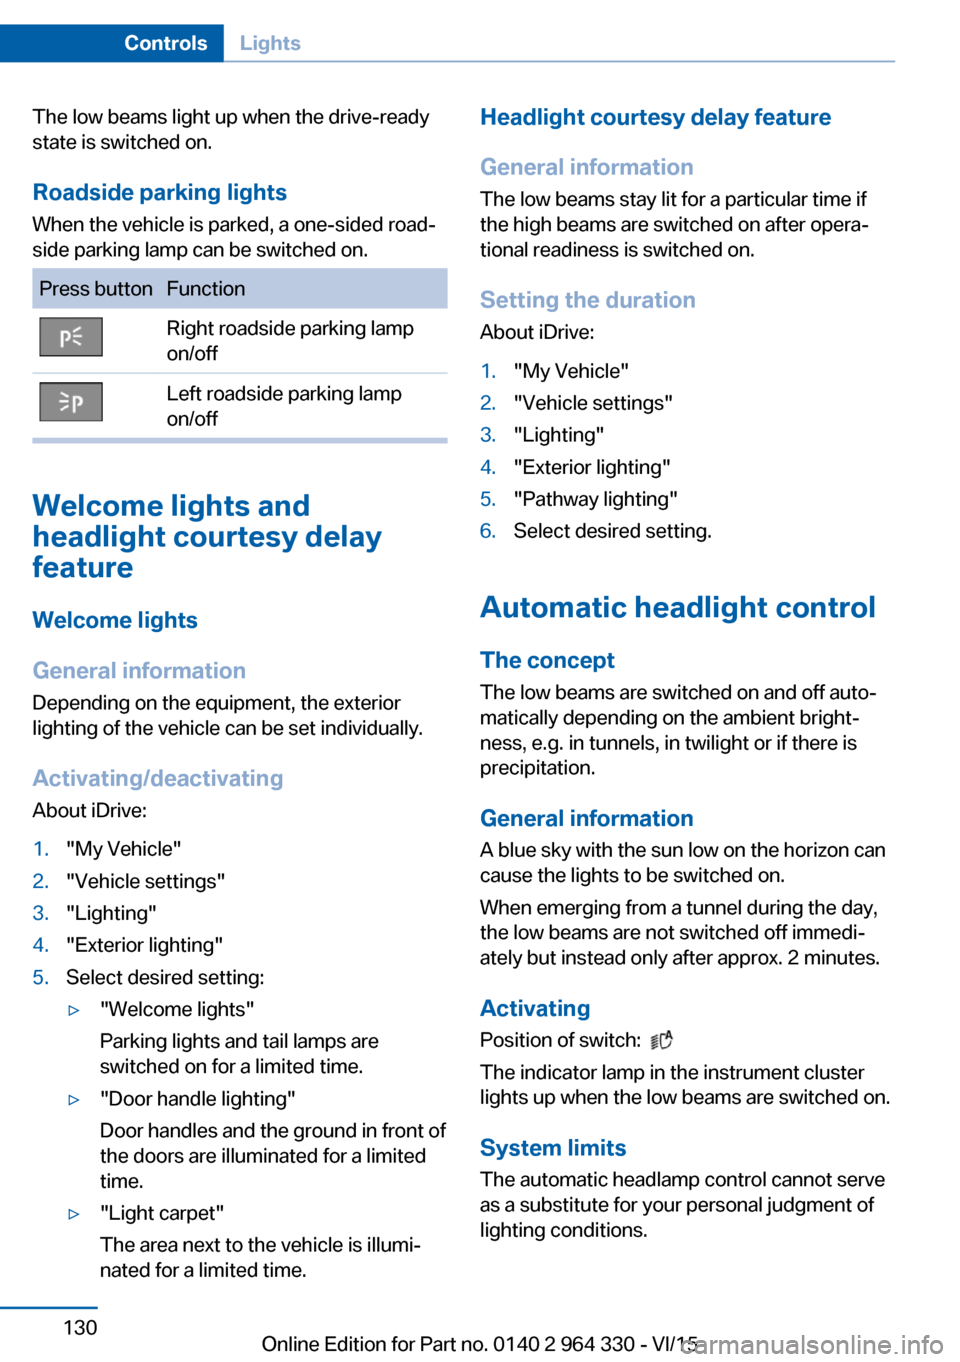
Roadside parking lights When the vehicle is parked, a one-sided road‐
side parking lamp can be switched on.Press buttonFunctionRight roadside parking lamp
on/offLeft roadside parking lamp
on/off
Welcome lights and
headlight courtesy delay
feature
Welcome lights
General information
Depending on the equipment, the exterior
lighting of the vehicle can be set individually.
Activating/deactivating About iDrive:
1."My Vehicle"2."Vehicle settings"3."Lighting"4."Exterior lighting"5.Select desired setting:▷"Welcome lights"
Parking lights and tail lamps are
switched on for a limited time.▷"Door handle lighting"
Door handles and the ground in front of
the doors are illuminated for a limited
time.▷"Light carpet"
The area next to the vehicle is illumi‐
nated for a limited time.Headlight courtesy delay feature
General information
The low beams stay lit for a particular time if
the high beams are switched on after opera‐
tional readiness is switched on.
Setting the duration
About iDrive:1."My Vehicle"2."Vehicle settings"3."Lighting"4."Exterior lighting"5."Pathway lighting"6.Select desired setting.
Automatic headlight control
The concept
The low beams are switched on and off auto‐
matically depending on the ambient bright‐
ness, e.g. in tunnels, in twilight or if there is
precipitation.
General information
A blue sky with the sun low on the horizon can
cause the lights to be switched on.
When emerging from a tunnel during the day,
the low beams are not switched off immedi‐
ately but instead only after approx. 2 minutes.
ActivatingPosition of switch:
The indicator lamp in the instrument cluster
lights up when the low beams are switched on.
System limits
The automatic headlamp control cannot serve
as a substitute for your personal judgment of
lighting conditions.
Seite 130ControlsLights130
Online Edition for Part no. 0140 2 964 330 - VI/15
Page 132 of 314
High-beam AssistantThe concept
The high-beam Assistant detects other traffic
participants early on and automatically
switches the high beams on or off depending
on the traffic situation. The assistant ensures
that the high beams are activated whenever
the traffic situation allows. In the low speed
range, the high beams are not switched on by
the system.
General information
The system responds to light from oncoming
traffic and traffic driving ahead of you, and to
adequate illumination, e.g., in towns and cities.
The driver can intervene at any time and switch
the high beams on and off as usual.
Depending on the version of the system in the
vehicle, the high beams may not switch off for
oncoming vehicles, but may only be dimmed in
the areas that blind oncoming traffic. In this
case, the blue indicator light will stay on.
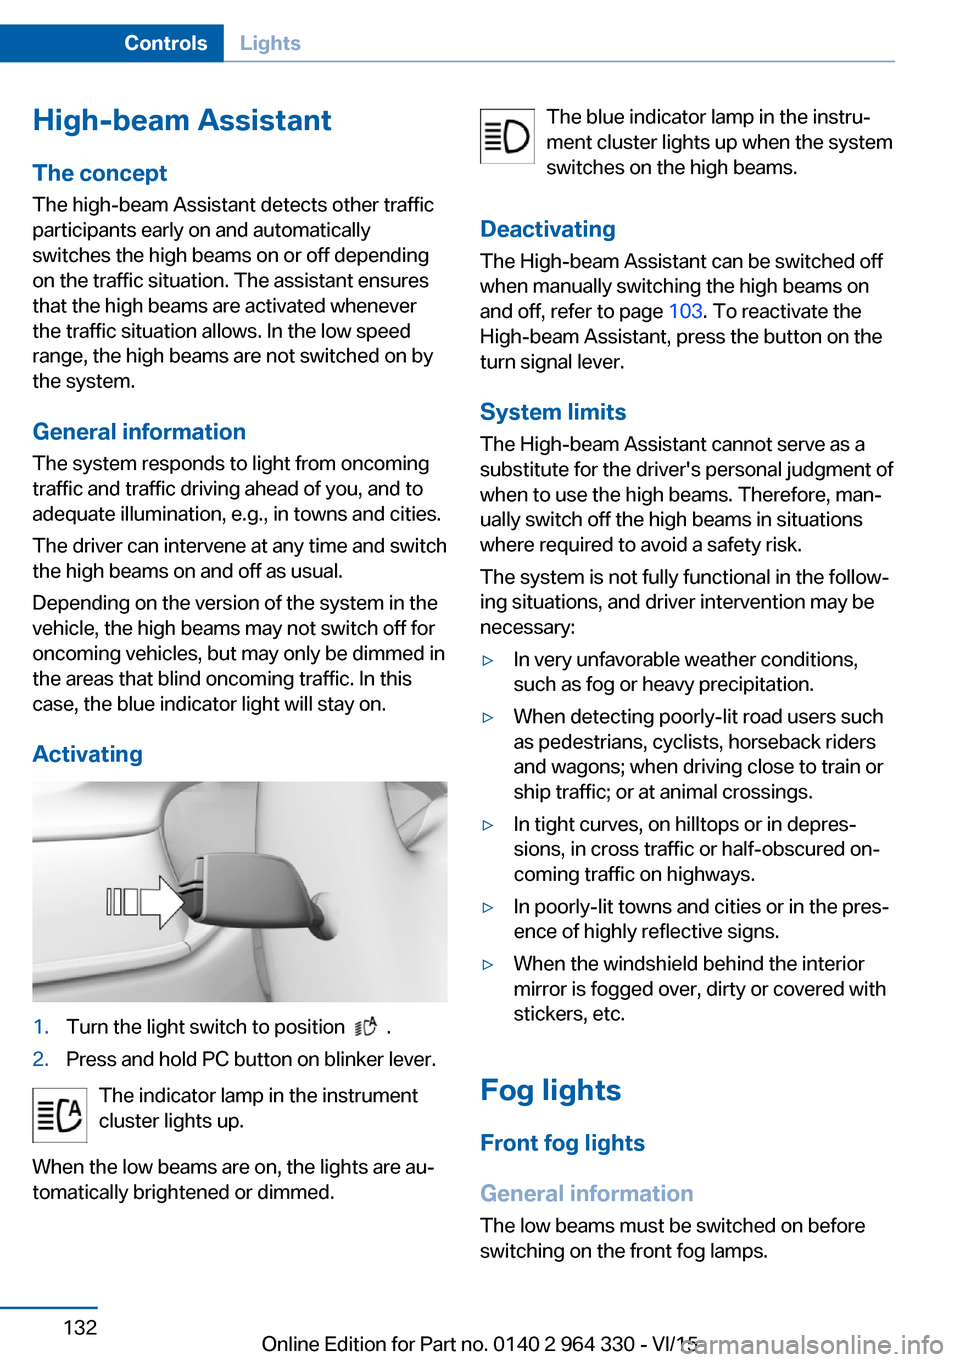
Activating1.Turn the light switch to position .2.Press and hold PC button on blinker lever.
The indicator lamp in the instrument
cluster lights up.
When the low beams are on, the lights are au‐
tomatically brightened or dimmed.
The blue indicator lamp in the instru‐
ment cluster lights up when the system
switches on the high beams.
Deactivating The High-beam Assistant can be switched off
when manually switching the high beams on
and off, refer to page 103. To reactivate the
High-beam Assistant, press the button on the
turn signal lever.
System limits The High-beam Assistant cannot serve as a
substitute for the driver's personal judgment of
when to use the high beams. Therefore, man‐
ually switch off the high beams in situations
where required to avoid a safety risk.
The system is not fully functional in the follow‐
ing situations, and driver intervention may be
necessary:▷In very unfavorable weather conditions,
such as fog or heavy precipitation.▷When detecting poorly-lit road users such
as pedestrians, cyclists, horseback riders
and wagons; when driving close to train or
ship traffic; or at animal crossings.▷In tight curves, on hilltops or in depres‐
sions, in cross traffic or half-obscured on‐
coming traffic on highways.▷In poorly-lit towns and cities or in the pres‐
ence of highly reflective signs.▷When the windshield behind the interior
mirror is fogged over, dirty or covered with
stickers, etc.
Fog lights
Front fog lights
General information
The low beams must be switched on before
switching on the front fog lamps.
Seite 132ControlsLights132
Online Edition for Part no. 0140 2 964 330 - VI/15
Page 133 of 314
Switching on/offPress button. The green indicator
lamp lights up.
If the automatic headlight control, refer to
page 130, is activated, the low beams will
come on automatically when you switch on the
front fog lights.
When the high beams or headlight flasher are
activated, the front fog lights are not switched
on.
Instrument lighting The parking lights or low beams
must be switched on to adjust
the brightness.
Adjust the brightness with the
thumbwheel.
Interior lights
General information
Depending on the equipment version, interior
lights, footwell lights, entry lamps, door handle
lighting, and speaker lighting are automatically
controlled.
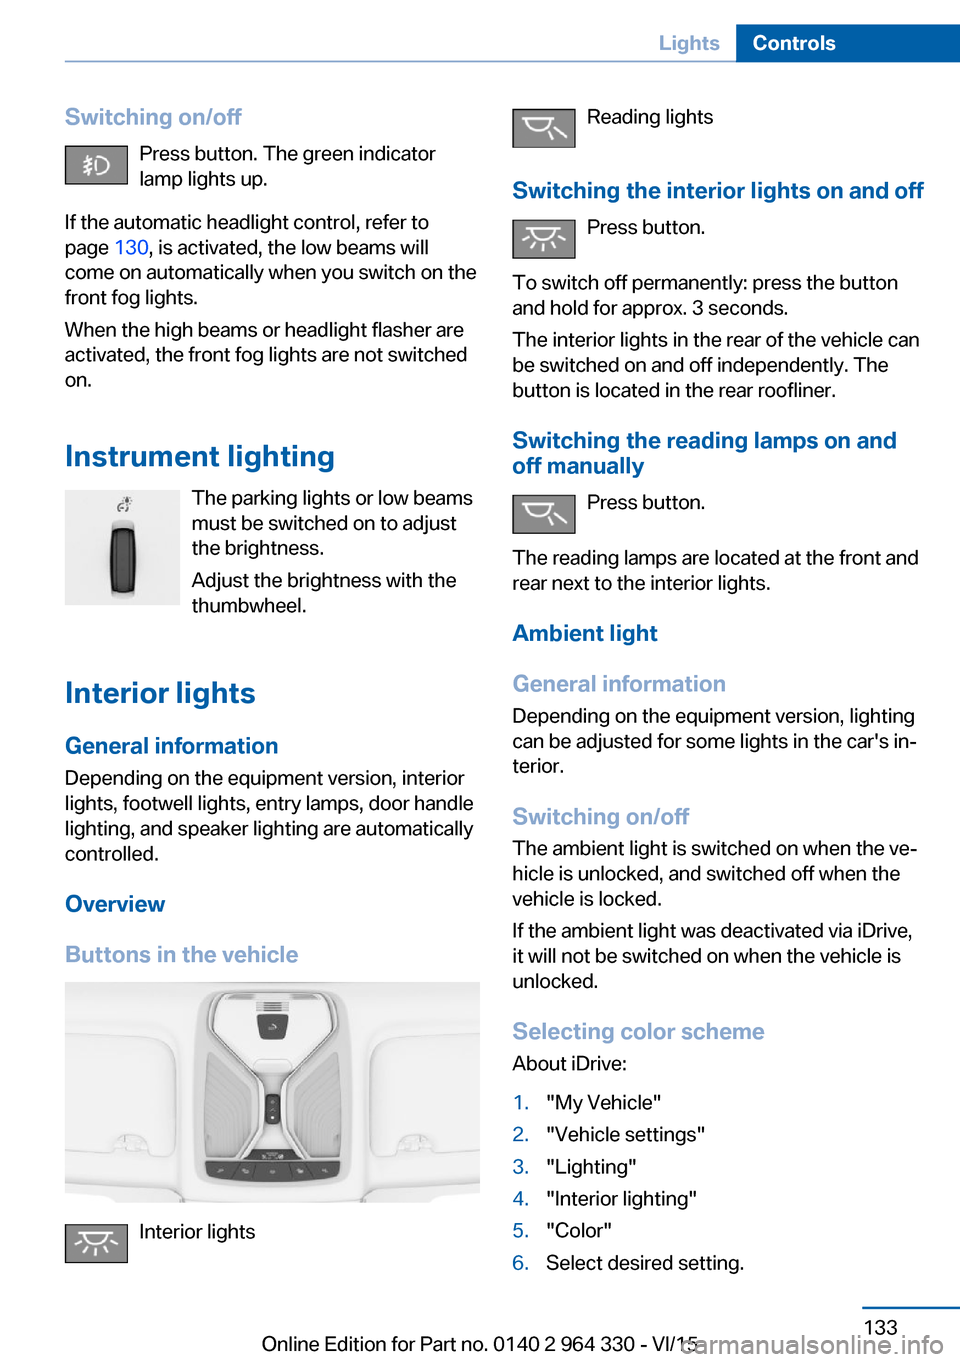
Overview
Buttons in the vehicle
Interior lights
Reading lights
Switching the interior lights on and off Press button.
To switch off permanently: press the button
and hold for approx. 3 seconds.
The interior lights in the rear of the vehicle can
be switched on and off independently. The
button is located in the rear roofliner.
Switching the reading lamps on and off manually
Press button.
The reading lamps are located at the front and
rear next to the interior lights.
Ambient light
General information
Depending on the equipment version, lighting
can be adjusted for some lights in the car's in‐
terior.
Switching on/off The ambient light is switched on when the ve‐
hicle is unlocked, and switched off when the
vehicle is locked.
If the ambient light was deactivated via iDrive,
it will not be switched on when the vehicle is
unlocked.
Selecting color scheme About iDrive:1."My Vehicle"2."Vehicle settings"3."Lighting"4."Interior lighting"5."Color"6.Select desired setting.Seite 133LightsControls133
Online Edition for Part no. 0140 2 964 330 - VI/15
Page 147 of 314
▷If there are constant blinding effects be‐
cause of oncoming light, e. g., from the sun
low in the sky.▷When it is dark outside.
Night Vision with pedestrian
and animal detection
The concept
Night Vision with pedestrian and animal detec‐
tion is a night vision system.
An infrared camera scans the area in front of
the vehicle and issues a warning if it detects
pedestrians and animals on the street. Warm
objects that are similar in shape to human be‐
ings or animals are detected by the system. If
necessary, the heat image can be displayed on
the Control Display.
Heat image
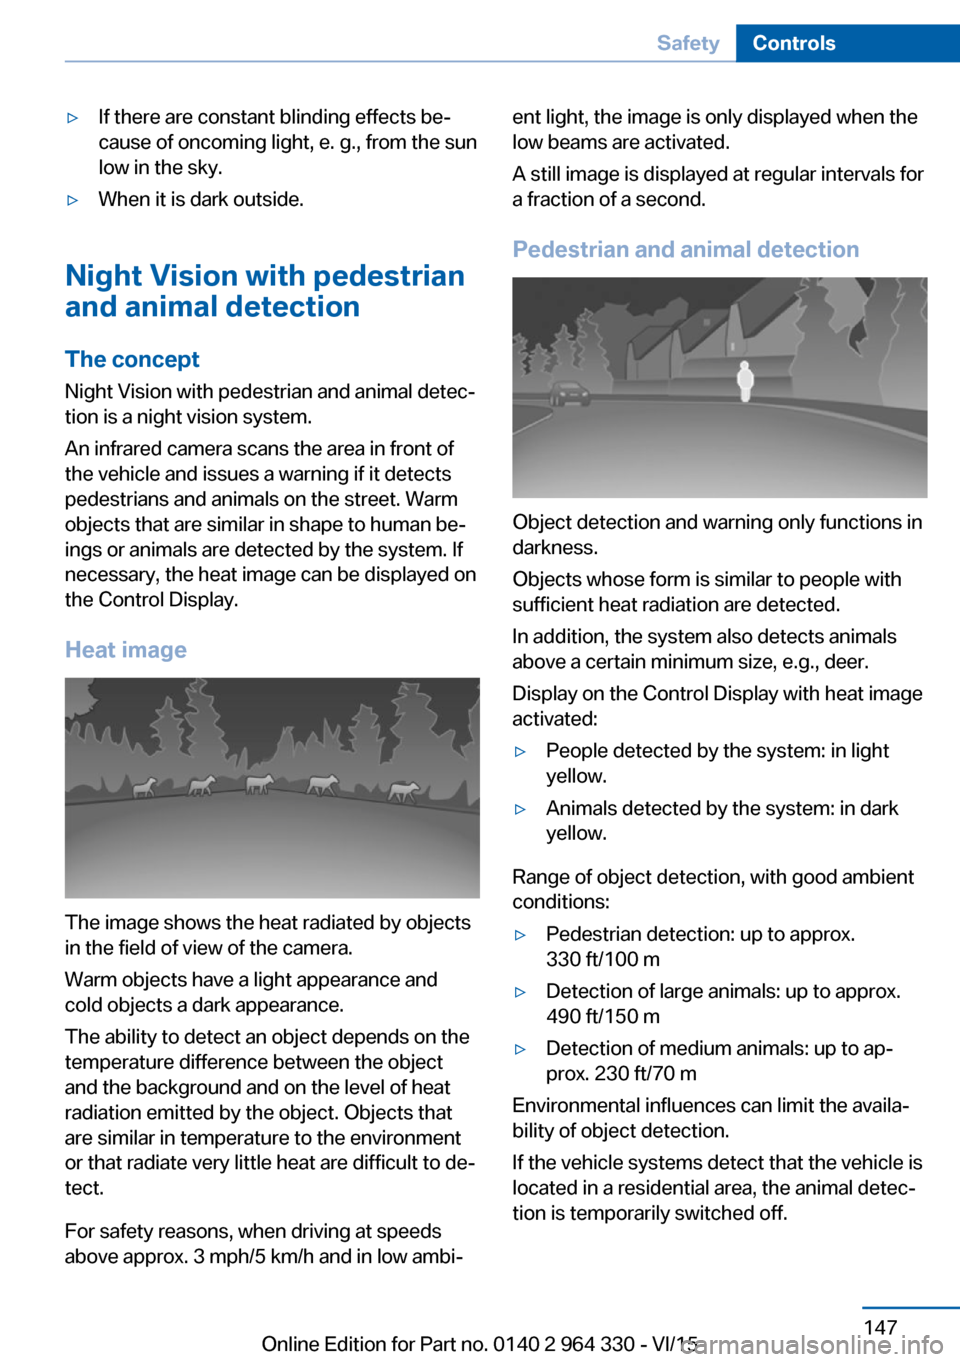
The image shows the heat radiated by objects
in the field of view of the camera.
Warm objects have a light appearance and
cold objects a dark appearance.
The ability to detect an object depends on the
temperature difference between the object
and the background and on the level of heat
radiation emitted by the object. Objects that
are similar in temperature to the environment
or that radiate very little heat are difficult to de‐
tect.
For safety reasons, when driving at speeds
above approx. 3 mph/5 km/h and in low ambi‐
ent light, the image is only displayed when the
low beams are activated.
A still image is displayed at regular intervals for
a fraction of a second.
Pedestrian and animal detection
Object detection and warning only functions in
darkness.
Objects whose form is similar to people with
sufficient heat radiation are detected.
In addition, the system also detects animals
above a certain minimum size, e.g., deer.
Display on the Control Display with heat image
activated:
▷People detected by the system: in light
yellow.▷Animals detected by the system: in dark
yellow.
Range of object detection, with good ambient
conditions:
▷Pedestrian detection: up to approx.
330 ft/100 m▷Detection of large animals: up to approx.
490 ft/150 m▷Detection of medium animals: up to ap‐
prox. 230 ft/70 m
Environmental influences can limit the availa‐
bility of object detection.
If the vehicle systems detect that the vehicle is
located in a residential area, the animal detec‐
tion is temporarily switched off.
Seite 147SafetyControls147
Online Edition for Part no. 0140 2 964 330 - VI/15
Page 306 of 314
Fragrance, see Ambient airpackage 211
Fragrancing, see Ambient air package 211
Front airbags 136
Front center armrest 227
Front cupholder 228
Front fog lights 132
Front passenger seat, adjust‐ ing 78
Front-seat passenger airbags, automatic deactivation 138
Front-seat passenger airbags, indicator lamp 138
Front seats 76
FTM Flat Tire Monitor 268
Fuel 252
Fuel consumption, see Aver‐ age fuel consumption 124
Fuel filler flap 250
Fuel gauge 118
Fuel lid 250
Fuel quality 252
Fuel recommendation 252
Fuel, tank capacity 300
Fuse 285
G
Garage door opener, see Uni‐ versal Integrated Remote
Control 215
Gasoline 252
Gear change, Steptronic transmission 106
Gear shift indicator 120
General driving notes 234
General settings 38
Gentleman function 78
Gesture 30
Gesture control 30
Gesture operation 30
Glare shield 217
Glass sunroof, powered 73
Glove compartment 225 Gross vehicle weight, ap‐
proved 299
H
Handbrake, see Parking brake 100
Hand-held transmitter, alter‐ nating code 216
Hand movement 30
Hazard warning flashers 286
HDC Hill Descent Con‐ trol 165
Head airbags 136
Headlight control, auto‐ matic 130
Headlight courtesy delay fea‐ ture 130
Headlight courtesy delay fea‐ ture via remote control 61
Headlight flasher 103
Headlight glass 282
Headlights, care 292
Head restraint pillows 84
Head restraints 76
Head restraints, front 82
Head restraints, rear 83
Head-up Display 126
Head-up Display, care 294
Heating, see Parked-car heat‐ ing 209
Heavy cargo, stowing 238
High-beam Assistant 132
High beams 103
High beams/low beams, see High-beam Assistant 132
Hill Descent Control HDC 165
Hills 236
Hill start assistant, see Drive- off assistant 163
Holder for beverages 228
Homepage 6
Hood 272
Horn 14
Hotel function, trunk lid 65 Hot exhaust system 235
HUD Head-up Display 126
Hydroplaning 235
I iBrake — Post Crash 161
Ice warning, see External temperature warning 118
Icy roads, see External tem‐ perature warning 118
Identification marks, tires 256
Identification number, see ve‐ hicle identification num‐
ber 10
Idle state, operating and drive readiness 19
iDrive 21
Ignition key, see Remote con‐ trol 54
Indication of a flat tire 266 , 269
Indicator and alarm lamps, see Check Control 114
Indicator lamp, see Check Control 114
Individual air distribution 205
Individual settings, see pro‐ files 58
Inflation pressure, tires 254
Inflation pressure warning FTM, tires 268
Information 6
Initialize, Tire Pressure Moni‐ tor TPM 265
Initializing, Flat Tire Monitor FTM 269
Instrument cluster 113
Instrument lighting 133
Integral Active Steering 166
Integrated key 54
Integrated Owner's Manual in the vehicle 49
Intelligent Emergency Re‐ quest 286
Intelligent Safety 139 Seite 306ReferenceEverything from A to Z306
Online Edition for Part no. 0140 2 964 330 - VI/15