bulb BMW 740I 1998 Owners Manual
[x] Cancel search | Manufacturer: BMW, Model Year: 1998, Model line: 740I, Model: BMW 740I 1998Pages: 211, PDF Size: 1.68 MB
Page 13 of 211
Contents
Owner service procedures
Advanced technology
Technical data
Replacement procedures:
Onboard tool kit162
Windshield wiper blades162
Lamps and bulbs163
Remote control168
Changing tires170
Battery173
Fuses176
In case of electrical
malfunction:
Fuel filler door178
Sliding/Tilt sunroof178
Assistance, giving and
receiving:
Jump-starting179
Towing the vehicle180Airbags184
Adaptive Transmission Control
(ATC)184
Automatic Stability Control plus
Traction (ASC+T)/Dynamic Sta-
bility Control (DSC)185
Radio reception186
BMW Active Seat186
Safety belt tensioner187
DSP sound system187
Interior rearview mirror with auto-
matic dimming feature188
Tire Pressure Control (RDC)189
Xenon lamps190
Water and dirt repelling
windshield191Engine specifications194
Dimensions195
Weights196
Capacities197
Electrical system198
Drive belts198
Page 77 of 211

76n
Check ControlPriority 2
These alerts for problems are reported
for 20 seconds when the ignition key is
in position 2. The status reports remain
after the message disappears. You can
view the message again by pressing the
CHECK button.
>TRUNK LID OPEN
This message is given only when ini-
tially starting off.
>DOOR OPEN
This is displayed after a minimum
vehicle speed is exceeded.
>FASTEN SEAT BELTS
*
In addition, the indicator lamp with
the safety belt symbol appears and
an acoustic signal is heard.
>WASHER FLUID LOW
The washer fluid is too low. Top up
the fluid at the earliest opportunity.
Refer to page 142.
>CHECK ENGINE OIL
Add engine oil as soon as possible.
Refer to page 143.
>OUTSIDE TEMPERATURE 247
(–5.06)
This display is only an example. The
current reading appears at an outside
temperature of 37.57 (+36) and
below. Refer also to page 72.>TIRE PRESSURE SET
*
The RDC has imported the current in-
flation pressure in the tires as the tar-
get values which the system will
monitor.
Refer to page 94.
>CHECK TIRE PRESSURE
*
Check and correct the tire inflation
pressure to specifications at the earli-
est opportunity (next stop for fuel).
Refer to page 94.
>TIRE CHECK INACTIVE
*
A temporary interference of the RDC
or a system fault. Refer to page 95
>BRAKE LAMP CIRCUIT
A bulb has failed or the circuit has a
malfunction. Refer to pages 163, 176
or consult an authorized BMW center.
>CHECK LOWBEAMS
CHECK SIDE LAMPS
CHECK REAR LAMPS
CHECK FRONT FOGLAMPS
CHECK LICPLATE LAMP
CHECK TRAILER LIGHTS
CHECK HIGHBEAMS
CHECK BACKUP LAMPS
Defective bulb or circuit. Refer to
pages 163, 176 or consult an autho-
rized BMW center.
>TRANS. FAILSAFE PROG
Please consult the nearest authorized
BMW center. Refer to pages 64, 67.>CHECK BRAKE LININGS
Have the brake pads inspected by
your BMW center. Refer to page 126.
>REMOTE KEY BATTERY
Change the battery. Refer to
page 168.
>CHECK COOLANT LEVEL
The coolant is too low. Top up at the
next opportunity. Refer to page 146.
>ENGINE FAILSAFE PROG
Fault in the Electronic Engine Power
Control EML. When braking, higher
brake application pressure may be
necessary and brake pedal travel may
be significantly longer.
Please have the system inspected by
your authorized BMW center.
Page 162 of 211
Overview
Controls and features
Operation, care
and maintenance
Owner service procedures
Technical data
Index Advanced technology
161n
RepairsIndexOverview Controls Car care Technology Data
Replacement procedures:
Onboard tool kit162
Windshield wiper blades162
Lamps and bulbs163
Remote control168
Changing tires170
Battery173
Fuses176
In case of electrical
malfunction:
Fuel filler door178
Sliding/Tilt sunroof178
Assistance, giving and
receiving:
Jump-starting179
Towing the vehicle180
Page 164 of 211
163n
RepairsIndexOverview Controls Car care Technology Data
Lamps and bulbsThe lamps and bulbs make essential
contributions to the safety of your vehi-
cle. Observe the following instructions
during bulb replacement carefully. If
you are not familiar with any of the pro-
cedures, consult your authorized BMW
center.
Do not touch the glass portion of a
new bulb with your bare hands
since even small amounts of impurities
burn in to the surface, thus reducing the
service life of the bulb. Use a clean
cloth, paper napkin, or a similar mate-
rial, or hold the bulb by its metallic
base.<
A replacement bulb set is available from
your BMW center.
Whenever working on the electri-
cal system, switch off the electri-
cal accessory you are working on or
disconnect the cable from the negative
terminal of the battery. Failure to do this
could result in short circuits.
To prevent injuries and damage, comply
with any instructions provided by the
bulb manufacturer.<
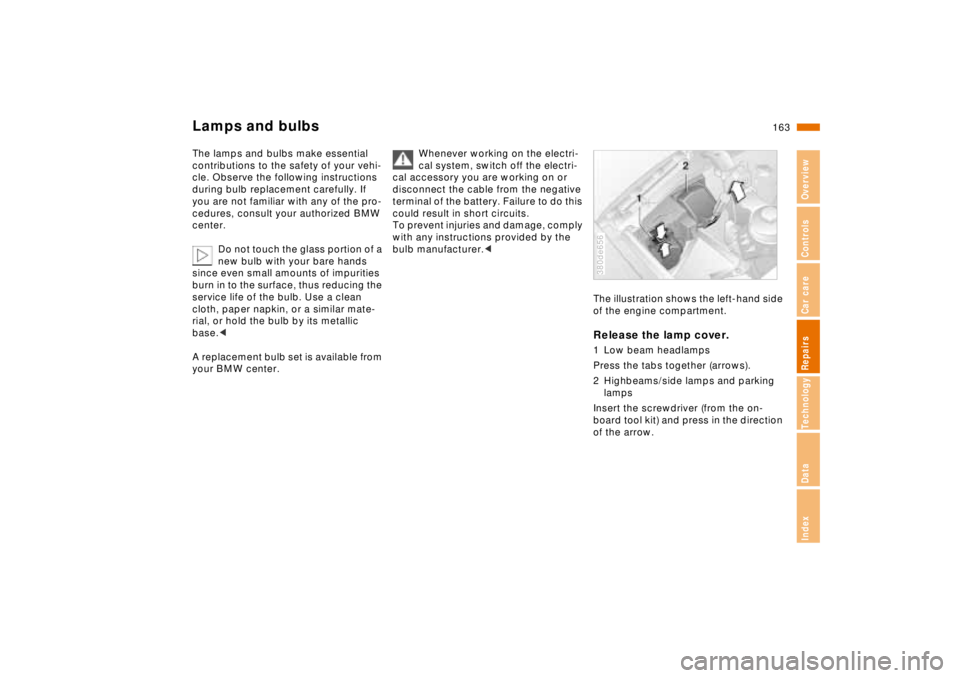
The illustration shows the left-hand side
of the engine compartment.Release the lamp cover.1 Low beam headlamps
Press the tabs together (arrows).
2 Highbeams/side lamps and parking
lamps
Insert the screwdriver (from the on-
board tool kit) and press in the direction
of the arrow.380de656
Page 165 of 211
164n
Lamps and bulbs
For checking and adjusting head-
lamp aim, please contact your
BMW center.<
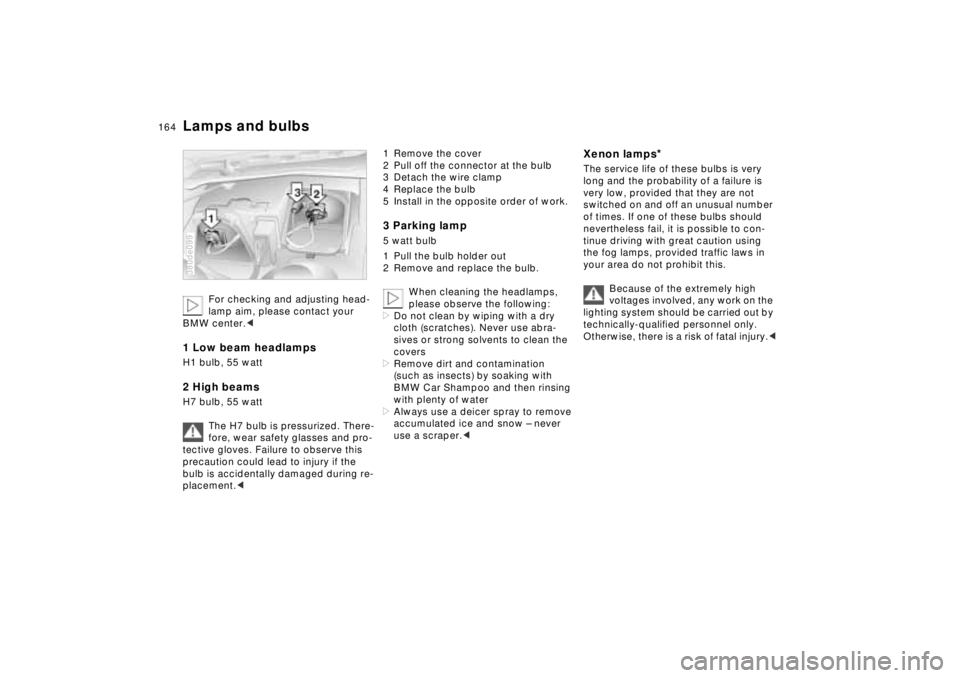
1 Low beam headlampsH1 bulb, 55 watt 2 High beamsH7 bulb, 55 watt
The H7 bulb is pressurized. There-
fore, wear safety glasses and pro-
tective gloves. Failure to observe this
precaution could lead to injury if the
bulb is accidentally damaged during re-
placement.< 380de099
1 Remove the cover
2 Pull off the connector at the bulb
3 Detach the wire clamp
4 Replace the bulb
5 Install in the opposite order of work.3 Parking lamp5 watt bulb
1 Pull the bulb holder out
2 Remove and replace the bulb.
When cleaning the headlamps,
please observe the following:
>Do not clean by wiping with a dry
cloth (scratches). Never use abra-
sives or strong solvents to clean the
covers
>Remove dirt and contamination
(such as insects) by soaking with
BMW Car Shampoo and then rinsing
with plenty of water
>Always use a deicer spray to remove
accumulated ice and snow – never
use a scraper.<
Xenon lamps
*
The service life of these bulbs is very
long and the probability of a failure is
very low, provided that they are not
switched on and off an unusual number
of times. If one of these bulbs should
nevertheless fail, it is possible to con-
tinue driving with great caution using
the fog lamps, provided traffic laws in
your area do not prohibit this.
Because of the extremely high
voltages involved, any work on the
lighting system should be carried out by
technically-qualified personnel only.
Otherwise, there is a risk of fatal injury.<
Page 166 of 211
165n
RepairsIndexOverview Controls Car care Technology Data
Lamps and bulbsTurn signals/Parking lamps
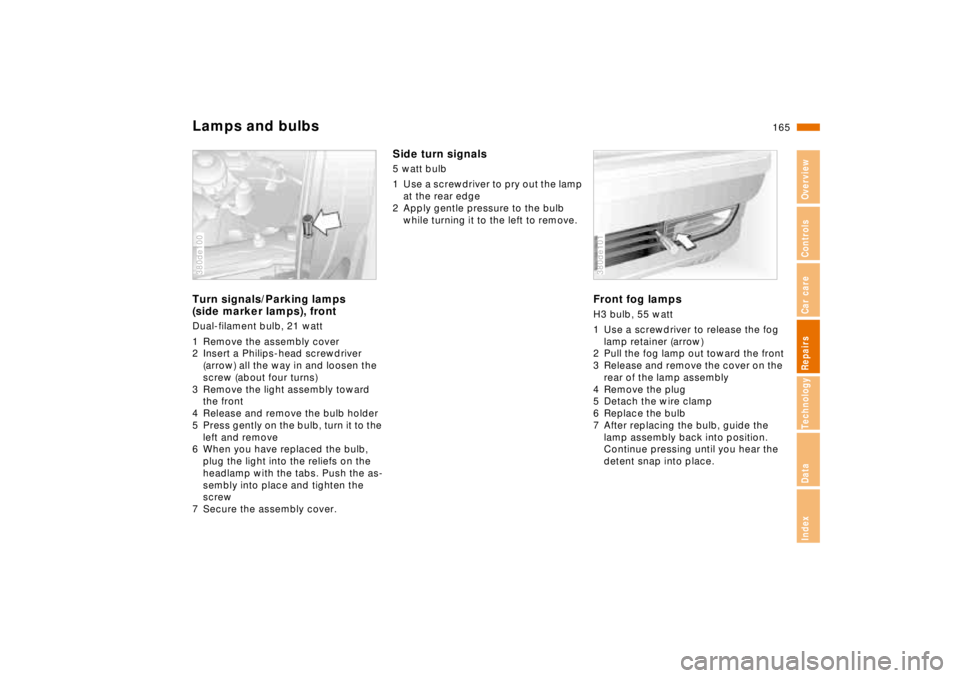
(side marker lamps), frontDual-filament bulb, 21 watt
1 Remove the assembly cover
2 Insert a Philips-head screwdriver
(arrow) all the way in and loosen the
screw (about four turns)
3 Remove the light assembly toward
the front
4 Release and remove the bulb holder
5 Press gently on the bulb, turn it to the
left and remove
6 When you have replaced the bulb,
plug the light into the reliefs on the
headlamp with the tabs. Push the as-
sembly into place and tighten the
screw
7 Secure the assembly cover.380de100
Side turn signals5 watt bulb
1 Use a screwdriver to pry out the lamp
at the rear edge
2 Apply gentle pressure to the bulb
while turning it to the left to remove.
Front fog lampsH3 bulb, 55 watt
1 Use a screwdriver to release the fog
lamp retainer (arrow)
2 Pull the fog lamp out toward the front
3 Release and remove the cover on the
rear of the lamp assembly
4 Remove the plug
5 Detach the wire clamp
6 Replace the bulb
7 After replacing the bulb, guide the
lamp assembly back into position.
Continue pressing until you hear the
detent snap into place.380de101
Page 167 of 211
166n
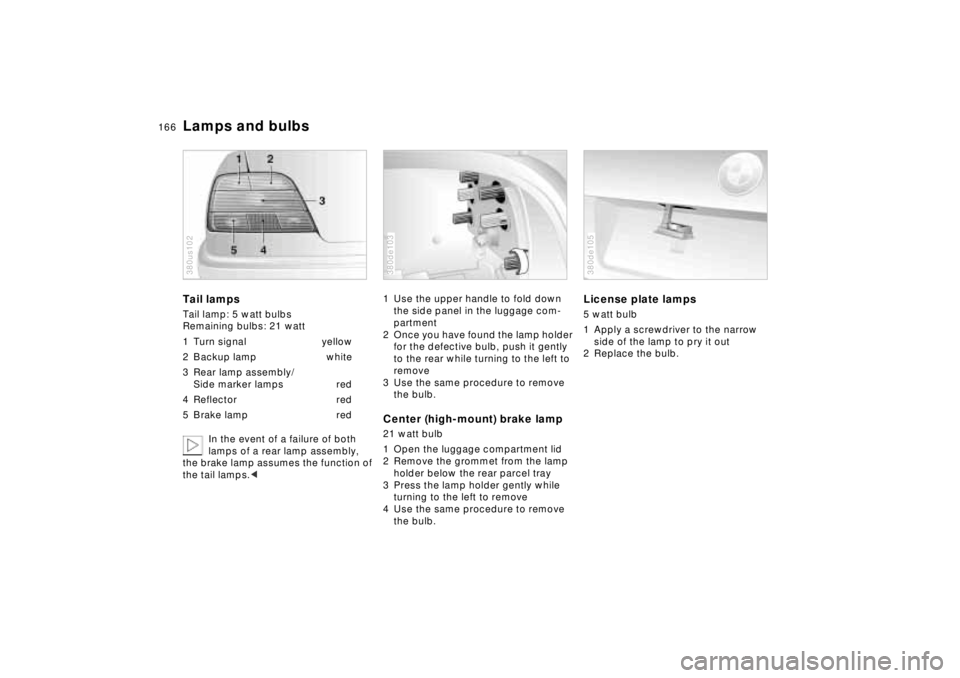
Lamps and bulbsTail lampsTail lamp: 5 watt bulbs
Remaining bulbs: 21 watt
1 Turn signal yellow
2 Backup lamp white
3 Rear lamp assembly/
Side marker lamps red
4 Reflector red
5 Brake lamp red
In the event of a failure of both
lamps of a rear lamp assembly,
the brake lamp assumes the function of
the tail lamps.< 380us102
1 Use the upper handle to fold down
the side panel in the luggage com-
partment
2 Once you have found the lamp holder
for the defective bulb, push it gently
to the rear while turning to the left to
remove
3 Use the same procedure to remove
the bulb.Center (high-mount) brake lamp21 watt bulb
1 Open the luggage compartment lid
2 Remove the grommet from the lamp
holder below the rear parcel tray
3 Press the lamp holder gently while
turning to the left to remove
4 Use the same procedure to remove
the bulb.380de103
License plate lamps5 watt bulb
1 Apply a screwdriver to the narrow
side of the lamp to pry it out
2 Replace the bulb.380de105
Page 168 of 211

167n
RepairsIndexOverview Controls Car care Technology Data
Lamps and bulbsInterior lampsFront:
Interior lamp (10 watt bulb) with reading
lamps (10 watt bulbs)
1 Interior lamp: Use a screwdriver to
press out the lamp sideways and re-
move the lens. Pull the bulb out of the
contact studs
2 Reading lamp: Gently press against
the lamp while turning it to the left to
remove.
Rear:
Interior lamp (10 watt bulb) with reading
lamp (5 watt bulb)
1 Use a screwdriver at the top of the
recesses to press out the light
2 Interior lamp: Push the tab back on
the reflector and change the bulb
3 Reading lamp: Gently press against
the lamp while turning it to the left to
remove.
Indirect lighting (1 watt bulb)
1 Unclip the lamp holder
2 Replace the bulb.
Footwell lamps5 watt bulb
1 Use a screwdriver to remove the lens
to the side
2 Replace the bulb.Door warning lamps5 watt bulb
1 Apply a screwdriver to the narrow
side of the lamp to pry it out
2 Turn the bulb holder to the left to
remove
3 Replace the bulb.Door handle lampsPlease contact your BMW center in the
case of a malfunction.
Glove compartment lamp5 watt bulb
1 Apply a screwdriver to the recess to
pry the lamp out
2 Remove the reflector
3 Replace the bulb.Luggage compartment lamps10 watt bulbs
Lamps on the underside of the package
tray and in the luggage compartment
lid:
1 Apply a screwdriver to the recess to
pry the lamp out
2 Remove the reflector
3 Replace the bulb.
Page 203 of 211
Everything from A to ZAABS125
Accessories6
Activated-charcoal filter105
Active seat48
Adaptive Transmission
Control (ATC)63
Adding engine oil143
Adding washer fluid142
Adjust the backrest46
Adjusting steering wheel49
Air distribution102
Air flow103
Air jets100
Air pressure132
Airbags55
Alarm system40
Deactivating in an
emergency41
Antenna diversity186
Antifreeze146
Antifreeze, radiator128, 146
Antilock Brake System
(ABS)125
Anti-theft alarm system
32,40
Approved gross vehicle
weight196
Aquaplaning123,132
Armrest111
ASC+T (Automatic Stability
Control plus Traction)92Ashtray114
AUC (Automatic recirculated-
air control)103
Audio System78
Automatic car washes150
Automatic climate
control100
Automatic climate control,
removing window
condensation102
Automatic recirculated-air
control (AUC)103
Automatic Soft-Close
feature38
Automatic Stability Control
plus Traction (ASC+T)92
Automatic steering wheel
adjustment49
Automatic transmission62
Automatic transmission with
Steptronic65
Automatic windshield
washer69
Average fuel consumption 85
Average speed86
Axle loads196
BBackup lamps, bulb
replacement166
Battery173,198
Battery capacity198Battery change, radio remote
control168
Battery charge current20
Battery, discharged179
Battery, removal and
installation175
Belts54
Beverage holders113
Blower103
Body-cavity protectant151
Brake faults128
Brake fluid147
Brake hydraulic system20
Brake lamps, bulb
replacement166
Brakes126
Break-in procedure122
Break-resistant security
glass, care153
Bulb replacement163
CCar jack170
Car Memory53
Car radio reception131, 186
Car telephone113
Car wash150
Care, exterior152
Care, interior154
Caring for the vehicle
finish152
Caring for your car150Catalytic converter124
Cellular phone131
Center (high-mount) brake
lamp166
Central locking system32
Central locking system,
button36
Changing a wheel170
Charge indicator lamp20
Charging the battery174
Check Control75
CHECK key75
Checking the engine oil143
Checking tire pressure26
Child restraints57
Childproof door locks58
Cigarette lighter115
Clock,
refer to Digital clock79
Code88
Refer to the Radio Owner's
Manuel
Codes, tires134
Coin tray113
Cold start60
Comfort seats47
Connecting a car vacuum
cleaner115
Consumption display73
Contour seat48
Page 204 of 211
RepairsIndexOverview Controls Car care Technology Data
Everything from A to Z
203n
Convenience operating mode
for windows and sliding/tilt
roof32
Convenience operating mode
for windows and sliding/tilt
sunroof33
Convenience starting59
Coolant146
Coolant temperature
gauge74
Coolant, antifreeze128
Cooling system, capacity 197
Cruise control70
Cruising range85
DDaytime-driving light
switch96
DBC (Dynamic Brake
Control)127
Defrosting, windows102
Digital clock79
Digital sound processor187
Dimensions195
Dimming feature, interior
rearview mirror50
Dipstick, engine oil143
Disc brakes126
Disconnect the battery175
Displacement194
Displays18
Distance86Distance warning90
Door key30
Door warning lamps, bulb
replacement167
Doors, emergency release 32
Doors, radio remote
control33
Drink holders113
Drive belts198
Driving notes123
DSC (Dynamic Stability
Control)92
Dynamic Brake Control
(DBC)127
Dynamic Stability Control
(DSC)92
EEDC (Electronic Damper
Control)93
Electric power windows42
Electric rear seat
adjustment48
Electric steering wheel
adjustment49
Electrical accessories,
failure176
Electrical system198
Electronic Damper Control
(EDC)93
Electronic immobilizer31Emergency deactivation of
the alarm system41
Emergency release
doors32
fuel filler door178
luggage compartment
lid37
sliding/tilt sunroof178
Energy Control73
Engine coolant146
Engine data194
Engine oil consumption143
Engine oil pressure20
Engine oil specifications144
Estimated time of arrival87
Exterior door handles,
lighted33
Exterior finish, care151, 152
FFailure messages75
First-aid kit24
Fittings for tow-starting
and towing180
Flashlight111
Flat tires132
Fluid, power steering148
Fog lamps97
bulb replacement165
switch97
Footwell lamps98Footwell lamps, bulb
replacement167
For wheelslip control, refer
to ASC+T/DSC92
Front armrest112
Front seat adjustment46
Fuel25
Fuel consumption
indicator73
Fuel filler door25
Fuel filler door,
manual release after
electrical fault178
Fuel gauge73
Fuel specifications25
Fuel tank capacity197
Fuel, average fuel
consumption85
Fuses176
GGasoline25
Glove compartment110
Glove compartment lamp,
bulb replacement167
Gross vehicle weight196HHand brake, refer to Parking
brake61
Handsfree system113
Hazard warning triangle24