clock BMW 745i 2005 E65 Owner's Manual
[x] Cancel search | Manufacturer: BMW, Model Year: 2005, Model line: 745i, Model: BMW 745i 2005 E65Pages: 239, PDF Size: 8.03 MB
Page 14 of 239
Cockpit
12
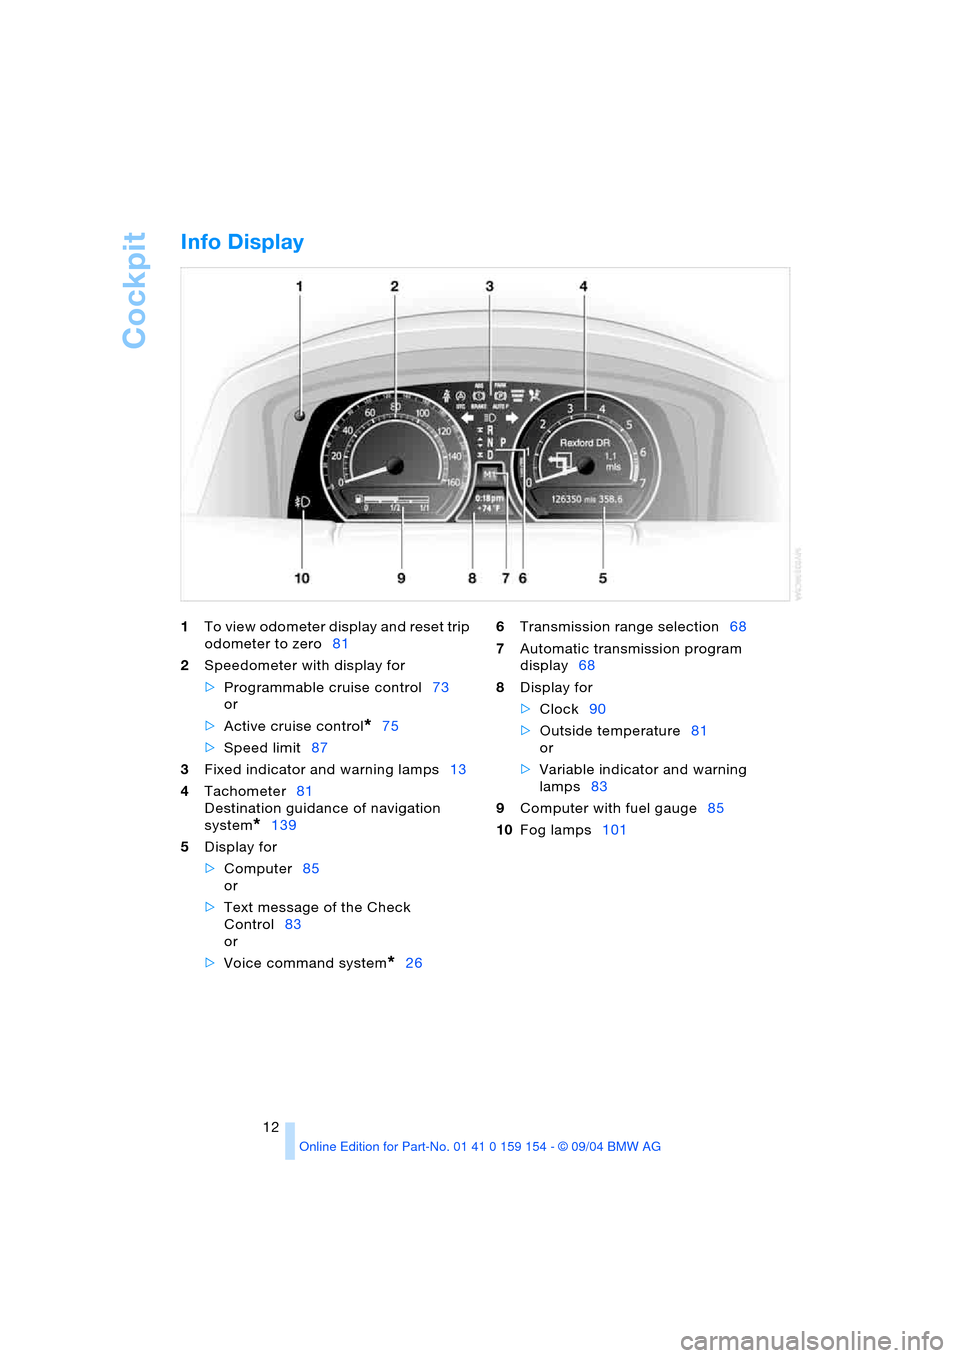
Info Display
1To view odometer display and reset trip
odometer to zero81
2Speedometer with display for
>Programmable cruise control73
or
>Active cruise control
*75
>Speed limit87
3Fixed indicator and warning lamps13
4Tachometer81
Destination guidance of navigation
system
*139
5Display for
>Computer85
or
>Text message of the Check
Control83
or
>Voice command system
*266Transmission range selection68
7Automatic transmission program
display68
8Display for
>Clock90
>Outside temperature81
or
>Variable indicator and warning
lamps83
9Computer with fuel gauge85
10Fog lamps101
Page 20 of 239
Control Center
18 Select button. Continue to press
the controller until the desired function
appears.
The "Brief info" function is not avail-
able in the rear.<
Control Display
To open the start menu:
Press the button
or
move the controller
>toward the currently active menu
>twice in one direction.
To switch off the Control Display, press the
controller when you are in the start menu.
When the Control Display appears,
you see the start menu for approx.
5 seconds, then the last active menu. You
can have the display of the start menu
deactivated at your BMW center.<
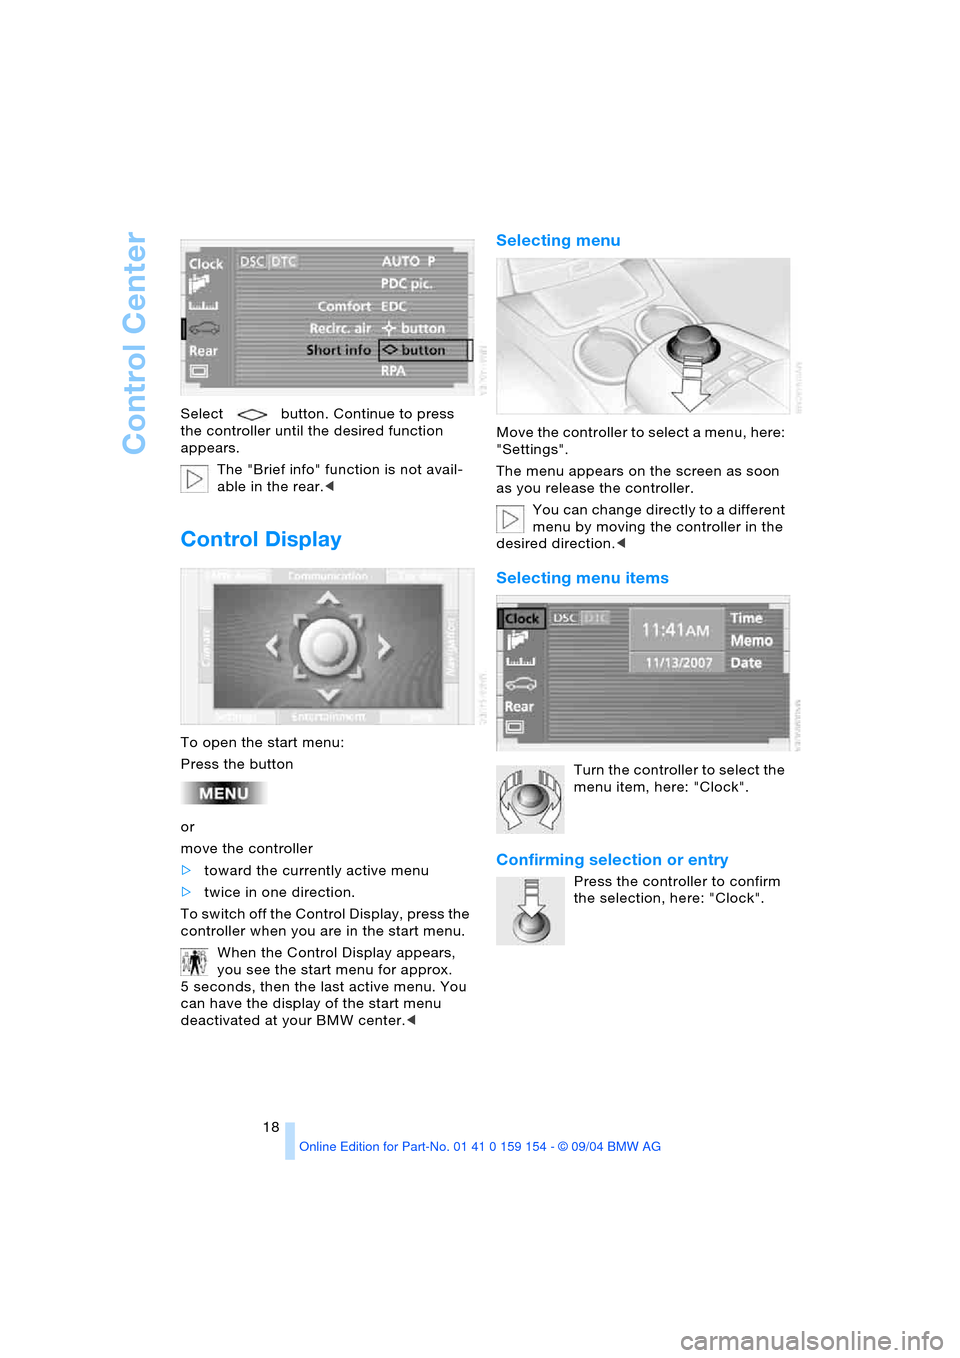
Selecting menu
Move the controller to select a menu, here:
"Settings".
The menu appears on the screen as soon
as you release the controller.
You can change directly to a different
menu by moving the controller in the
desired direction.<
Selecting menu items
Turn the controller to select the
menu item, here: "Clock".
Confirming selection or entry
Press the controller to confirm
the selection, here: "Clock".
Page 48 of 239
Adjustments
46
Adjustments
Sitting safely
The ideal sitting position can make a vital
contribution to relaxed driving that is as
fatigue-free as possible. The sitting posi-
tion plays an important role together with
the safety belts and airbags in an accident.
To ensure that the safety systems operate
with optimized efficiency, we strongly urge
you to observe the instructions contained
in the following section.
For additional information on transporting
children safely, refer to page58.
Sitting safely with airbags
Always maintain an adequate dis-
tance between yourself and the air-
bags. Always hold the steering wheel by its
rim with hands at the 9 o'clock and
3 o'clock positions, to minimize the risk of
injuries to your hands and arms in the event
of airbag deployment.
No one and nothing is to come between the
airbags and the seat occupant.
Do not use the cover of the front airbag on
the front passenger side as a storage area.
Make sure that the front passenger is cor-
rectly seated and does not rest feet or legs
on the instrument panel, otherwise leg inju-
ries can occur if the knee and front airbag
are triggered.
Never let an occupant's head rest near or
on a side airbag because the inflating air-
bag could cause a serious or fatal injury.<
Even if you adhere to all the instructions,
injuries resulting from contact with airbags
cannot be fully excluded, depending on the
circumstances. The ignition and inflation
noise may provoke a mild – usually tempo-
rary – hearing loss in extremely sensitive
individuals.
For airbag locations and additional infor-
mation on airbags, refer to page98.
Sitting safely with safety belts
Even though there is an airbag, wear a
safety belt every time you get in the vehicle.
Although airbags enhance safety by pro-
viding added protection, they are not a
substitute for safety belts.
Your vehicle has five seats that are all
equipped with a safety belt.
At all times, occupants should sit
upright and be properly restrained,
infants and small children in appropriate
child-restraint systems; larger children and
adults using the safety belts.
Expectant mothers should always wear
their safety belts, taking care to position the
lap belt against the lower hips, where it will
not exert pressure against the abdominal
area.
Never allow more than one person to wear
a single safety belt. Never allow infants or
small children to ride in a passenger's lap.
Do not route the belt across your neck, or
run it across sharp edges. Be sure that the
belt does not become caught or jammed.
Avoid twisting the belt while routing it firmly
across the hips and shoulder. Do not allow
the belt to rest against hard or fragile
objects. Otherwise, in the event of a frontal
impact, a loose lap belt could slide over
your hips, leading to abdominal injury.
Avoid wearing clothing that prevents the
belt from fitting properly and pull the lap
belt periodically to readjust the tension
across your shoulder in order to avoid a
reduction in the retention effect of the
safety belt.<
For instructions on operating safety belts,
refer to page51.
Page 73 of 239
Controls
71Reference
At a glance
Driving tips
Communications
Navigation
Entertainment
Mobility
Releasing
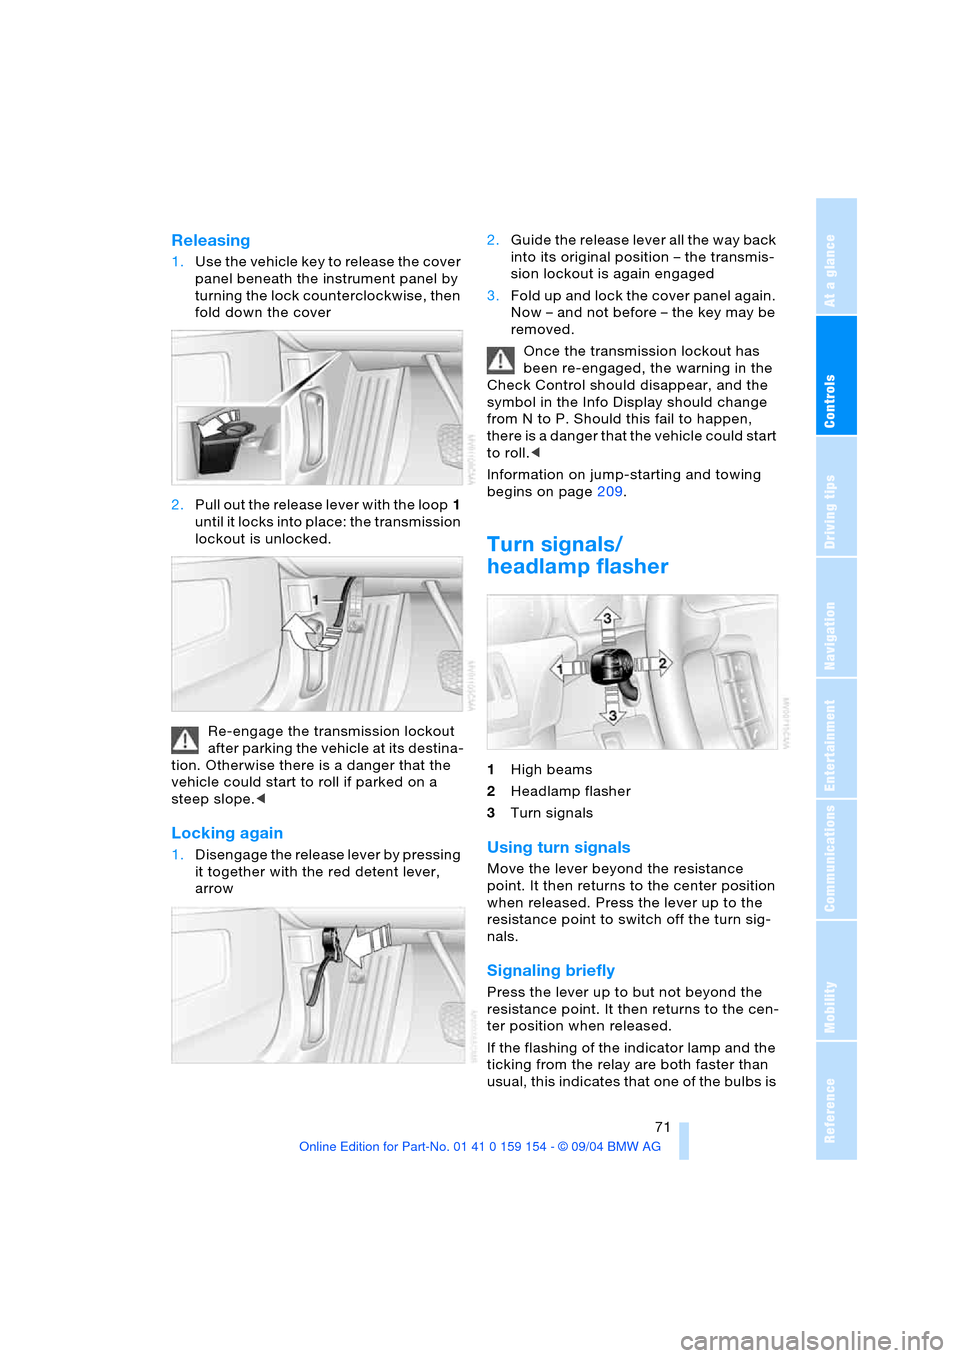
1.Use the vehicle key to release the cover
panel beneath the instrument panel by
turning the lock counterclockwise, then
fold down the cover
2.Pull out the release lever with the loop1
until it locks into place: the transmission
lockout is unlocked.
Re-engage the transmission lockout
after parking the vehicle at its destina-
tion. Otherwise there is a danger that the
vehicle could start to roll if parked on a
steep slope.<
Locking again
1.Disengage the release lever by pressing
it together with the red detent lever,
arrow 2.Guide the release lever all the way back
into its original position – the transmis-
sion lockout is again engaged
3.Fold up and lock the cover panel again.
Now – and not before – the key may be
removed.
Once the transmission lockout has
been re-engaged, the warning in the
Check Control should disappear, and the
symbol in the Info Display should change
from N to P. Should this fail to happen,
there is a danger that the vehicle could start
to roll.<
Information on jump-starting and towing
begins on page209.
Turn signals/
headlamp flasher
1High beams
2Headlamp flasher
3Turn signals
Using turn signals
Move the lever beyond the resistance
point. It then returns to the center position
when released. Press the lever up to the
resistance point to switch off the turn sig-
nals.
Signaling briefly
Press the lever up to but not beyond the
resistance point. It then returns to the cen-
ter position when released.
If the flashing of the indicator lamp and the
ticking from the relay are both faster than
usual, this indicates that one of the bulbs is
Page 83 of 239
Controls
81Reference
At a glance
Driving tips
Communications
Navigation
Entertainment
Mobility
Everything under control
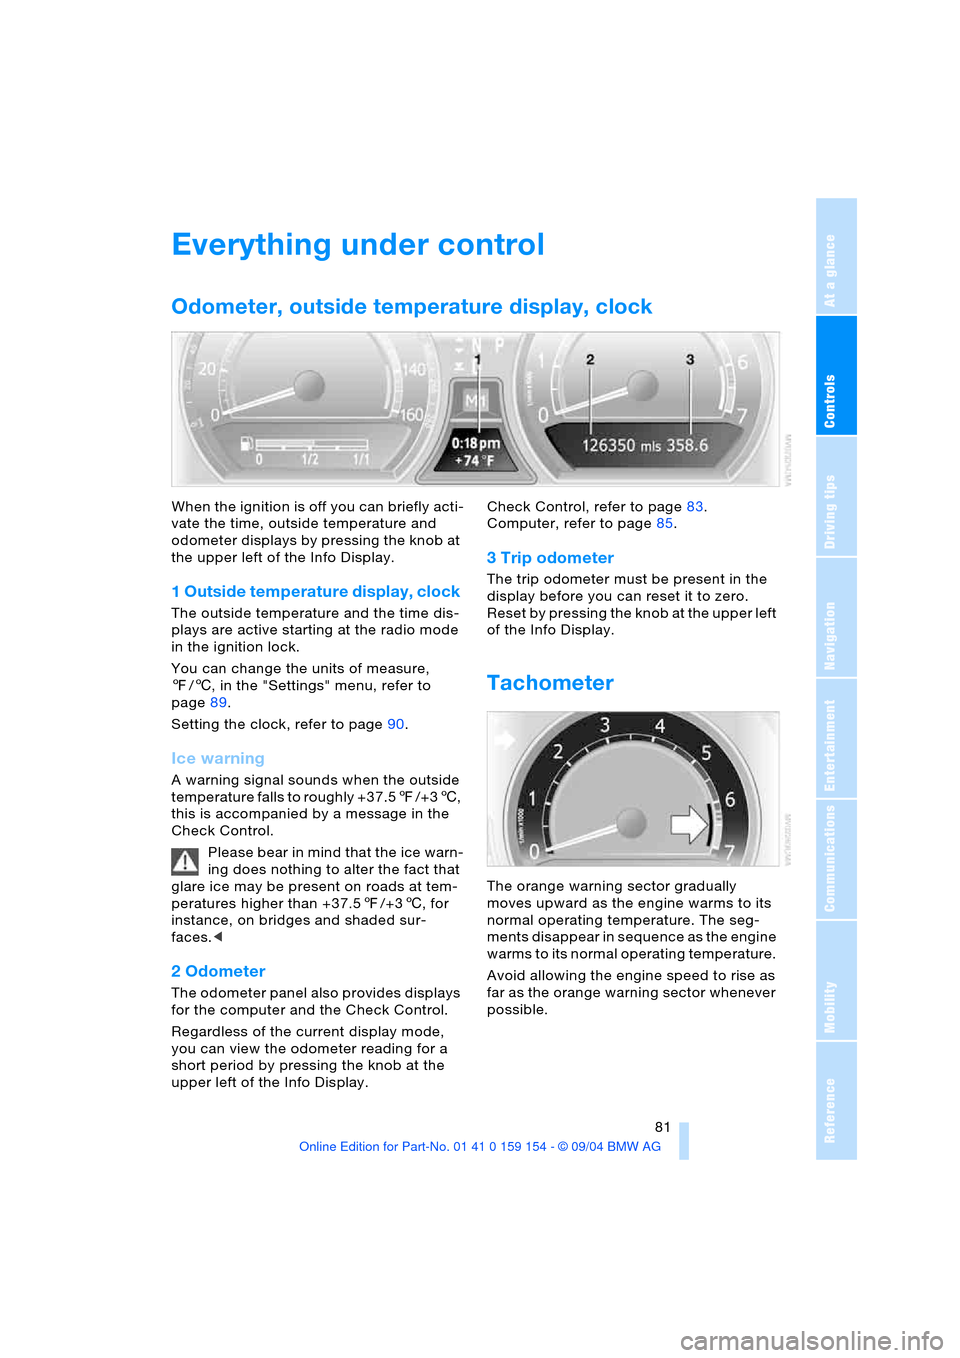
Odometer, outside temperature display, clock
When the ignition is off you can briefly acti-
vate the time, outside temperature and
odometer displays by pressing the knob at
the upper left of the Info Display.
1 Outside temperature display, clock
The outside temperature and the time dis-
plays are active starting at the radio mode
in the ignition lock.
You can change the units of measure,
7/6, in the "Settings" menu, refer to
page89.
Setting the clock, refer to page90.
Ice warning
A warning signal sounds when the outside
temperature falls to roughly +37.57/+36,
this is accompanied by a message in the
Check Control.
Please bear in mind that the ice warn-
ing does nothing to alter the fact that
glare ice may be present on roads at tem-
peratures higher than +37.57/+36, for
instance, on bridges and shaded sur-
faces.<
2 Odometer
The odometer panel also provides displays
for the computer and the Check Control.
Regardless of the current display mode,
you can view the odometer reading for a
short period by pressing the knob at the
upper left of the Info Display. Check Control, refer to page83.
Computer, refer to page85.
3 Trip odometer
The trip odometer must be present in the
display before you can reset it to zero.
Reset by pressing the knob at the upper left
of the Info Display.
Tachometer
The orange warning sector gradually
moves upward as the engine warms to its
normal operating temperature. The seg-
ments disappear in sequence as the engine
warms to its normal operating temperature.
Avoid allowing the engine speed to rise as
far as the orange warning sector whenever
possible.
Page 92 of 239
Everything under control
90
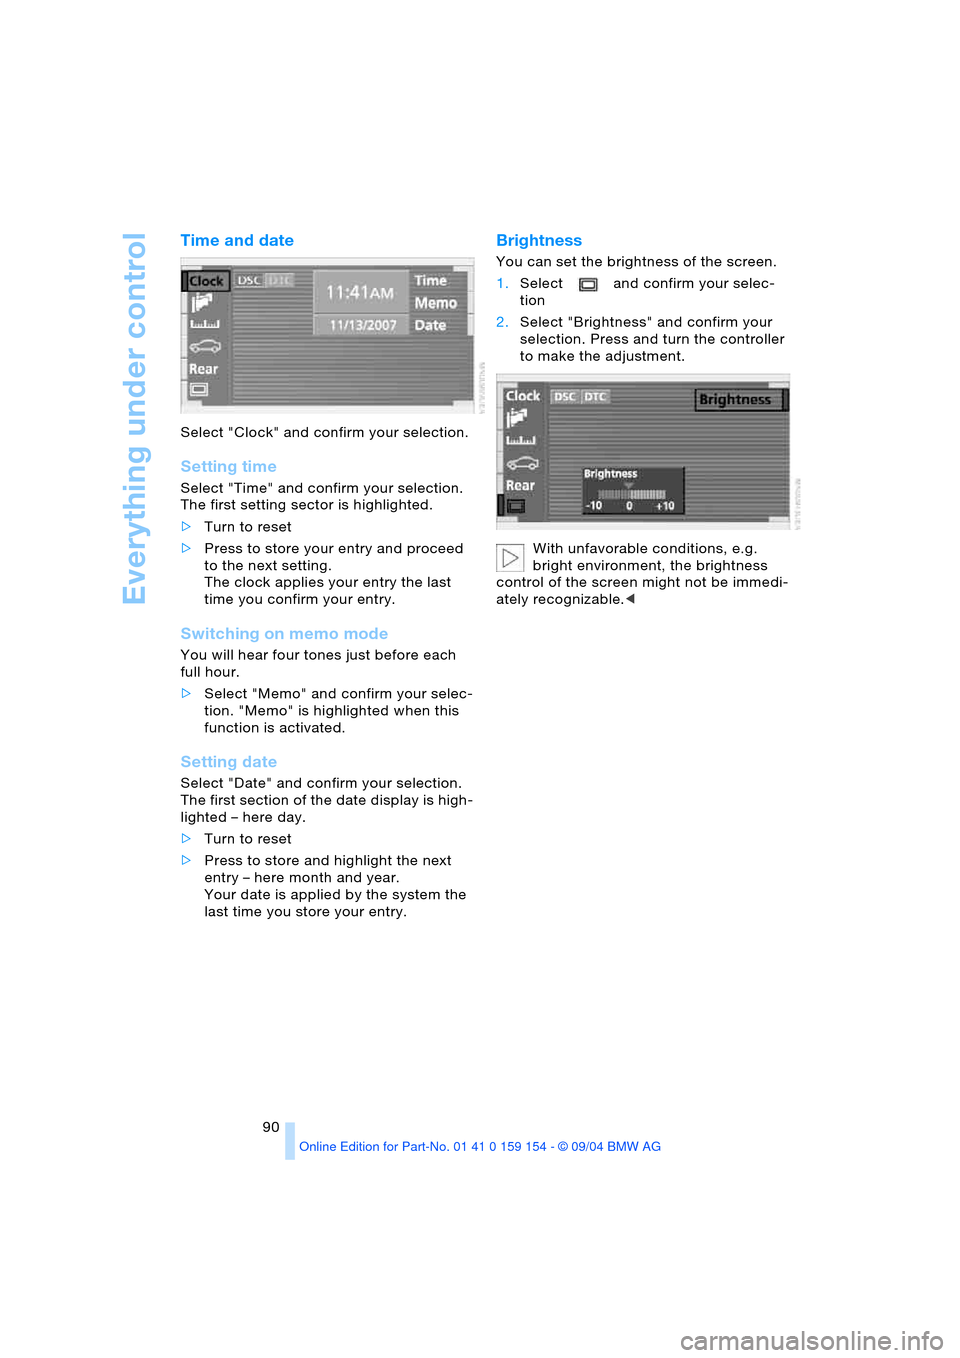
Time and date
Select "Clock" and confirm your selection.
Setting time
Select "Time" and confirm your selection.
The first setting sector is highlighted.
>Turn to reset
>Press to store your entry and proceed
to the next setting.
The clock applies your entry the last
time you confirm your entry.
Switching on memo mode
You will hear four tones just before each
full hour.
>Select "Memo" and confirm your selec-
tion. "Memo" is highlighted when this
function is activated.
Setting date
Select "Date" and confirm your selection.
The first section of the date display is high-
lighted – here day.
>Turn to reset
>Press to store and highlight the next
entry – here month and year.
Your date is applied by the system the
last time you store your entry.
Brightness
You can set the brightness of the screen.
1.Select and confirm your selec-
tion
2.Select "Brightness" and confirm your
selection. Press and turn the controller
to make the adjustment.
With unfavorable conditions, e.g.
bright environment, the brightness
control of the screen might not be immedi-
ately recognizable.<
Page 198 of 239
Under the hood
196 1.5 liter. Do not fill beyond the upper mark
on the dipstick. Excess oil can damage the
engine.
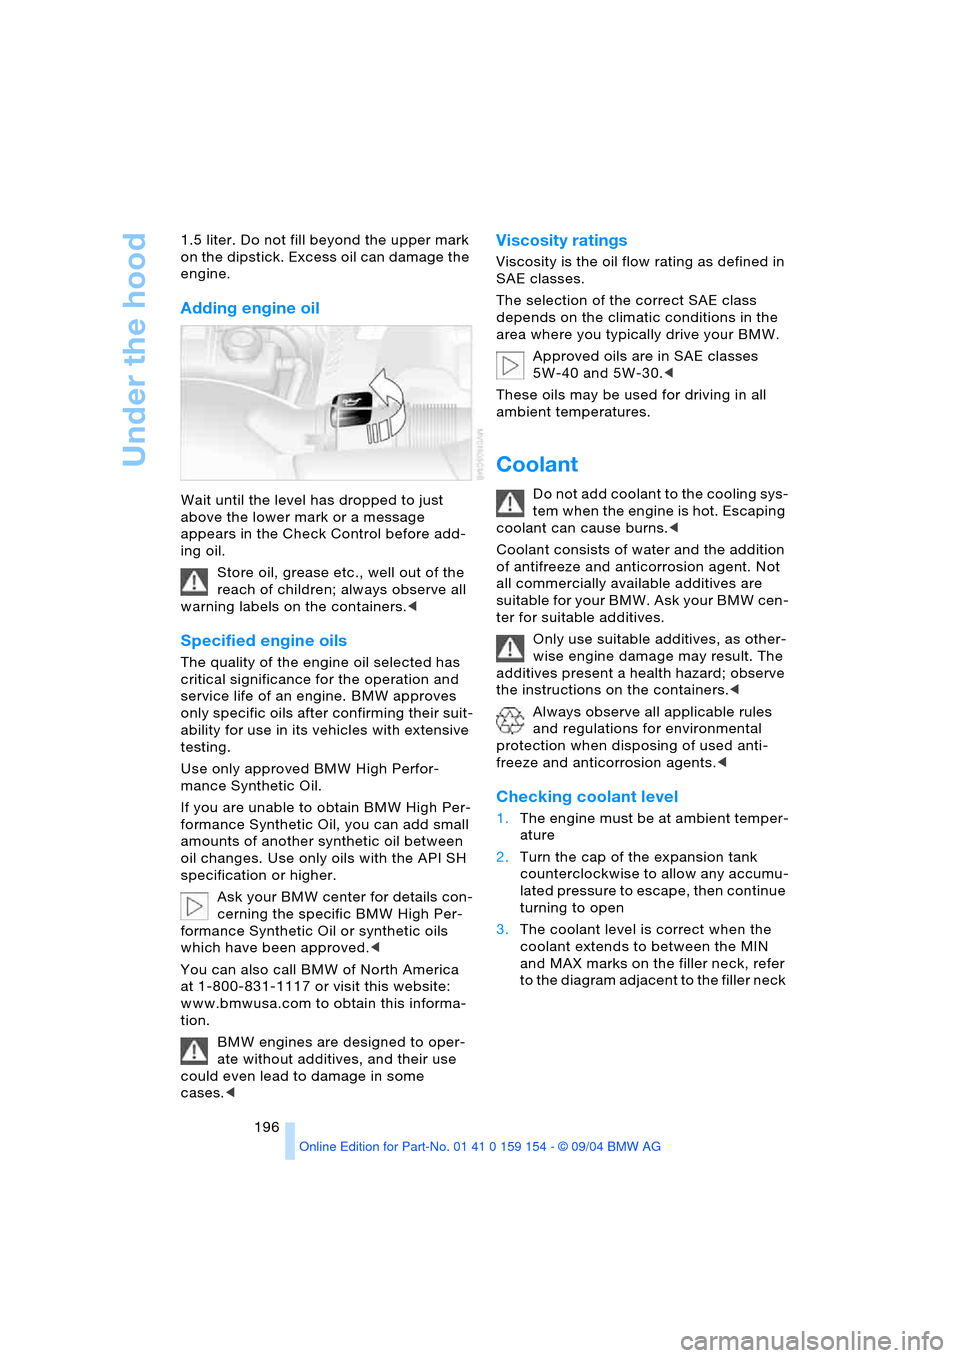
Adding engine oil
Wait until the level has dropped to just
above the lower mark or a message
appears in the Check Control before add-
ing oil.
Store oil, grease etc., well out of the
reach of children; always observe all
warning labels on the containers.<
Specified engine oils
The quality of the engine oil selected has
critical significance for the operation and
service life of an engine. BMW approves
only specific oils after confirming their suit-
ability for use in its vehicles with extensive
testing.
Use only approved BMW High Perfor-
mance Synthetic Oil.
If you are unable to obtain BMW High Per-
formance Synthetic Oil, you can add small
amounts of another synthetic oil between
oil changes. Use only oils with the API SH
specification or higher.
Ask your BMW center for details con-
cerning the specific BMW High Per-
formance Synthetic Oil or synthetic oils
which have been approved.<
You can also call BMW of North America
at 1-800-831-1117 or visit this website:
www.bmwusa.com to obtain this informa-
tion.
BMW engines are designed to oper-
ate without additives, and their use
could even lead to damage in some
cases.<
Viscosity ratings
Viscosity is the oil flow rating as defined in
SAE classes.
The selection of the correct SAE class
depends on the climatic conditions in the
area where you typically drive your BMW.
Approved oils are in SAE classes
5W-40 and 5W-30.<
These oils may be used for driving in all
ambient temperatures.
Coolant
Do not add coolant to the cooling sys-
tem when the engine is hot. Escaping
coolant can cause burns.<
Coolant consists of water and the addition
of antifreeze and anticorrosion agent. Not
all commercially available additives are
suitable for your BMW. Ask your BMW cen-
ter for suitable additives.
Only use suitable additives, as other-
wise engine damage may result. The
additives present a health hazard; observe
the instructions on the containers.<
Always observe all applicable rules
and regulations for environmental
protection when disposing of used anti-
freeze and anticorrosion agents.<
Checking coolant level
1.The engine must be at ambient temper-
ature
2.Turn the cap of the expansion tank
counterclockwise to allow any accumu-
lated pressure to escape, then continue
turning to open
3.The coolant level is correct when the
coolant extends to between the MIN
and MAX marks on the filler neck, refer
to the diagram adjacent to the filler neck
Page 203 of 239
Mobility
201Reference
At a glance
Controls
Driving tips
Communications
Navigation
Entertainment
Replacing components
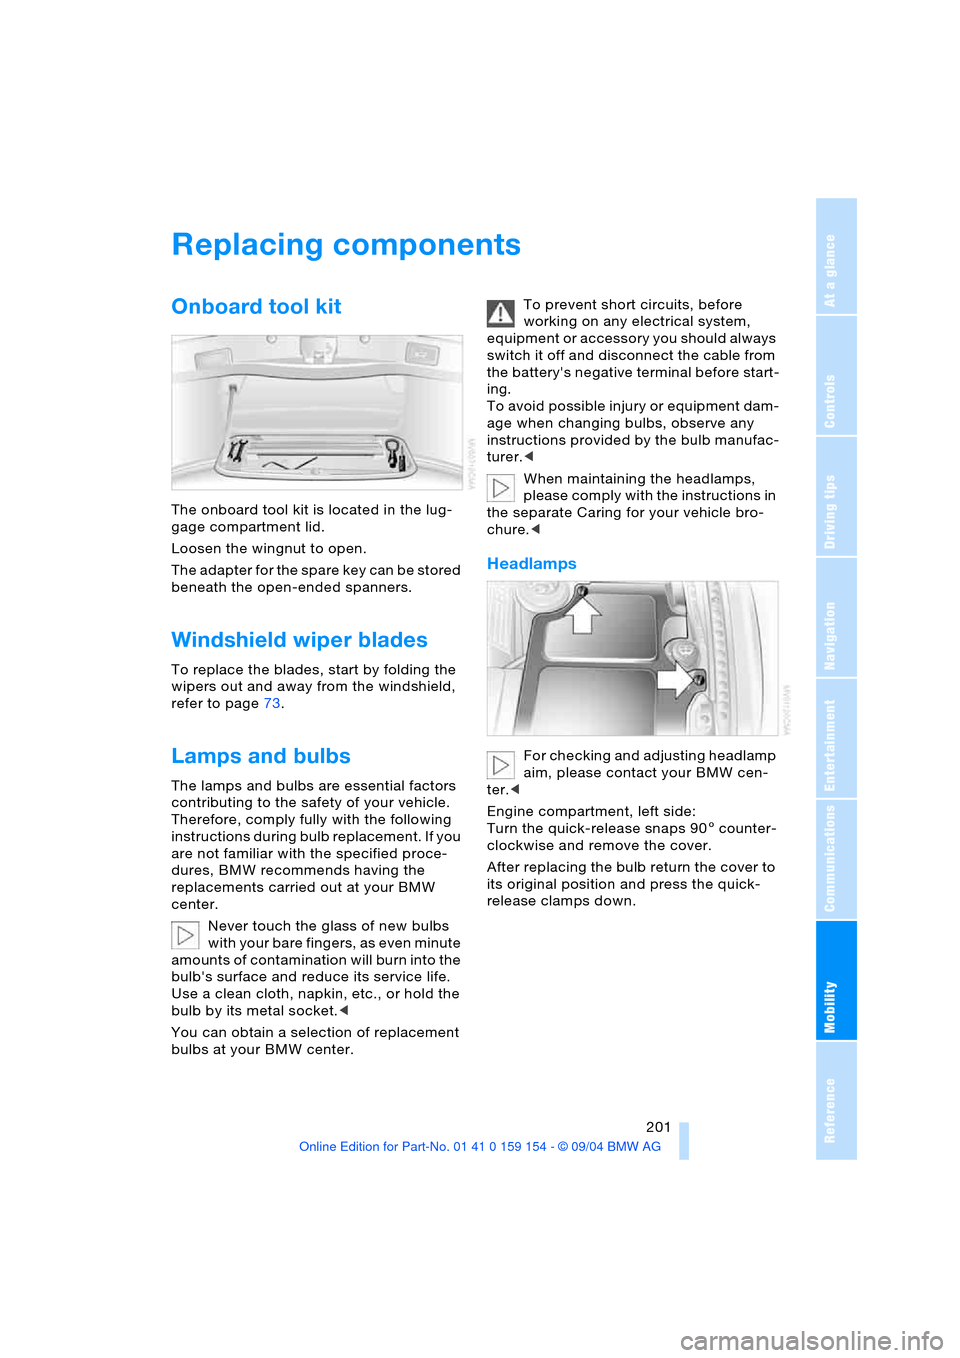
Onboard tool kit
The onboard tool kit is located in the lug-
gage compartment lid.
Loosen the wingnut to open.
The adapter for the spare key can be stored
beneath the open-ended spanners.
Windshield wiper blades
To replace the blades, start by folding the
wipers out and away from the windshield,
refer to page73.
Lamps and bulbs
The lamps and bulbs are essential factors
contributing to the safety of your vehicle.
Therefore, comply fully with the following
instructions during bulb replacement. If you
are not familiar with the specified proce-
dures, BMW recommends having the
replacements carried out at your BMW
center.
Never touch the glass of new bulbs
w i t h y o u r b a r e f i n g e r s , a s e v e n m i n u t e
amounts of contamination will burn into the
bulb's surface and reduce its service life.
Use a clean cloth, napkin, etc., or hold the
bulb by its metal socket.<
You can obtain a selection of replacement
bulbs at your BMW center. To prevent short circuits, before
working on any electrical system,
equipment or accessory you should always
switch it off and disconnect the cable from
the battery's negative terminal before start-
ing.
To avoid possible injury or equipment dam-
age when changing bulbs, observe any
instructions provided by the bulb manufac-
turer.<
When maintaining the headlamps,
please comply with the instructions in
the separate Caring for your vehicle bro-
chure.<
Headlamps
For checking and adjusting headlamp
aim, please contact your BMW cen-
ter.<
Engine compartment, left side:
Turn the quick-release snaps 905 counter-
clockwise and remove the cover.
After replacing the bulb return the cover to
its original position and press the quick-
release clamps down.
Page 222 of 239
Everything from A to Z
220 "Brightness"
– in the Control Center90
– in TV mode164
Brightness90
– in TV mode164
– on Control Display90
Bulb replacement, refer to
Lamps and bulbs201
Buttons on multi-function
steering wheel16
– automatic transmission
with Steptronic70
Bypassing traffic
congestion140
C
Calculating distance86
California laws
– Event Data Recorders200
– Proposition 65
Warning200
Call
– beginning178
– during a call179
– ending178
– replacing179
– when absent181
Calling
– from phone book179
– from the Top 8 list180
– redialing180
– with telephone keypad,
folding176
Calls, switching between
two calls179
Can holder, refer to
Beverage holders116
Capacities217
Car care, refer to the Caring
for your vehicle brochure
Car-care products, refer to
the Caring for your vehicle
brochure
"Car data", vehicle84
Care, refer to the Caring for
your vehicle brochure
Caring for the vehicle finish,
refer to the Caring for
your vehicle brochure
Car jack points205Car key, refer to
Key/remote control34
Carpet care, refer to the
Caring for your vehicle
brochure
Car phone, refer to
separate portable phone
Owner's Manual174
Car radio, refer to
Radio152
Car wash122
– refer to the Caring for your
vehicle brochure
– with Comfort Access122
Catalytic converter, refer to
High temperatures122
CBC Cornering Brake
Control92
– warning lamp13
CBS Condition Based
Service198
"CD"
– in audio mode148
– in CD player mode158
CD changer160
– adjusting tone149
– controls148
– fast forward, reverse162
– location160
– random sequence161
– sampling161
– selecting a CD161
– selecting track162
– starting160
– volume149
CD player158
– adjusting tone149
– controls148
– fast forward, reverse159
– random sequence158
– sampling158
– selecting tracks158
– starting158
– volume149
Center armrest115,118
Center brake lamp, bulb
replacement203
Center console, refer to
Comfort features14Central locking system35
– Comfort Access37
– interior38
"CHANGE" for
navigation137
Changes, technical, refer to
For your own safety5
Changing language89
Changing navigation CDs/
DVDs130
Changing scale140
Changing settings on the
Control Display89
Changing time display89
Changing units of measure
in Control Display89
Changing wheels204
Charge current indicator
lamp83
CHECK button84
Check Control83
– "Check"84
Child's seats, refer to Child-
restraint systems58
Child-restraint systems58
Child-safety lock60
Chrome parts, refer to the
Caring for your vehicle
brochure
Chrome-plated parts, care,
refer to the Caring for
your vehicle brochure
Cigarette lighter117,118
Cleaning, vehicle, refer to
the Caring for your vehicle
brochure
Cleaning windshield72
Climate comfort
windshield126
"Climate" for seat
heating52
"Clock"90
Clock81
– 12/24-hour mode89
– setting90
– setting time and date90
Closing
– from inside38
– from outside35
Clothes hooks116
Cockpit10,14
Page 224 of 239
Everything from A to Z
222 Defrosting windows105
– automatic climate
control105
Defrosting windows and
removing condensation,
automatic climate
control105
Defrosting windshield,
refer to Defrosting
windows105
"DELETE" for
navigation136,137
Destination address
– deleting137
– entering134
Destination for
navigation132
– selecting using voice142
– selecting via
information135
Destination guidance139
– changing route
specifications137
– continuing142
– displaying driving
route131
– distance and arrival86
– interrupting142
– interrupting voice
instructions141
– selecting new route140
– starting139
– terminating142
– volume of voice
instructions141
Destinations recently
driven to137
"Dest. input" for
navigation132
"Detour" for navigation141
Dialed numbers for
telephone180
Differential, break-in122
Digital clock81
Dimensions215
Dimmed interior mirror53
Dipstick, engine oil195
Directional indicators,
refer to Turn signals71Direction instruction, refer
to Voice instructions141
Directory, refer to
– Address book142
– Phone book179
Disc brakes123
Displacement, refer to
Engine specifications214
Display, refer to Control
Display18
Display direction,
altering140
Display elements12
Display illumination101
Display lighting, refer to
Instrument lighting101
Display of faults83
Displays, refer to Info
Display12
Disposal
– battery of remote
control37
– vehicle battery207
Distance86
– unit of measure89
Distance control, refer to
Active cruise control75
Distance to destination86
Distance warning91
Door entry lighting102
Door keys34
Door lock38
DOT Quality Grades190
Draft-free ventilation106
Driving lamps, refer to
Parking lamps/
low beams100
Driving notes122
Driving stability control92
Driving through water,
flooding123
Driving time87
Dry air, refer to
A/C operation105
"DSC", vehicle94
DSC Dynamic Stability
Control93
– indicator lamp13
"DTC", vehicle93DTC Dynamic Traction
Control93
– indicator lamp13
"DVD"
– in audio mode148
– in DVD mode166
DVD changer165
– adjusting picture168
– adjusting tone149
– controls148
– country codes166
– DVD controller166
– fast forward167
– fast reverse167
– freezing frame168
– searching for chapter168
– selecting a track167
– selecting DVD167
– selecting language168
– selecting picture
format168
– selecting subtitles168
– specific menu169
– starting166
– volume149
DVD multimedia changer,
refer to DVD changer165
Dynamic Brake Control
DBC94
– indicator lamp13
Dynamic destination
guidance, traffic
information during
destination guidance140
Dynamic Drive95
Dynamic Stability Control
DSC93
– indicator lamp13
Dynamic Traction Control
DTC93
– indicator lamp13
E
EBV Electronic brake-force
distribution93
EDC Electronic Damping
Control95
Editorial notice5