reset BMW 745i 2005 E65 Owner's Manual
[x] Cancel search | Manufacturer: BMW, Model Year: 2005, Model line: 745i, Model: BMW 745i 2005 E65Pages: 239, PDF Size: 8.03 MB
Page 14 of 239
Cockpit
12
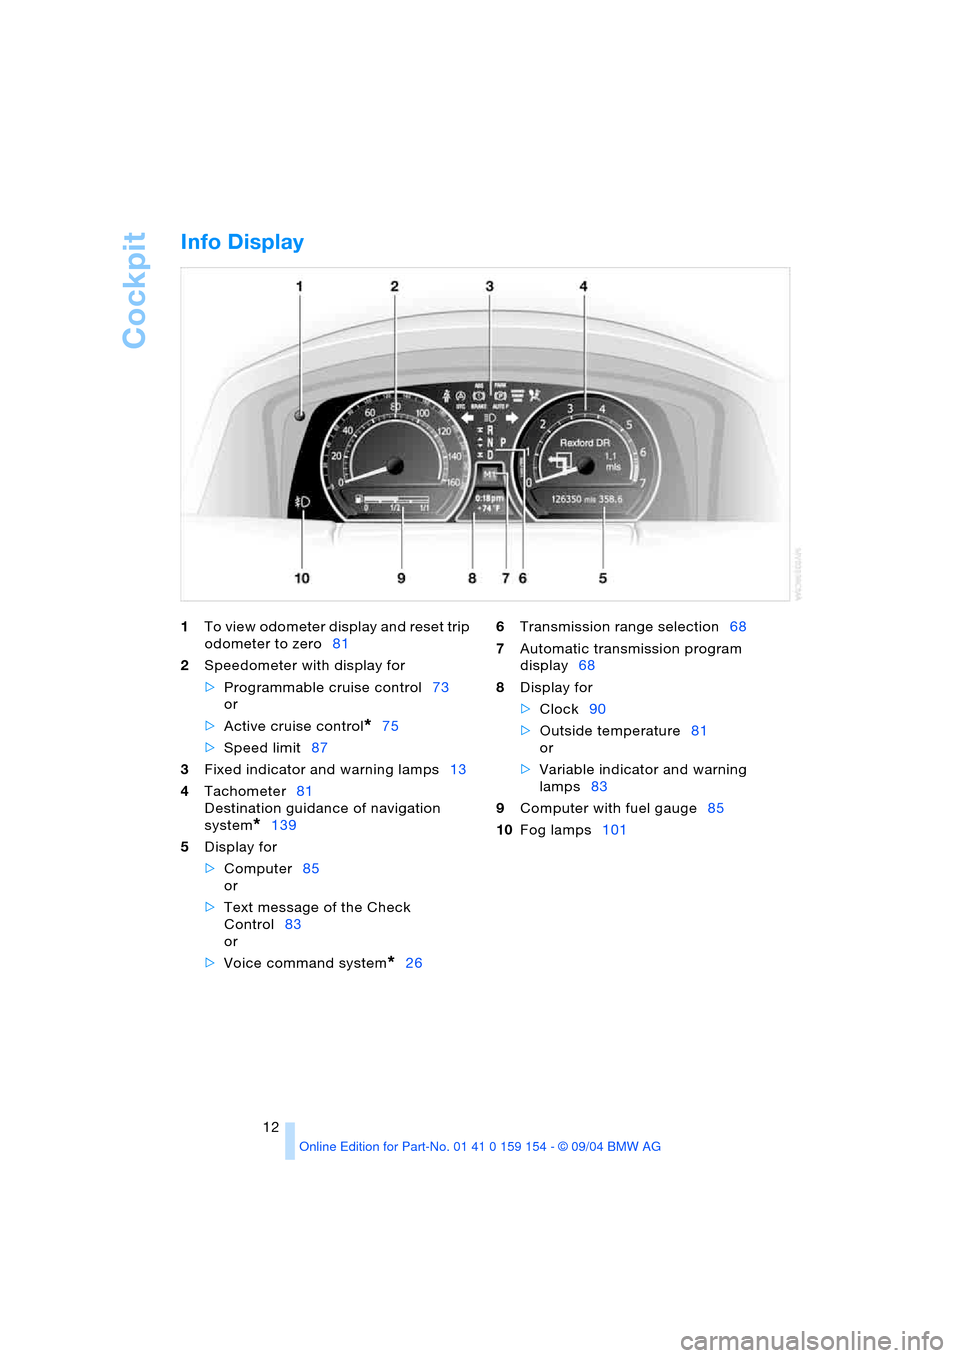
Info Display
1To view odometer display and reset trip
odometer to zero81
2Speedometer with display for
>Programmable cruise control73
or
>Active cruise control
*75
>Speed limit87
3Fixed indicator and warning lamps13
4Tachometer81
Destination guidance of navigation
system
*139
5Display for
>Computer85
or
>Text message of the Check
Control83
or
>Voice command system
*266Transmission range selection68
7Automatic transmission program
display68
8Display for
>Clock90
>Outside temperature81
or
>Variable indicator and warning
lamps83
9Computer with fuel gauge85
10Fog lamps101
Page 51 of 239
Controls
49Reference
At a glance
Driving tips
Communications
Navigation
Entertainment
Mobility
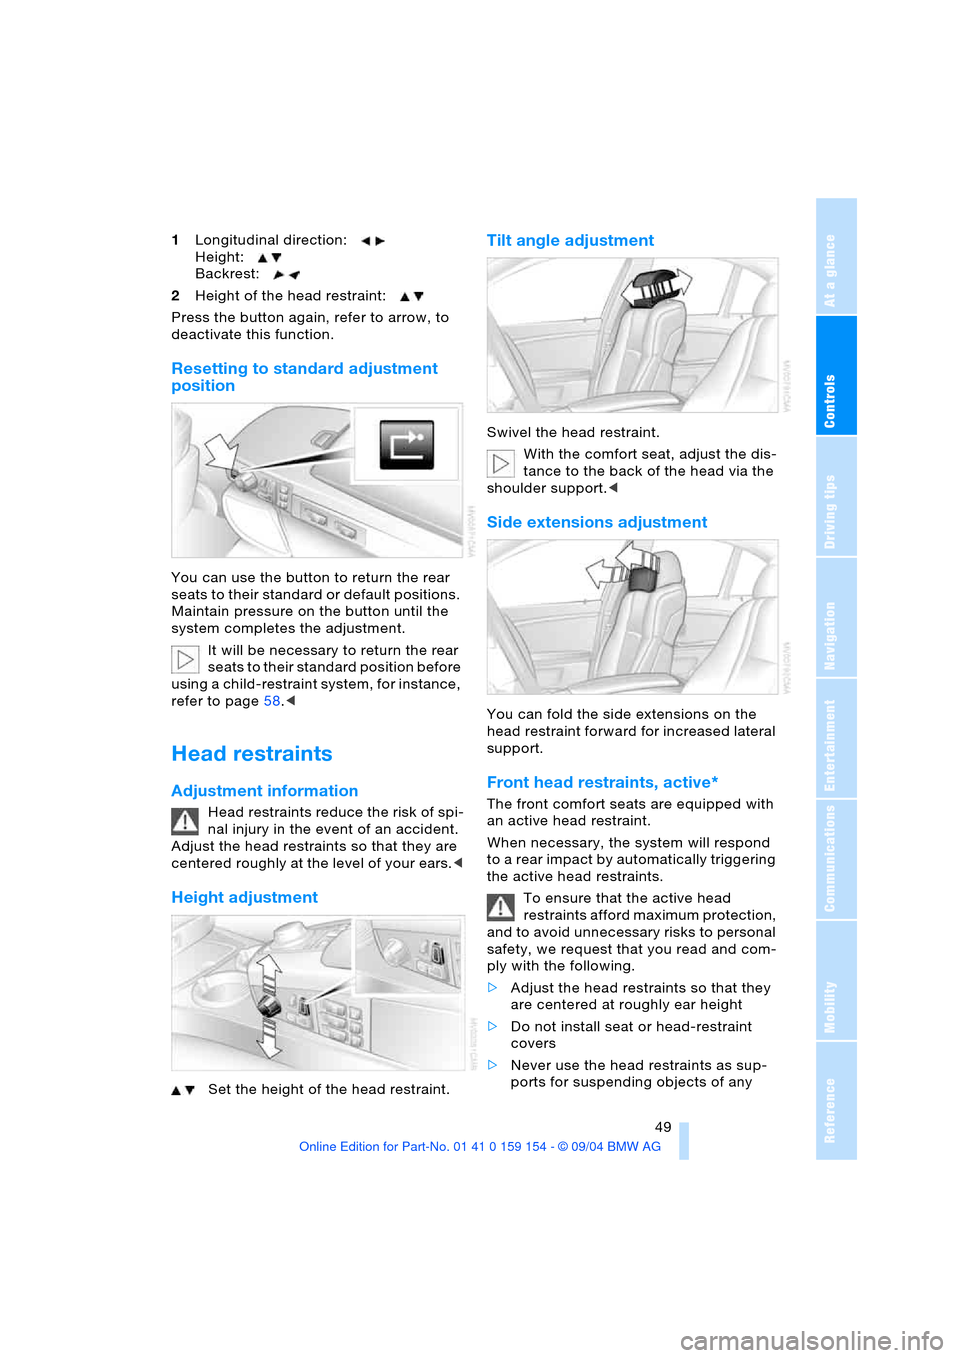
1Longitudinal direction:
Height:
Backrest:
2Height of the head restraint:
Press the button again, refer to arrow, to
deactivate this function.
Resetting to standard adjustment
position
You can use the button to return the rear
seats to their standard or default positions.
Maintain pressure on the button until the
system completes the adjustment.
It will be necessary to return the rear
seats to their standard position before
using a child-restraint system, for instance,
refer to page58.<
Head restraints
Adjustment information
Head restraints reduce the risk of spi-
nal injury in the event of an accident.
Adjust the head restraints so that they are
centered roughly at the level of your ears.<
Height adjustment
Set the height of the head restraint.
Tilt angle adjustment
Swivel the head restraint.
With the comfort seat, adjust the dis-
tance to the back of the head via the
shoulder support.<
Side extensions adjustment
You can fold the side extensions on the
head restraint forward for increased lateral
support.
Front head restraints, active*
The front comfort seats are equipped with
an active head restraint.
When necessary, the system will respond
to a rear impact by automatically triggering
the active head restraints.
To ensure that the active head
restraints afford maximum protection,
and to avoid unnecessary risks to personal
safety, we request that you read and com-
ply with the following.
>Adjust the head restraints so that they
are centered at roughly ear height
>Do not install seat or head-restraint
covers
>Never use the head restraints as sup-
ports for suspending objects of any
Page 58 of 239
Adjustments
56
Tilt function, passenger-side mirror
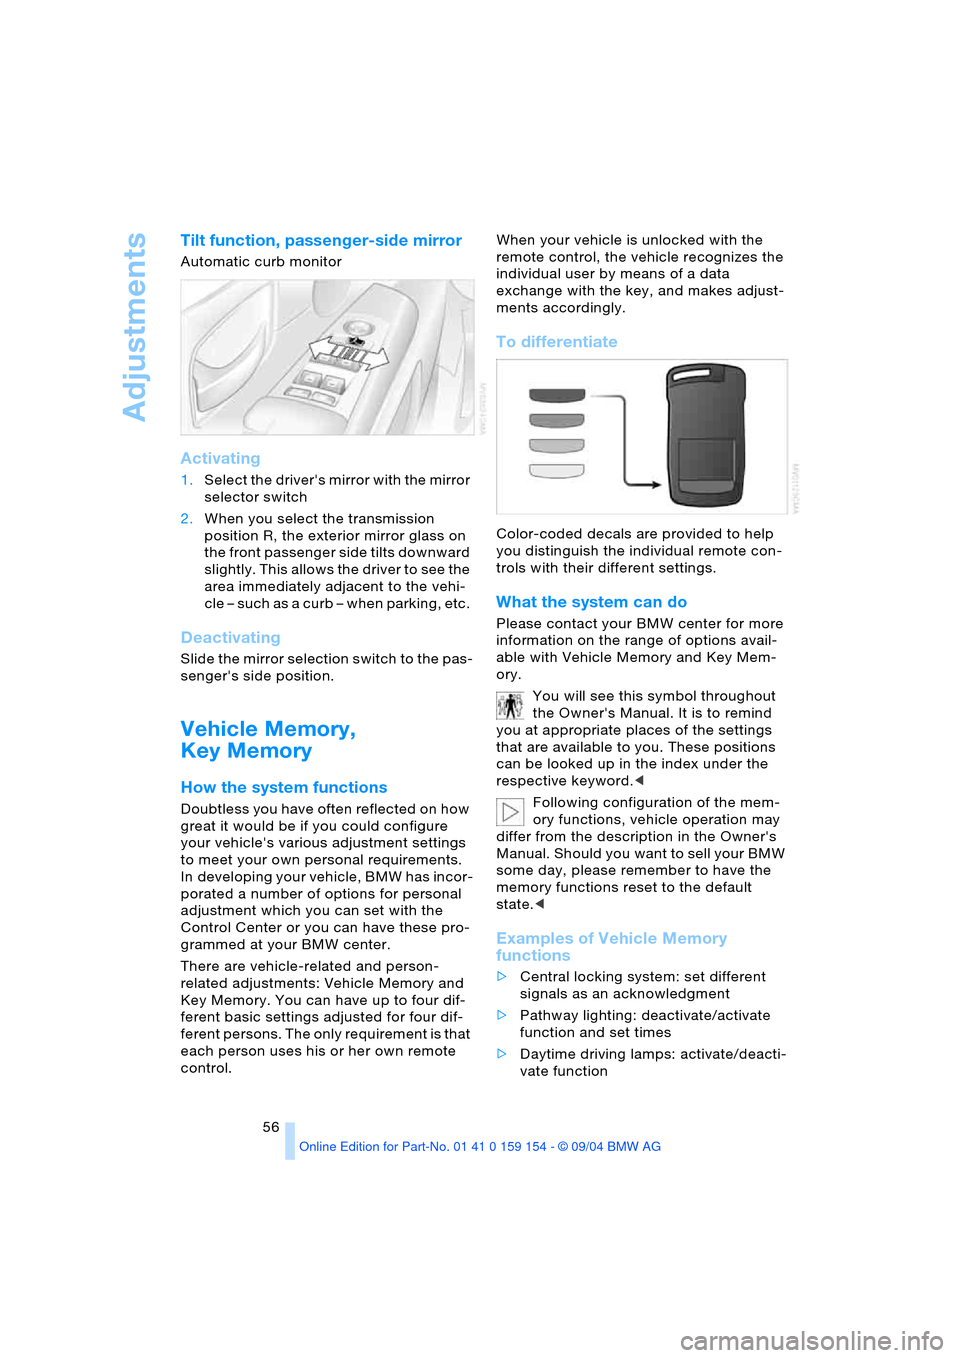
Automatic curb monitor
Activating
1.Select the driver's mirror with the mirror
selector switch
2.When you select the transmission
position R, the exterior mirror glass on
the front passenger side tilts downward
slightly. This allows the driver to see the
area immediately adjacent to the vehi-
cle – such as a curb – when parking, etc.
Deactivating
Slide the mirror selection switch to the pas-
senger's side position.
Vehicle Memory,
Key Memory
How the system functions
Doubtless you have often reflected on how
great it would be if you could configure
your vehicle's various adjustment settings
to meet your own personal requirements.
In developing your vehicle, BMW has incor-
porated a number of options for personal
adjustment which you can set with the
Control Center or you can have these pro-
grammed at your BMW center.
There are vehicle-related and person-
related adjustments: Vehicle Memory and
Key Memory. You can have up to four dif-
ferent basic settings adjusted for four dif-
ferent persons. The only requirement is that
each person uses his or her own remote
control. When your vehicle is unlocked with the
remote control, the vehicle recognizes the
individual user by means of a data
exchange with the key, and makes adjust-
ments accordingly.
To differentiate
Color-coded decals are provided to help
you distinguish the individual remote con-
trols with their different settings.
What the system can do
Please contact your BMW center for more
information on the range of options avail-
able with Vehicle Memory and Key Mem-
ory.
You will see this symbol throughout
the Owner's Manual. It is to remind
you at appropriate places of the settings
that are available to you. These positions
can be looked up in the index under the
respective keyword.<
Following configuration of the mem-
ory functions, vehicle operation may
differ from the description in the Owner's
Manual. Should you want to sell your BMW
some day, please remember to have the
memory functions reset to the default
state.<
Examples of Vehicle Memory
functions
>Central locking system: set different
signals as an acknowledgment
>Pathway lighting: deactivate/activate
function and set times
>Daytime driving lamps: activate/deacti-
vate function
Page 75 of 239
Controls
73Reference
At a glance
Driving tips
Communications
Navigation
Entertainment
Mobility
The rain sensor is automatically deac-
tivated when you switch off the igni-
tion.<
Deactivate the rain sensor when
passing through an automatic car
wash. Failure to do so could result in dam-
age caused by undesired wiper activa-
tion.<
Selecting wiper fold-out position
Important for changing wiper blades, when
folding away from windshield to prevent
blades from sticking when ice forms, etc.
1.Switch off the engine and remove the
remote control from the ignition lock
2.Press the wiper lever up and maintain
pressure for about 3 seconds until the
wipers are roughly vertical: this is the
fold-out position.
After folding the wipers back against the
windshield you will need to reactivate the
wiper system:
1.Insert the remote control to activate the
radio mode in the ignition lock
2.Apply brief upward pressure to the
wiper lever. The wipers return to their
retracted position and are ready for nor-
mal operation.
To prevent damage to the wipers,
always fold them back against the
windshield before switching on either the
radio mode or the ignition.<
Washer fluid
Washer fluid antifreeze is flammable.
Always keep it well away from sparks
and open flames, and store it in tightly
closed containers well out of the reach of
children. Always observe the instructions
for use provided on the containers.<
We recommend that you mix the
washer fluid before adding it to the
reservoir.<
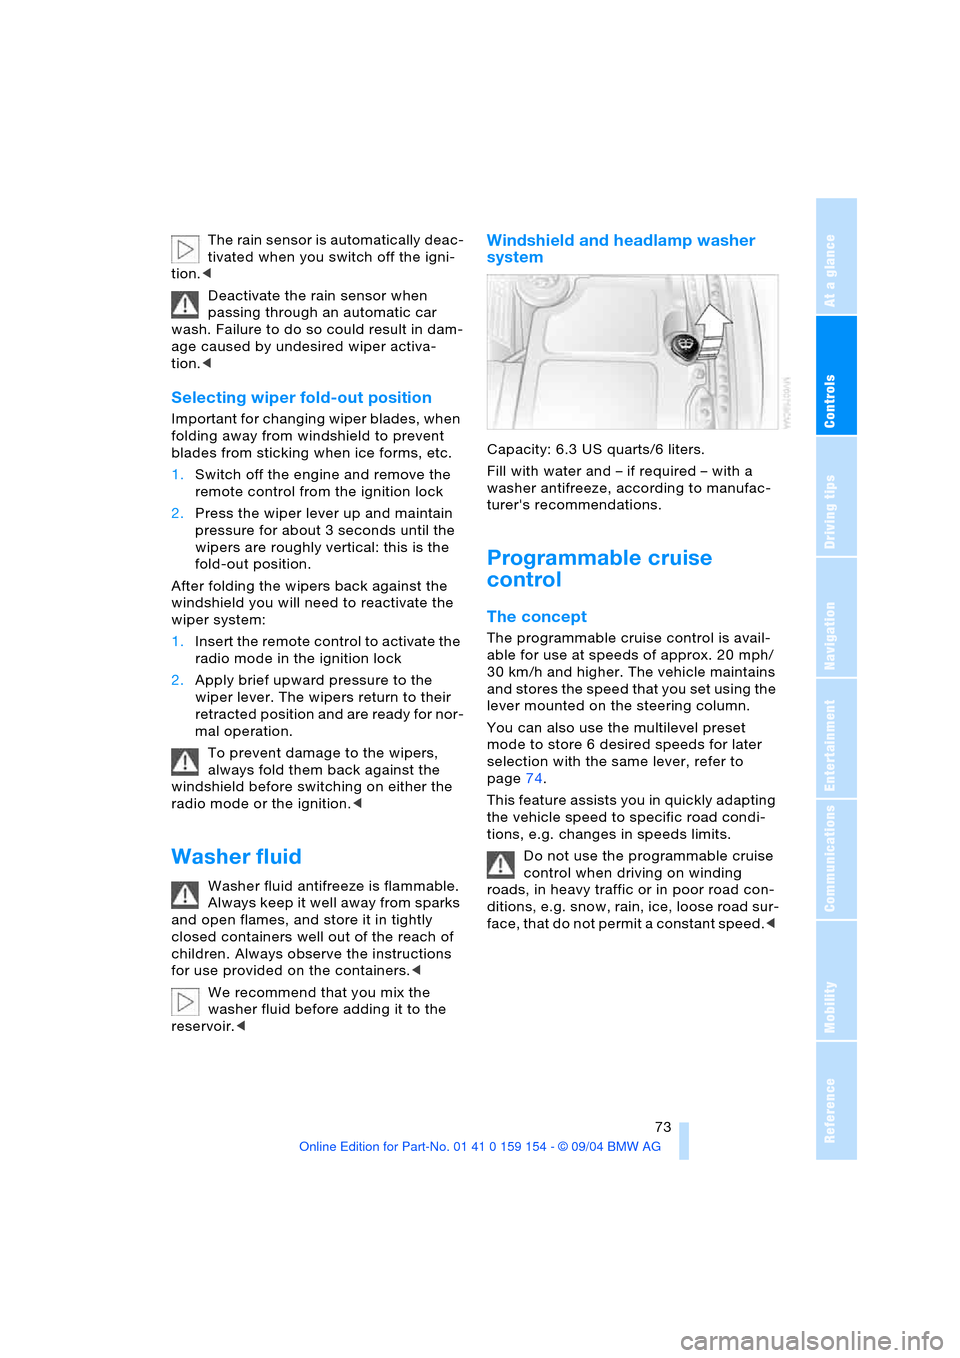
Windshield and headlamp washer
system
Capacity: 6.3USquarts/6liters.
Fill with water and – if required – with a
washer antifreeze, according to manufac-
turer's recommendations.
Programmable cruise
control
The concept
The programmable cruise control is avail-
able for use at speeds of approx. 20 mph/
30 km/h and higher. The vehicle maintains
and stores the speed that you set using the
lever mounted on the steering column.
You can also use the multilevel preset
mode to store 6 desired speeds for later
selection with the same lever, refer to
page74.
This feature assists you in quickly adapting
the vehicle speed to specific road condi-
tions, e.g. changes in speeds limits.
Do not use the programmable cruise
control when driving on winding
roads, in heavy traffic or in poor road con-
ditions, e.g. snow, rain, ice, loose road sur-
face, that do not permit a constant speed.<
Page 76 of 239
Driving
74
One lever for all functions
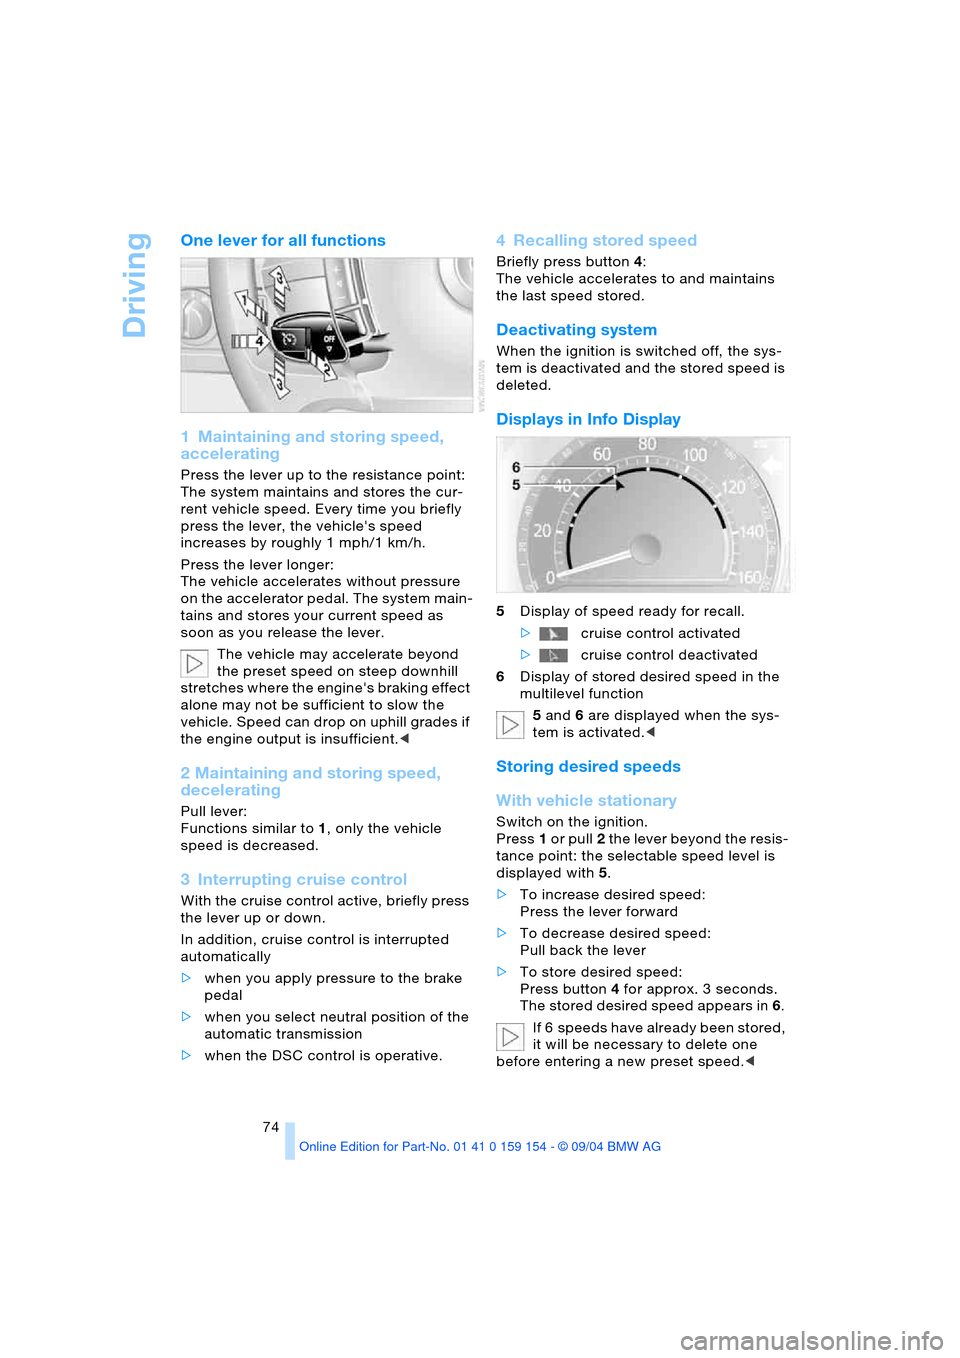
1 Maintaining and storing speed,
accelerating
Press the lever up to the resistance point:
The system maintains and stores the cur-
rent vehicle speed. Every time you briefly
press the lever, the vehicle's speed
increases by roughly 1 mph/1 km/h.
Press the lever longer:
The vehicle accelerates without pressure
on the accelerator pedal. The system main-
tains and stores your current speed as
soon as you release the lever.
The vehicle may accelerate beyond
the preset speed on steep downhill
stretches where the engine's braking effect
alone may not be sufficient to slow the
vehicle. Speed can drop on uphill grades if
the engine output is insufficient.<
2 Maintaining and storing speed,
decelerating
Pull lever:
Functions similar to1, only the vehicle
speed is decreased.
3 Interrupting cruise control
With the cruise control active, briefly press
the lever up or down.
In addition, cruise control is interrupted
automatically
>when you apply pressure to the brake
pedal
>when you select neutral position of the
automatic transmission
>when the DSC control is operative.
4 Recalling stored speed
Briefly press button4:
The vehicle accelerates to and maintains
the last speed stored.
Deactivating system
When the ignition is switched off, the sys-
tem is deactivated and the stored speed is
deleted.
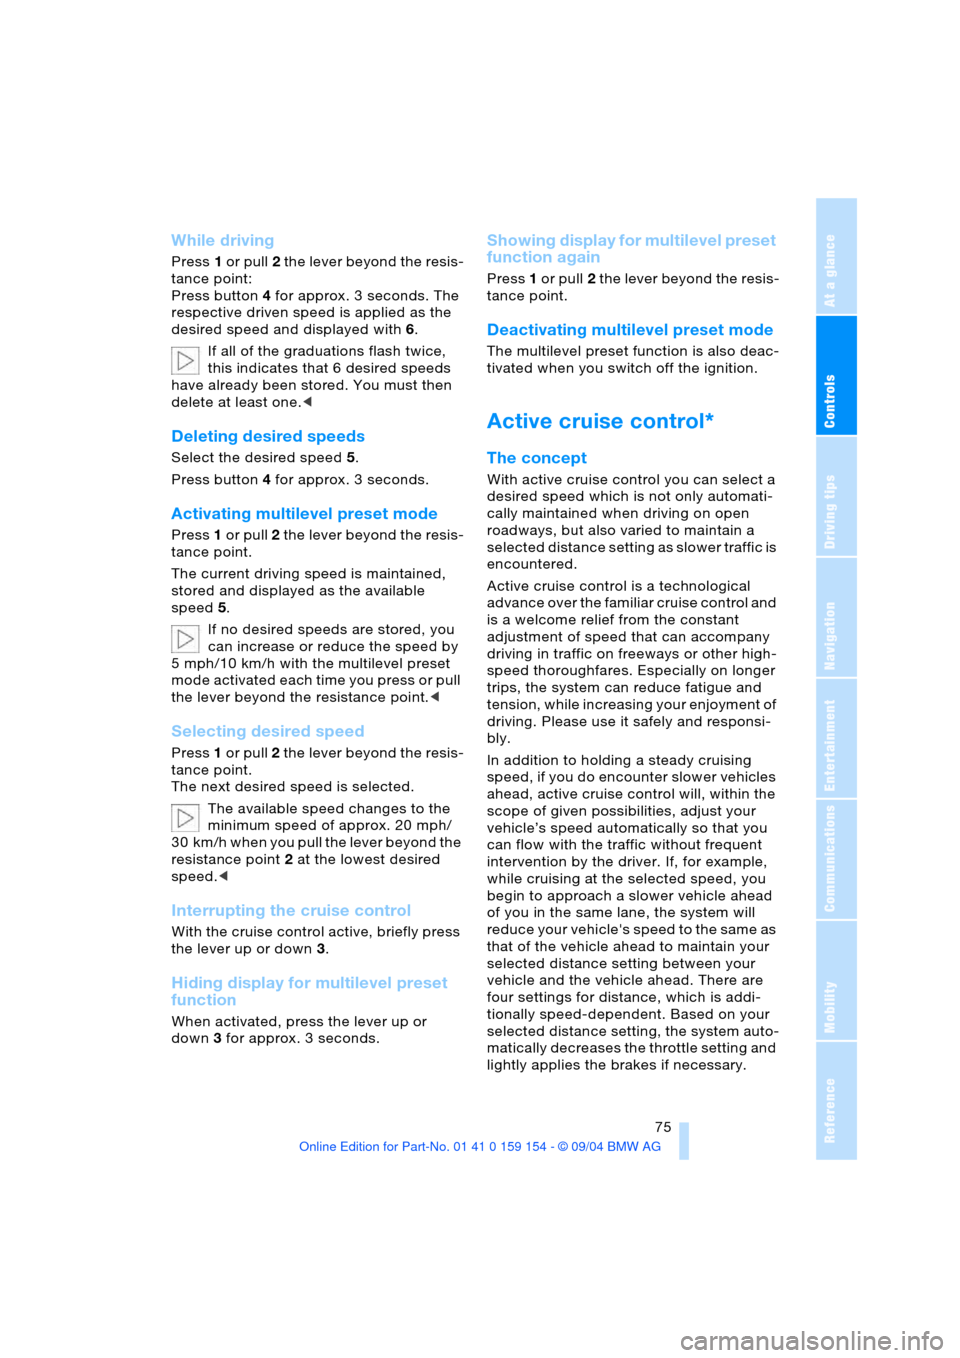
Displays in Info Display
5Display of speed ready for recall.
>cruise control activated
>cruise control deactivated
6Display of stored desired speed in the
multilevel function
5 and 6 are displayed when the sys-
tem is activated.<
Storing desired speeds
With vehicle stationary
Switch on the ignition.
Press1 or pull2 the lever beyond the resis-
tance point: the selectable speed level is
displayed with5.
>To increase desired speed:
Press the lever forward
>To decrease desired speed:
Pull back the lever
>To store desired speed:
Press button4 for approx. 3 seconds.
The stored desired speed appears in 6.
If 6 speeds have already been stored,
it will be necessary to delete one
before entering a new preset speed.<
Page 77 of 239
Controls
75Reference
At a glance
Driving tips
Communications
Navigation
Entertainment
Mobility
While driving
Press1 or pull2 the lever beyond the resis-
tance point:
Press button4 for approx. 3 seconds. The
respective driven speed is applied as the
desired speed and displayed with6.
If all of the graduations flash twice,
this indicates that 6 desired speeds
have already been stored. You must then
delete at least one.<
Deleting desired speeds
Select the desired speed5.
Press button4 for approx. 3 seconds.
Activating multilevel preset mode
Press 1 or pull 2 the lever beyond the resis-
tance point.
The current driving speed is maintained,
stored and displayed as the available
speed5.
If no desired speeds are stored, you
can increase or reduce the speed by
5 mph/10 km/h with the multilevel preset
mode activated each time you press or pull
the lever beyond the resistance point.<
Selecting desired speed
Press 1 or pull 2 the lever beyond the resis-
tance point.
The next desired speed is selected.
The available speed changes to the
minimum speed of approx. 20 mph/
30 km/h when you pull the lever beyond the
resistance point 2 at the lowest desired
speed.<
Interrupting the cruise control
With the cruise control active, briefly press
the lever up or down3.
Hiding display for multilevel preset
function
When activated, press the lever up or
down3 for approx. 3 seconds.
Showing display for multilevel preset
function again
Press 1 or pull2 the lever beyond the resis-
tance point.
Deactivating multilevel preset mode
The multilevel preset function is also deac-
tivated when you switch off the ignition.
Active cruise control*
The concept
With active cruise control you can select a
desired speed which is not only automati-
cally maintained when driving on open
roadways, but also varied to maintain a
selected distance setting as slower traffic is
encountered.
Active cruise control is a technological
advance over the familiar cruise control and
is a welcome relief from the constant
adjustment of speed that can accompany
driving in traffic on freeways or other high-
speed thoroughfares. Especially on longer
trips, the system can reduce fatigue and
tension, while increasing your enjoyment of
driving. Please use it safely and responsi-
bly.
In addition to holding a steady cruising
speed, if you do encounter slower vehicles
ahead, active cruise control will, within the
scope of given possibilities, adjust your
vehicle’s speed automatically so that you
can flow with the traffic without frequent
intervention by the driver. If, for example,
while cruising at the selected speed, you
begin to approach a slower vehicle ahead
of you in the same lane, the system will
reduce your vehicle's speed to the same as
that of the vehicle ahead to maintain your
selected distance setting between your
vehicle and the vehicle ahead. There are
four settings for distance, which is addi-
tionally speed-dependent. Based on your
selected distance setting, the system auto-
matically decreases the throttle setting and
lightly applies the brakes if necessary.
Page 83 of 239
Controls
81Reference
At a glance
Driving tips
Communications
Navigation
Entertainment
Mobility
Everything under control
Odometer, outside temperature display, clock
When the ignition is off you can briefly acti-
vate the time, outside temperature and
odometer displays by pressing the knob at
the upper left of the Info Display.
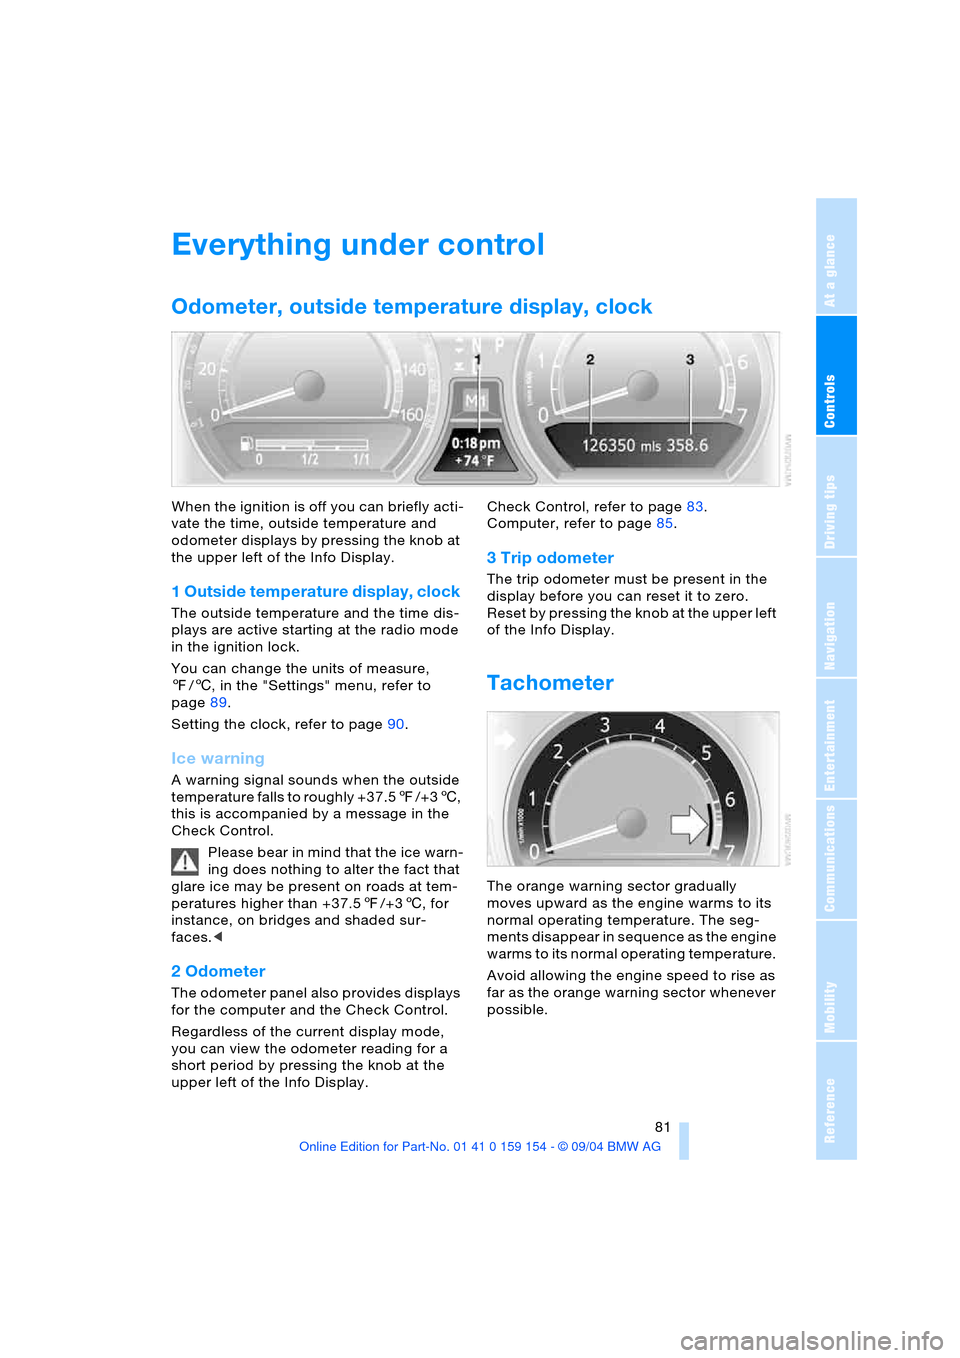
1 Outside temperature display, clock
The outside temperature and the time dis-
plays are active starting at the radio mode
in the ignition lock.
You can change the units of measure,
7/6, in the "Settings" menu, refer to
page89.
Setting the clock, refer to page90.
Ice warning
A warning signal sounds when the outside
temperature falls to roughly +37.57/+36,
this is accompanied by a message in the
Check Control.
Please bear in mind that the ice warn-
ing does nothing to alter the fact that
glare ice may be present on roads at tem-
peratures higher than +37.57/+36, for
instance, on bridges and shaded sur-
faces.<
2 Odometer
The odometer panel also provides displays
for the computer and the Check Control.
Regardless of the current display mode,
you can view the odometer reading for a
short period by pressing the knob at the
upper left of the Info Display. Check Control, refer to page83.
Computer, refer to page85.
3 Trip odometer
The trip odometer must be present in the
display before you can reset it to zero.
Reset by pressing the knob at the upper left
of the Info Display.
Tachometer
The orange warning sector gradually
moves upward as the engine warms to its
normal operating temperature. The seg-
ments disappear in sequence as the engine
warms to its normal operating temperature.
Avoid allowing the engine speed to rise as
far as the orange warning sector whenever
possible.
Page 85 of 239
Controls
83Reference
At a glance
Driving tips
Communications
Navigation
Entertainment
Mobility
or the battery switch OFF.
Please remember that brake fluid should be
changed every two years at the latest, even
if the display does not yet indicate that ser-
vice is required, refer to page197.
This same precaution applies to all of the
other service and maintenance operations
scheduled according to periodic inter-
vals.<
Displaying and entering dates for
legally-mandated emission and
vehicle inspections
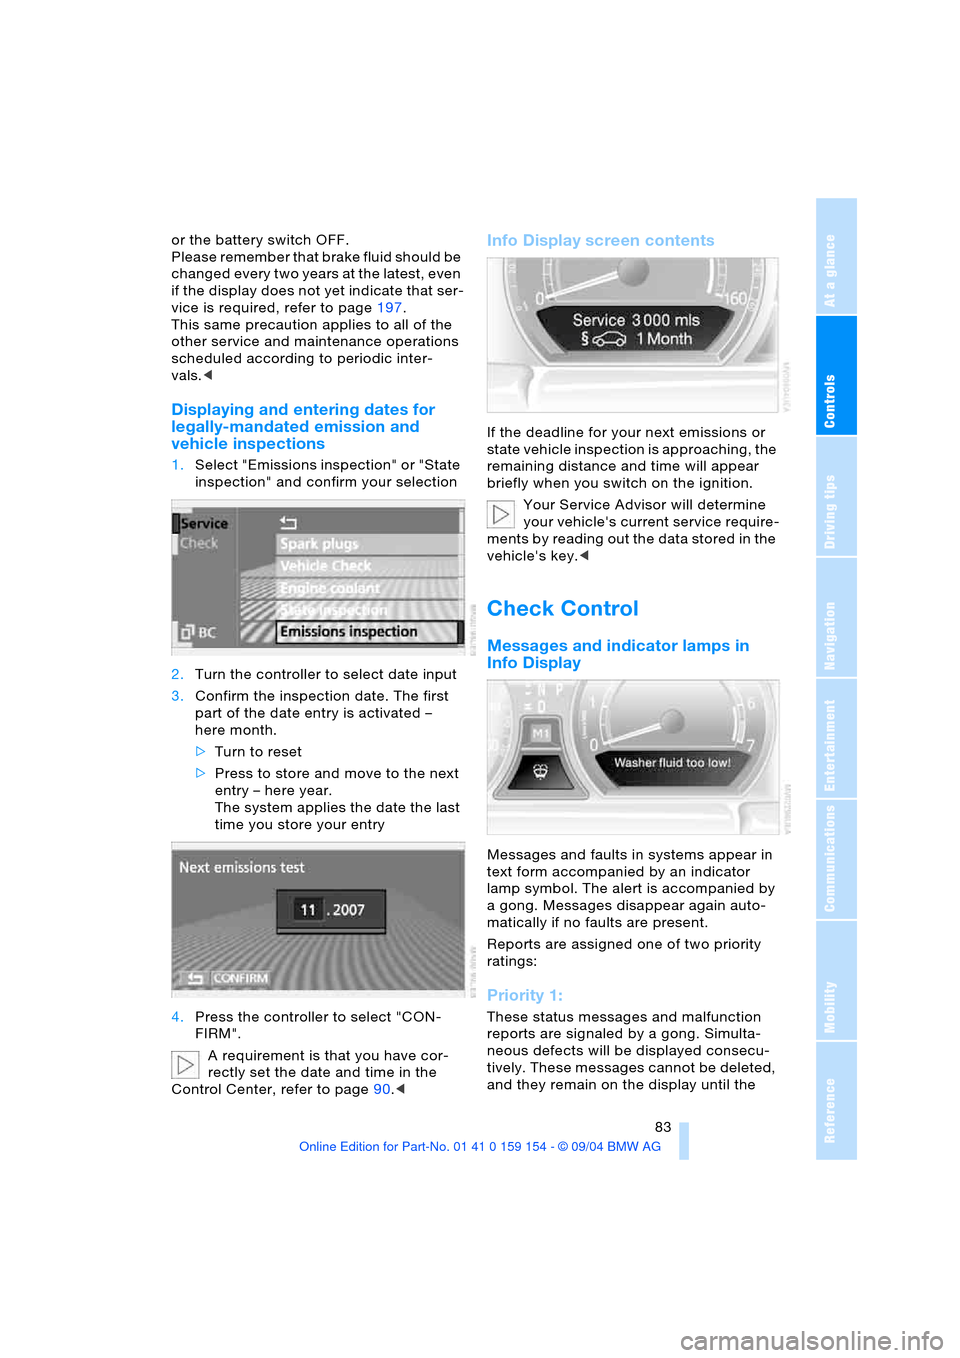
1.Select "Emissions inspection" or "State
inspection" and confirm your selection
2.Turn the controller to select date input
3.Confirm the inspection date. The first
part of the date entry is activated –
here month.
>Turn to reset
>Press to store and move to the next
entry – here year.
The system applies the date the last
time you store your entry
4.Press the controller to select "CON-
FIRM".
A requirement is that you have cor-
rectly set the date and time in the
Control Center, refer to page90.<
Info Display screen contents
If the deadline for your next emissions or
state vehicle inspection is approaching, the
remaining distance and time will appear
briefly when you switch on the ignition.
Your Service Advisor will determine
your vehicle's current service require-
ments by reading out the data stored in the
vehicle's key.<
Check Control
Messages and indicator lamps in
Info Display
Messages and faults in systems appear in
text form accompanied by an indicator
lamp symbol. The alert is accompanied by
a gong. Messages disappear again auto-
matically if no faults are present.
Reports are assigned one of two priority
ratings:
Priority 1:
These status messages and malfunction
reports are signaled by a gong. Simulta-
neous defects will be displayed consecu-
tively. These messages cannot be deleted,
and they remain on the display until the
Page 88 of 239
Everything under control
86 >Energy Control/
current fuel consumption86
>Average fuel consumption86
>Average speed86
>Time of arrival87.
Maintain pressure on button1 to can-
cel the display from the computer.
Briefly press the button again to return to
the last display.
It will not be possible to cancel the display
if the fuel level has fallen into the reserve
range or if a Check Control status report is
currently on the screen.
Briefly press the button again to view the
last display.<
Fuel gauge
The fuel gauge mode appears automati-
cally once the fuel level falls into the
reserve range. At the same time, the words
"Fuel reserve" appear. The tank still con-
tains approx. 2.6 gallons/10 liters of fuel.
If the tilt of the vehicle varies, when you are
driving in mountainous areas, for example,
the indicator may fluctuate slightly.
It will not be possible to cancel the
computer display once the fuel level
drops into the reserve range. However, you
can still request a display of the travel
range. Computer, refer to page85.<
Fuel tank capacity: approx. 23.2 gallons/
88 liters. You can find information on refu-
eling on page186.
Refuel well before the tank is empty,
as otherwise engine functions will not
be ensured and damage can occur if you
drive down to the last drop.<
Cruising range
Displays the estimated cruising range avail-
able with the remaining fuel. The fuel level
is measured and the range is calculated
taking the driving style over the last
20 miles/30 km into account.
Always refuel as soon as possible
once your range falls to below
30 miles/50 km, as otherwise engine func-tions are not ensured and damage can
occur.<
Refueling is only registered by the com-
puter for fuel amounts above approx.
1.3 gallons/5 liters.
Remaining distance
When you enter a destination in the naviga-
tion system or manually enter a distance in
the computer prior to departure, the system
can also display the distance remaining to
your destination, refer to page132 or87.
The system automatically applies the dis-
tance to your destination using the route
recommended by the navigation system.
When you enter a destination in the
navigation system, any manual entries
will be overwritten no later than once
1,640 ft/500 meters of the calculated dis-
tance have elapsed.<
Energy Control/
current fuel consumption
Shows the current fuel consumption. This
allows you to see whether your current
driving style is conducive to fuel economy
with minimum exhaust emissions.
Average fuel consumption
The average fuel consumption is calculated
for the time during which the engine is run-
ning.
You can use the Control Display to view
your fuel consumption rate over two differ-
ent distances, refer to Computer or Trip
computer.
Average speed
Periods with the vehicle parked and the
engine off are not included in the calcula-
tions of average speed.
Reset average speed: Press button2 in the
turn indicator lever for approx. 2 seconds.
Page 89 of 239
Controls
87Reference
At a glance
Driving tips
Communications
Navigation
Entertainment
Mobility
Time of arrival
A display of your estimated time of arrival is
available whenever you enter a destination
in the navigation system, refer to page132,
or enter the distance manually in the com-
puter, refer to page87, prior to departure.
A requirement is that you have cor-
rectly set the time in the Control Cen-
ter, refer to page90.<
Control Display screen contents
You can activate the computer function at
any time by selecting it from the "Car data"
menu.
You have two possibilities to display infor-
mation of the computer:
>Computer
>Trip computer
Use this, for example, for driving on
vacation, as when you reset the values
to zero, all the functions are reset
together and then restart.
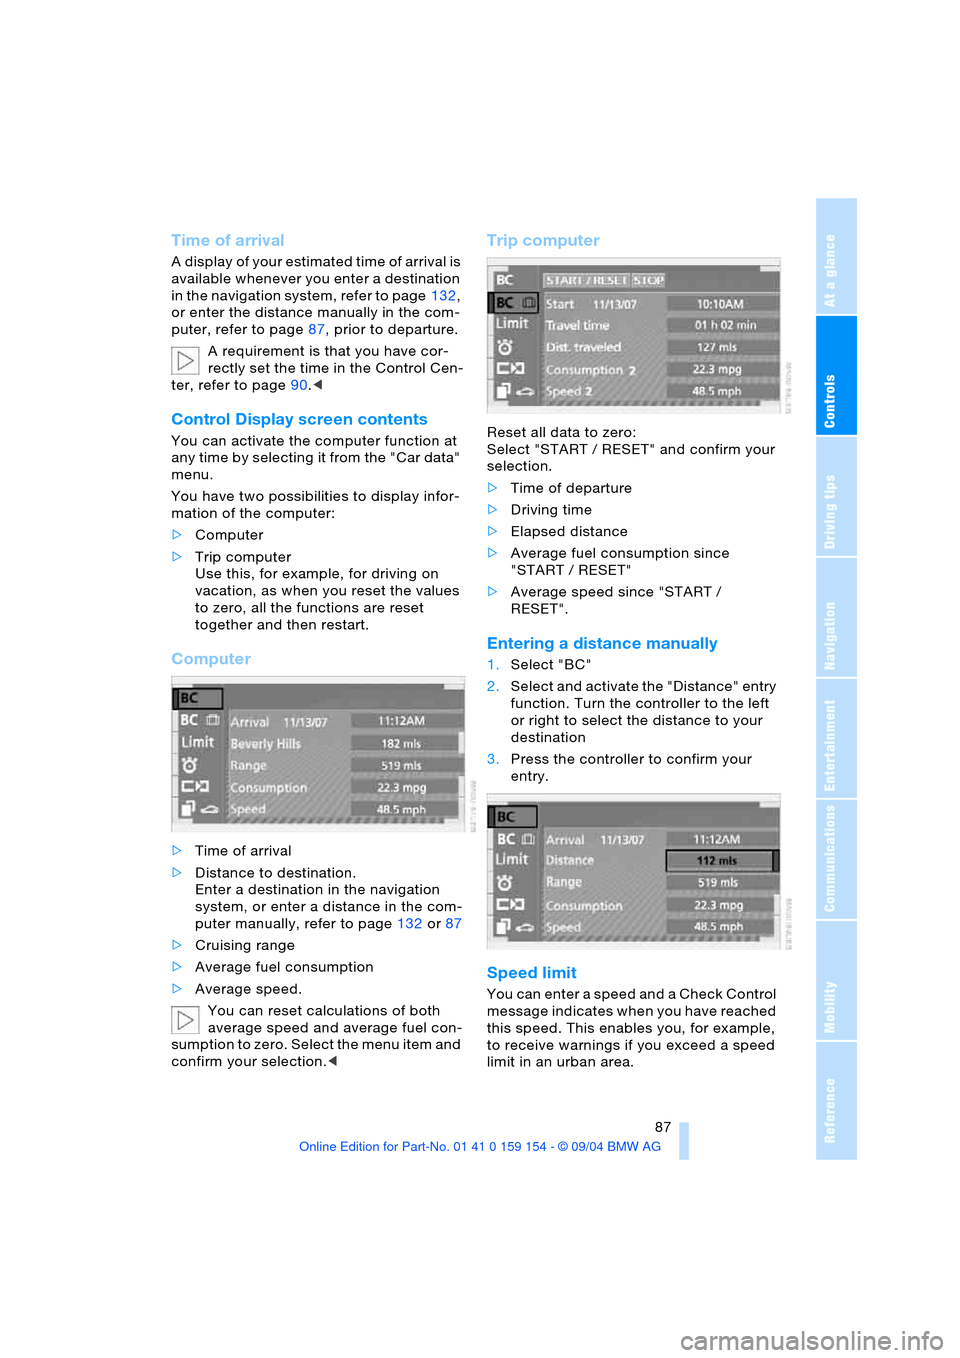
Computer
>Time of arrival
>Distance to destination.
Enter a destination in the navigation
system, or enter a distance in the com-
puter manually, refer to page132 or87
>Cruising range
>Average fuel consumption
>Average speed.
You can reset calculations of both
average speed and average fuel con-
sumption to zero. Select the menu item and
confirm your selection.<
Trip computer
Reset all data to zero:
Select "START / RESET" and confirm your
selection.
>Time of departure
>Driving time
>Elapsed distance
>Average fuel consumption since
"START / RESET"
>Average speed since "START /
RESET".
Entering a distance manually
1.Select "BC"
2.Select and activate the "Distance" entry
function. Turn the controller to the left
or right to select the distance to your
destination
3.Press the controller to confirm your
entry.
Speed limit
You can enter a speed and a Check Control
message indicates when you have reached
this speed. This enables you, for example,
to receive warnings if you exceed a speed
limit in an urban area.