Dvd BMW 745i 2006 E65 Owner's Manual
[x] Cancel search | Manufacturer: BMW, Model Year: 2006, Model line: 745i, Model: BMW 745i 2006 E65Pages: 247, PDF Size: 8.66 MB
Page 5 of 247
Reference
At a glance
Controls
Driving tips
Communications
Navigation
Entertainment
Mobility
Contents
The fastest way to find specific topics is to use
the index, refer to page224.
Using this Owner's Manual
4Notes
At a glance
10Cockpit
16iDrive
23Voice command system
Controls
30Opening and closing
43Adjusting
54Transporting children safely
57Driving
75Everything under control
86Technology for comfort, convenience
and safety
99Lamps
103Climate
111Practical interior accessories
Driving tips
122Things to remember when driving
Navigation
130Starting navigation system
131Destination input
143Route guidance
148What to do if …
Entertainment
152On/off and settings
155Radio
162CD player
164CD changer
168DVD changer
Communications
176Telephone overview
179Getting started
182Using the phone
186BMW Assist
Mobility
192Refueling
194Wheels and tires
201Under the hood
205Maintenance
207Replacing components
213Giving and receiving assistance
Reference
218Technical data
222Short commands of the voice command
system
224Everything from A to Z
Page 20 of 247
iDrive
18 5Help
>Brief help text displays20
>Menu name for menu change19
6Entertainment
>Radio155
>CD player
*162
>CD changer
*164
>DVD changer
*168
It is only possible to play a DVD on the
rear seat screen, refer to Rear seat
screen
* on page21.<
7Settings
>Parking brake58
>PDC Park Distance Control86
>EDC Electronic Damping Control89
>Programmable buttons52
>FTM Flat Tire Monitor
*90
>TPM Tire Pressure Monitor
*91
>Time and date84
>Language84
>Units of measure and display format84
>Brightness85
>Rear seat screen
*21
8Climate
>Intensity of AUTO program104
>Air volume106
>Heated seats
*49
>Parked car ventilation109
>Extra, e.g. rear air conditioner108
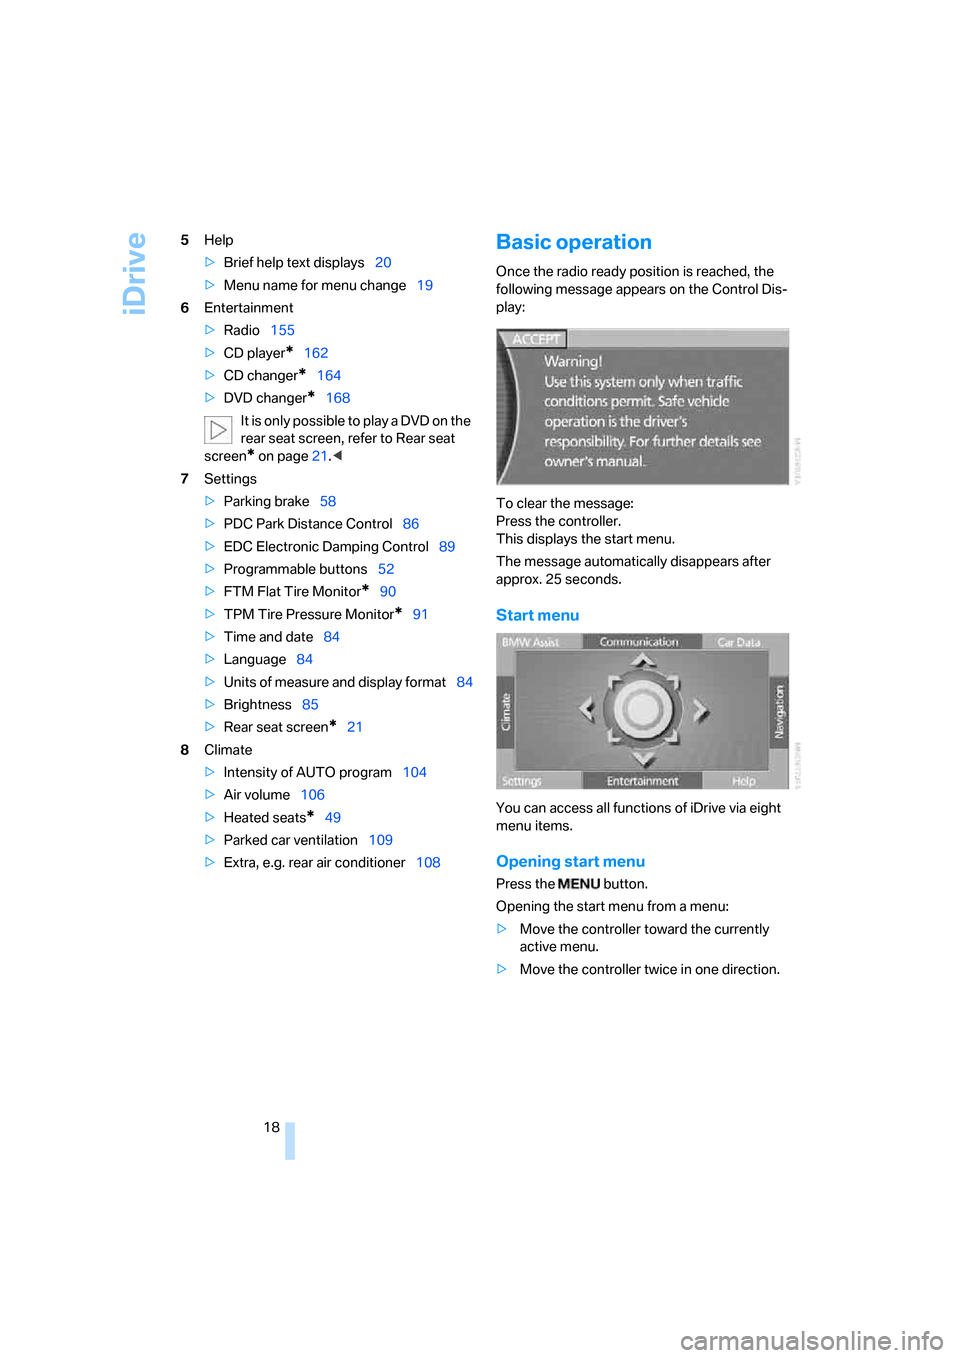
Basic operation
Once the radio ready position is reached, the
following message appears on the Control Dis-
play:
To clear the message:
Press the controller.
This displays the start menu.
The message automatically disappears after
approx. 25 seconds.
Start menu
You can access all functions of iDrive via eight
menu items.
Opening start menu
Press the button.
Opening the start menu from a menu:
>Move the controller toward the currently
active menu.
>Move the controller twice in one direction.
Page 23 of 247
At a glance
21Reference
Controls
Driving tips
Communications
Navigation
Entertainment
Mobility
5Telephone status
>Green, yellow and red flashing:
Linking of a mobile phone.
>Green:
Incoming or outgoing call.
>Red:
No network available.
>Yellow:
The network of another provider is being
used, partner network.
>Flashing yellow:
The network of another provider is being
used, external network.
Roaming in a partner or external net-
work incurs higher call charges than
in your home network.<
6Display of Check Control81
>You can use the "Car Data" menu to dis-
play the message on the Control Dis-
play.
Status service requirement display78
>Red:
At least one service interval has been
exceeded.
7Display of temperature selection and inten-
sity of the AUTO program, right side of pas-
senger compartment
8Air volume, right side of passenger com-
partment
9Entertainment
Display for radio, CD, and DVD
With compressed audio files, the informa-
tion about the track is displayed166
10Air volume, left side of passenger compart-
ment
11Display of temperature selection and inten-
sity of the AUTO program, left side of pas-
senger compartment
Assistance window*
The status lines in the assistance window show
the following:
>Outside temperature
>Navigation system destination>Time
>Date
Rear seat screen*
Some of the functions of iDrive can also be
operated via the rear seat screen. Certain func-
tions are only available via iDrive. These func-
tions can only be operated to a limited degree
on the rear screen, e.g. the speed limit can only
be displayed. The settings are made via iDrive.
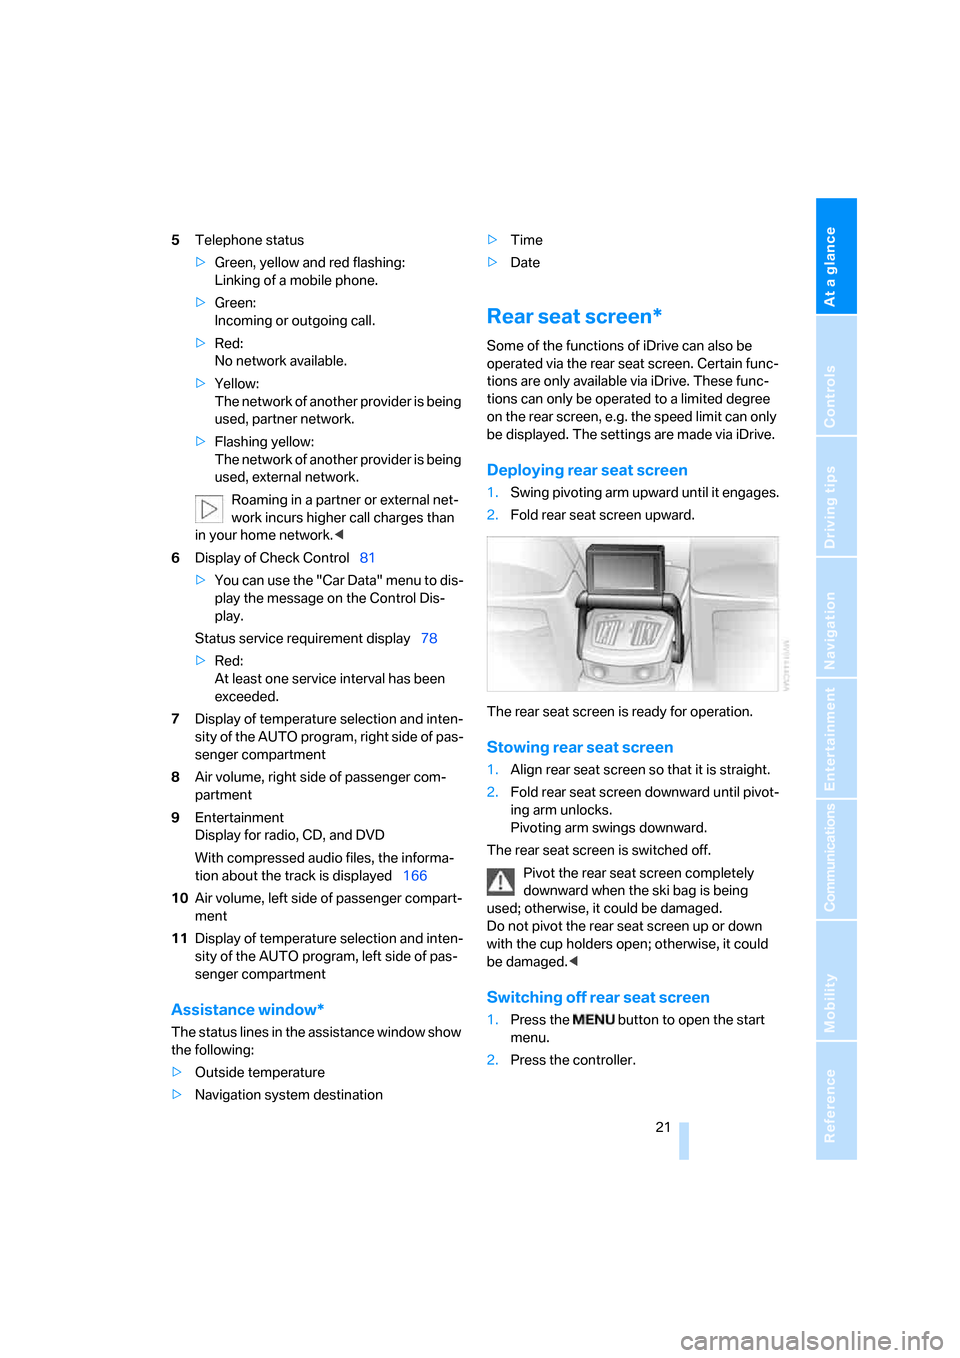
Deploying rear seat screen
1.Swing pivoting arm upward until it engages.
2.Fold rear seat screen upward.
The rear seat screen is ready for operation.
Stowing rear seat screen
1.Align rear seat screen so that it is straight.
2.Fold rear seat screen downward until pivot-
ing arm unlocks.
Pivoting arm swings downward.
The rear seat screen is switched off.
Pivot the rear seat screen completely
downward when the ski bag is being
used; otherwise, it could be damaged.
Do not pivot the rear seat screen up or down
with the cup holders open; otherwise, it could
be damaged.<
Switching off rear seat screen
1.Press the button to open the start
menu.
2.Press the controller.
Page 24 of 247
iDrive
22 Press the controller again to switch the screen
back on.
Controller/buttons
The controller and buttons are located on the
center armrest.
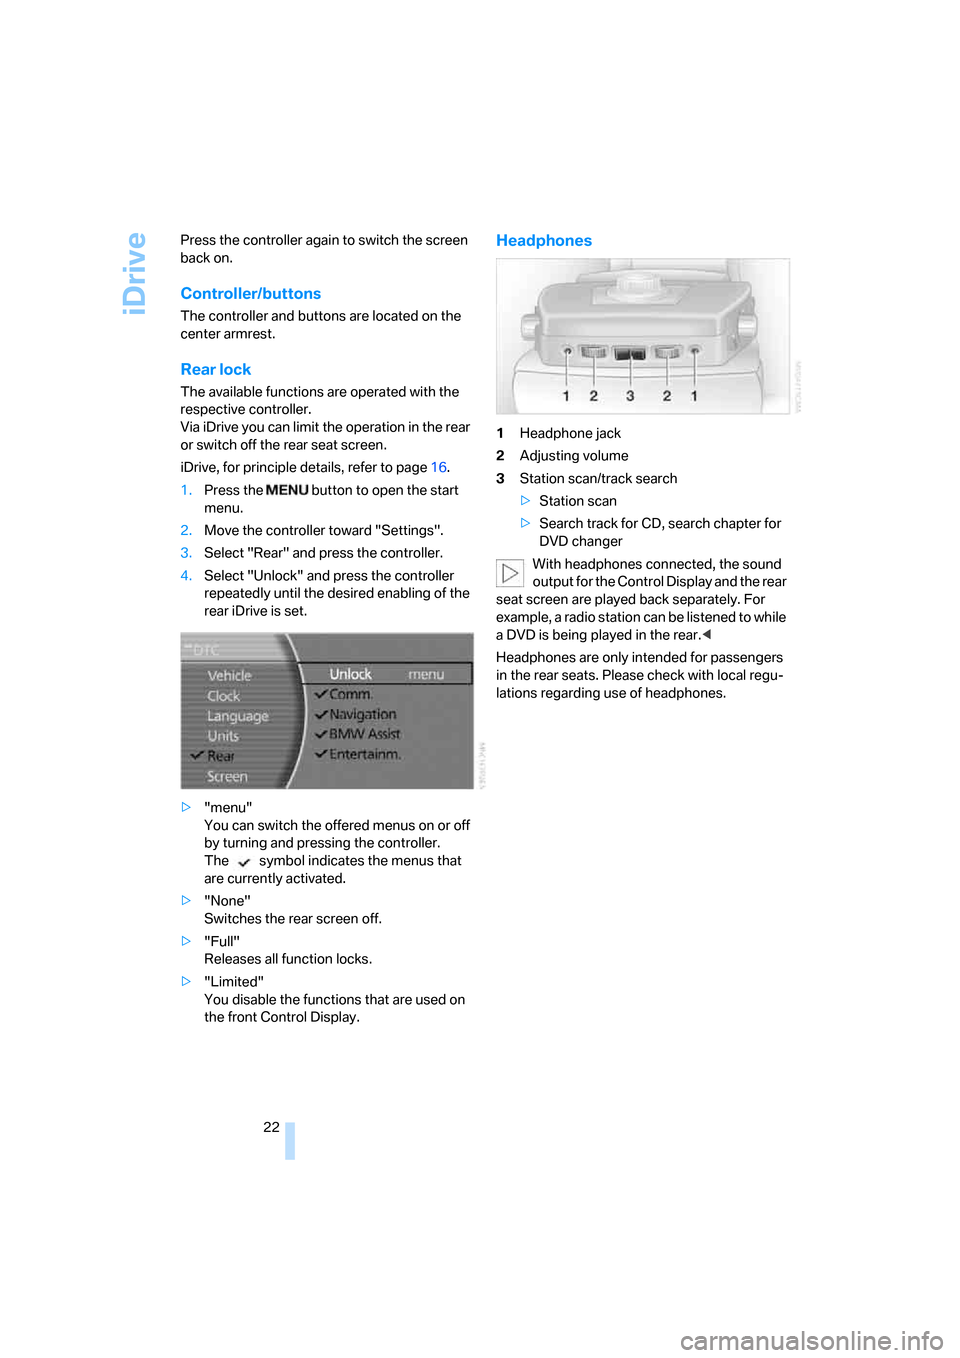
Rear lock
The available functions are operated with the
respective controller.
Via iDrive you can limit the operation in the rear
or switch off the rear seat screen.
iDrive, for principle details, refer to page16.
1.Press the button to open the start
menu.
2.Move the controller toward "Settings".
3.Select "Rear" and press the controller.
4.Select "Unlock" and press the controller
repeatedly until the desired enabling of the
rear iDrive is set.
>"menu"
You can switch the offered menus on or off
by turning and pressing the controller.
The symbol indicates the menus that
are currently activated.
>"None"
Switches the rear screen off.
>"Full"
Releases all function locks.
>"Limited"
You disable the functions that are used on
the front Control Display.
Headphones
1Headphone jack
2Adjusting volume
3Station scan/track search
>Station scan
>Search track for CD, search chapter for
DVD changer
With headphones connected, the sound
output for the Control Display and the rear
seat screen are played back separately. For
example, a radio station can be listened to while
a DVD is being played in the rear.<
Headphones are only intended for passengers
in the rear seats. Please check with local regu-
lations regarding use of headphones.
Page 25 of 247
At a glance
23Reference
Controls
Driving tips
Communications
Navigation
Entertainment
Mobility
Voice command system
The concept
The voice command system allows you to con-
trol operation of various vehicle systems with-
out ever removing your hands from the steering
wheel. The system operates on the basis of
voice commands that you will learn easily after
using them a few times. In many cases, the
voice command system assists you with
announcements or questions while you are
making your entries.
The voice command system transforms your
oral commands and dialog answers into control
signals for the selected systems.
Please take the time to acquaint yourself
with how a particular system operates
before proceeding to control it using the voice
command system.<
Note
Use iDrive to set the language that will be used
for the voice command system in order to be
able to identify the commands to be spoken.
Setting the language of iDrive, refer to page84.
Symbols used
{...} Verbal instructions to use with the voice
command system.
{{...}} Identifies the answers generated by the
voice command system.
Systems available for use with voice
command
>{Navigation}, refer to page130
>{Radio}, refer to page155
>{Telephone}, refer to page182
>{CD}, refer to page162
>{CD changer}, refer to page164
>{Notepad}, refer to page25
>{DVD}, refer to page168The Info Display, refer to page24, will display
either the equipment that you are now operat-
ing or any current error messages.
Voice commands
Voice command system activation
Briefly press the button on the steering
wheel.
An acoustic signal and the display "SVS active"
on the Info Display, refer to page24, indicate
that the system is ready for operation. The sys-
tem automatically starts in the main menu.
From here, you can call up all the equipment
that can be operated.
Canceling voice command
Briefly press the button on the steering
wheel
or
In dialogs in which any text can be spoken, e.g.
names, notes, canceling is only possible using
the button.
The system automatically switches over
to its telephone mode if you receive a call
during voice input. "SVS active" appears on the
Info Display, refer to page24.<
Voice commands
The voice command system operates on the
basis of specific, predefined commands; these
commands should be spoken precisely as indi-
cated. You can have the possible commands
read back at any stage. To do so, say the com-
mand {Options}.
In addition to the commands described, there
are often other commands that run the same
function. Instead of {Options}, you can, for
example, also say {What now}. In addition,
*
These sections contain information on
using the voice command system.
{Cancel}.
Page 132 of 247
Starting navigation system
130
Starting navigation system
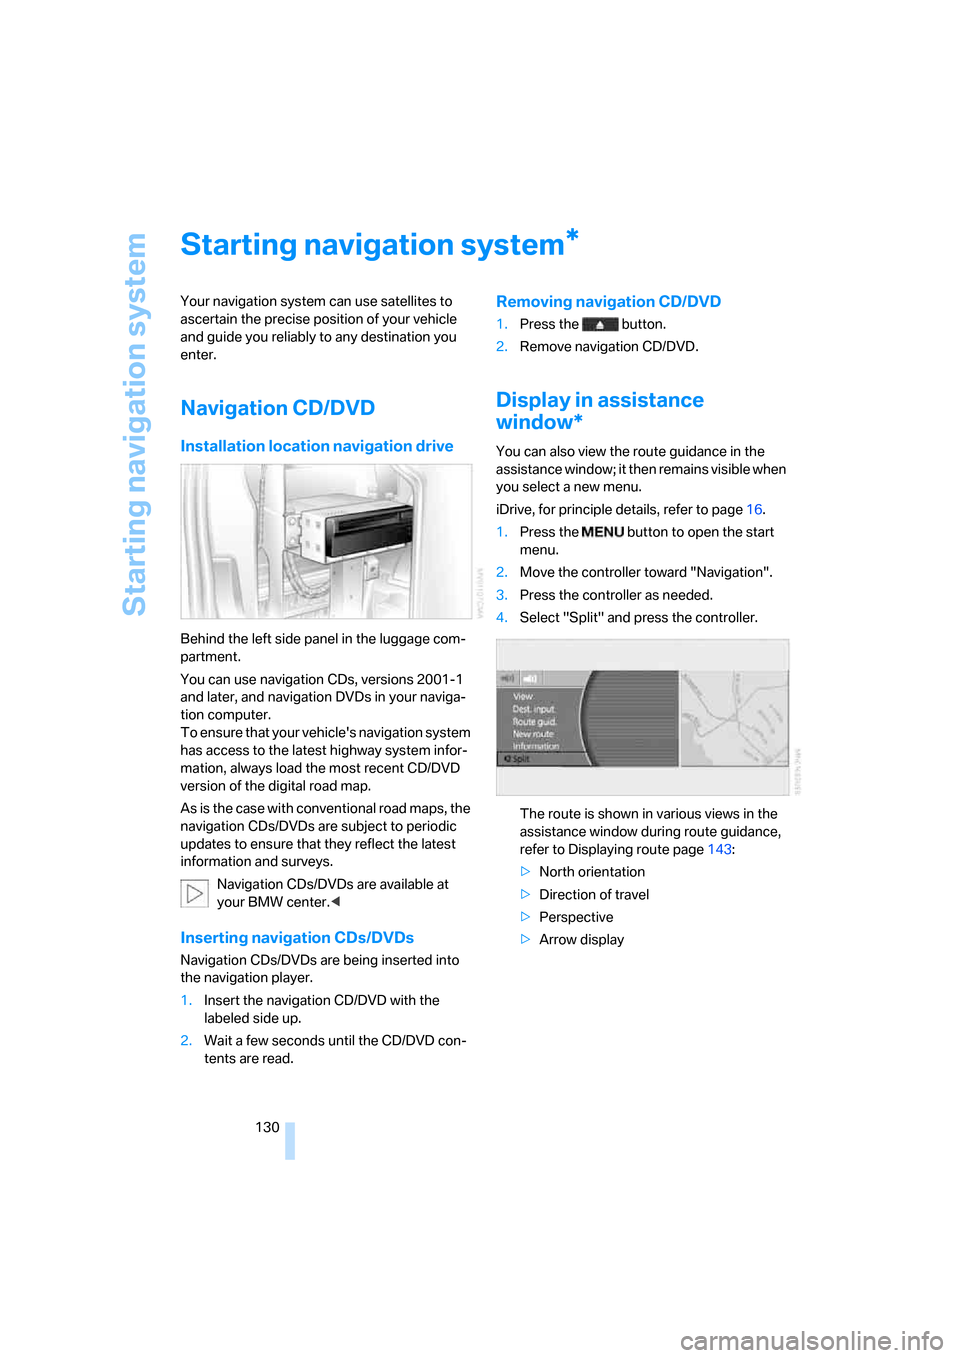
Your navigation system can use satellites to
ascertain the precise position of your vehicle
and guide you reliably to any destination you
enter.
Navigation CD/DVD
Installation location navigation drive
Behind the left side panel in the luggage com-
partment.
You can use navigation CDs, versions 2001-1
and later, and navigation DVDs in your naviga-
tion computer.
To ensure that your vehicle's navigation system
has access to the latest highway system infor-
mation, always load the most recent CD/DVD
version of the digital road map.
As is the case with conventional road maps, the
navigation CDs/DVDs are subject to periodic
updates to ensure that they reflect the latest
information and surveys.
Navigation CDs/DVDs are available at
your BMW center.<
Inserting navigation CDs/DVDs
Navigation CDs/DVDs are being inserted into
the navigation player.
1.Insert the navigation CD/DVD with the
labeled side up.
2.Wait a few seconds until the CD/DVD con-
tents are read.
Removing navigation CD/DVD
1.Press the button.
2.Remove navigation CD/DVD.
Display in assistance
window*
You can also view the route guidance in the
assistance window; it then remains visible when
you select a new menu.
iDrive, for principle details, refer to page16.
1.Press the button to open the start
menu.
2.Move the controller toward "Navigation".
3.Press the controller as needed.
4.Select "Split" and press the controller.
The route is shown in various views in the
assistance window during route guidance,
refer to Displaying route page143:
>North orientation
>Direction of travel
>Perspective
>Arrow display
*
Page 133 of 247
Navigation
Driving tips
131Reference
At a glance
Controls
Communications
Entertainment
Mobility
Destination input
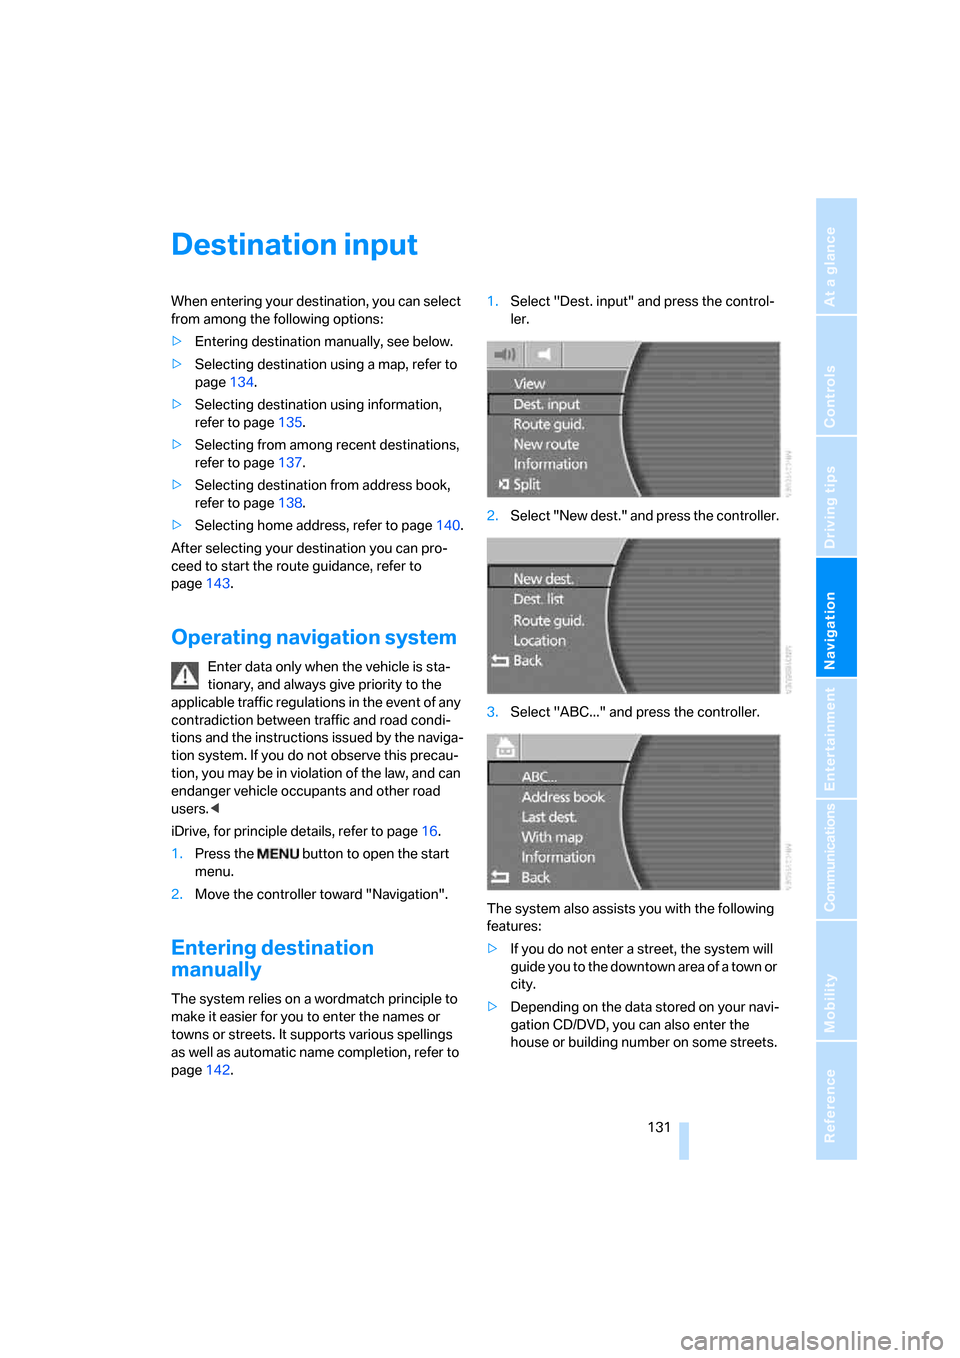
When entering your destination, you can select
from among the following options:
>Entering destination manually, see below.
>Selecting destination using a map, refer to
page134.
>Selecting destination using information,
refer to page135.
>Selecting from among recent destinations,
refer to page137.
>Selecting destination from address book,
refer to page138.
>Selecting home address, refer to page140.
After selecting your destination you can pro-
ceed to start the route guidance, refer to
page143.
Operating navigation system
Enter data only when the vehicle is sta-
tionary, and always give priority to the
applicable traffic regulations in the event of any
contradiction between traffic and road condi-
tions and the instructions issued by the naviga-
tion system. If you do not observe this precau-
tion, you may be in violation of the law, and can
endanger vehicle occupants and other road
users.<
iDrive, for principle details, refer to page16.
1.Press the button to open the start
menu.
2.Move the controller toward "Navigation".
Entering destination
manually
The system relies on a wordmatch principle to
make it easier for you to enter the names or
towns or streets. It supports various spellings
as well as automatic name completion, refer to
page142.1.Select "Dest. input" and press the control-
ler.
2.Select "New dest." and press the controller.
3.Select "ABC..." and press the controller.
The system also assists you with the following
features:
>If you do not enter a street, the system will
guide you to the downtown area of a town or
city.
>Depending on the data stored on your navi-
gation CD/DVD, you can also enter the
house or building number on some streets.
Page 134 of 247
Destination input
132 >You can skip the entry of country and city if
the existing entries should be retained for
your new destination.
Using the voice command system:
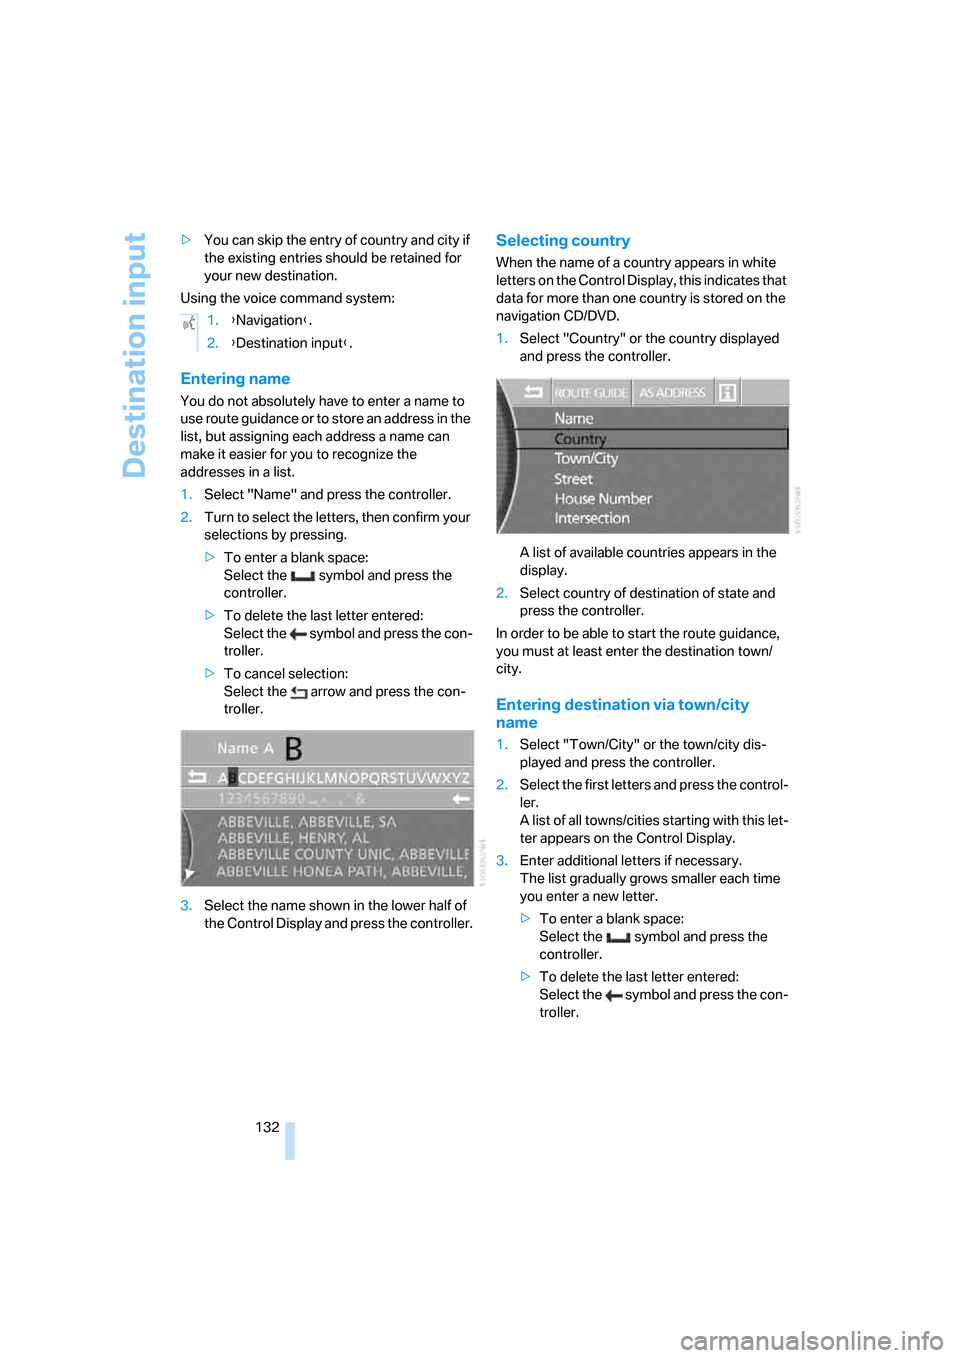
Entering name
You do not absolutely have to enter a name to
use route guidance or to store an address in the
list, but assigning each address a name can
make it easier for you to recognize the
addresses in a list.
1.Select "Name" and press the controller.
2.Turn to select the letters, then confirm your
selections by pressing.
>To enter a blank space:
Select the symbol and press the
controller.
>To delete the last letter entered:
Select the symbol and press the con-
troller.
>To cancel selection:
Select the arrow and press the con-
troller.
3.Select the name shown in the lower half of
the Control Display and press the controller.
Selecting country
When the name of a country appears in white
letters on the Control Display, this indicates that
data for more than one country is stored on the
navigation CD/DVD.
1.Select "Country" or the country displayed
and press the controller.
A list of available countries appears in the
display.
2.Select country of destination of state and
press the controller.
In order to be able to start the route guidance,
you must at least enter the destination town/
city.
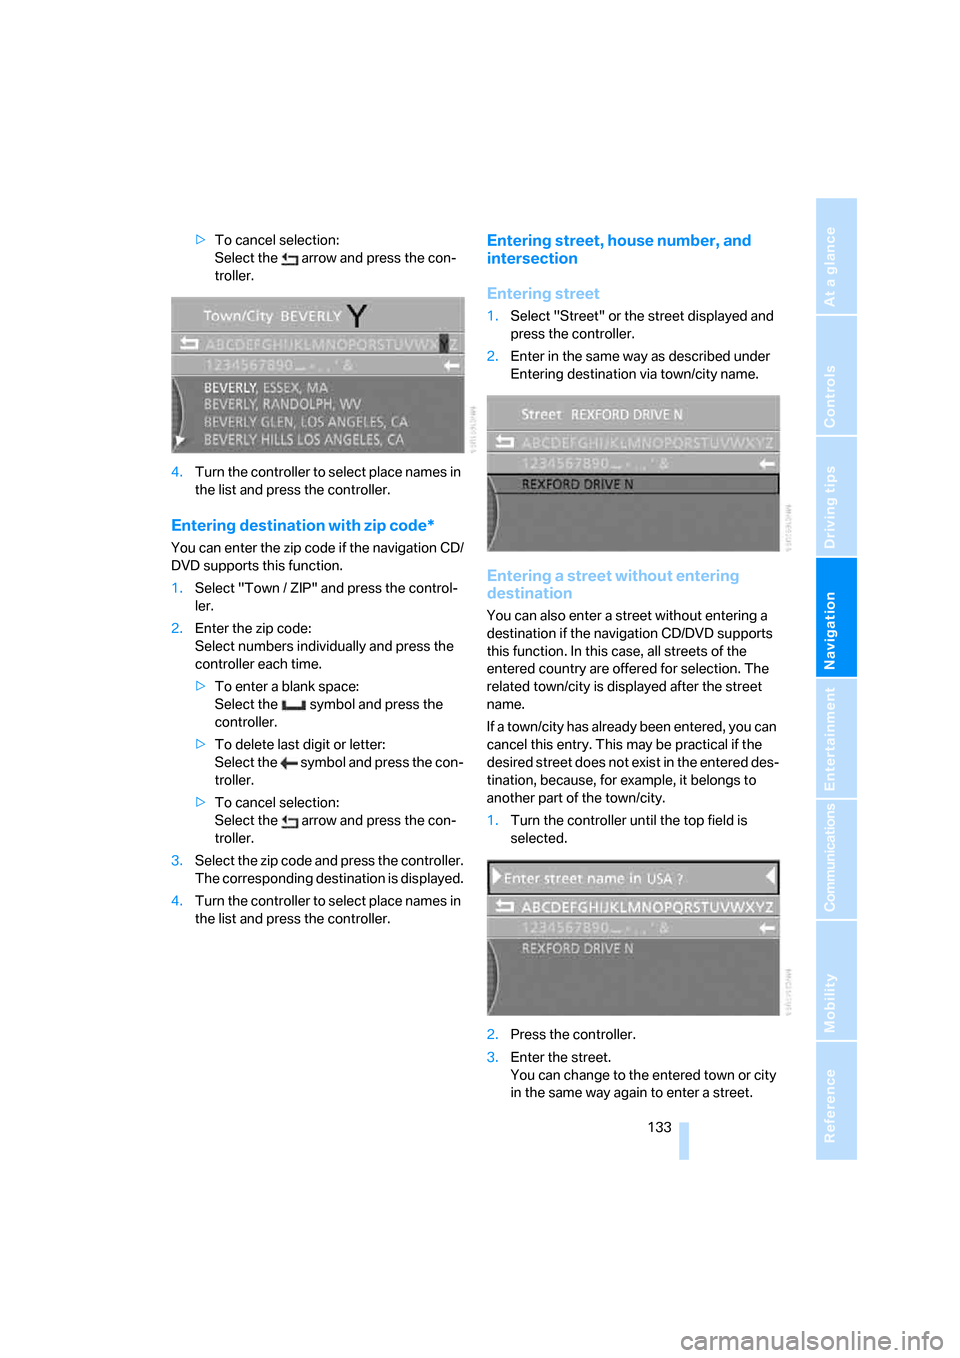
Entering destination via town/city
name
1.Select "Town/City" or the town/city dis-
played and press the controller.
2.Select the first letters and press the control-
ler.
A list of all towns/cities starting with this let-
ter appears on the Control Display.
3.Enter additional letters if necessary.
The list gradually grows smaller each time
you enter a new letter.
>To enter a blank space:
Select the symbol and press the
controller.
>To delete the last letter entered:
Select the symbol and press the con-
troller. 1.{Navigation}.
2.{Destination input}.
Page 135 of 247
Navigation
Driving tips
133Reference
At a glance
Controls
Communications
Entertainment
Mobility
>To cancel selection:
Select the arrow and press the con-
troller.
4.Turn the controller to select place names in
the list and press the controller.
Entering destination with zip code*
You can enter the zip code if the navigation CD/
DVD supports this function.
1.Select "Town / ZIP" and press the control-
ler.
2.Enter the zip code:
Select numbers individually and press the
controller each time.
>To enter a blank space:
Select the symbol and press the
controller.
>To delete last digit or letter:
Select the symbol and press the con-
troller.
>To cancel selection:
Select the arrow and press the con-
troller.
3.Select the zip code and press the controller.
The corresponding destination is displayed.
4.Turn the controller to select place names in
the list and press the controller.
Entering street, house number, and
intersection
Entering street
1.Select "Street" or the street displayed and
press the controller.
2.Enter in the same way as described under
Entering destination via town/city name.
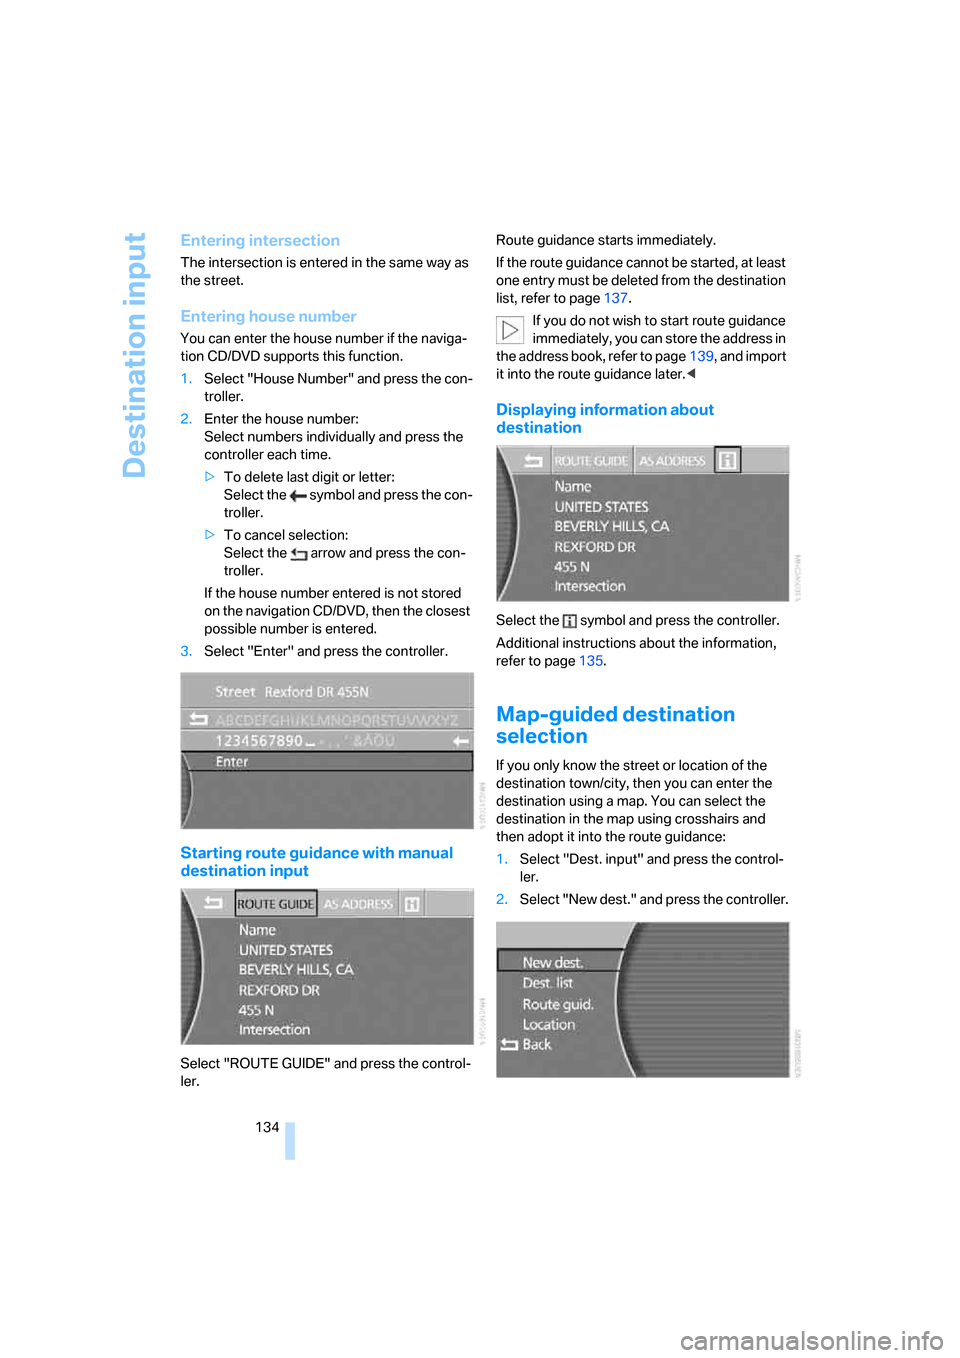
Entering a street without entering
destination
You can also enter a street without entering a
destination if the navigation CD/DVD supports
this function. In this case, all streets of the
entered country are offered for selection. The
related town/city is displayed after the street
name.
If a town/city has already been entered, you can
cancel this entry. This may be practical if the
desired street does not exist in the entered des-
tination, because, for example, it belongs to
another part of the town/city.
1.Turn the controller until the top field is
selected.
2.Press the controller.
3.Enter the street.
You can change to the entered town or city
in the same way again to enter a street.
Page 136 of 247
Destination input
134
Entering intersection
The intersection is entered in the same way as
the street.
Entering house number
You can enter the house number if the naviga-
tion CD/DVD supports this function.
1.Select "House Number" and press the con-
troller.
2.Enter the house number:
Select numbers individually and press the
controller each time.
>To delete last digit or letter:
Select the symbol and press the con-
troller.
>To cancel selection:
Select the arrow and press the con-
troller.
If the house number entered is not stored
on the navigation CD/DVD, then the closest
possible number is entered.
3.Select "Enter" and press the controller.
Starting route guidance with manual
destination input
Select "ROUTE GUIDE" and press the control-
ler.Route guidance starts immediately.
If the route guidance cannot be started, at least
one entry must be deleted from the destination
list, refer to page137.
If you do not wish to start route guidance
immediately, you can store the address in
the address book, refer to page139, and import
it into the route guidance later.<
Displaying information about
destination
Select the symbol and press the controller.
Additional instructions about the information,
refer to page135.
Map-guided destination
selection
If you only know the street or location of the
destination town/city, then you can enter the
destination using a map. You can select the
destination in the map using crosshairs and
then adopt it into the route guidance:
1.Select "Dest. input" and press the control-
ler.
2.Select "New dest." and press the controller.