navigation BMW 745Li 2005 E66 Owner's Manual
[x] Cancel search | Manufacturer: BMW, Model Year: 2005, Model line: 745Li, Model: BMW 745Li 2005 E66Pages: 239, PDF Size: 8.03 MB
Page 193 of 239
Mobility
191Reference
At a glance
Controls
Driving tips
Communications
Navigation
Entertainment
Temperature
The temperature grades are A, the highest,
B and C, representing the tire's resistance
to the generation of heat and its ability to
dissipate heat when tested under con-
trolled conditions on a specified indoor lab-
oratory test wheel.
Sustained high temperature can cause the
material of the tire to degenerate and
reduce tire life, and excessive temperature
can lead to sudden tire failure. The grade C
corresponds to a level of performance
which all passenger car tires must meet
under the Federal Motor Vehicle Safety
Standard No. 109. Grades B and A repre-
sent higher levels of performance on the
laboratory test wheel than the minimum
required by law.
The temperature grade for this tire is
established for a tire that is properly
inflated and not overloaded. Excessive
speed, underinflation, or excessive load-
ing, either separately or in combination,
can cause heat buildup and possible tire
failure.<
RSC: run-flat tires
You will recognize run-flat tires by a circular
symbol containing the letters RSC on the
side of the tire, refer to page192.
M+S
Winter and all-season tires.
These have better winter properties than
summer tires.
Tire condition
Inspect your tires frequently for treadwear,
signs of damage and for foreign objects
lodged in the tread. Check the tread depth.
Tire tread
The tread depth should not drop below
εin/3 mm, although, for example, Euro-
pean legislation only specifies a minimum
tread depth of κ/ΦΚin/1.6 mm. At tread
depths below εin/3 mm, there is an
increased risk of high-speed hydroplaning, even when only small amounts of water are
present on the road surface.
As winter tires display a noticeable loss in
their ability to cope with cold-weather driv-
ing conditions once the tread wears to
below κ/Κin/4 mm, to ensure continued
safety you should always have such tires
replaced.
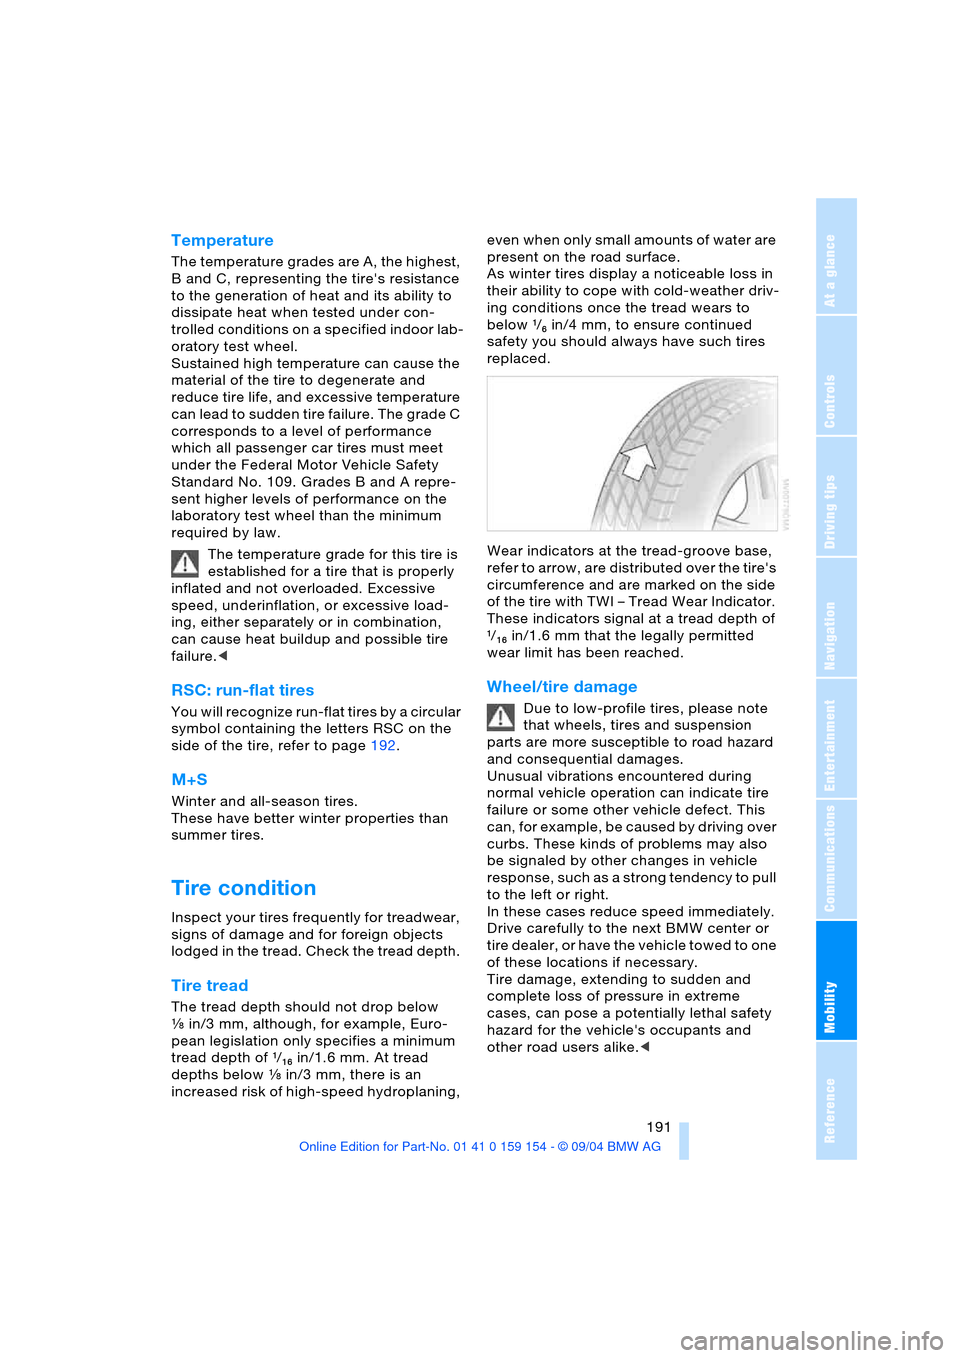
Wear indicators at the tread-groove base,
refer to arrow, are distributed over the tire's
circumference and are marked on the side
of the tire with TWI – Tread Wear Indicator.
These indicators signal at a tread depth of
κ/ΦΚin/1.6 mm that the legally permitted
wear limit has been reached.
Wheel/tire damage
Due to low-profile tires, please note
that wheels, tires and suspension
parts are more susceptible to road hazard
and consequential damages.
Unusual vibrations encountered during
normal vehicle operation can indicate tire
failure or some other vehicle defect. This
can, for example, be caused by driving over
curbs. These kinds of problems may also
be signaled by other changes in vehicle
response, such as a strong tendency to pull
to the left or right.
In these cases reduce speed immediately.
Drive carefully to the next BMW center or
tire dealer, or have the vehicle towed to one
of these locations if necessary.
Tire damage, extending to sudden and
complete loss of pressure in extreme
cases, can pose a potentially lethal safety
hazard for the vehicle's occupants and
other road users alike.<
Page 195 of 239
Mobility
193Reference
At a glance
Controls
Driving tips
Communications
Navigation
Entertainment
remounted on the vehicle as soon as pos-
sible.
Recommended tire sizes and brands
BMW tests certain tire brands for each tire
size, classifies them as road-safe and
approves them. You can find out about
these at specialized dealers or at your
BMW center. Observe any country-specific
regulations, e.g. on making a correspond-
ing entry in the vehicle documents.
The factory-mounted tires have been spe-
cially selected to provide optimized perfor-
mance when installed on your vehicle; if
properly cared for, they will provide a com-
bination of safety and excellent ride com-
fort.
Run-flat tires
If your BMW is equipped with run-flat tires,
refer to Run-flat tires, only use these tires,
as in the event of a breakdown there is no
spare tire available.
Special characteristics of winter
tires
BMW recommends winter tires for use in
cold winter driving conditions. Although so-
called all-season M+S tires provide better
winter traction than summer tires, they
generally fail to provide the same levels of
cold-weather performance as winter tires.
Run-flat tires
When mounting new tires or switching from
summer to winter tires, or vice versa, use
run-flat tires, as in the event of a break-
down there is no spare wheel available.
Your BMW center will be glad to advise
you.
Observing speed ratings
Never exceed the maximum speed
for which the winter tires are rated.
Unprofessional attempts by laymen to ser-
vice tires can lead to damage and acci-
dents. Have this work performed by skilled
professionals only. The technicians at your
BMW center will be glad to assist you with the required professional knowledge and
specialized equipment.<
Storage
Always store wheels and tires in a cool, dry
pl ace w it h as l itt le exp osu r e t o li gh t a s po s-
sible. Always protect tires against all con-
tact with oil, grease and fuels.
Do not exceed the maximum tire inflation
pressure indicated on the side wall of the
tire.
Snow chains*
BMW only tests certain snow chains, clas-
sifies them as road-safe and approves
them. Consult your BMW center for more
information. BMW recommends only using
these approved, narrow-link snow chains.
Use on summer or winter tires is only per-
missible in pairs on the rear wheels.
Observe the manufacturer's instructions
when installing snow chains.
Do not exceed a vehicle speed of 30 mph/
50 km/h with the chains mounted.
After mounting snow chains, do not
activate the Flat Tire Monitor.
When you are driving with snow chains, it
can be beneficial to switch off DSC briefly,
refer to page94.<
Page 197 of 239
Mobility
195Reference
At a glance
Controls
Driving tips
Communications
Navigation
Entertainment
Engine compartment
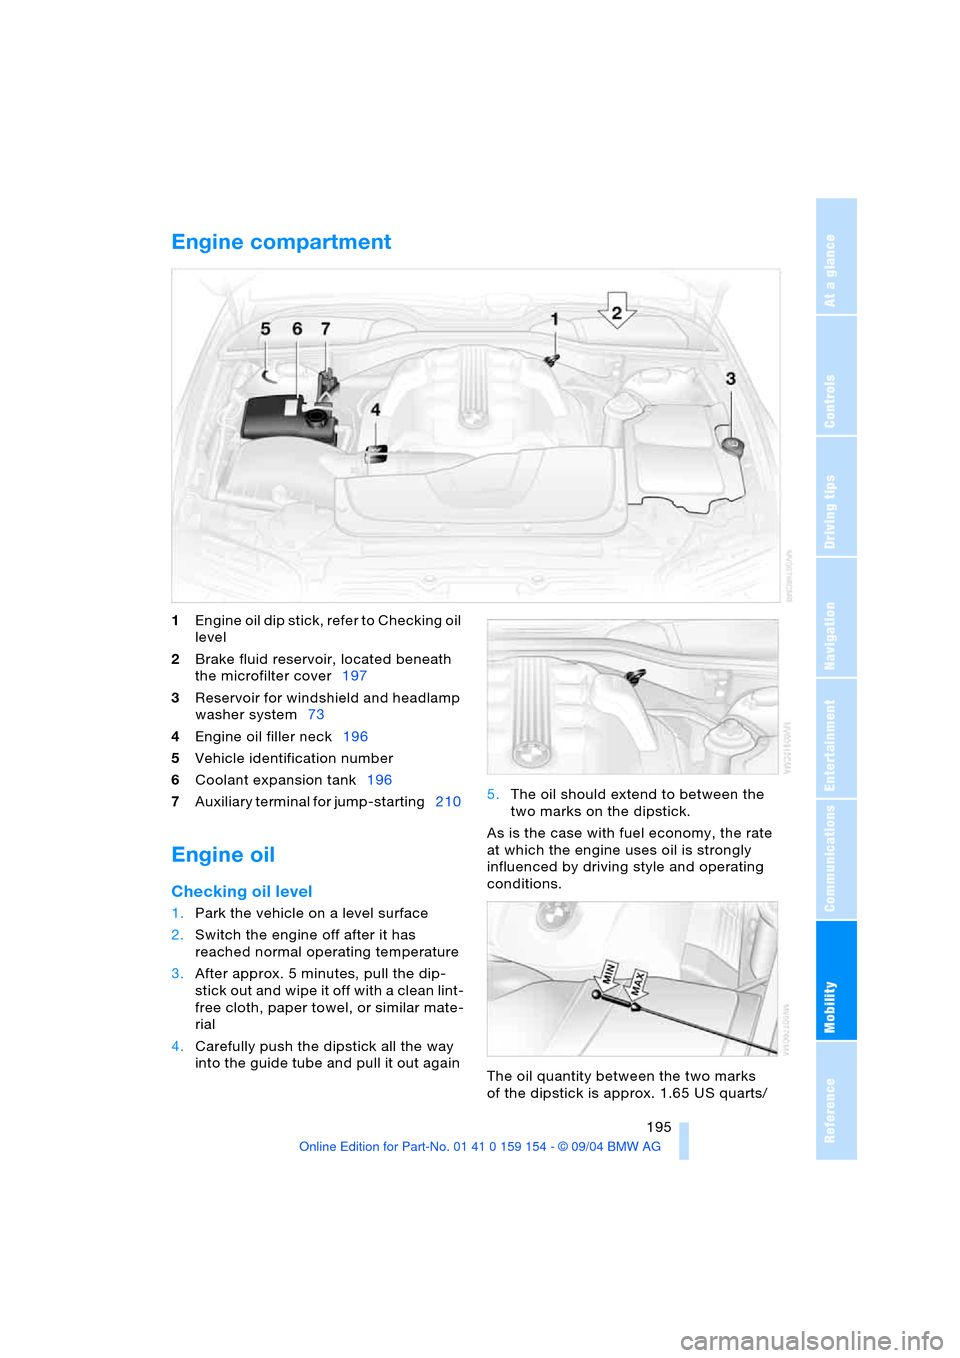
1Engine oil dip stick, refer to Checking oil
level
2Brake fluid reservoir, located beneath
the microfilter cover197
3Reservoir for windshield and headlamp
washer system73
4Engine oil filler neck196
5Vehicle identification number
6Coolant expansion tank196
7Auxiliary terminal for jump-starting210
Engine oil
Checking oil level
1.Park the vehicle on a level surface
2.Switch the engine off after it has
reached normal operating temperature
3.After approx. 5 minutes, pull the dip-
stick out and wipe it off with a clean lint-
free cloth, paper towel, or similar mate-
rial
4.Carefully push the dipstick all the way
into the guide tube and pull it out again 5.The oil should extend to between the
two marks on the dipstick.
As is the case with fuel economy, the rate
at which the engine uses oil is strongly
influenced by driving style and operating
conditions.
The oil quantity between the two marks
of the dipstick is approx. 1.65 US quarts/
Page 199 of 239
Mobility
197Reference
At a glance
Controls
Driving tips
Communications
Navigation
Entertainment
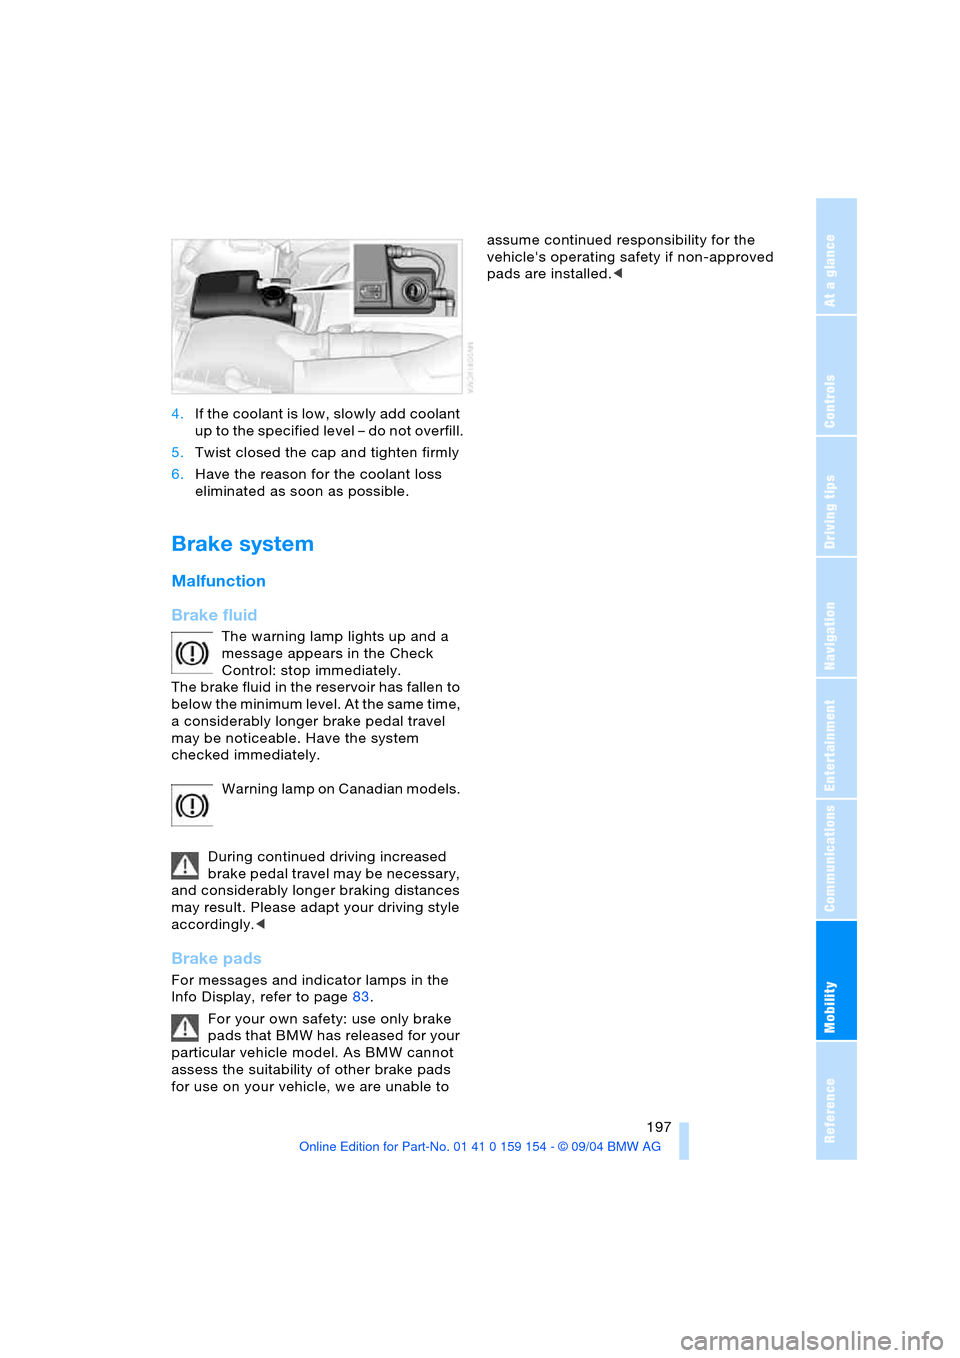
4.If the coolant is low, slowly add coolant
up to the specified level – do not overfill.
5.Twist closed the cap and tighten firmly
6.Have the reason for the coolant loss
eliminated as soon as possible.
Brake system
Malfunction
Brake fluid
The warning lamp lights up and a
message appears in the Check
Control: stop immediately.
The brake fluid in the reservoir has fallen to
below the minimum level. At the same time,
a considerably longer brake pedal travel
may be noticeable. Have the system
checked immediately.
Warning lamp on Canadian models.
During continued driving increased
brake pedal travel may be necessary,
and considerably longer braking distances
may result. Please adapt your driving style
accordingly.<
Brake pads
For messages and indicator lamps in the
Info Display, refer to page83.
For your own safety: use only brake
pads that BMW has released for your
particular vehicle model. As BMW cannot
assess the suitability of other brake pads
for use on your vehicle, we are unable to assume continued responsibility for the
vehicle's operating safety if non-approved
pads are installed.<
Page 201 of 239
Mobility
199Reference
At a glance
Controls
Driving tips
Communications
Navigation
Entertainment
Care
You can find useful information on caring
for your BMW in the Caring for your vehicle
brochure.
Page 203 of 239
Mobility
201Reference
At a glance
Controls
Driving tips
Communications
Navigation
Entertainment
Replacing components
Onboard tool kit
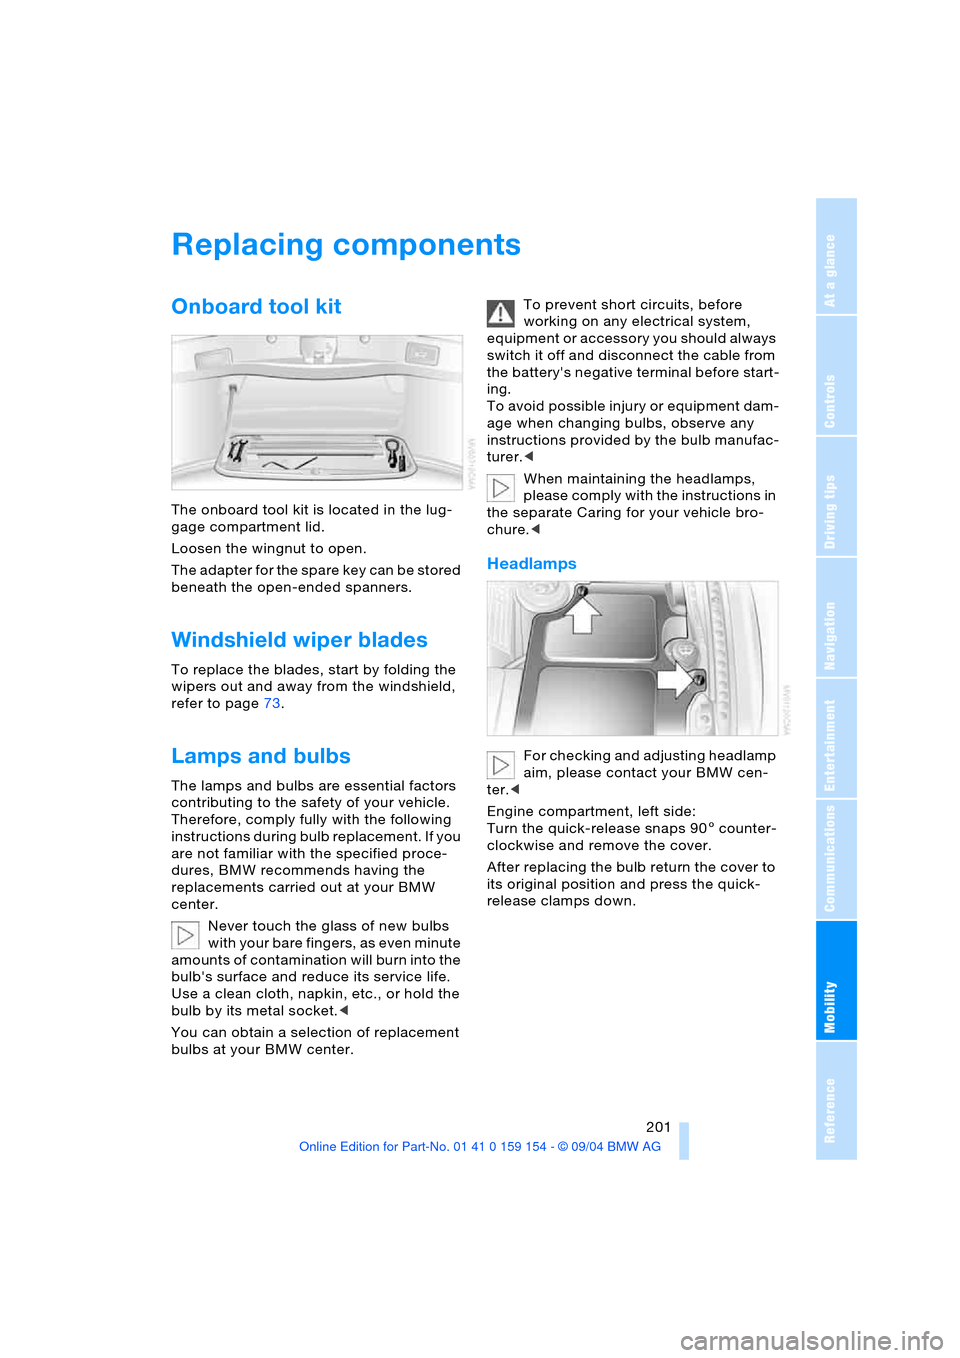
The onboard tool kit is located in the lug-
gage compartment lid.
Loosen the wingnut to open.
The adapter for the spare key can be stored
beneath the open-ended spanners.
Windshield wiper blades
To replace the blades, start by folding the
wipers out and away from the windshield,
refer to page73.
Lamps and bulbs
The lamps and bulbs are essential factors
contributing to the safety of your vehicle.
Therefore, comply fully with the following
instructions during bulb replacement. If you
are not familiar with the specified proce-
dures, BMW recommends having the
replacements carried out at your BMW
center.
Never touch the glass of new bulbs
w i t h y o u r b a r e f i n g e r s , a s e v e n m i n u t e
amounts of contamination will burn into the
bulb's surface and reduce its service life.
Use a clean cloth, napkin, etc., or hold the
bulb by its metal socket.<
You can obtain a selection of replacement
bulbs at your BMW center. To prevent short circuits, before
working on any electrical system,
equipment or accessory you should always
switch it off and disconnect the cable from
the battery's negative terminal before start-
ing.
To avoid possible injury or equipment dam-
age when changing bulbs, observe any
instructions provided by the bulb manufac-
turer.<
When maintaining the headlamps,
please comply with the instructions in
the separate Caring for your vehicle bro-
chure.<
Headlamps
For checking and adjusting headlamp
aim, please contact your BMW cen-
ter.<
Engine compartment, left side:
Turn the quick-release snaps 905 counter-
clockwise and remove the cover.
After replacing the bulb return the cover to
its original position and press the quick-
release clamps down.
Page 205 of 239
Mobility
203Reference
At a glance
Controls
Driving tips
Communications
Navigation
Entertainment
Side marker lamps, front and rear
Please contact your BMW center for
replacement.
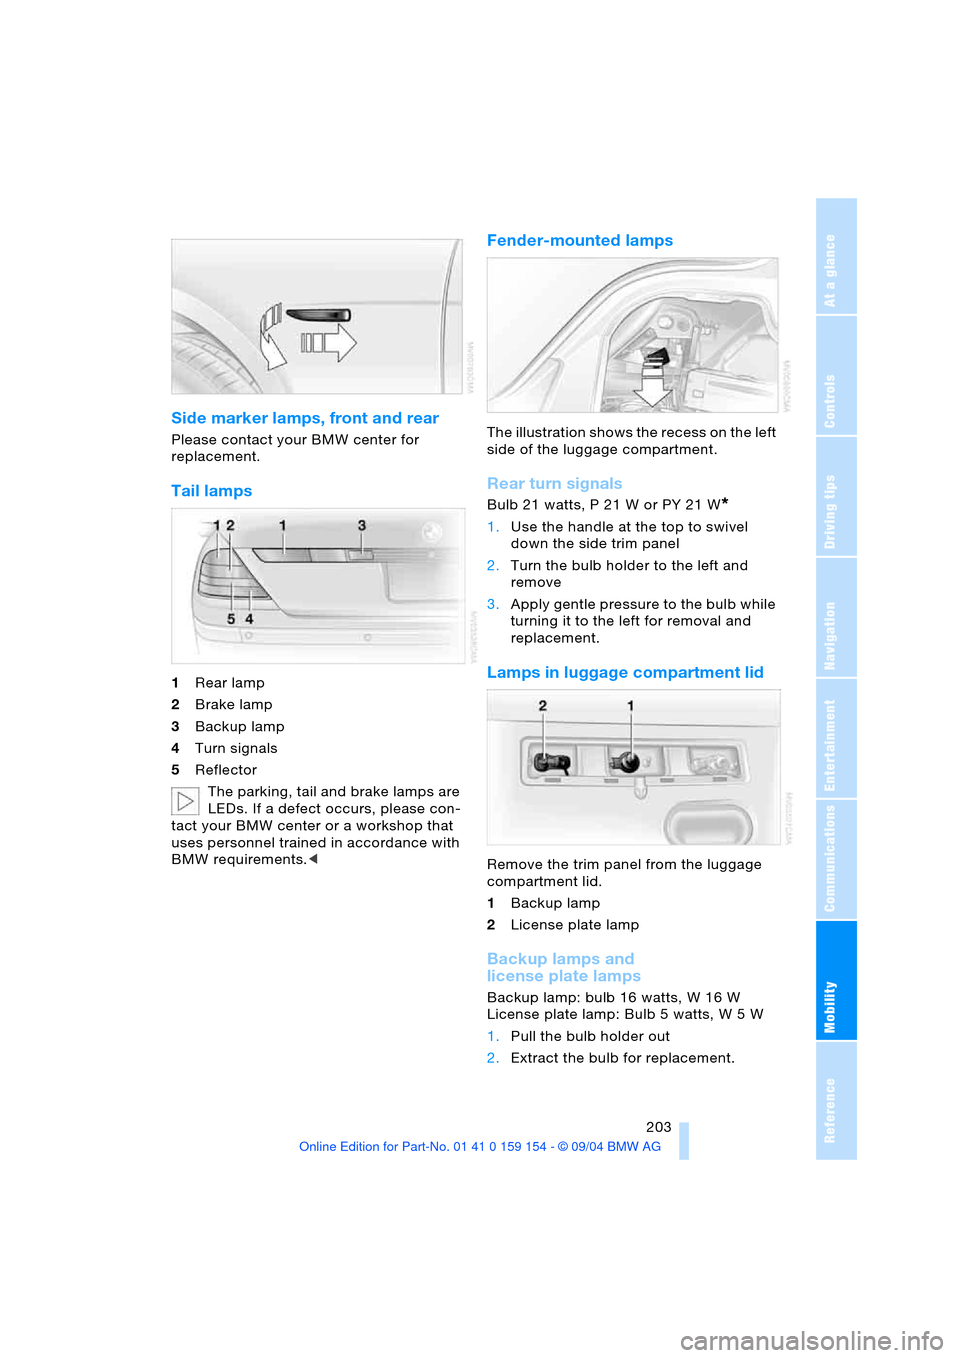
Tail lamps
1Rear lamp
2Brake lamp
3Backup lamp
4Turn signals
5Reflector
The parking, tail and brake lamps are
LEDs. If a defect occurs, please con-
tact your BMW center or a workshop that
uses personnel trained in accordance with
BMW requirements.<
Fender-mounted lamps
The illustration shows the recess on the left
side of the luggage compartment.
Rear turn signals
Bulb 21 watts, P 21 W or PY 21 W*
1.Use the handle at the top to swivel
down the side trim panel
2.Turn the bulb holder to the left and
remove
3.Apply gentle pressure to the bulb while
turning it to the left for removal and
replacement.
Lamps in luggage compartment lid
Remove the trim panel from the luggage
compartment lid.
1Backup lamp
2License plate lamp
Backup lamps and
license plate lamps
Backup lamp: bulb 16 watts, W 16 W
License plate lamp: Bulb 5 watts, W 5 W
1.Pull the bulb holder out
2.Extract the bulb for replacement.
Page 207 of 239
Mobility
205Reference
At a glance
Controls
Driving tips
Communications
Navigation
Entertainment
Grasp the handle in the upper panel and
fold it down.
Undo the wingnut and remove the jack.
After use, screw the jack all the way
back down and snap the handle back
into place.
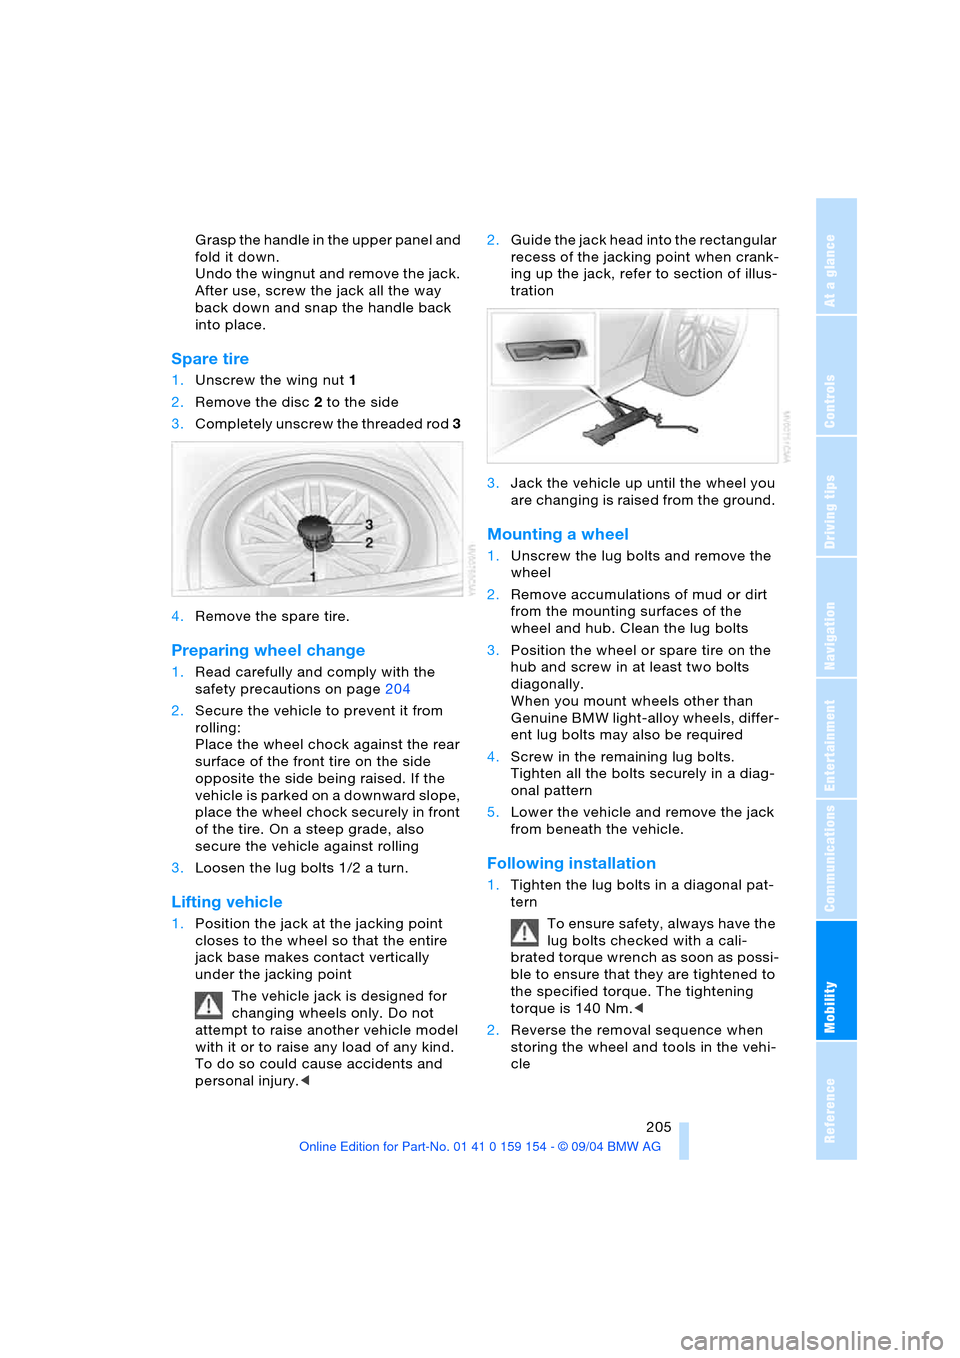
Spare tire
1.Unscrew the wing nut 1
2.Remove the disc 2 to the side
3.Completely unscrew the threaded rod 3
4.Remove the spare tire.
Preparing wheel change
1.Read carefully and comply with the
safety precautions on page204
2.Secure the vehicle to prevent it from
rolling:
Place the wheel chock against the rear
surface of the front tire on the side
opposite the side being raised. If the
vehicle is parked on a downward slope,
place the wheel chock securely in front
of the tire. On a steep grade, also
secure the vehicle against rolling
3.Loosen the lug bolts 1/2 a turn.
Lifting vehicle
1.Position the jack at the jacking point
closes to the wheel so that the entire
jack base makes contact vertically
under the jacking point
The vehicle jack is designed for
changing wheels only. Do not
attempt to raise another vehicle model
with it or to raise any load of any kind.
To do so could cause accidents and
personal injury.<2.Guide the jack head into the rectangular
recess of the jacking point when crank-
ing up the jack, refer to section of illus-
tration
3.Jack the vehicle up until the wheel you
are changing is raised from the ground.
Mounting a wheel
1.Unscrew the lug bolts and remove the
wheel
2.Remove accumulations of mud or dirt
from the mounting surfaces of the
wheel and hub. Clean the lug bolts
3.Position the wheel or spare tire on the
hub and screw in at least two bolts
diagonally.
When you mount wheels other than
Genuine BMW light-alloy wheels, differ-
ent lug bolts may also be required
4.Screw in the remaining lug bolts.
Tighten all the bolts securely in a diag-
onal pattern
5.Lower the vehicle and remove the jack
from beneath the vehicle.
Following installation
1.Tighten the lug bolts in a diagonal pat-
tern
To ensure safety, always have the
lug bolts checked with a cali-
brated torque wrench as soon as possi-
ble to ensure that they are tightened to
the specified torque. The tightening
torque is 140 Nm.<
2.Reverse the removal sequence when
storing the wheel and tools in the vehi-
cle
Page 209 of 239
Mobility
207Reference
At a glance
Controls
Driving tips
Communications
Navigation
Entertainment
Battery
Battery care
The battery is 100 % maintenance-free, i.e.,
the electrolyte will last for the life of the bat-
tery when the vehicle is operated in a tem-
perate climate. Your BMW center will be
happy to advise you on all questions con-
cerning the battery.
Charging battery
Only charge the battery in the vehicle via
the terminals in the engine compartment
with the engine off. Connections, refer to
Jump-starting on page210.
Battery switch
Before storing the vehicle for an extended
period of several weeks or more, slide the
battery switch located behind the trim
panel on the right side of the luggage com-
partment to OFF. This reduces the current
flow from the battery for the period during
which the vehicle remains parked. A mes-
sage appears in the Check Control. Please
take note of the supplementary information
provided on the Control Display.
Disposal
Have old batteries disposed of follow-
ing replacement at your BMW center
or bring them to a collection point. Maintain
the battery in an upright position for trans-
port and storage. Always secure the battery
to prevent it from tipping over during trans-
port.<
Power failure
Following a temporary power failure, e.g. in
the case of a flat battery, some equipment
is subject to restricted use and must be
reinitialized. Individual settings are also lost
and must be updated again:
>Seat, mirror and steering wheel memory
The positions must be stored again,
refer to page55
>Time and date
Must be updated again, refer to
page90
>Radio
Stations must be stored again, refer to
page 154
>Navigation system
The operability must be waited for, refer
to page130.
Fuses
Never attempt to repair a blown fuse,
and do not replace a defective fuse
with a substitute of another color or amper-
age rating, as this could lead to a circuit
overload, ultimately resulting in a fire in the
vehicle.<
Spare fuses are located on the fuse strip in
the glove compartment; plastic tweezers
can be found at the fuse holder in the lug-
gage compartment.
In glove compartment
Press the tab on the cover to the front, then
fold up the cover.
Page 211 of 239
Mobility
209Reference
At a glance
Controls
Driving tips
Communications
Navigation
Entertainment
Giving and receiving assistance
Warning triangle*
The warning triangle is conveniently stored
in the onboard tool kit mounted on the
inside of the luggage compartment lid.
Comply with legal requirements
requiring you to carry a hazard warn-
ing triangle in the vehicle.<
First-aid kit*
You will also find the first-aid kit in the
onboard tool kit's container.
Some of the articles contained in the
first-aid kit have a limited service life.
Therefore, check the expiration dates of the
contents regularly and replace the contents
concerned in good time if necessary. You
can find replacements in any pharmacy.
Comply with legal requirements requiring
you to carry a first-aid kit in the vehicle.<
Jump-starting
When your battery is discharged you can
use two jumper cables to start your vehicle
with power from the battery in a second
vehicle. You can also use the same method
to help start another vehicle. Use only
jumper cables with fully-insulated terminal
clamps.
To avoid the risk of potentially fatal
injury, always avoid all contact with
electrical components while the engine is running. Carefully adhere to the following
sequence, both to prevent damage to one
or both vehicles, and to guard against pos-
sible personal injury.<
Preparing
1.Check whether the battery of the other
vehicle has a voltage of 12 Volts and
approximately the same capacitance
in Ah. This information can be found on
the battery
2.Switch off the engine of the support
vehicle
3.Switch off any electrical systems and
components in both vehicles.
Ensure that no contact exists
between the bodywork on the two
vehicles, otherwise there is a danger of
short circuits.<
Connecting jumper cables
To avoid personal injury from sparks,
always observe this sequence when
connecting jumper cables.<
Your BMW is equipped with an auxiliary
terminal specifically designed for jump-
starting. It is located within the engine
compartment, refer to arrow 1 in the illus-
tration. The symbol + is embossed on the
cover.
1.Remove the cover of the BMW auxiliary
terminal for jump-starting
2.Connect one terminal clamp of the pos-
itive/+ jumper cable to the positive ter-
minal of the battery or an auxiliary termi-