language BMW 750I 2006 Owners Manual
[x] Cancel search | Manufacturer: BMW, Model Year: 2006, Model line: 750I, Model: BMW 750I 2006Pages: 247, PDF Size: 8.66 MB
Page 20 of 247
iDrive
18 5Help
>Brief help text displays20
>Menu name for menu change19
6Entertainment
>Radio155
>CD player
*162
>CD changer
*164
>DVD changer
*168
It is only possible to play a DVD on the
rear seat screen, refer to Rear seat
screen
* on page21.<
7Settings
>Parking brake58
>PDC Park Distance Control86
>EDC Electronic Damping Control89
>Programmable buttons52
>FTM Flat Tire Monitor
*90
>TPM Tire Pressure Monitor
*91
>Time and date84
>Language84
>Units of measure and display format84
>Brightness85
>Rear seat screen
*21
8Climate
>Intensity of AUTO program104
>Air volume106
>Heated seats
*49
>Parked car ventilation109
>Extra, e.g. rear air conditioner108
Basic operation
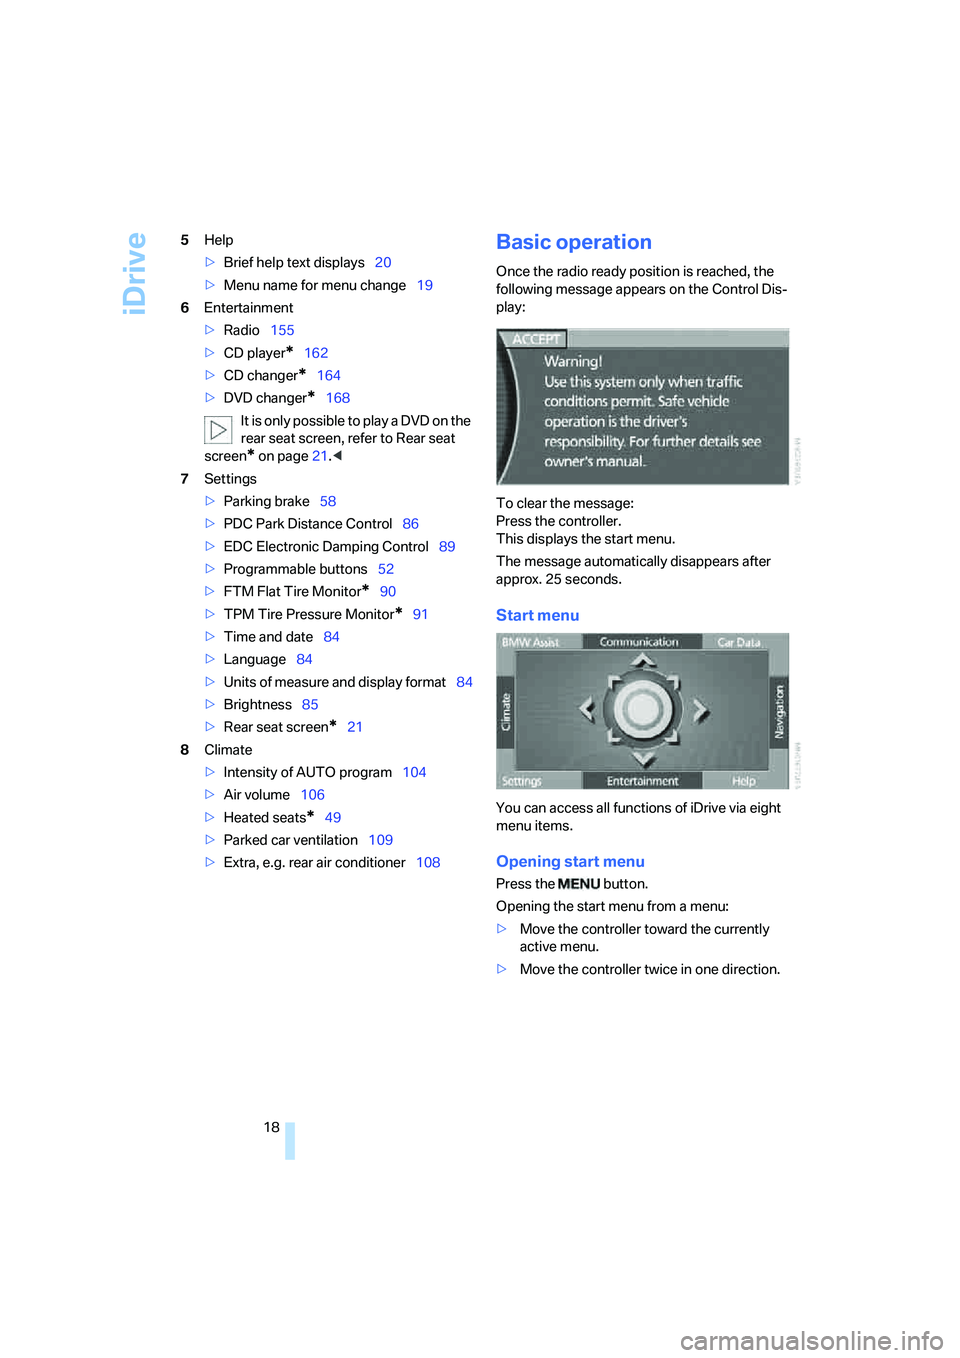
Once the radio ready position is reached, the
following message appears on the Control Dis-
play:
To clear the message:
Press the controller.
This displays the start menu.
The message automatically disappears after
approx. 25 seconds.
Start menu
You can access all functions of iDrive via eight
menu items.
Opening start menu
Press the button.
Opening the start menu from a menu:
>Move the controller toward the currently
active menu.
>Move the controller twice in one direction.
Page 25 of 247
At a glance
23Reference
Controls
Driving tips
Communications
Navigation
Entertainment
Mobility
Voice command system
The concept
The voice command system allows you to con-
trol operation of various vehicle systems with-
out ever removing your hands from the steering
wheel. The system operates on the basis of
voice commands that you will learn easily after
using them a few times. In many cases, the
voice command system assists you with
announcements or questions while you are
making your entries.
The voice command system transforms your
oral commands and dialog answers into control
signals for the selected systems.
Please take the time to acquaint yourself
with how a particular system operates
before proceeding to control it using the voice
command system.<
Note
Use iDrive to set the language that will be used
for the voice command system in order to be
able to identify the commands to be spoken.
Setting the language of iDrive, refer to page84.
Symbols used
{...} Verbal instructions to use with the voice
command system.
{{...}} Identifies the answers generated by the
voice command system.
Systems available for use with voice
command
>{Navigation}, refer to page130
>{Radio}, refer to page155
>{Telephone}, refer to page182
>{CD}, refer to page162
>{CD changer}, refer to page164
>{Notepad}, refer to page25
>{DVD}, refer to page168The Info Display, refer to page24, will display
either the equipment that you are now operat-
ing or any current error messages.
Voice commands
Voice command system activation
Briefly press the button on the steering
wheel.
An acoustic signal and the display "SVS active"
on the Info Display, refer to page24, indicate
that the system is ready for operation. The sys-
tem automatically starts in the main menu.
From here, you can call up all the equipment
that can be operated.
Canceling voice command
Briefly press the button on the steering
wheel
or
In dialogs in which any text can be spoken, e.g.
names, notes, canceling is only possible using
the button.
The system automatically switches over
to its telephone mode if you receive a call
during voice input. "SVS active" appears on the
Info Display, refer to page24.<
Voice commands
The voice command system operates on the
basis of specific, predefined commands; these
commands should be spoken precisely as indi-
cated. You can have the possible commands
read back at any stage. To do so, say the com-
mand {Options}.
In addition to the commands described, there
are often other commands that run the same
function. Instead of {Options}, you can, for
example, also say {What now}. In addition,
*
These sections contain information on
using the voice command system.
{Cancel}.
Page 33 of 247
Controls
31Reference
At a glance
Driving tips
Communications
Navigation
Entertainment
Mobility
Adapter for spare key
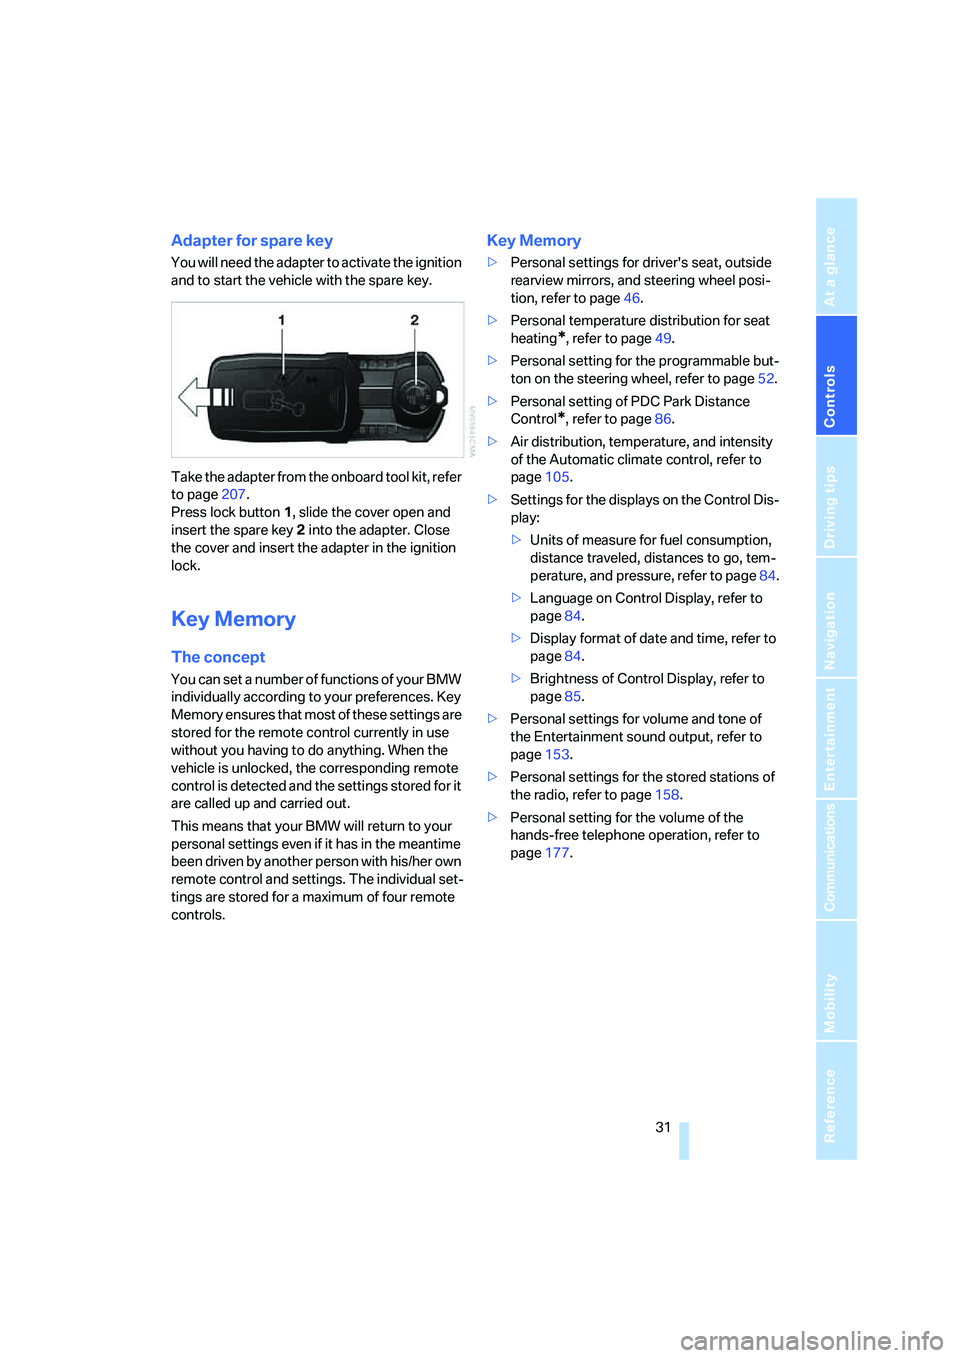
You will need the adapter to activate the ignition
and to start the vehicle with the spare key.
Take the adapter from the onboard tool kit, refer
to page207.
Press lock button1, slide the cover open and
insert the spare key2 into the adapter. Close
the cover and insert the adapter in the ignition
lock.
Key Memory
The concept
You can set a number of functions of your BMW
individually according to your preferences. Key
Memory ensures that most of these settings are
stored for the remote control currently in use
without you having to do anything. When the
vehicle is unlocked, the corresponding remote
control is detected and the settings stored for it
are called up and carried out.
This means that your BMW will return to your
personal settings even if it has in the meantime
been driven by another person with his/her own
remote control and settings. The individual set-
tings are stored for a maximum of four remote
controls.
Key Memory
>Personal settings for driver's seat, outside
rearview mirrors, and steering wheel posi-
tion, refer to page46.
>Personal temperature distribution for seat
heating
*, refer to page49.
>Personal setting for the programmable but-
ton on the steering wheel, refer to page52.
>Personal setting of PDC Park Distance
Control
*, refer to page86.
>Air distribution, temperature, and intensity
of the Automatic climate control, refer to
page105.
>Settings for the displays on the Control Dis-
play:
>Units of measure for fuel consumption,
distance traveled, distances to go, tem-
perature, and pressure, refer to page84.
>Language on Control Display, refer to
page84.
>Display format of date and time, refer to
page84.
>Brightness of Control Display, refer to
page85.
>Personal settings for volume and tone of
the Entertainment sound output, refer to
page153.
>Personal settings for the stored stations of
the radio, refer to page158.
>Personal setting for the volume of the
hands-free telephone operation, refer to
page177.
Page 86 of 247
Everything under control
84
Settings on Control Display
Setting units of measure and display
format
You can change the units of measure used in
the displays of fuel consumption, distances and
temperatures as well as the display format for
the time and date.
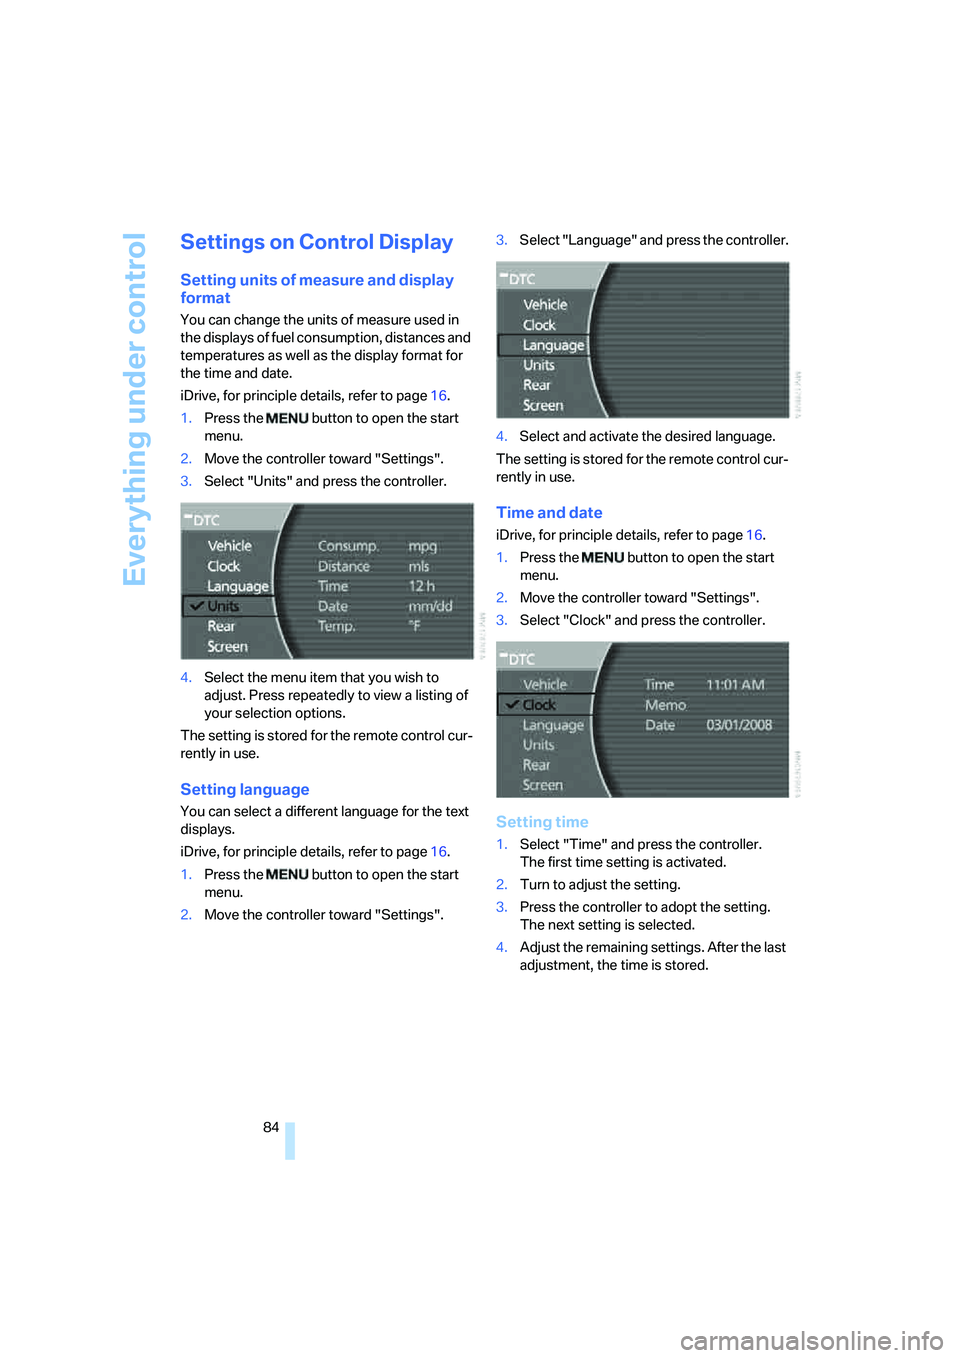
iDrive, for principle details, refer to page16.
1.Press the button to open the start
menu.
2.Move the controller toward "Settings".
3.Select "Units" and press the controller.
4.Select the menu item that you wish to
adjust. Press repeatedly to view a listing of
your selection options.
The setting is stored for the remote control cur-
rently in use.
Setting language
You can select a different language for the text
displays.
iDrive, for principle details, refer to page16.
1.Press the button to open the start
menu.
2.Move the controller toward "Settings".3.Select "Language" and press the controller.
4.Select and activate the desired language.
The setting is stored for the remote control cur-
rently in use.
Time and date
iDrive, for principle details, refer to page16.
1.Press the button to open the start
menu.
2.Move the controller toward "Settings".
3.Select "Clock" and press the controller.
Setting time
1.Select "Time" and press the controller.
The first time setting is activated.
2.Turn to adjust the setting.
3.Press the controller to adopt the setting.
The next setting is selected.
4.Adjust the remaining settings. After the last
adjustment, the time is stored.
Page 171 of 247
Navigation
Entertainment
Driving tips
169Reference
At a glance
Controls
Communications
Mobility
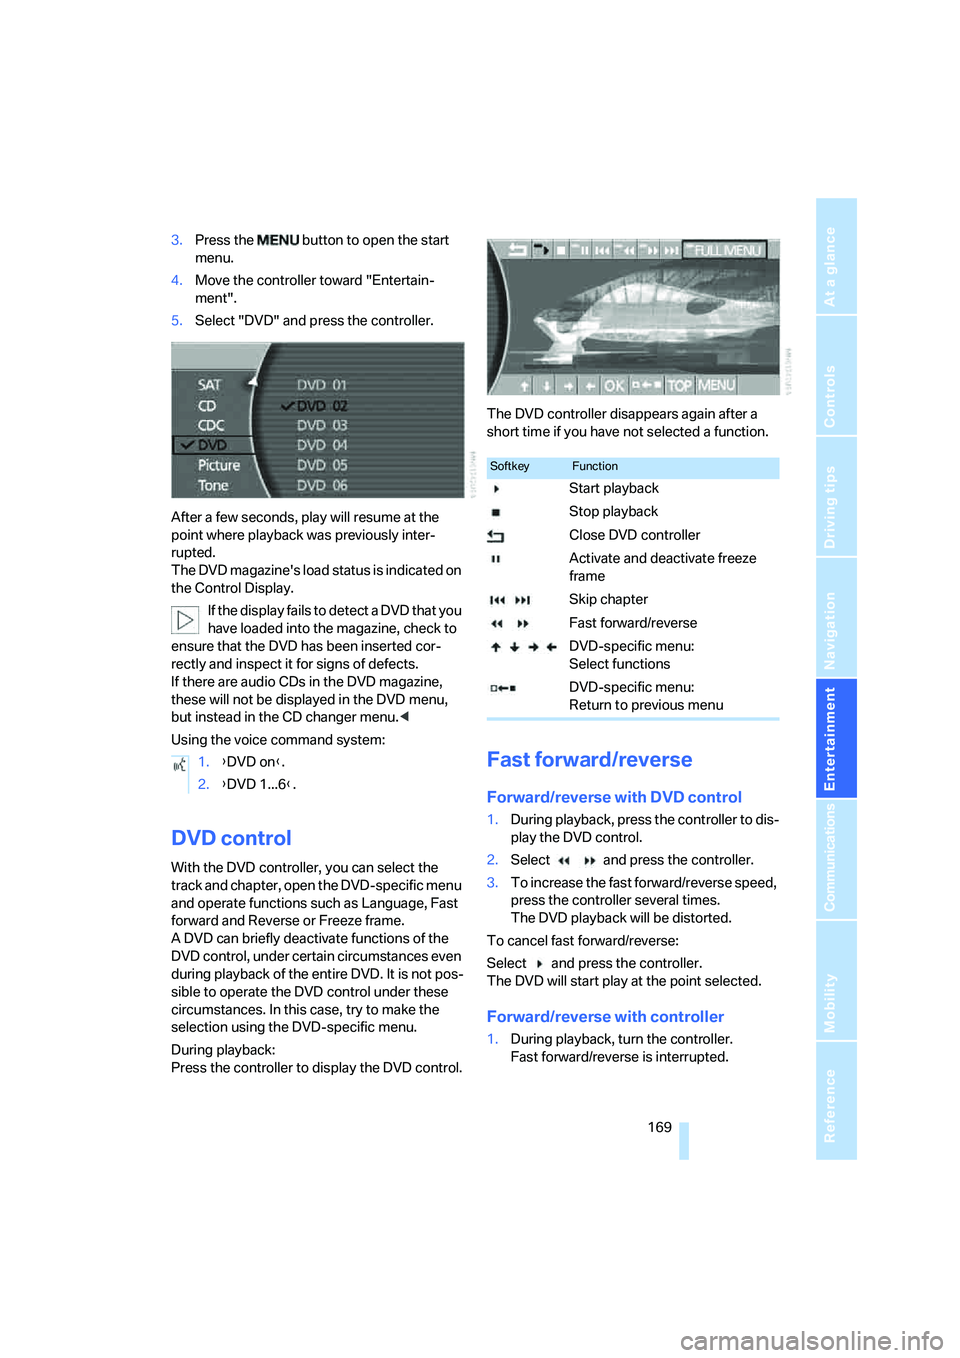
3.Press the button to open the start
menu.
4.Move the controller toward "Entertain-
ment".
5.Select "DVD" and press the controller.
After a few seconds, play will resume at the
point where playback was previously inter-
rupted.
The DVD magazine's load status is indicated on
the Control Display.
If the display fails to detect a DVD that you
have loaded into the magazine, check to
ensure that the DVD has been inserted cor-
rectly and inspect it for signs of defects.
If there are audio CDs in the DVD magazine,
these will not be displayed in the DVD menu,
but instead in the CD changer menu.<
Using the voice command system:
DVD control
With the DVD controller, you can select the
track and chapter, open the DVD-specific menu
and operate functions such as Language, Fast
forward and Reverse or Freeze frame.
A DVD can briefly deactivate functions of the
DVD control, under certain circumstances even
during playback of the entire DVD. It is not pos-
sible to operate the DVD control under these
circumstances. In this case, try to make the
selection using the DVD-specific menu.
During playback:
Press the controller to display the DVD control.The DVD controller disappears again after a
short time if you have not selected a function.
Fast forward/reverse
Forward/reverse with DVD control
1.During playback, press the controller to dis-
play the DVD control.
2.Select and press the controller.
3.To increase the fast forward/reverse speed,
press the controller several times.
The DVD playback will be distorted.
To cancel fast forward/reverse:
Select and press the controller.
The DVD will start play at the point selected.
Forward/reverse with controller
1.During playback, turn the controller.
Fast forward/reverse is interrupted. 1.{DVD on}.
2.{DVD 1...6}.
SoftkeyFunction
Start playback
Stop playback
Close DVD controller
Activate and deactivate freeze
frame
Skip chapter
Fast forward/reverse
DVD-specific menu:
Select functions
DVD-specific menu:
Return to previous menu
Page 173 of 247
Navigation
Entertainment
Driving tips
171Reference
At a glance
Controls
Communications
Mobility
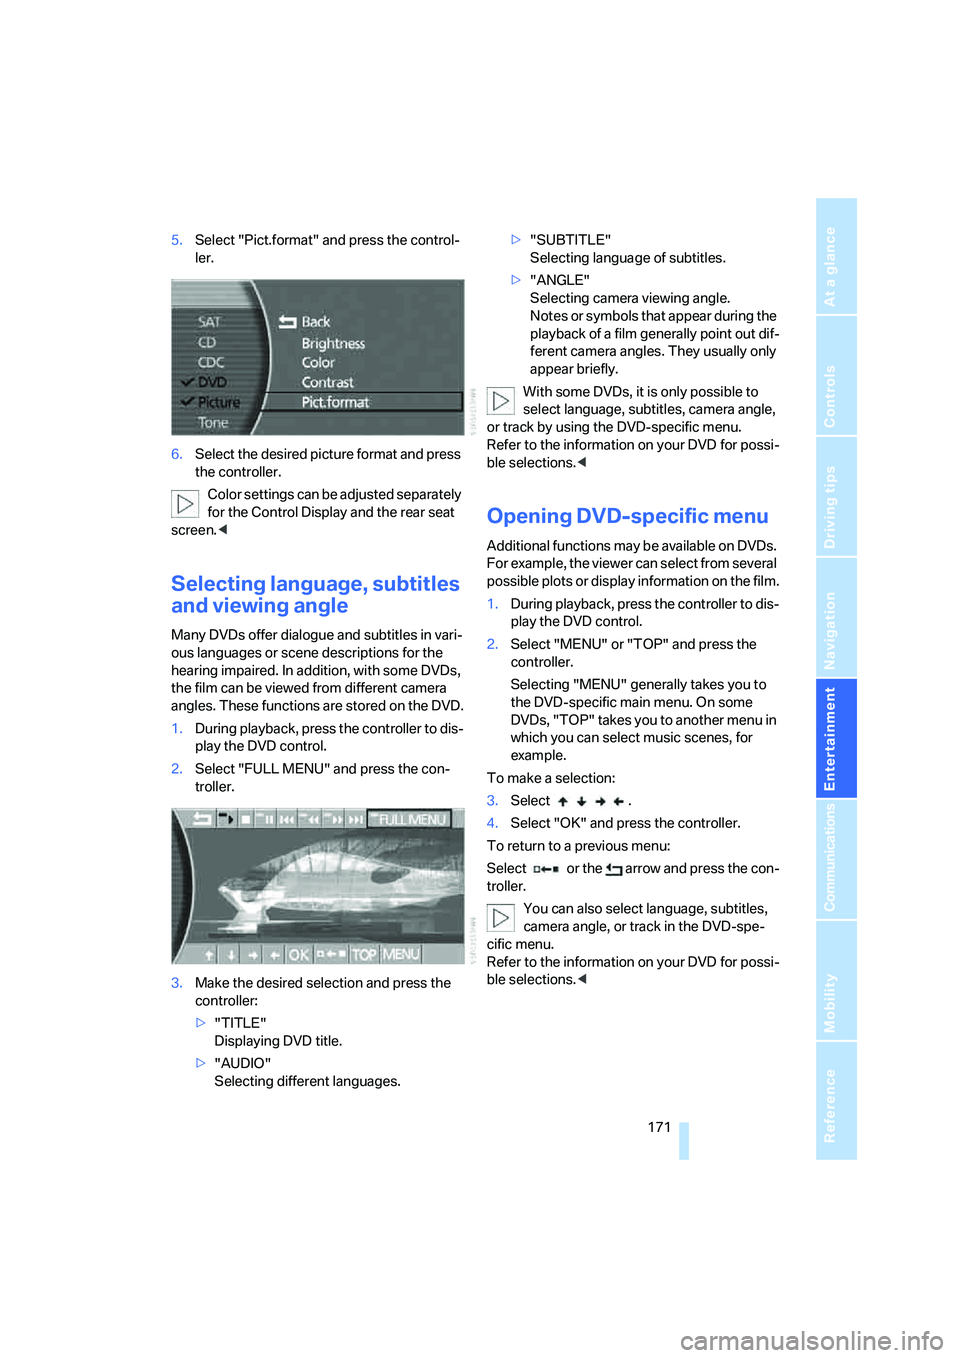
5.Select "Pict.format" and press the control-
ler.
6.Select the desired picture format and press
the controller.
Color settings can be adjusted separately
for the Control Display and the rear seat
screen.<
Selecting language, subtitles
and viewing angle
Many DVDs offer dialogue and subtitles in vari-
ous languages or scene descriptions for the
hearing impaired. In addition, with some DVDs,
the film can be viewed from different camera
angles. These functions are stored on the DVD.
1.During playback, press the controller to dis-
play the DVD control.
2.Select "FULL MENU" and press the con-
troller.
3.Make the desired selection and press the
controller:
>"TITLE"
Displaying DVD title.
>"AUDIO"
Selecting different languages.>"SUBTITLE"
Selecting language of subtitles.
>"ANGLE"
Selecting camera viewing angle.
Notes or symbols that appear during the
playback of a film generally point out dif-
ferent camera angles. They usually only
appear briefly.
With some DVDs, it is only possible to
select language, subtitles, camera angle,
or track by using the DVD-specific menu.
Refer to the information on your DVD for possi-
ble selections.<
Opening DVD-specific menu
Additional functions may be available on DVDs.
For example, the viewer can select from several
possible plots or display information on the film.
1.During playback, press the controller to dis-
play the DVD control.
2.Select "MENU" or "TOP" and press the
controller.
Selecting "MENU" generally takes you to
the DVD-specific main menu. On some
DVDs, "TOP" takes you to another menu in
which you can select music scenes, for
example.
To make a selection:
3.Select .
4.Select "OK" and press the controller.
To return to a previous menu:
Select or the arrow and press the con-
troller.
You can also select language, subtitles,
camera angle, or track in the DVD-spe-
cific menu.
Refer to the information on your DVD for possi-
ble selections.<
Page 174 of 247
DVD changer
172
Notes
The DVD changer can play the following for-
mats:
>Video DVD
>CD-DA (audio CD)
The DVD Audio format is not supported by the
DVD changer. However, many audio DVDs
available in stores also contain a video track in
the DVD Video format in addition to the audio
track. These DVDs can be played back by the
DVD changer. Please refer to the information on
your DVD to determine whether your audio DVD
contains an additional video track.
DVDs are usually divided into tracks and chap-
ters and can contain different subtitles, camera
angles or sound tracks, languages and sound
formats. Depending on the version of the DVD,
these functions can be selected either directly
with the DVD control system or only via the
DVD-specific menu. Refer to the information on
your DVD for possible selections.
Dual-sided DVDs available from retail suppliers
are coated on both sides and bear no markings.
This means both sides are information carriers.
To play back the information on the other side,
remove the magazine and turn the DVD over.
Safety note
The BMW DVD changer is a Class 1 laser
product. Do not operate with a damaged
cover panel as this can lead to severe eye injury.
Never play CDs/DVDs with stick-on labels.
They can come loose during playback due to
the heat buildup and cause irreparable damage
to the system.
Only use round CDs/DVDs with a standard
diameter of 4.7 in/12 cm and do not play CDs/
DVDs with an adapter, e.g. CD singles; other-
wise, the CD/DVD or the adapter can jam and
may no longer eject properly.
Do not use combined CD/DVDs, e.g. DVD
Plus;
otherwise, the CD/DVD can jam, preventing it
from being ejected properly.<
General malfunctions
The BMW DVD changer is optimized for opera-
tion in the vehicle. It may react more sensitively
to defective CDs/DVDs than devices intended
for stationary use.
If a CD/DVD cannot be played back, first check
to make sure it has been correctly inserted.
Humidity
High humidity can fog the CD/DVD or the focus-
ing lens for the laser beam, temporarily prevent-
ing playback.
Malfunctions with particular CDs/DVDs
If malfunctions occur only with particular CDs/
DVDs, this can be due to one of the following
causes.
Home-recorded CDs/DVDs
Malfunction sources in home-recorded CDs/
DVDs include, for example, inconsistent data
origination and recording processes as well as
low quality or pronounced aging of the blanks
used.
Only write on CDs/DVDs with a marker espe-
cially designed for this purpose.
Damaged CDs/DVDs
Avoid finger prints, dust, scratches, and mois-
ture.
Store CDs/DVDs in a sleeve.
Do not expose CDs/DVDs to temperatures
above 1227/506, high humidity or direct
sunlight.
CDs/DVDs with copy protection
Manufacturers often provide CDs/DVDs with
copy protection. This can prevent or limit the
playback of these CDs/DVDs.
Care instructions
You can find everything you need to know about
this topic by consulting the separate Caring for
your vehicle brochure.
Page 231 of 247
Reference 229
At a glance
Controls
Driving tips
Communications
Navigation
Entertainment
Mobility
DVD changer168
– adjusting picture170
– adjusting volume153
– controls152
– country codes168
– DVD controller169
– fast forward169
– freeze frame170
– opening specific menu171
– playing DVD168
– reverse169
– searching for chapter170
– selecting language171
– selecting picture format170
– selecting subtitles171
– starting168
– tone control153
DVD multimedia changer,
refer to DVD changer168
Dynamic Brake Control
DBC87
Dynamic Drive89
Dynamic Stability Control
DSC87
– indicator lamp13
Dynamic Traction Control
DTC88
– indicator lamp13
E
"EDC"89
EDC Electronic Damping
Control89
Eject button, refer to Buttons
on CD player152
Electrical malfunction
– door lock34
– driver's door34
– fuel filler door192
– glass sunroof, electric42
– luggage compartment lid36
– parking brake60
Electric steering wheel
adjustment52
Electronic brake-force
distribution87Electronic Damping Control
EDC89
Electronic Stability Program
ESP, refer to DSC Dynamic
Stability Control87
Electronic toll collection
device, refer to Entry/pass
tags126
Emergency actuation, refer to
Manual operation
– door lock34
– driver's door34
– fuel filler door192
– glass sunroof42
– luggage compartment lid36
– parking brake60
– transmission lock for
automatic transmission with
Steptronic64
Emergency call178
Emergency release of luggage
compartment lid from inside
the luggage
compartment37
Emergency services, refer to
Roadside Assistance187
"Emissions inspection"79
Energy-conscious driving,
refer to Energy Control/
current fuel consumption77
Energy Control77
Engine
– breaking-in122
– data218
– overheated, refer to Coolant
temperature76
– speed218
– starting57
– starting difficulties58
– switching off58
Engine compartment202
Engine coolant203Engine oil
– additives, refer to Approved
engine oils203
– approved oils203
– checking oil level202
– electronic oil level check202
– filling capacity221
– possible displays203
"Engine oil level O.K."203
"Engine oil level too high"203
Engine output, refer to Engine
specifications218
Engine overheating, refer to
Coolant temperature76
Engine speed218
"Enter", navigation134
Entering activation time of
parked car ventilation109
– "Time 1"110
– "Time 2"110
Entering destination
address133
Entering destination town/
city132
Entering house number or
intersection, navigation133
Entering intersection133
Entering name132
Entering street133
"Entertainment", tone
adjustment153
Entertainment sound output
on/off153
Entry/pass tags126
Entry for current position and
destination, refer to Entering
destination manually131
Environmentally friendly
driving, refer to Energy
Control77
ESP Electronic Stability
Program, refer to DSC
Dynamic Stability
Control87
Event Data Recorders206
Exhaust system, refer to Hot
exhaust system122
Page 233 of 247
Reference 231
At a glance
Controls
Driving tips
Communications
Navigation
Entertainment
Mobility
Head light, refer to Adaptive
Head Light100
Headphones22
Head restraints46
– front head restraints,
active47
– sitting safely43
Heated
– mirrors51
– seats49
Heated rear window, refer to
Rear window defroster107
Heated steering wheel52
Heater, windshield, refer to
Defrosting windows and
removing condensation106
Heating103
– exterior mirrors51
– residual heat106
– seats49
– steering wheel52
– windshield washer
nozzles66
Heating and ventilation103
Heating when parked, refer to
Residual heat106
Heavy cargo, refer to Stowing
cargo125
Height, refer to
Dimensions219
Height adjustment
– seats44
– steering wheel52
"Help"
– assistance window20
– menu navigation19
"Help text", assistance
window20
Help text on Control
Display20
"Hide map icons",
navigation137
"high", automatic climate
control105
High-beam assistant100
High beams100
– headlamp flasher100
– indicator lamp11High Definition Radio161
High temperatures122
Hills123
Holder for cups115
Home address
– selecting140
– storing140
Hood201
Horn11
Hour signal activation85
"House Number",
navigation134
Hydraulic brake assistant,
refer to DBC87
Hydroplaning123
I
ID3 tag, refer to Displaying
information on track166
iDrive16
– assistance window20
– automatic climate
control104
– changing date and time84
– changing language84
– changing settings84
– changing units of measure
and display format84
– confirming selection or
entry19
– controller16
– controls16
– displays, menus17
– menus17
– rear seat screen21
– selecting menu item19
– setting brightness85
– showing help text20
– start menu18
– status lines20
– symbols20
Ignition key30
Ignition lock57
Illuminated vanity mirror51
Imitation leather, refer to
Caring for your vehicle
brochure"Indep. ventil.", automatic
climate control109
Indicator/warning lamps12
– airbags95
– alarm system37
– DSC88
– DTC88
– Flat Tire Monitor91
– fog lamps101
– safety belt warning49
– Tire Pressure Monitor93
Individually programmable
buttons11,52
Individual settings, refer to
Key Memory31
Inflation pressure, refer to Tire
inflation pressure194
Inflation pressure monitoring,
refer to Flat Tire Monitor90
Inflation pressure monitoring,
refer to Tire Pressure
Monitor91
Info Display12
Info menu, refer to Assistance
window20
"Information",
navigation135,136
Information, navigation
– "On country"135
– "On dest."135
– "On location"135
– "On town/city"135
Information on travel direction,
refer to Voice
instructions145
Infrared windshield, refer to
Entry/pass tags126
"INITIALIZE", BMW
Assist186
Initializing BMW Assist186
Inserting navigation CD/
DVD130
Installation location
– CD changer164
– DVD changer168
– mobile phone, refer to
Inserting mobile phone179
– navigation drive130
Page 234 of 247
Everything from A to Z
232 Instructions, navigation
system, refer to Route
guidance by voice
instructions145
Instrument cluster, refer to
Info Display12
Instrument lighting101
Instrument panel, refer to
Cockpit10
– all around the steering
wheel10
– comfort features14
Integrated universal remote
control111
Interior lamps102
– switching on with remote
control33
Interior motion sensor38
– switching off38
Interior rearview mirror,
automatic dimming
feature123
Interlock, refer to Switching
off engine58
"INTERM. TIME",
stopwatch83
Interval Display, refer to
Service requirements78
J
Joystick, refer to iDrive16
Jump starting213
K
Keyless-Go, refer to Comfort
Access38
Keyless opening and closing,
refer to Comfort Access38
Key Memory31
Keys30
– adapter for spare key30
– key-related settings, refer to
Key Memory31
Kick-down63
Knock control193
L
Lamps and bulbs207
"Language", settings84
Lashing eyes, refer to
Securing cargo125
"Last", telephone184
"Last dest.", navigation137
LATCH child-restraint fixing
system55
Leather care, refer to Caring
for your vehicle brochure
LEDs light-emitting
diodes207
"Left", seat heating49
Length, refer to
Dimensions219
Level control system89
Light
– refer to High-beam
assistant100
– refer to Parking lamps/low
beams99
– refer to Roadside parking
lamps/low beams100
Light alloy wheels, care and
maintenance, refer to Caring
for your vehicle brochure
Light-emitting diodes
LEDs207
Lighter116
Lighter socket, refer to Power
socket116
Lighting
– of instruments101
– of vehicle99
Light switch99
"Limit"82
Limit, refer to Speed limit82
"Limited", rear seat screen22
Load, refer to Loading124
Loading
– securing cargo125
– vehicle124
"LOC.", navigation140
"Location",
navigation139,146,147Lock buttons in the doors,
refer to Locking34
Locking
– from inside34
– from outside33
Locking without key, refer to
Comfort Access38
Locking without remote
control, refer to Comfort
Access38
"LOGIC7", tone control154
Longlife oils, approved
oils203
Long wave, LW155
– High Definition Radio161
"low", automatic climate
control105
Low beams99
– automatic99
– indicator lamp, defective
lamp80
Lower back support, refer to
Lumbar support
adjustment45
Low-fuel warning light, refer to
Fuel gauge76
Lows, refer to Tone
adjustment153
Lug bolts
– refer to Preparing for a wheel
change210
– tightening torque, refer to
After mounting211
– wrench, refer to What you
will need209
Luggage compartment119
– capacity220
– Comfort Access39
– opening/closing, refer to
Luggage compartment
lid35
– opening from inside36
– opening from outside35
– opening with remote
control33