BMW 750I 2008 E65 Owner's Manual
Manufacturer: BMW, Model Year: 2008, Model line: 750I, Model: BMW 750I 2008 E65Pages: 254, PDF Size: 7.98 MB
Page 101 of 254
Controls
99Reference
At a glance
Driving tips
Communications
Navigation
Entertainment
Mobility
>"Brightness":
The brightness of the screen can be
adjusted, refer to page172.
The settings are stored for the remote control
currently in use.
To exit the menu:
The image will automatically disappear after
a p p r o x . 5 s e c o n d s , o r s e l e c t t h e r e t u r n a r r o w
and press the controller to exit sooner.
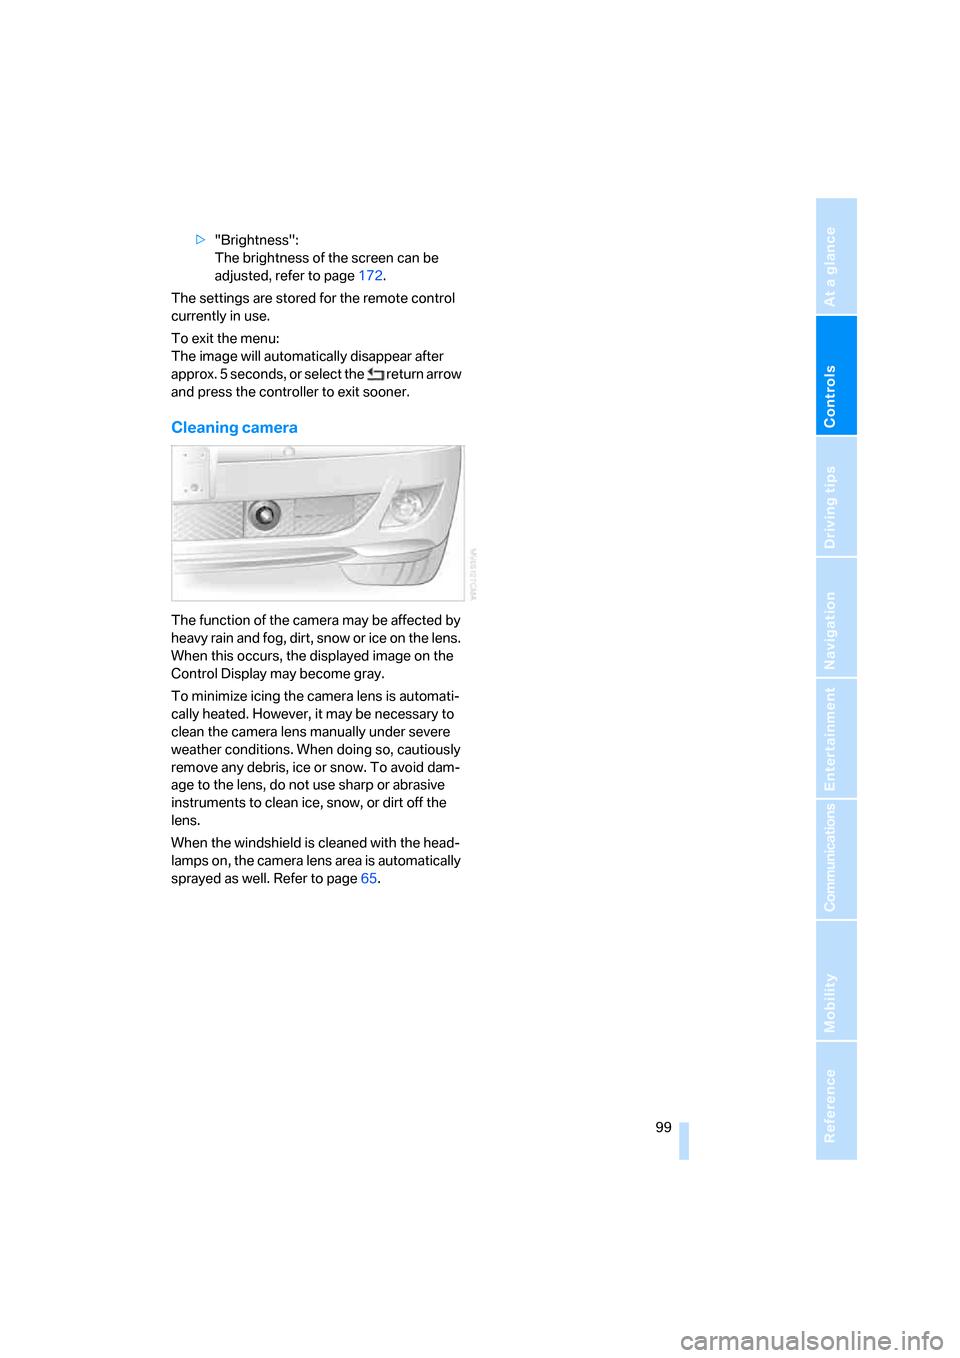
Cleaning camera
The function of the camera may be affected by
heavy rain and fog, dirt, snow or ice on the lens.
When this occurs, the displayed image on the
Control Display may become gray.
To minimize icing the camera lens is automati-
cally heated. However, it may be necessary to
clean the camera lens manually under severe
weather conditions. When doing so, cautiously
remove any debris, ice or snow. To avoid dam-
age to the lens, do not use sharp or abrasive
instruments to clean ice, snow, or dirt off the
lens.
When the windshield is cleaned with the head-
lamps on, the camera lens area is automatically
sprayed as well. Refer to page65.
Page 102 of 254
Lamps
100
Lamps
Parking lamps/low beams
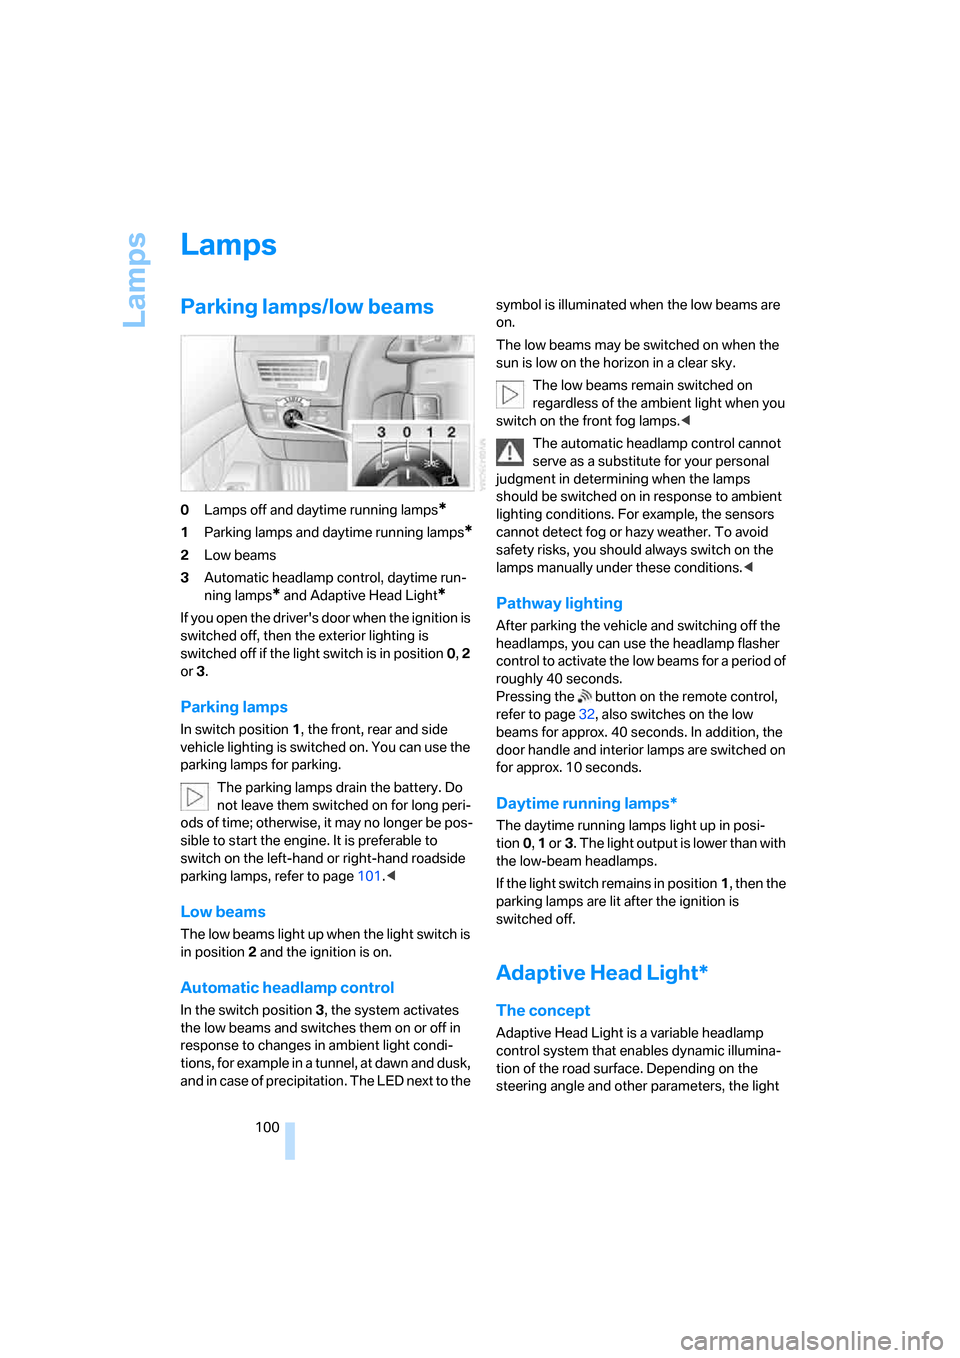
0Lamps off and daytime running lamps*
1Parking lamps and daytime running lamps*
2Low beams
3Automatic headlamp control, daytime run-
ning lamps
* and Adaptive Head Light*
If you open the driver's door when the ignition is
switched off, then the exterior lighting is
switched off if the light switch is in position0, 2
or3.
Parking lamps
In switch position1, the front, rear and side
vehicle lighting is switched on. You can use the
parking lamps for parking.
The parking lamps drain the battery. Do
not leave them switched on for long peri-
ods of time; otherwise, it may no longer be pos-
sible to start the engine. It is preferable to
switch on the left-hand or right-hand roadside
parking lamps, refer to page101.<
Low beams
The low beams light up when the light switch is
in position 2 and the ignition is on.
Automatic headlamp control
In the switch position3, the system activates
the low beams and switches them on or off in
response to changes in ambient light condi-
tions, for example in a tunnel, at dawn and dusk,
and in case of precipitation. The LED next to the symbol is illuminated when the low beams are
on.
The low beams may be switched on when the
sun is low on the horizon in a clear sky.
The low beams remain switched on
regardless of the ambient light when you
switch on the front fog lamps.<
The automatic headlamp control cannot
serve as a substitute for your personal
judgment in determining when the lamps
should be switched on in response to ambient
lighting conditions. For example, the sensors
cannot detect fog or hazy weather. To avoid
safety risks, you should always switch on the
lamps manually under these conditions.<
Pathway lighting
After parking the vehicle and switching off the
headlamps, you can use the headlamp flasher
control to activate the low beams for a period of
roughly 40 seconds.
Pressing the button on the remote control,
refer to page32, also switches on the low
beams for approx. 40 seconds. In addition, the
door handle and interior lamps are switched on
for approx. 10 seconds.
Daytime running lamps*
The daytime running lamps light up in posi-
tion0, 1 or3. The light output is lower than with
the low-beam headlamps.
If the light switch remains in position1, then the
parking lamps are lit after the ignition is
switched off.
Adaptive Head Light*
The concept
Adaptive Head Light is a variable headlamp
control system that enables dynamic illumina-
tion of the road surface. Depending on the
steering angle and other parameters, the light
Page 103 of 254
Controls
101Reference
At a glance
Driving tips
Communications
Navigation
Entertainment
Mobility
from the headlamp follows the course of the
road.
Activating Adaptive Head Light
In switch position3, the Adaptive Head Light is
activated and Automatic headlamp control is
switched on.
In order not to blind oncoming traffic, the Adap-
tive Head Light is not active when driving in
reverse and only points toward the passenger
side when the vehicle is stationary.
Malfunction
The LED above the symbol for automatic head-
lamp control flashes. Adaptive Head Light is
malfunctioning or has failed. Have the system
checked as soon as possible.
High beams/
roadside parking lamps
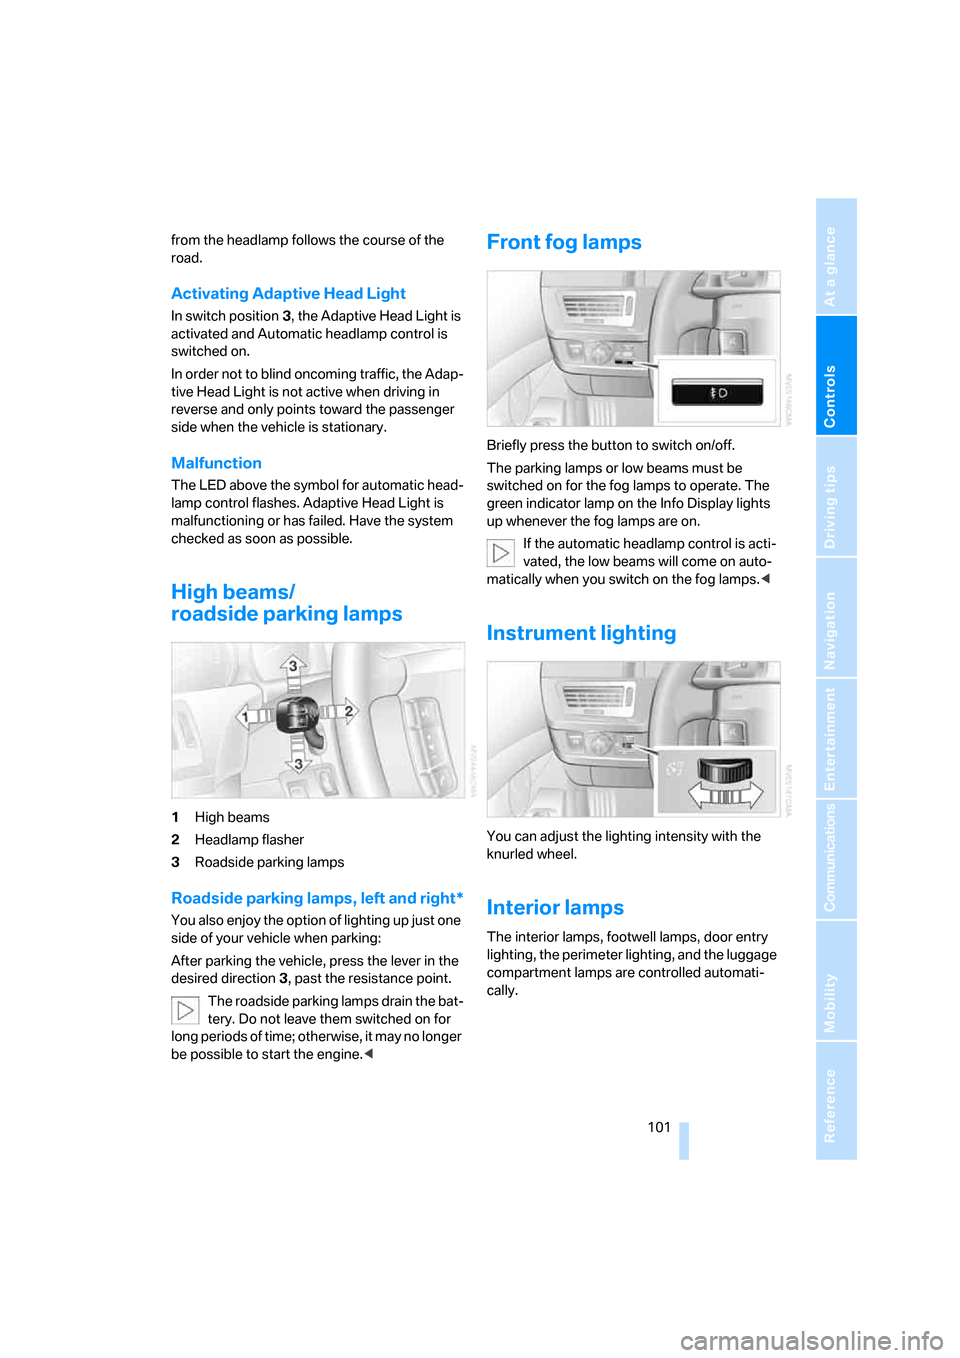
1High beams
2Headlamp flasher
3Roadside parking lamps
Roadside parking lamps, left and right*
You also enjoy the option of lighting up just one
side of your vehicle when parking:
After parking the vehicle, press the lever in the
desired direction3, past the resistance point.
The roadside parking lamps drain the bat-
tery. Do not leave them switched on for
long periods of time; otherwise, it may no longer
be possible to start the engine.<
Front fog lamps
Briefly press the button to switch on/off.
The parking lamps or low beams must be
switched on for the fog lamps to operate. The
green indicator lamp on the Info Display lights
up whenever the fog lamps are on.
If the automatic headlamp control is acti-
vated, the low beams will come on auto-
matically when you switch on the fog lamps.<
Instrument lighting
You can adjust the lighting intensity with the
knurled wheel.
Interior lamps
The interior lamps, footwell lamps, door entry
lighting, the perimeter lighting, and the luggage
compartment lamps are controlled automati-
cally.
Page 104 of 254
Lamps
102
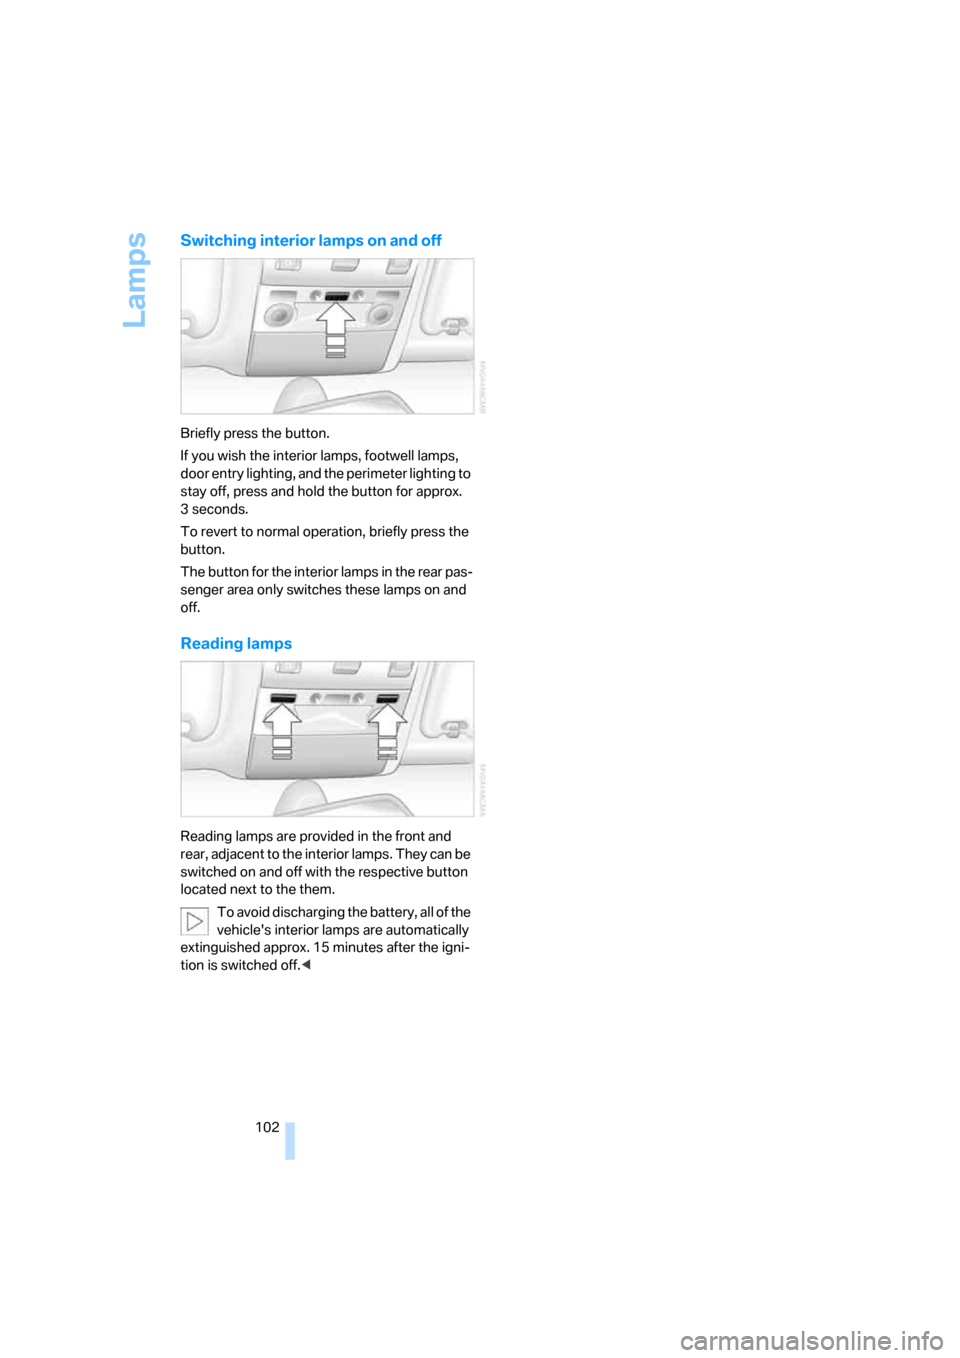
Switching interior lamps on and off
Briefly press the button.
If you wish the interior lamps, footwell lamps,
door entry lighting, and the perimeter lighting to
stay off, press and hold the button for approx.
3seconds.
To revert to normal operation, briefly press the
button.
The button for the interior lamps in the rear pas-
senger area only switches these lamps on and
off.
Reading lamps
Reading lamps are provided in the front and
rear, adjacent to the interior lamps. They can be
switched on and off with the respective button
located next to the them.
To avoid discharging the battery, all of the
vehicle's interior lamps are automatically
extinguished approx. 15 minutes after the igni-
tion is switched off.<
Page 105 of 254
Controls
103Reference
At a glance
Driving tips
Communications
Navigation
Entertainment
Mobility
Climate
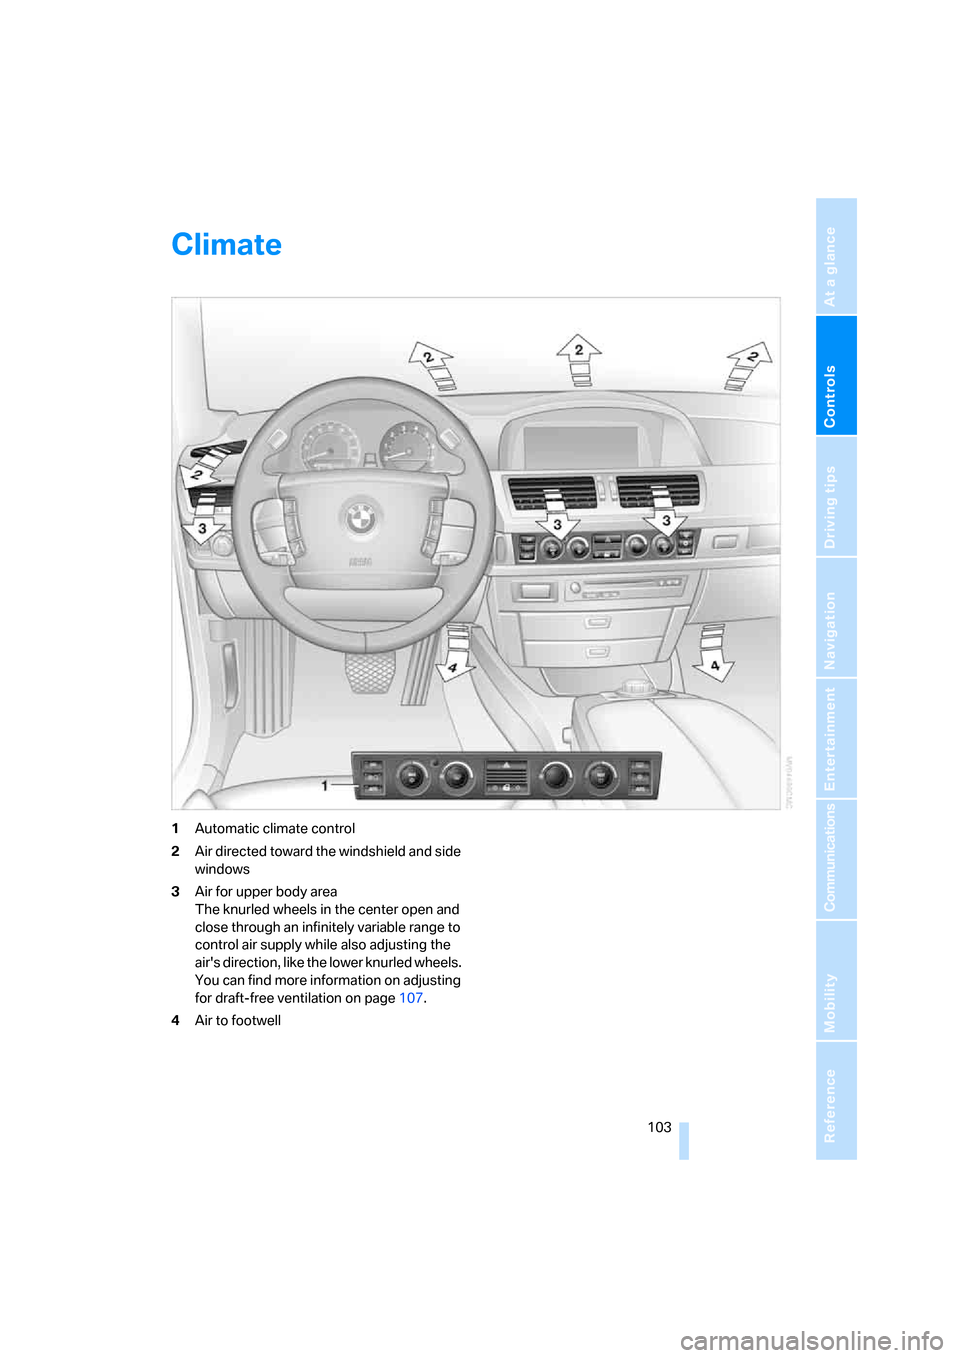
1Automatic climate control
2Air directed toward the windshield and side
windows
3Air for upper body area
The knurled wheels in the center open and
close through an infinitely variable range to
control air supply while also adjusting the
air's direction, like the lower knurled wheels.
You can find more information on adjusting
for draft-free ventilation on page107.
4Air to footwell
Page 106 of 254
Climate
104
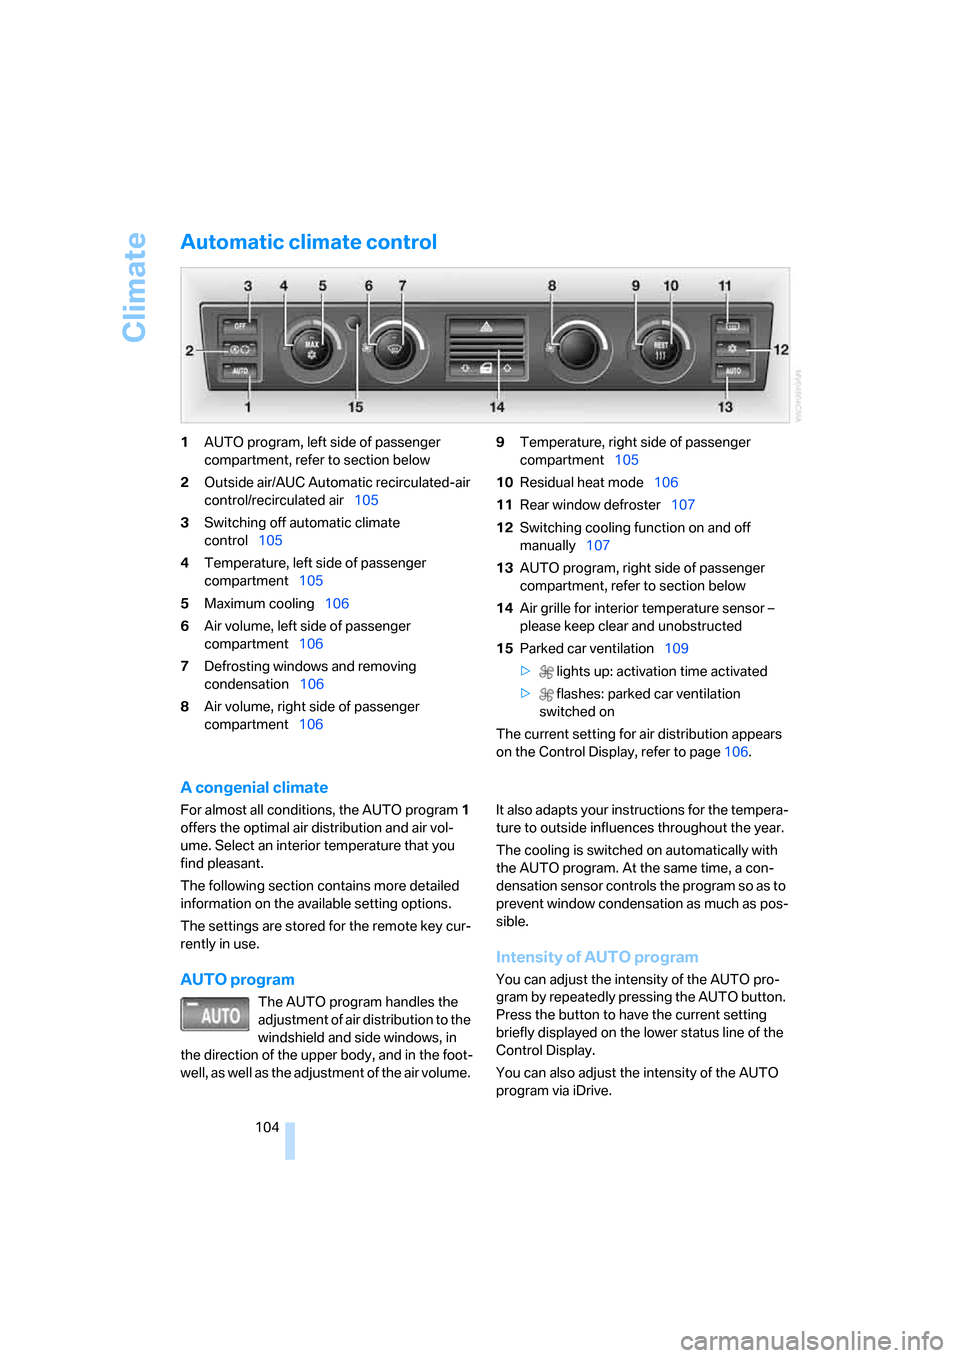
Automatic climate control
1AUTO program, left side of passenger
compartment, refer to section below
2Outside air/AUC Automatic recirculated-air
control/recirculated air105
3Switching off automatic climate
control105
4Temperature, left side of passenger
compartment105
5Maximum cooling106
6Air volume, left side of passenger
compartment106
7Defrosting windows and removing
condensation106
8Air volume, right side of passenger
compartment1069Temperature, right side of passenger
compartment105
10Residual heat mode106
11Rear window defroster107
12Switching cooling function on and off
manually107
13AUTO program, right side of passenger
compartment, refer to section below
14Air grille for interior temperature sensor –
please keep clear and unobstructed
15Parked car ventilation109
> lights up: activation time activated
> flashes: parked car ventilation
switched on
The current setting for air distribution appears
on the Control Display, refer to page106.
A congenial climate
For almost all conditions, the AUTO program1
offers the optimal air distribution and air vol-
ume. Select an interior temperature that you
find pleasant.
The following section contains more detailed
information on the available setting options.
The settings are stored for the remote key cur-
rently in use.
AUTO program
The AUTO program handles the
adjustment of air distribution to the
windshield and side windows, in
the direction of the upper body, and in the foot-
well, as well as the adjustment of the air volume. It also adapts your instructions for the tempera-
ture to outside influences throughout the year.
The cooling is switched on automatically with
the AUTO program. At the same time, a con-
densation sensor controls the program so as to
prevent window condensation as much as pos-
sible.
Intensity of AUTO program
You can adjust the intensity of the AUTO pro-
gram by repeatedly pressing the AUTO button.
Press the button to have the current setting
briefly displayed on the lower status line of the
Control Display.
You can also adjust the intensity of the AUTO
program via iDrive.
Page 107 of 254
Controls
105Reference
At a glance
Driving tips
Communications
Navigation
Entertainment
Mobility
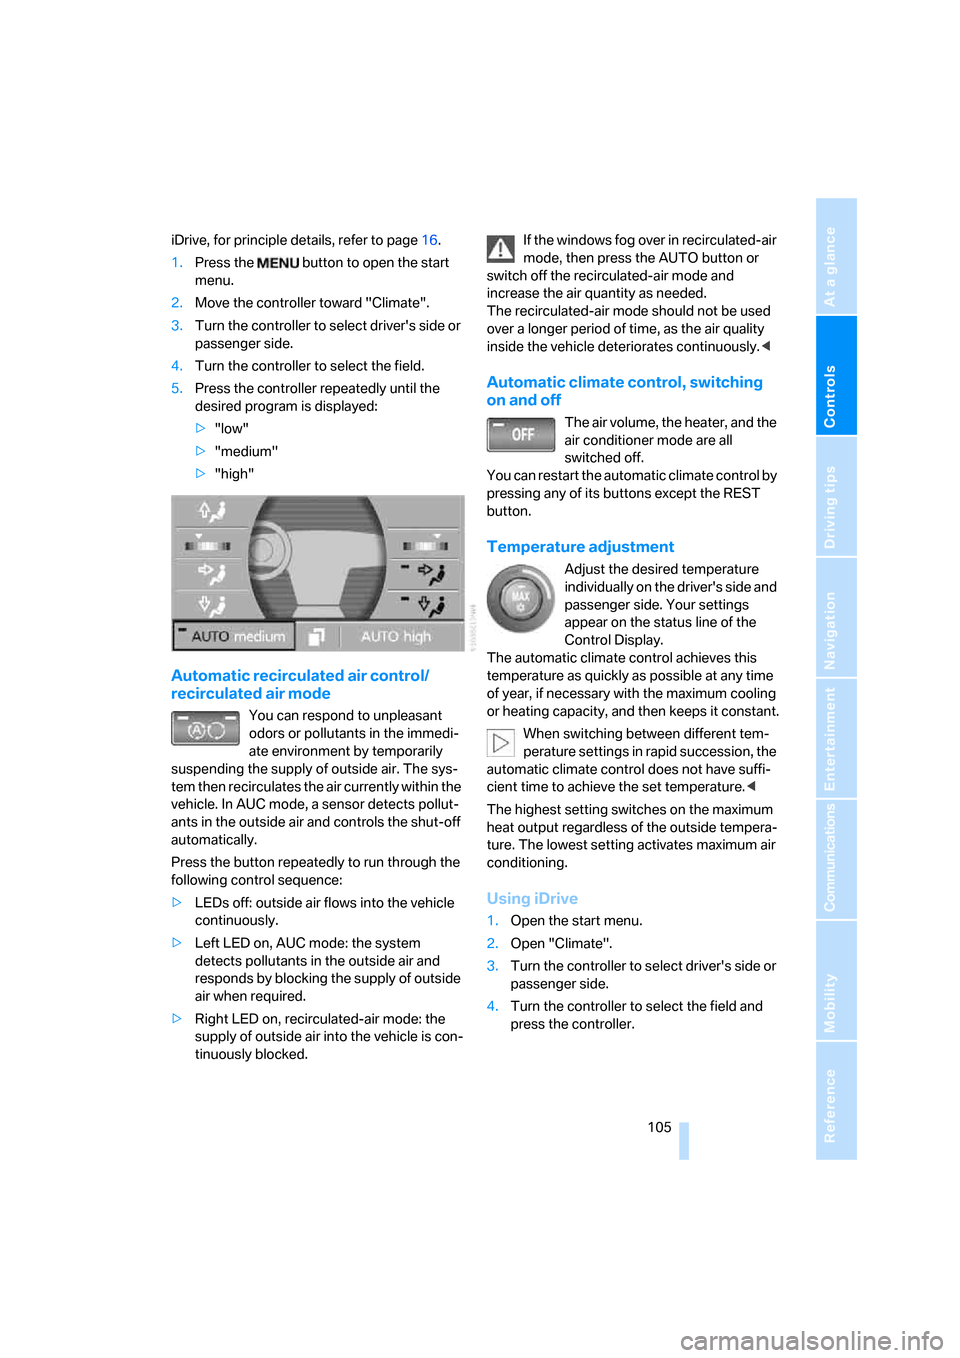
iDrive, for principle details, refer to page16.
1.Press the button to open the start
menu.
2.Move the controller toward "Climate".
3.Turn the controller to select driver's side or
passenger side.
4.Turn the controller to select the field.
5.Press the controller repeatedly until the
desired program is displayed:
>"low"
>"medium"
>"high"
Automatic recirculated air control/
recirculated air mode
You can respond to unpleasant
odors or pollutants in the immedi-
ate environment by temporarily
suspending the supply of outside air. The sys-
tem then recirculates the air currently within the
vehicle. In AUC mode, a sensor detects pollut-
ants in the outside air and controls the shut-off
automatically.
Press the button repeatedly to run through the
following control sequence:
>LEDs off: outside air flows into the vehicle
continuously.
>Left LED on, AUC mode: the system
detects pollutants in the outside air and
responds by blocking the supply of outside
air when required.
>Right LED on, recirculated-air mode: the
supply of outside air into the vehicle is con-
tinuously blocked.If the windows fog over in recirculated-air
mode, then press the AUTO button or
switch off the recirculated-air mode and
increase the air quantity as needed.
The recirculated-air mode should not be used
over a longer period of time, as the air quality
inside the vehicle deteriorates continuously.<
Automatic climate control, switching
on and off
The air volume, the heater, and the
air conditioner mode are all
switched off.
You can restart the automatic climate control by
pressing any of its buttons except the REST
button.
Temperature adjustment
Adjust the desired temperature
individually on the driver's side and
passenger side. Your settings
appear on the status line of the
Control Display.
The automatic climate control achieves this
temperature as quickly as possible at any time
of year, if necessary with the maximum cooling
or heating capacity, and then keeps it constant.
When switching between different tem-
perature settings in rapid succession, the
automatic climate control does not have suffi-
cient time to achieve the set temperature.<
The highest setting switches on the maximum
heat output regardless of the outside tempera-
ture. The lowest setting activates maximum air
conditioning.
Using iDrive
1.Open the start menu.
2.Open "Climate".
3.Turn the controller to select driver's side or
passenger side.
4.Turn the controller to select the field and
press the controller.
Page 108 of 254
Climate
106 5.Turn the controller to adjust the tempera-
ture:
>Turn toward the left, toward blue: colder
>Turn toward the right, toward red:
warmer
6.Press the controller to save the setting.
Maximum cooling
Maximally cooled air is obtained as
quickly as possible at an outside
temperature of approx. 327/06
and with the engine running.
The automatic climate control
changes over to the lowest temperature and
switches into the recirculated-air mode. The
maximum air quantity only flows out of the vents
for the upper body. So open these vents for
maximum cooling.
Air volume
You can vary the air volume by
turning. You can reactivate the
automatic air supply mode by
pressing the AUTO button.
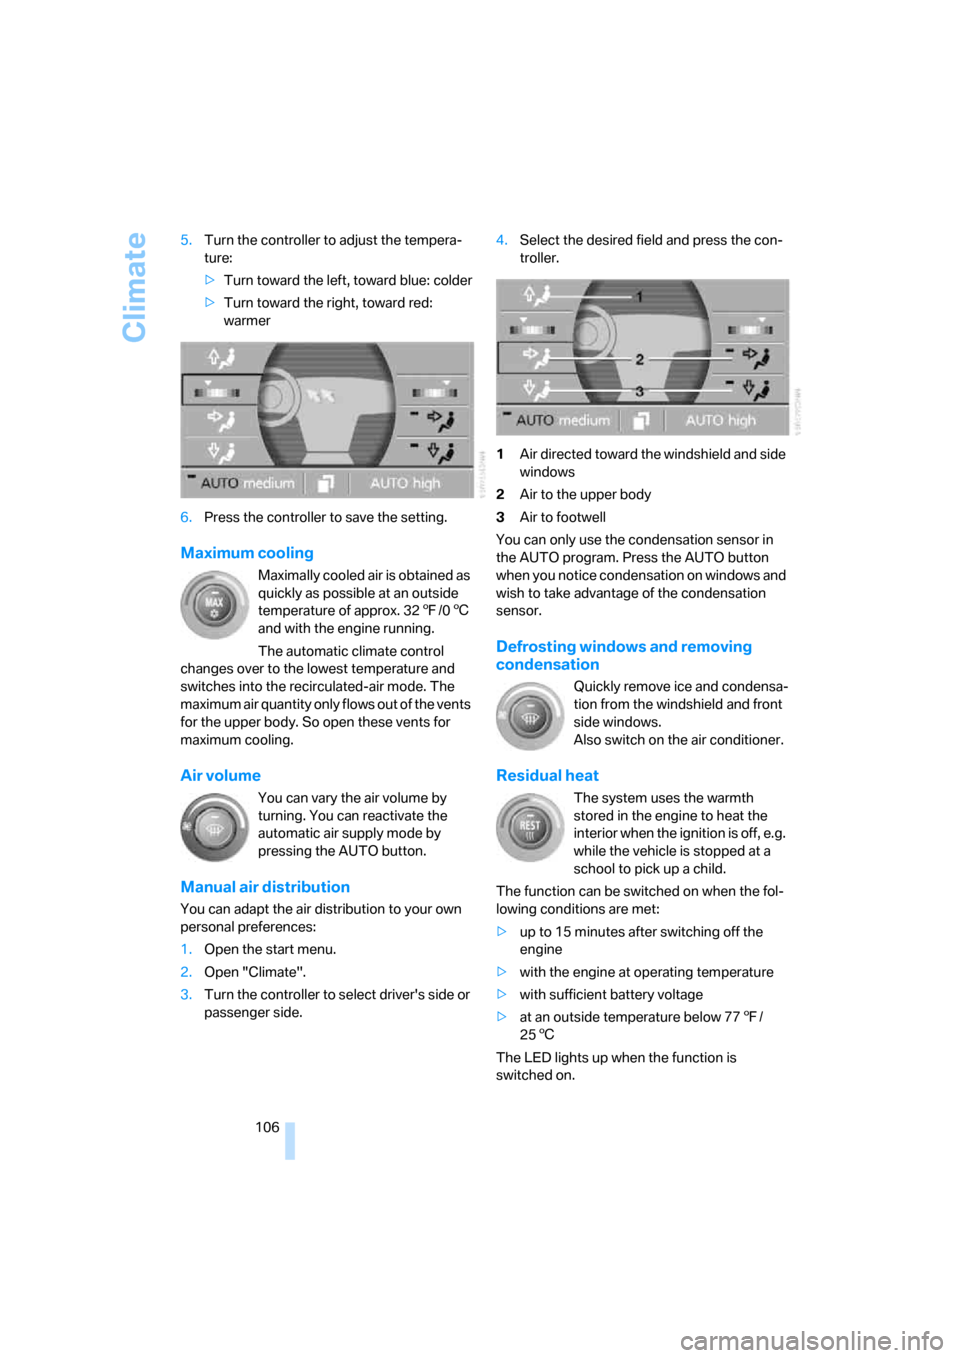
Manual air distribution
You can adapt the air distribution to your own
personal preferences:
1.Open the start menu.
2.Open "Climate".
3.Turn the controller to select driver's side or
passenger side.4.Select the desired field and press the con-
troller.
1Air directed toward the windshield and side
windows
2Air to the upper body
3Air to footwell
You can only use the condensation sensor in
the AUTO program. Press the AUTO button
when you notice condensation on windows and
wish to take advantage of the condensation
sensor.
Defrosting windows and removing
condensation
Quickly remove ice and condensa-
tion from the windshield and front
side windows.
Also switch on the air conditioner.
Residual heat
The system uses the warmth
stored in the engine to heat the
interior when the ignition is off, e.g.
while the vehicle is stopped at a
school to pick up a child.
The function can be switched on when the fol-
lowing conditions are met:
>up to 15 minutes after switching off the
engine
>with the engine at operating temperature
>with sufficient battery voltage
>at an outside temperature below 777/
256
The LED lights up when the function is
switched on.
Page 109 of 254
Controls
107Reference
At a glance
Driving tips
Communications
Navigation
Entertainment
Mobility
The interior temperature, air volume, and air
distribution can be set starting from the radio
ready state.
Switching cooling function on and off
manually
When activated, the air conditioner
mode cools and dehumidifies the
incoming air, reheating it as
required, depending on the temperature set-
ting. Depending on the weather, the windshield
may fog over briefly when the engine is started.
The cooling function is switched on automati-
cally with the AUTO program. The passenger
compartment can only be cooled with the
engine running.
Rear window defroster
The rear window defroster
switches off automatically after a
while. Depending on your equip-
ment package, the upper wires are used as an
antenna and are not part of the rear window
defroster.
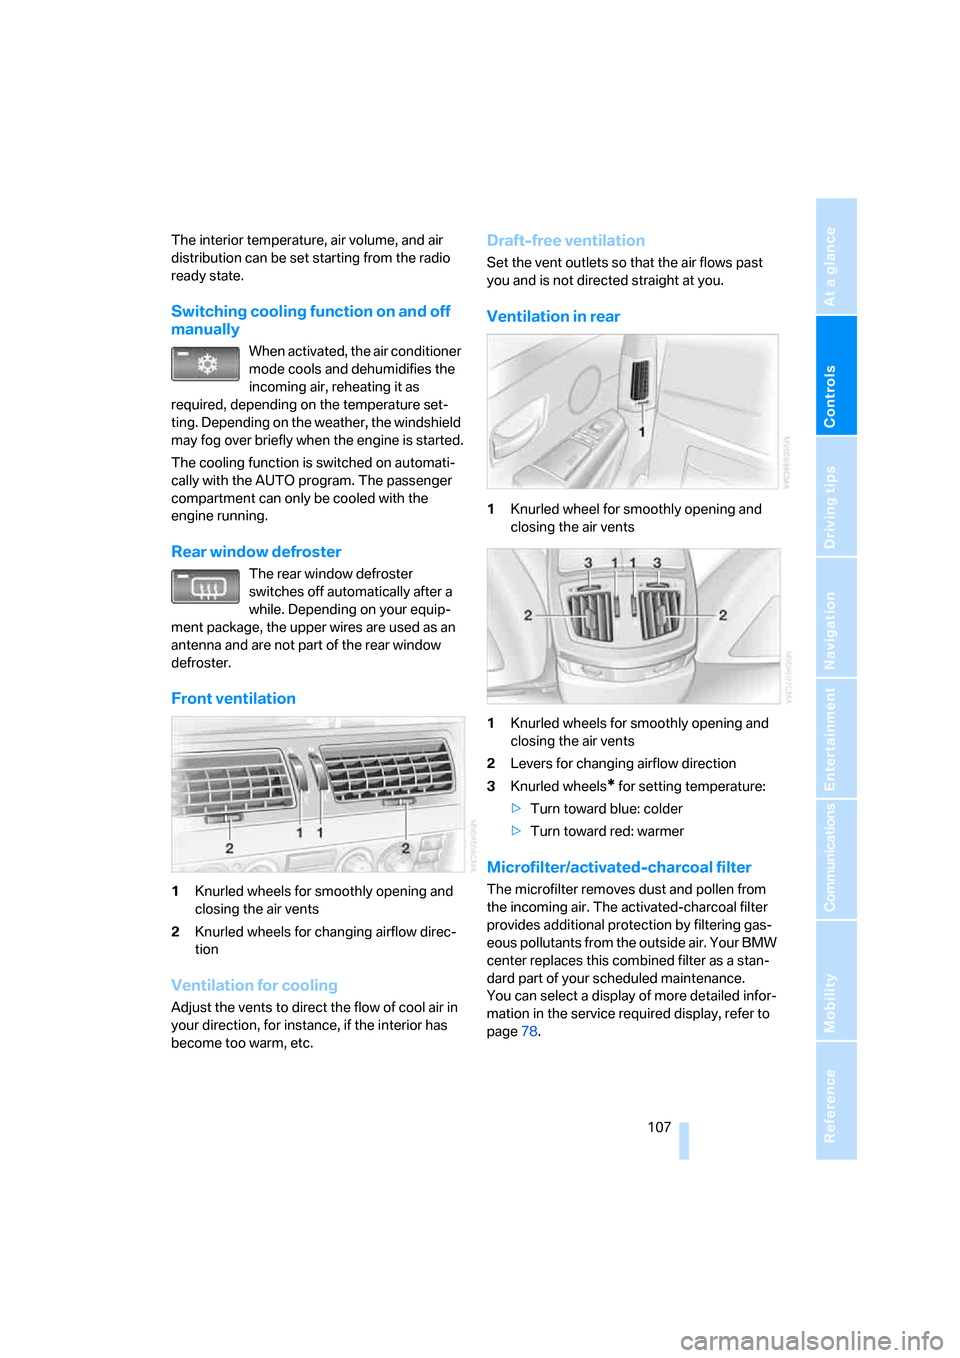
Front ventilation
1Knurled wheels for smoothly opening and
closing the air vents
2Knurled wheels for changing airflow direc-
tion
Ventilation for cooling
Adjust the vents to direct the flow of cool air in
your direction, for instance, if the interior has
become too warm, etc.
Draft-free ventilation
Set the vent outlets so that the air flows past
you and is not directed straight at you.
Ventilation in rear
1Knurled wheel for smoothly opening and
closing the air vents
1Knurled wheels for smoothly opening and
closing the air vents
2Levers for changing airflow direction
3Knurled wheels
* for setting temperature:
>Turn toward blue: colder
>Turn toward red: warmer
Microfilter/activated-charcoal filter
The microfilter removes dust and pollen from
the incoming air. The activated-charcoal filter
provides additional protection by filtering gas-
eous pollutants from the outside air. Your BMW
center replaces this combined filter as a stan-
dard part of your scheduled maintenance.
You can select a display of more detailed infor-
mation in the service required display, refer to
page78.
Page 110 of 254
Climate
108
Rear climate control*
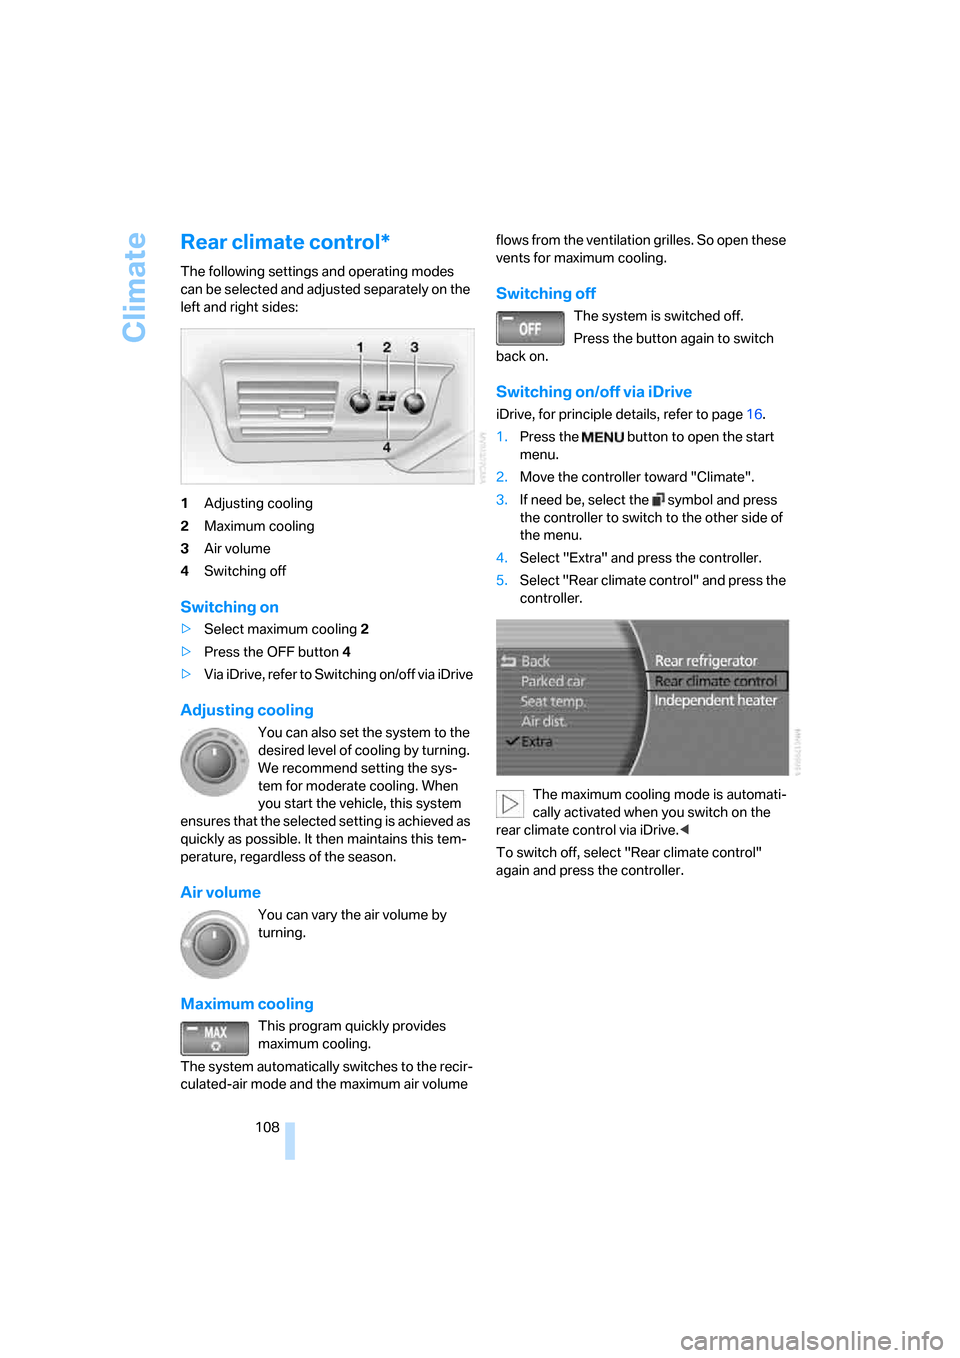
The following settings and operating modes
can be selected and adjusted separately on the
left and right sides:
1Adjusting cooling
2Maximum cooling
3Air volume
4Switching off
Switching on
>Select maximum cooling2
>Press the OFF button 4
>Via iDrive, refer to Switching on/off via iDrive
Adjusting cooling
You can also set the system to the
desired level of cooling by turning.
We recommend setting the sys-
tem for moderate cooling. When
you start the vehicle, this system
ensures that the selected setting is achieved as
quickly as possible. It then maintains this tem-
perature, regardless of the season.
Air volume
You can vary the air volume by
turning.
Maximum cooling
This program quickly provides
maximum cooling.
The system automatically switches to the recir-
culated-air mode and the maximum air volume flows from the ventilation grilles. So open these
vents for maximum cooling.
Switching off
The system is switched off.
Press the button again to switch
back on.
Switching on/off via iDrive
iDrive, for principle details, refer to page16.
1.Press the button to open the start
menu.
2.Move the controller toward "Climate".
3.If need be, select the symbol and press
the controller to switch to the other side of
the menu.
4.Select "Extra" and press the controller.
5.Select "Rear climate control" and press the
controller.
The maximum cooling mode is automati-
cally activated when you switch on the
rear climate control via iDrive.<
To switch off, select "Rear climate control"
again and press the controller.