navigation BMW 750LI 2007 E66 Owners Manual
[x] Cancel search | Manufacturer: BMW, Model Year: 2007, Model line: 750LI, Model: BMW 750LI 2007 E66Pages: 254, PDF Size: 7.98 MB
Page 167 of 254
Navigation
Entertainment
Driving tips
165Reference
At a glance
Controls
Communications
Mobility
CD changer
Installation location
The BMW CD changer for six CDs is installed
above the glove compartment.
Compressed audio files
The CD changer can play CDs with compressed
audio files, such as MP3s.
Removing CD magazine
To insert CDs into the CD magazine or remove
them from it, you must first remove the maga-
zine from the CD changer:
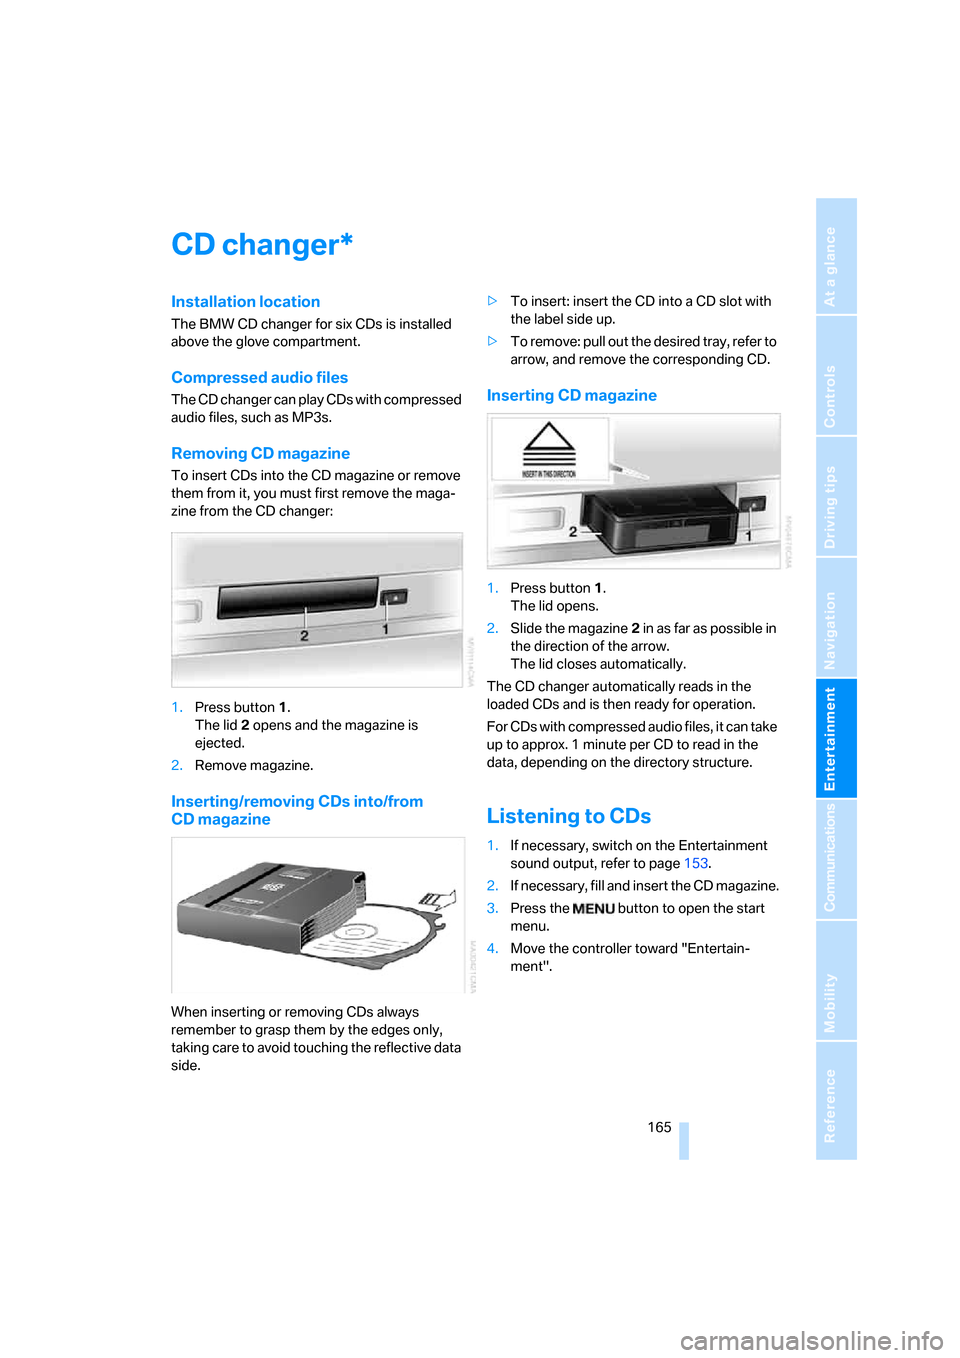
1.Press button1.
The lid2 opens and the magazine is
ejected.
2.Remove magazine.
Inserting/removing CDs into/from
CD magazine
When inserting or removing CDs always
remember to grasp them by the edges only,
taking care to avoid touching the reflective data
side.>To insert: insert the CD into a CD slot with
the label side up.
>To remove: pull out the desired tray, refer to
arrow, and remove the corresponding CD.
Inserting CD magazine
1.Press button1.
The lid opens.
2.Slide the magazine2 in as far as possible in
the direction of the arrow.
The lid closes automatically.
The CD changer automatically reads in the
loaded CDs and is then ready for operation.
For CDs with compressed audio files, it can take
up to approx. 1 minute per CD to read in the
data, depending on the directory structure.
Listening to CDs
1.If necessary, switch on the Entertainment
sound output, refer to page153.
2.I f n ec e s s a r y, f il l a n d i n s e r t t h e C D m a g a z in e .
3.Press the button to open the start
menu.
4.Move the controller toward "Entertain-
ment".
*
Page 169 of 254
Navigation
Entertainment
Driving tips
167Reference
At a glance
Controls
Communications
Mobility
Using the voice command system:
Displaying track information
With compressed audio files, you can display
any additional stored information about the cur-
rent track, e.g. the name of the artist and title of
the album.
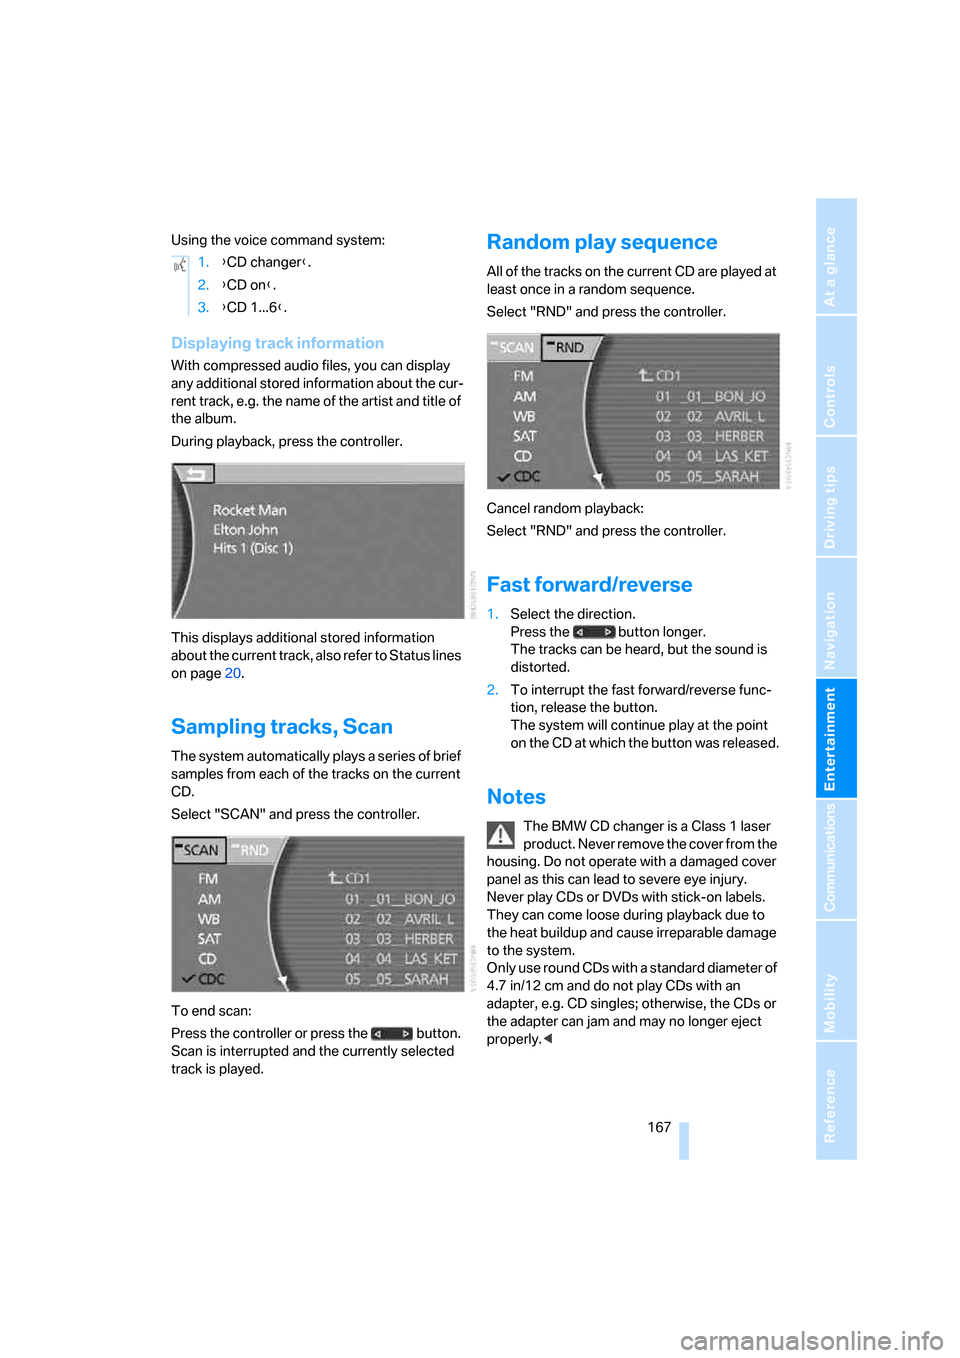
During playback, press the controller.
This displays additional stored information
about the current track, also refer to Status lines
on page20.
Sampling tracks, Scan
The system automatically plays a series of brief
samples from each of the tracks on the current
CD.
Select "SCAN" and press the controller.
To end scan:
Press the controller or press the button.
Scan is interrupted and the currently selected
track is played.
Random play sequence
All of the tracks on the current CD are played at
least once in a random sequence.
Select "RND" and press the controller.
Cancel random playback:
Select "RND" and press the controller.
Fast forward/reverse
1.Select the direction.
Press the button longer.
The tracks can be heard, but the sound is
distorted.
2.To interrupt the fast forward/reverse func-
tion, release the button.
The system will continue play at the point
on the CD at which the button was released.
Notes
The BMW CD changer is a Class 1 laser
product. Never remove the cover from the
housing. Do not operate with a damaged cover
panel as this can lead to severe eye injury.
Never play CDs or DVDs with stick-on labels.
They can come loose during playback due to
the heat buildup and cause irreparable damage
to the system.
Only use round CDs with a standard diameter of
4.7 in/12 cm and do not play CDs with an
adapter, e.g. CD singles; otherwise, the CDs or
the adapter can jam and may no longer eject
properly.< 1.{CD changer}.
2.{CD on}.
3.{CD 1...6}.
Page 171 of 254
Navigation
Entertainment
Driving tips
169Reference
At a glance
Controls
Communications
Mobility
External audio device
You can connect an external audio device, for
instance an MP3 player, and output the sound
to vehicle's speaker system. You can adjust the
tone using iDrive.
It is recommended that the external audio
device be set to a mid-level volume and neutral
tone settings. The tone may depend on the
quality of the audio data.
Connecting
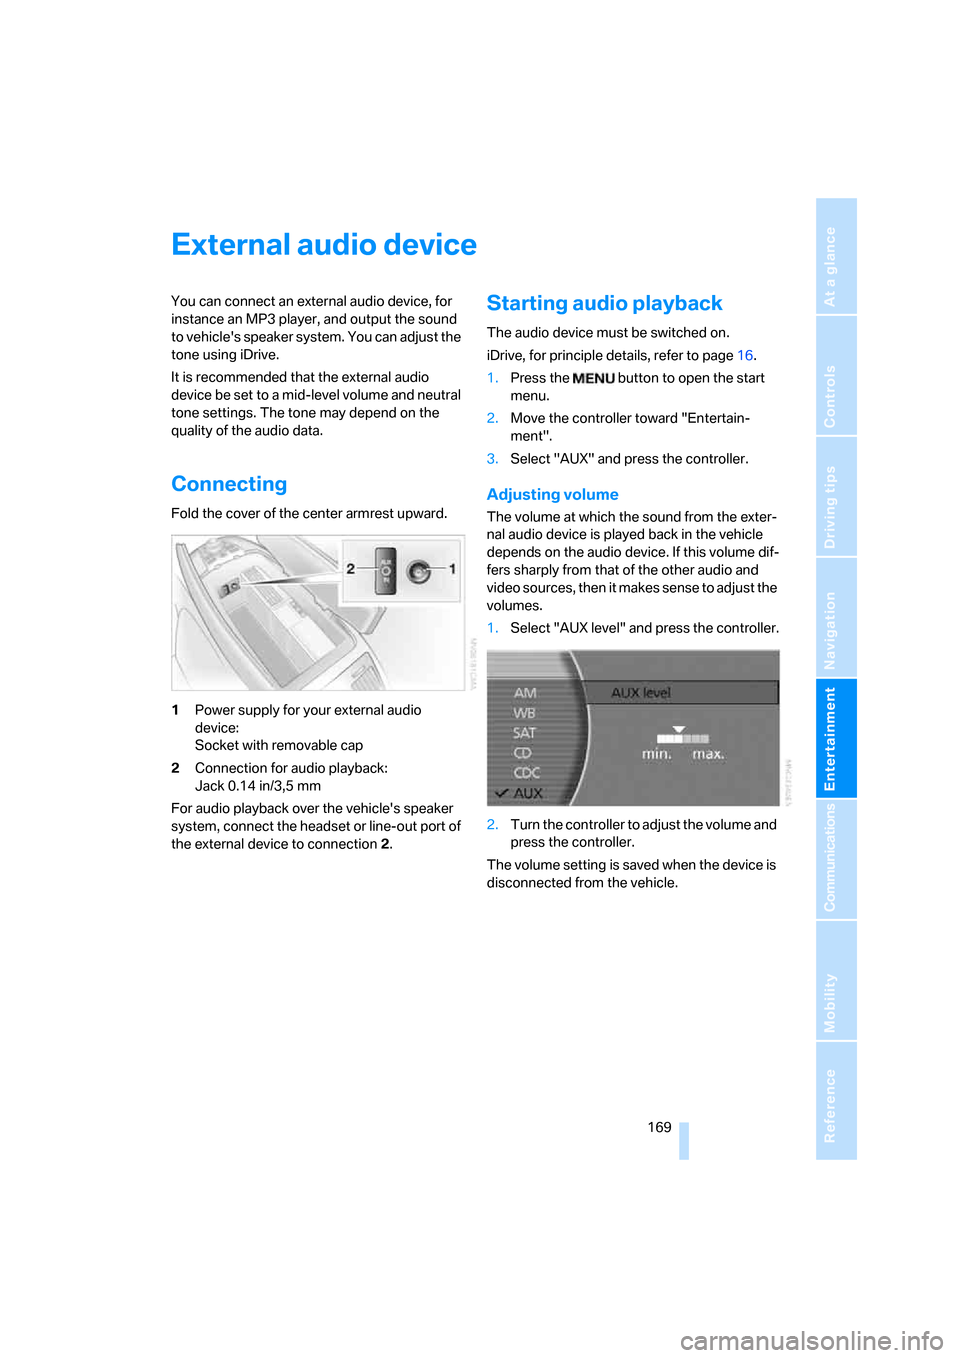
Fold the cover of the center armrest upward.
1Power supply for your external audio
device:
Socket with removable cap
2Connection for audio playback:
Jack 0.14 in/3,5 mm
For audio playback over the vehicle's speaker
system, connect the headset or line-out port of
the external device to connection 2.
Starting audio playback
The audio device must be switched on.
iDrive, for principle details, refer to page16.
1.Press the button to open the start
menu.
2.Move the controller toward "Entertain-
ment".
3.Select "AUX" and press the controller.
Adjusting volume
The volume at which the sound from the exter-
nal audio device is played back in the vehicle
depends on the audio device. If this volume dif-
fers sharply from that of the other audio and
video sources, then it makes sense to adjust the
volumes.
1.Select "AUX level" and press the controller.
2.Turn the controller to adjust the volume and
press the controller.
The volume setting is saved when the device is
disconnected from the vehicle.
Page 173 of 254
Navigation
Entertainment
Driving tips
171Reference
At a glance
Controls
Communications
Mobility
DVD country codes
Your DVD changer will only play back DVDs
coded for your home region, e.g. USA,
Canada = 1. The country code supported by
your DVD is indicated in the information sup-
plied with the DVD. This coding cannot be
changed. An overview of the six coding zones:
DVDs with the Code 0 can be played on
all devices.<
Playing DVDs
Playback is only possible on the rear seat
screen, refer to Rear seat screen
* on page21.
1.If necessary, switch on the Entertainment
sound output, refer to page153.
2.If necessary, fill and insert the DVD maga-
zine.
3.Press the button to open the start
menu.
4.Move the controller toward "Entertain-
ment".
5.Select "DVD" and press the controller.After a few seconds, play will resume at the
point where playback was previously inter-
rupted.
The DVD magazine's load status is indicated on
the Control Display.
If the display fails to detect a DVD that you
have loaded into the magazine, make sure
that the DVD has been inserted correctly and
inspect it for signs of defects.
If there are audio CDs in the DVD magazine,
these will not be displayed in the DVD menu,
but instead in the CD changer menu.<
Using the voice command system:
DVD control
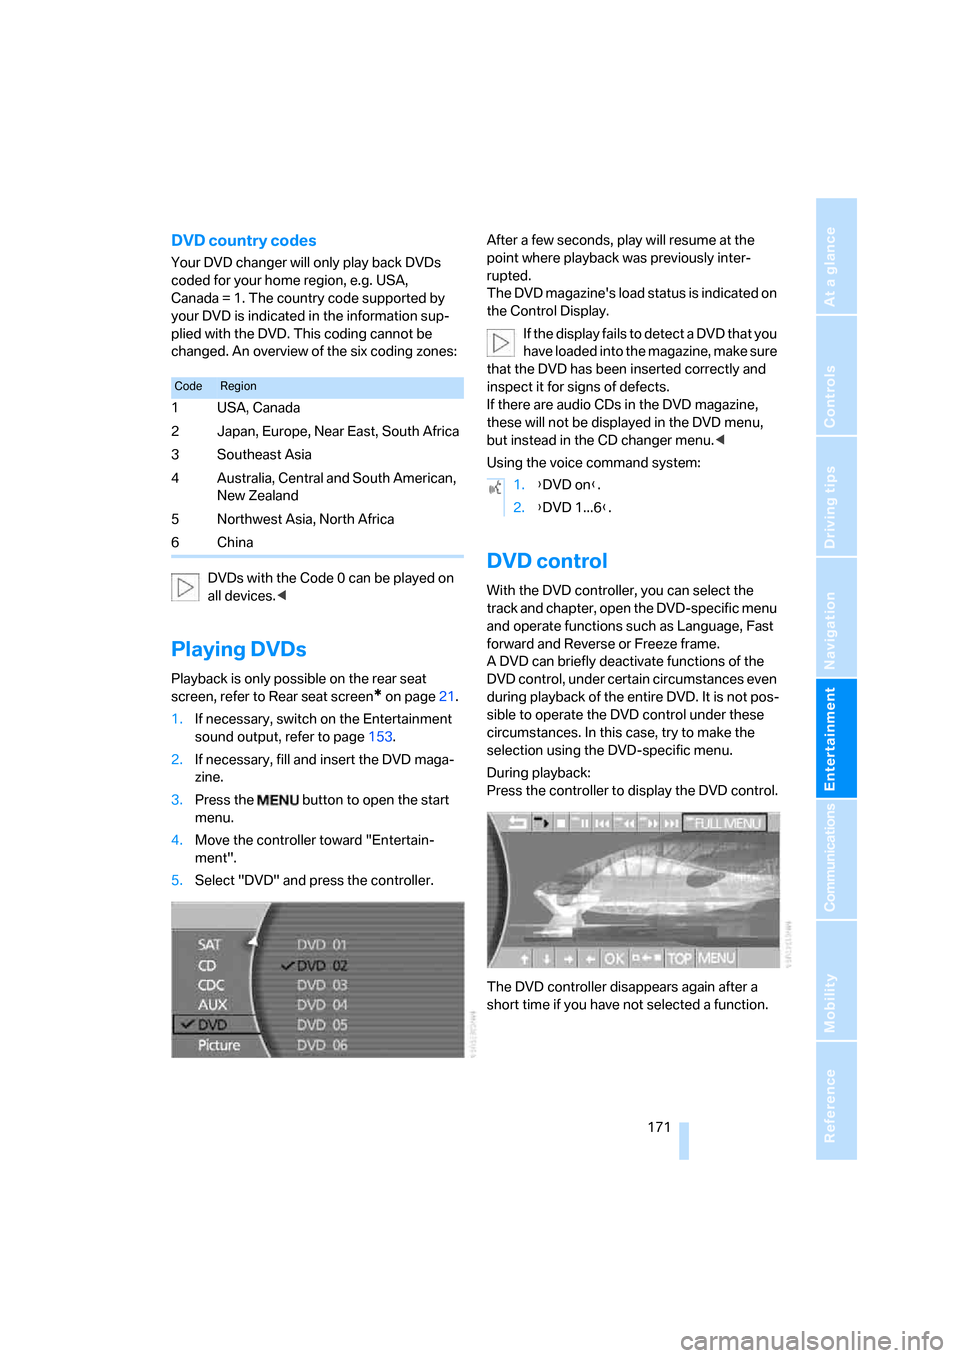
With the DVD controller, you can select the
track and chapter, open the DVD-specific menu
and operate functions such as Language, Fast
forward and Reverse or Freeze frame.
A DVD can briefly deactivate functions of the
DVD control, under certain circumstances even
during playback of the entire DVD. It is not pos-
sible to operate the DVD control under these
circumstances. In this case, try to make the
selection using the DVD-specific menu.
During playback:
Press the controller to display the DVD control.
The DVD controller disappears again after a
short time if you have not selected a function.
CodeRegion
1USA, Canada
2 Japan, Europe, Near East, South Africa
3Southeast Asia
4 Australia, Central and South American,
New Zealand
5Northwest Asia, North Africa
6China
1.{DVD on}.
2.{DVD 1...6}.
Page 175 of 254
Navigation
Entertainment
Driving tips
173Reference
At a glance
Controls
Communications
Mobility
Freeze frame
1.During playback, press the controller to dis-
play the DVD control.
2.Select at the desired point and press the
controller.
The film is stopped.
3.Select or and press the controller to
cancel the freeze frame.
DVD playback is continued at the point at
which it was interrupted.
Selecting picture format
You can adjust the DVD format to your screen.
The picture format is a DVD-specific function
and is not available on all DVDs.
1.During playback, press the controller to dis-
play the DVD control.
2.Select and press the controller.
3.Select the arrow and press the control-
ler.
4."Picture" and press the controller.
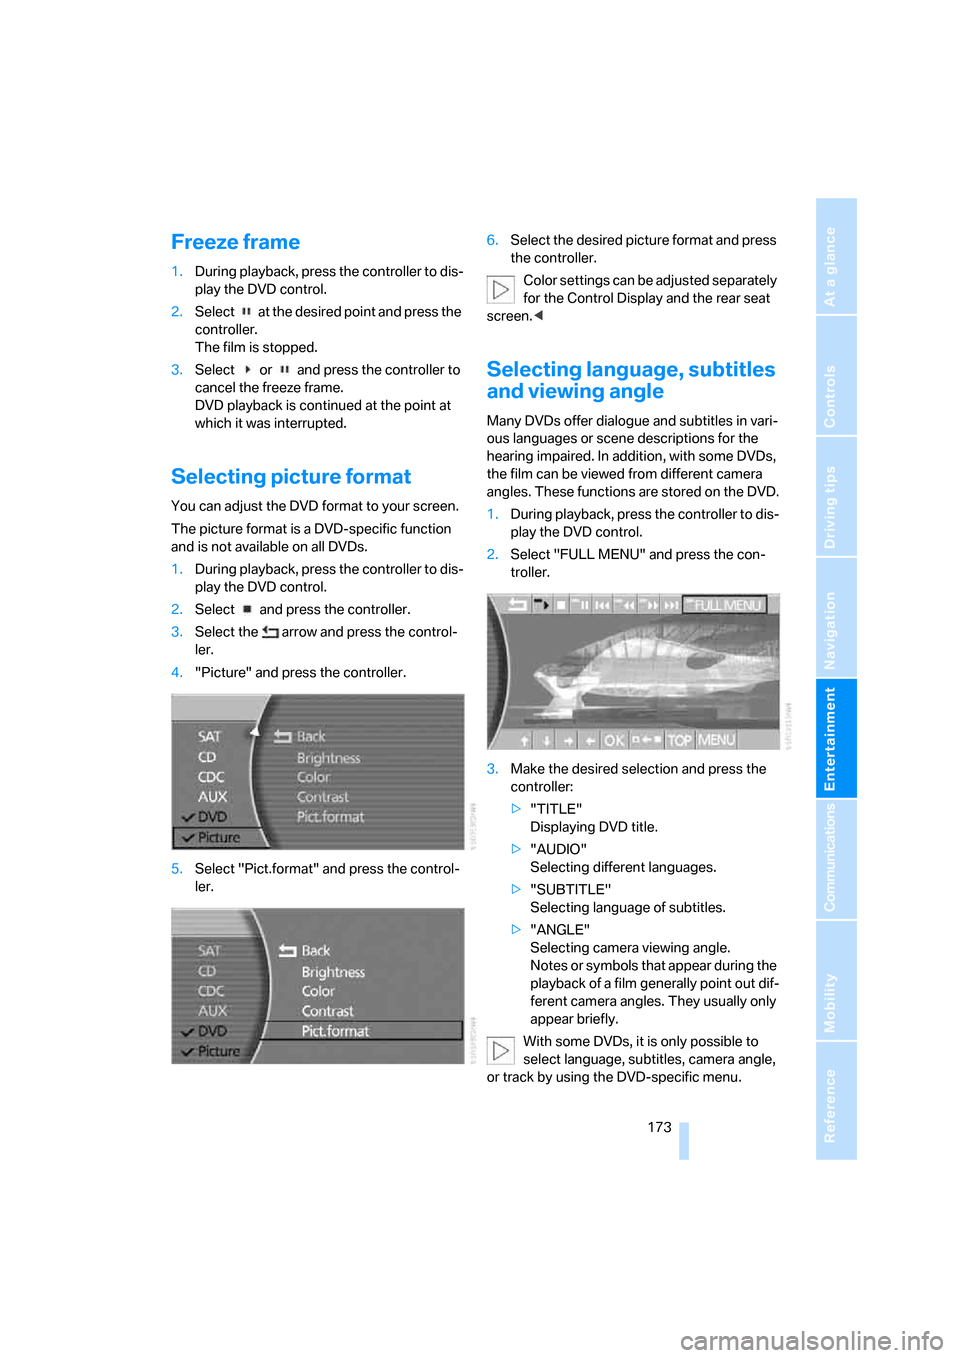
5.Select "Pict.format" and press the control-
ler.6.Select the desired picture format and press
the controller.
Color settings can be adjusted separately
for the Control Display and the rear seat
screen.<
Selecting language, subtitles
and viewing angle
Many DVDs offer dialogue and subtitles in vari-
ous languages or scene descriptions for the
hearing impaired. In addition, with some DVDs,
the film can be viewed from different camera
angles. These functions are stored on the DVD.
1.During playback, press the controller to dis-
play the DVD control.
2.Select "FULL MENU" and press the con-
troller.
3.Make the desired selection and press the
controller:
>"TITLE"
Displaying DVD title.
>"AUDIO"
Selecting different languages.
>"SUBTITLE"
Selecting language of subtitles.
>"ANGLE"
Selecting camera viewing angle.
Notes or symbols that appear during the
playback of a film generally point out dif-
ferent camera angles. They usually only
appear briefly.
With some DVDs, it is only possible to
select language, subtitles, camera angle,
or track by using the DVD-specific menu.
Page 177 of 254
Navigation
Entertainment
Driving tips
175Reference
At a glance
Controls
Communications
Mobility
Malfunctions with particular CDs/DVDs
If malfunctions occur only with particular CDs/
DVDs, this can be due to one of the following
causes.
Home-recorded CDs/DVDs
Malfunction sources in home-recorded CDs/
DVDs include, for example, inconsistent data
origination and recording processes as well as
low quality or pronounced aging of the blanks
used.
Only write on CDs/DVDs with a marker espe-
cially designed for this purpose.
Damaged CDs/DVDs
Avoid finger prints, dust, scratches, and mois-
ture.
Store CDs/DVDs in a sleeve.
Do not expose CDs/DVDs to temperatures
above 1227/506, high humidity or direct
sunlight.
CDs/DVDs with copy protection
Manufacturers often provide CDs/DVDs with
copy protection. This can prevent or limit the
playback of these CDs/DVDs.
Care instructions
You can find everything you need to know about
this topic by consulting the separate Caring for
your vehicle brochure.
Page 181 of 254
179
Entertainment
Reference
At a glance
Controls
Driving tips Communications
Navigation
Mobility
Hands-free system
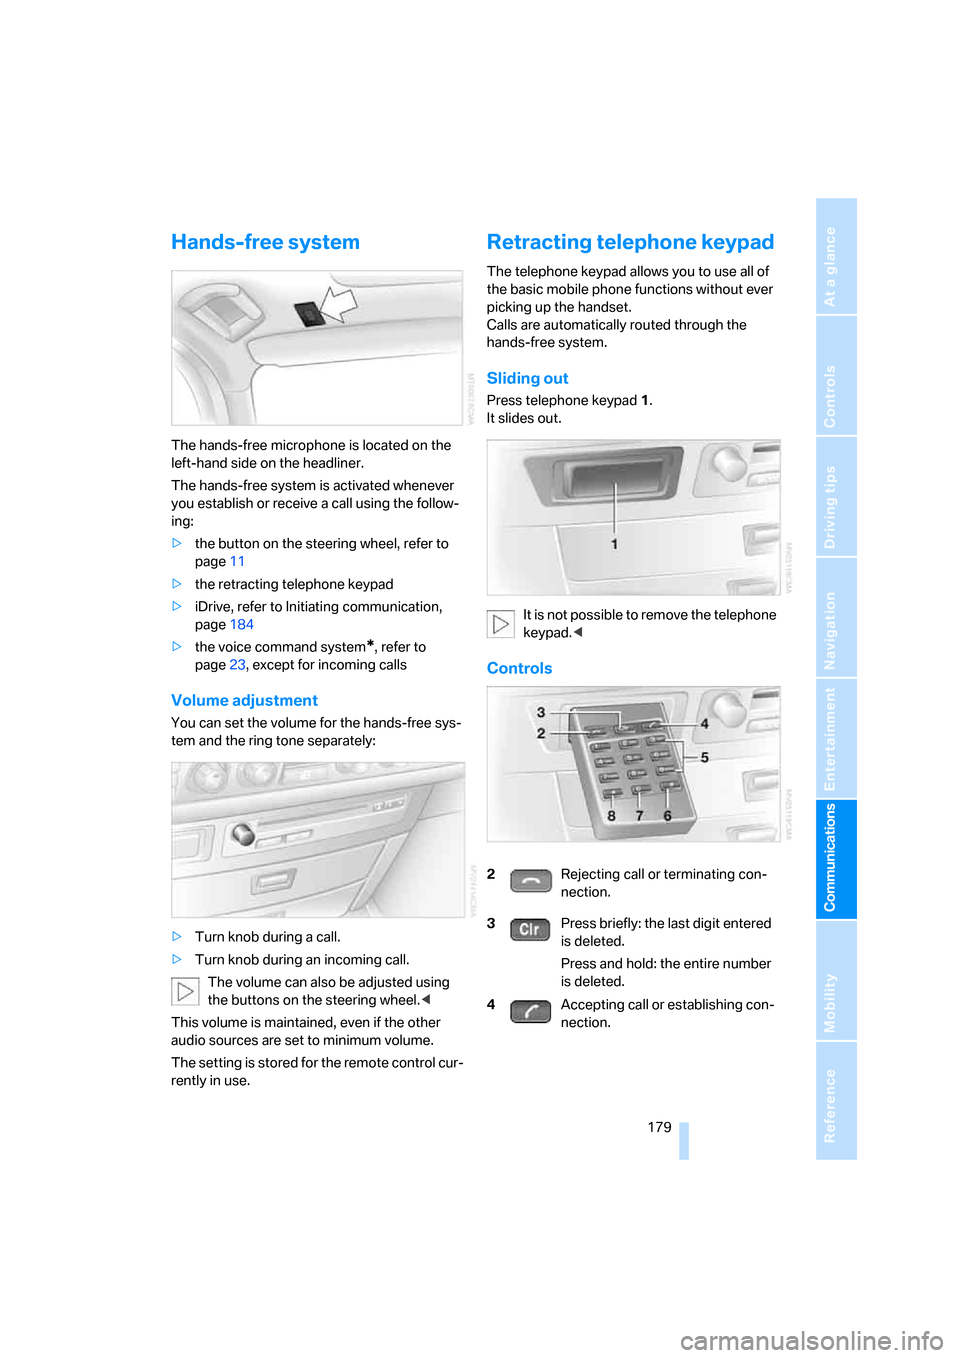
The hands-free microphone is located on the
left-hand side on the headliner.
The hands-free system is activated whenever
you establish or receive a call using the follow-
ing:
>the button on the steering wheel, refer to
page11
>the retracting telephone keypad
>iDrive, refer to Initiating communication,
page184
>the voice command system
*, refer to
page23, except for incoming calls
Volume adjustment
You can set the volume for the hands-free sys-
tem and the ring tone separately:
>Turn knob during a call.
>Turn knob during an incoming call.
The volume can also be adjusted using
the buttons on the steering wheel.<
This volume is maintained, even if the other
audio sources are set to minimum volume.
The setting is stored for the remote control cur-
rently in use.
Retracting telephone keypad
The telephone keypad allows you to use all of
the basic mobile phone functions without ever
picking up the handset.
Calls are automatically routed through the
hands-free system.
Sliding out
Press telephone keypad1.
It slides out.
It is not possible to remove the telephone
keypad.<
Controls
2Rejecting call or terminating con-
nection.
3Press briefly: the last digit entered
is deleted.
Press and hold: the entire number
is deleted.
4Accepting call or establishing con-
nection.
Page 183 of 254
181
Entertainment
Reference
At a glance
Controls
Driving tips Communications
Navigation
Mobility
Getting started
Snap-in adapter*
The so-called snap-in adapter, a cradle for your
mobile phone, is inserted into the center arm-
rest. If the mobile phone is inserted into the
snap-in adapter, the battery is charged and the
mobile phone is connected to the external
antenna of the vehicle whenever the ignition
key is in the radio ready state or higher. This
assures better network reception and uniform
sound quality. Ask your BMW center which
mobile phones snap-in adapters are offered for.
Inserting
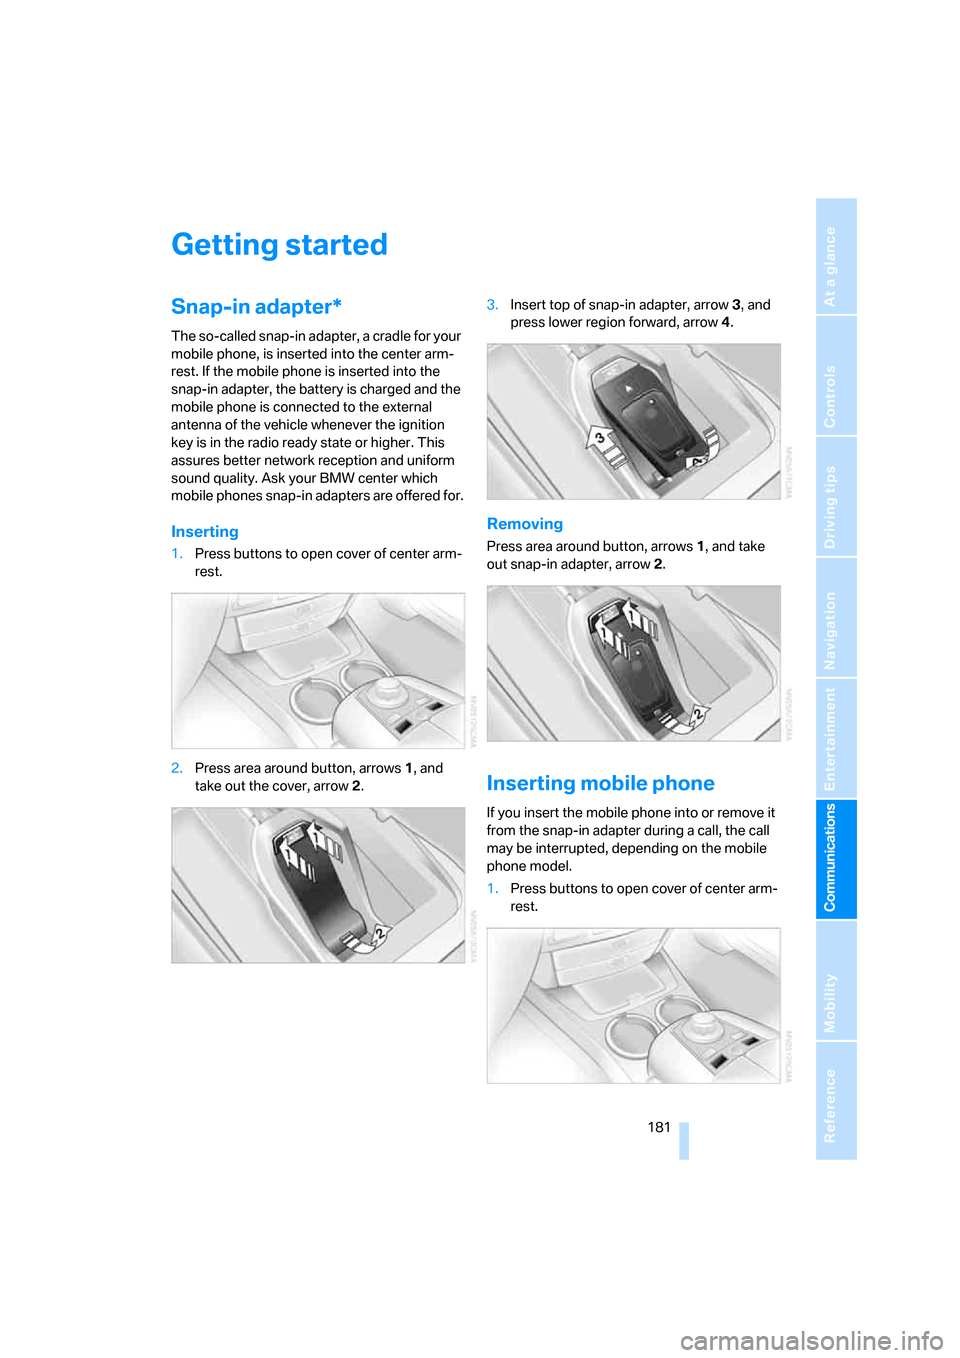
1.Press buttons to open cover of center arm-
rest.
2.Press area around button, arrows1, and
take out the cover, arrow2.3.Insert top of snap-in adapter, arrow3, and
press lower region forward, arrow4.
Removing
Press area around button, arrows1, and take
out snap-in adapter, arrow2.
Inserting mobile phone
If you insert the mobile phone into or remove it
from the snap-in adapter during a call, the call
may be interrupted, depending on the mobile
phone model.
1.Press buttons to open cover of center arm-
rest.
Page 185 of 254
183
Entertainment
Reference
At a glance
Controls
Driving tips Communications
Navigation
Mobility
your mobile phone will appear on the Con-
trol Display.
The next time you use the mobile phone within
Bluetooth range of the vehicle, it will be
detected within a short time with the ignition
switched on.
As soon as the vehicle detects a mobile phone,
the phone book entries stored on the SIM card
and/or in your mobile phone are transmitted to
your vehicle. This transfer is dependent on your
mobile phone, refer to the operating instruc-
tions of your mobile phone if necessary, and
can take several minutes.
During each connection, the phone book
entries present in the vehicle are calibrated with
the phone book entries currently stored in the
mobile phone. The entries in the vehicle are
added to or deleted as needed in the process of
this.
Up to four mobile phones can be paired one
after the other. If you want to pair a fifth mobile
phone, the logon data of one mobile phone
must first be deleted, refer to Unpairing mobile
phone from vehicle.
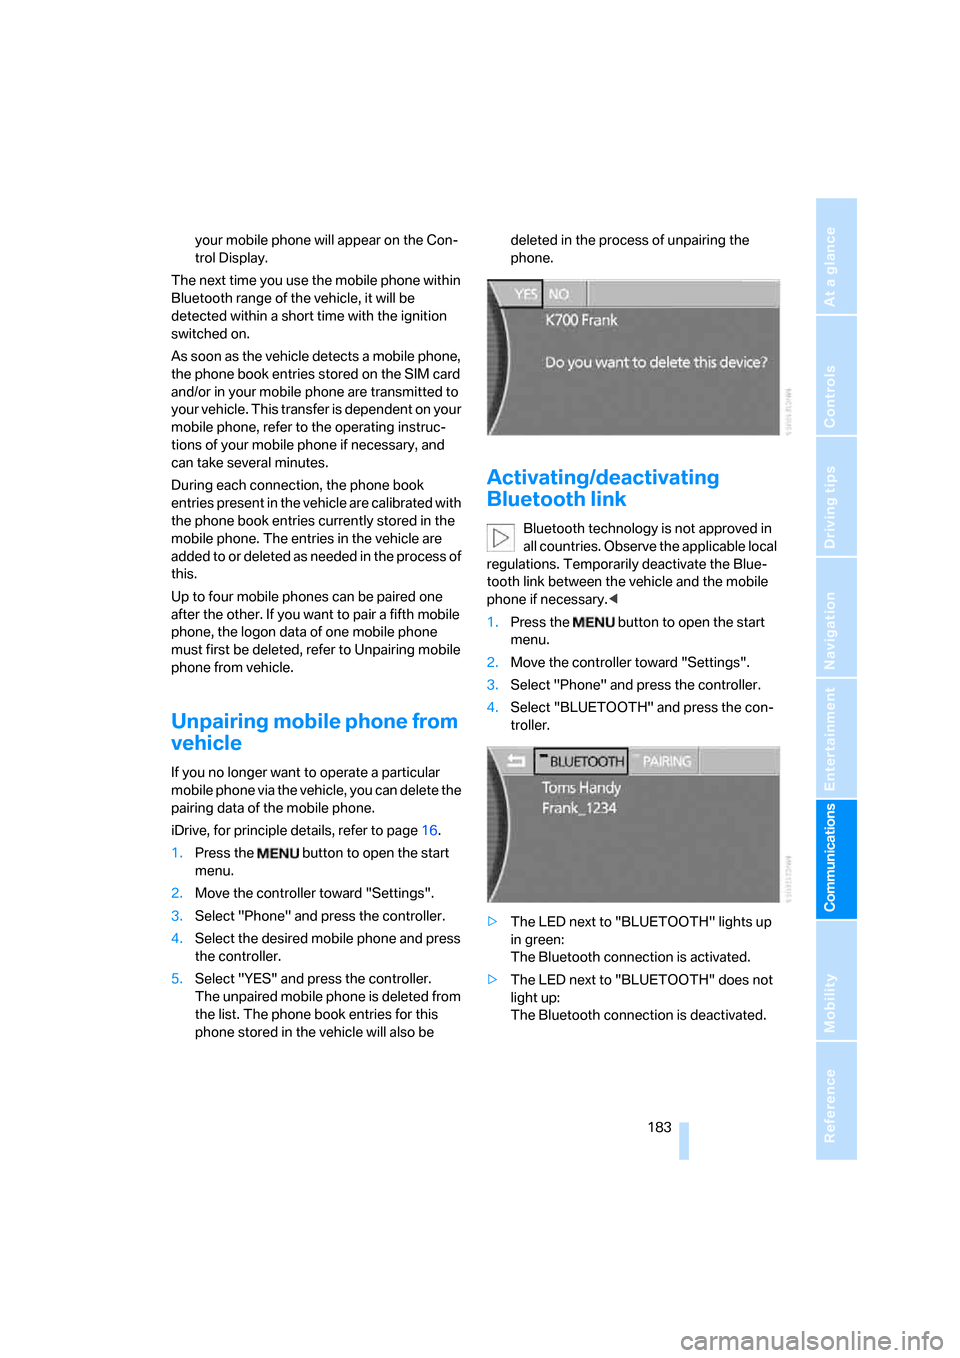
Unpairing mobile phone from
vehicle
If you no longer want to operate a particular
mobile phone via the vehicle, you can delete the
pairing data of the mobile phone.
iDrive, for principle details, refer to page16.
1.Press the button to open the start
menu.
2.Move the controller toward "Settings".
3.Select "Phone" and press the controller.
4.Select the desired mobile phone and press
the controller.
5.Select "YES" and press the controller.
The unpaired mobile phone is deleted from
the list. The phone book entries for this
phone stored in the vehicle will also be deleted in the process of unpairing the
phone.
Activating/deactivating
Bluetooth link
Bluetooth technology is not approved in
all countries. Observe the applicable local
regulations. Temporarily deactivate the Blue-
tooth link between the vehicle and the mobile
phone if necessary.<
1.Press the button to open the start
menu.
2.Move the controller toward "Settings".
3.Select "Phone" and press the controller.
4.Select "BLUETOOTH" and press the con-
troller.
>The LED next to "BLUETOOTH" lights up
in green:
The Bluetooth connection is activated.
>The LED next to "BLUETOOTH" does not
light up:
The Bluetooth connection is deactivated.
Page 187 of 254
185
Entertainment
Reference
At a glance
Controls
Driving tips Communications
Navigation
Mobility
Voice command system*
T h e s ys t e m r ec o g n i z es d i g it s f r o m z e ro t o n i n e .
You can say each digit individually or group
them into a sequence to speed up the entry
process:
After the last spoken sequence of digits has
been repeated by the system, you can delete
this sequence of digits:
With {Delete number} all digits previously
entered are deleted:
Redialing
>Press the button on the steering wheel.
>Press the button on the retracting tele-
phone keypad.
Using the voice command system:
Dialing a number from phone book or
from numbers stored in a list
Phone numbers you have called, missed calls,
and the entries of the phone book of the SIM
card or of the mobile phone are stored in lists
when the mobile phone is connected to the
vehicle via Bluetooth. If the caller is listed in the
phone book, the name of the entry is displayed
instead of the phone number.
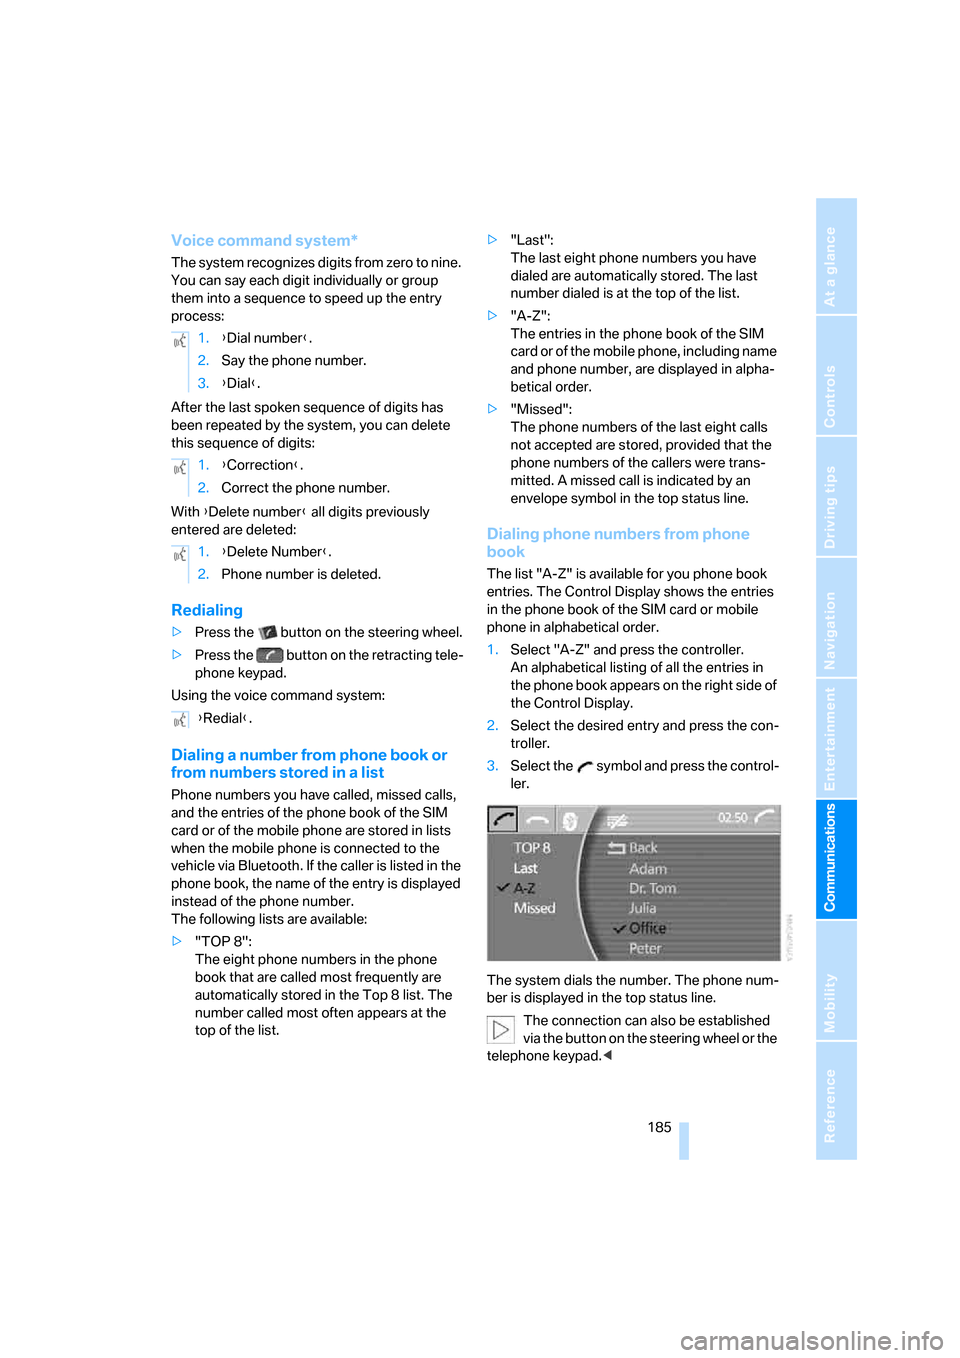
The following lists are available:
>"TOP 8":
The eight phone numbers in the phone
book that are called most frequently are
automatically stored in the Top 8 list. The
number called most often appears at the
top of the list.>"Last":
The last eight phone numbers you have
dialed are automatically stored. The last
number dialed is at the top of the list.
>"A-Z":
The entries in the phone book of the SIM
card or of the mobile phone, including name
and phone number, are displayed in alpha-
betical order.
>"Missed":
The phone numbers of the last eight calls
not accepted are stored, provided that the
phone numbers of the callers were trans-
mitted. A missed call is indicated by an
envelope symbol in the top status line.
Dialing phone numbers from phone
book
The list "A-Z" is available for you phone book
entries. The Control Display shows the entries
in the phone book of the SIM card or mobile
phone in alphabetical order.
1.Select "A-Z" and press the controller.
An alphabetical listing of all the entries in
the phone book appears on the right side of
the Control Display.
2.Select the desired entry and press the con-
troller.
3.Select the symbol and press the control-
ler.
The system dials the number. The phone num-
ber is displayed in the top status line.
The connection can also be established
via the button on the steering wheel or the
telephone keypad.< 1.{Dial number}.
2.Say the phone number.
3.{Dial}.
1.{Correction}.
2.Correct the phone number.
1.{Delete Number}.
2.Phone number is deleted.
{Redial}.